
CHAPTER |
|
23 |
The Applet Class |
This chapter examines the Applet class, which provides the foundation for applets. The Applet class is contained in the java.applet package. Applet contains several methods that give you detailed control over the execution of your applet. In addition, java.applet also defines three interfaces: AppletContext, AudioClip, and AppletStub.
Two Types of Applets
It is important to state at the outset that there are two varieties of applets based on Applet. The first are those based directly on the Applet class described in this chapter. These applets use the Abstract Window Toolkit (AWT) to provide the graphical user interface (or use no GUI at all). This style of applet has been available since Java was first created.
The second type of applets are those based on the Swing class JApplet, which inherits Applet. Swing applets use the Swing classes to provide the GUI. Swing offers a richer and often easier-to-use user interface than does the AWT. Thus, Swing-based applets are now the most popular. However, traditional AWT-based applets are still used, especially when only a very simple user interface is required. Thus, both AWT- and Swing-based applets are valid.
This chapter describes AWT-based applets. However, because JApplet inherits Applet, all the features of Applet are also available in JApplet, and much of the information in this chapter applies to both types of applets. Therefore, even if you are interested in only Swing applets, the information in this chapter is still relevant and necessary. Understand, however, that when creating Swing-based applets, some additional constraints apply and these are described later in this book, when Swing is covered.
NOTE For information on building applets when using Swing, see Chapter 31.
Applet Basics
Chapter 13 introduced the general form of an applet and the steps necessary to compile and run one. Let’s begin by reviewing this information.
AWT-based applets are subclasses of Applet. Applets are not stand-alone programs. Instead, they run within either a web browser or an applet viewer. The illustrations shown in this chapter were created with the standard applet viewer, called appletviewer, provided by the JDK.
Execution of an applet does not begin at main( ). Actually, few applets even have main( ) methods. Instead, execution of an applet is started and controlled with an entirely different mechanism, which will be explained shortly. Output to your applet’s window is not performed by System.out.println( ). Rather, in an AWT-based applet, output is handled with various AWT methods, such as drawString( ), which outputs a string to a specified X,Y location. Input is also handled differently than in a console application.
Before an applet can be used, a deployment strategy must be chosen. There are two basic approaches. The first is to use the Java Network Launch Protocol (JNLP). This approach offers the most flexibility, especially as it relates to rich Internet applications. For real-world applets that you create, JNLP will often be the best choice. However, a detailed discussion of JNLP is beyond the scope of this book. (See the JDK documentation for the latest details on JNLP.) Fortunately, JNLP is not required for the example applets shown here.
The second basic approach to deploying an applet is to specify the applet directly in an HTML file, without the use of JNLP. This is the original way that applets were launched when Java was created, and it is still used today—especially for simple applets. Furthermore, because of its inherent simplicity, it is the appropriate method for the applet examples described in this book. At the time of this writing, Oracle recommends the APPLET tag for this purpose. Therefore, the APPLET tag is used in this book. (Be aware that the APPLET tag is currently deprecated by the HTML specification. The alternative is the OBJECT tag. You should check the JDK documentation in this regard for the latest recommendations.) When an APPLET tag is encountered in the HTML file, the specified applet will be executed by a Java-enabled web browser.
The use of the APPLET tag offers a secondary advantage when developing applets because it enables you to easily view and test the applet. To do so, simply include a comment at the head of your Java source code file that contains the APPLET tag. This way, your code is documented with the necessary HTML statements needed by your applet, and you can test the compiled applet by starting the applet viewer with your Java source code file specified as the target. Here is an example of such a comment:

This comment contains an APPLET tag that will run an applet called MyApplet in a window that is 200 pixels wide and 60 pixels high. Because the inclusion of an APPLET command makes testing applets easier, all of the applets shown in this book will contain the appropriate APPLET tag embedded in a comment.
NOTE As noted in Chapter 13, beginning with the release of Java 7, update 21, Java applets must be signed to prevent security warnings when run in a browser. In fact, in some cases, the applet may be prevented from running. Applets stored in the local file system, such as you would create when compiling the examples in this book, are especially sensitive to this change. You may need to adjust the security settings in the Java Control Panel to run a local applet in a browser. At the time of this writing, Oracle recommends against the use of local applets, recommending instead that applets be executed through a web server. Furthermore, unsigned local applets may be blocked from execution in the future. In general, for applets that will be distributed via the Internet, such as commercial applications, signing is a virtual necessity. The concepts and techniques required to sign applets (and other types of Java programs) are beyond the scope of this book. However, extensive information is found on Oracle’s website. Finally, as mentioned, the easiest way to try the applet examples is to use appletviewer.
The Applet Class
The Applet class defines the methods shown in Table 23-1. Applet provides all necessary support for applet execution, such as starting and stopping. It also provides methods that load and display images, and methods that load and play audio clips. Applet extends the AWT class Panel. In turn, Panel extends Container, which extends Component. These classes provide support for Java’s window-based, graphical interface. Thus, Applet provides all of the necessary support for window-based activities. (An overview of the AWT is presented in subsequent chapters.)

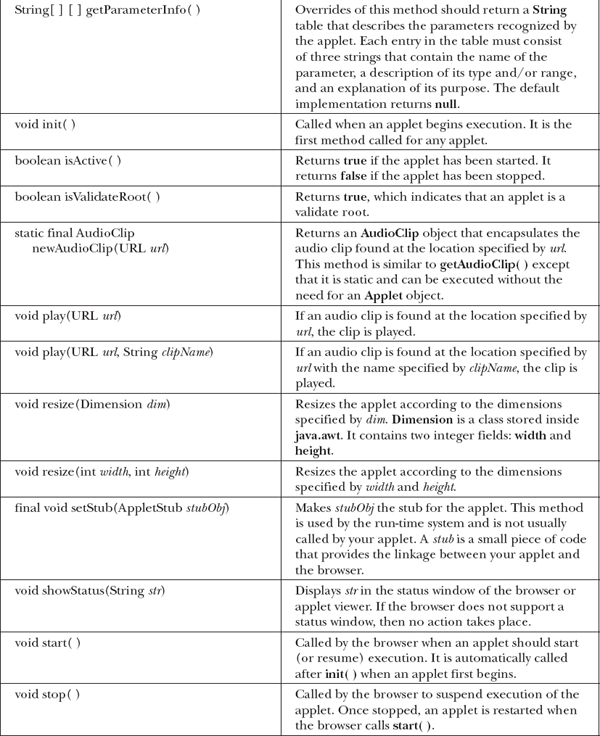
Table 23-1 The Methods Defined by Applet
Applet Architecture
As a general rule, an applet is a GUI-based program. As such, its architecture is different from the console-based programs shown in the first part of this book. If you are already familiar with GUI programming, you will be right at home writing applets. If not, then there are a few key concepts you must understand.
First, applets are event driven. Although we won’t examine event handling until the following chapter, it is important to understand in a general way how the event-driven architecture impacts the design of an applet. An applet resembles a set of interrupt service routines. Here is how the process works. An applet waits until an event occurs. The run-time system notifies the applet about an event by calling an event handler that has been provided by the applet. Once this happens, the applet must take appropriate action and then quickly return. This is a crucial point. For the most part, your applet should not enter a "mode" of operation in which it maintains control for an extended period. Instead, it must perform specific actions in response to events and then return control to the run-time system. In those situations in which your applet needs to perform a repetitive task on its own (for example, displaying a scrolling message across its window), you must start an additional thread of execution. (You will see an example later in this chapter.)
Second, the user initiates interaction with an applet—not the other way around. As you know, in a console-based program, when the program needs input, it will prompt the user and then call some input method, such as readLine( ). This is not the way it works in an applet. Instead, the user interacts with the applet as he or she wants, when he or she wants. These interactions are sent to the applet as events to which the applet must respond. For example, when the user clicks the mouse inside the applet’s window, a mouse-clicked event is generated. If the user presses a key while the applet’s window has input focus, a keypress event is generated. As you will see in later chapters, applets can contain various controls, such as push buttons and check boxes. When the user interacts with one of these controls, an event is generated.
While the architecture of an applet is not as easy to understand as that of a console-based program, Java makes it as simple as possible. If you have written programs for Windows (or other GUI-based operating systems), you know how intimidating that environment can be. Fortunately, Java provides a much cleaner approach that is more quickly mastered.
An Applet Skeleton
All but the most trivial applets override a set of methods that provides the basic mechanism by which the browser or applet viewer interfaces to the applet and controls its execution. Four of these methods, init( ), start( ), stop( ), and destroy( ), apply to all applets and are defined by Applet. Default implementations for all of these methods are provided. Applets do not need to override those methods they do not use. However, only very simple applets will not need to define all of them.
AWT-based applets (such as those discussed in this chapter) will also often override the paint( ) method, which is defined by the AWT Component class. This method is called when the applet’s output must be redisplayed. (Swing-based applets use a different mechanism to accomplish this task.) These five methods can be assembled into the skeleton shown here:
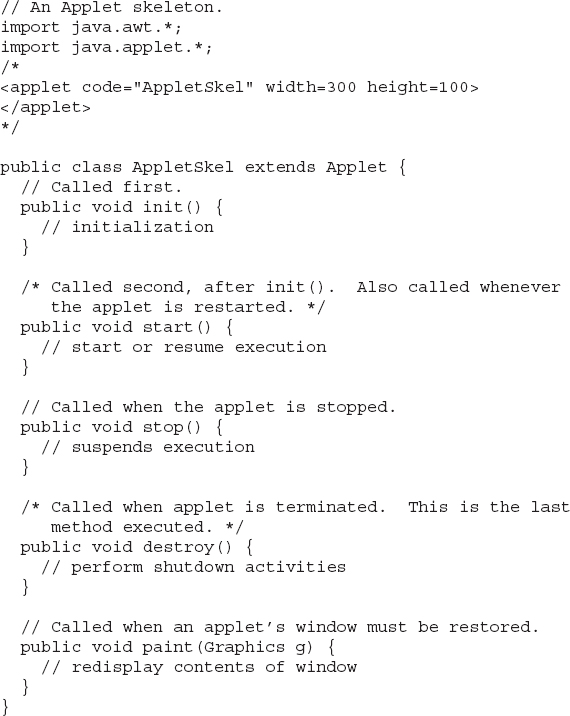
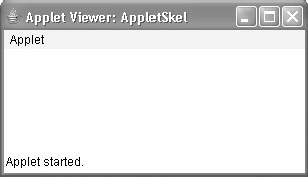
Although this skeleton does not do anything, it can be compiled and run. When run, it generates the following empty window when viewed with appletviewer. Of course, in this and all subsequent examples, the precise look of the appletviewer frame may differ based on your execution environment. To help illustrate this fact, a variety of environments were used to generate the screen captures shown throughout this book.
Applet Initialization and Termination
It is important to understand the order in which the various methods shown in the skeleton are called. When an applet begins, the following methods are called, in this sequence:
1. init( )
2. start( )
3. paint( )
When an applet is terminated, the following sequence of method calls takes place:
1. stop( )
2. destroy( )
Let’s look more closely at these methods.
init( )
The init( ) method is the first method to be called. This is where you should initialize variables. This method is called only once during the run time of your applet.
start( )
The start( ) method is called after init( ). It is also called to restart an applet after it has been stopped. Whereas init( ) is called once—the first time an applet is loaded—start( ) is called each time an applet’s HTML document is displayed onscreen. So, if a user leaves a web page and comes back, the applet resumes execution at start( ).
paint( )
The paint( ) method is called each time an AWT-based applet’s output must be redrawn. This situation can occur for several reasons. For example, the window in which the applet is running may be overwritten by another window and then uncovered. Or the applet window may be minimized and then restored. paint( ) is also called when the applet begins execution. Whatever the cause, whenever the applet must redraw its output, paint( ) is called. The paint( ) method has one parameter of type Graphics. This parameter will contain the graphics context, which describes the graphics environment in which the applet is running. This context is used whenever output to the applet is required.
stop( )
The stop( ) method is called when a web browser leaves the HTML document containing the applet—when it goes to another page, for example. When stop( ) is called, the applet is probably running. You should use stop( ) to suspend threads that don’t need to run when the applet is not visible. You can restart them when start( ) is called if the user returns to the page.
destroy( )
The destroy( ) method is called when the environment determines that your applet needs to be removed completely from memory. At this point, you should free up any resources the applet may be using. The stop( ) method is always called before destroy( ).
Overriding update( )
In some situations, an AWT-based applet may need to override another method defined by the AWT, called update( ). This method is called when your applet has requested that a portion of its window be redrawn. The default version of update( ) simply calls paint( ). However, you can override the update( ) method so that it performs more subtle repainting. In general, overriding update( ) is a specialized technique that is not applicable to all applets, and the examples in this chapter do not override update( ).
Simple Applet Display Methods
As we’ve mentioned, applets are displayed in a window, and AWT-based applets use the AWT to perform input and output. Although we will examine the methods, procedures, and techniques related to the AWT in subsequent chapters, a few are described here, because we will use them to write sample applets. (Remember, Swing-based applets are described later in this book.)
As described in Chapter 13, to output a string to an applet, use drawString( ), which is a member of the Graphics class. Typically, it is called from within either update( ) or paint( ). It has the following general form:
void drawString(String message, int x, int y)
Here, message is the string to be output beginning at x,y. In a Java window, the upper-left corner is location 0,0. The drawString( ) method will not recognize newline characters. If you want to start a line of text on another line, you must do so manually, specifying the precise X,Y location where you want the line to begin. (As you will see in later chapters, there are techniques that make this process easy.)
To set the background color of an applet’s window, use setBackground( ). To set the foreground color (the color in which text is shown, for example), use setForeground( ). These methods are defined by Component, and they have the following general forms:
void setBackground(Color newColor)
void setForeground(Color newColor)
Here, newColor specifies the new color. The class Color defines the constants shown here that can be used to specify colors:
| Color.black | Color.magenta |
| Color.blue | Color.orange |
| Color.cyan | Color.pink |
| Color.darkGray | Color.red |
| Color.gray | Color.white |
| Color.green | Color.yellow |
| Color.lightGray |
Uppercase versions of the constants are also defined.
The following example sets the background color to green and the text color to red:
A good place to set the foreground and background colors is in the init( ) method. Of course, you can change these colors as often as necessary during the execution of your applet.
You can obtain the current settings for the background and foreground colors by calling getBackground( ) and getForeground( ), respectively. They are also defined by Component and are shown here:
Color getBackground( )
Color getForeground( )
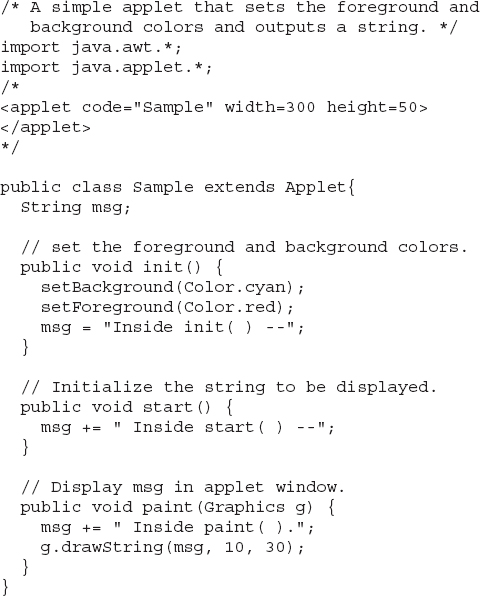
Here is a very simple applet that sets the background color to cyan, the foreground color to red, and displays a message that illustrates the order in which the init( ), start( ), and paint( ) methods are called when an applet starts up:
Sample output is shown here:
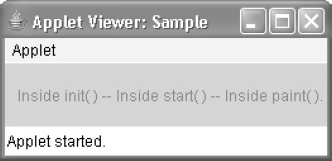
The methods stop( ) and destroy( ) are not overridden, because they are not needed by this simple applet.
Requesting Repainting
As a general rule, an applet writes to its window only when its paint( ) method is called by the AWT. This raises an interesting question: How can the applet itself cause its window to be updated when its information changes? For example, if an applet is displaying a moving banner, what mechanism does the applet use to update the window each time this banner scrolls? Remember, one of the fundamental architectural constraints imposed on an applet is that it must quickly return control to the run-time system. It cannot create a loop inside paint( ) that repeatedly scrolls the banner, for example. This would prevent control from passing back to the AWT. Given this constraint, it may seem that output to your applet’s window will be difficult at best. Fortunately, this is not the case. Whenever your applet needs to update the information displayed in its window, it simply calls repaint( ).
The repaint( ) method is defined by the AWT. It causes the AWT run-time system to execute a call to your applet’s update( ) method, which, in its default implementation, calls paint( ). Thus, for another part of your applet to output to its window, simply store the output and then call repaint( ). The AWT will then execute a call to paint( ), which can display the stored information. For example, if part of your applet needs to output a string, it can store this string in a String variable and then call repaint( ). Inside paint( ), you will output the string using drawString( ).
The repaint( ) method has four forms. Let’s look at each one, in turn. The simplest version of repaint( ) is shown here:
void repaint( )
This version causes the entire window to be repainted. The following version specifies a region that will be repainted:
void repaint(int left, int top, int width, int height)
Here, the coordinates of the upper-left corner of the region are specified by left and top, and the width and height of the region are passed in width and height. These dimensions are specified in pixels. You save time by specifying a region to repaint. Window updates are costly in terms of time. If you need to update only a small portion of the window, it is more efficient to repaint only that region.
Calling repaint( ) is essentially a request that your applet be repainted sometime soon. However, if your system is slow or busy, update( ) might not be called immediately. Multiple requests for repainting that occur within a short time can be collapsed by the AWT in a manner such that update( ) is only called sporadically. This can be a problem in many situations, including animation, in which a consistent update time is necessary. One solution to this problem is to use the following forms of repaint( ):
void repaint(long maxDelay)
void repaint(long maxDelay, int x, int y, int width, int height)
Here, maxDelay specifies the maximum number of milliseconds that can elapse before update( ) is called. Beware, though. If the time elapses before update( ) can be called, it isn’t called. There’s no return value or exception thrown, so you must be careful.
NOTE It is possible for a method other than paint( ) or update( ) to output to an applet’s window. To do so, it must obtain a graphics context by calling getGraphics( ) (defined by Component) and then use this context to output to the window. However, for most applications, it is better and easier to route window output through paint( ) and to call repaint( ) when the contents of the window change.
A Simple Banner Applet
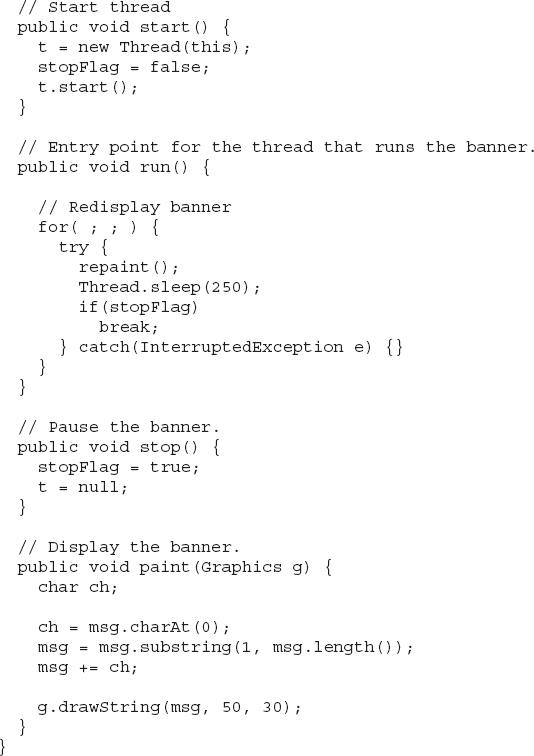
To demonstrate repaint( ), a simple banner applet is developed. This applet scrolls a message, from right to left, across the applet’s window. Since the scrolling of the message is a repetitive task, it is performed by a separate thread, created by the applet when it is initialized. The banner applet is shown here:

Following is sample output:
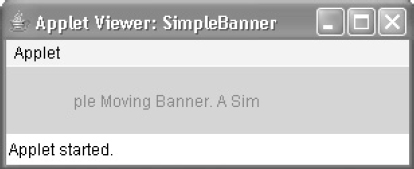
Let’s take a close look at how this applet operates. First, notice that SimpleBanner extends Applet, as expected, but it also implements Runnable. This is necessary, since the applet will be creating a second thread of execution that will be used to scroll the banner. Inside init( ), the foreground and background colors of the applet are set.
After initialization, the run-time system calls start( ) to start the applet running. Inside start( ), a new thread of execution is created and assigned to the Thread variable t. Then, the boolean variable stopFlag, which controls the execution of the applet, is set to false. Next, the thread is started by a call to t.start( ). Remember that t.start( ) calls a method defined by Thread, which causes run( ) to begin executing. It does not cause a call to the version of start( ) defined by Applet. These are two separate methods.
Inside run( ), a call to repaint( ) is made. This eventually causes the paint( ) method to be called, and the rotated contents of msg are displayed. Between each iteration, run( ) sleeps for a quarter of a second. The net effect is that the contents of msg are scrolled right to left in a constantly moving display. The stopFlag variable is checked on each iteration. When it is true, the run( ) method terminates.
If a browser is displaying the applet when a new page is viewed, the stop( ) method is called, which sets stopFlag to true, causing run( ) to terminate. This is the mechanism used to stop the thread when its page is no longer in view. When the applet is brought back into view, start( ) is once again called, which starts a new thread to execute the banner.
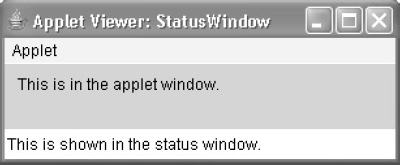
Using the Status Window
In addition to displaying information in its window, an applet can also output a message to the status window of the browser or applet viewer on which it is running. To do so, call showStatus( ) with the string that you want displayed. The status window is a good place to give the user feedback about what is occurring in the applet, suggest options, or possibly report some types of errors. The status window also makes an excellent debugging aid, because it gives you an easy way to output information about your applet.
The following applet demonstrates showStatus( ):
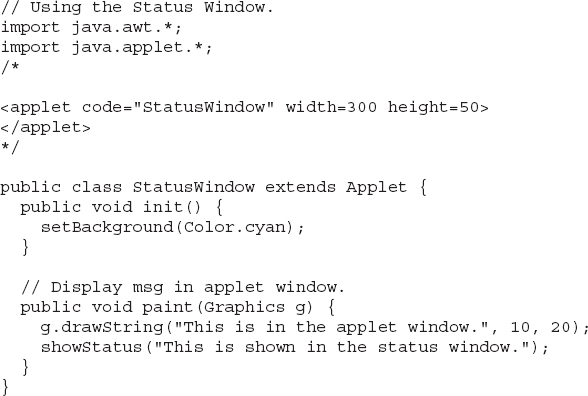
Sample output from this program is shown here:
The HTML APPLET Tag
As mentioned earlier, at the time of this writing, Oracle recommends that the APPLET tag be used to manually start an applet when JNLP is not used. An applet viewer will execute each APPLET tag that it finds in a separate window, while web browsers will allow many applets on a single page. So far, we have been using only a simplified form of the APPLET tag. Now it is time to take a closer look at it.
The syntax for a fuller form of the APPLET tag is shown here. Bracketed items are optional.
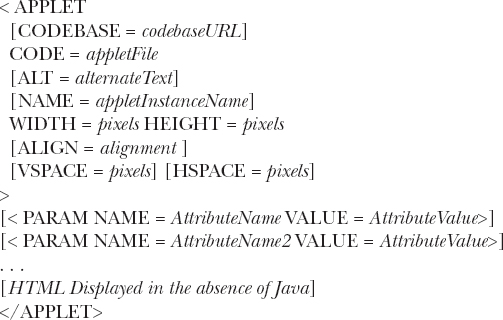
Let’s take a look at each part now.
CODEBASE CODEBASE is an optional attribute that specifies the base URL of the applet code, which is the directory that will be searched for the applet’s executable class file (specified by the CODE tag). The HTML document’s URL directory is used as the CODEBASE if this attribute is not specified.
CODE CODE is a required attribute that gives the name of the file containing your applet’s compiled .class file. This file is relative to the code base URL of the applet, which is the directory that the HTML file was in or the directory indicated by CODEBASE if set.
ALT The ALT tag is an optional attribute used to specify a short text message that should be displayed if the browser recognizes the APPLET tag but can’t currently run Java applets. This is distinct from the alternate HTML you provide for browsers that don’t support applets.
NAME NAME is an optional attribute used to specify a name for the applet instance. Applets must be named in order for other applets on the same page to find them by name and communicate with them. To obtain an applet by name, use getApplet( ), which is defined by the AppletContext interface.
WIDTH and HEIGHT WIDTH and HEIGHT are required attributes that give the size (in pixels) of the applet display area.
ALIGN ALIGN is an optional attribute that specifies the alignment of the applet. This attribute is treated the same as the HTML IMG tag with these possible values: LEFT, RIGHT, TOP, BOTTOM, MIDDLE, BASELINE, TEXTTOP, ABSMIDDLE, and ABSBOTTOM.
VSPACE and HSPACE These attributes are optional. VSPACE specifies the space, in pixels, above and below the applet. HSPACE specifies the space, in pixels, on each side of the applet. They’re treated the same as the IMG tag’s VSPACE and HSPACE attributes.
PARAM NAME and VALUE The PARAM tag allows you to specify applet-specific arguments. Applets access their attributes with the getParameter( ) method.
Other valid APPLET attributes include ARCHIVE, which lets you specify one or more archive files, and OBJECT, which specifies a saved version of the applet. In general, an APPLET tag should include only a CODE or an OBJECT attribute, but not both.
Passing Parameters to Applets
As just discussed, the APPLET tag allows you to pass parameters to your applet. To retrieve a parameter, use the getParameter( ) method. It returns the value of the specified parameter in the form of a String object. Thus, for numeric and boolean values, you will need to convert their string representations into their internal formats. Here is an example that demonstrates passing parameters:
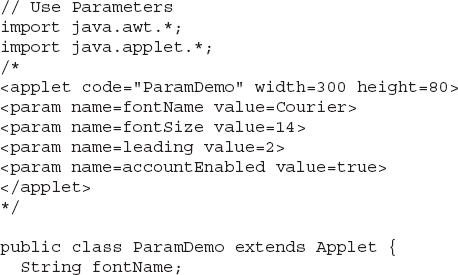
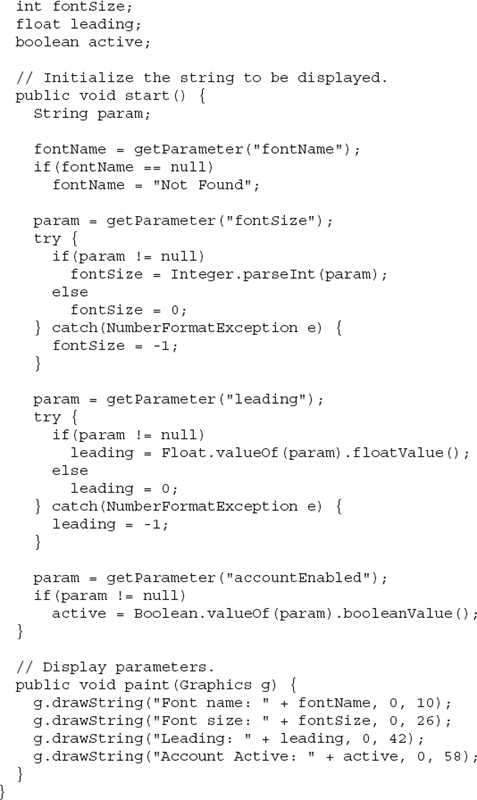
Sample output from this program is shown here:
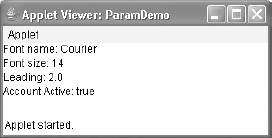
As the program shows, you should test the return values from getParameter( ). If a parameter isn’t available, getParameter( ) will return null. Also, conversions to numeric types must be attempted in a try statement that catches NumberFormatException. Uncaught exceptions should never occur within an applet.
Improving the Banner Applet
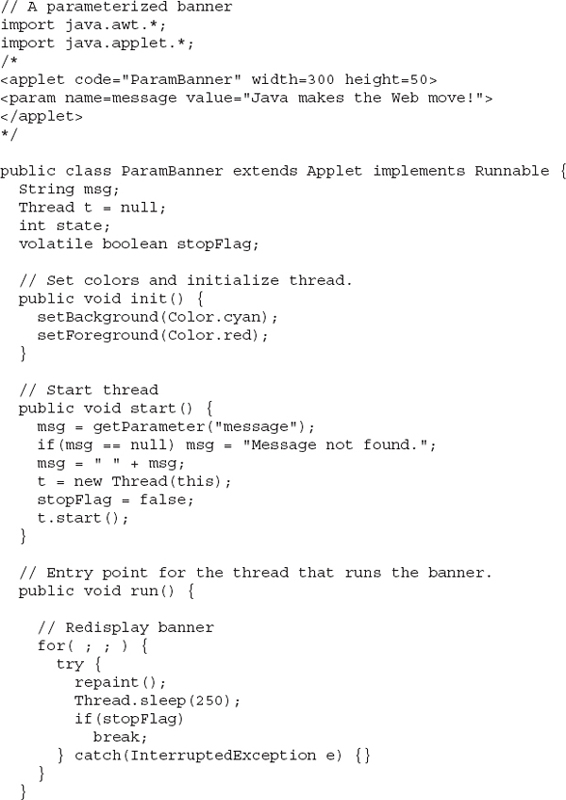
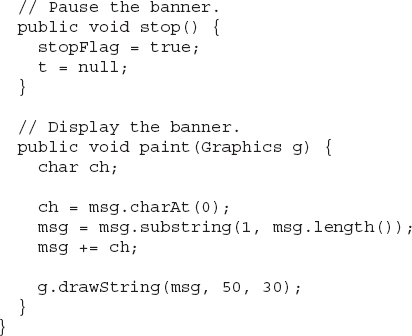
It is possible to use a parameter to enhance the banner applet shown earlier. In the previous version, the message being scrolled was hard-coded into the applet. However, passing the message as a parameter allows the banner applet to display a different message each time it is executed. This improved version is shown here. Notice that the APPLET tag at the top of the file now specifies a parameter called message that is linked to a quoted string.
getDocumentBase( ) and getCodeBase( )
Often, you will create applets that will need to explicitly load media and text. Java will allow the applet to load data from the directory holding the HTML file that started the applet (the document base) and the directory from which the applet’s class file was loaded (the code base). These directories are returned as URL objects (described in Chapter 22) by getDocumentBase( ) and getCodeBase( ). They can be concatenated with a string that names the file you want to load. To actually load another file, you will use the showDocument( ) method defined by the AppletContext interface, discussed in the next section.
The following applet illustrates these methods:
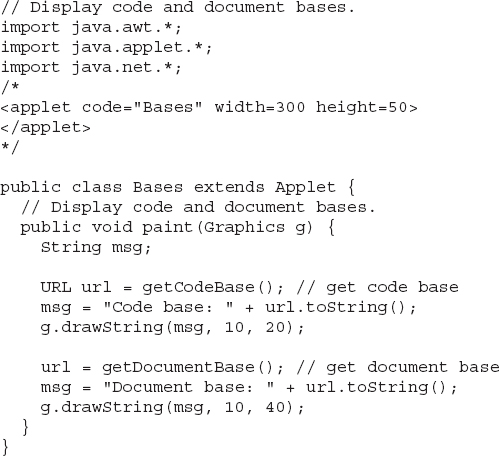
Sample output from this program is shown here:

AppletContext and showDocument( )
One application of Java is to use active images and animation to provide a graphical means of navigating the Web that is more interesting than simple text-based links. To allow your applet to transfer control to another URL, you must use the showDocument( ) method defined by the AppletContext interface. AppletContext is an interface that lets you get information from the applet’s execution environment. The methods defined by AppletContext are shown in Table 23-2. The context of the currently executing applet is obtained by a call to the getAppletContext( ) method defined by Applet.
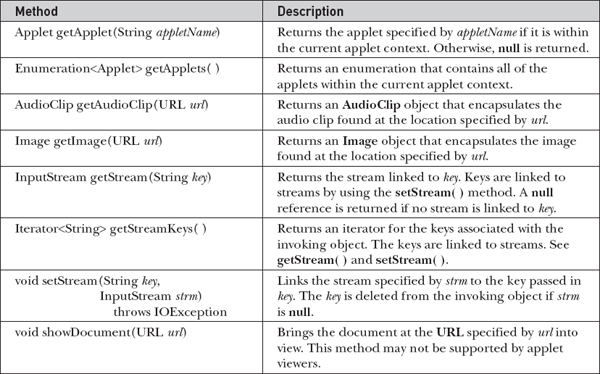

Table 23-2 The Methods Defined by the AppletContext Interface
Within an applet, once you have obtained the applet’s context, you can bring another document into view by calling showDocument( ). This method has no return value and throws no exception if it fails, so use it carefully. There are two showDocument( ) methods. The method showDocument(URL) displays the document at the specified URL. The method showDocument(URL, String) displays the specified document at the specified location within the browser window. Valid arguments for where are "_self" (show in current frame), "_parent" (show in parent frame), "_top" (show in topmost frame), and "_blank" (show in new browser window). You can also specify a name, which causes the document to be shown in a new browser window by that name.
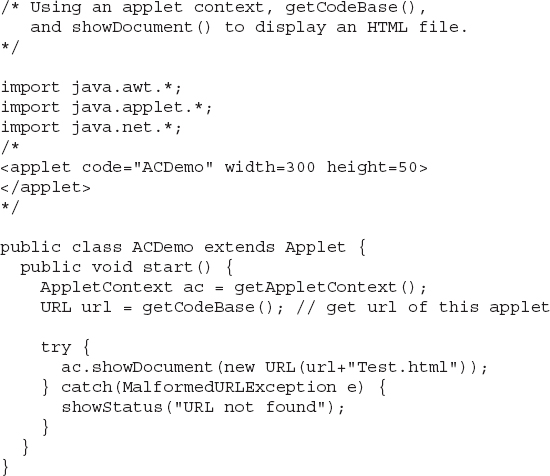
The following applet demonstrates AppletContext and showDocument( ). Upon execution, it obtains the current applet context and uses that context to transfer control to a file called Test.html. This file must be in the same directory as the applet. Test.html can contain any valid hypertext that you like.
The AudioClip Interface
The AudioClip interface defines these methods: play( ) (play a clip from the beginning), stop( ) (stop playing the clip), and loop( ) (play the loop continuously). After you have loaded an audio clip using getAudioClip( ), you can use these methods to play it.
The AppletStub Interface
The AppletStub interface provides the means by which an applet and the browser (or applet viewer) communicate. Your code will not typically implement this interface.
Outputting to the Console
Although output to an applet’s window must be accomplished through GUI-based methods, such as drawString( ), it is still possible to use console output in your applet—especially for debugging purposes. In an applet, when you call a method such as System.out.println( ), the output is not sent to your applet’s window. Instead, it appears either in the console session in which you launched the applet viewer or in the Java console that is available in some browsers. Use of console output for purposes other than debugging is discouraged, since it violates the design principles of the graphical interface most users will expect.
..................Content has been hidden....................
You can't read the all page of ebook, please click here login for view all page.