
CHAPTER |
|
27 |
Images |
This chapter examines the Image class and the java.awt.image package. Together, they provide support for imaging (the display and manipulation of graphical images). An image is simply a rectangular graphical object. Images are a key component of web design. In fact, the inclusion of the <img> tag in the Mosaic browser at NCSA (National Center for Supercomputer Applications) is what caused the Web to begin to grow explosively in 1993. This tag was used to include an image inline with the flow of hypertext. Java expands upon this basic concept, allowing images to be managed under program control. Because of its importance, Java provides extensive support for imaging.
Images are objects of the Image class, which is part of the java.awt package. Images are manipulated using the classes found in the java.awt.image package. There are a large number of imaging classes and interfaces defined by java.awt.image, and it is not possible to examine them all. Instead, we will focus on those that form the foundation of imaging. Here are the java.awt.image classes discussed in this chapter:
CropImageFilter |
MemoryImageSource |
FilteredImageSource |
PixelGrabber |
ImageFilter |
RGBImageFilter |
These are the interfaces that we will use:
Also examined is the MediaTracker class, which is part of java.awt.
File Formats
Originally, web images could only be in GIF format. The GIF image format was created by CompuServe in 1987 to make it possible for images to be viewed while online, so it was well suited to the Internet. GIF images can have only up to 256 colors each. This limitation caused the major browser vendors to add support for JPEG images in 1995. The JPEG format was created by a group of photographic experts to store full-color-spectrum, continuous-tone images. These images, when properly created, can be of much higher fidelity as well as more highly compressed than a GIF encoding of the same source image. Another file format is PNG. It too is an alternative to GIF. In almost all cases, you will never care or notice which format is being used in your programs. The Java image classes abstract the differences behind a clean interface.
Image Fundamentals: Creating, Loading, and Displaying
There are three common operations that occur when you work with images: creating an image, loading an image, and displaying an image. In Java, the Image class is used to refer to images in memory and to images that must be loaded from external sources. Thus, Java provides ways for you to create a new image object and ways to load one. It also provides a means by which an image can be displayed. Let’s look at each.
Creating an Image Object
You might expect that you create a memory image using something like the following:
Not so. Because images must eventually be painted on a window to be seen, the Image class doesn’t have enough information about its environment to create the proper data format for the screen. Therefore, the Component class in java.awt has a factory method called createImage( ) that is used to create Image objects. (Remember that all of the AWT components are subclasses of Component, so all support this method.)
The createImage( ) method has the following two forms:
Image createImage(ImageProducer imgProd)
Image createImage(int width, int height)
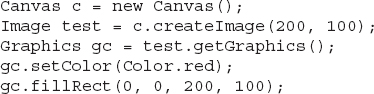
The first form returns an image produced by imgProd, which is an object of a class that implements the ImageProducer interface. (We will look at image producers later.) The second form returns a blank (that is, empty) image that has the specified width and height. Here is an example:
This creates an instance of Canvas and then calls the createImage( ) method to actually make an Image object. At this point, the image is blank. Later, you will see how to write data to it.
Loading an Image
The other way to obtain an image is to load one. One way to do this is to use the getImage( ) method defined by the Applet class. It has the following forms:
Image getImage(URL url)
Image getImage(URL url, String imageName)
The first version returns an Image object that encapsulates the image found at the location specified by url. The second version returns an Image object that encapsulates the image found at the location specified by url and having the name specified by imageName.
Displaying an Image
Once you have an image, you can display it by using drawImage( ), which is a member of the Graphics class. It has several forms. The one we will be using is shown here:
boolean drawImage(Image imgObj, int left, int top, ImageObserver imgOb)
This displays the image passed in imgObj with its upper-left corner specified by left and top. imgOb is a reference to a class that implements the ImageObserver interface. This interface is implemented by all AWT (and Swing) components. An image observer is an object that can monitor an image while it loads. ImageObserver is described in the next section.
With getImage( ) and drawImage( ), it is actually quite easy to load and display an image. Here is a sample applet that loads and displays a single image. The file Lilies.jpg is loaded, but you can substitute any GIF, JPG, or PNG file you like (just make sure it is available in the same directory with the HTML file that contains the applet).

In the init( ) method, the img variable is assigned to the image returned by getImage( ). The getImage( ) method uses the string returned by getParameter("img") as the filename for the image. This image is loaded from a URL that is relative to the result of getDocumentBase( ), which is the URL of the HTML page this applet tag was in. The filename returned by getParameter("img") comes from the applet tag <param name= "img" value="Lilies.jpg">. This is the equivalent, if a little slower, of using the HTML tag <img src="Lilies.jpg" width=400 height=345>. Figure 27-1 shows what it looks like when you run the program.
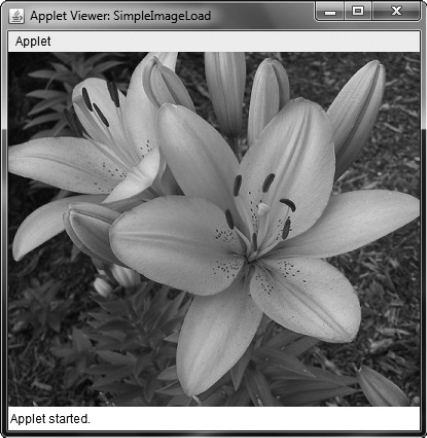
Figure 27-1 Sample output from SimpleImageLoad
When this applet runs, it starts loading img in the init( ) method. Onscreen you can see the image as it loads from the network, because Applet’s implementation of the ImageObserver interface calls paint( ) every time more image data arrives.
Seeing the image load is somewhat informative, but it might be better if you use the time it takes to load the image to do other things in parallel. That way, the fully formed image can simply appear on the screen in an instant, once it is fully loaded. You can use ImageObserver, described next, to monitor loading an image while you paint the screen with other information.
ImageObserver
ImageObserver is an interface used to receive notification as an image is being generated, and it defines only one method: imageUpdate( ). Using an image observer allows you to perform other actions, such as show a progress indicator or an attract screen, as you are informed of the progress of the download. This kind of notification is very useful when an image is being loaded over a slow network.
The imageUpdate( ) method has this general form:
Here, imgObj is the image being loaded, and flags is an integer that communicates the status of the update report. The four integers left, top, width, and height represent a rectangle that contains different values depending on the values passed in flags. imageUpdate( ) should return false if it has completed loading, and true if there is more image to process.
The flags parameter contains one or more bit flags defined as static variables inside the ImageObserver interface. These flags and the information they provide are listed in Table 27-1.
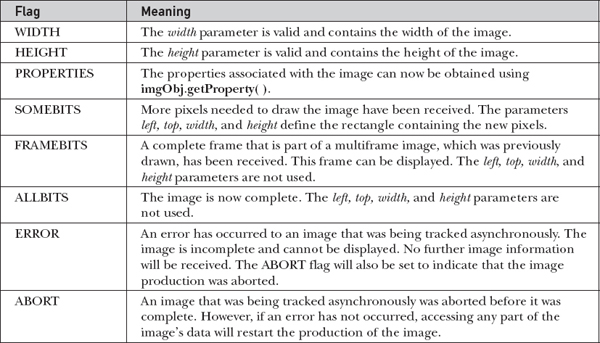
Table 27-1 Bit Flags of the imageUpdate( ) flags Parameter
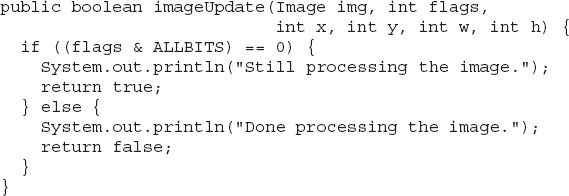
The Applet class has an implementation of the imageUpdate( ) method for the ImageObserver interface that is used to repaint images as they are loaded. You can override this method in your class to change that behavior.
Here is a simple example of an imageUpdate( ) method:
Double Buffering
Not only are images useful for storing pictures, as we’ve just shown, but you can also use them as offscreen drawing surfaces. This allows you to render any image, including text and graphics, to an offscreen buffer that you can display at a later time. The advantage to doing this is that the image is seen only when it is complete. Drawing a complicated image could take several milliseconds or more, which can be seen by the user as flashing or flickering. This flashing is distracting and causes the user to perceive your rendering as slower than it actually is. Use of an offscreen image to reduce flicker is called double buffering, because the screen is considered a buffer for pixels, and the offscreen image is the second buffer, where you can prepare pixels for display.
Earlier in this chapter, you saw how to create a blank Image object. Now you will see how to draw on that image rather than the screen. As you recall from earlier chapters, you need a Graphics object in order to use any of Java’s rendering methods. Conveniently, the Graphics object that you can use to draw on an Image is available via the getGraphics( ) method. Here is a code fragment that creates a new image, obtains its graphics context, and fills the entire image with red pixels:
Once you have constructed and filled an offscreen image, it will still not be visible. To actually display the image, call drawImage( ). Here is an example that draws a time-consuming image to demonstrate the difference that double buffering can make in perceived drawing time:
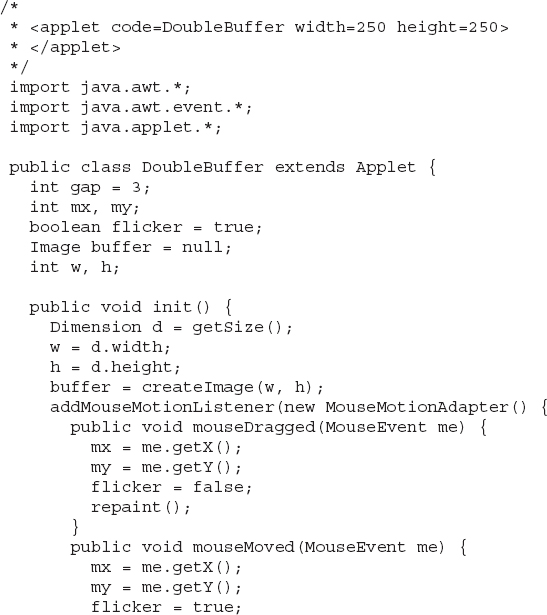
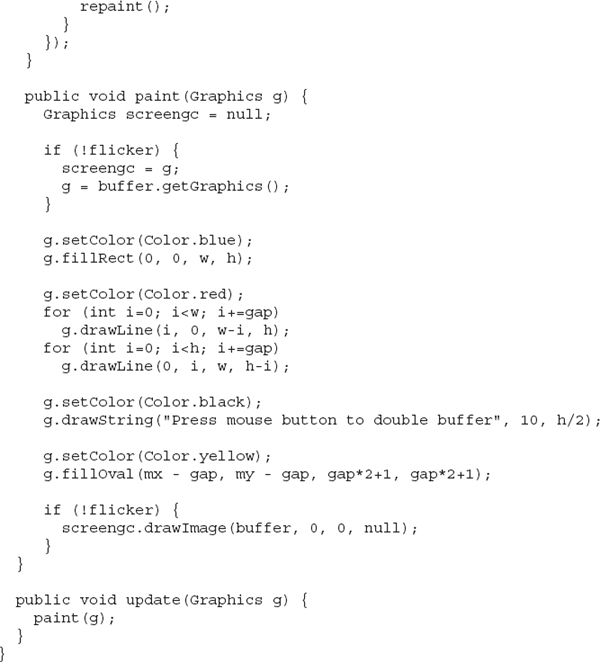
This simple applet has a complicated paint( ) method. It fills the background with blue and then draws a red moiré pattern on top of that. It paints some black text on top of that and then paints a yellow circle centered at the coordinates mx, my. The mouseMoved( ) and mouseDragged( ) methods are overridden to track the mouse position. These methods are identical, except for the setting of the flicker Boolean variable. mouseMoved( ) sets flicker to true, and mouseDragged( ) sets it to false. This has the effect of calling repaint( ) with flicker set to true when the mouse is moved (but no button is pressed) and set to false when the mouse is dragged with any button pressed.
When paint( ) gets called with flicker set to true, we see each drawing operation as it is executed on the screen. In the case where a mouse button is pressed and paint( ) is called with flicker set to false, we see quite a different picture. The paint( ) method swaps the Graphics reference g with the graphics context that refers to the offscreen canvas, buffer, which we created in init( ). Then all of the drawing operations are invisible. At the end of paint( ), we simply call drawImage( ) to show the results of these drawing methods all at once.
Notice that it is okay to pass in a null as the fourth parameter to drawImage( ). This is the parameter used to pass an ImageObserver object that receives notification of image events. Since this is an image that is not being produced from a network stream, we have no need for notification. The left snapshot in Figure 27-2 is what the applet looks like with the mouse button not pressed. As you can see, the image was in the middle of repainting when this snapshot was taken. The right snapshot shows how, when a mouse button is pressed, the image is always complete and clean due to double buffering.
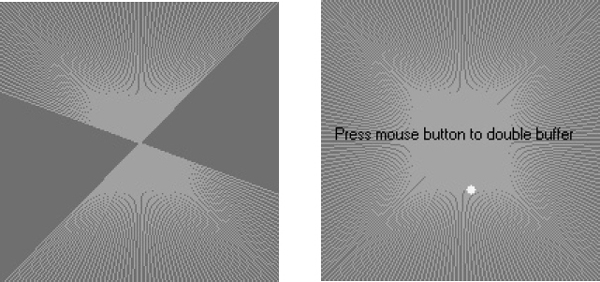
Figure 27-2 Output from DoubleBuffer without (left) and with (right) double buffering
MediaTracker
A MediaTracker is an object that will check the status of an arbitrary number of images in parallel. To use MediaTracker, you create a new instance and use its addImage( ) method to track the loading status of an image. addImage( ) has the following general forms:
void addImage(Image imgObj, int imgID)
void addImage(Image imgObj, int imgID, int width, int height)
Here, imgObj is the image being tracked. Its identification number is passed in imgID. ID numbers do not need to be unique. You can use the same number with several images as a means of identifying them as part of a group. Furthermore, images with lower IDs are given priority over those with higher IDs when loading. In the second form, width and height specify the dimensions of the object when it is displayed.
Once you’ve registered an image, you can check whether it’s loaded, or you can wait for it to completely load. To check the status of an image, call checkID( ). The version used in this chapter is shown here:
boolean checkID(int imgID)
Here, imgID specifies the ID of the image you want to check. The method returns true if all images that have the specified ID have been loaded (or if an error or user-abort has terminated loading). Otherwise, it returns false. You can use the checkAll( ) method to see if all images being tracked have been loaded.
You should use MediaTracker when loading a group of images. If all of the images that you’re interested in aren’t downloaded, you can display something else to entertain the user until they all arrive.
CAUTION If you use MediaTracker once you’ve called addImage( ) on an image, a reference in MediaTracker will prevent the system from garbage collecting it. If you want the system to be able to garbage collect images that were being tracked, make sure it can collect the MediaTracker instance as well.
Here’s an example that loads a three-image slide show and displays a nice bar chart of the loading progress:
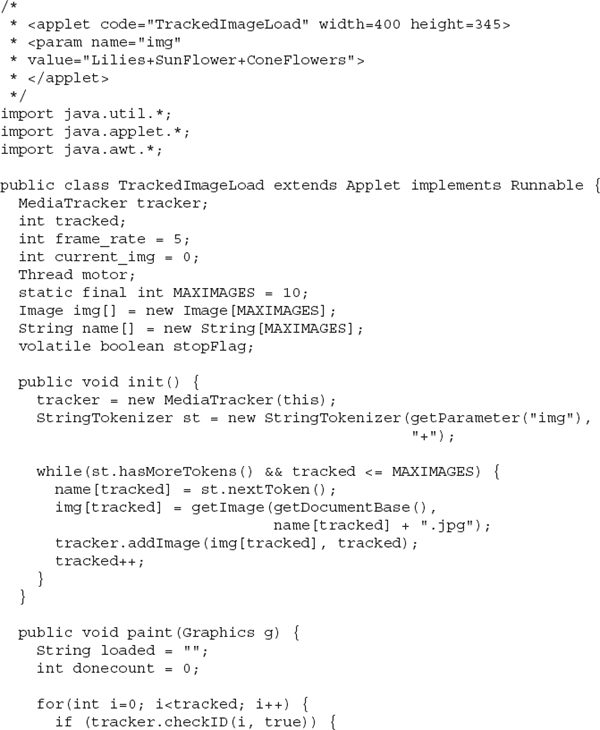
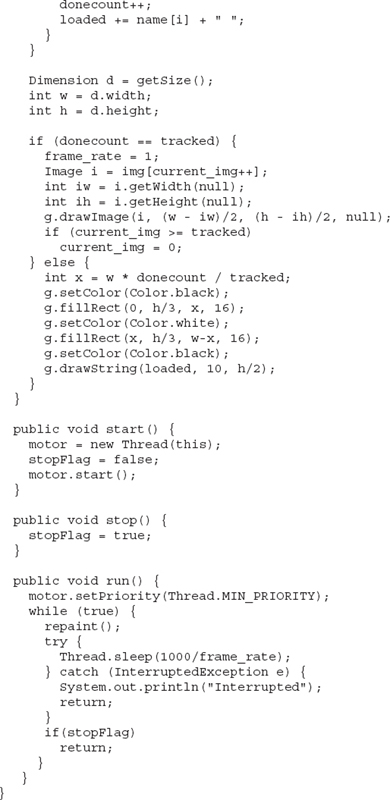
This example creates a new MediaTracker in the init( ) method and then adds each of the named images as a tracked image with addImage( ). In the paint( ) method, it calls checkID( ) on each of the images that we’re tracking. If all of the images are loaded, they are displayed. If not, a simple bar chart of the number of images loaded is shown, with the names of the fully loaded images displayed underneath the bar.
ImageProducer
ImageProducer is an interface for objects that want to produce data for images. An object that implements the ImageProducer interface will supply integer or byte arrays that represent image data and produce Image objects. As you saw earlier, one form of the createImage( ) method takes an ImageProducer object as its argument. There are two image producers contained in java.awt.image: MemoryImageSource and FilteredImageSource. Here, we will examine MemoryImageSource and create a new Image object from data generated in an applet.
MemoryImageSource
MemoryImageSource is a class that creates a new Image from an array of data. It defines several constructors. Here is the one we will be using:
The MemoryImageSource object is constructed out of the array of integers specified by pixel, in the default RGB color model to produce data for an Image object. In the default color model, a pixel is an integer with Alpha, Red, Green, and Blue (0xAARRGGBB). The Alpha value represents a degree of transparency for the pixel. Fully transparent is 0 and fully opaque is 255. The width and height of the resulting image are passed in width and height. The starting point in the pixel array to begin reading data is passed in offset. The width of a scan line (which is often the same as the width of the image) is passed in scanLineWidth.
The following short example generates a MemoryImageSource object using a variation on a simple algorithm (a bitwise-exclusive-OR of the x and y address of each pixel) from the book Beyond Photography, The Digital Darkroom by Gerard J. Holzmann (Prentice Hall, 1988).
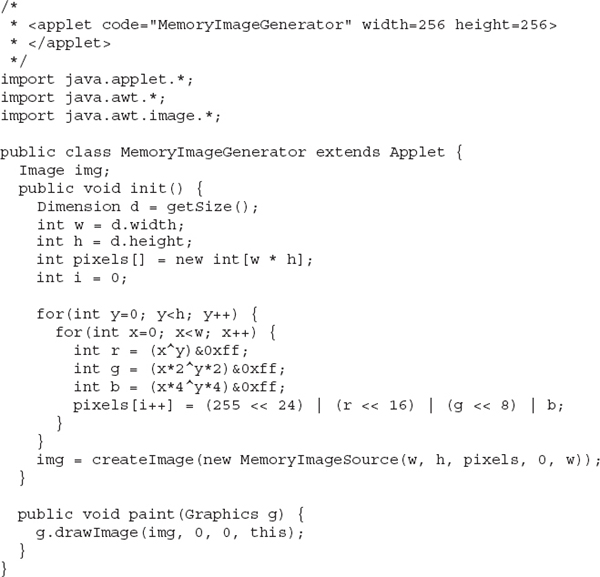
The data for the new MemoryImageSource is created in the init( ) method. An array of integers is created to hold the pixel values; the data is generated in the nested for loops where the r, g, and b values get shifted into a pixel in the pixels array. Finally, createImage( ) is called with a new instance of a MemoryImageSource created from the raw pixel data as its parameter. Figure 27-3 shows the image when we run the applet. (It looks much nicer in color.)
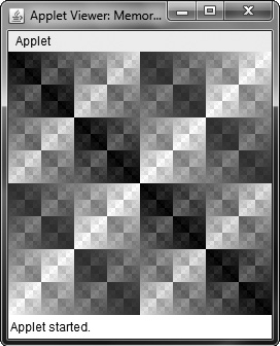
Figure 27-3 Sample output from MemoryImageGenerator
ImageConsumer
ImageConsumer is an interface for objects that want to take pixel data from images and supply it as another kind of data. This, obviously, is the opposite of ImageProducer, described earlier. An object that implements the ImageConsumer interface is going to create int or byte arrays that represent pixels from an Image object. We will examine the PixelGrabber class, which is a simple implementation of the ImageConsumer interface.
PixelGrabber
The PixelGrabber class is defined within java.lang.image. It is the inverse of the MemoryImageSource class. Rather than constructing an image from an array of pixel values, it takes an existing image and grabs the pixel array from it. To use PixelGrabber, you first create an array of ints big enough to hold the pixel data, and then you create a PixelGrabber instance passing in the rectangle that you want to grab. Finally, you call grabPixels( ) on that instance.
The PixelGrabber constructor that is used in this chapter is shown here:
Here, imgObj is the object whose pixels are being grabbed. The values of left and top specify the upper-left corner of the rectangle, and width and height specify the dimensions of the rectangle from which the pixels will be obtained. The pixels will be stored in pixel beginning at offset. The width of a scan line (which is often the same as the width of the image) is passed in scanLineWidth.
grabPixels( ) is defined like this:
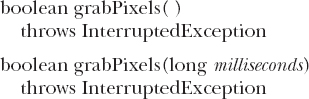
Both methods return true if successful and false otherwise. In the second form, milliseconds specifies how long the method will wait for the pixels. Both throw InterruptedException if execution is interrupted by another thread.
Here is an example that grabs the pixels from an image and then creates a histogram of pixel brightness. The histogram is simply a count of pixels that are a certain brightness for all brightness settings between 0 and 255. After the applet paints the image, it draws the histogram over the top.
Figure 27-4 shows an example image and its histogram.
ImageFilter
Given the ImageProducer and ImageConsumer interface pair—and their concrete classes MemoryImageSource and PixelGrabber—you can create an arbitrary set of translation filters that takes a source of pixels, modifies them, and passes them on to an arbitrary consumer. This mechanism is analogous to the way concrete classes are created from the abstract I/O classes InputStream, OutputStream, Reader, and Writer (described in Chapter 20). This stream model for images is completed by the introduction of the ImageFilter class. Some subclasses of ImageFilter in the java.awt.image package are AreaAveragingScaleFilter, CropImageFilter, ReplicateScaleFilter, and RGBImageFilter. There is also an implementation of ImageProducer called FilteredImageSource, which takes an arbitrary ImageFilter and wraps it around an ImageProducer to filter the pixels it produces. An instance of FilteredImageSource can be used as an ImageProducer in calls to createImage( ), in much the same way that BufferedInputStreams can be passed off as InputStreams.
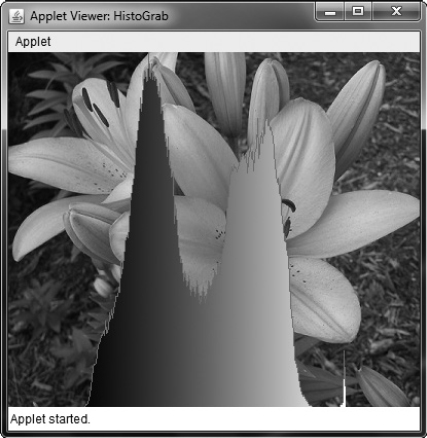
Figure 27-4 Sample output from HistoGrab
In this chapter, we examine two filters: CropImageFilter and RGBImageFilter.
CropImageFilter
CropImageFilter filters an image source to extract a rectangular region. One situation in which this filter is valuable is where you want to use several small images from a single, larger source image. Loading twenty 2K images takes much longer than loading a single 40K image that has many frames of an animation tiled into it. If every subimage is the same size, then you can easily extract these images by using CropImageFilter to disassemble the block once your program starts. Here is an example that creates 16 images taken from a single image. The tiles are then scrambled by swapping a random pair from the 16 images 32 times.


Figure 27-5 shows the flowers image scrambled by the TileImage applet.
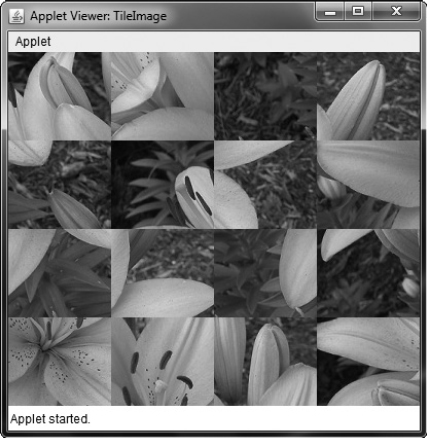
Figure 27-5 Sample output from TileImage
RGBImageFilter
The RGBImageFilter is used to convert one image to another, pixel by pixel, transforming the colors along the way. This filter could be used to brighten an image, to increase its contrast, or even to convert it to grayscale.
To demonstrate RGBImageFilter, we have developed a somewhat complicated example that employs a dynamic plug-in strategy for image-processing filters. We’ve created an interface for generalized image filtering so that an applet can simply load these filters based on <param> tags without having to know about all of the ImageFilters in advance. This example consists of the main applet class called ImageFilterDemo, the interface called PlugInFilter, and a utility class called LoadedImage, which encapsulates some of the MediaTracker methods we’ve been using in this chapter. Also included are three filters—Grayscale, Invert, and Contrast—which simply manipulate the color space of the source image using RGBImageFilters, and two more classes—Blur and Sharpen—which do more complicated "convolution" filters that change pixel data based on the pixels surrounding each pixel of source data. Blur and Sharpen are subclasses of an abstract helper class called Convolver. Let’s look at each part of our example.
ImageFilterDemo.java
The ImageFilterDemo class is the applet framework for our sample image filters. It employs a simple BorderLayout, with a Panel at the South position to hold the buttons that will represent each filter. A Label object occupies the North slot for informational messages about filter progress. The Center is where the image (which is encapsulated in the LoadedImage Canvas subclass, described later) is put. We parse the buttons/filters out of the filters <param> tag, separating them with +’s using a StringTokenizer.
The actionPerformed( ) method is interesting because it uses the label from a button as the name of a filter class that it tries to load with (PlugInFilter) Class.forName(a).newInstance( ). This method is robust and takes appropriate action if the button does not correspond to a proper class that implements PlugInFilter.
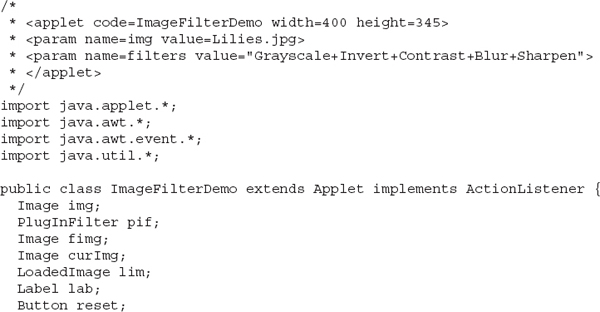
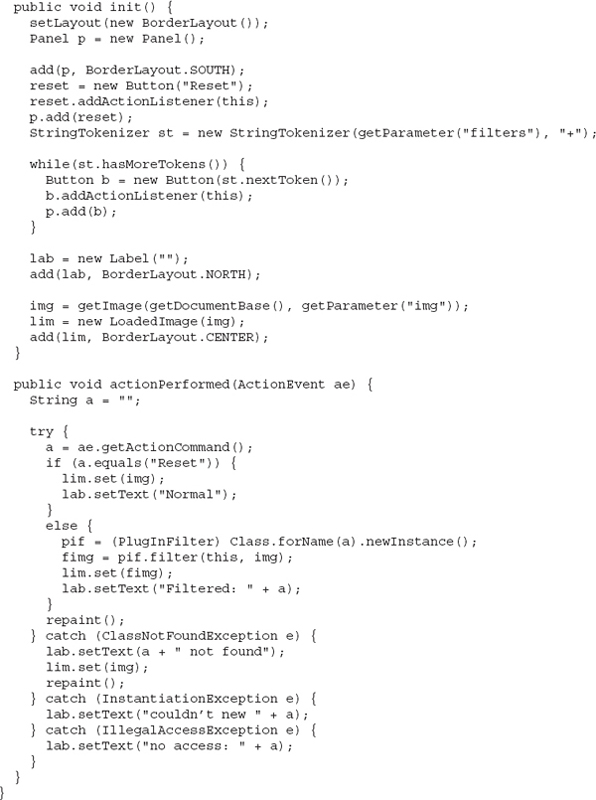
Figure 27-6 shows what the applet looks like when it is first loaded using the applet tag shown at the top of this source file.
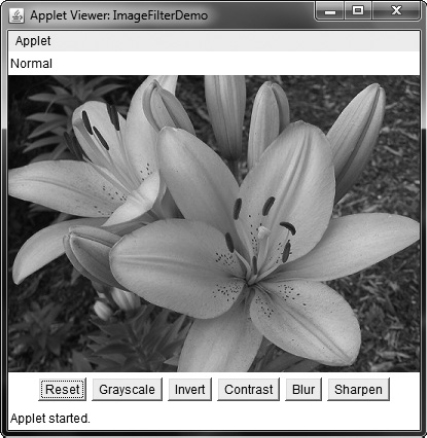
Figure 27-6 Sample normal output from ImageFilterDemo
PlugInFilter.java
PlugInFilter is a simple interface used to abstract image filtering. It has only one method, filter( ), which takes the applet and the source image and returns a new image that has been filtered in some way.

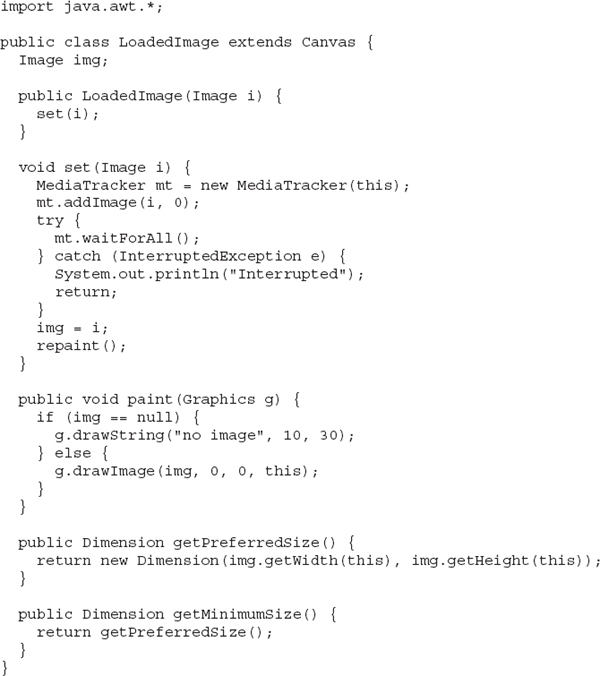
LoadedImage.java
LoadedImage is a convenient subclass of Canvas, which takes an image at construction time and synchronously loads it using MediaTracker. LoadedImage then behaves properly inside of LayoutManager control, because it overrides the getPreferredSize( ) and getMinimumSize( ) methods. Also, it has a method called set( ) that can be used to set a new Image to be displayed in this Canvas. That is how the filtered image is displayed after the plug-in is finished.
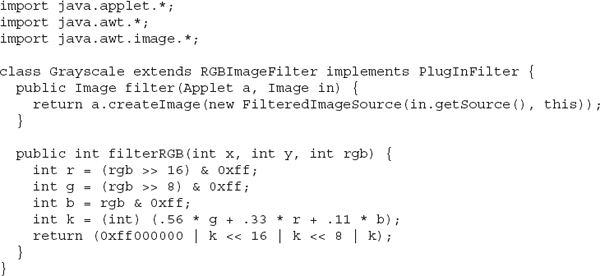
Grayscale.java
The Grayscale filter is a subclass of RGBImageFilter, which means that Grayscale can use itself as the ImageFilter parameter to FilteredImageSource’s constructor. Then all it needs to do is override filterRGB( ) to change the incoming color values. It takes the red, green, and blue values and computes the brightness of the pixel, using the NTSC (National Television Standards Committee) color-to-brightness conversion factor. It then simply returns a gray pixel that is the same brightness as the color source.
Invert.java
The Invert filter is also quite simple. It takes apart the red, green, and blue channels and then inverts them by subtracting them from 255. These inverted values are packed back into a pixel value and returned.
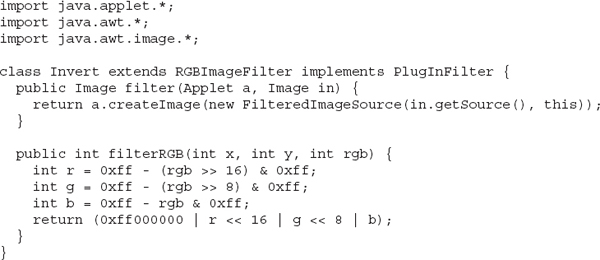
Figure 27-7 shows the image after it has been run through the Invert filter.
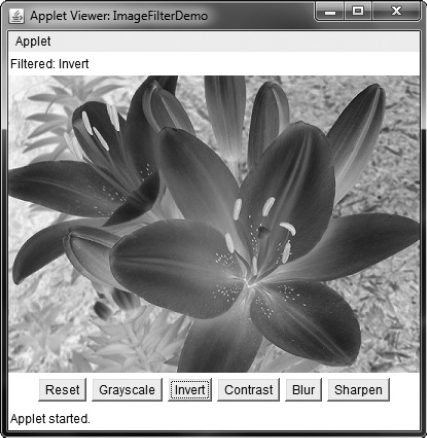
Figure 27-7 Using the Invert filter with ImageFilterDemo
Contrast.java
The Contrast filter is very similar to Grayscale, except its override of filterRGB( ) is slightly more complicated. The algorithm it uses for contrast enhancement takes the red, green, and blue values separately and boosts them by 1.2 times if they are already brighter than 128. If they are below 128, then they are divided by 1.2. The boosted values are properly clamped at 255 by the multclamp( ) method.
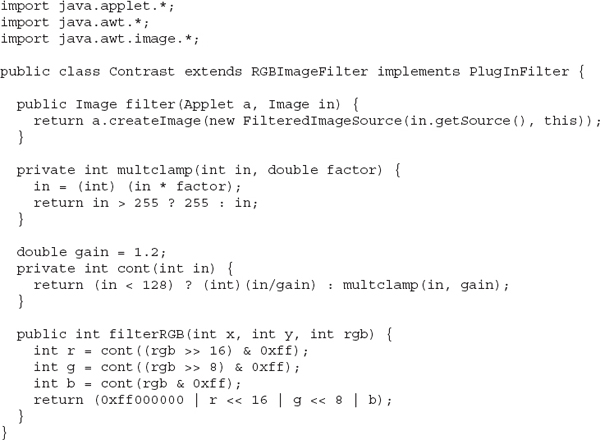
Figure 27-8 shows the image after Contrast is pressed.
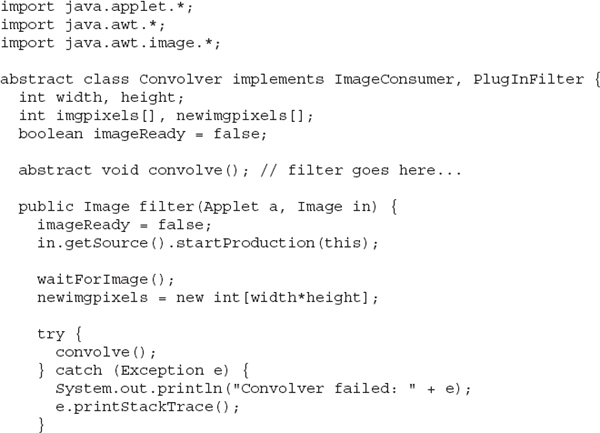
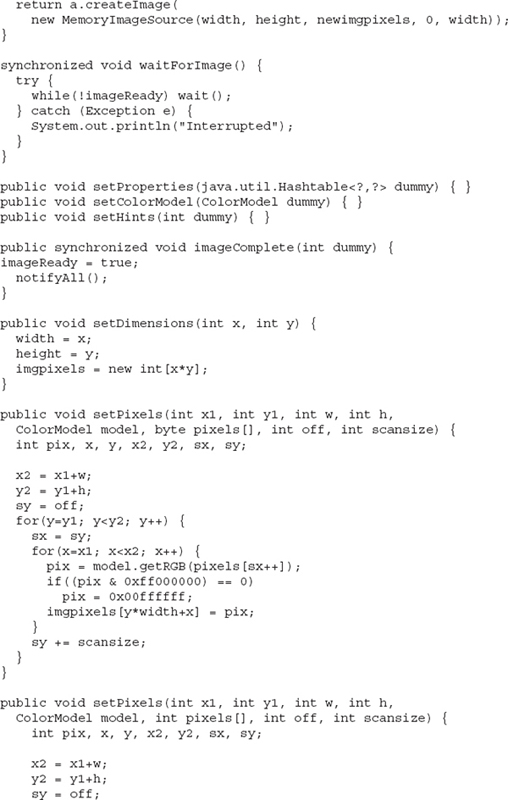
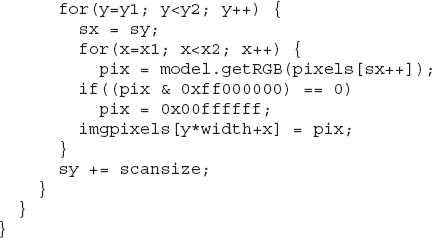
Convolver.java
The abstract class Convolver handles the basics of a convolution filter by implementing the ImageConsumer interface to move the source pixels into an array called imgpixels. It also creates a second array called newimgpixels for the filtered data. Convolution filters sample a small rectangle of pixels around each pixel in an image, called the convolution kernel. This area, 3 x 3 pixels in this demo, is used to decide how to change the center pixel in the area.
NOTE The reason that the filter can’t modify the imgpixels array in place is that the next pixel on a scan line would try to use the original value for the previous pixel, which would have just been filtered away.
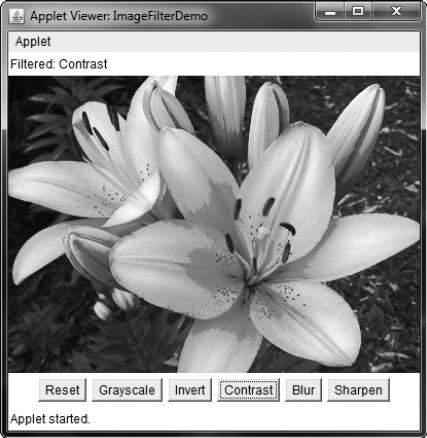
Figure 27-8 Using the Contrast filter with ImageFilterDemo
The two concrete subclasses, shown in the next section, simply implement the convolve( ) method, using imgpixels for source data and newimgpixels to store the result.
NOTE A built-in convolution filter called ConvolveOp is provided by java.awt.image. You may want to explore its capabilities on your own.
Blur.java
The Blur filter is a subclass of Convolver and simply runs through every pixel in the source image array, imgpixels, and computes the average of the 3 x 3 box surrounding it. The corresponding output pixel in newimgpixels is that average value.
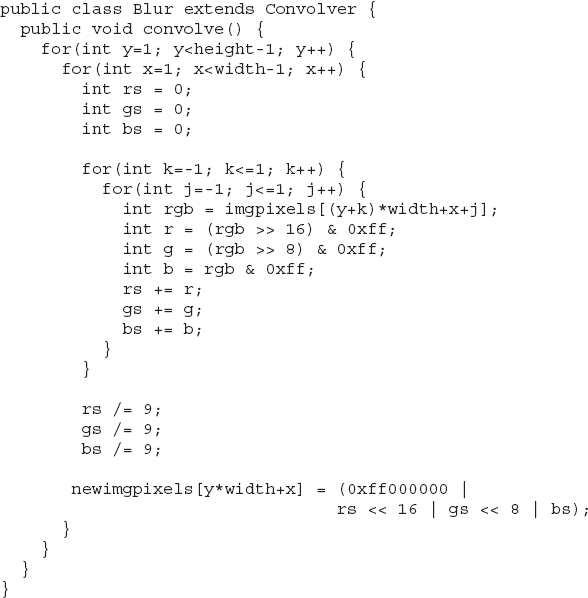
Figure 27-9 shows the applet after Blur.

Figure 27-9 Using the Blur filter with ImageFilterDemo
Sharpen.java
The Sharpen filter is also a subclass of Convolver and is (more or less) the inverse of Blur. It runs through every pixel in the source image array, imgpixels, and computes the average of the 3 x 3 box surrounding it, not counting the center. The corresponding output pixel in newimgpixels has the difference between the center pixel and the surrounding average added to it. This basically says that if a pixel is 30 brighter than its surroundings, make it another 30 brighter. If, however, it is 10 darker, then make it another 10 darker. This tends to accentuate edges while leaving smooth areas unchanged.
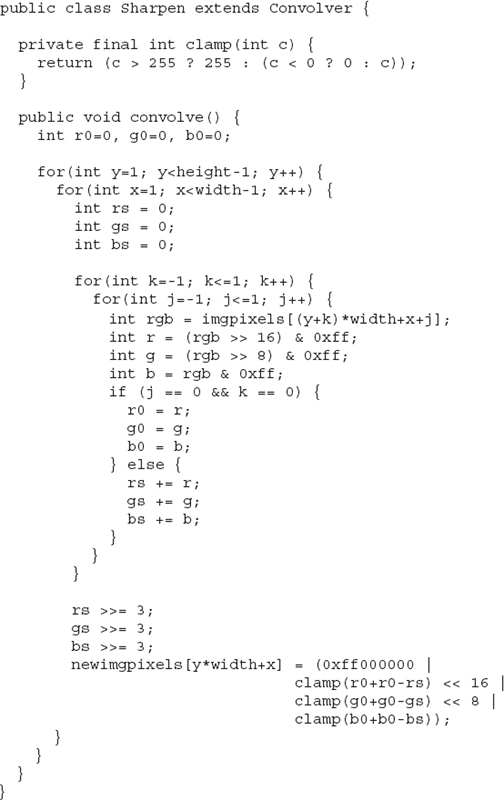
Figure 27-10 shows the applet after Sharpen.
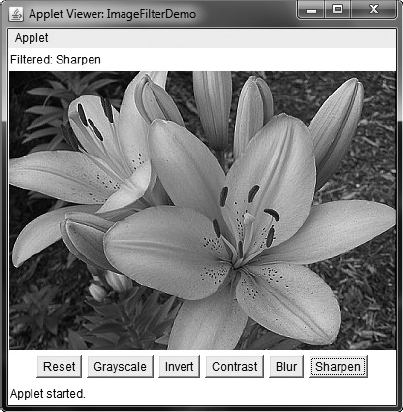
Figure 27-10 Using the Sharpen filter with ImageFilterDemo
Additional Imaging Classes
In addition to the imaging classes described in this chapter, java.awt.image supplies several others that offer enhanced control over the imaging process and that support advanced imaging techniques. Also available is the imaging package called javax.imageio. This package supports plug-ins that handle various image formats. If sophisticated graphical output is of special interest to you, then you will want to explore the additional classes found in java.awt.image and javax.imageio.
..................Content has been hidden....................
You can't read the all page of ebook, please click here login for view all page.