
switch Statements
The if and else statements are good for situations with two possible conditions, but there are times when you have more than two conditions.
With the preceding grade example, you saw that if and else statements can be chained to handle several different conditions.
Another way to do this is with the switch statement, which can test for a variety of different conditions and respond accordingly. In the following code, the grading example has been rewritten with a switch statement:
switch (grade) {
case 'A':
System.out.println("You got an A. Great job!");
break;
case 'B':
System.out.println("You got a B. Good work!");
break;
case 'C':
System.out.println("You got a C. What went wrong?");
break;
default:
System.out.println("You got an F. You'll do well in Congress!");
}
The first line of the switch statement specifies the variable that is tested—in this example, grade. Then, the switch statement uses the { and } brackets to form a block statement.
Each case statement checks the test variable in the switch statement against a specific value. The value used in a case statement can be a character, an integer, or a string. In the preceding example, there are case statements for the characters A, B, and C. Each has one or two statements that follow it. When one of these case statements matches the variable in switch, the computer handles the statements after the case statement until it encounters a break statement.
For example, if the grade variable has the value of B, the text “You got a B. Good work!” is displayed. The next statement is break, so nothing else in the switch statement is executed. The break statement tells the computer to break out of the switch statement.
The default statement is used as a catch-all if none of the preceding case statements is true. In this example, it occurs if the grade variable does not equal A, B, or C. You do not have to use a default statement with every switch block statement you use in your programs. If it is omitted, nothing happens if none of the case statements has the correct value.
Java 7 adds support for using strings as the test variable in a switch-case statement. The Commodity class in Listing 7.2 uses this statement to either buy or sell an unspecified commodity. The commodity costs $20 when purchased and earns $15 when sold.
A switch-case statement tests the value of a string named command, running one block if it equals “BUY” and another if it equals “SELL”.
Listing 7.2. The Commodity Program
1: public class Commodity {
2: public static void main(String arguments) {
3: String command = "BUY";
4: int balance = 550;
5: int quantity = 42;
6:
7: switch (command) {
8: case "BUY":
9: quantity += 5;
10: balance -= 20;
11: break;
12: case "SELL":
13: quantity -= 5;
14: balance += 15;
15: }
16: System.out.println("Balance: " + balance + "
"
17: + "Quantity: " + quantity);
18: }
19: }
This application sets the command string to “BUY” in line 3. When the switch is tested, the case block in lines 9–11 is run. The quantity of the commodity increases by 5 and the balance is lowered by $20.
You might encounter an error when writing this program that prevents it from being compiled and run. NetBeans might not be configured to employ features of the language introduced in Java 7. If you use a string in a switch statement, you might see a red alert icon to the left of the source code editor pane on line 7. The error message could be “strings in switch are not supported,” which indicates that some configuration is needed.
Java 7 features are enabled on a project-by-project basis in NetBeans. Follow these steps to do this:
1. In the Projects pane, right-click the Java24 item (or whatever you named your project) and click Properties from the pop-up menu. The Project Properties dialog opens.
2. In the Categories pane, click Sources if it is not already selected. The dialog displays source code properties (see Figure 7.2).
Figure 7.2. Setting up the NetBeans editor to support Java 7.
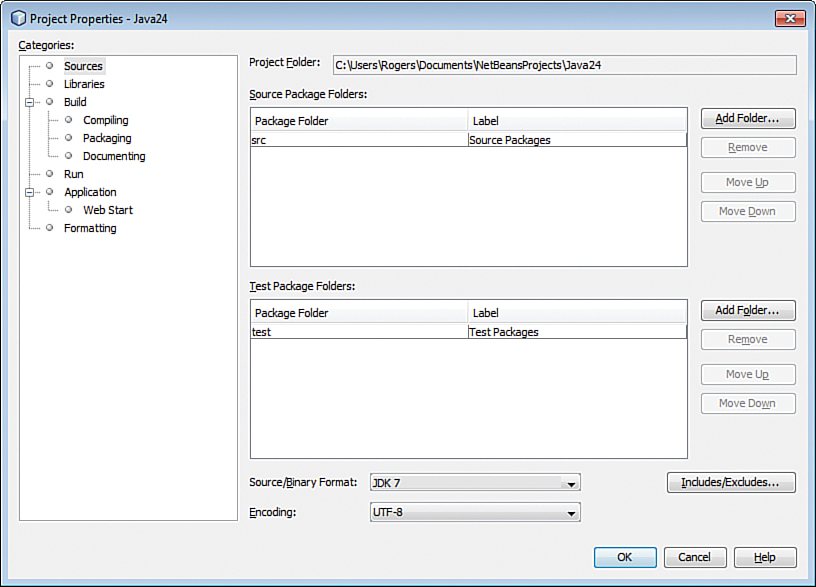
3. In the Source/Binary Format drop-down, choose JDK 7 and click OK.
This sets up the source code editor for all programs in the project to work with Java 7.
When the Commodity program is run, it produces the following output:
Balance: 530
Quantity: 47