
4. Building Android Content Providers
Applications can access data in other applications on the Android system through content provider interfaces and they can expose internal application data to other applications by becoming a content provider. Typically, a content provider is backed by a SQLite database where the underlying data is stored. In this chapter, you build upon the knowledge of SQLite application databases from Chapter 3, “Leveraging SQLite Application Databases,” by working through two content provider examples.
Acting as a Content Provider
Do you have data in your application? Can another application do something interesting with that data? To share the information in your application with other applications, you need to make the application a content provider by providing the standardized content provider interface for other applications; then you must register your application as a content provider in the Android manifest file. The most straightforward way to make an application a content provider is to store the information you want to share in a SQLite database.
We work through two content provider exercises in this chapter. The first is a content provider for GPS track points. This content provider enables users of it to query for points and store points. The data for each point contains a time stamp, the latitude and longitude, and the elevation.

The code examples provided in this section are taken from the Tracks application. This source code for the Tracks application is provided for download on the book’s websites.
Implementing a Content Provider Interface
Implementing a content provider interface is relatively straightforward. The following code shows the basic interface that an application needs to implement to become a content provider, requiring implementations of five important methods:
public class TrackPointProvider extends ContentProvider {
public int delete(Uri uri,
String selection, String[] selectionArgs) {
return 0;
}
public String getType(Uri uri) {
return null;
}
public Uri insert(Uri uri, ContentValues values) {
return null;
}
public boolean onCreate() {
return false;
}
public Cursor query(Uri uri, String[] projection,
String selection, String[] selectionArgs, String sortOrder) {
return null;
}
public int update(Uri uri, ContentValues values,
String selection, String[] selectionArgs) {
return 0;
}
}
You can use Eclipse to easily create a new class and include the basic overrides that you need. To do this, right-click on the package you want to add the new class to, choose New, and then choose Class. Type the name of your content provider in the Name field, choose android.content.ContentProvider as your superclass, and check the box next to Inherited abstract methods.
Defining the Data URI
The provider application needs to define a base URI that other applications will use to access this content provider. This must be in the form of a public static final Uri named CONTENT_URI, and it must start with content://. The URI must be unique. The best practice for this naming is to use the fully qualified class name of the content provider. Here, we have created a URI name for our GPS track point provider book example:
public static final Uri CONTENT_URI =
Uri.parse("content://com.androidbook.TrackPointProvider");
Defining Data Columns
The user of the content provider needs to know what columns the content provider has available to it. In this case, the columns used are timestamp, latitude and longitude, and the elevation. We also include a column for the record number, which is called _id.
public final static String _ID = "_id";
public final static String TIMESTAMP = "timestamp";
public final static String LATITUDE = "latitude";
public final static String LONGITUDE = "longitude";
public final static String ELEVATION = "elevation";
Users of the content provider use these same strings. A content provider for data such as this often stores the data in a SQLite database. If this is the case, matching these columns’ names to the database column names simplifies the code.
Implementing Important Content Provider Methods
This section shows example implementations of each of the methods that are used by the system to call this content provider when another application wants to use it. The system, in this case, is the ContentResolver interface that was used indirectly in the previous section when built-in content providers were used.
Some of these methods can make use of a helper class provided by the Android SDK, UriMatcher, which is used to match incoming Uri values to patterns that help speed up development. The use of UriMatcher is described and then used in the implementation of these methods.
Implementing the query() Method
Let’s start with a sample query implementation. Any query implementation needs to return a Cursor object. One convenient way to get a Cursor object is to return the Cursor from the underlying SQLite database that many content providers use. In fact, the interface to ContentProvider.query() is compatible with the SQLiteQueryBuilder.query() call. This example uses it to quickly build the query and return a Cursor object.
public Cursor query(Uri uri, String[] projection,
String selection, String[] selectionArgs,
String sortOrder) {
SQLiteQueryBuilder qBuilder = new SQLiteQueryBuilder();
qBuilder.setTables(TrackPointDatabase.TRACKPOINTS_TABLE);
if ((sURIMatcher.match(uri)) == TRACKPOINT_ID) {
qBuilder.appendWhere("_id=" + uri.getLastPathSegment());
}
Cursor resultCursor = qBuilder.query(mDB
.getReadableDatabase(), projection,
selection, selectionArgs, null, null,
sortOrder, null);
resultCursor.setNotificationUri(getContext()
.getContentResolver(), uri);
return resultCursor;
}
First, the code gets an instance of a SQLiteQueryBuilder object, which builds up a query with some method calls. Then, the setTables() method configures which table in the database is used. The UriMatcher class checks to see which specific rows are requested. UriMatcher is discussed in greater detail later.
Next, the actual query is called. The content provider query has fewer specifications than the SQLite query, so the parameters are passed through and the rest is ignored. The instance of the SQLite database is read-only. Because this is only a query for data, it’s acceptable.
Finally, the Cursor needs to know if the source data has changed. This is done by a call to the setNotificationUri() method telling it which URI to watch for data changes. The call to the application’s query() method might be called from multiple threads, as it calls to update(), so it’s possible the data can change after the Cursor is returned. Doing this keeps the data synchronized.
Exploring the UriMatcher Class
The UriMatcher class is a helper class for pattern matching on the URIs that are passed to this content provider. It is used frequently in the implementations of the content provider functions that must be implemented. Here is the UriMatcher used in these sample implementations:
public static final String AUTHORITY =
"com.androidbook.TrackPointProvider"
private static final int TRACKPOINTS = 1;
private static final int TRACKPOINT_ID = 10;
private static final UriMatcher sURIMatcher =
new UriMatcher(UriMatcher.NO_MATCH);
static {
sURIMatcher.addURI(AUTHORITY, "points", TRACKPOINTS);
sURIMatcher.addURI(AUTHORITY, "points/#", TRACKPOINT_ID);
}
First, arbitrary numeric values are defined to identify each different pattern. Next, a static UriMatcher instance is created for use. The code parameter that the constructor wants is merely the value to return when there is no match. A value for this is provided for use within the UriMatcher class itself.
Next, the URI values are added to the matcher with their corresponding identifiers. The URIs are broken up in to the authority portion, defined in AUTHORITY, and the path portion, which is passed in as a literal string. The path can contain patterns, such as the “#” symbol to indicate a number. The “*” symbol is used as a wildcard to match anything.
Implementing the insert() Method
The insert() method is used for adding data to the content provider. Here is a sample implementation of the insert() method:
public Uri insert(Uri uri, ContentValues values) {
int match = sURIMatcher.match(uri);
if (match != TRACKPOINTS) {
throw new IllegalArgumentException(
"Unknown or Invalid URI " + uri);
}
SQLiteDatabase sqlDB = mDB.getWritableDatabase();
long newID = sqlDB.
insert(TrackPointDatabase.TRACKPOINTS_TABLE, null, values);
if (newID > 0) {
Uri newUri = ContentUris.withAppendedId(uri, newID);
getContext()
.getContentResolver().notifyChange(newUri, null);
return newUri;
}
throw new SQLException("Failed to insert row into " + uri);
}
The Uri is first validated to make sure it’s one where inserting makes sense. A Uri targeting a particular row would not, for instance. Next, a writeable database object instance is retrieved. Using this, the database insert() method is called on the table defined by the incoming Uri and with the values passed in. At this point, no error checking is performed on the values. Instead, the underlying database implementation throws exceptions that can be handled by the user of the content provider.
If the insert was successful, a Uri is created for notifying the system of a change to the underlying data via a call to the notifyChange() method of the ContentResolver. Otherwise, an exception is thrown.
Implementing the update() Method
The update() method is used to modify an existing row of data. It has elements similar to the insert() and query() methods. The update is applied to a particular selection defined by the incoming Uri.
public int update(Uri uri, ContentValues values,
String selection, String[] selectionArgs) {
SQLiteDatabase sqlDB = mDB.getWritableDatabase();
int match = sURIMatcher.match(uri);
int rowsAffected;
switch (match) {
case TRACKPOINTS:
rowsAffected = sqlDB.update(
TrackPointDatabase.TRACKPOINTS_TABLE,
values, selection, selectionArgs);
break;
case TRACKPOINT_ID:
String id = uri.getLastPathSegment();
if (TextUtils.isEmpty(selection)) {
rowsAffected = sqlDB.update(
TrackPointDatabase.TRACKPOINTS_TABLE,
values, _ID + "=" + id, null);
} else {
rowsAffected = sqlDB.update(
TrackPointDatabase.TRACKPOINTS_TABLE,
values, selection + " and " + _ID + "="
+ id, selectionArgs);
}
break;
default:
throw new IllegalArgumentException(
"Unknown or Invalid URI " + uri);
}
getContext().getContentResolver().notifyChange(uri, null);
return rowsAffected;
}
In this block of code, a writable SQLiteDatabase instance is retrieved and the Uri type the user passed in is determined with a call to the match() method of the UriMatcher. No checking of values or parameters is performed here. However, to block updates to a specific Uri, such as a Uri affecting multiple rows or a match on TRACKPOINT_ID, java.lang.UnsupportedOperationException can be thrown to indicate this. In this example, though, trust is placed in the user of this content provider.
After calling the appropriate update() method, the system is notified of the change to the URI with a call to the notifyChange() method. This tells any observers of the URI that data has possibly changed. Finally, the affected number of rows is returned, which is information conveniently returned from the call to the update() method.
Implementing the delete() Method
Now it’s time to clean up the database. The following is a sample implementation of the delete() method. It doesn’t check to see whether the user might be deleting more data than they should. You also notice that this is similar to the update() method.
public int delete(Uri uri, String selection, String[] selectionArgs) {
int match = sURIMatcher.match(uri);
SQLiteDatabase sqlDB = mDB.getWritableDatabase();
int rowsAffected = 0;
switch (match) {
case TRACKPOINTS:
rowsAffected = sqlDB.delete(
TrackPointDatabase.TRACKPOINTS_TABLE,
selection, selectionArgs);
break;
case TRACKPOINT_ID:
String id = uri.getLastPathSegment();
if (TextUtils.isEmpty(selection)) {
rowsAffected =
sqlDB.delete(TrackPointDatabase.TRACKPOINTS_TABLE,
_ID+"="+id, null);
} else {
rowsAffected =
sqlDB.delete(TrackPointDatabase.TRACKPOINTS_TABLE,
selection + " and " +_ID+"="+id, selectionArgs);
}
break;
default:
throw new IllegalArgumentException(
"Unknown or Invalid URI " + uri);
}
getContext().getContentResolver().notifyChange(uri, null);
return rowsAffected;
}
Again, a writable database instance is retrieved and the Uri type is determined using the match method of UriMatcher. If the result is a directory Uri, the delete is called with the selection the user passed in. However, if the result is a specific row, the row index is used to further limit the delete, with or without the selection. Allowing this without a specific selection enables deletion of a specified identifier without having to also know exactly where it came from.
As before, the system is then notified of this change with a call to the notifyChange() method of the ContentResolver class. Also as before, the number of affect rows is returned, which we stored after the call to the delete() method.
Implementing the getType() Method
The last method to implement is the getType() method. The purpose of this method is to return the MIME type for a particular Uri that is passed in. It does not need to return MIME types for specific columns of data.
public static final String CONTENT_ITEM_TYPE =
ContentResolver.CURSOR_ITEM_BASE_TYPE +
"/track-points";
public static final String CONTENT_TYPE =
ContentResolver.CURSOR_DIR_BASE_TYPE +
"/track-points";
public String getType(Uri uri) {
int matchType = sURIMatcher.match(uri);
switch (matchType) {
case TRACKPOINTS:
return CONTENT_TYPE;
case TRACKPOINT_ID:
return CONTENT_ITEM_TYPE;
default:
throw new
IllegalArgumentException("Unknown or Invalid URI "
+ uri);
}
}
To start, a couple of MIME types are defined. The Android SDK provides some guideline values for single items and directories of items, which are used here. The corresponding string for each is vnd.android.cursor.item and vnd.android.cursor.dir, respectively. Finally, the match() method is used to determine the type of the provided Uri so that the appropriate MIME type can be returned.
Updating the Manifest File
Finally, you need to update your application’s AndroidManifest.xml file so that it reflects that a content provider interface is exposed to the rest of the system. Here, the class name and the authorities, or what might be considered the domain of the content:// URI, need to be set. For instance, content://com.androidbook.TrackPointProvider is the base URI used in this content provider example, which means the authority is com.androidbook.TrackPointProvider. The following XML shows an example of this:
<provider
android:authorities="com.androidbook.gpx.TrackPointProvider"
android:multiprocess="true"
android:name="com.androidbook.gpx.TrackPointProvider"
</provider>
The value of multiprocess is set to true because the data does not need to be synchronized between multiple running versions of this content provider. It’s possible that two or more applications might access a content provider at the same time, so proper synchronization might be necessary.

We frequently reference notifications that are sent to observers. In Chapter 6, “Working with Notifications,” you learn about notifications that are sent to the device.
Enhancing Applications Using Content Providers
The concept of a content provider is complex and best understood by working through examples. The Pet Tracker applications from Chapter 3 are nice and all, but the application can use some graphics. Wouldn’t it be great if we could include photos for each pet record? Well, let’s do it! There’s only one catch: We need to access pictures provided through another application on the Android system—the Media Store application.
The code examples provided in this section are taken from the PetTracker3 application. This source code for the PetTracker3 application is provided for download on the book’s websites.
In Figure 4.1, you can see the results of extending the previous Pet Tracking projects using the Media Store content provider.
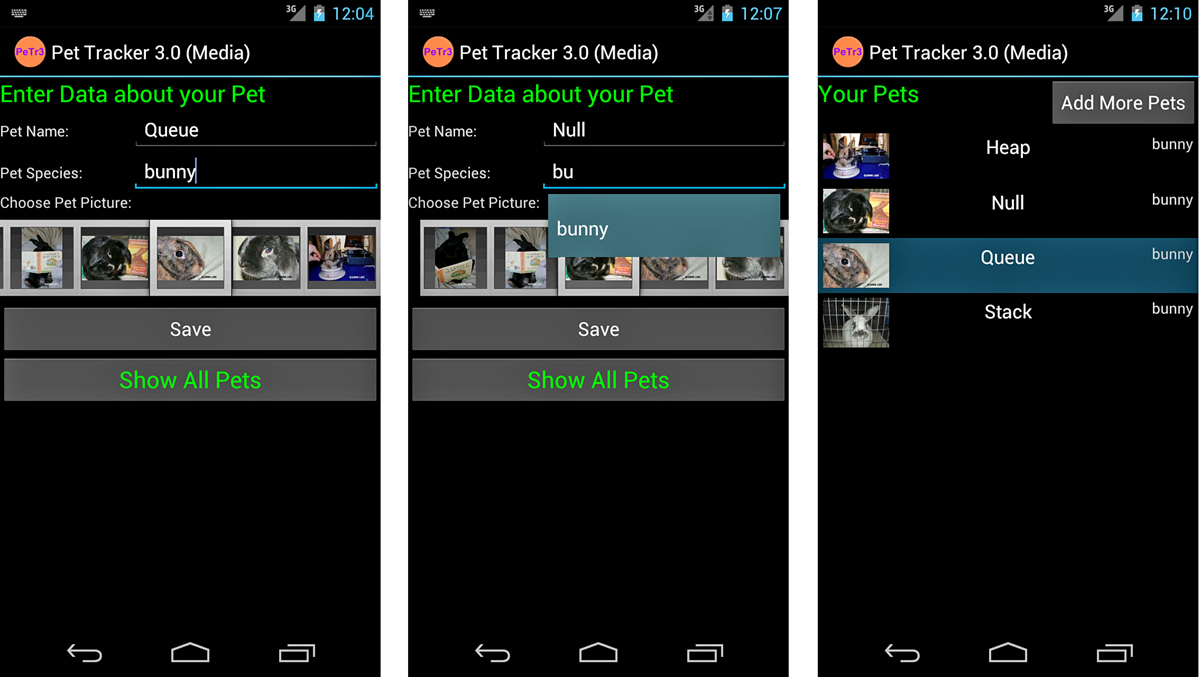
Figure 4.1. The main PetTracker3 application screens: Entry Screen (left, middle) and Pet Listing Screen (right).
Accessing Images on the Device
Now that you can visualize what adding photos looks like, let’s break down the steps needed to achieve this feature. The PetTracker3 application has the same basic structure as our previous Pet Tracker projects, with several key differences:
• On the Pet Entry screen, you can choose a photo from a Gallery control, which displays all the images available on the SD card, or simulated SD card on the emulator, by accessing the MediaStore content provider (Figure 4.1, left).
• On the Pet Listing screen, each picture is displayed in the ListView control (Figure 4.1, right), again using the MediaStore content provider to access specific images.
• On the Pet Listing screen, each item in the ListView (Figure 4.1, right) is a custom layout. The new PetTracker3 sample application provides two methods to achieve this: by inflating a custom layout XML file and by generating the layout programmatically.
• Internally, we extend BaseAdapter on two different occasions to successfully bind pet data to the ListView and Gallery with our own custom requirements.
• Finally, we provide custom implementations of the methods for SimpleCursorAdapter.CursorToStringConverter and FilterQueryProvider to allow the AutoCompleteTextView to bind directly to the internal SQLite database table called pet_types (Figure 4.1, middle), and change the AutoCompleteTextView behavior to match all substrings, not only the beginning of the word. Although we won’t go into detail about this in the subsequent text, check out the sample code for more information on the specific details of implementation.
First, we need to decide where we are going to get our photos. We can take pictures with the built-in camera and access those, but for simplicity’s sake with the emulator (which can only take “fake pictures”), it is easier if we download those cute, fuzzy pictures from the browser onto the SD card and access them that way.
For the PetTracker3 sample application to work, you need to configure your emulator to use a virtual SD card. To keep the code simple and readable, we do not provide error handling for when this is not set up or where there are no images, nor do we check the content type of the media.
After you launch the browser on the emulator, browse to a website, and download some pictures, and then view these photographs in the Gallery application, you’ll know you’ve set things up correctly. (Viewing them in the Gallery creates the thumbnails, so it’s an important step.)
To download an image through the Browser application, select an image to download by long-pressing on the image (clicking and holding with the mouse works), and then selecting the Save Image option. Go ahead and download your own pet (or kid or whatever) images from whatever website you like and save them onto the SD card. If you don’t have pets, kids, or whatever, you can borrow our personal bunny pictures that we use in our example from http://tinyurl.com/geekybuns.
Locating Content on the Android System Using URIs
Most access to content providers comes in the form of queries: a list of contacts, a list of bookmarks, a list of calls, a list of pictures, and a list of audio files. Applications make these requests much as they would access a database, and they get the same type of structured results. The results of a query are often iterated through the use of a cursor. However, instead of crafting queries, we use URIs.
You can think of a URI as an “address” to the location where content exists. URI addresses are hierarchical. Most content providers, such as the Contacts and the MediaStore, have URI addresses predefined. For example, to access thumbnails of the images on the External Media Device (sometimes an SD card, not always user removable), we use the following URI:
Uri thumbnailUri = MediaStore.Images.Thumbnails.EXTERNAL_CONTENT_URI;
Retrieving Content Provider Data with CursorLoader
We can query the Media Store content provider using the URI much like we would query a database. We use a CursorLoader to return a Cursor containing all image media available on the SD card. CursorLoader uses AsyncTask to load data in the background and not block the main thread. Loaders are handled by the LoaderManager object, of which there is an instance available to Activity classes.
Bundle args = new Bundle();
args.putString(GALLERY_CURSOR_URI_ARG, thumbnailUri.toString());
getLoaderManager().initLoader(GALLERY_CURSOR_LOADER_ID, args, this);
Then, you must implement LoaderManager.LoaderCallbacks<Cursor>. We did this as part of the Activity class. The three methods enable you to create the CursorLoader with the appropriate content provider query and set the Cursor on the adapter when the time is ready. (We create the adapter next.)
@Override
public Loader<Cursor> onCreateLoader(int id, Bundle args) {
switch (id) {
case GALLERY_CURSOR_LOADER_ID:
String[] projection =
new String[] { MediaStore.Images.Thumbnails._ID };
Uri thumbnailUri = Uri
.parse(args.getString(GALLERY_CURSOR_URI_ARG));
CursorLoader loader = new CursorLoader(this, thumbnailUri,
projection, null, null,
MediaStore.Images.Thumbnails.DEFAULT_SORT_ORDER
);
return loader;
}
return null;
}
@Override
public void onLoadFinished(Loader<Cursor> cursorLoader, Cursor cursor) {
switch (cursorLoader.getId()) {
case GALLERY_CURSOR_LOADER_ID:
mGalleryAdapter.swapCursor(cursor);
break;
}
}
@Override
public void onLoaderReset(Loader<Cursor> cursorLoader) {
switch (cursorLoader.getId()) {
case GALLERY_CURSOR_LOADER_ID:
mGalleryAdapter.swapCursor(null);
break;
}
}
We configured the CursorLoader to retrieve the records of thumbnail images for each piece of media available on the SD card and do so off the main thread.
Now we have this Cursor, but we still have some legwork to get our Gallery widget to display the individual images.
Although CursorLoader was introduced in API Level 11, it is available for use in the Android support package. This means you can gain its benefits as far back as API Level 4.
Data-Binding to the Gallery Control
We need to extend the CursorAdapter class for a new type of data adapter called ImageUriAdapter to map the URI data we retrieved to the Gallery widget. Our custom ImageUriAdapter maps the Cursor results to the child items in the Gallery widget. Implementing a CursorAdapter means you implement two primary methods and a constructor. The methods are bindView(), which is called when an existing View object is reused with new data and newView(), which is called when a new View object must be created and data assigned to it. The constructor is a good place to cache anything that might be useful in each of these calls, such as column indexes. Here is our implementation of the CursorAdapter:
public class ImageUriAdapter extends CursorAdapter {
private int colIndexMediaId;
private final Uri baseUri;
public ImageUriAdapter(Context context, Cursor c, boolean autoRequery,
Uri baseUri) {
super(context, c, autoRequery);
if (c != null) {
colIndexMediaId = c
.getColumnIndex(MediaStore.Images.Thumbnails._ID);
} this.baseUri = baseUri;
}
@Override
public void bindView(View view, Context context, Cursor cursor) {
long id = cursor.getLong(colIndexMediaId);
Uri imageUri = Uri.withAppendedPath(baseUri, String.valueOf(id));
((ImageView) view).setImageURI(imageUri);
view.setTag(imageUri);
}
@Override
public View newView(Context context, Cursor cursor,
ViewGroup parent) {
ImageView imageView = new ImageView(context);
long id = cursor.getLong(colIndexMediaId);
Uri imageUri = Uri.withAppendedPath(baseUri, String.valueOf(id));
imageView.setImageURI(imageUri);
imageView.setLayoutParams(new Gallery.LayoutParams(
LayoutParams.WRAP_CONTENT, LayoutParams.WRAP_CONTENT));
imageView.setTag(imageUri);
return imageView;
}
}
After all this magic has been implemented, we can set our newly defined custom adapter to the adapter used by the Gallery. The Cursor is null here because it is set by the loader callbacks when the Cursor is finished loading in the background, as handled by the CursorLoader.
ImageUriAdapter iAdapter = new ImageUriAdapter(this,
null, false, thumbnailUri);
final Gallery pictureGal =
(Gallery) findViewById(R.id.GalleryOfPics);
pictureGal.setAdapter(iAdapter);
 A Warning about Bitmap.setImageURI()
The setImageURI() method of the Bitmap object decodes the image from the URI on the main thread. As such, this should never be called on the main thread. Our example here does just that and you’ll quickly find that without further work, StrictMode complains. Also interesting, though, is how StrictMode won’t complain on an orientation change, showing the CursorLoader at work, caching the Cursor object across rotate operations.
Retrieving Gallery Images and Saving Them in the Database
Notice that we added two new columns to our SQLite database: the base URI for the image and the individual image id, which is the unique identifier tacked to the end of the URI. We do not save the image itself in the database, only the URI information to retrieve it.
When the user presses the Save button on the Pet Entry screen, we examine the Gallery item selected and extract the information we require from the Tag property of the selected View, like this:
final Gallery imagePickerGallery =
(Gallery) findViewById(R.id.GalleryOfPics);
ImageView selectedImageView = (ImageView) imagePickerGallery
.getSelectedView();
Uri imageUri = (Uri) selectedImageView.getTag();
String imageUriString = imageUri.toString();
We can then save our Pet Record as we have before.
Summary
Your application can leverage the data available in other Android applications, if they expose that data as a content provider. Applications can also share data among themselves by becoming content providers. Becoming a content provider involves implementing a set of methods that manage how and what data you expose for use in other applications. Content providers are usually backed by data in the form of a private application database.
References and More Information
Android Dev Guide: “Content Providers”:
http://d.android.com/guide/topics/providers/content-providers.html
Android Dev Guide: “Loaders”: