Chapter 12. Assessing System Security
Chapter Objectives
After reading this chapter and completing the exercises, you will be able to do the following:
![]() Evaluate a system’s security.
Evaluate a system’s security.
![]() Scan a system for vulnerabilities.
Scan a system for vulnerabilities.
![]() Evaluate the overall security of a network.
Evaluate the overall security of a network.
![]() Use the “Six Ps” of security.
Use the “Six Ps” of security.
![]() Apply a patch to your system.
Apply a patch to your system.
![]() Document your security.
Document your security.
Introduction
As you learn more about computer security, you will learn new techniques for securing a particular system. However, the ability to assess a system’s security is critical. Before you can begin administering system security, you must have a realistic assessment of the system’s current state of security. This chapter discusses the essential steps that you should follow in assessing a system’s security level. It is very important to assess a system’s security level prior to implementing any security measures. You must be cognizant of the current state of affairs in order to appropriately address vulnerabilities. You should also conduct periodic security audits to ensure that the appropriate level of security is being maintained.
It is also commonplace for security professionals and firms to be contracted to audit a system’s security. Whatever your purpose for assessing a system’s security, you will need to have some framework within which to conduct your review. This chapter gives you an understanding of how to approach such a review, and what to look for.
Evaluating the Security Risk
In Chapter 1 we provided a method for assigning a numeric value to your system’s security risk based on several factors. In this section we will expand upon that system. Recall that we evaluated three aspects of your system:
![]() Attractiveness to attackers
Attractiveness to attackers
![]() Nature of information
Nature of information
![]() Level of security
Level of security
The system being evaluated was given a numeric designation between 1 and 10 for each of these factors. The first two are added together, and then the third number (level of security) is subtracted. The lower the number, the more secure your system; the higher the number the greater your risk. The best rating is for a system that:
![]() Receives a 1 in attractiveness to hackers (i.e., a system that is virtually unknown, has no political or ideological significance, etc.)
Receives a 1 in attractiveness to hackers (i.e., a system that is virtually unknown, has no political or ideological significance, etc.)
![]() Receives a 1 in informational content (i.e., a system that has no confidential or sensitive data on it)
Receives a 1 in informational content (i.e., a system that has no confidential or sensitive data on it)
![]() Receives a 10 in security (i.e., a system with an extensive layered, proactive security system complete with firewalls, ports blocked, antivirus software, IDS, anti-spyware, appropriate policies, all workstations and servers hardened, etc.)
Receives a 10 in security (i.e., a system with an extensive layered, proactive security system complete with firewalls, ports blocked, antivirus software, IDS, anti-spyware, appropriate policies, all workstations and servers hardened, etc.)
This hypothetical system would get a score of 1 + 1 – 10, or -8. That is the lowest threat score possible. Conversely, the worst rating is for a system that:
![]() Receives a 10 in attractiveness (i.e., a well-known system that has a very controversial ideological or political significance)
Receives a 10 in attractiveness (i.e., a well-known system that has a very controversial ideological or political significance)
![]() Receives a 10 in informational content (i.e., a system that contains highly sensitive financial records or classified military data)
Receives a 10 in informational content (i.e., a system that contains highly sensitive financial records or classified military data)
![]() Receives a 1 in security (no firewall, no antivirus, no system hardening, etc.)
Receives a 1 in security (no firewall, no antivirus, no system hardening, etc.)
This system would get a 10 + 10 – 1, or a 19. Such a hypothetical system is, in effect, a disaster waiting to happen. As a systems administrator, you are unlikely to encounter either extreme. Evaluating system attractiveness to hackers is certainly quite subjective. However, evaluating the value of informational content or the level of security can be done with simple metrics.
To evaluate the value of the informational content on your systems, you have to consider the impact of such data being made public. What would be the worst-case scenario of that data being made public? Table 12.1 divides data into categories, based on worst-case impact, and gives examples of types of data that fit that specification.
You can use similar metrics to evaluate the security level of any network. Table 12.2 shows an example.
A few observations about Table 12.2 should be made here. The first is that Level 3 is actually the bare minimum any person should be using. Because both Windows 7 and Linux have built-in firewalls, there is no reason that even a home user would not achieve Level 3. Most organizational networks should be able to get a minimum standard of Level 5 or 6. It should also be noted that you probably will not find networks that fit exactly into one of these levels. However, this chart should give you some guidelines for how to evaluate the security level of these systems.
This system is somewhat simplistic, and parts of it are clearly subjective. It is hoped that this will form a basis for you as you begin working on security for your network. Having numerical values to evaluate your threat level can be a great assistance when assessing your security level. The real issue is that you have some quantifiable method for evaluating the security of a given system. This system is presented to you simply because there are very few similar systems in existence today. Most security evaluations are somewhat subjective. This numerical grading system (which is the invention of this author) is offered as a starting point. You should feel encouraged to expand upon it.
Making the Initial Assessment
Disaster recovery, access rights, and appropriate policies are topics that are often overlooked by those new to security. To keep it simple and easy to remember, the stages of assessing a system’s security can be separated into the “Six Ps”:
![]() Patch
Patch
![]() Ports
Ports
![]() Protect
Protect
![]() Policies
Policies
![]() Probe
Probe
![]() Physical
Physical
The first three are discussed in this section. The fifth — probe — is discussed in the next section, and policies are covered in Chapter 11. You should note that these Six Ps are the invention of this book’s author (just as the numerical grading system was), and are not yet standards in the security industry. They are provided here as a framework for approaching system security.
Patches
Patching a system is perhaps the most fundamental part of security. Therefore, when assessing any system’s security, you should check to see whether a procedure is in place to govern the routine updating of all patches. And you should also, of course, check to see that the machines actually have current patches and updates. A written policy is essential, but when performing a security audit, you need to ensure that those policies are actually being followed.
As you are aware, operating system and application vendors occasionally discover security flaws in their products and release patches to correct these flaws. Unfortunately, it is not uncommon to find organizations in which patches have not been applied as late as 30 days or more after their release.
Applying Patches
Applying patches means that the operating system, database management systems, development tools, Internet browsers, and so on are all checked for patches. In a Microsoft environment this should be easy because the Microsoft Web site has a utility that scans your system for any required patches to the browser, operating system, or office products. It is a very basic tenet of security to ensure that all patches are up-to-date. This should be one of your first tasks when assessing a system. Regardless of the operating system or application vendor, you should be able to go to its Web site and find information regarding how to download and install the latest patches.
Once you have ensured that all patches are up-to-date, the next step is to set up a system to ensure that they are kept up-to-date. One simple method is to initiate a periodic patch review where, at a scheduled time, all machines are checked for patches. There are also automated solutions that will patch all systems in your organization. It is imperative that all machines be patched, not just the servers.
Automated Patch Systems
Manually patching machines can be quite cumbersome, and in larger networks, simply impractical. However, there are automated solutions that will patch all systems on your network. These solutions scan your systems at preset times and update any required patches. A few are listed here:
![]() Windows Update: For systems running Microsoft Windows, you can set up Windows to automatically patch your system. Recent versions of Windows have this turned on automatically. If your system is older, simply go to www.microsoft.com and click on the link on the left-hand side that says “Update Windows.” This will give that individual machine routing updates for the Windows operating system. This approach does have a few shortcomings, the first being that it will only update Windows and not any other applications on your machine. The second drawback is that it does not provide any way to check patches on a test machine before deploying them to the entire network. Its main advantages are that it is free, and integrated with the Windows operating system.
Windows Update: For systems running Microsoft Windows, you can set up Windows to automatically patch your system. Recent versions of Windows have this turned on automatically. If your system is older, simply go to www.microsoft.com and click on the link on the left-hand side that says “Update Windows.” This will give that individual machine routing updates for the Windows operating system. This approach does have a few shortcomings, the first being that it will only update Windows and not any other applications on your machine. The second drawback is that it does not provide any way to check patches on a test machine before deploying them to the entire network. Its main advantages are that it is free, and integrated with the Windows operating system.
![]() HFNetChkPro: This product is available from http://www.petri.co.il/hfnetchk_pro.htm. It automatically administers and manages patches, including rebooting the patched machines. It is sold on a per seat license, with five seats going for about $200 and 100 seats selling for about $2,100.
HFNetChkPro: This product is available from http://www.petri.co.il/hfnetchk_pro.htm. It automatically administers and manages patches, including rebooting the patched machines. It is sold on a per seat license, with five seats going for about $200 and 100 seats selling for about $2,100.
![]() Zen Works Patch Management: This product is available from Novell at http://www.novell.com/products/zenworks/patchmanagement/. If you are currently using a Novell network, then it might make sense for you to also use their patch management software. There is a licensing fee of about $18 per each device to be patched.
Zen Works Patch Management: This product is available from Novell at http://www.novell.com/products/zenworks/patchmanagement/. If you are currently using a Novell network, then it might make sense for you to also use their patch management software. There is a licensing fee of about $18 per each device to be patched.
![]() Lumenison (formerly known as PatchLink): Available from http://www.lumension.com/ this product also manages and automates the patching process. PatchLink uses an agent-based system. This means an intelligent agent is installed on each workstation to manage patching.
Lumenison (formerly known as PatchLink): Available from http://www.lumension.com/ this product also manages and automates the patching process. PatchLink uses an agent-based system. This means an intelligent agent is installed on each workstation to manage patching.
![]() McAfee ePolicy Orchestrator: This product (http://www.mcafee.com/us/products/epolicyorchestrator.aspx) is both interesting and popular. It handles the automated patching of your system, and it includes a number of other features. One interesting feature is that it monitors the network for any devices that are connected to the network that are not set up via ePolicy Orchestrator. This prevents “rogue” machines. In larger organizations people setting up their own machines and servers can be a significant security risk. ePolicy Orchestrator also monitors other aspects of your network defense, including antivirus and firewall software.
McAfee ePolicy Orchestrator: This product (http://www.mcafee.com/us/products/epolicyorchestrator.aspx) is both interesting and popular. It handles the automated patching of your system, and it includes a number of other features. One interesting feature is that it monitors the network for any devices that are connected to the network that are not set up via ePolicy Orchestrator. This prevents “rogue” machines. In larger organizations people setting up their own machines and servers can be a significant security risk. ePolicy Orchestrator also monitors other aspects of your network defense, including antivirus and firewall software.
Other patch management software solutions are available. These four are provided to give you an example of the solutions available and the price range you can expect to pay for them. A simple Internet search using any major search engine should give you several more options you may want to consider.
The choice of patch management system is often affected by other considerations, such as what other software the company uses. For example if you already use McAfee Firewall and antivirus software, then using their patch management system is definitely an option you should seriously consider.
If no automated patch management system is used, then the next best option is scheduled, periodic manual patching. This means that the IT department in that organization has a schedule wherein they routinely scan each machine and update its patches. How frequently this is done is dependent upon the security needs of the organization. Patching quarterly should be considered the absolute minimum for any organization. Monthly is probably appropriate for most businesses. If a higher level of security is desired, then manual patching is probably not the appropriate choice.
Ports
As we have discussed in previous chapters, all communication takes place via some port. This is also true for many virus attacks. Frequently virus attacks will utilize some uncommon port to gain access to your system. Recall that ports 1 through 1024 are assigned and used for well-known protocols. We have examined viruses, Trojan horses, and other dangers that operate on specific port numbers. If those ports are closed, then your vulnerability to these specific attacks is significantly reduced.
Unfortunately some system administrators do not make a policy of closing unused ports. This is probably due to the fact that many administrators think that if the firewall is blocking certain traffic, then there is no need to block that port on individual machines. However, this approach provides you with only perimeter security, not layered security. By closing ports on individual machines, you provide a backup in case the firewall is breached. As a rule, any port you do not explicitly need for operations should be closed, and communication should be disallowed on this port. A port is usually associated with a service. For example an FTP service is often associated with ports 21 and 20. In order to close a port on an individual machine, you would need to shut down the service that uses that port. This means those unused services on servers and individual workstations should be shut down.
Both Windows 7 and Linux have built-in port-filtering capability. Windows 2000 Professional also has port-filtering capability whereas Windows XP has a complete firewall solution built into the operating system. This means in addition to shutting down the particular unneeded services on all client machines, you should also shut down the ports. The end of this chapter has exercises that specifically walk you through closing down services on a Windows 7 Machine. This process would be almost identical for Windows 8, Windows Server 2008, or Windows Server 2012.
You should also shut down any unused router ports in your network. If your network is part of a larger wide area network (WAN), then it is likely you have a router connecting you to that WAN. Every open port is a possible avenue of entry for a virus or intruder. Therefore, every port you can close is one less opportunity for such attacks to affect your system. The specifics of how to close a port on a router are particular to the individual router. The documentation that came with your router or the vendor should be able to provide you with specific instructions for how to accomplish this. If you have a vendor servicing your router, then you should make a list of all required ports and request that the vendor close all other ports on the router.
Protect
The next phase is to ensure that all reasonable protective software and devices are employed. This means at a minimum having a firewall between your network and the outside world. Firewalls were discussed in Chapters 3 and 4. Clearly more advanced firewalls such as stateful packet inspection firewalls are preferred. When auditing a system, you must note not only whether the system has a firewall, but what type of firewall it has.
You should also consider using an intrusion detection system (IDS) on that firewall and any Web servers. An IDS is considered nonessential by some security experts; you can certainly have a secure network without one.
However, they are the only way to know of impending attacks, and there are free, open source IDS available. For that reason, most experts highly recommend them. The firewall and IDS will provide basic security to your network’s perimeter, but you also need virus scanning. Each and every machine, including servers, must have a virus scanner that is updated regularly. The point has already been made that a virus infection is the greatest threat to most networks. As also previously discussed, it is probably prudent to consider anti-spyware software on all of your systems. This will prevent users of your network from inadvertently running spyware on the network.
Finally, a proxy server, also discussed in Chapter 2, is a very good idea. It not only masks your internal IP addresses, but most proxy servers allow you to discover what Web sites users visit and put on filters for certain sites. Many security experts consider a proxy server to be as essential as a firewall.
In addition to protecting your network, you must also protect data that is transmitted, particularly outside your network. All external connections should be made via a VPN. Having data encrypted prevents hackers from intercepting the data via a packet sniffer. For more secure locations you might even look for all internal transmissions to be encrypted as well.
In short, when assessing the protection of the network, check to see whether the following items are present, properly configured, and functioning:
![]() Firewall
Firewall
![]() Antivirus protection
Antivirus protection
![]() Anti-spyware protection
Anti-spyware protection
![]() IDS
IDS
![]() Proxy Server or NAT
Proxy Server or NAT
![]() Data transmissions encryption
Data transmissions encryption
Be aware that the first two items are met in most networks. Any network that does not have a firewall or antivirus software is so substandard that the audit should probably stop at that point. In fact, it is unlikely that such an organization would even bother to have a security audit. The IDS and data encryption options are probably less common; however, they should be considered for all systems.
Physical
In addition to securing your network from unwanted digital access, you must also ensure that it has adequate physical security. The most robustly secure computer that is left sitting unattended in an unlocked room is not at all secure. You must have some policy or procedure governing the locking of rooms with computers as well as the handling of laptops, PDAs, and other mobile computer devices. Servers must be in a locked and secure room with as few people as is reasonably possible having access to them. Backup tapes should be stored in a fireproof safe. Documents and old backup tapes should be destroyed before disposal (e.g., by melting tapes, de-magnetizing hard disks, breaking CDs).
Physical access to routers and hubs should also be tightly controlled. Having the most hi-tech, professional information security on the planet but leaving your server in an unlocked room to which everyone has access is a recipe for disaster. One of the most common mistakes in the arena of physical security is co-locating a router or switch in a janitorial closet. This means that, in addition to your own security personnel and network administrators, the entire cleaning staff has access to your router or switch, and any one of them could leave the door unlocked for an extended period of time.
There are some basic rules you should follow regarding physical security:
![]() Server Rooms: The room where servers are kept should be the most fire-resistant room in your building. It should have a strong door with a strong lock, such as a deadbolt. Only those personnel who actually have a need to go in the room should have a key. You might also consider a server room log wherein each person logs in when they enter or exit the room. There are actually electronic locks that record who enters a room, when they enter, and when they leave. Consult local security vendors in your area for more details on price and availability.
Server Rooms: The room where servers are kept should be the most fire-resistant room in your building. It should have a strong door with a strong lock, such as a deadbolt. Only those personnel who actually have a need to go in the room should have a key. You might also consider a server room log wherein each person logs in when they enter or exit the room. There are actually electronic locks that record who enters a room, when they enter, and when they leave. Consult local security vendors in your area for more details on price and availability.
![]() Workstations: All workstations should have an engraved identifying mark. You should also routinely inventory them. It is usually physically impossible to secure them as well as you secure servers, but you can take a few steps to improve their security.
Workstations: All workstations should have an engraved identifying mark. You should also routinely inventory them. It is usually physically impossible to secure them as well as you secure servers, but you can take a few steps to improve their security.
![]() Miscellaneous Equipment: Projectors, CD burners, laptops, and so forth should be kept under lock and key. Any employee that wishes to use one should be required to sign it out, and it should be checked to see that it is in proper working condition and that all parts are present when it is returned.
Miscellaneous Equipment: Projectors, CD burners, laptops, and so forth should be kept under lock and key. Any employee that wishes to use one should be required to sign it out, and it should be checked to see that it is in proper working condition and that all parts are present when it is returned.
These measures should be considered by all organizations. Some organizations go much further in ensuring physical security, and we will list some of the more extreme measures here. Most are probably more extreme than businesses require. However if you deal with highly sensitive or classified data, then you might want to consider some or all of these measures.
![]() Biometric locks to all server rooms, or equipment storage rooms. Such locks are triggered by a fingerprint scan, and the identity of the person as well as the time they entered the room are recorded.
Biometric locks to all server rooms, or equipment storage rooms. Such locks are triggered by a fingerprint scan, and the identity of the person as well as the time they entered the room are recorded.
![]() All visitors to the building are logged in (both their entry and exit time) and are escorted by an employee at all times.
All visitors to the building are logged in (both their entry and exit time) and are escorted by an employee at all times.
![]() All bags are inspected when personnel leave, or at least some bags are inspected at random.
All bags are inspected when personnel leave, or at least some bags are inspected at random.
![]() No portable devices that might record data are allowed on the premises. This includes USB drives, camera phones, or any device that might copy data or record screen images.
No portable devices that might record data are allowed on the premises. This includes USB drives, camera phones, or any device that might copy data or record screen images.
![]() All printing is logged. Who printed, the time the printing occurred, the document name, and the document size.
All printing is logged. Who printed, the time the printing occurred, the document name, and the document size.
![]() All copying is logged, similarly to printing.
All copying is logged, similarly to printing.
If you are in a situation that demands a greater than normal security level, these measures may be considered.
Probing the Network
Perhaps the most critical step in assessing any network is to probe the network for vulnerabilities. This means using various utilities to scan your network for vulnerabilities. Some network administrators skip this step. They audit policies, check the firewall logs, check patches, and so on. However, the probing tools discussed in this section are the same ones that most hackers use. If you want to know how vulnerable your network is, it is prudent to try the same tools that an intruder would use. In this section we review the more common scanning/probing tools. There are essentially three types of probes that are usually done. These are the same types of probes that skilled hackers use to evaluate your network:
![]() Port scanning: This is a process of scanning the well-known ports (there are 1024) or even all the ports (there are 65,535) and seeing which ports are open. Knowing what ports are open tells a lot about a system. If you see that 160 and 161 are open that tells you that the system is using SNMP. From the perspective of a network administrator, there should be no ports open that are not necessary.
Port scanning: This is a process of scanning the well-known ports (there are 1024) or even all the ports (there are 65,535) and seeing which ports are open. Knowing what ports are open tells a lot about a system. If you see that 160 and 161 are open that tells you that the system is using SNMP. From the perspective of a network administrator, there should be no ports open that are not necessary.
![]() Enumerating: This is a process whereby the attacker tries to find out what is on the target network. Items such as user accounts, shared folders, printers, and so on are sought after. Any of these might provide a point of attack.
Enumerating: This is a process whereby the attacker tries to find out what is on the target network. Items such as user accounts, shared folders, printers, and so on are sought after. Any of these might provide a point of attack.
![]() Vulnerability assessment: This is the use of some tool to seek out known vulnerabilities, or the attacker might try to manually assess vulnerabilities. Some outstanding tools are available for vulnerability assessment.
Vulnerability assessment: This is the use of some tool to seek out known vulnerabilities, or the attacker might try to manually assess vulnerabilities. Some outstanding tools are available for vulnerability assessment.
A number of tools are freely available on the Internet for active scanning. They range from the simple to the complex. Anyone involved in preventing or investigating computer crimes should be familiar with a few of these.
NetCop
The first scanner we will examine is NetCop. This particular scanner is not necessarily the most widely used in the security or hacking communities, but it is easy to use and therefore makes a very good place for us to start. This utility can be obtained from many sites, including http://download.cnet.com/windows/netcop-software/3260-20_4-112009.html. When you download NetCop, you get a simple self-extracting executable that will install the program on your machine and will even place a shortcut in your program menu. Launching NetCop brings up the screen shown in Figure 12.1. As you can see from this image, this scanner is relatively simple and intuitive to use.
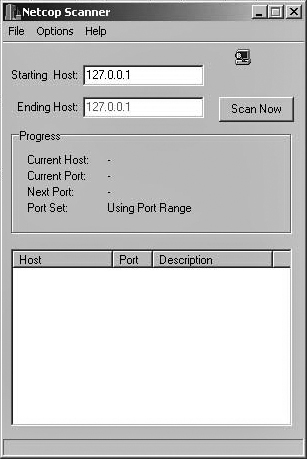
The first selection you make is how to scan the IP address. You can either choose to scan a single IP address or a range of IP addresses. The latter option makes this tool particularly useful for network administrators who want to check for open ports on their entire network. For our purposes we will begin by scanning a single IP address, our own machine. To follow along on your own computer, you will need to type in your machine’s IP address. You can either type your machine’s actual IP address or simply the loop back address (127.0.0.1). When you type in a single IP address and click on Scan Now, you can watch the display showing that it is checking each and every port, as shown in Figure 12.2. This is very methodical but also a bit slow.
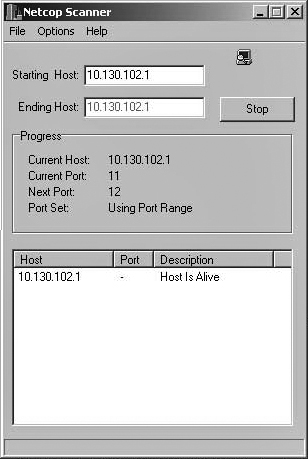
You can stop the scan if you wish to do so; however, if you let the scan run through all of the ports, you will then see something similar to what is shown in Figure 12.3. Of course, different machines you examine will have different ports open. That is the entire point of scanning, to find out which ports are open.
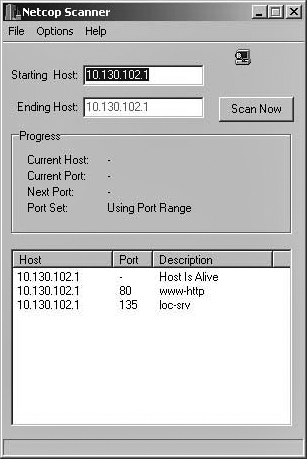
Finding out which ports are open on a given machine is only half the battle. It is important that you know what each port is used for, and which ones you can shut down without negatively impacting the machine’s purpose.
Over time you will probably memorize several commonly used ports. For a complete list of all ports, you can check any of these Web sites:
![]() www.networksorcery.com/enp/protocol/ip/ports00000.htm
www.networksorcery.com/enp/protocol/ip/ports00000.htm
![]() www.iana.org/assignments/port-numbers
www.iana.org/assignments/port-numbers
Consider what sort of information these ports tell you. Machines running port 80 are probably Web servers. But other ports can give a hacker even more useful information. For example, ports 137, 138, and 139 are used by NetBios, which is most often associated with older versions of Windows. If an intruder realizes that the target machine is using an older version of Windows, she knows she can exploit flaws that have been corrected in newer versions. Other ports can indicate if the target machine is running a database server, e-mail server, or other vital services. This information not only helps hackers to compromise systems, but also helps them identify information-rich targets.
If you are working within an organizational structure, the best course of action is to make a list of all open ports and identify which ones you believe are required for operations and which ones are not. You should then forward that list to relevant parties such as other network administrators, the IT manager, and the security manager. Give them a chance to identify any additional ports that may be needed. Then you can proceed to close all the ports not needed.
NetBrute
Some port scanners do more than simply scan for open ports. Some also give you additional information. One such product is NetBrute from RawLogic, located at www.rawlogic.com/netbrute/. This one is quite popular with both the security and hacker community. No computer security professionals should be without this item in their tool chests. This utility will give you open ports, as well as other vital information. Once you install and launch NetBrute, you will see a screen such as the one depicted in Figure 12.4.
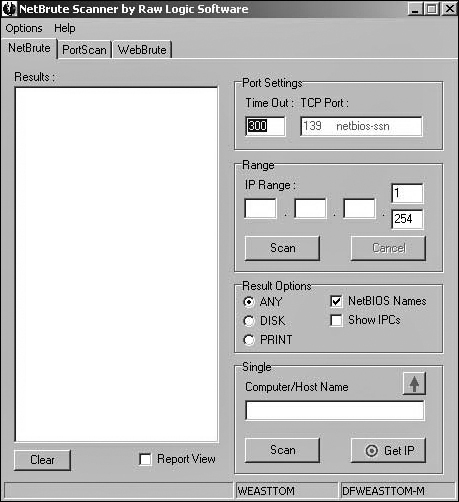
As you can see in Figure 12.4, there are three tabs. We will concentrate on the NetBrute tab first. You can elect to scan a range of IP addresses (perfect for network administrators assessing the vulnerability of their own systems), or you can choose to target an individual IP. When you are done, it will show you all the shared drives on that computer, as you see in Figure 12.5.
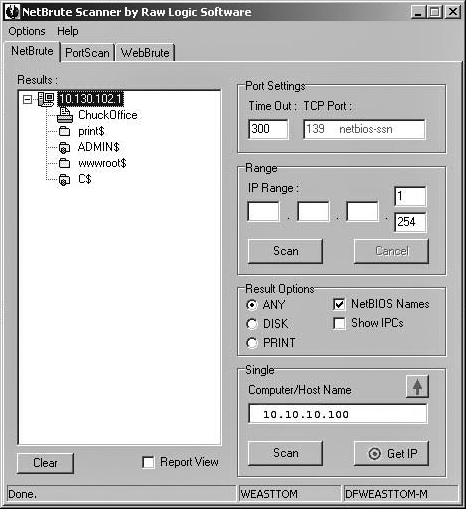
Shared folders and drives are important to security because they provide one possible way for a hacker to get into a system. If the hacker can gain access to that shared folder, she can use that area to upload a Trojan horse, virus, key logger, or other device. The rule on shared drives is simple: If you don’t absolutely need them, then don’t have them. Any drive or folder can be shared or not shared. Unless you have a compelling reason to share a drive, you should not. And if you do decide to share it, then the details of that shared drive—including content and reason for sharing it—should be in your security documentation.
With the PortScan tab, you can find ports. It works exactly like the first tab except that instead of giving you a list of shared folders/drives, it gives you a list of open ports. Thus, with NetBrute, you get a port scanner and a shared folder scanner. In essence the second tab contains the most pertinent information you might obtain from other products such as NetCop.
When scanning your own network, these first two tabs will be the most important. However if you wish to check the security of your Web server you would want to use the WebBrute tab. The WebBrute tab allows you to scan a target Web site and obtain information similar to what you would get from Netcraft. This scan gives you information such as the target system’s operating system and Web server software.
NetBrute is easy to use and provides most of the basic information you might need. The ability to track shared folders and drives in addition to open ports is of particular use. This tool is widely used by hackers as well as security professionals.
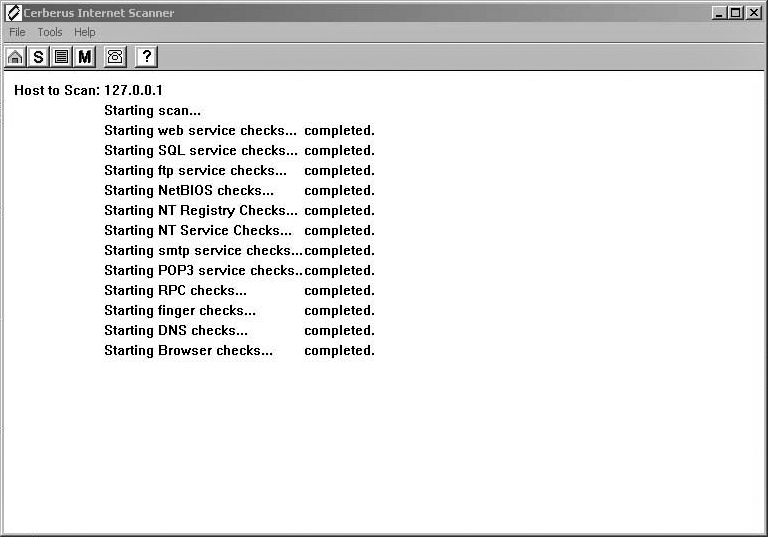
Cerberus
One of the most widely used scanning utilities, and a personal favorite of this author, is the Cerberus Internet Scanner, available as a free download from http://www.cerberusftp.com/download/ (alternative download locations are listed in the Appendices at the back of this book, or you can simply do a web search for Cerberus with your favorite search engine). This tool is remarkably simple to use and very informative. When you launch this tool, you will see a screen like the one shown in Figure 12.6.

From this screen you can click on the button on the far left that has an icon of a house. Or you can go to File and select Host. You then simply key in either the URL or the IP address of the machine that you wish to scan. Click either the button with the “S” on it or go to File and select Start Scan. Cerberus will then scan that machine and give you a wealth of information. You can see in Figure 12.7 all the various categories of information that you get from this scan.
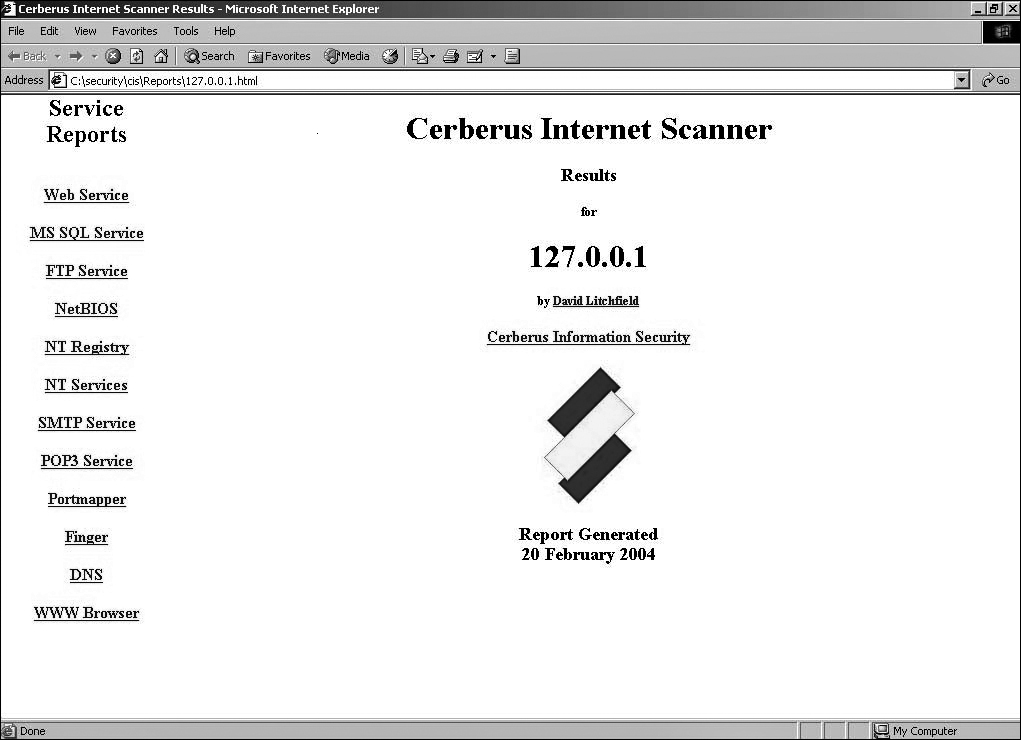
Click on the third button to review the report. The report will launch a Hypertext Markup Language (HTML) document (thus the document is easy to save for future reference) with links to each category. Click on the category you wish to view. As a rule you should save all such security reports for future audits. In the event of litigation it may be necessary for you to verify that you were practicing due diligence in implementing and auditing security. It is also important to document these activities as a part of the record of security precautions you take. This documentation could be crucial in the case of any external audit or even in helping a new IT security professional get up to speed on what actions have already been taken. This information should be stored in a secure location, as it is of great value to someone wishing to compromise your system security. An example of the report is shown in Figure 12.8.
One of the most interesting sections to review, particularly for a security administrator, is the NT Registry report. This report will examine the Windows Registry and inform you of any security flaws found there and how to correct them. This report is shown in Figure 12.9.
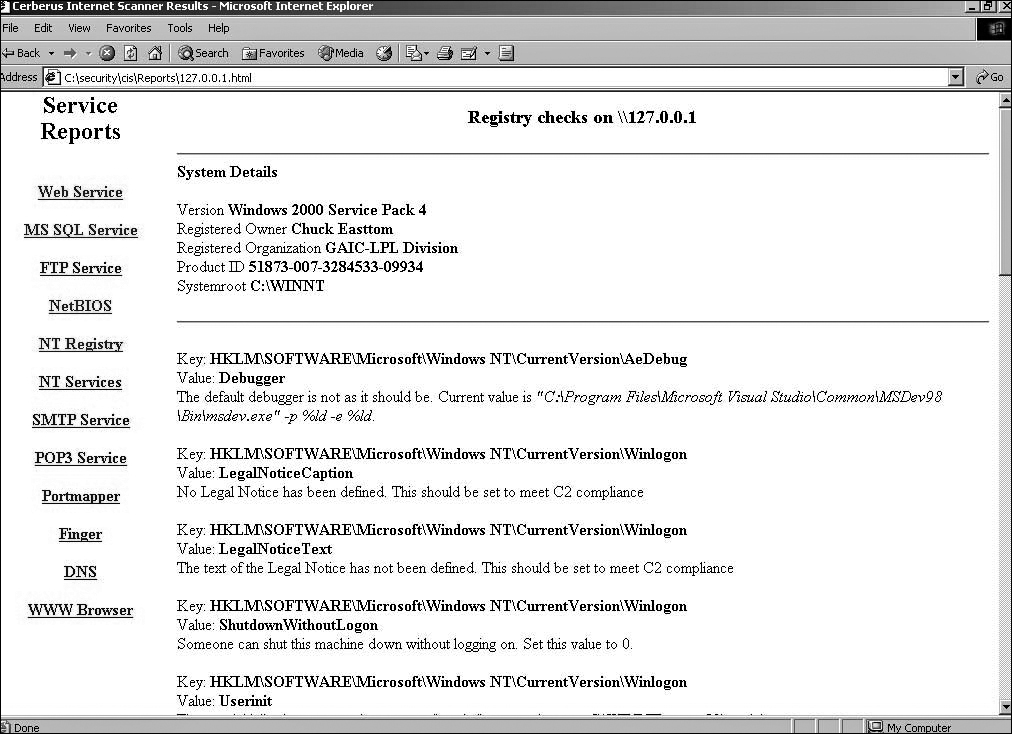
This list shows specific Windows Registry settings, why those settings are not particularly secure, and what you can do to secure them. For obvious reasons, this tool is very popular with hackers. Cerberus can provide a great map of all of a system’s potential vulnerabilities including, but not limited to, shared drives, insecure registry settings, services running, and known flaws in the operating system.
You may have noted that more detail was given on Cerberus than some of the other scanners. This is for two reasons. The first is that this particular scanner gives more information than most port scanners. The second reason is that this scanner is a particular favorite of the author. My recommendation to you is that if you have to go with just one scanner, this is the one. NOTE: Cerberus is also available for Android https://www.cerberusapp.com/download.php.
Port Scanner for Unix: SATAN
One tool that has been quite popular for years with Unix administrators (as well as hackers) is SATAN. This tool is not some diabolical supernatural entity, but rather an acronym for Security Administrator Tool for Analyzing Networks. It can be downloaded for free from any number of Web sites. Many of these sites are listed at http://linux.softpedia.com/progDownload/SATAN-Download-23306.html. This tool is strictly for Unix and does not work in Windows.
SATAN was created by Dan Farmer, author of COPS (Computer Oracle and Password System) and Wietse Venema and from the Eindhoven University of Technology in the Netherlands. It was originally released on April 5, 1995. It should be noted that SATAN, as well as many other probing tools, was originally used by hackers to find out about a target system. Over time, the more creative network administrators began to use these tools for their own purposes. Clearly if you wish to protect your system against intruders, it can be quite helpful to try the same tools that intruders use.
The user can enter either a single machine or an entire domain of machines to attack. There are three classes of attacks:
![]() Light: A light attack simply reports what hosts are available and what Remote Procedure Call services those hosts are running.
Light: A light attack simply reports what hosts are available and what Remote Procedure Call services those hosts are running.
![]() Normal: A normal attack probes the targets by establishing various connections including telnet, FTP, WWW, gopher, and SMTP. These are used to discover what operating system the host is running and what vulnerabilities may be available.
Normal: A normal attack probes the targets by establishing various connections including telnet, FTP, WWW, gopher, and SMTP. These are used to discover what operating system the host is running and what vulnerabilities may be available.
![]() Heavy: A heavy attack includes everything that a normal attack does with the addition of a search for several other known vulnerabilities, such as writable anonymous FTP directories or trusted hosts.
Heavy: A heavy attack includes everything that a normal attack does with the addition of a search for several other known vulnerabilities, such as writable anonymous FTP directories or trusted hosts.
The history of this particular product is quite illuminating. It began with the work of two computer scientists, Dan Farmer of Sun Microsystems and Wietse Venema of Eindhoven University of Technology. Together they published a paper entitled “Improving the Security of Your Site by Breaking Into It” (http://www.csm.ornl.gov/~dunigan/cracking.html). In it, they discussed using hacking techniques to attempt to break into your own system and thereby discover its security flaws. In the process of writing this paper, they developed the SATAN tool in order to aid network administrators in carrying out the recommendations of their paper. This means SATAN is the product of computer scientists working to improve computer security. It is not a commercial product and can be freely downloaded from numerous Web sites.
SAINT®
SAINT (Security Administrator’s Integrated Network Tool) is a network vulnerability assessment scanner (http://www.saintcorporation.com/) that scans a system and finds security weaknesses. It prioritizes critical vulnerabilities in the network and recommends safeguards for your data. SAINT can benefit you in several ways:
![]() Prioritized vulnerabilities let you focus your resources on the most critical security issues. This is probably the most distinctive feature of SAINT.
Prioritized vulnerabilities let you focus your resources on the most critical security issues. This is probably the most distinctive feature of SAINT.
![]() Fast assessment results help you identify problems quickly.
Fast assessment results help you identify problems quickly.
![]() Highly configurable scans increase the efficiency of your network security program.
Highly configurable scans increase the efficiency of your network security program.
![]() It allows network administrators to design and generate vulnerability assessment reports quickly and easily. Such reports are particularly useful when conducting audits.
It allows network administrators to design and generate vulnerability assessment reports quickly and easily. Such reports are particularly useful when conducting audits.
![]() The product is automatically updated whenever a scan is run.
The product is automatically updated whenever a scan is run.
This product is newer than Cerberus and SATAN, and is gaining widespread acceptance in both the hacking and security communities.
Nessus
Nessus, or the “Nessus Project,” is another extremely powerful network scanner. It is open source and can be downloaded from www.nessus.org. Nessus is fast and reliable, with a modular architecture that allows you to configure it to your needs. Nessus works on Unix-like systems (MacOS X, FreeBSD, Linux, Solaris, and more) and also has a Windows version (called NeWT).
Nessus includes a variety of plug-ins that can be enabled, depending on the type of security checks you want to perform. These plug-ins work cooperatively with each test specifying what is needed to proceed with the test. For example, if a certain test requires a remote FTP server and a previous test showed that none exists, that test will not be performed. Not performing futile tests speeds up the scanning process. These plug-ins are updated daily and are available from the Nessus Web site.
The output from a Nessus scan of a system is incredibly detailed, and there are multiple formats available for the reports. These reports give information about security holes, warnings, and notes. Nessus does not attempt to fix any security holes that it finds. It simply reports them and gives suggestions for how to make the vulnerable system more secure.
Some security professionals complain that Nessus can give false positives. This means it can report a problem where there is none. This product is also not as widely used as Cerberus, SATAN, or some of the other scanners we have examined.
NetStat Live
One of the most popular protocol monitors is NetStat, which ships free with Microsoft Windows. A version of this, NetStat Live (NSL), is freely available on the Internet from a variety of sites, such as www.analogx.com/contents/download/network/nsl.htm. This product is an easy-to-use TCP/IP protocol monitor that can be used to see the exact throughput on both incoming and outgoing data whether you are using a modem, cable modem, DSL, or a local network. It allows you to see the speed at which your data goes from your computer to another computer on the Internet. It even tells you how many other computers your data must go through to get to its destination. NSL also graphs the CPU usage of a system. This can be especially useful if, for example, you are experiencing slowed connection speeds. It can identify whether your computer or your Internet connection is the reason for the slowdown.
The NetStat Live screen is shown in Figure 12.10. This display shows the last 60 seconds of data throughput. It displays the average datarate, the total amount of data sent since last reboot, and the maximum datarate. It tracks these for all incoming and outgoing messages.
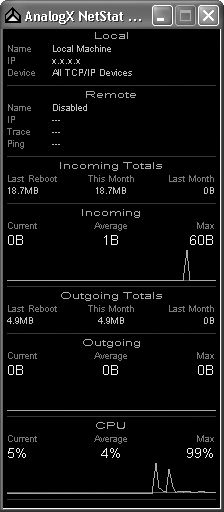
To enable or disable a pane, simply right-click on the window, choose Statistics, and then place a check next to any statistics that you would like to see. Your choices are:
![]() Local Machine. The current machine name, IP address, and network interface being monitored
Local Machine. The current machine name, IP address, and network interface being monitored
![]() Remote Machine. The remote machine, including average ping time and number of hops
Remote Machine. The remote machine, including average ping time and number of hops
![]() Incoming Data. Data on the incoming (download) channel
Incoming Data. Data on the incoming (download) channel
![]() Incoming Totals. Totals for the incoming data
Incoming Totals. Totals for the incoming data
![]() Outgoing Data. Data on the outgoing (upload) channel
Outgoing Data. Data on the outgoing (upload) channel
![]() Outgoing Totals. Totals for the outgoing data
Outgoing Totals. Totals for the outgoing data
![]() System Threads. Total number of threads currently running in the system
System Threads. Total number of threads currently running in the system
![]() CPU Usage. Graphs the CPU load
CPU Usage. Graphs the CPU load
Notice that the Remote section has a machine listed and some information pertaining to it. You can easily change the server for which you are gathering information. Simply open your Web browser, go to a Web page, and copy the URL (including “http://”) into the clipboard (by using Ctrl+C). When you return to viewing NSL, you will see that the server has been replaced with information on the site to which you browsed. One of the most important reasons to use NetStat or NetStat Live is to find out what the normal traffic flow is to a given server (or your entire network). It is difficult to determine whether abnormal activity is taking place if you do not know the characteristics of normal activity.
In Practice: When Doing an Audit
![]() A documented patch maintenance program
A documented patch maintenance program
![]() A documented change control process
A documented change control process
![]() A diagram of the entire network, complete with details of what is on each machine. This documentation must be secured and not generally available to unauthorized people.
A diagram of the entire network, complete with details of what is on each machine. This documentation must be secured and not generally available to unauthorized people.
![]() Documentation of the security training/certifications of the network staff
Documentation of the security training/certifications of the network staff
![]() Ongoing in-house security training
Ongoing in-house security training
![]() Routine review of security literature, journals, and Web sites
Routine review of security literature, journals, and Web sites
![]() Very limited or outdated documentation
Very limited or outdated documentation
![]() Unsecured network documentation that is easy for unauthorized personnel to get to
Unsecured network documentation that is easy for unauthorized personnel to get to
![]() Overly vague security policies
Overly vague security policies
![]() Security policies that do not mention any negative outcome for violations
Security policies that do not mention any negative outcome for violations
![]() Lack of logs (Most changes—database, server, security, etc.—should be logged.)
Lack of logs (Most changes—database, server, security, etc.—should be logged.)
Active Ports
Active Ports is another easy-to-use scanning tool for Windows. You can download it for free from http://www.majorgeeks.com/files/details/active_ports.html. This program enables you to monitor all open TCP and UDP ports on the local computer. Figure 12.11 shows the main screen of Active Ports. Active Ports maps ports to the owning application so you can watch which process has opened which port. It also displays a local and remote IP address for each connection and allows you to terminate the process that is using that port.
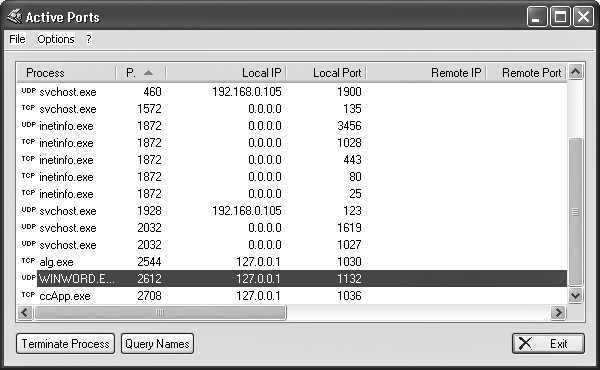
Active Ports lacks some of the features you would find in more advanced tools such as Cerberus or SATAN. It is a good place to start, though, especially if you have no experience port scanning at all.
Other Port Scanners
There are many more port scanners and security tools available on the Internet, a few of which are listed here:
![]() Like Active Ports, Fport reports all open TCP/IP and UDP ports and maps them to the owning application. Additionally, it maps those ports to running processes. Fport can be used to quickly identify unknown open ports and their associated applications. This product is available at http://www.mcafee.com/us/downloads/free-tools/fport.aspx.
Like Active Ports, Fport reports all open TCP/IP and UDP ports and maps them to the owning application. Additionally, it maps those ports to running processes. Fport can be used to quickly identify unknown open ports and their associated applications. This product is available at http://www.mcafee.com/us/downloads/free-tools/fport.aspx.
![]() TCPView is a Windows program that will show you detailed listings of all TCP and UDP endpoints on your system, including the remote address and the state of TCP connections. TCPView provides a conveniently presented subset of the NetStat program.
TCPView is a Windows program that will show you detailed listings of all TCP and UDP endpoints on your system, including the remote address and the state of TCP connections. TCPView provides a conveniently presented subset of the NetStat program.
![]() SuperScan is a port scanner originally from Foundstone Inc, now distributed by McAffee. It is available as a free download at http://www.mcafee.com/us/downloads/free-tools/superscan.aspx/. This particular scanner gives its report in HTML format. What is most interesting about SuperScan is the wide variety of tools also available at that same Web site, including tools that scan for any number of very specific vulnerabilities. Exploring this Web site is well worth your time.
SuperScan is a port scanner originally from Foundstone Inc, now distributed by McAffee. It is available as a free download at http://www.mcafee.com/us/downloads/free-tools/superscan.aspx/. This particular scanner gives its report in HTML format. What is most interesting about SuperScan is the wide variety of tools also available at that same Web site, including tools that scan for any number of very specific vulnerabilities. Exploring this Web site is well worth your time.
The specific port scanner you use is often more a matter of personal preference than anything else. The best approach is to use three or four separate scanners to ensure that you are checking all the possible vulnerabilities. Using more than three or four scanners provides limited incremental benefits and can be very time consuming. I would definitely recommend that Cerberus be one of the scanners you use. You may also wish to fully test your password with some of the password crackers we mentioned in Chapter 6 to ensure that your passwords cannot be easily cracked.
More security savvy network administrators will use these tools on their servers, just to check security. Full-time security professionals should try to stay abreast of trends in the hacking community, and may even use the same tools as hackers. This is a proactive and important step for a network administrator to take.
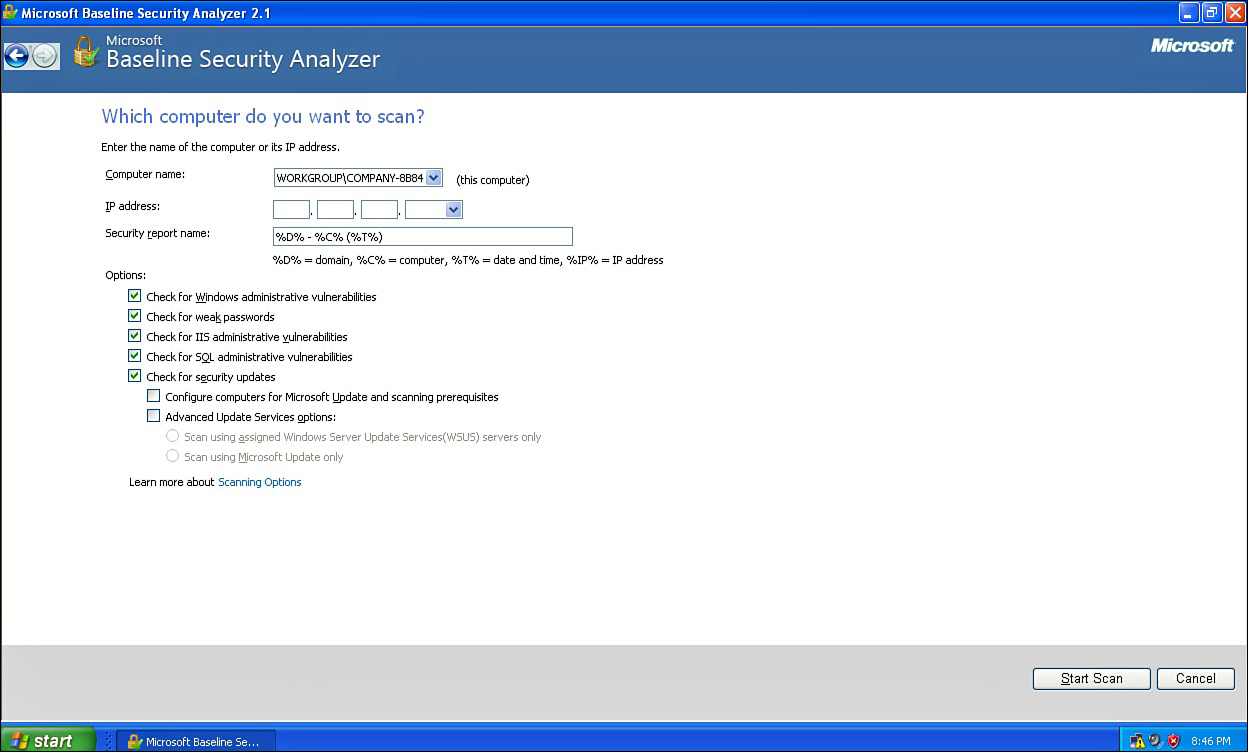
Microsoft Security Baseline Analyzer
The Microsoft Security Baseline Analyzer is certainly not the most robust vulnerability assessment tool, but it has a remarkably easy-to-use interface and it is free (see Figure 12.12). This tool is available from http://technet.microsoft.com/en-us/security/cc184923.aspx.

You can choose to scan one machine or many, and you can select which vulnerabilities you want to scan for, as shown in Figure 12.13.
When the scan completes, a complete report appears to the user, shown in Figure 12.14.
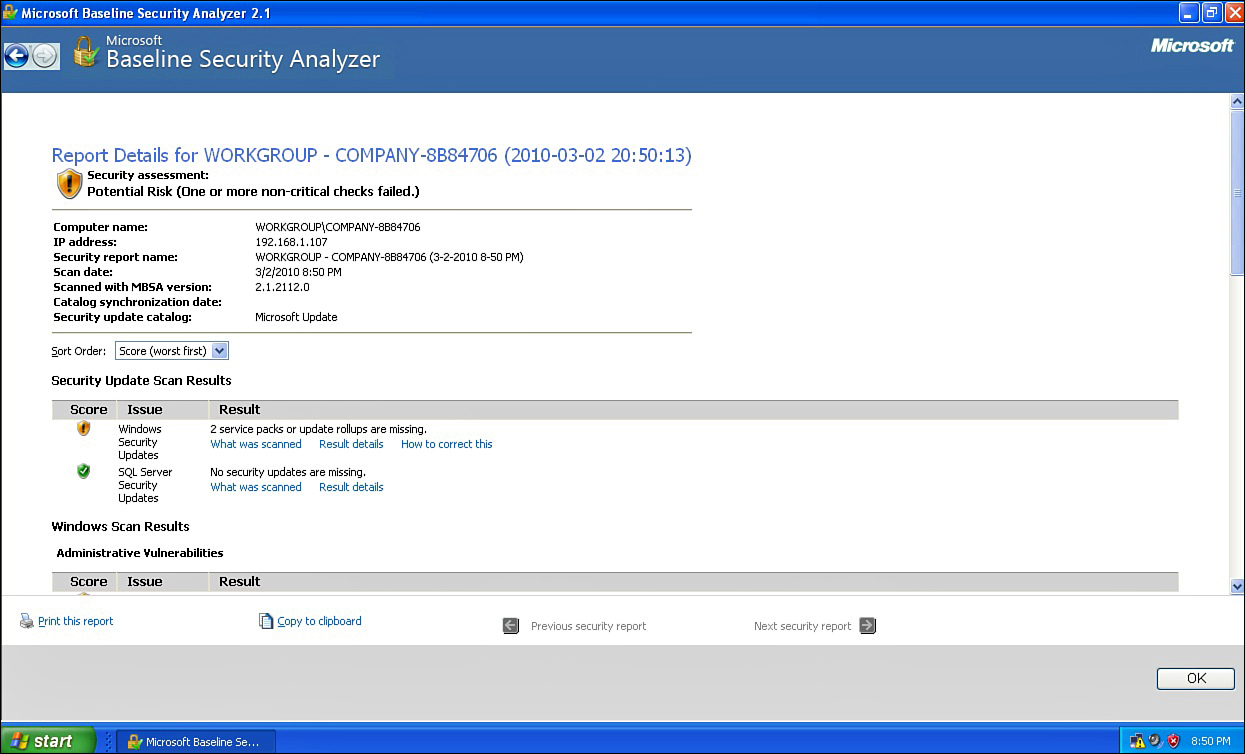
As you can see this easy-to-use tool gives you a clear overview of not only a given system’s vulnerabilities, but also specific details. This should make it easy for an attacker to exploit those vulnerabilities, but would also make it easy for you to correct them. This is the sort of tool someone might use to find possible attack vectors into your system but is also an excellent tool for system administrators to use to check their system for vulnerabilities.
NSAudit
The NSAudit tool offers basic system enumeration. If you look under Tools, you see the Enumerate Computers button, shown in Figure 12.15.

Click it to see a number of choices as to what you want to enumerate, as shown in Figure 12.16

You have a number of choices: You can enumerate all computers, or just the domain controller, or servers, or MS SQL database servers. When you run the enumerator the output is in XML format as shown in Figure 12.17.
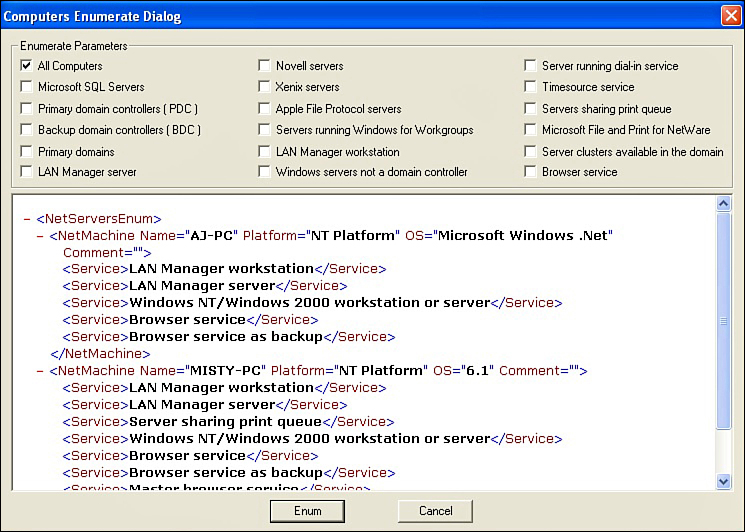
You can see that a great deal of information is provided about every computer on that network. You get a list of all the computers on the network, and then you can see what services they are running. Any running service is a potential attack vector.
Security Documentation
Throughout this chapter, and this book, we have frequently mentioned security documentation. By this point you are undoubtedly aware that you need to document your security. However you may not be clear as to exactly what documents you should have. Unfortunately this is an area of network securities for which there are not firm industry standards. There is no manual on documentation.
In this section we will explore some essential documents you should have, and what they should contain. To make this simpler, many of these documents relate directly to the aforementioned Six Ps of security.
Physical Security Documentation
You should have a document that lists physical security that is in place. Where are the machines located? This means documenting the location of every single server, workstation, router, hub, or other device. The documentation should contain serial numbers as well as what personnel have access to them. If a device is in a locked room, then the documentation should also have a list of who has keys to that room.
If you log entry to secured rooms, then copies of those logs should be filed with your other physical documentation. In even a medium-sized network this would quickly become a rather hefty file rather than a single document. You may consider implementing some method whereby after a certain period of time (1 year, for example) the access logs are archived, then after a longer period of time (such as 3 years) they are destroyed.
Policy and Personnel Documentation
All policies must be on file. Any revisions should be filed along with the originals. Assuming you have employees sign an agreement stating they are aware of the policies (and you absolutely should), then copies of that should also be on file.
Along with policy documentation, you should keep a list of personnel along with what items they have access to. This includes physical access as well as any machines (servers, workstations, or routers) that they have login rights to. You should also note what level of access they have (standard user, power user, administrator, and so on).
Probe Documents
Any time you conduct any security audit, a report of that audit should be filed. Even audits done by outside consultants should be kept on file. The audit report should include any flaws found, and have a follow-up report of what steps were taken to correct them.
Should you have a security incident (such as a virus infection or intruder), there should be at least a brief memo summarizing what occurred. That document should state what the security incident was, when it occurred, what machines were affected, and how it was corrected.
Network Protection Documents
The most obvious item to document is exactly what network protections you have in place. This documentation should detail the following:
![]() What firewall are you using and how is it configured?
What firewall are you using and how is it configured?
![]() What IDS are you using and how is it configured?
What IDS are you using and how is it configured?
![]() What antivirus and/or anti-spyware are you using?
What antivirus and/or anti-spyware are you using?
![]() Have you configured any honey pots?
Have you configured any honey pots?
![]() What individual machine security measures (such as workstation firewalls) have you taken?
What individual machine security measures (such as workstation firewalls) have you taken?
Summary
Periodic security audits must be a part of any proper security plan. The audit must include the following steps, at a minimum:
![]() Check for appropriate security policies.
Check for appropriate security policies.
![]() Check to see that all systems have updated patches for the operating system and applications. Also check to see whether a patch management plan is in place and documented.
Check to see that all systems have updated patches for the operating system and applications. Also check to see whether a patch management plan is in place and documented.
![]() Check physical security.
Check physical security.
![]() Probe the system using port scanners and other software to detect and correct any flaws.
Probe the system using port scanners and other software to detect and correct any flaws.
![]() Document the specific steps taken in the security audit, any flaws found, and any corrective actions that were taken or are recommended.
Document the specific steps taken in the security audit, any flaws found, and any corrective actions that were taken or are recommended.
Test Your Skills
Multiple Choice Questions
1. Which of the following scanners provides information regarding the target system’s registry?
A. Cerberus
B. NetCop
C. NetBrute
D. Active Ports
2. What is the minimum level of security (using the chapter’s 1–10 scale) that any organizational network should have?
A. 1
B. 3
C. 5
D. 7
3. Which of the following is the most fundamental aspect of security?
A. Shutting down unused services
B. Implementing an IDS
C. Patching the operating system
D. Conducting periodic security audits
4. What is the best device, method, or technique to help you be aware of attacks in progress?
A. Server logs
B. Firewall logs
C. IDS
D. NAT
5. VPNs should be used for what type of communications?
A. All external connections to your network
B. All external connections that might transmit sensitive data
C. All internal communications
D. All internal communications that might transmit sensitive data
6. What is not a primary reason for documenting your security activities and audits?
A. To prove due diligence in case of litigation
B. To provide information in case of any external or internal audit
C. To get new personnel up to speed on the current state of security
D. To demonstrate how much work the network administrators actually do
7. Which of the following is the least necessary security device/software?
A. Firewall at the perimeter
B. Anti-spyware on all machines
C. Antivirus on all machines
D. Encryption for all internal transmissions
8. How should used media be disposed of?
A. It should not be. It should be archived.
B. It should be disposed of normally after 5 years.
C. It should be destroyed thoroughly prior to disposal.
D. It should be archived and never destroyed if it contains sensitive data.
9. Which of the following utilities can reveal shared drives on a system?
A. NetCop
B. NetBrute
C. NetGuard
D. NetMaster
10. Which of the following scanners provides information about the Windows Registry?
A. NetCop
B. SATAN
C. Cerberus
D. SAINT
11. Which of the following scanners is a Unix-only tool popular with hackers?
A. NetCop
B. SATAN
C. Cerberus
D. SAINT
12. What is the most distinctive feature of SAINT?
A. Its registry report
B. Its prioritization of vulnerabilities
C. Its scans for shared drives
D. Its capability to map network traffic
13. What is the most important reason to use NetStat or NetStat Live?
A. To detect DoS attempts
B. To find registry vulnerabilities
C. To check passwords
D. To determine normal network traffic
14. What is the best approach when using scanners?
A. Pick any single scanner and use it.
B. Use three or four different scanners.
C. Find the most thorough scanner and use it.
D. Use every scanner type you can find.
15. What tools, besides port and security scanners, might you wish to use to assess security?
A. An IDS
B. A firewall
C. A virus
D. A password cracker
1. Download NetBrute and install it according to the instructions found in the product.
2. Scan either a laboratory computer or your own PC for open ports.
3. Document what you find. Also note anything that NetBrute provides that NetCop did not.
Exercise 12.2: Using Cerberus
1. Download Cerberus and install it according to the instructions found in the product.
2. Scan either a laboratory computer or your own PC for open ports.
3. Note what you found that neither NetCop nor NetBrute detected.
Exercise 12.3: Using SATAN
Note: This exercise requires a Unix-based operating system
1. Download SATAN and install it according to the instructions found in the product.
2. Scan either a laboratory computer or your own PC for open ports.
3. Document what you find. Particularly note any differences between the results from SATAN and the Windows-based software.
Exercise 12.4: Using Other Port Scanners
1. Download any other port scanner and install according to the instructions found.
2. Scan either a laboratory computer or your own PC for open ports.
3. Document differences between the results from that port scanner and NetCop, NetBrute, and Cerberus.
Exercise 12.5: Patching a System
1. Take a lab machine, preferably one that has not been checked for patches in some time.
2. Go to www.microsoft.com and run the Windows Update you will find on the left-hand side of the screen.
3. Note how many critical and recommended patches the machine has.
Exercise 12.6: Physical Security
Note: This is ideal for a group exercise.
1. Consider your educational institution. Examine (as much as possible) the physical security for servers and technology.
2. Devise your own plan for improving security.
3. Your plan might include additions such as
![]() Biometrics
Biometrics
![]() Alarms
Alarms
![]() Restricting access to keys
Restricting access to keys
![]() Putting routers under lock and key
Putting routers under lock and key
Projects
Project 12.1: Using the Security Rating Scale
Using the Security Rating Scale outlined at the beginning of this chapter, rate the security of your campus computer systems and network. Provide clear reasons for each of your ratings on the scale and recommendations for ways to improve the system’s security.
Project 12.2: Assessing Security Policies
Find an organization that will allow you to review their security policies. You can try inquiring at any place you work, asking friends and relatives if you might check with their company’s IT department, or checking with your college/university IT department. Make sure the organization has no objection to your review before you proceed.
The organization you review should have written security policies. Summarize the organization’s policies and make recommendations for changes you feel are needed to improve security there. You can also use resources that define appropriate security policies to compare against the policies of your chosen organization. Some sources for this information include:
![]() Information Security Policy World, 2004: www.information-security-policies-and-standards.com/
Information Security Policy World, 2004: www.information-security-policies-and-standards.com/
![]() Sans Institute, 2003: www.sans.org/resources/policies/
Sans Institute, 2003: www.sans.org/resources/policies/
![]() Writing Information Security Policies by Scott Barn, 2001
Writing Information Security Policies by Scott Barn, 2001
Project 12.3: Performing a Full Audit
Note: This exercise requires a fully equipped lab (at least 10 machines) and is probably best done in groups.
You and your team should conduct a complete audit of the chosen lab and write a detailed account of what you find. The audit must include a review of lab policies, probing the machines, checking for patches, and all other items mentioned in this chapter.