
Hour 9. Alert! Working with Dialogs
What You’ll Learn in This Hour
![]() Understanding a dialog fragment
Understanding a dialog fragment
![]() Using date picker and time picker dialogs
Using date picker and time picker dialogs
A dialog is a window that displays to the user. Dialogs might require a user to acknowledge information, make a decision, or enter additional information. Dialogs are typically used for modal windows, which means that they require a response from the user before they return to the main activity. In this hour, you use the DialogFragment class to create several types of dialogs.
Understanding a Dialog Fragment
Dialogs enable user interaction without losing context. When a dialog window displays, it usually contains a short message, or offers the user the ability to select a choice from a list, or make one or two other decisions.
Dialog fragments were introduced in the Honeycomb (API level 11, Android 3.0) release of Android but are also available in the support package. Via the support package, the DialogFragment class is backward compatible with earlier versions of Android.
Before the DialogFragment class was introduced, programmers used the Dialog class to create and display modal windows. With the availability now of the DialogFragment class, using dialogs directly in activities is not recommended. Rather, an activity should interact with a dialog fragment.
The Hour9App project contains the source code that accompanies this hour.
Displaying a Dialog
To demonstrate the basic use of a dialog fragment, you will create a window that requests that the user enter his or her first name. The window will display OK and Cancel buttons. You’ll create an XML layout file and define the DialogFragment class. The accompanying source code is BasicDialogFragment.java.
You will create a basic dialog fragment by creating a layout and implementing the onCreateView() method. Subsequent examples in this hour will use the onCreateDialog() method.
The code for creating a basic dialog using this technique exhibits only minor differences from that for creating any other kind of fragment:
1. Rather than extend a fragment, you extend the DialogFragment class:
public class BasicDialogFragment extends DialogFragment {
2. Because you are extending the DialogFragment class, you have access to a dialog window object. To access the underlying dialog, you make a call to getDialog().
3. To set the title for the dialog, you call getDialog() and then set the title:
getDialog().setTitle("First Name");
You can also choose to show no title at all using the requestWindowFeature() method:
getDialog().requestWindowFeature(Window.FEATURE_NO_TITLE);
Both setTitle() and requestWindowFeature() are methods of the Dialog class. Other methods are shown in the documentation for the class found at http://developer.android.com/reference/android/app/Dialog.html. Figure 9.1 shows the basic dialog. The title is set to “First Name.”
Besides extending the dialog fragment and adding the dialog title, no differences exist between this dialog fragment and other fragments that you have created. To retrieve data, you would implement a listener to see whether the name has been entered. The difference is in how the fragment displays. You do not load the fragment into a layout; rather, the dialog fragment is opened and closed.
To close the dialog, a call is made to the dismiss() method. The following shows the onClick() method for the Cancel button in the basic dialog:
mCancel = (Button)v.findViewById(R.id.buttonCancel);
mCancel.setOnClickListener(new OnClickListener() {
public void onClick(View v) {
BasicDialogFragment.this.dismiss();
}
});
Opening and Closing a Dialog
Opening a dialog is similar to creating and showing a fragment. In an activity or fragment, you create the dialog and make a call to the show() method:
BasicDialogFragment basicDialog = new BasicDialogFragment();
basicDialog.show(getFragmentManager(), "basic");
Before the dialog is opened, an opportunity exists to set the style of the dialog. Predefined Android styles are available specifically for dialogs. You can also create custom styles.
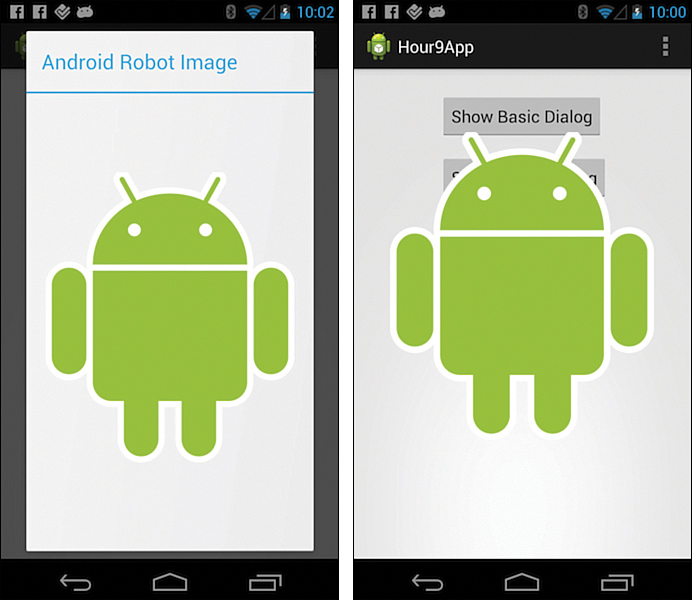
Figure 9.2 shows a dialog that displays an image. The accompanying source code is ImageDialogFragment.java. The dialog on the left shows the image being displayed in a dialog with the default style. When displayed, this dialog includes a title and a background and dims the area behind the window. The dialog on the right shows no title, no frame, and no dimming of the background. This is the Theme.Dialog.NoFrame style, and you set it as follows for a dialog fragment named ImageDialogFragment:
ImageDialogFragment imageDialog = new ImageDialogFragment();
imageDialog.setStyle(DialogFragment.STYLE_NO_FRAME, 0);
imageDialog.show(getFragmentManager(), "image");
Listing 9.1 shows the style definition for Theme.Dialog.NoFrame.
These styles are defined in the Android source code, and you can access them at https://android.googlesource.com/platform/frameworks/base/+/refs/heads/master/core/res/res/values/themes.xml.
LISTING 9.1 Dialog NoFrame Theme
1: <style name="Theme.Dialog.NoFrame">
2: <item name="windowBackground">@android:color/transparent</item>
3: <item name="android:windowFrame">@null</item>
4: <item name="windowContentOverlay">@null</item>
5: <item name="android:windowAnimationStyle">@null</item>
6: <item name="android:backgroundDimEnabled">false</item>
7: <item name="android:windowIsTranslucent">true</item>
8: <item name="android:windowNoTitle">true</item>
9: <item name="android:windowCloseOnTouchOutside">false</item>
10: </style>
Dialogs for Picking Date and Time
The Dialog class predates the DialogFragment class. The Fragment class was introduced in Android 3.0. The basic dialog class and several specialty dialog classes were included in the API level 1 version of Android.
The recommended way to use a dialog class is to wrap it in a dialog fragment.
The types of dialogs include the following:
![]()
DatePicker: User interface to select a date.
![]()
TimePicker: User interface to select a time.
![]()
AlertDialog: Can be used for many types of dialogs.
![]()
ProgressDialog: See note. Not recommended!
Android provides a ProgressDialog class that opens a small window that shows an indeterminate progress bar. This dialog is not recommended. Rather, incorporate a ProgressBar into your layout.
Using Date Picker
To use the date picker dialog, you wrap the dialog in a dialog fragment using the dialog fragment’s onCreateDialog() method. A dialog is returned from this method. The accompanying source code is DatePickerDialogFragment.java.
Let’s look at how to construct a DatePickerDialog instance. The constructor definition and parameters are as follows:
DatePickerDialog(Context context, DatePickerDialog.OnDateSetListener callBack, int
year, int monthOfYear, int dayOfMonth)
The constructor for the DatePickerDialog class includes a DatePickerDialog.OnDateSetListener callback parameter. You can use this parameter to provide an implementation of the onDateSet() method to handle when the user chooses a specific date within the picker. The year, month, and date are used to set an initial value for this dialog.
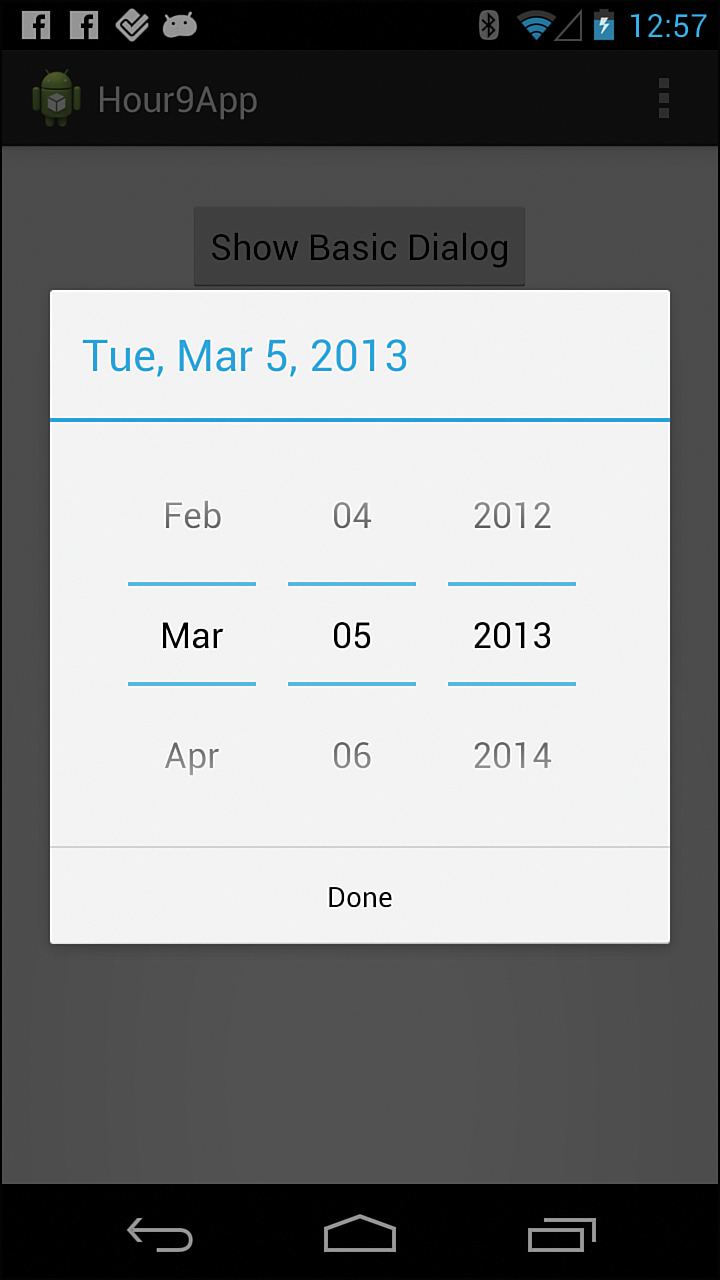
The following are the overall steps to use for creating the DateDialogFragment shown in Figure 9.3:
1. Create a DateDialogFragment class that extends DialogFragment and implements DatePickerDialog.onDateSetListener().
2. Implement the onDateSet() method within the DialogFragment.
3. Create a DatePickerDialog in the onCreateDialog() method.
Let’s do it. Create a DateDialogFragment that implements DatePickerDialog.OnDateSetListener as follows:
public class DatePickerDialogFragment extends DialogFragment implements
DatePickerDialog.OnDateSetListener {
This is a stub for the onDateSetMethod():
@Override
public void onDateSet(DatePicker view, int year, int monthOfYear,int dayOfMonth) {
// TODO handle selected date
}
Because DatePickerDialogFragment implements DatePickerDialog.OnDateSetListener, you can use this as the second parameter when creating the DatePickerDialog. Listing 9.2 shows the onCreateDialog() method for the DatePickerDialogFragment. DatePickerDialogdateDialog is defined on lines 4–6 of Listing 9.2.
LISTING 9.2 DatePickerDialogFragment onCreateDialog()
1: Calendar now = Calendar.getInstance();
2: @Override
3: public Dialog onCreateDialog(Bundle savedInstanceState) {
4: DatePickerDialog dateDialog = new DatePickerDialog(this.getActivity(),
5: this,
6: now.get(Calendar.YEAR), now.get(Calendar.MONTH),now.get(Calendar.DAY_
OF_MONTH));
7: return dateDialog;
8: }
You have used the onAttach() method and defined a listener interface in order for fragments to communicate with activities. You use the same method with the DatePickerDialogFragment. The onDateSet() method of the DatePickerDialog sets the value for the listener.
Listing 9.3 shows the full code for the DatePickerDialogFragment. The interface for communicating with the calling activity is defined in line 14. The onDateSet() method required by DatePickerDialog is created in line 31. In line 32, you use the onDateSet() method to call the OnDateEnteredListener.
LISTING 9.3 DatePickerDialogFragment Full Source
1: package com.bffmedia.hour9app;
2: import java.util.Calendar;
3: import android.app.Activity;
4: import android.app.DatePickerDialog;
5: import android.app.Dialog;
6: import android.app.DialogFragment;
7: import android.os.Bundle;
8: import android.widget.DatePicker;
9:
10: public class DatePickerDialogFragment extends DialogFragment implements
11: DatePickerDialog.OnDateSetListener {
12:
13: // OnDateEnteredListener is implemented by the calling Activity
14: interface OnDateEnteredListener {
15: public void OnDateEntered(int year, int monthOfYear, int dayOfMonth);
16: }
17: OnDateEnteredListener mListener;
18:
19: // Get current date and create the DatePickerDialog
20: Calendar now = Calendar.getInstance();
21: @Override
22: public Dialog onCreateDialog(Bundle savedInstanceState) {
23: DatePickerDialog dateDialog = new DatePickerDialog(this.getActivity(),
24: this,
25: now.get(Calendar.YEAR), now.get(Calendar.MONTH),now.get(Calendar.DAY_OF_
MONTH));
26: return dateDialog;
27: }
28:
29: // OnDateSet is required to implement DatePickerDialog.OnDateSetListener
30: @Override
31: public void onDateSet(DatePicker view, int year, int monthOfYear, int
dayOfMonth) {
32: mListener.OnDateEntered(year, monthOfYear, dayOfMonth);
33: }
34: @Override
35: public void onAttach(Activity activity) {
36: super.onAttach(activity);
37: try {
38: mListener = (OnDateEnteredListener) activity;
39: } catch (ClassCastException e) {
40: throw new ClassCastException(activity.toString()
41: + " must implement OnDateEnteredListener");
42: }
43: }
44: }
To open DatePickerDialogFragment, you must implement the interface onDateEnteredListener. So, the declaration for the calling activity looks like the following:
public class MainActivity extends Activity
implements DatePickerDialogFragment.OnDateEnteredListener{
You then implement the required OnDateSet() method as follows:
@Override
public void OnDateEntered(int year, int monthOfYear, int dayOfMonth) {
Toast.makeText(getApplicationContext(),
dayOfMonth + "." + monthOfYear +"."+year, Toast.LENGTH_SHORT).show();
}
A toast message displays the data returned.
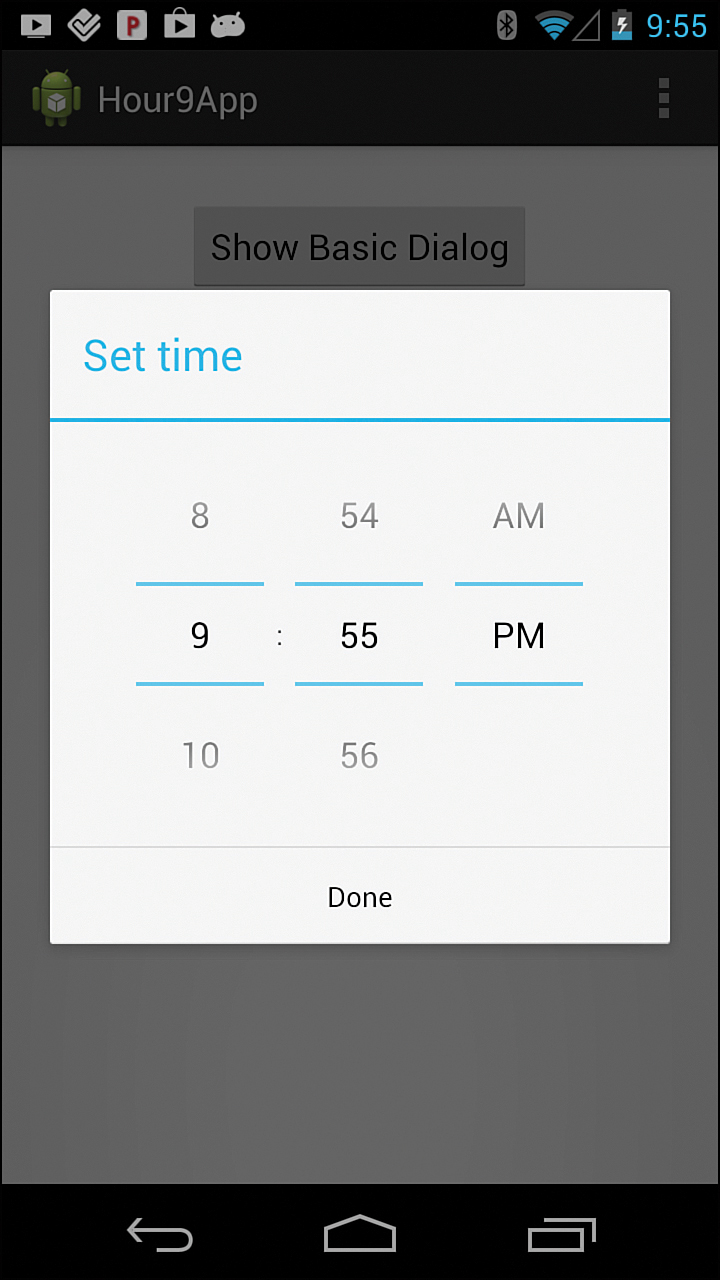
Using Time Picker
You use TimePickerDialog in a dialog fragment similar to the technique used for the date picker dialog. Listing 9.4 shows the onCreateDialog() method for this fragment, and Figure 9.4 shows the resulting dialog. The accompanying source code is TimePickerDialogFragment.java.
LISTING 9.4 TimePickerDialog Fragment onCreateDialog() Method
1: Calendar now = Calendar.getInstance();
2: @Override
3: public Dialog onCreateDialog(Bundle savedInstanceState) {
4: final Calendar c = Calendar.getInstance();
5: int hour = c.get(Calendar.HOUR_OF_DAY);
6: int minute = c.get(Calendar.MINUTE);
7: TimePickerDialog dateDialog = new TimePickerDialog(
8: this.getActivity(),
9: this,
10: hour, minute, false);
11: return dateDialog;
12: }
Using Alert Dialogs
An alert dialog uses the builder pattern to add features to a simple dialog. Each feature is added to the current dialog. To create dialog fragments for picking dates and times, you implemented the onCreateDialog() method and returned a dialog. Similarly, you will build an alert dialog in the onCreateDialog() class to create new dialog fragments. This section shows the typical components of an alert dialog and several examples.
You can use the techniques of creating listeners to interact with the calling activity and using the onAttach() method to ensure that the listener is defined with alert dialogs as well.
An alert dialog may include a title, content area, and up to three buttons that the user can select. For a simple dialog, a need might not exist for a separate content area. In that case, the title would ask the user a question and the buttons would handle the response. The buttons represent a positive response, a negative response, and a neutral response—for example, Yes, No, and Cancel.
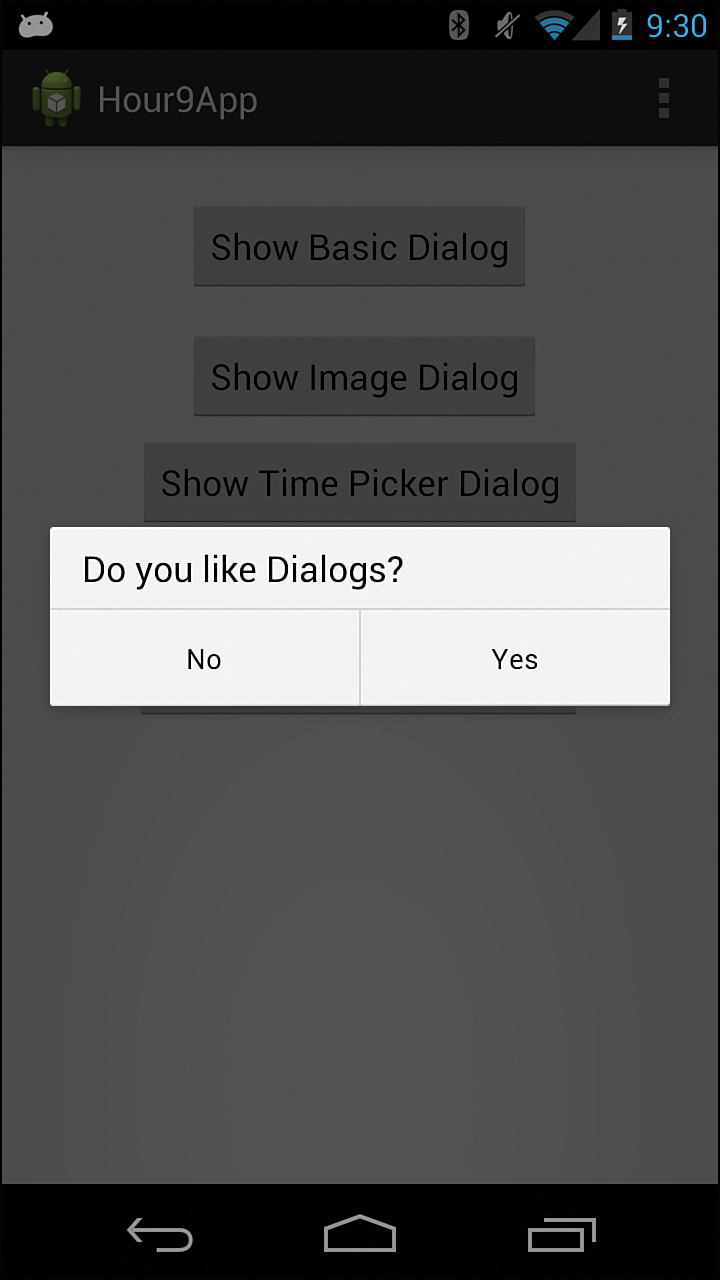
Listing 9.5 shows the code for a simple alert dialog. The accompanying source code is BasicAlertDialogFragment.java. The dialog uses the builder pattern to add features to itself. In line 5, a message is added to the content area. Lines 6 and 10 add the positive and negative buttons. When they are selected, the buttons will just close the window. If you wanted to collect this data and return it to the activity that opened the dialog, you would add a listener interface. Figure 9.5 shows the resulting dialog. The positive button is set on line 6 and the negative button is set on line 10. There is no neutral button in this case.
LISTING 9.5 AlertDialog Basic Example
1: public class BasicAlertDialogFragment extends DialogFragment{
2: @Override
3: public Dialog onCreateDialog(Bundle savedInstanceState) {
4: AlertDialog.Builder builder = new AlertDialog.Builder(getActivity());
5: builder.setMessage("Do you like Dialogs?")
6: .setPositiveButton("Yes", new DialogInterface.OnClickListener() {
7: public void onClick(DialogInterface dialog, int id) {
8: }
9: })
10: .setNegativeButton("No", new DialogInterface.OnClickListener() {
11: public void onClick(DialogInterface dialog, int id) {
12: }
13: });
14: return builder.create();
15: }
16:}
You can build alert dialogs with different user interfaces using the same basic model.
The steps to create a dialog fragment using an alert dialog are as follows:
1. Create the dialog fragment.
2. Build and return an alert dialog in the onCreateDialog() method.
3. Provide a listener interface to pass the results of the dialog back to the activity.
By using various AlertDialog.Builder methods, you can create different user experiences.
Showing a List of Items
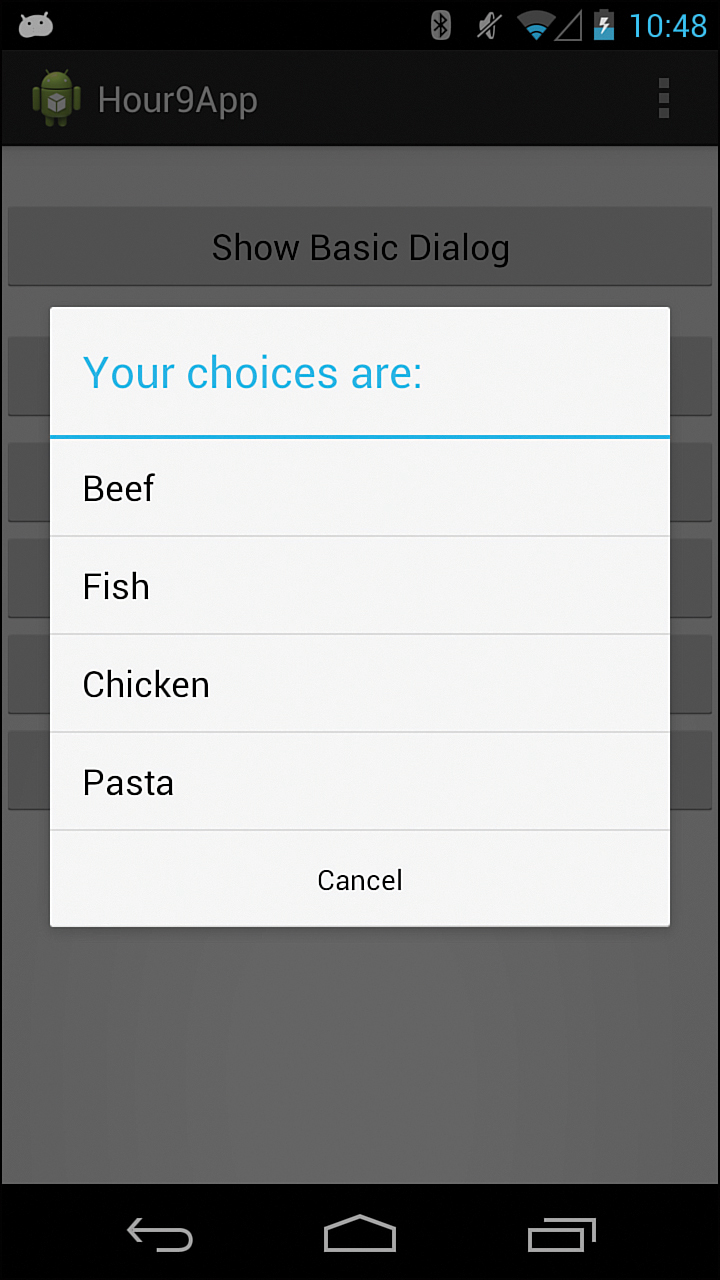
You can show a list of items in an alert dialog using the setItems() method. You can pass this method a resource that defines an array or an array of charSequence objects. Listing 9.6 shows the use of an array of String values to populate the item list. The title and a negative button are also added. In line 5, the onClick() method incudes the parameter which. It is the integer value corresponding to the position of the selected item. The accompanying source code is ListAlertDialogFragment.java.
LISTING 9.6 AlertDialog List Example
1: String[] items ={"Beef", "Fish", "Chicken", "Pasta"};
2: AlertDialog.Builder builder = new AlertDialog.Builder(getActivity());
3: builder.setTitle("Your choices are:");
4: builder.setItems(items, new DialogInterface.OnClickListener() {
5: public void onClick(DialogInterface dialog, int which) {
6: }
7: })
8: .setNegativeButton("Cancel", new DialogInterface.OnClickListener() {
9: public void onClick(DialogInterface dialog, int id) {
10: }
11: });
You could define the array shown in line 1 of Listing 9.6 as an array resource. In the res/values/strings.xml, you would add the following:
<?xml version="1.0" encoding="utf-8"?>
<resources>
<string-array name="food_array">
<item>Beef</item>
<item>Fish</item>
<item>Chicken</item>
<item>Pasta</item>
</string-array>
</resources>
This resource array could then be passed as the first parameter to the setItems() method:
builder.setItems(R.array.food_array, new DialogInterface.OnClickListener()...
Note: Using setTitle() and setMessage()
setTitle() provides a title for an alert dialog. SetMessage() provides a message in the content area of an alert dialog. You cannot use setMessage() and setItems() together because both populate the content area of the window. Listing 9.6 used setTitle(). Listing 9.5 used setMessage().
Figure 9.6 shows the alert dialog created in Listing 9.6. The title, list of items, and Cancel button are displayed.
Adding a Custom View
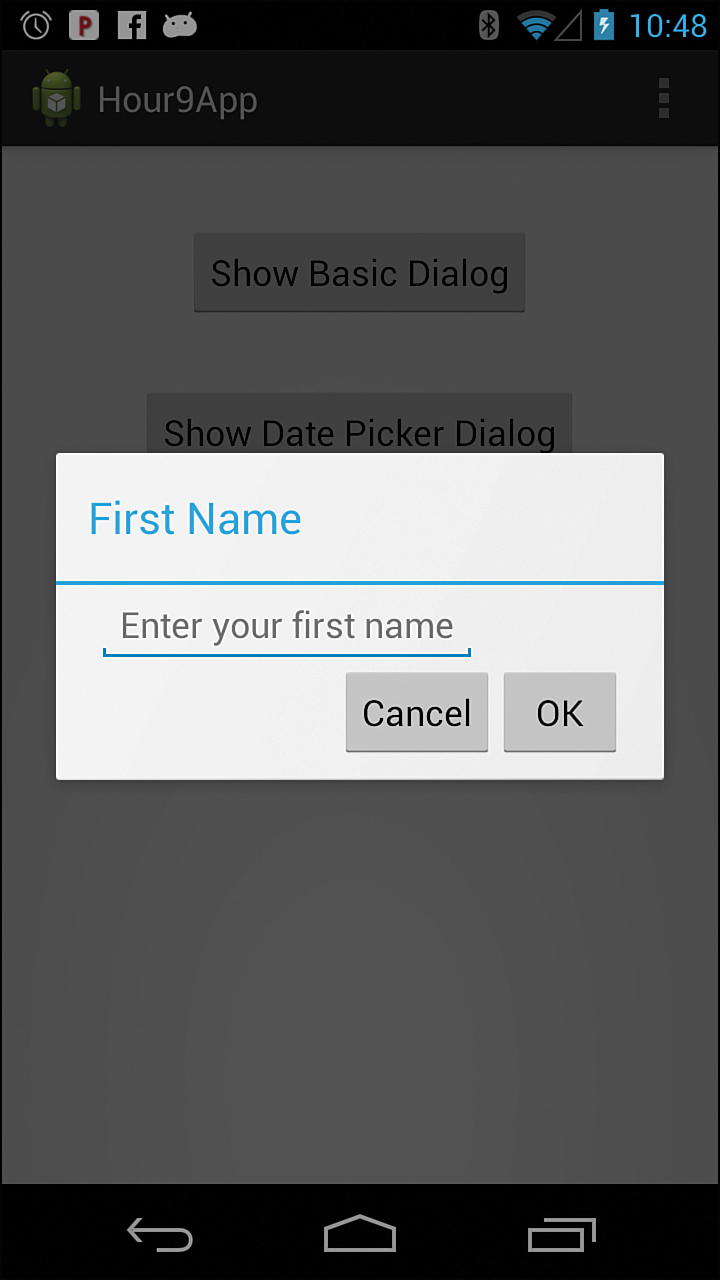
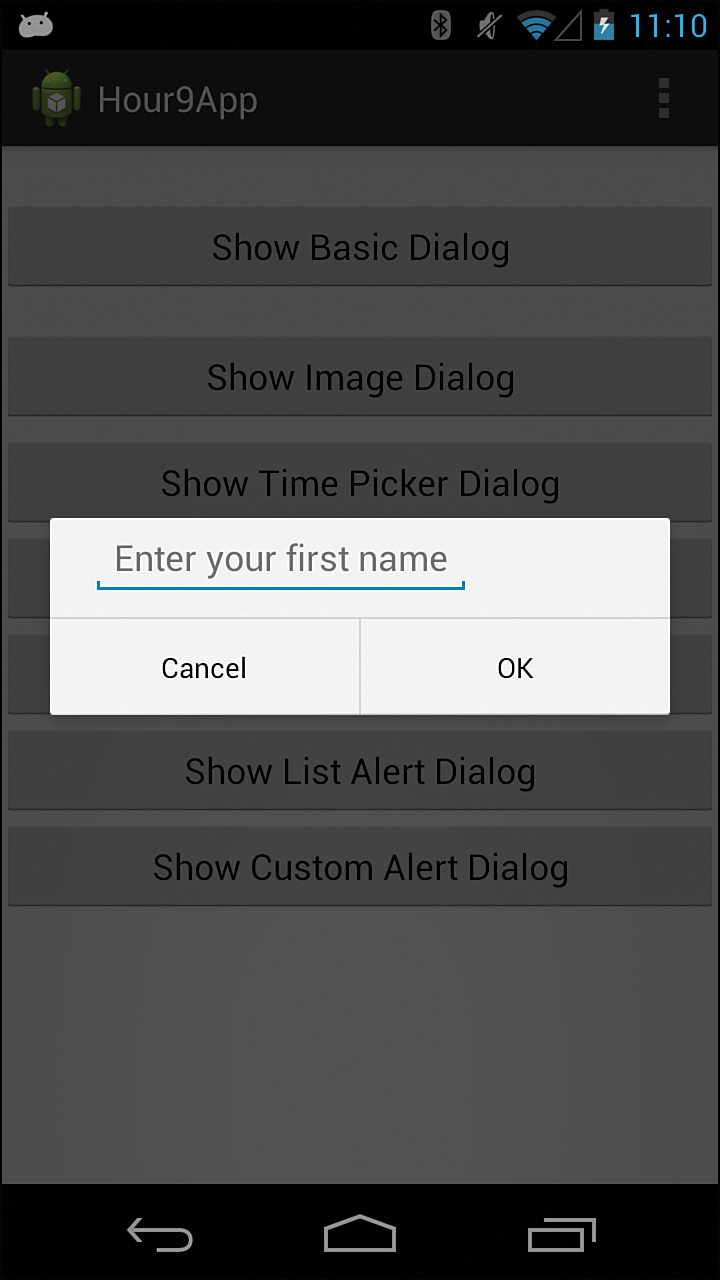
In the first example in this hour (BasicDialogFragment.java), which was shown in Figure 9.1, the custom layout included an EditText field and two buttons. You used the onCreateView() method rather than the onCreateDialog() method. You can change your approach and use a custom layout in an alert dialog to provide the same functionality. By creating a custom view within an alert dialog, you can create the precise user experience that you desire as a developer.
The custom layout for your new dialog will contain only an EditText field. The Cancel and OK buttons will be implemented as the negative and positive buttons using the builder methods.
Lines 3 and 4 of Listing 9.7 show how you get an inflater and inflate the layout into the view for this dialog. Line 8 shows that you are passing the entered name to a listener that you created. Figure 9.7 shows the dialog.
LISTING 9.7 AlertDialog with Custom Layout
1: public Dialog onCreateDialog(Bundle savedInstanceState) {
2: AlertDialog.Builder builder = new AlertDialog.Builder(getActivity());
3: LayoutInflater inflater = getActivity().getLayoutInflater();
4: builder.setView(inflater.inflate(R.layout.fragment_alert_dialog_name, null))
5: .setPositiveButton("OK", new DialogInterface.OnClickListener() {
6: public void onClick(DialogInterface dialog, int id) {
7: EditText nameText = (EditText) getDialog().findViewById(R.
id.editText1);
8: mListener.OnNameEntered(nameText.getText().toString());
9: }
10: })
11: .setNegativeButton("Cancel", new DialogInterface.OnClickListener() {
12: public void onClick(DialogInterface dialog, int id) {
13: }
14: });
15: return builder.create();
16: }
Summary
In this hour, you saw several ways to create dialogs. Dialogs provide small windows for user interaction within an app. Using dialogs, you can interact with the user and not lose overall context. You used the DialogFragment class and created dialogs for date and time. You saw how to create different kinds of dialogs by using the AlertDialog and AlertDialog.Builder classes. To pass data from dialogs back to the activities that opened them, you created listener interfaces in the dialogs.
Q&A
Q. How is a dialog fragment different from a fragment?
A. A dialog fragment is shown as an independent window. They are opened by calling show() and closed by calling dismiss(). A dialog fragment includes an onCreateDialog() method that can be overwritten as well as an onCreateView() method.
Q. What is the purpose of creating a listener interface in a dialog fragment?
A. The listener interface is a way for the dialog fragment to provide data back to the calling activity. The activity implements the listener. When the dialog fragment calls the listener, information can be passed back to the activity.
Workshop
Quiz
1. Name three kinds of dialogs.
2. When should the progress dialog be used?
3. When using an alert dialog with a positive button in a dialog fragment, how do you pass data back to the calling activity?
Answers
1. In this hour, you used dialog fragments and created dialogs within the onCreateDialog() method. There are four types of dialogs: TimePickerDialog, DatePickerDialog, AlertDialog, and ProgessDialog.
2. Never use a ProgressDialog.
3. A listener interface should be created and used to pass data to the activity.
Exercise
Use a TimePickerDialog and create a dialog fragment. In this dialog fragment, create a listener interface to pass the time back to the calling activity. Have the calling activity implement the listener.