
5. Essentials of Video Editing
Lesson overview
In this lesson, you’ll learn about the following:
• Working with clips in the Source Monitor
• Creating sequences
• Using essential editing commands
• Understanding tracks
This lesson will take approximately 45 minutes.
This lesson will teach you the core editing skills you will use again and again when creating sequences with Adobe Premiere Pro CC.
Editing is much more than choosing shots. You time your cuts precisely, placing clips in sequences at exactly the right point in time and on the track you want (to create layered effects), adding new clips to existing sequences, and removing old ones.
Getting started
No matter how you like to approach video editing, there are some very simple techniques you will employ time and again. Essentially, you’ll be making partial selections of your clips and selectively placing them in your sequence. There are several ways of doing this in Adobe Premiere Pro.
Before you begin, make sure you are using the default Editing workspace.
1. Choose Window > Workspace > Editing.
2. Choose Window > Workspace > Reset Current Workspace.
3. Click Yes in the Reset Workspace dialog.
For this lesson, you’ll use the project file you used in Lesson 4.
4. Continue to work with the project file from the previous lesson, or open it from your hard drive.
5. Choose File > Save As.
6. Rename the file Lesson 05.prproj.
7. Choose a preferred location on your hard drive, and click Save to save the project.
If you do not have the previous lesson file, you can open the Lesson 05.prproj file from the Lesson 05 folder.
You’ll begin by learning more about the Source Monitor and how to mark your clips to get them ready to be added to a sequence. Then you’ll learn about the Timeline panel, where you’ll work on your sequences, and you’ll learn how to put everything together.
Using the Source Monitor
The Source Monitor is the main place you’ll go when you want to check your assets before including them in a sequence.
When you view video clips in the Source Monitor, you watch them in their original format. They will play back with their frame rate, frame size, field order, audio sample rate, and audio bit depth exactly as they were recorded.
When you add a clip to a sequence, Adobe Premiere Pro conforms it to match the sequence settings. This means the frame rate, frame size, and audio type might be adjusted so that everything plays back the same way.
As well as being a viewer for multiple file types, the Source Monitor provides important additional functions. You can use two special kinds of markers, called In and Out points, to select just part of the clip for inclusion in your sequence. You can also add comments to other kinds of markers to refer to later or remind yourself about important facts relating to a clip. You might include a note about part of a shot you don’t have permission to use, for example.
Loading a clip
To load a clip, do the following:
1. Browse to the Theft Unexpected bin. With the default preferences, you can double-click the bin in the Project panel while holding the Control (Windows) or Command (Mac OS) key. The bin will open in the existing panel. To navigate back to the Project panel contents, click the Navigate Up button ![]() .
.
2. Double-click a video clip, or drag and drop a clip into the Source Monitor.
Either way, the result is the same: Adobe Premiere Pro displays the clip in the Source Monitor, ready for you to watch it and add markers.
3. Position your mouse pointer so that it is over the Source Monitor, and press the ` (grave) key. Press the ` (grave) key again, to restore the Source Monitor to its original size.
![]() Tip
Tip
Notice that the active frame has an orange outline. It’s important to know which frame is active, because menus sometimes update to reflect your current selection. If you press Shift+` (grave), the currently selected frame will toggle to full-screen, rather than the frame your mouse is over.
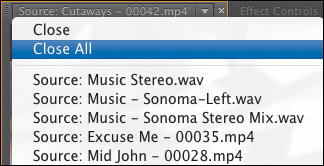
Loading multiple clips
Next you’ll create a selection of clips to work with in the Source Monitor.
1. Click the Recent Items menu at the top left of the Source Monitor, and choose Close All.
2. Click the List View button on the Theft Unexpected bin, and make sure the clips are displayed in alphabetical order by clicking the Name heading.
3. Select the first clip, Cutaways, and then hold down the Shift key and click the clip Mid John - 00028.
This makes a selection of multiple clips in the bin.
4. Drag the clips from the bin to the Source Monitor.
Now just the clips selected will be displayed in the Source Monitor Recent Items menu. You can use the menu to choose which clip to view.
Source Monitor controls
As well as playback controls, there are some important additional buttons in the Source Monitor.
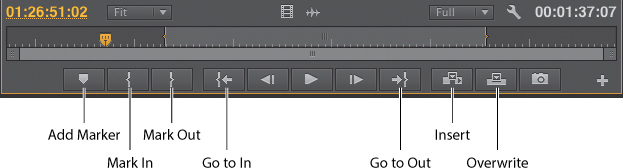
• Add Marker: Adds a marker to the clip at the location of the playhead. Markers can provide a simple visual reference or store comments.
• Mark In: Marks the beginning of the part of the clip you intend to use in a sequence. You can have only one In point. A new In point will automatically replace the existing one.
• Mark Out: Marks the end of the part of the clip you intend to use in a sequence. You can have only one Out point. A new Out point will automatically replace the existing one.
• Go to In: Moves the playhead to the clip In point.
• Go to Out: Moves the playhead to the clip Out point.
• Insert: Adds the clip to the sequence currently displayed in the Timeline panel using the insert edit method (see “Essential editing commands” later in this lesson).
• Overwrite: Adds the clip to the sequence currently displayed in the Timeline panel using the overwrite edit method (see “Essential editing commands” later in this lesson).
Selecting a range in a clip
Sometimes you want to select only a specific range within a clip.
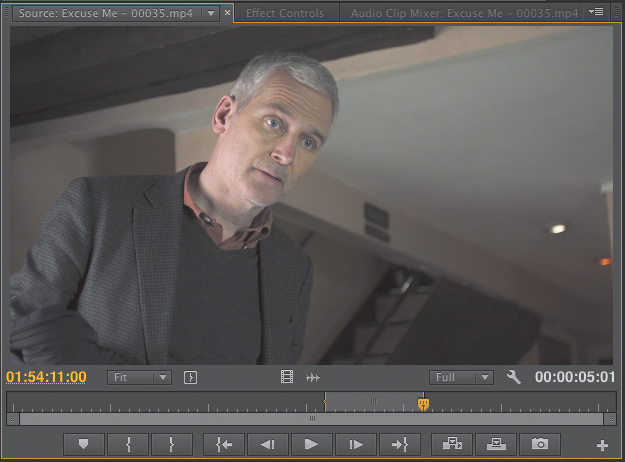
1. Use the Recent Items menu to select the clip Excuse Me - 00035. It’s a shot of John nervously asking if he can sit down.
2. Play the clip to get an idea of the action.
John walks onscreen about halfway through the shot but takes a moment to speak.
3. Position the playhead just before John enters the shot or just before he speaks—your choice. Around 01:54:06:00, he pauses briefly and speaks. Note that the timecode reference is based on the original recording.
![]() Tip
Tip
To help you find your way around your footage, Adobe Premiere Pro can display timecode numbers on the time ruler. Toggle this option on and off by clicking the Settings button ![]() and choosing Time Ruler Numbers.
and choosing Time Ruler Numbers.
4. Click the Mark In button. You can also press the I key on your keyboard.
Adobe Premiere Pro highlights the section of the clip that is selected. You have excluded the first part of the clip, but you’ll be able to reclaim this part later if you need to do so—that’s the wonderful freedom of nonlinear editing.
5. Position the playhead just as John sits down. Around 01:54:14:00 is perfect.
![]() Tip
Tip
If your keyboard has a separate numerical keypad, you can use it to enter timecode directly. For example, if you type 700, Adobe Premiere Pro will position the playhead at 00:00:07:00. There’s no need to enter the leading zeros. Also, be sure to use the numerical keypad and not the numbers along the top of your keyboard.
6. Press the O key on your keyboard to add an Out point.
In and Out points added to clips are persistent. That is, they will still be present if you close and open the clip again. Let’s add In and Out points for the following two clips as well.
![]() Tip
Tip
The tool tip that pops up if you hover your mouse over a button tells you the keyboard shortcut key in brackets after the name of the button.
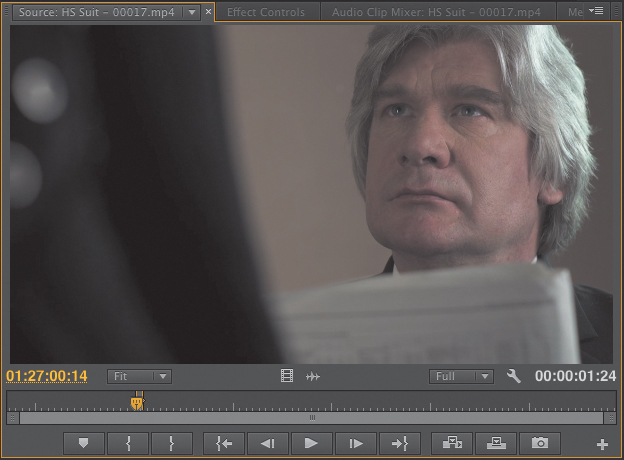
7. For the HS Suit clip, add an In point just after John’s line, about a quarter of the way into the shot (01:27:00:16).
8. Add an Out point just as the screen goes dark, after the brief reaction show, (01:27:02:14).
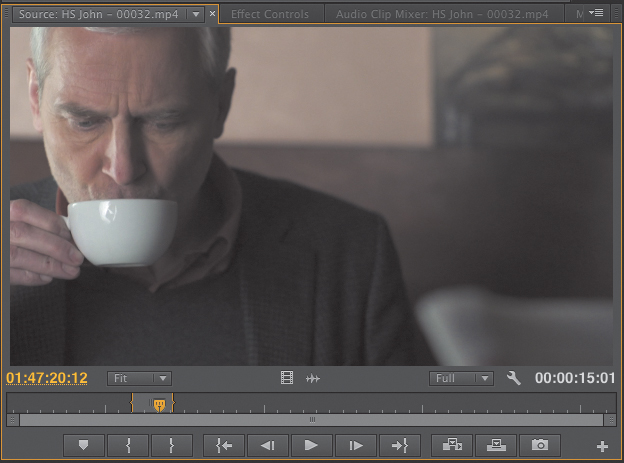
9. For Mid John, add an In point just as John sits down (01:39:52:00).
10. Add an Out point after he has a sip of tea (01:40:04:00).
As you gain experience as an editor, you may find you prefer to go through all of your available clips, adding In and Out points as required, before building your sequences. Some editors prefer to add In and Out points only as they use each clip.
Creating subclips
If you have a very long clip—perhaps even the entire contents of a video tape—there might be several parts you would like to use in your sequence, and it would be useful to have a way of separating the parts so they can be organized prior to building your sequence.
This is exactly the situation subclips were created for. Subclips are partial copies of clips. They are commonly used when working with very long clips, especially when there are several parts of the same original clip that might be used in a sequence.
• They can be organized in bins, just like regular clips (they have a different icon![]() ).
).
• They have a limited duration that is based on the In and Out points used to create them (this makes it easier to view their contents when compared with viewing potentially much longer original clips).
• Importantly, they share the same media files as the original clip they’re based on.
Let’s make a subclip:
1. Double-click the clip Cutaways in the Theft Unexpected bin to view it in the Source Monitor.
2. While viewing the contents of the Theft Unexpected bin, click the New Bin button at the bottom of the panel to create a new bin. The new bin will appear inside the existing Theft Unexpected bin.
3. Name the bin Subclips, and open it to see the contents; consider holding the Ctrl (Windows) or Command (Mac OS) key while double-clicking the bin to have it open in the same frame, rather than floating as an independent frame.
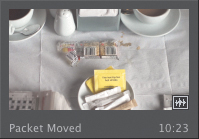
4. Choose a section of the clip to make into a subclip by marking the clip with an In point and an Out point. The moment (slightly more than halfway through) when the packet is removed and replaced might work well.
5. To create a subclip from the selection between your In and Out points, do one of the following:
• Right-click inside the picture display of the Source Monitor, and choose Make Subclip. Give the subclip the name Packet Moved, and click OK.
• Click the Clip menu, and choose Make Subclip. Name the subclip Packet Moved, and click OK. The new subclip is added to the Subclips bin, with the duration you specified with your In and Out marks.
![]() Note
Note
If you select Restrict Trims To Subclip Boundaries, you won’t be able to access the parts of your clip that are outside your selection when viewing the subclip. This might be exactly what you want (and you can change this setting).
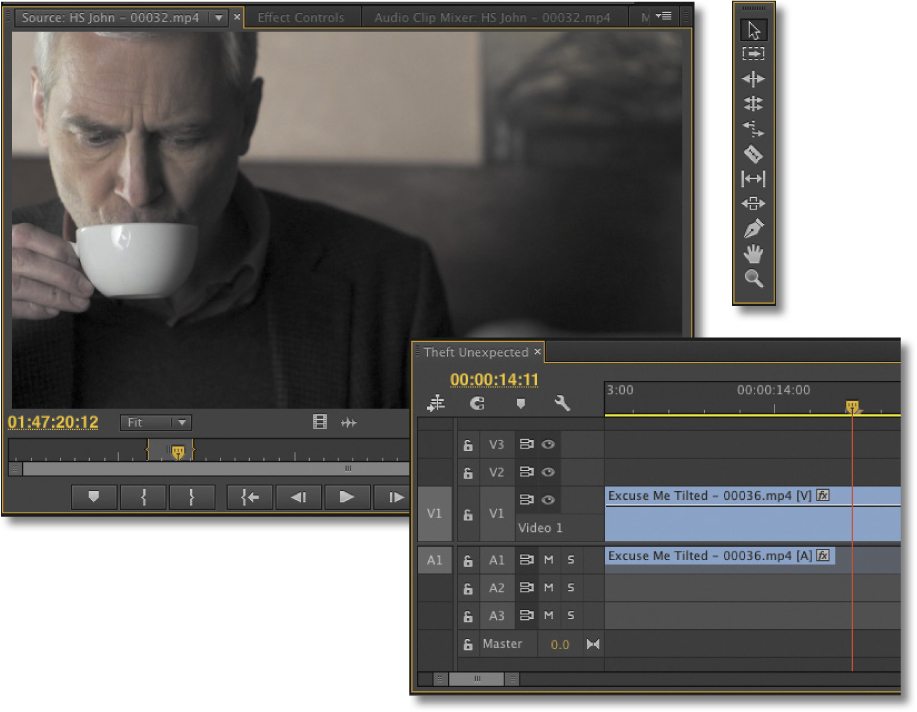
Navigating the Timeline
If the Project panel is the heart of your project, then the Timeline panel is the canvas. The Timeline is where you will add clips to your sequences, make editorial changes to them, add visual and audio special effects, mix soundtracks, and add titles and graphics.
Here are a few facts about the Timeline panel:
• You view and edit sequences in the Timeline panel.
• You can open multiple sequences at the same time, and each will be displayed in its own Timeline panel.
• The terms sequence and Timeline are often used interchangeably, as in “in the sequence” or “on the Timeline.”
• You can have up to 99 video tracks and upper video tracks play “in front” of lower ones.
• You can have up to 99 audio tracks that all play at the same time to create an audio mix (audio tracks can be mono, stereo, 5.1, or adaptive—with up to 32 channels).
• You can change the height of Timeline tracks to gain access to additional controls and thumbnails on your video clips.
• Each track has a set of controls that change the way it functions.
• Time is displayed on the Timeline, always moving from left to right.
• The Program Monitor shows you the contents of the currently displayed sequence at the position of the playhead.
• For most operations on the Timeline, you will use the standard Selection tool. However, there are several other tools for dedicated purposes. If in doubt, press the V key. This is the keyboard shortcut for the Selection tool.
• You can zoom in and out of the Timeline using the + and – keys at the top of your keyboard to get a better view of your clips. If you press the key, Adobe Premiere Pro toggles the zoom level between your current setting and showing your whole sequence.
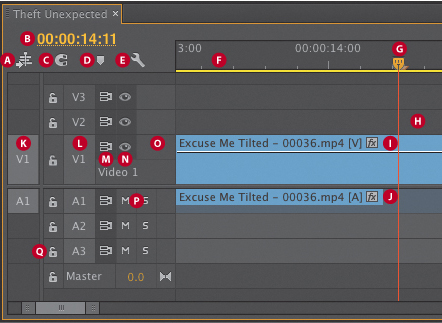
A Sequence nest toggle
B Timecode
C Snap
D Add Marker
E Display settings
F Time ruler
G Playhead
H Track
I Clip video
J Clip audio
K Source tracks
L Track selection
M Sync lock
N Track output
O Drag between tracks to resize
P Mute or solo audio
Q Track lock
What is a sequence?
A sequence is a container for a series of clips that play, one after another—sometimes with multiple blended layers, and often with special effects, titles, and audio—to produce a completed film.
You can have as many sequences as you like in a project.
Let’s make a new sequence for our Theft Unexpected drama:
1. In the Theft Unexpected bin, drag the clip Excuse Me (not Excuse Me Tilted) onto the New Item button at the bottom of the panel.
This is a shortcut to make a sequence that perfectly matches your media. Adobe Premiere Pro creates a new sequence, which shares the name of the clip you selected.
![]() Note
Note
You may need to click the Navigate Up button to see the Theft Unexpected bin.
2. The sequence is highlighted in the bin, and it would be a good idea to rename it right away. Right-click the sequence in the bin, and choose Rename. Name the sequence Theft Unexpected.
The sequence is automatically open, and it contains the clip you used to create it. This works for our purposes, but if you had used a random clip to perform this shortcut, you could always just select it in the sequence and delete it now (by pressing the Delete key).
Close the sequence by clicking the x on its name tab in the Timeline panel.
Opening a sequence in a Timeline panel
To open a sequence in the Timeline panel, do one of the following:
• Double-click the sequence in a bin.
• Right-click the sequence in a bin, and choose Open in Timeline.
![]() Tip
Tip
You can also open a sequence in the Source Monitor to use it as if it were a clip. Be careful not to drag a sequence into the Timeline panel to open it. You’ll add it to your current sequence.
Open the Theft Unexpected sequence now, and take a look at it in the Timeline panel.
Understanding tracks
Much in the way that railway tracks keep trains in line, sequences have video and audio tracks that constrain the positions of clips you add to them. The simplest form of sequence would have just one video track and perhaps one audio track. You add clips to tracks, one after another, from left to right, and they play in the order you position them.
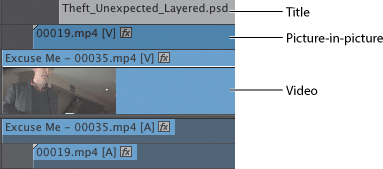
Sequences can have additional video and audio tracks. These become layers of video and additional audio channels. Since the higher video tracks appear in front of lower ones, you can use them to creatively produce layered compositions.
You might use an upper video track to add titles to a sequence or to blend multiple layers of video using special effects.
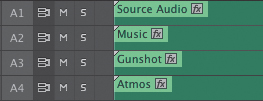
You might use multiple audio tracks to create a complete audio composition for your sequence, with original source dialogue, music, spot audio effects like gunshots or fireworks, atmospheric sound, and voice-over.
Adobe Premiere Pro CC has multiple scrolling options, giving you different results depending on the location of your cursor:
• If you hover your mouse over any tracks, you can scroll left and right; trackpad gestures work too.
• If you hover your mouse over video or audio tracks and hold the Control key (Windows) or the Command key (Mac OS) while scrolling up and down, you’ll scroll just that type of track up and down.
• If you hover your mouse over a track header and scroll, you’ll increase or decrease the height of the track.
• If you hover your mouse over a video or audio track header and scroll while holding the Shift key, you’ll increase or decrease the height of all tracks of that type.
Targeting tracks
Track headers are more than name plates. They also act as enable/disable buttons for the tracks when making selections to remove parts of a sequence using In and Out marks, or when rendering.
![]() Tip
Tip
The use of track headers has changed with the release of Adobe Premiere Pro CC. Whether a track header is on or off makes no difference when using source clip indicators to add clips to a sequence.
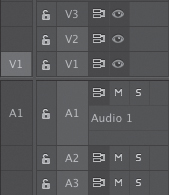
To the left of the track headers, you’ll see an extra set of buttons that represent the available tracks for the clip currently displayed in the Source Monitor or selected in the Project panel. These are the source track indicators.
If you drag and drop a clip into a sequence, the source track indicators are ignored. However, when you use the keyboard or the buttons on the Source Monitor to add a clip to a sequence, source track indicators are very important.
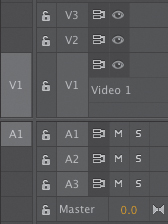
In the following example, the position of the source track indicators means a clip would be added to the Video 1 and Audio 1 tracks on the Timeline.
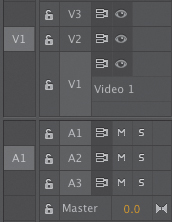
In the following example, the source track indicators have been moved by dragging and dropping. In this example, the clip would be added to the Video 2 and Audio 2 tracks on the Timeline.
The source track indicators enable or disable the video and audio channels of your source clips. You can make advanced edits by carefully positioning the source track indicators and selecting which tracks you have on or off.
In and Out points
The In and Out points used in the Source Monitor define the part of a clip you would like to add to a sequence. The points you use on the Timeline have two primary purposes:
• Use them to tell Adobe Premiere Pro where a clip should be positioned when it is added to a sequence.
• Use them to select parts of a sequence you would like to remove. In combination with the track headers, you can make very precise selections to remove whole clips, or parts of clips, from multiple tracks.

The lighter region indicates the selected part of the sequence.
Setting In and Out points
Adding In and Out points on the Timeline is almost the same as adding them in the Source Monitor. One key difference is that, unlike the controls in the Source Monitor, the controls on the Program Monitor also apply to the Timeline.
![]() Tip
Tip
There’s also a shortcut to adding In and Out points to your Timeline based on the duration of a clip (or a group of clips) in your sequence. To try it, select a clip segment in your sequence and press /.
To add an In point to the Timeline, make sure the Timeline panel is active, and then press the I key or click the Mark In button on the Program Monitor.
To add an Out point to the Timeline, make sure the Timeline panel is active, and then press the O key or click the Mark Out button on the Program Monitor.
Clearing In and Out points
If you open a clip that has In and Out points already that you would like to remove (or there are In and Out points on the Timeline that are cluttering up your view), it’s easy to remove them. You use the same techniques to remove In and Out points on the Timeline, in the Program Monitor, and in the Source Monitor.
1. On the Timeline, select the Excuse Me clip by clicking it.
2. Press the / key. This adds an In mark to the Timeline at the start of the clip (on the left) and an Out mark at the end of the clip (on the right). Both are added to the time ruler at the top of the Timeline panel.
3. Right-click the time ruler at the top of the Timeline panel, and take a look at the menu options. Select the option you need in this menu, or use one of the following keyboard shortcuts:
• Alt+I: Remove In Point (Clear In)
• Alt+O: Remove Out Point (Clear Out)
• Shift+Ctrl+X (Windows)/Alt+X (Mac OS): Remove In Point and Out Point (Clear In and Out)

4. That last option is particularly useful. It’s easy to remember and quickly removes both points. Try it now to remove those marks.
Using time rulers
The time rulers at the bottom of the Source Monitor and Program Monitor and at the top of the Timeline all serve the same purpose: They allow you to navigate through your clips or your sequences in time. Time always goes from left to right, and the location of the playhead gives you a visual reference in relation to your clips.
Click the Timeline time ruler now, and drag left and right. The playhead moves to follow your mouse. As you drag across the Excuse Me clip, you see the contents of the clip in the Program Monitor. Dragging through your content in this way is called scrubbing.
Notice that the Source Monitor, Program Monitor, and Timeline all have scroll bars at the bottom of the panel. You can zoom the Time Ruler by hovering over the bar and using your mouse wheel to scroll. Once you have zoomed in, you can navigate the Time Ruler by clicking and dragging the bar.
The zoom bar on the Program Monitor
Customizing track headers
Adobe Premiere Pro CC includes a new set of options to choose the controls available on the track headers. To access these options, right-click a video or audio track header, and choose Customize.
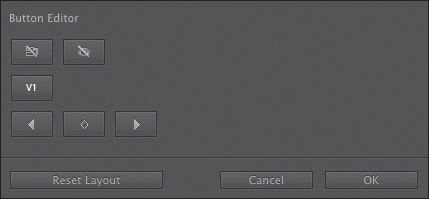
The video track Button Editor
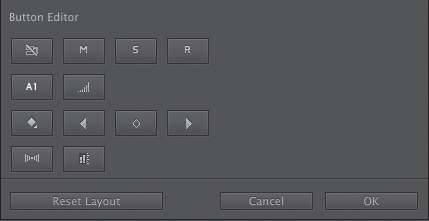
The audio track Button Editor
To find out the name of an available button, hover your mouse over it to see the tool tip. Many of the buttons will be familiar to you already. The others will be explained in later lessons.
You add a button to a track header by dragging and dropping it from the Button Editor. You remove a button from a track header by dragging it away.
Feel free to experiment with this feature now, and when you have finished, click the Reset Layout button on the Button Editor to return the track header to the default options. Finally, click Cancel to leave the Button Editor.
Essential editing commands
Whether you use the mouse to drag and drop a clip into a sequence, use a button on the Source Monitor, or use a keyboard shortcut, you’ll apply an insert edit or an overwrite edit.
When you add a clip to a sequence that has existing clips where you want to position the new clip, these two choices—Insert and Overwrite—will have markedly different effects.
Overwrite edit
Let’s use an overwrite edit to add a reaction shot to John’s request for a chair.
![]() Note
Note
The terms shot and clip are often used interchangeably.
1. Open the shot HS Suit in the Source Monitor. You added In and Out marks to this clip already.
2. You’ll need to set up the Timeline carefully for this edit. Position the Timeline playhead just after John makes his request. Around 00:00:04:00 is perfect.
Unless an In or Out mark has been placed on the Timeline, the playhead is used to position new clips when editing with the keyboard or onscreen buttons.
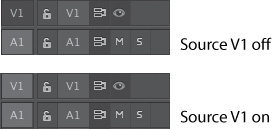
3. Though the new clip has an audio track, we don’t need it. We’ll keep the audio on the Timeline. Click the source track selection button A1 to turn it off. The difference is subtle, but these buttons turn a darker gray when they’re switched off.

4. Check that your track headers look like the following example.
5. Click the Overwrite button on the Source Monitor.
The clip is added to the Timeline, but only on the Video 1 track. Once again, the timing might not be perfect, but you’re building a nice dialogue scene!
![]() Note
Note
Notice that the sequence does not get longer when you perform an overwrite edit.

By default, when you drag and drop a clip into a sequence using the mouse, you perform an overwrite edit. You can change it to an insert edit by holding down the Control (Windows) or Command (Mac OS) key.
Insert edit
To perform an insert edit in the Adobe Premiere Pro Timeline, do the following:
1. Drag the Timeline playhead so that it is positioned over the Excuse Me clip just after John says “Excuse me” (around 00:00:02:16).
2. Open the clip Mid Suit in the Source Monitor, add an In mark at 01:15:46:00, and add an Out mark at 01:15:48:00. This is actually from a different part of the action, but it might work well as a reaction shot.
3. Check that your Timeline has the source track indicators lined up as in the following example.

![]() Note
Note
If you add an In point or an Out point to the Timeline, Adobe Premiere Pro will use it in preference to the location of the playhead.
4. Click the Insert button on the Source Monitor.
Congratulations! You have completed an insert edit. The clip Excuse Me, already in the sequence, has been split, with the part after the playhead moved later to accommodate the new clip Mid Suit.
5. Position the playhead at the beginning of the sequence, and play through your edit. You can use the Home key on your keyboard to jump to the beginning, you can drag the playhead with the mouse, or you can press the Up Arrow key to jump the playhead to earlier edits (the Down Arrow key jumps to later edits).
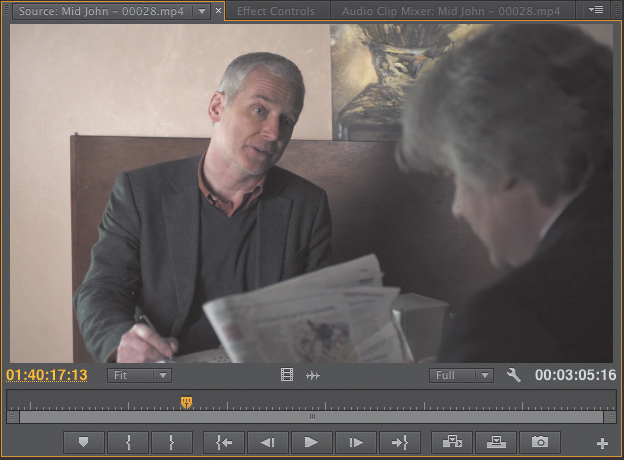
6. Open the clip Mid John in the Source Monitor. This clip already has In and Out points.
7. Position the Timeline playhead at the end of the sequence—on the end of the Excuse Me clip.
![]() Tip
Tip
Hold the Shift key while you scrub to have the playhead snap to edits on the Timeline.
8. Click either the Insert or Overwrite button on the Source Monitor. Since the Timeline playhead is at the end of the sequence, there are no clips in the way, and it makes no difference which kind of edit you perform.
Let’s insert one more.
9. Position the Timeline playhead just before John takes a sip of tea, around 00:00:14:00.
10. Open the clip Mid Suit in the Source Monitor, and, using In and Out points, choose a part you think would go well between John sitting down and his first sip of tea. An In mark around 01:15:55:00 and an Out mark around 01:16:00:00 might work well.
11. Edit the clip into the sequence using an insert edit.

The timing of the edit may not be perfect, but that’s OK. The beauty of working with a nonlinear editing system like Adobe Premiere Pro is that you can change your mind about the timing later. The important thing, to begin with, is to get the order of the clips right.
![]() Note
Note
When you use an insert edit, it makes your sequence longer. More specifically, the clips already on the selected track will move later in the sequence to make room for the new clip.
Three-point editing
To perform an edit, Adobe Premiere Pro needs to know the duration you’ll work with in both the Source Monitor and the Timeline. The duration of one can be worked out from the other, so you need only three points, or marks, not four. For example, if you choose four seconds of a clip in the Source Monitor, Adobe Premiere Pro automatically knows it will take four seconds of time in your sequence.
When you made your last edit, Adobe Premiere Pro aligned the In point from the clip (the start of the clip) with the In point on the Timeline (the playhead).
So even though you didn’t manually add an In mark to the Timeline, you are still performing a three-point edit, with the duration calculated from the Source Monitor clip.
If you add an In point to the Timeline, Adobe Premiere Pro uses that for the edit, ignoring the position of the playhead.
You can achieve a similar result by adding just an Out point to the Timeline. In this case, Adobe Premiere Pro will align the Out point of the clip with the Out point on the Timeline when you perform the edit. You might choose to do this if you have a piece of timed action, like a door closing, at the end of a clip in the sequence and your new clip needs to line up in time with it.
Storyboard editing
The term storyboard usually describes a series of drawings that show the intended camera angles and action for a film. Storyboards are often quite similar to comic strips, though they usually include more technical information, such as intended camera moves, lines of dialogue, and sound effects.
You can use clip thumbnails in a bin as storyboard images. Arrange the thumbnails by dragging and dropping them in the order you would like the clips to appear in your sequence, from left to right and from top to bottom. Then drag and drop them into your sequence or use a special automated edit feature to add them to your sequence with transition effects.
Using a storyboard to build a rough cut
An assembly edit is a sequence in which the order of the clips is correct but the timing has yet to be worked out. It is common to build sequences as an assembly first, just to make sure the structure works, and then adjust the timing later.
You can use storyboard editing to quickly get your clips in the right order.
1. Save the current project.
2. Open Desert Sequence.prproj in the Lesson 05 folder.
This project has a Desert Montage sequence that already has music. We’ll add some beautiful shots.
Arranging your storyboard
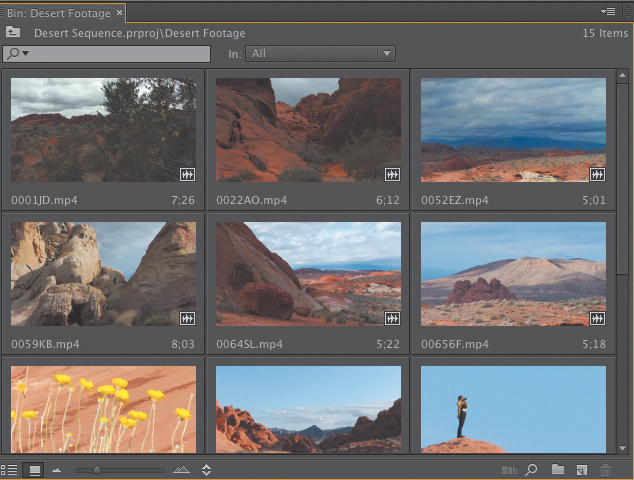
Double-click the Desert Footage bin to open it. There are a series of short shots in this bin.
1. Click the Icon View button ![]() on the bin to see thumbnails for the clips.
on the bin to see thumbnails for the clips.
2. Drag and drop the thumbnails in the bin to position them in the order you would like them to appear in the sequence.
3. Make sure the Desert Footage bin is selected. Select all of the clips in the bin by pressing Control+A (Windows) or Command+A (Mac OS).
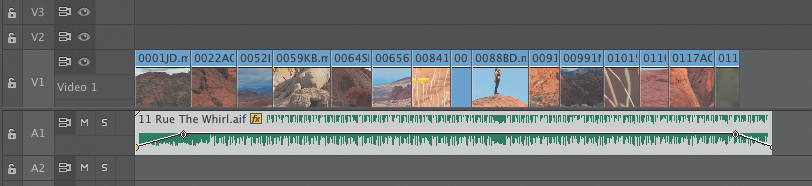
4. Drag and drop the clips into the sequence, positioning them on the Video 1 track right at the beginning of the Timeline, above the music clip.
![]() Note
Note
Adobe Premiere Pro CC has the option to sort clips in Icon view based on a number of criteria. Click the Sort Icons ![]() button for the options. Be sure to leave the menu set to User Order to be able to drag and drop the clips to a new order.
button for the options. Be sure to leave the menu set to User Order to be able to drag and drop the clips to a new order.
5. Play your sequence to see the result.
Automating your storyboard to a sequence
In addition to dragging and dropping your storyboard edit into the Timeline, you can use the special Automate To Sequence option.
1. Undo your edit by pressing Control+Z (Windows) or Command+Z (Mac OS), and position your Timeline playhead at the very beginning of the Timeline.
2. In the bin, with your clips still selected, click the Automate To Sequence button.
Automate To Sequence, as the name suggests, automatically adds your clips to the currently displayed sequence. Here are the options:
• Ordering: This positions clips in your sequence in the order they appear in the bin or in the order you click to select them.
• Placement: By default, the clips will be added one after another. If you have markers on the Timeline (perhaps in time with the beat of your music), you can add clips wherever there is a marker.
• Method: Choose between Insert and Overwrite.
• Clip Overlap: Automatically overlaps the clips to allow for a special-effect transition.
• Transitions: Choose to have a video or audio transition automatically added between each clip.
• Ignore Options: Choose to exclude the video or audio parts of your clips.
3. Set up the Automate To Sequence dialog so that the settings match the figure (the Ignore Audio option especially), and click OK.
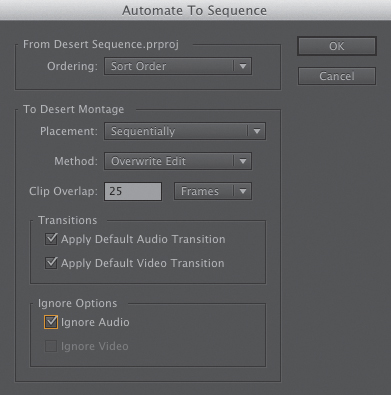
This time, the clips are overlapping with a special-effect dissolve. Note that the overlap decreases the total duration for the sequence.
Review questions
1. What do In and Out points do?
2. Is the Video 2 track in front of the Video 1 track or behind it?
3. How do subclips help you stay organized?
4. How would you select a part of your sequence to work with?
5. What is the difference between an overwrite edit and an insert edit?
6. How much of your source clip will be added to a sequence if it has no In or Out point?
Review answers
1. In the Source Monitor, In and Out points define the part of a clip you would like to use in a sequence. On the Timeline, In and Out points are used to define parts of your sequence you would like to remove. They can also be used to define parts of your sequence you would like to render when working with effects and parts of your Timeline you would like to export to create a new video file.
2. Upper video tracks are always in front of lower ones.
3. Though subclips make little difference to the way Adobe Premiere Pro plays back video and sound, they make it easier for you to divide up your footage into different bins. For larger projects with lots of longer clips, it can make a big difference to be able to divide up content this way.
4. You’ll use In and Out marks to define parts of your sequence you would like to render when working with effects or parts of your sequence you would like to export to make a file you can share.
5. Clips added to a sequence using an overwrite edit replace any content already in the sequence where they are placed. Clips added to a sequence using an insert edit displace existing clips, pushing them later (to the right).
6. If you don’t add In or Out points to your source clip, Adobe Premiere Pro will use the entire clip when you add it to a sequence. Just using one of the two marks will limit the part used.