
Getting Started
The tools for creating and broadcasting a professional-quality video have never been as accessible as they are today, thanks to more affordable and powerful recording equipment and computers, broadband Internet, and user-friendly software.
The digital video tools available in Adobe Creative Cloud offer industry-standard applications for project organization, video and audio editing, animation, and final encoding for delivery.
About Classroom in a Book
Digital Video with Adobe Creative Cloud Classroom in a Book® is part of the official training series for Adobe graphics and publishing software. The lessons are designed so you can learn at your own pace. If you’re new to the software in Adobe Creative Cloud, you’ll learn the fundamental concepts and features you’ll need to use the programs. This book also teaches many advanced features, including tips and techniques for using the latest version of this software.
You’ll learn how to:
• Format a script in Adobe Story and learn the basics of its online features to collaborate with other members of your creative team
• Ingest footage and add searchable metadata to your video clips with Adobe Prelude
• Use Adobe Premiere Pro as the creative hub in which you’ll do a refined edit of your movie and add visual effects and titles
• Use Adobe Photoshop to edit still images with the new Smart Sharpen filter.
• Use Adobe Illustrator to create a lower third graphic
• Create motion graphics in Adobe After Effects and integrate 3D animations with the MAXON CINEWARE plug-in
• Create the final audio mix of your edit using Adobe Audition
• Use the enhanced Three-Way Color Corrector effect in Adobe Premiere Pro to color correct your edit
• Create grading presets with Adobe SpeedGrade
• Create files for the Internet and mobile devices with Adobe Media Encoder
• Apply a media playback skin to your exported movie file with Adobe Flash Professional
• Upload and promote your media with Adobe Creative Cloud
Prerequisites
Before beginning to use Digital Video with Adobe Creative Cloud Classroom in a Book, make sure your system is set up correctly and that you’ve installed the required software and hardware. You can view updated system requirements by visiting the specific software pages in the Video category at www.adobe.com/products/creativecloud.html.
You should have a working knowledge of your computer and operating system. You should know how to use the mouse and standard menus and commands, and also how to open, save, and close files. If you need to review these techniques, see the printed or online documentation included with your Windows or Mac OS system.
Installing software in Adobe Creative Cloud
You must purchase an Adobe Creative Cloud subscription separately from this book. For system requirements and complete instructions on installing the software, visit www.adobe.com/support. You can purchase Adobe Creative Cloud by visiting www.adobe.com/products/creativecloud and following the onscreen instructions.
Hardware requirements
The basic hardware requirements needed to run the software in Adobe Creative Cloud are as follows:
For Windows
• Intel Core™2 Duo or AMD Phenom II processor with 64-bit support; Intel Core i7 processor required for Adobe SpeedGrade
• Microsoft Windows 7 with Service Pack 1 (64 bit)
• 4 GB of RAM (8 GB recommended)
• 21.2 GB of available hard-disk space for installation; additional free space required during installation (cannot install on removable flash storage devices)
• Additional disk space required for disk cache, preview files, and other working files (10 GB recommended)
• 1280×800 display
• 7200 RPM hard drive (multiple fast disk drives, preferably RAID 0 configured, recommended)
• Sound card compatible with ASIO protocol or Microsoft Windows Driver Model
• OpenGL 2.0–capable system
• QuickTime 7.6.6 software required for QuickTime features
• Optional: Adobe-certified GPU card for GPU-accelerated performance
• Internet connection and registration are necessary for required software activation, membership validation, and access to online services
For Mac OS
• Multicore Intel processor with 64-bit support
• OS X v10.7 or v10.8
• 4 GB of RAM (8 GB recommended)
• 21.2 GB of available hard-disk space for installation; additional free space required during installation (cannot install on a volume that uses a case-sensitive file system or on removable flash storage devices)
• Additional disk space required for disk cache, preview files, and other working files (10 GB recommended)
• 1440×900 display
• 7200 RPM hard drive (multiple fast disk drives, preferably RAID 0 configured, recommended)
• OpenGL 2.0–capable system
• QuickTime 7.6.6 software required for QuickTime features
• Optional: Adobe-certified GPU card for GPU-accelerated performance
• Internet connection and registration are necessary for required software activation, membership validation, and access to online services
Optimizing performance
Editing video is memory- and processor-intensive work for a computer. A fast processor and a lot of RAM will make your editing experience faster and more efficient; 4 GB of RAM is the minimum, and 8 GB or more is best for high-definition (HD) media. Adobe Creative Cloud takes advantage of multicore processors on Windows and Macintosh systems.
A dedicated 7200 RPM or faster hard drive is recommended for HD media. A RAID 0 striped disk array or SCSI disk subsystem is strongly recommended for HD. Performance will be significantly affected if you attempt to store media files and program files on the same hard drive. Be sure to keep your media files on a second drive if at all possible.
The Mercury Playback Engine in Adobe Premiere Pro and the Global Performance Cache in Adobe After Effects can operate in software-only mode or in GPU acceleration mode. The GPU acceleration mode provides significant performance improvement. GPU acceleration is possible with select video cards. You can find a list of these video cards on the Adobe website at www.adobe.com/products/premiere/tech-specs.html.
How to use these lessons
Each lesson in this book provides step-by-step instructions for creating one or more specific elements of a real-world project. The lessons stand alone, but most of them build on previous lessons in terms of concepts and skills. So, the best way to learn from this book is to proceed through the lessons in sequential order.
The organization of the lessons is workflow-oriented rather than feature-oriented, and the book uses a real-world approach. The lessons follow the typical sequential steps that creative media makers use to complete a project: writing a script; acquiring video; laying down a cuts-only sequence; adding effects; creating a motion graphic sequence; sweetening the audio track; color-correcting video clips; exporting the project as a movie file for the web, a portable device, or Flash; and ultimately sharing with others online.
Copying the lesson files and bonus chapters
The lessons in Digital Video with Adobe Creative Cloud Classroom in a Book use specific source files, such as video clips, audio files, and image files created in Adobe Photoshop CC and Adobe Illustrator CC. To complete the lessons in this book, you must download all the lesson and media files from www.peachpit.com.
Also included with this book are two bonus chapters that cover advanced topics in editing (Chapter 4) and motion graphics (Chapter 6). The lesson files for those chapters are also included at www.peachpit.com (see step-by-step instructions below).
You’ll need about 11.4 GB of total storage space. This includes 830 MB for the files from the website in addition to the 10.5 GB you need to install the software used in this book. It is also recommended that you have at least 10 GB of additional storage space for disk cache, preview files, and other working files.
Although each lesson stands alone, some lessons use files from other lessons, so you’ll need to keep the entire collection of lesson assets on your hard drive as you work through the book.
To access the Classroom in a Book files:
1. On a Mac or Windows computer, go to www.peachpit.com/redeem and enter the code found at the back of your book.
2. If you do not have a Peachpit.com account, you will be prompted to create one.
The download files will be listed in the Lesson & Update Files tab on your Account page.
![]() Note
Note
If updates to this book are posted, those updates will also appear on your Account page at www.peachpit.com.
3. Click the lesson file links to download them to your computer.
This process may take some time to complete, depending on the speed of your computer and Internet connection.
4. Unzip the lesson files and media files.
Relinking the lesson files
It is possible that the file path to the lesson files may need to be updated.
If you open an Adobe Premiere Pro project and it cannot find a media file, a dialog may open and ask Where is the File MEDIA.mov? If this happens, you’ll need to navigate to one of the offline files to reconnect. Once you’ve reconnected one file in the project, the rest should reconnect.
If you open an Adobe After Effects project and it cannot find a media file, a window will open telling you that a number of files are missing. Look through your Project panel to find italicized filenames of imported media. Double-click each of these filenames and navigate to the offline files to reconnect them. To find the files:
• You can navigate to the same location where you put the files you downloaded for this book. You may need to look in some of the included folders to find the media file.
• You can use the search field in the OS dialog to search for the file by name.
When you locate a file, just select it and click the Open button.
Interpreting the frame rate of linked files
As of this writing, Premiere Pro project files do not retain their interpret-footage settings on clips that don’t require relinking. For the exercises in some lessons in this book to work properly, you must complete the following steps.
All provided RED clips must be modified to have a frame rate of 48 frames per second (fps). They were all shot at 48 fps, but you will be putting them into a sequence that will play at 23.976 fps. If the RED clips play at 23.976 fps, they will play too slowly.
1. In the Premiere Pro Project panel, click in the search field. If there is any text there, select and delete it. Type .R3D and press Return (Enter) to search for all clips with the .R3D file extension.
The .R3D clips are revealed.
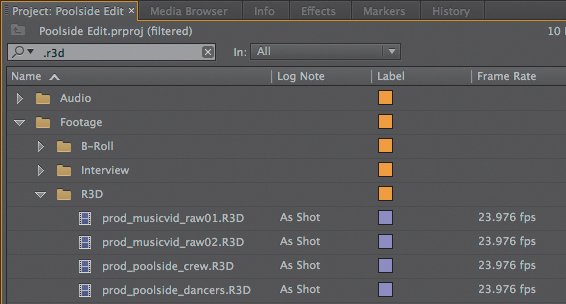
2. With the Selection tool, marquee-select all of these .R3D clips.
3. Choose Clip > Modify > Interpret Footage.
4. In the Modify Clip window, in the Frame Rate settings, select “Assume this frame rate” and enter 48 in the text field.
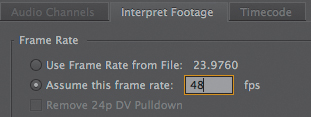
5. At the bottom of the Modify Clip window, click OK.
Under the Frame Rate column in the Project panel, note the interpreted frame rate of the RED clips.
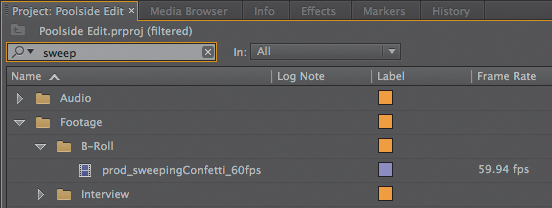
6. In the Project panel search field, click the X button to clear the field. Then type sweep into the search field and press Return (Enter) to find the clip prod_sweepingConfetti_60fps.m4v.
This clip was shot at 59.94 fps, but you will want it to play back slowly in your 23.976 fps sequence. Therefore, you want Premiere Pro to interpret its frame rate at 23.976 fps.
7. Select this clip, then choose Clip > Modify > Interpret Footage.
8. In the Modify Clip window, in the Frame Rate settings, select “Assume this frame rate” and enter 23.976 in the text field.
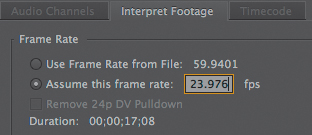
9. At the bottom of the Modify Clip window, click OK.
Note the modified frame rate of this clip in the Project panel.
10. In the Project panel search field, click the X button to clear the field.
Additional resources
Digital Video with Adobe Creative Cloud Classroom in a Book is not meant to replace documentation that comes with the program or to be a comprehensive reference for every feature. Only the commands and options used in the lessons are explained in this book. For comprehensive information about program features and tutorials, please refer to these resources:
Adobe Creative Cloud Help and Support. www.adobe.com/support is where you can find and browse Help and Support content on adobe.com.
Adobe Creative Cloud Learning. For inspiration, key techniques, cross-product workflows, and updates on new features, go to the Creative Cloud Learn page at https://helpx.adobe.com/creative-cloud/tutorials.html. Available only to Creative Cloud members.
Adobe Forums. http://forums.adobe.com lets you tap into peer-to-peer discussions, questions, and answers on Adobe products.
Adobe TV. http://tv.adobe.com is an online video resource for expert instruction and inspiration about Adobe products, including a How To channel to get you started with your product.
Resources for educators. www.adobe.com/education and http://edex.adobe.com offer a treasure trove of information for instructors who teach classes on Adobe software. Find solutions for education at all levels, including free curricula that use an integrated approach to teaching Adobe software and can be used to prepare for the Adobe Certified Associate exams.
Also check out these useful links:
Adobe Marketplace & Exchange. www.adobe.com/cfusion/exchange is a central resource for finding tools, services, extensions, code samples, and more to supplement and extend your Adobe products.
Adobe Creative Cloud product home page. Go to www.adobe.com/products/ creativecloud has for more information about this product.
Adobe Labs. labs.adobe.com gives you access to early builds of cutting-edge technology as well as to forums where you can interact with the Adobe development teams building that technology and with other like-minded members of the community.
Adobe certification
The Adobe training and certification programs are designed to help Adobe customers improve and promote their product-proficiency skills. There are four levels of certification:
• Adobe Certified Associate (ACA)
• Adobe Certified Expert (ACE)
• Adobe Certified Instructor (ACI)
• Adobe Authorized Training Center (AATC)
The Adobe Certified Associate (ACA) credential certifies that individuals have the entry-level skills to plan, design, build, and maintain effective communications using different forms of digital media.
The Adobe Certified Expert program is a way for expert users to upgrade their credentials. You can use Adobe certification as a catalyst for getting a raise, finding a job, or promoting your expertise.
If you are an ACE-level instructor, the Adobe Certified Instructor program takes your skills to the next level and gives you access to a wide range of Adobe resources.
Adobe Authorized Training Centers offer instructor-led courses and training on Adobe products, employing only Adobe Certified Instructors. A directory of AATCs is available at http://partners.adobe.com.
For information on the Adobe Certified programs, visit www.adobe.com/support/certification/index.html.