Chapter Three. Shooting Weddings Like a Pro
There Is No Retaking Wedding Photos. It Has Got to Be Right the First Time!
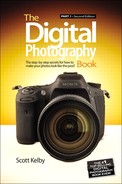
SHUTTER SPEED: 1/25 SEC F-STOP: F/2.8 ISO: 1000 FOCAL LENGTH: 82MM | PHOTOGRAPHER: SCOTT KELBY

If you’re living your life and you think to yourself, “Ya know, I’ve got it pretty easy,” then it’s time to shoot a wedding. Don’t worry, this isn’t something you’re going to have to go looking for—if you’ve got even one long lens (200mm or longer), it will find you. That’s because in a lot of people’s minds, if you have a long lens, you’re a serious photographer. It’s true. Seriously, try this: show up at an event with a 200mm to 400mm lens on your camera and people will literally get out of your way. They assume you’ve been hired by the event and that you’re on official photography business, and they will stand aside to let you shoot. It’s the equivalent of walking into a factory with a clipboard—people assume you’re legit and they let you go about your business. Add a photographer’s vest and it’s like having an official press pass to anything (try this one—you’ll be amazed). Anyway, if you have a long lens, before long someone you know will get married but they won’t have a budget for a professional photographer (like your cousin Earl). He’ll ask, “Can you shoot our wedding photos?” Of course, you’re a nice person and you say, “Why sure.” Big mistake. You’re going to work your butt off, miss all the food, drinks, and fun, and you’ll experience stress at a level only NORAD radar operators monitoring North Korea ever achieve. A wedding ceremony happens once in real time. There are no second takes, no room for mess-ups, no excuses. Don’t make Earl’s bride really mad—read this chapter first.
Tricks for Low-Light Shooting in a Church, Part 1
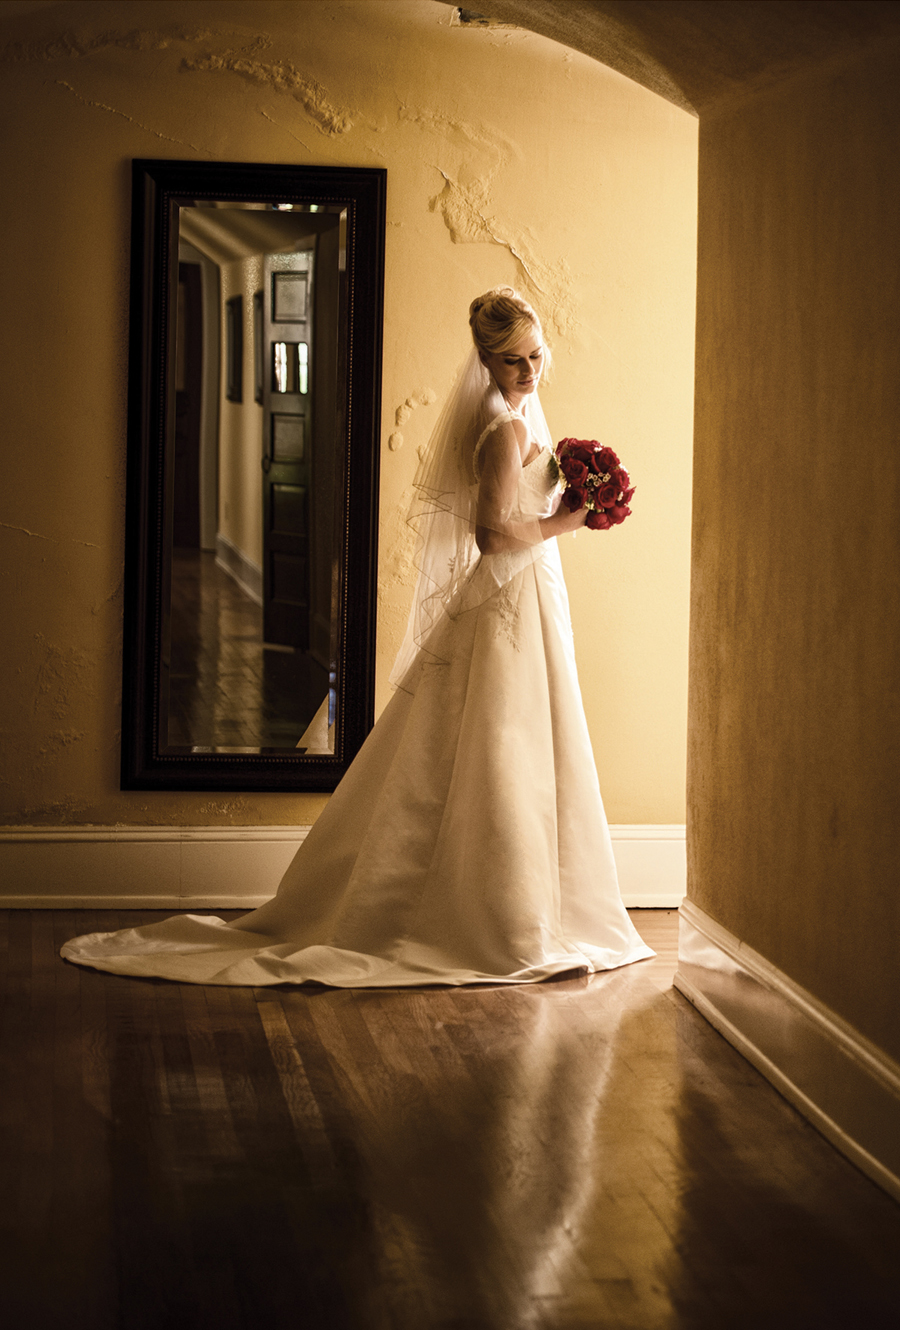
Although you usually should use a tripod when shooting the formals (the group shots after the ceremony with the bride, groom, family members, etc.), when shooting the wedding ceremony in a low-light situation like a church, you’ll probably need to hand-hold your shots. This is a problem because hand-holding in low-light situations is almost a guarantee of having blurry photos. Here’s why: When there’s low lighting, your camera compensates for it by slowing down the shutter speed to take in more light so it can make a proper exposure. So, your exposure will still be right, but chances are your photos will wind up being blurry because the shutter speed isn’t fast enough. Any tiny little movement on your part equals blurry photos. So, how do the pros get those crisp low-light shots in a setting like a church? Well, one thing they do is increase their digital camera’s ISO setting, which raises the camera’s shutter speed (you generally need a shutter speed of at least 1/60 of a second for non-blurry photos). Luckily, today’s DSLR cameras let you shoot at high ISOs with little visible noise. So, how high can you go? At least ISO 800, but you can usually get away with as high as ISO 1600 in most situations (or more, depending on your camera model—generally, the more expensive the camera, the less noise you’ll see shooting at high ISOs). So, now that you know what to do, here’s how to do it: Aim at the low-light scene you want shoot, press your shutter button halfway down, and look in your viewfinder to see what your shutter speed will be. If it’s slower than 1/60 of a second, you’re going to need to crank up the ISO until you see your shutter speed hit at least 1/60 of a second or faster (then hold your camera very steady).
Tricks for Low-Light Shooting in a Church, Part 2
The second trick wedding pros use to shoot in low-light situations is to shoot with a fast lens to let in more light (by that, I mean a lens where the largest available f-stop is something like f/1.4 or f/1.8, or maybe f/2.8—lower numbers are better). Once you have one of these lenses, shooting at these fast f-stops (let’s use f/1.8, for example) lets a lot more light in, which gives you faster shutter speeds so you don’t have to raise your ISO nearly as much (or at all). Since we know that raising our ISO adds at least some noise to our photos, if we have a choice, we’d rather use a fast lens than crank up our ISO. Now, depending on how dark it is where you’re shooting, you might still have to increase the ISO amount, even when using one of these fast lenses at it’s wide-open (lowest number) setting, but you’ll have to raise it less, which means less noise.
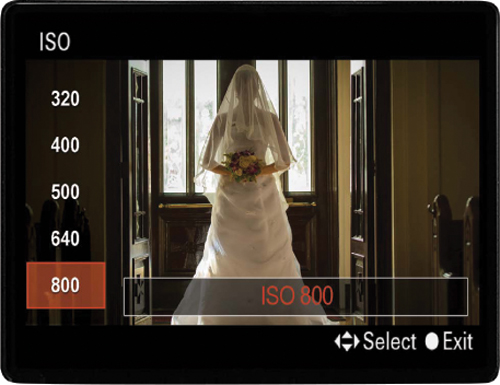
Do You Really Need the f/1.4 Lens?
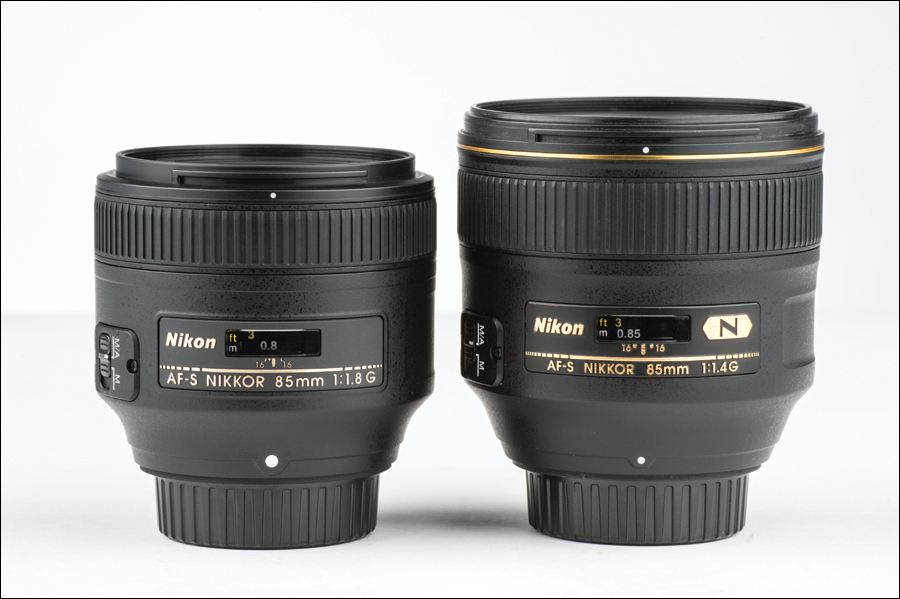
So, now you know that wedding pros use fast lenses to shoot in lower light with less noise, so having one of these in your wedding shoot camera bag makes a lot of sense. However, how fast of a lens do you really need? The two most popular fast lens sizes for wedding photographers these days are probably the 50mm prime and the 85mm prime (prime means it’s not a zoom lens, it’s stuck at that one focal length). Okay, so now do you need the f/1.4 or the f/1.8? This I can help with: At the time this book was published, a Nikon 50mm f/1.8 lens sold for around $125 (over at B&H). However, to get just 2/3 of a stop more light, the Nikon 50mm f/1.4 sold for around $330 (nearly triple the price). Besides the obvious price difference, you need to be more accurate with your focus shooting at f/1.4 than you do shooting at f/1.8 (shooting a close object with either is going to create a very shallow depth of field. For example, if you shoot a close-up portrait at f/1.4, the tip of your subject’s nose could be in focus, but then their eyes would be a bit out of focus, and their hair would be way out of focus). For that reason, I’m personally more likely to shoot at f/1.8 (it gives me a little more latitude, and a little more area in focus). As for quality, there’s a lot of debate as to whether anyone can really see the quality difference between the f/1.4 or the f/1.8, so for most folks, I recommend going with the less expensive f/1.8 lens (so, who would I recommend buy the f/1.4 model? That’s easy—rich doctors).
Getting Soft, Diffused Light with Flash, Part 1
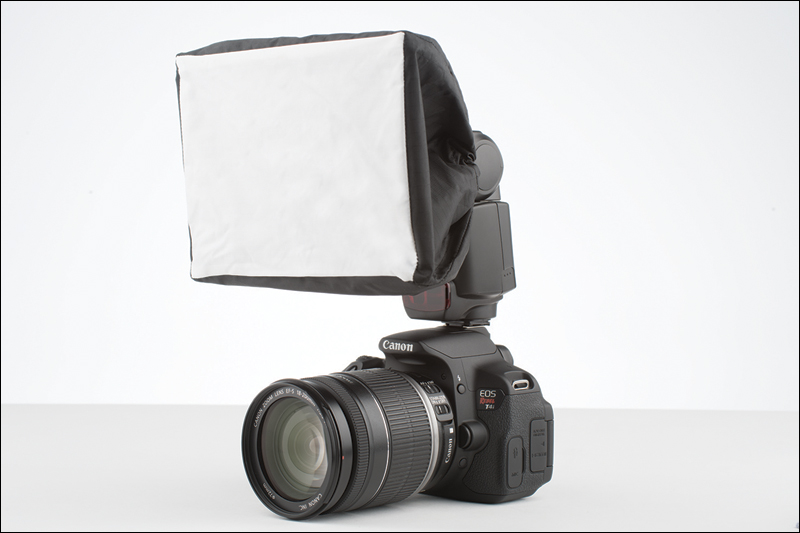
If you’re shooting your weddings with a flash indoors, you’re likely to get harsh shadows and unflattering, flat light, but it doesn’t have to be that way. The trick for getting soft, diffused light is to get a flash diffuser of some sort. One of the most popular ones these days is the Westcott Micro Apollo Softbox (shown above), which runs around $30. Another popular flash diffuser is Gary Fong’s Lightsphere Collapsible, which sells for around $45. Both attach over your flash unit, and do a great job of softening the light and dispersing it evenly. This will make a big difference in the quality of the light that falls on your bride, groom, and bridal party, and you’ll get much more professional results for a very small investment.
Getting Soft, Diffused Light with Flash, Part 2
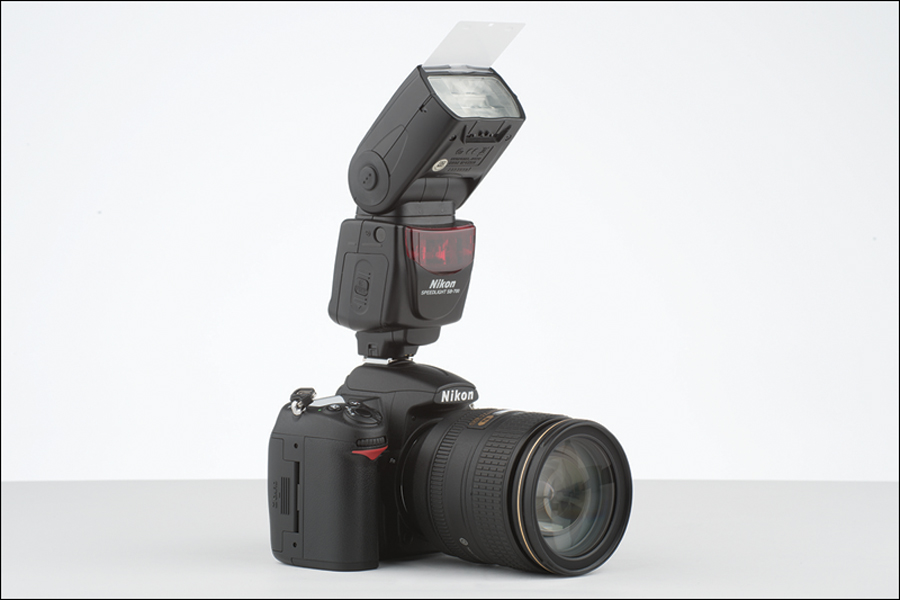
The other method of getting soft, diffused, and better yet, directional light using a flash (the key word here is directional, because it keeps your flash shots from looking flat) works if you’re using an external flash unit (and not the built-in flash on your camera, which is pretty limited, as you’ll soon see). The advantage of an external flash unit is that you can change the angle and direction of the flash. The reason this is cool is that instead of aiming your flash right into your subject’s face (which gives the most harsh, flat light you can imagine), you can bounce the light off one of two places: (1) The ceiling. If the room you’re shooting in has a white ceiling (and chances are the ceiling is white), then you can aim your flash head up at the ceiling at a 45° angle (as shown above, and provided that the ceiling isn’t more than 10 feet tall) and the ceiling will absorb the harsh light, and what will fall on your subject is much softer, smoother light and, best of all, it won’t cast hard shadows behind your subject. Instead, your soft shadows will cast on the ground (and out of your frame). Now, want to take this up another notch? Then instead of aiming at the ceiling, (2) have an assistant (a friend, relative, etc.) hold a reflector on your left or right side, slightly above shoulder height, and angle your flash head into that. So now, the reflector eats up the harsh light, but better yet, since the reflector is at an angle, it casts soft directional light on an angle, too. This puts soft shadows on one side of the bride’s (groom’s, bridesmaid’s, etc.) face, giving a more pleasing and less flat lighting effect (think of it as side lighting).
Use Your Flash at Outdoor Weddings
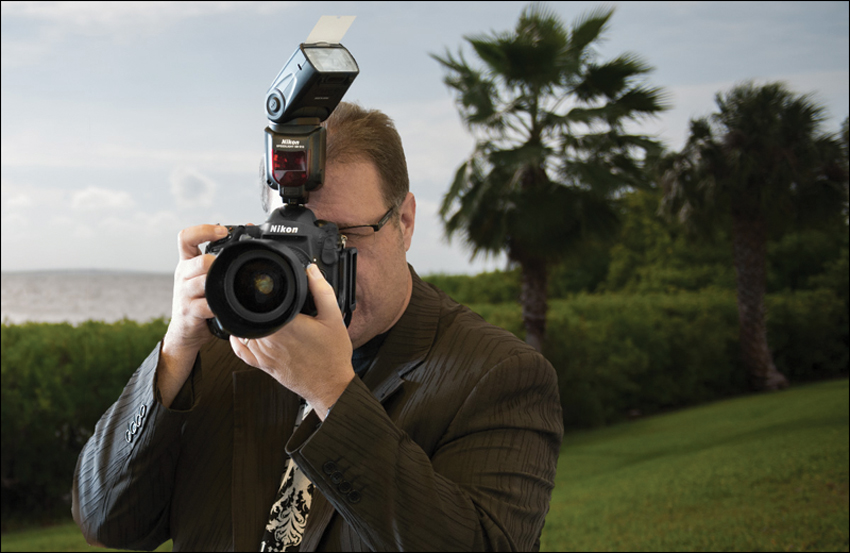
One trick that wedding photographers have been using for years is to use fill flash outdoors on sunny days. I know, it sounds crazy to use a flash when the sun is bright in the sky, but wedding photographers add flash to these daylight shots to help eliminate those hard, harsh shadows in their subjects’ faces, and make the bride and groom look more natural under these undesirable lighting conditions (plus it usually adds nice catchlights in the eyes of your subjects, as well). Always check the results in your LCD monitor to make sure your light is properly balanced. Here’s a shot of me taken while shooting a recent wedding. Notice the flash doesn’t fire straight into the wedding party’s faces. Instead, the head is rotated to the right (or left) and tilted 45°, so the flash fills in the shadows yet doesn’t have that harsh look you’d get by aiming the flash straight at your subjects. As long as you’re not more than 8 or 10 feet away from your subject, don’t worry—the flash will still be effective, even though it’s not aiming straight on.
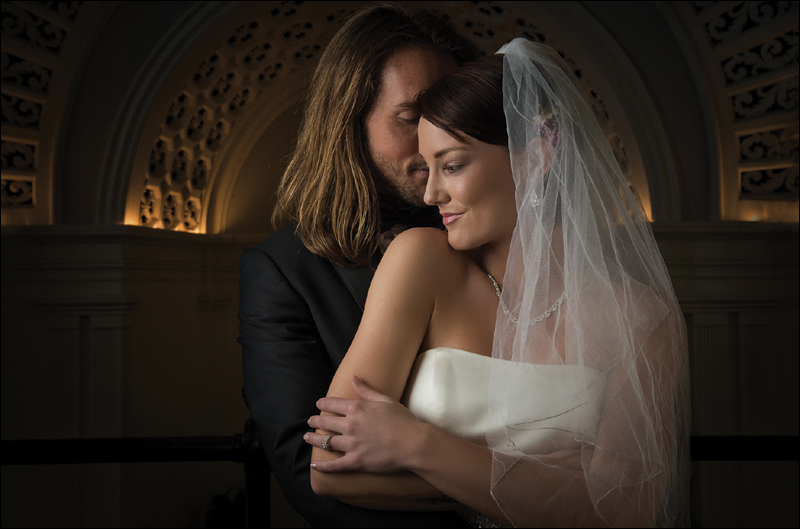
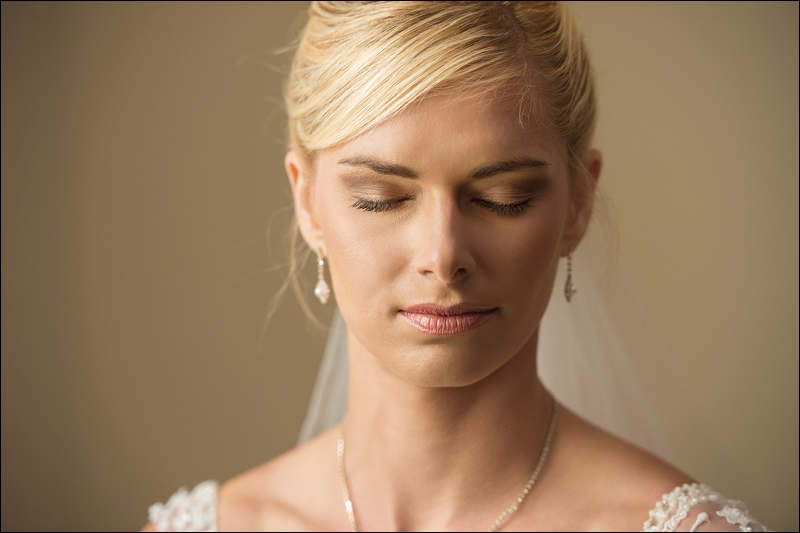
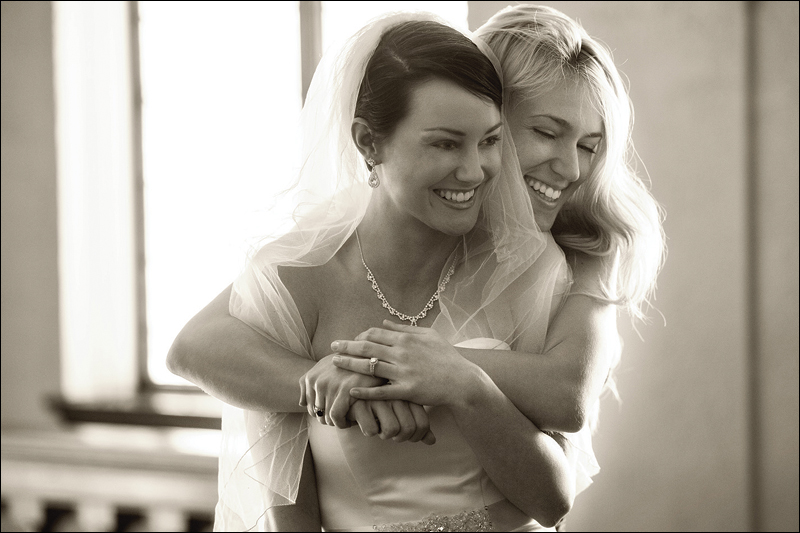
Finding That Perfect Bridal Light
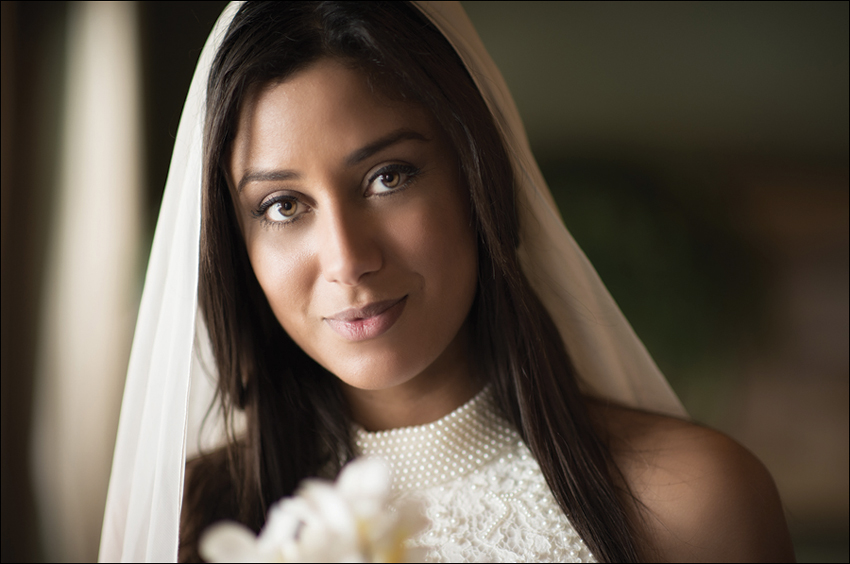
At most weddings there is a spot with really spectacular light just waiting for you to walk over and find it, but once you find it, you have to know how to use it. That light, of course, is natural light coming in through a window (it’s hard to make a photo look bad in that light). Look for a window that doesn’t have direct sunlight (a window facing north usually works well to provide some soft, diffused light). So, once you find this wonderful natural side light coming in from a window, where do you place the bride? Ideally, about 6 to 8 feet from the window, so the light falls evenly and softly upon her (almost sounds like a song, doesn’t it?). This is a great spot for shooting some pre-wedding shots of the bride alone, the bride with her mother, and the bride with her father.
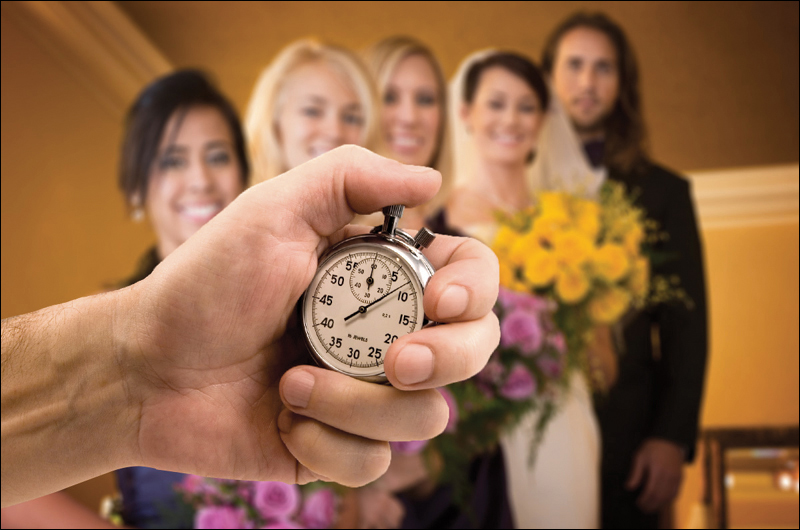
A very famous wedding photographer gave me some great advice one day about shooting the formals (the posed group portraits, usually taken after the ceramony, of the bride and groom posed with the wedding party, with just the bridesmaids, just the groomsmen, just the bride’s parents, just the groom’s parents, and so on). He said, “Get the formals over fast. You have to do them, but nobody cares about them.” They don’t usually include a special or touching moment and they’re rarely photos anybody talks about after the wedding (unless, of course, you forget to do them). So, get everybody together, knock those shots out, and move on to the important job of capturing the moments that do matter.
Formals: Who to Shoot First
After the ceremony, in most cases you’ll shoot the formal portraits of the bride and groom posed with everyone from bridesmaids to grandparents. The hard part is rounding up all the people you’ll need to shoot with the bride and groom at the exact time you need them. This can take 30 minutes or three hours—it’s up to you and how organized you are. Here’s a tip to make things move as quickly as possible: gather everyone that will appear in any shot together right from the start. While they’re all sitting there, shoot the formal bride and groom portraits first (you’ll see why in just a moment). Once you’ve got those out of the way, shoot the largest groups of people (the huge family portraits), and then once you’re done with a group (like the grandparents for example), send them off to the reception. So, in short—start with everyone, and then as you shoot them, release them to go to the reception until you’re left with just the bride and groom again. If you don’t do it this way, you’ll wind up standing around for long periods of time waiting for Uncle Arnie, who’s somewhere in the reception hall. The reason you shoot the bride and groom first is that the pressure to get the bride and groom to the reception hall increases exponentially as time goes by, because generally they hold the meal until the bride and groom have arrived. So, everyone is sitting in the reception hall waiting on you—the photographer. You then wind up rushing the most important portraits of them all (the ones the couple will actually buy—their formal portraits). Make your life easy—start big, then get small.
There’s a popular format for creating all your formals—have the bride and groom in the center, and have them stay put. They don’t move—instead you have groups of other people (bridesmaids, groomsmen, the best man, maid of honor, parents, grandparents, etc.) move in and out around them. Use the bride and groom as building blocks and everything will be much easier (well, as far as posing your large groups goes anyway).
How to Pose the Bride with Other People
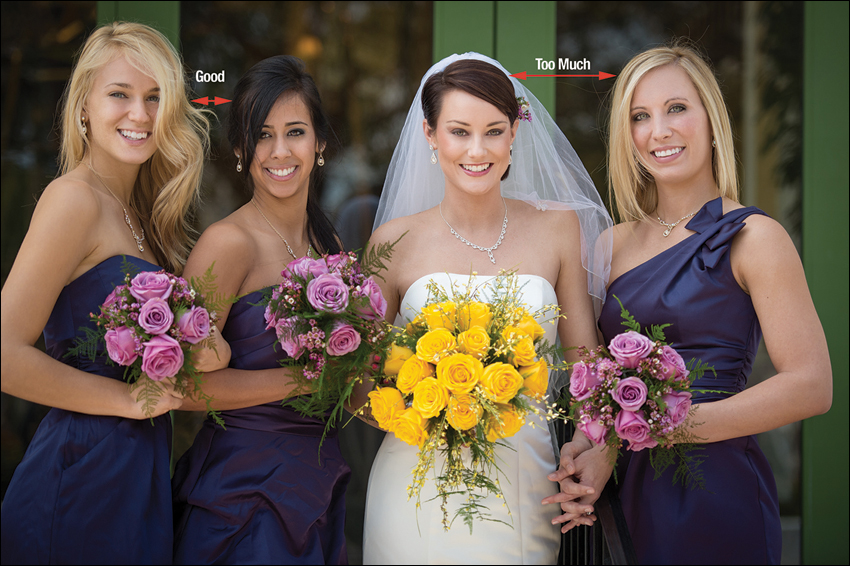
When you’re posing other people with the bride, including the groom, to create the level of closeness you’ll want in your photos, be sure to position the heads of the bride and the other person very close to each other. This doesn’t sound like it would be a problem, until you actually start posing people. When they fall into what feels like a natural pose, they leave way too much room between their head and the bride’s head. While this may look perfectly natural in person, the photos will lack a closeness that will be really obvious. I’ve seen this again and again, and I constantly have to remind people, even the groom, to move their head in very close to the bride’s. To them, it just feels unnatural being that close while posing, but if they don’t do it, your shots will look stiff and unnatural. Keep an eye out for this on your next wedding shoot and you’ll be amazed at how the level of closeness between your subjects goes up, giving you much more powerful images.
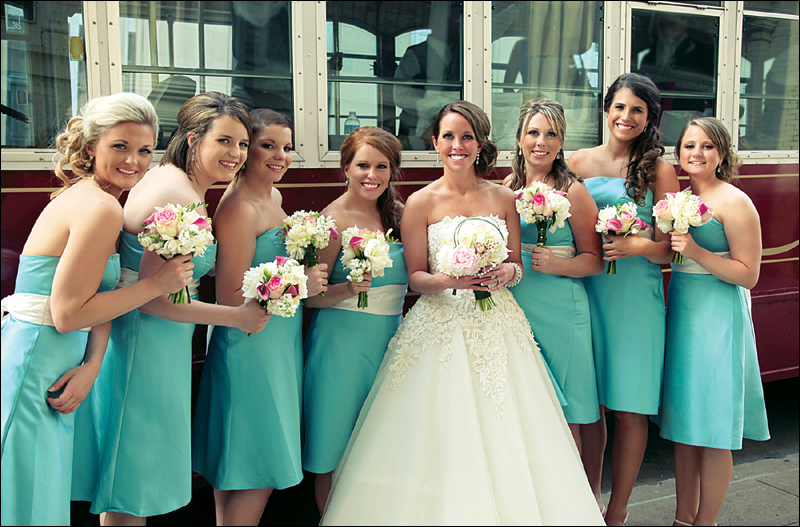
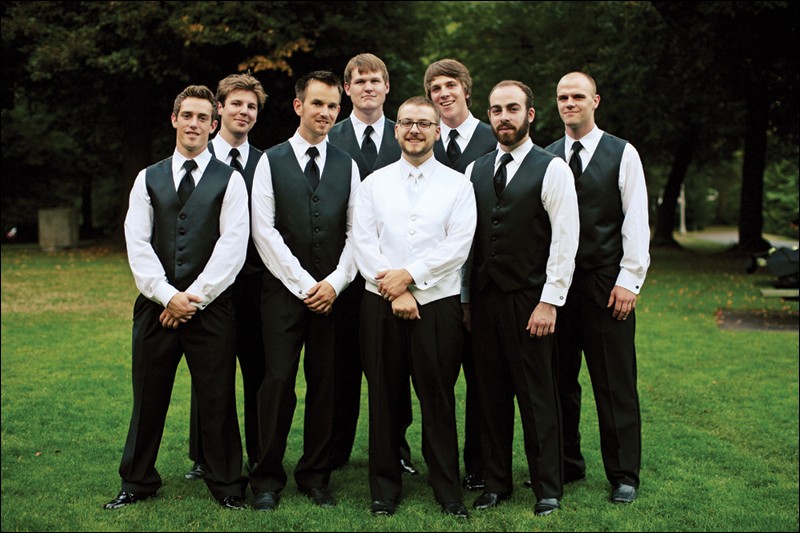
The Trick to Keeping Them from Blinking
If you shoot a group of five people or more, it’s almost guaranteed that one or more people will have their eyes shut. It’s another natural law of wedding photography, but you’re not going to have to worry about that very much, because you’re about to learn a great trick that will eliminate most, if not all, instances of people blinking or having their eyes closed. When you’re ready to shoot the shot, have everybody close their eyes, and then on the count of three have them all open their eyes and smile. Then, wait one more count before you take your shot. When I’m shooting these groups, here’s what I say, “Okay, everybody close your eyes. Now open them on 3-2-1...open!” Then I wait one count after they open their eyes before I take the shot. It works wonders.
When shooting large groups for the formal portraits, you’ll want to make sure that you use an aperture setting that keeps everyone in focus. Try f/11 for a reasonable depth of field for groups. Now, where do you focus? If you have more than one row of people deep, the old rule (which still stands true today) is to focus on the eyes of the people in the front row. You have more depth behind than in front, so make sure you focus on them, and the rest should be okay, but if that front row is out of focus, the whole shot is a bust.
Formals: How High to Position Your Camera
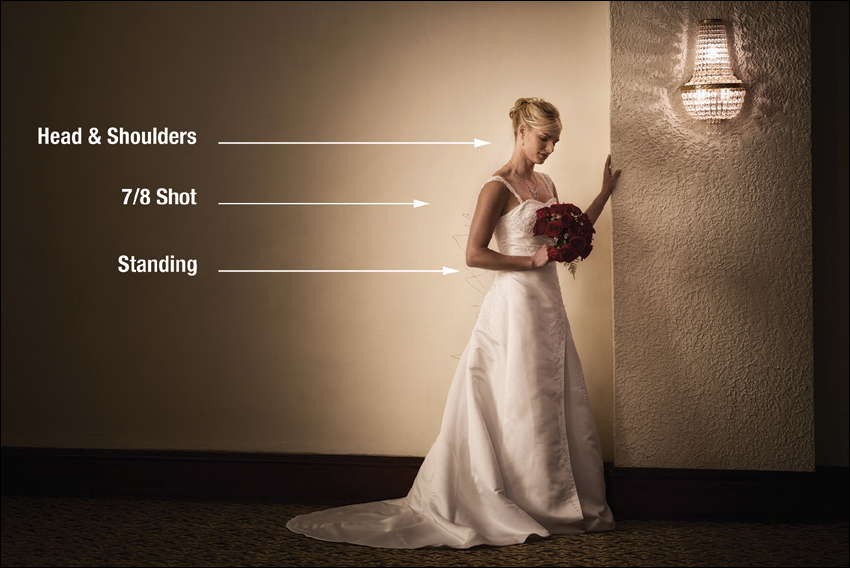
When you’re shooting your formal shots, the height that you position the camera is actually very important, because if it’s not positioned correctly, your subject’s body can look distorted or some parts can look larger than normal (in general, this is just not good stuff). So, finding the right height for professional portraits is critical. Here are a few guidelines to help you get the pro look:
Standing, Full-Length Portrait: Position your camera (on your tripod) at the bride’s waist height (yes, you’ll have to squat down/bend over, etc., but the final result will be worth it). Keep your lens straight (don’t aim up toward the bride’s face).
⅞ Shots (from the Calf Up): Position your camera (on your tripod) at the bride’s chest level and shoot with your lens straight from there.
Head and Shoulders Shots: Position your camera (on your tripod) either at the bride’s eye level or slightly above.
Formals: Don’t Cut Off Joints
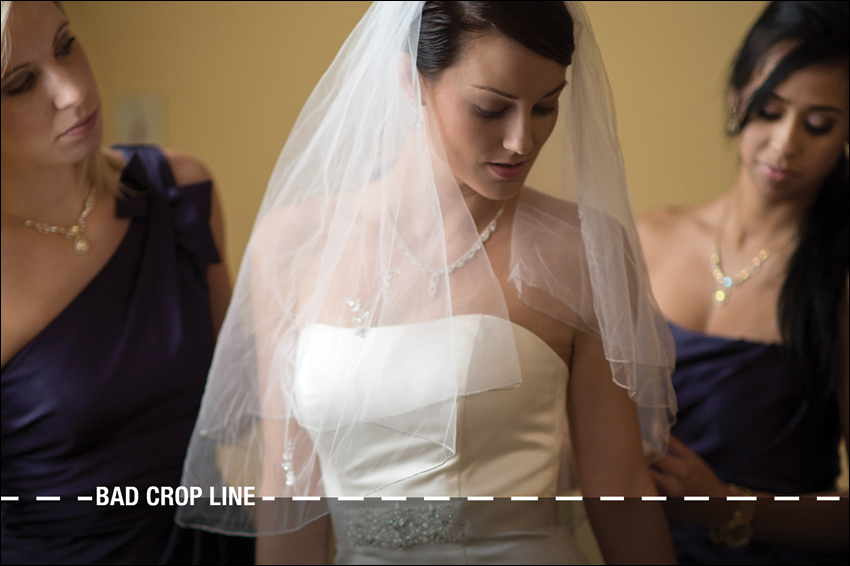
When you’re framing your formals in your viewfinder, for a more professional look, be careful not to cut off anyone at the joints (in other words, don’t let the bottom of the frame cut anyone off at the elbow or knee. On the side of the frame, don’t cut anyone off at the wrist or elbow either). Basically, stay away from the joints. If you have to crop an arm or leg off, try to do it as close to the middle of the arm or leg as possible, staying clear of the joints. ‘Nuf said.
Formals: The Trick to Great Backgrounds
In formal portraits, the backgrounds are just that—backgrounds. And the key to a great background is using a very simple one. The simpler, the better. So don’t look for an outdoor shot with a waterfall, 36 different kinds of plant life, and flowers blossoming from hanging vines, etc. Look for simplicity or it will greatly distract from your portraits, and give your formals an uncomfortable look (yet nobody will know why). Plus, if for any reason you have to retouch the background later in Photoshop, the less busy the background, the easier your retouch will be.
Reception Photos: Making Them Dance
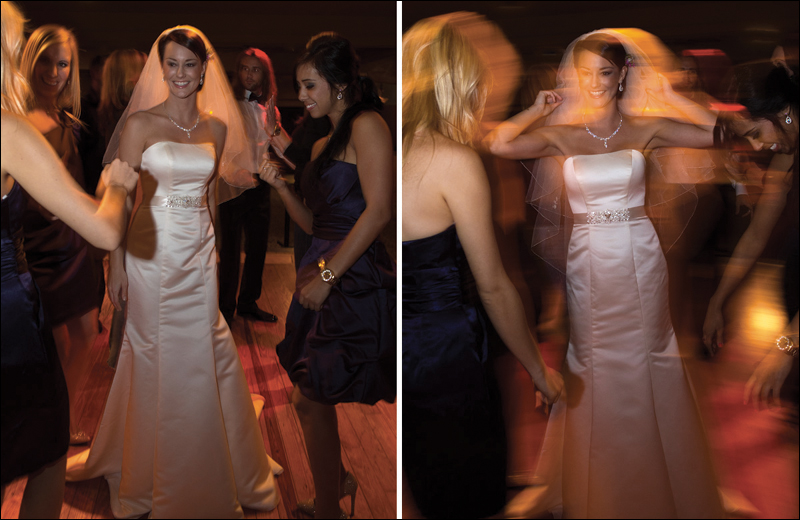
There’s a problem with taking photos of people dancing. If you shoot them with a flash (and most likely you will), it will freeze their movement, so they’ll look like they’re just standing still, but in somewhat awkward poses. It still amazes me how people doing a line dance can be pictured as people in a police lineup—the camera just doesn’t capture motion, unless you tell it to. There are really two techniques: The first is in the camera. Use a slow shutter speed so the people have a motion blur, which makes them look like (you guessed it) they’re dancing. (If you want the main person in your shot, like the bride, to be in focus, you can use panning, where you take the camera and follow their movement.) If you didn’t remember to employ this technique during your reception shoot, then you can add this motion blur in Photoshop. The first step is to duplicate the Background layer. Then go under the Filter menu, under Blur, and choose Motion Blur. Set the Angle to 0°, then increase the Distance until things look like they’re really moving. If you want to keep one person in focus, get the Eraser tool, choose a really big, soft-edged brush (like the soft round 200-pixel brush) and erase over the person you’re focusing on (like the bride, etc.) so that person appears in focus, while everyone else is dancing and moving around having a good time.
Your Main Job: Follow the Bride
The main focus at any wedding is the bride, so make darn sure your main focus at the pre-wedding, the ceremony, the formals, and the reception is the bride. Follow the bride just like you would follow the quarterback if you were shooting a football game. Especially if you’re going to be selling these photos, as it will be the bride (either directly or indirectly) who will be buying the prints. So, make darn sure that she’s the clear star of the show (photos of Uncle Arnie at the reception don’t sell well, if you get my drift).
Shooting the Details (& Which Ones to Shoot)
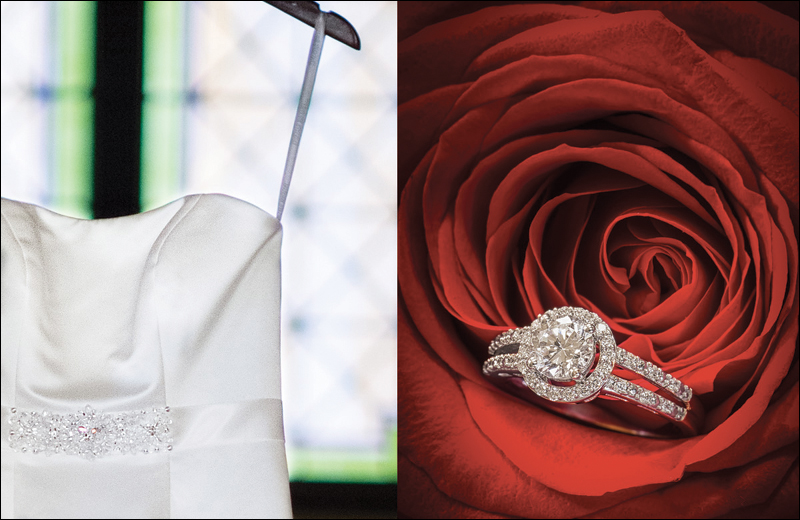
The photojournalism style of wedding photography is very big right now (where you tell the story of the wedding in photos as if you were covering it for a newspaper or magazine). One of the cornerstone elements of this technique is to make sure to photographically capture the tiny details of the wedding, especially behind the scenes before the wedding. Here’s a list of things you might want to capture (shoot), which can either stand alone in the wedding album or be used as backgrounds for other photos:
• The bride’s shoes
• The bride’s dress hanging on a hanger
• The bride’s tiara, necklace, etc.
• The wedding invitation
• The sheet music played at the wedding
• The guestbook (once a few people have signed it)
• Their champagne glasses
• Name cards at the reception
• Their wedding rings (perhaps posed on the invitation with some rose petals casually placed nearby)
• The airline tickets for their honeymoon
• The sheet music, or CD jewel case, to the music for their first dance
• The groom’s boutonniere
• The bride’s bouquet
• Any fine detail in her dress
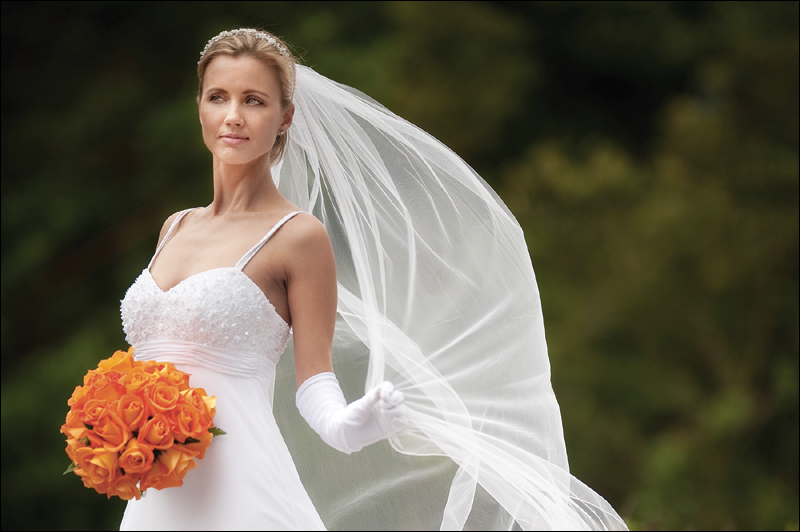
Change Your Vantage Point to Add Interest

Want to create a shot everyone will remember? Shoot it from a high vantage point (look for a second story window you can shoot down from, or a balcony on the second floor, a bridge, etc.). If you can’t find an existing high vantage point, then you can always create your own by bringing (or borrowing) a ladder to shoot from. Of course, be careful, because being on a ladder with expensive camera equipment is the stuff Hollywood comedies are made of. This high vantage point trick is ideal for shooting bridesmaids, groomsmen, the bride and groom, and even the bride alone (as shown here, where I shot the bride while standing on a ladder).
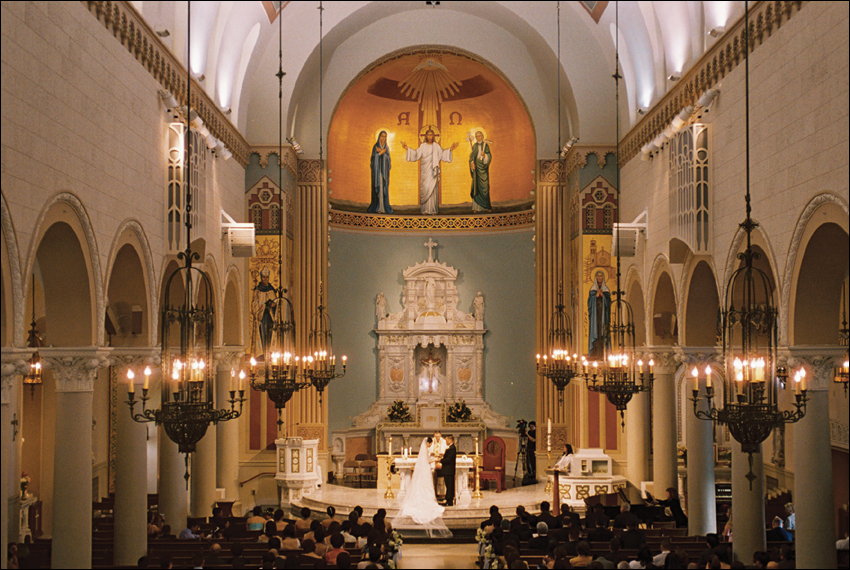
At weddings, there are three things you’re definitely going to want to shoot with a wide-angle lens. One is the rice throwing (of course, they don’t actually throw rice anymore). You’ll want to shoot this with a wide-angle lens so you get the bride, groom, and—just as important—the crowd throwing the rice (or birdseed, or blowing bubbles, etc.) behind and around them. Another thing you’ll want a wide-angle lens for is shooting the interior of the church. The bride is going to expect a photo that takes it all in and your wide-angle lens will be your Get Out of Jail Free card when it comes to covering this all-important shot. Lastly, you’ll want your wide-angle lens for shooting the bouquet toss and garter toss, so you can get both the tosser and the anxious crowd waiting to capture the prize (so to speak). Go wide, shoot from in front of the bride, and you’ll get it all in one shot (but don’t just take one shot—this is where a burst of shots will pay off).
Keep Backup Memory Cards on You
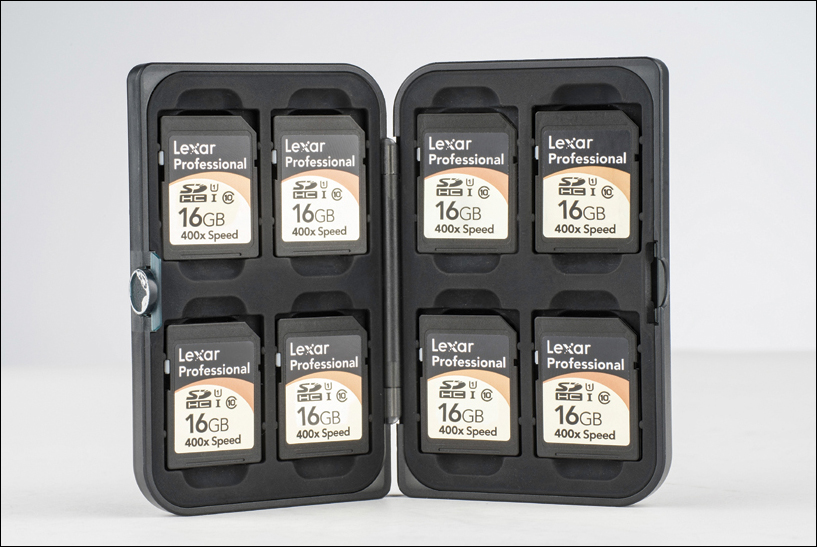
It’s not unusual for a pro wedding photographer to shoot 750 shots in one wedding, covering the four major parts of a wedding (the pre-wedding shots, the ceremony, the formals, and the reception), so it’s likely you’ll be shooting a similar amount (maybe less, maybe more, but it will be literally hundreds of shots). The last thing you want to happen is to run out of film (in other words—you don’t want to fill up your digital camera’s memory card unless you have an empty backup card ready to step right in so you can keep shooting). The trick here is to keep a spare backup memory card physically on you at all times. Keep one right there in your pocket (or purse) so the moment your card reads full, you’re just seconds away from continuing your shoot. It’s a natural law of wedding photography that your memory card will become full at the most crucial moment of the ceremony, and if you have to stop to go find your backup card (in your camera bag across the room, in the car, or in the reception hall), you’re going to miss the most important shot of the day (I learned this the hard way). So always keep a backup physically on you, so you’re only 10 seconds away from shooting again.
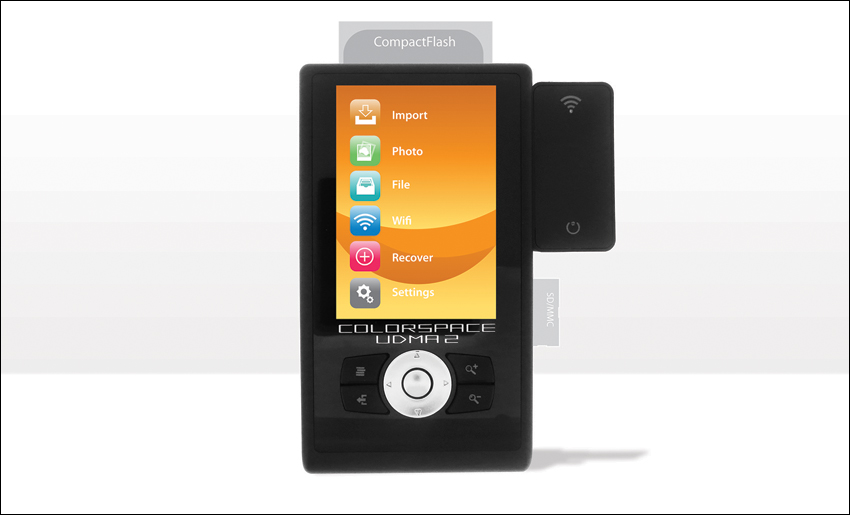
A wedding happens once. You don’t get a redo, so make sure that backing up your photos on location is a part of your workflow. If you fill a memory card, and pop in a new one, the next thing you should be doing is backing up that full card to a hard drive, like the Sanho 250-GB HyperDrive ColorSpace UDMA2 Multimedia Player/Storage Device (shown above), which lets you pop a CompactFlash card directly into the unit and back up your photos onto it without having a computer nearby. As soon as you fill a card, pop it into the Sanho HyperDrive and hit the copy button. In just a few minutes, your memory card (with those irreplaceable photos) is backed up. Also, as soon as you return to your studio, immediately copy all the photos on the backup drive onto a removable hard drive, so now you have two backups of the wedding photos. This backing up is so important—without a backup, you’re placing a lot of faith in those memory cards. Imagine how you’d feel having to tell a bride and groom that your memory card somehow became corrupted and you lost the shots of their ceremony. You can sidestep that crisis (and a potential lawsuit) by making one or two simple backups.
Scott’s Gear Finder
![]() The 250-GB Sanho HyperDrive (around $370)
The 250-GB Sanho HyperDrive (around $370)
![]() The 750-GB NEXTO DI Photo Storage Portable Backup Drive (around $450)
The 750-GB NEXTO DI Photo Storage Portable Backup Drive (around $450)
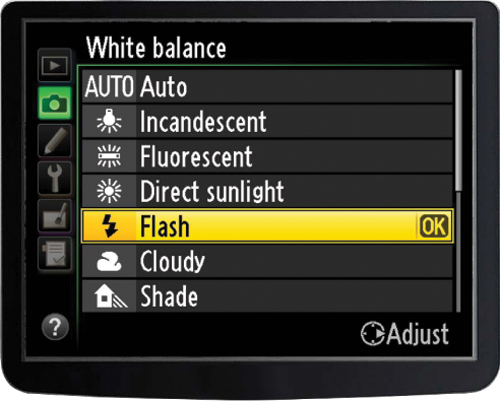
If Shooting JPEGs, Use a Preset White Balance
If you’re shooting with your digital camera set to RAW format, you don’t need to worry about the white balance (leave it set at Auto White Balance, you can always change it later, in Photoshop), but if you’re like many pro wedding photographers, you’re shooting in JPEG Fine format (so you can take more shots and write to the memory card faster). If that’s the case, then you’re better off choosing a preset white balance in the camera that matches the lighting situation you’re shooting in (that way, the overall color of your photo looks balanced for the light). If you don’t set the right white balance, your photos can look too yellow or too blue. Luckily, choosing a white balance is easier than you’d think, and it will save you loads of time later when you’re processing your photos in Photoshop. Just go to the menu on your digital camera, scroll to the white balance control, and choose Incandescent if you’re shooting in a standard reception hall, or Daylight if you’re shooting an outdoor wedding. If you’re using a flash, set your white balance to Flash. It’s that easy to get your color in line.