
Hour 8. Scripting Part 1
What You’ll Learn in This Hour:
• The basics of scripts in Unity
• How to use variables
• How to use operators
• How to use conditionals
• How to use loops
You have learned how to make objects in Unity so far, however those objects have been a bit boring. How useful is a cube that just sits there? It would be much better to give the cube some custom action to make it interesting in some way. What you need are scripts. Scripts are files of code that are used to define complex or non-standard behaviors for objects. In this hour you will be learning about the basics of scripting. You will begin by looking at how to start working with scripts in Unity. You will learn how to create scripts and use the scripting environment. Then, you will learn about the various components of a scripting language. These components include variables, operators, conditionals, and loops.
Tip: Sample Scripts
Several of the scripts and coding structures mentioned in this hour are available in the book assets for Hour 8. Be sure to check them out for additional learning.
Caution: New to Programming
If you have never programmed before, this can all seem very strange and confusing. As you work through this Hour, try your best to focus on how things are structured and why they are structured that way. Remember that programming is purely logical. If a program is not doing something you want it to, it is because you have not told it how to do it correctly. Sometimes it is up to you to change the way you think. Take this Hour slowly and be sure to practice.
Scripts
As mentioned above, scripts are a way to define behavior. They attach to objects in Unity just like other components and give them interactivity. There are generally three steps to working with scripts in Unity:
1. Create the script.
2. Attach the script to one or more game objects.
3. If the script requires it, populate any properties with values or other game objects (This step will be talked about later).
Creating Scripts
Before creating scripts, it is best to create a “Scripts” folder under the “Assets” folder in the project view. Once you have a folder to contain all of your scripts, simply right click the folder and select “Create->C# Script”. Once created, you will need to give your script a name before continuing.
Note: Scripting Language
Unity allows you to write scripts in C#, Javascript, or Boo. This book will cover all scripts in the C# language. It is worth noting that there is no real reason to select one language over the other. If you have a preference for a different language, feel free to work in that language.
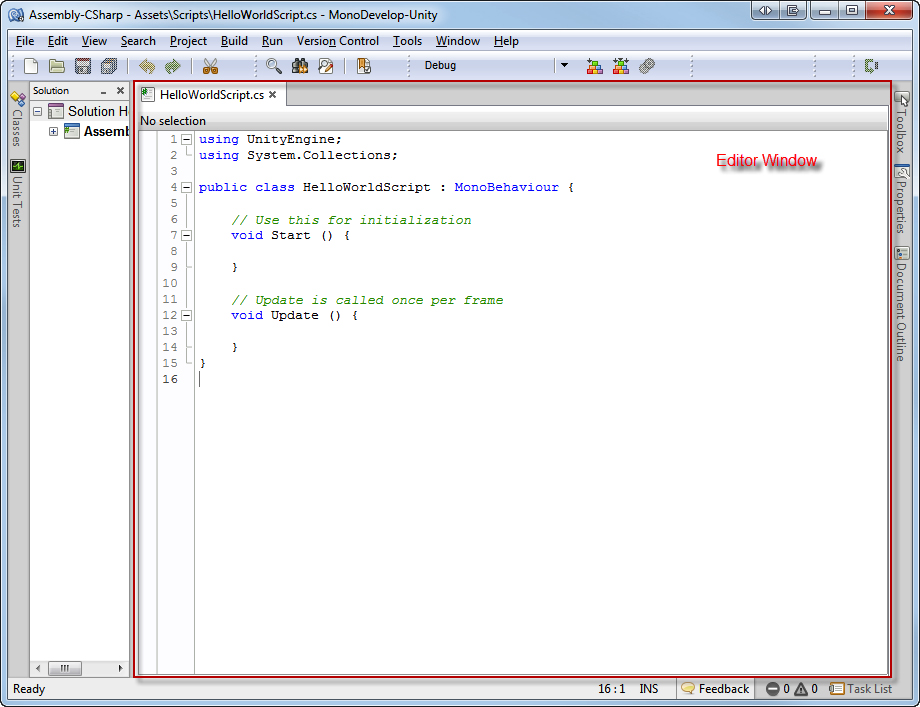
Once the script is created, you will be able to view and modify it. Clicking on the script in the project view will allow you to see the contents of the script in the inspector view (see Figure 8.1). Double clicking on the script in the project view will open your default editor which will allow you to add code to the script. Assuming you have installed the default components and haven’t changed anything, double clicking on a file will open the MonoDevelop development software (see Figure 8.2).
Figure 8.1. The inspector view preview of a script.
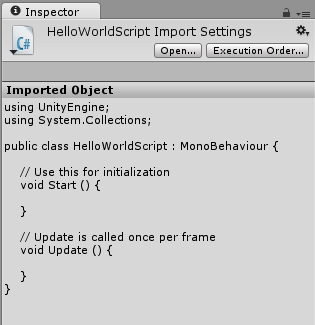
Figure 8.2. The MonoDevelop software with the editor window highlighted.
MonoDevelop is a robust and complex piece of software that is bundled with Unity. It is not actually a part of Unity. Therefore, it will not be covered in any great depth. The only part of MonoDevelop you will need to be familiar with right now is the editor window. If there is anything else you need to know about MonoDevelop, it will be covered in the Hour where it is needed.
Attaching a Script
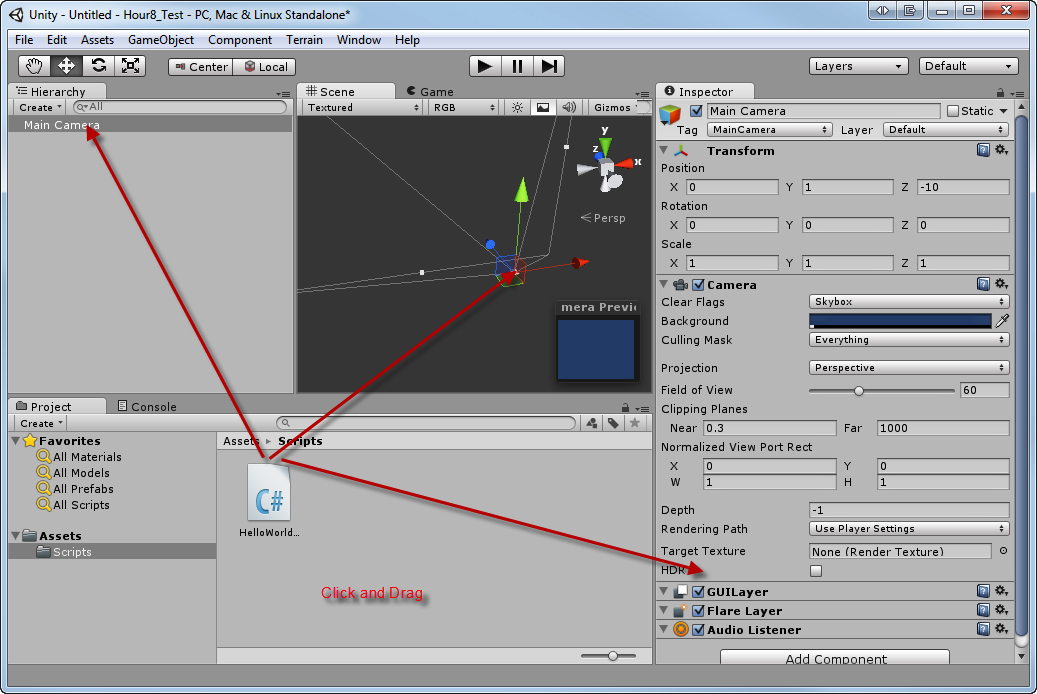
To attach a script to a game object, simply click the script in the project view and drag it onto the object (see Figure 8.3). You can drag the script onto the object in the hierarchy view, scene view, or the inspector view (assuming the object is selected). Once attached to an object, the script will become a component of that object and will be visible in the inspector view.
Figure 8.3. Click and drag the script onto the desired object.
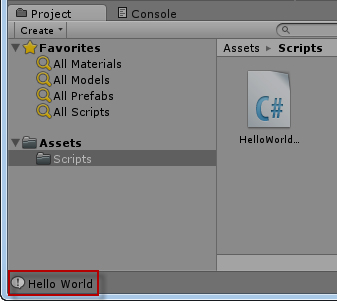
To see this in action, attach the “HelloWorldScript” you created in the section above to the main camera. You should now see a component named “Hello World Script (Script)” in the inspector view. If you run the scene, you will see the words “Hello World” appear at the bottom of the screen (see Figure 8.4).
Figure 8.4. The words “Hello World” output when running the scene.
Anatomy of a Basic Script
In the previous section you modified a script to output some text to the screen but the contents of the script wasn’t explained. In this section you will be looking at the default template that is applied to every new C# script. It is worth noting that scripts written in Javascript or Boo will have the same components even if they look a little different. Listing 8.2 contains the full code that is generated for you by Unity when you make a new script. The code in Listing 8.2 assumes that the script file created was named “HelloWorldScript”.
Listing 8.2. Default Script Code
using UnityEngine;
using System.Collections;
public class HelloWorldScript : MonoBehaviour {
// Use this for initialization
void Start () {
}
// Update is called once per frame
void Update () {
}
}
The code above can be broken down into three parts.
The “Using” section
The first part lists the libraries that this script will be using. This part looks like:
using UnityEngine;
using System.Collections;
Generally speaking you won’t be changing this section and should just leave it alone for the time being.
The Class Declaration Section
The next part is called a “class declaration”. Every script contains a class that is named after the script. It looks like:
public class HelloWorldScript : MonoBehaviour { }
All of the code in between the opening bracket { and closing bracket } will be a part of this class and therefore a part of the script. All of your code should go between these brackets. Once again, like above, you will rarely change this and should just leave it alone for now.
The Class Contents
The section in between the opening and closing brackets of the class is considered to be “in” the class. All of your code will go here. By default, a script contains two “methods” inside the class: “Start”, and “Update”.
// Use this for initialization
void Start () {
}
// Update is called once per frame
void Update () {
}
Methods will be covered in greater detail next hour. For now, just know that any code put inside the “Start” method will run when a scene first starts. Any code put inside the “Update” method will run every time the game updates (about 60 times a second on average depending on the computer).
Tip: Comments
Programming languages have a way for the author of the code to leave messages for those that read the code later. These messages are called comments. Any words that follow two forward slashes // will be “commented out”. This means that the computer will skip over them and not attempt to read them as code. You can see an example of commenting above.
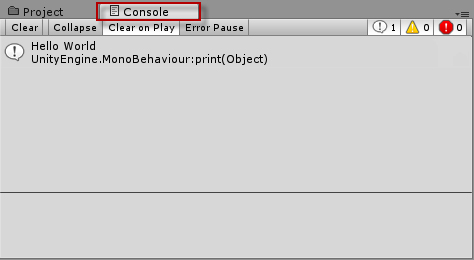
Note: The Console
There is another window in the Unity editor that has not been mentioned up until now. That window is called the console. Basically, the console a window that contains text output from your game. Often, when there is an error or output from a script, messages will get written to the console. Figure 8.5 below shows you the console and how to access it.
Figure 8.5. The console window.
Variables
Sometimes you want to use the same bit of data more than once in a script. What you need is a placeholder for data that can be reused. These placeholders are called variables. Unlike traditional math, variables in programming can contain more than just numbers. They can hold words, complex objects, or other scripts.
Creating Variables
Every variable has a name and a type. These are given to the variable when it is created. You create a variable with the following syntax:
<variable type> <name>;
So, to create an integer named “num1” you would type:
int num1;
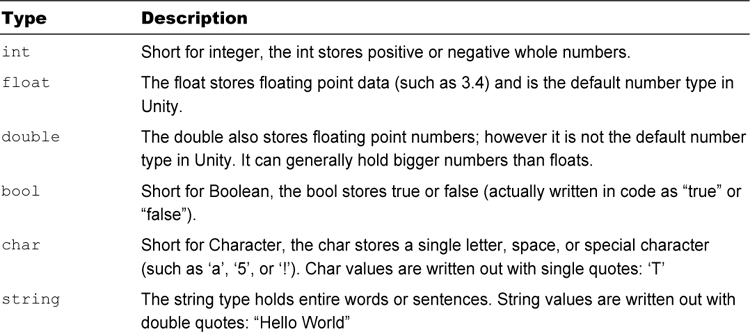
Table 8.1 contains all of the primitive (or basic) variable types and the types of data they can hold.
Note: Syntax
The term syntax refers to the rules of a programming language. The syntax dictates how things are written so that the computer knows how to read them. You may have noticed that every statement, or command, in our scripts ends with a semi-colon. This is also a part of the C# syntax. Forgetting the semi-colon will cause your script to not work. If you want to know more about the syntax of C#, check out the C# wiki at http://en.wikipedia.org/wiki/C_Sharp_syntax.
Variable Scope
The variable scope refers to where a variable is able to be used. As you have seen in scripts, classes and methods use open and close brackets to denote what belongs to them. The area between the two brackets can often be referred to as a “block”. The reason that this is important is that variables are only able to be used in the blocks in which they are created. So if a variable is created inside the Start method of a script, it will not be available in the Update method. They are two different blocks. If a variable is created in the class, but outside of a method however, it will be available to both methods since both methods are in the same block as the variable (the class block). Listing 8.3 demonstrates this.
Listing 8.3. Demonstration of Class and Local Block Level
//This is in the "class block" and will
//be available everywhere in this class
private int num1;
void Start () {
//this is in a "local block" and will
//only be available in the Start method
int num2;
}
Public and Private
If you look in Listing 8.3 above, you will see the keyword “private” appear before num1. This is called an “access modifier” and it is only needed variables declared at the class level. There are two access modifiers you will need to use: private and public. There is a lot that can be said about the two access modifiers, but what you need to know is how they affect variables at this level. Basically, private variables (variables with the word private before them) are only useable inside the file they are created in. Other scripts and the editor cannot see them or modify them in any way. They are intended for internal use only. Public variables, on the other hand, are visible to other scripts and even the Unity editor. This makes it very easy for you to change the values of your variables on the fly within Unity.
Let’s take a moment and see how public variables are visible in the Unity editor.
1. Create a new C# script and in MonoDevelop add the following line in the class but above the Start method:
public int runSpeed;
2. Save the script and then in Unity attach it to the main camera.
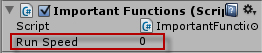
3. Select the main camera and look in the inspector view. Notice the script you just attached as a component. Now notice that the component has a new property: Run Speed. You can modify that property in the inspector view and the change will be reflected in the script at run time. See Figure 8.6 to see the component with the new property. This figure assumes the script created was named “ImportantFunctions”.
Figure 8.6. The new “Run Speed” property of the script component.
Operators
All of the data in variables are worthless if you have no way of accessing or modifying it. Operators are special symbols that allow you to perform modifications to data. They generally fall into one of four categories: arithmetic operators, assignment operators, equality operators, and logical operators.
Arithmetic Operators
Arithmetic operators perform some standard mathematic operation to variables. They are generally only used on number variables, though a few exceptions exist. Table 8.3 contains the arithmetic operators and their description.
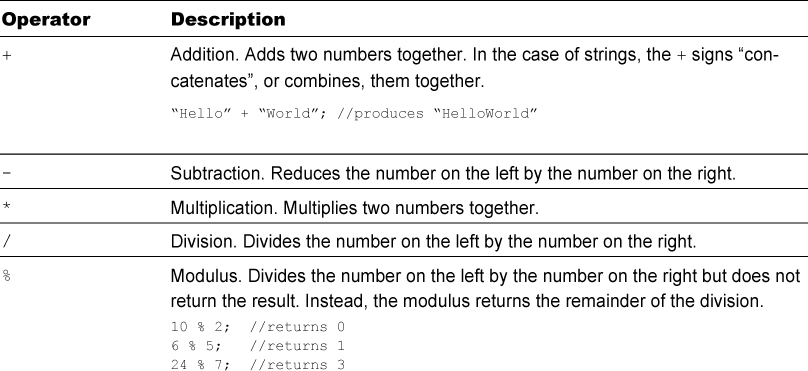
Arithmetic operators can be cascaded together to produce more complex math strings.
x + (5 * (6 – y) / 3);
Arithmetic operators work in the standard mathematic order of operations. Math is done left to right, with parenthesis done first, multiplication and division done second, addition and subtraction done third.
Assignment Operators
Assignment operators are just what they sound like. They are operators that assign a value to a variable. The most notable assignment operator is the equals sign, but there are more that combine multiple operations together. All assignment is C# is right to left. That means that whatever is on the right side gets moved to the left.
x = 5; //This works. It sets the variable x to 5
5 = x; //This does not work. You cannot assign a value to 5
Table 8.3 contains the assignment operators and explains what they do.
Table 8.3. Assignment Operators

Equality Operators
Equality operators compare two values. The result of an equality operator will always be either true or false. Therefore, the only variable type that can hold the result of an equality operator is a Boolean (remember that Booleans can only contain true or false). Table 8.4 contains the assignment operators and explains what they do.

Tip: Additional Practice
In the book assets for Hour 8, there is a script called “EqualityAndOperations.cs”. Be sure to look through it for some additional practice with the various operators.
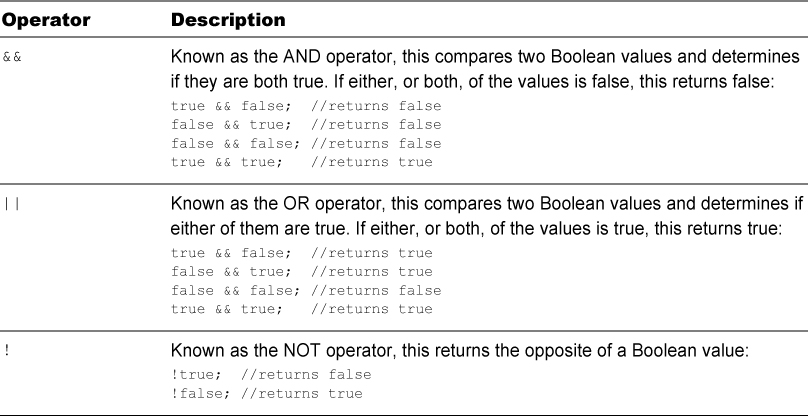
Logical Operators
Logical operators allow you to combine two or more Boolean values (true or false) into a single Boolean value. They are useful for determining complex conditions. Table 8.5 contains the logical operators and explains what they do.
Conditionals
Much of the power of a computer lies within its ability to make rudimentary decisions. At the root of this power lies the Boolean true and false. You can use these Boolean values to build conditionals and steer a program down a unique course. As you are building your flow of logic through code, just remember that a machine can only make a single, simple, decision at a time. Put enough of those decisions together, though, and you can build very complex interactions.
The IF Statement
The basis of conditionals is the IF statement. And it is structured like this:
if( <some Boolean condition>)
{
//do something
}
The IF structure can be read as “if this is true, do this”. So, if you wanted to output “Hello World” to the console if the value of x was greater than 5, you could write:
if(x > 5)
{
print("Hello World");
}
Remember that the contents of the IF statement condition must evaluate to either a true or a false. Putting numbers, words, or anything else in there will not work:
if( "Hello" == "Hello") //correct
{}
If( x + y) //incorrect
{}
Finally, any code that you want to run if the condition evaluates to true must go inside the opening and closing brackets that follow the IF statement.
Tip: Odd Behavior
Conditional statements follow a specific syntax and can give you strange behaviors if you don’t follow if exactly. You may have an IF statement in your code and notice that something isn’t quite right. Maybe the condition code runs all the time even when it shouldn’t. You may also notice that it never runs, even if it should. There are two common causes for this to be aware of. First, the IF condition does not have a semi colon after it. If you write an IF statement with a semi colon, the code following it will always run. Second, be sure you are using the equality operator (==) and not the assignment operator (=) inside the IF statement. Doing that will also lead to bizarre behavior.
The IF / ELSE Statement
The IF statement is nice for conditional code, but what if you want to diverge your program down two different paths? The IF / ELSE statement will allow you to do that. The IF / ELSE is the same basic premise of the IF statement, except it can be read more like “if this is true do this, else do this other thing”. The IF / ELSE is written like this:
if( <some Boolean condition>)
{
//do something
}
else
{
//do something else
}
For example, if you wanted to print “X is greater than Y” to the console if the variable x was larger than the variable y or you wanted to print “Y is greater than X” if x wasn’t bigger than y, you could write:
if(x > y)
{
print("X is greater than Y");
}
else
{
print("X is greater than Y");
}
The IF / ELSE IF Statement
Sometimes you want your code to diverge down one of many paths. You may want the user to be able to pick from a selection of options (like a menu for example). The IF /ELSE IF is structured much in the game way as the previous two structures, except that this has multiple conditions:
if( <some Boolean condition>)
{
//do something
}
else if( <some other Boolean condition>)
{
//do something else
}
else //the else is optional in the IF / ELSE IF statement
{
//do something else
}
For example, if you wanted to output a person’s letter grade to the console based on their percentage, you could write:
if(grade >= 90)
{
print("You got an A");
}
else if(grade >= 80)
{
print("You got a B");
}
else if(grade >= 70)
{
print("You got a c");
}
else if(grade >= 60)
{
print("You got a D");
}
else
{
print("You got an F");
}
Tip: Single Line IF Statements
If your IF statement code is only a single line, then you do not need to have the open and closed brackets. Therefore, you code which may look like this:
if(x > y)
{
print("X is greater than Y");
}
Can also be written as:
if(x > y)
print("X is greater than Y");
Iteration
So far you have seen how to work with variables and make decisions. This is certainly useful if you want to do something like adding two numbers together. But what if you wanted to add all of the numbers between 1 and 100 together? What about 1 and 1000? You definitely would not want to type all of that redundant code out. Instead, you can use something called iteration (commonly referred to as looping). There are two primary types of loops for you to work with: the WHILE loop and the FOR loop.
The WHILE Loop
The WHILE loop is the most basic form of iteration. It follows a very similar structure to an IF statement:
while(<some Boolean condition>)
{
//do something
}
The only difference is that an IF statement only runs its contained code once while a loop will run the contained code over and over until the condition becomes false. Therefore, if you wanted to add together all of the numbers between 1 and 100 and then output them to the console, you could write something like this:
int sum = 0;
int count = 1;
while(count >= 100)
{
sum += count;
count++;
}
print(sum);
As you can see above, the value of count will start at 1 and increase by one every iteration, or execution of the loop, until it equals 101. Once count equals 101, it will no longer be less than or equal to 100 and the loop will exit. During each iteration of the loop, the value of count will be added to the variable sum. Once the loop exits, the sum will be written to the console.
In summation, at WHILE loop will run its containing code over and over as long as its condition is true. Once its condition becomes false, it stops looping.
The FOR Loop
The FOR loop follows the same idea as the WHILE loop, except it is structured a bit differently. As you saw in the above code for the WHILE loop, you had to create a count variable, you had to test the variable (as the condition), and you had to increase the variable all on three separate lines. The FOR loop condenses that syntax down to a single line. It looks like this:
for(<create a counter> ; <Boolean conditional> ; <increment the counter >)
{
//do something
}
The FOR loop has three special “compartments” for controlling the loop. Notice the semi colons, not commas, in between each section in the FOR loop header. The first compartment creates a variable to be used as a counter (a common name for the counter is ‘i’, short for iterator). The second compartment is the conditional statement of the loop. The third compartment handles increasing or decreasing the counter. The above WHILE loop example can be rewritten using a FOR loop. It would look like this:
int sum = 0;
for(int count = 1; count <= 100; count++)
{
sum += count;
}
print(sum);
As you can see, the different parts of the loop get condensed down and take up less space. You can see that the FOR loop is really good at things like counting.
Summary
This hour you took your first steps into video game programming. You started by looking at the basics of scripting in Unity. You learned how to make and attach scripts. You also looked at the basic anatomy of a script. From there, you studied the basic logical components of a program. You worked with variables, operators, conditions, and loops.
Q&A
Q. How much programming is required to make a game?
A. Most games use some form of programming to define complex behaviors. The more complex the behaviors need to be, the more complex the programming needs to be. If you want to make games, you should definitely become comfortable with the concepts of programming. This is true even if you don’t intend to be the primary developer for a game. With that in mind, know that this book will show you everything you need to know to make your first few simple games.
Q. Is this all there is to scripting?
A. Yes and no. Presented in this text are the fundamental blocks of programming. They never really change; they just get applied in new and unique ways. That being said, a lot of what is presented here is simplified due to the complex nature of programming in general. If you would like to learn more about programming, you should books or articles specifically on the subject.
Workshop
Take some time to work through the questions here to ensure you have a firm grasp on the material.
Quiz
1. What three languages does Unity allow you to program with?
2. True or False: The code in the Start method runs at the start of every frame?
3. Which variable type is the default floating point number type in Unity?
4. Which operator returns the result of division?
5. What is a conditional statement?
6. Which loop type is best suited for counting?
Answers
1. C#, Javascript, and Boo.
2. False. The start method runs at the beginning of the scene. The Update method runs every frame.
3. Float.
4. The modulus.
5. A code structure that allows the computer to choose a code path based on a simple decision.
6. The FOR loop.
Exercise
It can often be helpful to view coding structures as building blocks. Alone, each piece is very simple. Put together, however, they can build very complex entities. Below you will find multiple programming challenges. Use the knowledge you have gained this hour to build a solution to the problems. You should put each solution in its own script and attach the scripts to the main camera of a scene to ensure that they work. The solution to this exercise can be found in the book assets for Hour 8:
1. Write a script that adds together all of the even numbers between 2 and 500. Output the result to the console.
2. Write a script that outputs all of the numbers 1-100 to the console. Don’t output multiples of 3 or 5 though. Instead, output “Programming is Awesome!” (Hint: you can tell if a number is a multiple of another number if the result of a modulus operation is zero).
3. In the Fibonacci sequence, you determine a number by adding the two previous numbers together. The sequence starts with 0, 1, 1, 2, 3, 5... Write a script that determines the first 20 places of the Fibonacci sequence and outputs them to the console.