
Hour 1. Introduction to Unity
What You’ll Learn in This Hour:
• How to install Unity
• How to create a new project or open an existing project
• How to use the Unity editor
• How to navigate inside the Unity scene view
This hour focuses on getting you ready to rock and roll in the Unity environment. We start by looking at the different Unity licenses, choosing one, and then installing it. Once installed, you learn how to create new projects as well as opening existing ones. You open the powerful Unity editor and we examine its various components. Finally, you learn to navigate a scene using mouse controls and keyboard commands. This chapter is meant to be hands-on, download Unity while reading and follow along.
Installing Unity
In order to begin using Unity, you first need to download and install it. Software installation is a pretty simple and straight forward process these days and Unity is no exception. Before we can install anything though, we need to look at the two available Unity licenses: Unity Free and Unity Pro. Unity Free is more than sufficient to complete all of the examples and projects in this book. In fact, Unity free contains everything you need to make games commercially. If you feel like working with more power (and spending money) Unity Pro provides a suite of extended tools that gives you a true “high priced” game engine experience. If you are curious about Unity Pro but don’t want to commit to purchasing it, Unity Free comes with a 30-day trial of the pro license. Feel free to play around with the pro features and determine if it is right for you. While on the Unity website, you might notice the Android and iOS plug-in licenses as well. These plug-ins are not required for this text, and they are only useful if you plan on deploying to mobile devices. Again, if you aren’t sure if one of the mobile plug-ins is right for you, the Unity Free license comes with a free 30-day Android trial.
Downloading and Installing Unity
For the purposes of this chapter, we will assume you are sticking with the Unity Free license. If you went with the pro version the process will be very similar, only deviating when it comes time to choose the license. When you are ready to begin downloading and installing Unity follow these steps:
1. Download the Unity installer from the Unity3D download page at: http://unity3d.com/unity/download/.
2. Run the installer and follow the prompts as you would with any other piece of software.
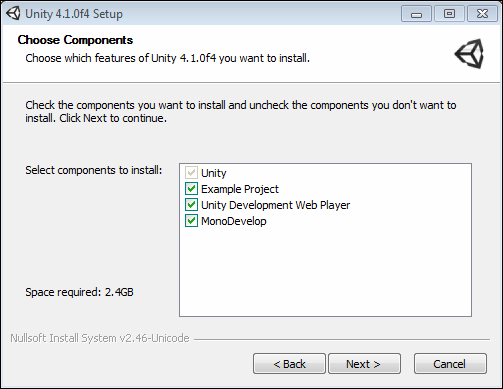
3. When prompted, be sure to leave the “Example Project”, “Unity Development Web Player”, and “MonoDevelop” check boxes checked (See Figure 1.1).
Figure 1.1. Prompt to choose the installed components
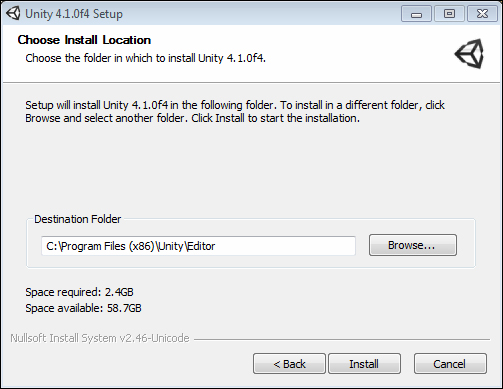
4. Choose an install location for Unity (See Figure 1.2). It is recommended that you leave the default unless you know what you are doing.
Figure 1.2. The prompt to choose the install location
5. At this point the installation will finish.
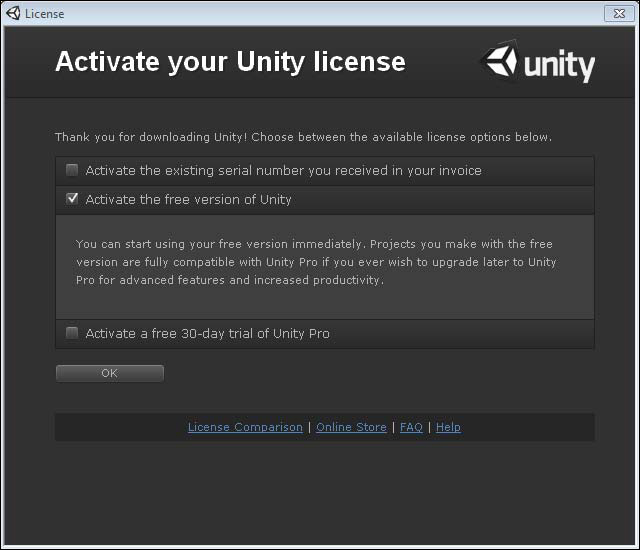
6. When you run Unity for the first time, you will be asked to activate your license. At this point you can select whether you want to use Unity Free or start a 30-day trial of Unity Pro. If you purchased Unity Pro you can enter your serial number in to unlock it. We will operate under the assumption that you choose Unity Free for now.
Figure 1.3. The Unity License Selection Screen
7. You will be prompted to log into a Unity account. If you have one you will enter it here. If you don’t you will choose the “Create Account” option and fill out the required form.
Figure 1.4. The prompt to log into a Unity account

8. That’s it! Unity installation is now complete.
Note: Supported Operating Systems and Hardware
In order to use Unity you must be using a Windows PC or a Macintosh computer. While it is possible to build your projects to run on a Linux machine, the Unity editor itself will not. Your computer must also meet the minimum requirements outlined here (taken from the Unity website at the time of writing):
• Windows: XP SP2 or later; Mac OS X: Intel CPU and “Snow Leopard” 10.6 or later. Note that Unity was not tested on server versions of Windows and OS X.
• Graphics card with DirectX 9 level (shader model 2.0) capabilities. Any card made since 2004 should work.
• Using Occlusion Culling requires a GPU with Occlusion Query support (some Intel GPUs do not support that).
Note that these are minimum requirements.
Caution: Internet Links
All Internet links are current as of the time of writing. It is possible that web locations change. If the material you are looking for is no longer provided at the links I give you, a good Internet search should turn up what you are looking for.
Getting to Know the Unity Editor
Now that we have Unity installed, we can begin exploring the Unity editor. The Unity editor is the visual component that enables you to build your games in a very “what you see is what you get” fashion. Since most interaction we have is actually with the editor, we often just refer to it as Unity. The next portion of this chapter is going to focus on learning all of the different elements of the Unity editor and how they fit together to make games.
The Project Dialog
The first window you see when opening Unity for the first time is the project dialog. This window is what we use to open up recent projects, browse for projects that have already been created, or start new projects.
Figure 1.5. The project dialog
If you have created a project in Unity already, whenever you open Unity it will go directly into that project. In order to get back to the project dialog, you will need to (from inside Unity) go to File->New Project... to get to the “Create New Project” dialog or File->Open Project... to get to the “Open Project” dialog.
Tip: Opening the Project Dialog
When you run Unity, the last project you were working on opens automatically. If you would like to open the project dialog instead of the last project you can do so by holding the Alt key (Control on a Mac) while clicking the Unity icon. If you would like Unity to behave this way all of the time, you can set it to do so by going to Edit->Preferences... and checking the box “Always Show Project Wizard”.
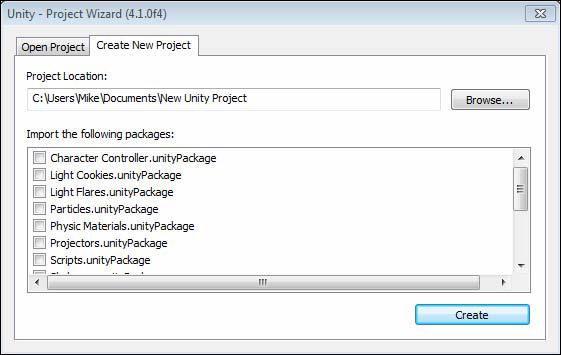
Let’s go ahead and create a project now. We will need to pay special attention to where we save the project so that we will easily be able to find it later if need be. Figure 1.6 shows you what the dialog window should look like before creating the project
Figure 1.6. The settings used for our first project
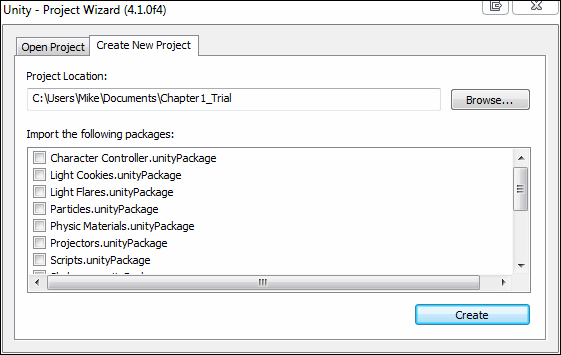
1. Open the “Create New Project” dialog.
2. Select a location for your project. If you are unsure where to put your project, you can leave the default location. If you decide to choose a custom location, you will need to select an empty folder to put your project in. The empty folder will dictate the name of the project.
3. Name your project “Chapter1_Trial”. The project name is the last bit of text in the “Project Location” text box.
4. Leave all of the packages under “Import the following packages:” unchecked. We will discuss packages at a later time.
5. Click “Create.”
Caution: Projects and Packages
At first you might be tempted to select a bunch of packages in the “Create New Project” dialog. I would, however, like to caution you against frivolously adding packages to your project as unneeded items can add size and lag. Unused packages just take up space and provide no real benefit. With that in mind, it is better to wait until you actually need a package to import it. Even then, only import the parts of the package that you intend to use.
The Unity Interface
So far we have installed Unity and looked at the project dialog. Now it is time to dig in and start playing around. When you open a new Unity project for the first time you will be looking at a collection of grey windows (called views) and everything will be rather empty. Never fear, we will quickly get this place hopping. In the following sections, we will look at each of the unique views one by one. First though, I would like to talk about the layout as a whole.
Figure 1.7. The Unity Interface
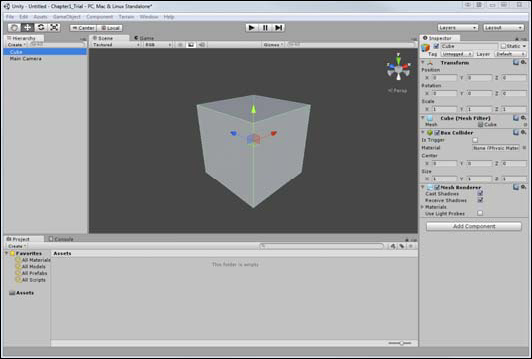
For starters, Unity allows the user to determine exactly how they want to work. This means that any of the views can be moved, docked, duplicated, or changed. For instance, if you click on the word “Hierarchy” (on the left) to select the hierarchy view and drag it over to the “Inspector” (on the right), you can tab the two views together. You can also place your cursor on any line between views and resize the windows. In fact, why don’t you take a moment to play around and move things so that they are to your liking. If you end up with a layout you don’t much care for, never fear. We can quickly and easily switch back to the built-in default view by going to Window->Layouts->Default Layout. While we are on the topic of built-in layouts, go ahead and try out a few of the other layouts (I’m a fan of the “Wide” layout). If you create a custom layout you like, you can always save it by going to Window->Layouts->Save Layout. Now if you accidently change your layout, you can always get it back.
Note: Finding the Right Layout
No two people are alike, and likewise, no two ideal layouts are alike. A good layout will help you work on your projects and make things much easier for you. Be sure to take the time to fiddle around with the layout to find the one that works best for you. You will be working a lot with Unity. It pays to set your environment up in a way that is comfortable.
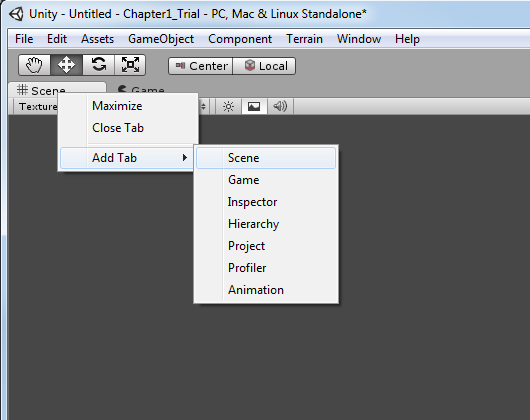
If you would like to duplicate a view it is a fairly straightforward process as well. You can simply right click on any view tab (the “tab” is the part sticking up with the views name on it), hover the mouse cursor over “Add Tab”, and a list of views will pop up for you to choose from. You may wonder why you would want to duplicate a view. It is possible that in your view-moving frenzy, you accidently closed the view. Re-adding the tab will give it back to you. Also, consider the capability to create multiple scene views. Each scene view could align with a specific element or axis within your project. If you want to see this in action, check out the “4 Split” built-in layout by going to Window->Layouts->4 Split (if you created a layout that you like, be sure to save it first).
Now, without further ado, let’s look at the specific views themselves.
The Project View
Everything that has been created for a project (files, scripts, textures, models, etc) can be found in the Project View (See Figure 1.9). This is our window into all of the assets and organization of our entire project. When you create a new project, you will notice a single folder item called “Assets”. If you go to the folder on your hard drive where you save the project, you will also find an “Assets” folder. This is because Unity mirrors the project view with the folders on the hard drive. If you create a file or folder in Unity, the corresponding one appears in the explorer (and vice versa). Items in the Project View can be moved around simply by dragging and dropping. This enables you to place items inside folders or reorganize your project on the fly.
An asset is any item that exists as a file in your assets folder. All textures, meshes, sound files, scripts, etc. are considered assets. In contrast, if you create a game object, but it doesn’t create a corresponding file, then it is not an asset.
Caution: Moving Assets
Unity maintains links between the various assets associated with projects. As a result, moving or deleting items outside of Unity could cause potential problems. As a general rule, it is a good idea to do all of your asset management inside Unity.
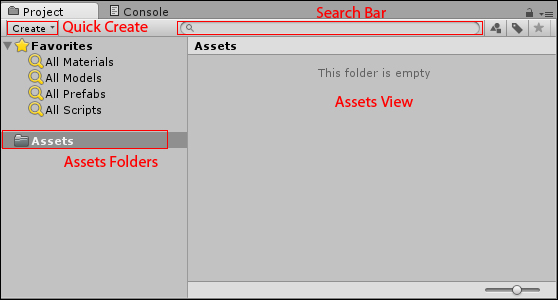
Whenever you click on a folder in the Project View, the contents of the folder will be displayed under the “Assets” section on the right. As you can see in Figure 1.9, the Assets folder is currently empty and therefore nothing is appearing on the right. If you would like to create assets, you can do so very easily by clicking on the “Create” drop down menu. This menu enables you to add all manner of assets and folders to your project.
Tip: Project Organization
Organization is extremely important for project management. As your projects get bigger, the number of assets will start to grow until finding anything can be a chore. You can help prevent a lot of frustration by employing some simple organization rules:
• Every asset type (Scenes, Scripts, Textures, etc.) should get its own folder
• Every asset should be in a folder
• If you are going to use a folder inside another folder, make sure that the structure makes sense. Folders should become more specific and not be vague or generalized
Following these few, simple rules will really make a difference.
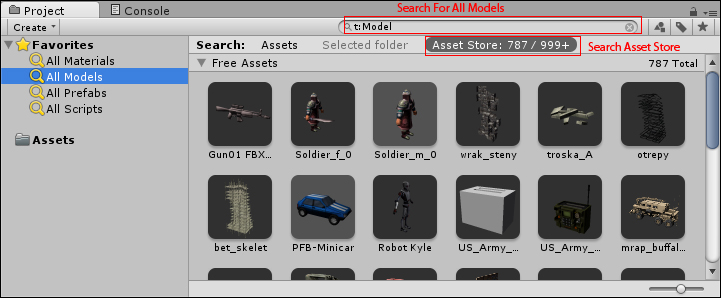
One of my favorite additions to the Project View in Unity 4 would be the addition of favorites and the integration of the Unity Asset Store. The “Favorites” buttons enable you to quickly select all assets of a certain type. This makes it possible for you to get an “at a glance” view of your assets quickly. When you click one of the favorite buttons (“All Models” for instance) or perform a search with the built-in search bar, you will see that you can narrow down the results between “Assets” and “Asset Store”. If you click on “Asset Store” you will be able to browse the assets that fit your search criteria from the Unity Asset Store (See Figure 1.10). You can further narrow your results down by free and paid assets. To me, this is a fantastic addition as it enables you to go and grab assets that you need for your project without ever leaving the Unity interface.
Figure 1.10. Searching the Unity Asset Store
The Hierarchy View
In many ways, the Hierarchy View (See Figure 1.11) is a lot like the Project View. The difference is that the Hierarchy view shows all of the items in the current scene instead of the entire project. When you first create a project with Unity you get the default scene, which is empty except for a single item: the Main Camera. As you add items to your scene, they will appear in the Hierarchy View. Just like with the Project View you can use the “Create” menu to quickly add items to your scene, search using the built-in search bar, and click and drag items to organize and “nest” them.
Figure 1.11. The Hierarchy View
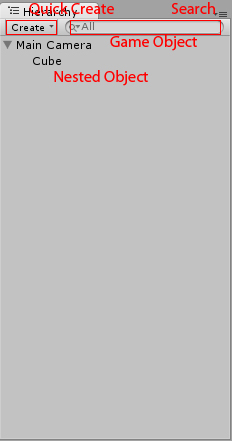
Tip: Nesting
Nesting is the term for establishing a relationship between two or more items. In the Hierarchy View, clicking and dragging an item onto another item with nest the dragged item under the other. This is commonly known as a Parent / Child relationship. In this case, the object on top is the parent and any objects below it are children. You will know when an object is nested because it will become indented. As we will see later, nesting objects in the Hierarchy View can affect how they behave.
A scene is the term Unity uses to describe what you might already know as a level. As you develop a Unity project, each collection of objects and behaviors should be its own scene. Therefore, if you were building a game with a snow level and a jungle level, those would be separate scenes.
Tip: Scene Organization
The first thing you should do when working with a new Unity project is create a “Scenes” folder under “Assets” in the project view. This way, all of your scenes (or “levels”) will be stored in the same place. Be sure to give your scenes a descriptive name. “Scene1” may sound like a great name now, but when you have 30 scenes it can get very confusing.
The Inspector View
The Inspector View gives us the capability to see all of the properties of a currently selected item. Simply click on any asset or object from the Project or Hierarchy View and the Inspector View automatically propagates with information.
In Figure 1.12 we can see the Inspector View after the “Main Camera” object was selected from the Hierarchy View.
Figure 1.12. The Inspector View
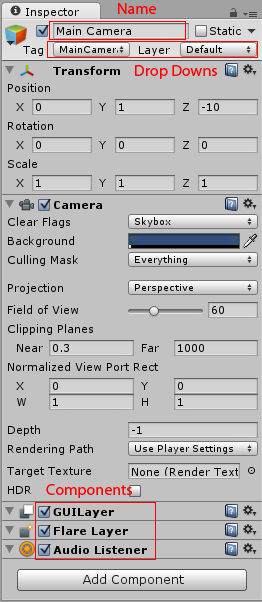
Let’s break down some of this functionality:
• If you click the checkbox next to the object’s name, it will become disabled and not appear in the project.
• Dropdown lists (such as the “Layer” or “Tag” lists; more on those later) are used to select from a set of predefined options.
• Textboxes, dropdowns, and sliders can have their values changed and the changes will be automatically and immediately reflected in the scene—even if the game is running!
• Each game object acts like a container for different components (such as “Transform”, “Camera”, and “GUILayer” in Figure 1.12). These components can be disabled by unchecking them or removed by right clicking and selecting “Remove Component.
• Components can be added by pressing the “Add Component” button.
Caution: Changing Properties While Running a Scene
The capability to change the properties of an object and seeing those changes reflected immediately in a running scene is very powerful. It enables you to tweak things like movement speed, jumping height, collision power, etc. all on the fly without stopping and starting the game. Be wary though. Any changes you make to the properties of an object while the scene is running will be changed back when the scene finishes. If you make a change and like the result, be sure to remember what it was so that you can set it again when the scene is stopped.
The Scene View
The Scene View is the most important view you work with because it enables you to see your game visually as it is being built (See Figure 1.13). Using the mouse controls and a few hotkeys, you can move around inside your scene and place objects where you want them. This gives you an immense level of control.
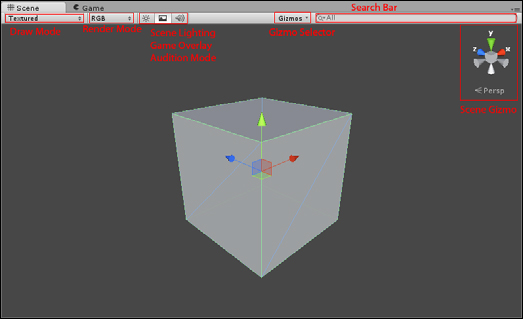
In a little bit we will talk about moving around within a scene, but first let’s focus on the controls that are a part of the scene view.
• Draw Mode: This controls how the scene is depicted. By default it is set to “Textured,” which means objects will be drawn with their textures.
• Render Mode: This controls how the objects in the scene are drawn. By default the render mode is “RGB,” which means that objects will be drawn in their full color.
• Scene Lighting: This control determines whether objects in the Scene View will be lit by default ambient lighting or by lights that actually exist within the scene. The default is to use the built-in ambient lighting but that gets changed once the first light is added to the scene.
• Game Overlay: This determines whether items like skyboxes and GUI components appear in the scene view. This also controls whether or not the placement grid is visible.
• Audition Mode: This control sets whether an audio source in the Scene View functions or not.
• Gizmo Selector: This control enables you to choose which “gizmos” appear in the scene view. A gizmo is an indicator that gives visual debugging or aids in setup.
• Scene Gizmo: This control serves to show you which direction you are currently facing and to align the scene view with an axis.
The Scene Gizmo gives you a lot of power over the scene view. As you can see, the control has an X, Y, and Z indicator that aligns with the three axes. This makes it very easy to tell exactly which way you are looking in the scene. We discuss axes and 3D space more in a later chapter. The gizmo also gives you active control over the scene alignment. If you click on one of the gizmo’s axes, you will notice that the scene view immediately snaps to that axis and gets set to a direction like “top” or “left”. Clicking on the box in the center of the gizmo toggles you between “Iso” and “Persp” modes. “Iso” stands for “Isometric” and is the 3D view with no perspective applied. Inversely, “Persp” stands for “Perspective” and is the 3D view with perspective applied. Try it out for yourself and see how it affects the scene view.
The Game View
The last view to go over is the game view. Essentially, the game view allows you to “play” the game inside the editor by giving you a full simulation of the current scene. All elements of a game will function in the game view just as they would if the project were fully built. Figure 1.14 shows you what a game view looks like. It is important to note that while the “Play”, “Pause”, and “Step” buttons are not technically a part of the game view, they control the game view and thus are included in the image.
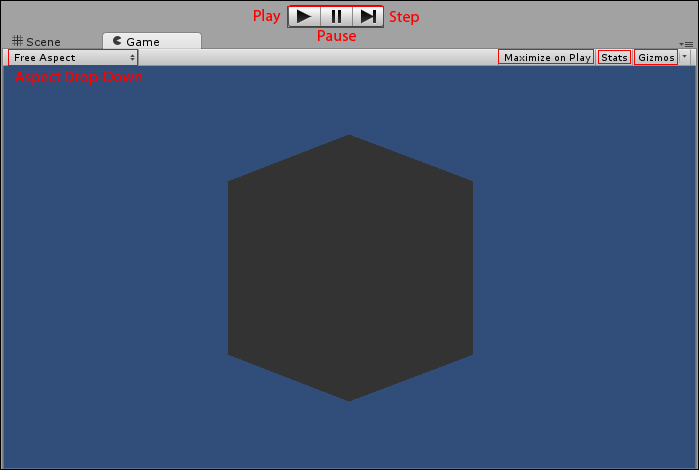
Tip: Missing Game View
If you find that the game view is hidden behind the scene view, or that the game view tab is missing entirely, don’t worry. As soon as you press the “Play” button a game view tab will appear in the editor and begin displaying the game.
The game view comes with some controls that assist us with testing our games:
• Play: The “Play” button allows you to play your current scene. All controls, animations, sounds, and effects will be present and working. Once a game is running, it will behave just like the game would if it was being run in a stand-alone player (such as on your PC or mobile device). In order to stop the game from running, click the “Play” button again.
• Pause: The “Pause” button pauses the execution of the currently running game view. The game will maintain its state and continue exactly where it was when paused. Clicking the “Pause” button again will continue running the game.
• Step: The “Step” button works while the game view is paused and causes the game to execute a single frame of the game. This effectively allows you to “step” through the game slowly and debug any issues you might have. Pressing the “Step” button while the game is running will cause the game to pause.
• Aspect Drop-Down: This drop down menu gives you the ability to choose the aspect ratio you want the game view window to display in while running. The default is “Free Aspect” but you can change this to match the aspect ratio of the target platform you are developing for.
• Maximize On Play: This button will determine if the game view takes up the entirety of the editor when run. By default this is “off” and a running game will only take up the size of the game view tab.
• Stats: This button will determine if rendering statistics are displayed on the screen while the game is running. These statistics can be useful for measuring the efficiency of your scene. This button is set to “off” by default.
• Gizmos: This is both a button and a drop down menu. The button will determine if gizmos are displayed while the game is running. The button is set to “off” by default. The drop down menu (the small arrow) on this button determines which gizmos appear if gizmos are turned on.
Note: “Running”, “Paused”, and “Off”
It can be difficult at first to determine what is meant by the terms “running”, “paused”, and “off”. When the game is not executing in the game view, the game is said to be “off”. When a game is “off”, the game controls do not work and the game cannot be played. When the “Play” button is pressed and the game begins executing, the game is said to be “running”. “Playing”, “executing”, and “running” all mean the same thing. If the game is running and the pause button is pressed, the game stops running but still maintains its state. At this point the game is “paused”. The difference between a “paused” game and an “off” game is that a “paused” game will resume execution at the point it was paused while an “off” game will begin executing at the beginning.
Honorable Mention – The Toolbar
While not a view, the toolbar is an essential part of the Unity Editor. Figure 1.15 shows the toolbar components.

• Transform Tools: These buttons allow you manipulate game objects. These will be covered in greater detail later. Pay special attention to the button that resembles a hand. This is the “Hand” tool and will be described later in this chapter.
• Transform Gizmo Toggles: These toggles manipulate how gizmos appear in the scene view. These should be left alone for now.
• Game View Controls: These buttons control the game view.
• Layers Drop Down: This menu will determine which object layers appear in the scene view. By default everything appears in the scene view. This should be left alone for now. Layers will be covered in a later chapter.
• Layout Drop Down: This menu allows you to quickly change the layout of the editor.
Navigating the Unity Scene View
The scene view gives you a lot of control over the construction of your game. The ability to place and modify items visually is very powerful. None of this is very useful though if you cannot move around inside the scene. In this section you are going to look at a couple different ways to change your position and navigate the scene view.
The Hand Tool
The “Hand” tool (shortcut Q; See Figure 1.16) provides you a simple mechanic to move about the scene view with the mouse. This tool is especially useful if you are using a mouse with only a single button as other methods require a two-button mouse.
Table 1.1. The Hand Tool Controls

Caution: Different Cameras
There are two types of cameras that you will be dealing with when working in Unity. The first is the standard game object camera. You can see that you already have one in your scene (it is there by default). The second type is more of an imaginary camera. It is not a camera in the traditional sense. Instead, it is what determines what we can see in the scene view. In this chapter, when the camera is mentioned it is the second type that is being referred to. You will not actually be manipulating the game object camera.
Flythrough Mode
Flythrough mode allows you to move about the scene using a tradition “First Person” control scheme. This mode will feel right at home for anyone who plays first person 3D games (such as the First Person Shooter genre). If you don’t play those games, then this mode might take a little getting used to. Once you become familiar with it though, it will be second nature.
Holding down the right mouse button will put you into Flythrough mode. All of the actions laid out for you below (See table 1.2) require that the right mouse button be held down.
Table 1.2. Flythrough Mode Controls

Tip: Zoom
Regardless of what method you are using for navigation, scrolling the mouse wheel will always zoom the view within a scene. By default the scene zooms in and out of the center of the scene view. If you hold alt while scrolling, however, you zoom in and out of wherever the mouse is currently pointing. Go ahead and give it a try!
Tip: Snap Controls
There are many ways to attain a very precious control over the scene navigation. Sometimes you just want to quickly get around the scene though. For times like these, it is good to use what I call “snap controls”. If you want to quickly navigate to, and zoom in on, a game object in your scene, you can do so by highlighting the object in the hierarchy view and pressing F. You will notice that the scene “snaps” to that game object. Another snap control is one you have seen already. The “Scene Gizmo” allows you to quickly snap the camera to any axis. This way, you can see an object from any angle without have to manually move the scene camera around. Be sure to learn the snap controls and navigating your scene quickly with become a snap!
Summary
In this hour you took our first look at the Unity game engine. You started off by downloading and installing Unity. From there you learned how to open and create projects. Then you learned about all of the different views that make up the Unity editor. Finally, you learned how to navigate around the scene view.
Q&A
Q. Are assets and game objects the same?
A. Not exactly. Basically the big difference is that assets have a corresponding file or group of files on the hard drive while a game object does not. An asset may or may not contain a game object.
Q. There are a lot of different controls and options. Will I need to memorize them all right away?
A. Not at all. Most controls and options will already be set to a default state that covers most situations. As your knowledge of Unity grows, you can continue to learn more about the different controls that you have available to you. This chapter is just meant to show you what’s there and to give you some level of familiarity.
Workshop
Take some time to work through the questions here to ensure you have a firm grasp on the material.
Quiz
1. True or False: You must purchase Unity Pro to make games.
2. Which view enables us to manipulate objects in a scene visually?
3. True or False: You should always move your asset files around within Unity and not use the Operating System’s file explorer.
4. True or False: When creating a new project, you should include every asset that you think is awesome.
5. What mode do you enter in the scene view when you hold down the right mouse button?
Answers
1. False
2. The Scene View
3. True
4. False
5. Flythrough Mode
Exercise
You should take a moment and practice the concepts studied in this chapter. It is important to have a strong foundational understanding of the Unity editor as everything you will learn from here on out will utilize it in some way. To complete this exercise, do the following:
1. Create a new scene by going to File->New Scene or by pressing CTRL+N (Command+N on a Mac).
2. Create a “Scene” folder under “Assets” in the project view.
3. Save your scene by going to File->Save Scene or by pressing CTRL+S (Command+S on a Mac). Be sure to save the scene in the “Scenes” folder you created and name it something descriptive.
2. Add a cube to your scene. To do this click the “GameObject” menu at the top, place your mouse over “Create Other” and select “Cube” from the pop up menu.
3. Select the newly added cube in the hierarchy view and experiment with its properties in the inspector view.
4. Practice navigating around the scene view using flythrough mode, the hand tool, and snap controls. Use the cube as a point of reference to help you navigate.