
Hour 16. Particle Systems
What You’ll Learn in This Hour:
• The basics of particle systems
• How to work with modules
• How to use the curve editor
In this hour you are going to learn how to use Unity’s particle system. You will start by learning all about particle systems in general and how they work. You will focus on Unity’s new Shuriken particle system. From there, you will experiment with the many different particle system modules. You will wrap the hour up by experimenting with the Unity curve editor.
Particle Systems
A particle system is basically an object or component that emits other objects, commonly referred to as particles. These particles can be fast, slow, flat, shaped, small, or large. The definition is very generic because these systems can achieve a great variety of effects with the proper settings. They can make jets of fire, plumes of billowing smoke, fireflies, rain, fog, or anything else you can think of. These effects are commonly referred to as particle effects.
Particles
A particle is a single entity that is emitted by a particle system. Since many particles are generally emitted very quickly, it is important for particles to be as efficient as possible. This is the reason that most particles are 2D billboards. Remember that a billboard is a flat image that always faces the camera. This gives them the effect that they are 3D.
Unity Particle Systems
As of update 3.5, Unity uses a new particle engine called the Shuriken particle system. Any systems you create will be using this new particle engine; however particle systems created before update 3.5 will still work. Later this hour you will actually get a chance to try out some of the legacy particle systems that come as part of Unity.
To create a particle system in a scene, you can either add a particle system object or add a particle system component to an existing object. To add a particle system object, click “GameObject->Create Other->Particle System”. To add a particle system component to an existing object, select the object and click “Component->Effects->Particle System”.
In this exercise you will be creating a particle system object in your scene.
1. Create a new project or scene.
2. Add a particle system by clicking “GameObject->Create Other->Particle System”.
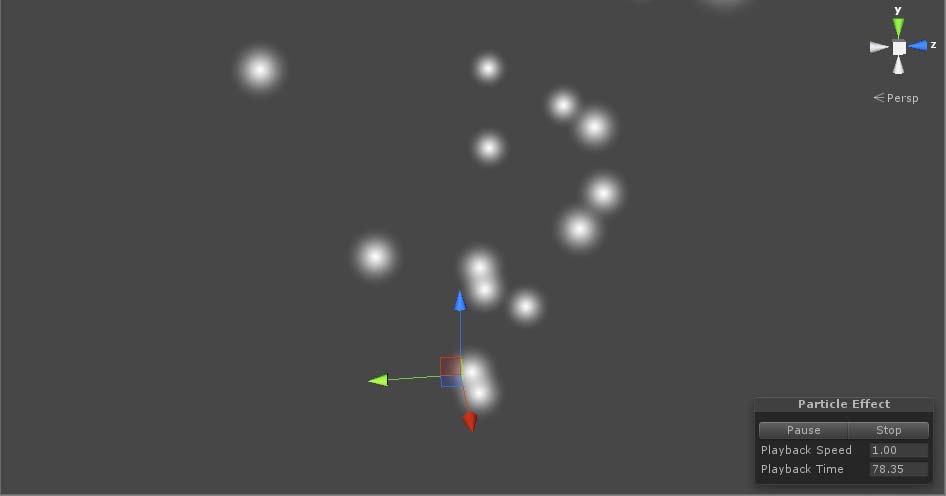
3. Notice how the particle system is emitting white particles in the scene view (see Figure 16.1). This is the basic particle system. Try rotating and scaling the particle system to see how it reacts.
Figure 16.1. The basic particle system.
Note: Custom Particles
By default, the particles in Unity are small white spheres that fade into transparency. This is a really useful generic particle, but it can only take you so far. Sometimes you want something more specific though (to make fire, for example). If you want, you can make your own particles out of any 2D image to make effects to exactly suit your needs.
Particle System Controls
You may have noticed that when you added a particle system to your scene it began emitting particles in the scene view. You may have also noticed the particle effect controls that appeared (see Figure 16.2). These controls allow you to pause, stop, and restart the particle animation in a scene. This can be very helpful when tweaking the behavioral components of a particle system.
Figure 16.2. The particle effects control.
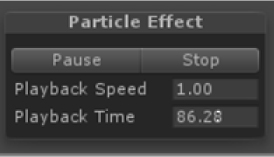
The control also allows you to speed up the play back and also tells you how long the effect has been playing. This can be very useful when testing duration effects.
Note: Particle Effects
In order to create complex and visually appealing effects, you will want several particle systems to work together (a smoke and a fire system, for example). When multiple particle systems are working together it is called a particle effect. In Unity, creating a particle effect is achieved by nesting particle systems together. One particle system can be the child of another, or they can both be children of a different object. The result of a particle effect in Unity is that they are treated as one system and the particle effect controls will control the entire effect as one unit.
Particle System Modules
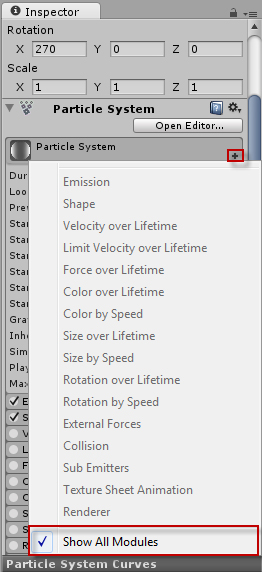
At its root, a particle system is just a point in space that emits particle objects. How the particles look, behave, and the effects they cause are all determined by modules. Modules are various properties that define some form of behavior. In Unity’s new Shuriken system, modules are an integrated and essential component. This section is going to list each module and explain briefly what it does. Note that with the exception of the default module (covered first) all modules can be turned on and off. To turn modules on or off, put a check mark by the modules name. To hide or show modules, click the plus sign (+) next to the “Particle System” modules (see Figure 16.3). By default, all modules are visible and only the “Emission”, “Shape”, and “Renderer” modules are enabled.
Figure 16.3. Showing all modules
Note: Brief Overview
Several modules have properties that are either self-explanatory (like the length and width property of a rectangle) or have been covered previously. For the sake of simplicity (and to prevent this hour from being 30 pages) these will be omitted. If you see more properties on your screen than are covered in this text, don’t worry. That is intentional.
Note: Constant, Curve, Random
The new Shuriken system has introduced the concept of value curves. A curve allows you to change the value of a property over the lifetime of a particle system. You will know which properties can use curves by the downward facing arrow next to the value. The options you are given are: “Constant”, “Curve”, “Random Between Two Constants”, and “Random Between Two Curves”. For the sake of this section, all values will be treated as constant. Later this hour you will get a chance to explore the curve editor in detail.
Default Module
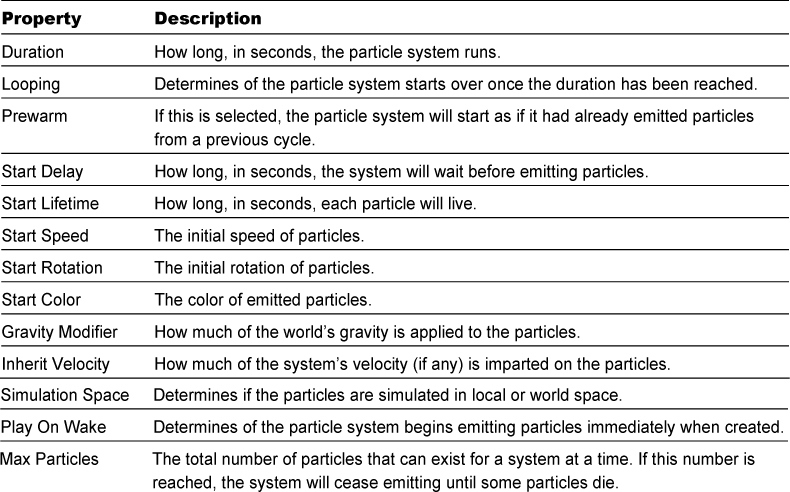
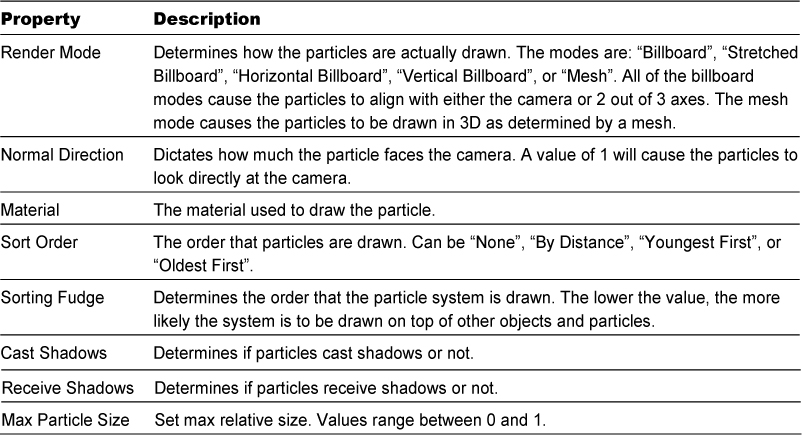
The default module is simply labeled “Particle System”. This module contains all of the specific information that every particle system requires. Table 16.1 lists all of the properties and their descriptions:
Table 16.1. Default Module Properties
Emission Module
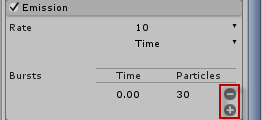
This module is used to determine the rate in which particles are emitted. Using this module you can dictate whether particles stream at a constant rate, in bursts, or somewhere in between. Table 16.2 has the emission module properties:
Table 16.2. Emission Module Properties

Figure 16.4. The emission module.
Shape Module
Just as its name would imply, the shape module determines the shape formed by the emitted particles. The shape options are: Sphere, Hemisphere, Cone, Box, and Mesh. Additionally, each shape has a set of properties used to define it. These properties are things like radius for cones and spheres. There are fairly self-explanatory and won’t be covered here.
Velocity over Lifetime Module
This module will directly animate each particle by applying an x, y, and z axis velocity to it. Note that this is a velocity change of each particle over the lifetime of the particle, not over the lifetime of the particle system. Table 16.3 contains the properties of the Velocity over Lifetime module:
Table 16.3. Velocity over Lifetime Module Properties

Limit Velocity over Lifetime Module
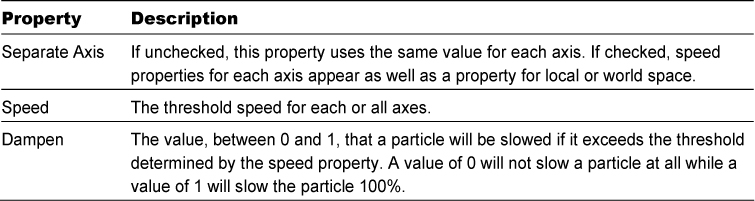
This very long named module can be used to dampen or clamp the velocity of a particle. Basically, it prevents, or slows down, particles that exceed a threshold speed on one or all of the axes. Table 16.4 has the properties for this module:
Table 16.4. Limit Velocity over Lifetime Module Properties
Force over Lifetime Module
This module is very similar to the Velocity over Lifetime module. The difference is that this module applies a force, not a velocity, to each particle. This module also allows you to randomize the force each frame, as opposed to all upfront.
Color over Lifetime Module
The Color over Lifetime module allows you to change the color of the particle as time passes. This is useful for creating effects like sparks, which start our bright orange and end a dark red before disappearing. To use this module you must specify a gradient of color. You can also specify two gradients and have Unity randomly pick a color between them. Gradients can be edited using Unity’s gradient editor (see Figure 16.5).
Figure 16.5. The gradient editor.
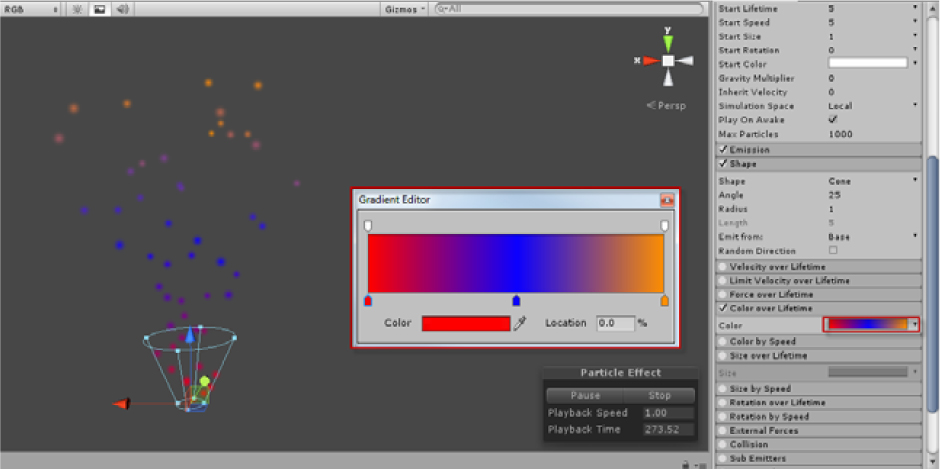
It is worth noting that the color of the gradient will be multiplied by the “Start Color” property of the default module. This means that if your start color is black, this module will have no effect.
Color by Speed Module
This module allows you to change the color of a particle based on its speed. The properties for the Color by Speed module can be found in table 16.5:
Table 16.5. Color by Speed Module Properties

Size over Lifetime Module
The Size over Lifetime module allows you to specify a change in size of a particle. The size value must be a curve and will dictate whether the particle grows or shrinks as time elapses.
Size by Speed Module
Much like the Color by Speed module, this module will change the size of a particle based on its speed between a min and maximum value.
Rotation over Lifetime Module
This module allows you to specify a rotation over the life of a particle. Note that the rotation is of the particle itself, and not a curve in the world coordinate system. What this means is that if your particle is a plain circle, you will not be able to see the rotation. If the particle has some detail, however, you will notice it spin. The values for the rotation can be given as a constant, curve, or random number.
Rotation by Speed Module
This is the same as the Rotation Over Lifetime module except that it changes values based on the speed of the particle. Rotation will change based on a min and max speed value.
External Forces Module
The External Forces module allows you to apply a multiplier to any forces that exist outside of the particle system. A good example of this is any wind forces that may exist in a scene. The property “Multiplier” scales the forces either up or down depending on its value.
Collision Module
This module allows you to set up collisions for particles. This is useful for all sorts of collision effects, like fire rolling off a wall or rain hitting the ground. You can set the collision to work with predetermined planes (Plane mode: most efficient), or with objects in the scene (World mode: slows performance). The Collision module has some common properties and some unique properties depending on the collision type chosen. Table 16.6 lists the common properties of the Collision module and their descriptions. Tables 16.7 and 16.8 list the properties that belong to Planes mode and World mode respectively:
Table 16.6. Common Collision Module Properties
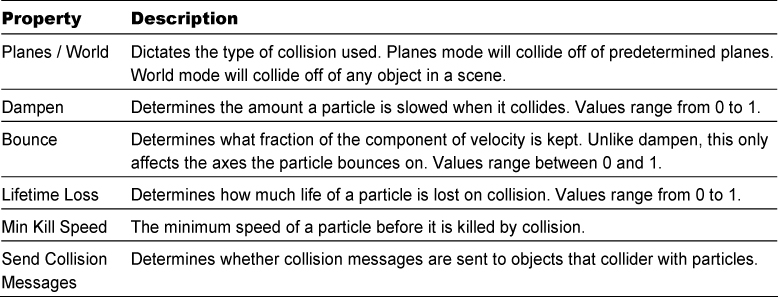
Table 16.7. Plane Mode Properties
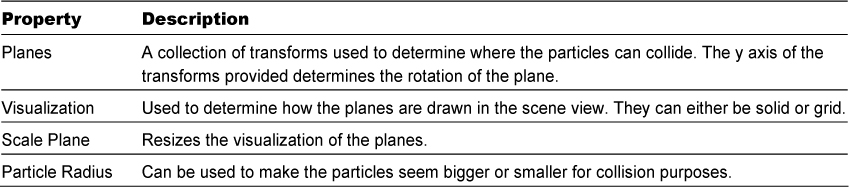
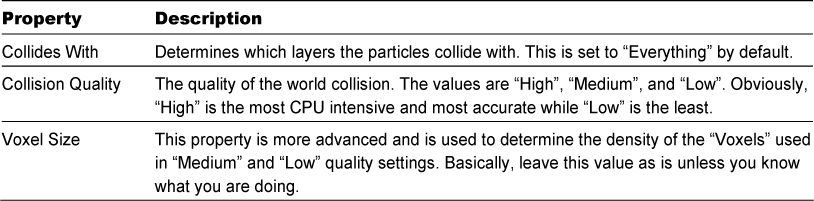
Table 16.8. World Mode Properties
In this exercise you will get an opportunity to set up collision with a particle system. This exercise will use both Plane and World collision modes.
1. Create a new project or scene. Add a particle system to the scene and place it at (0, 0, 0).
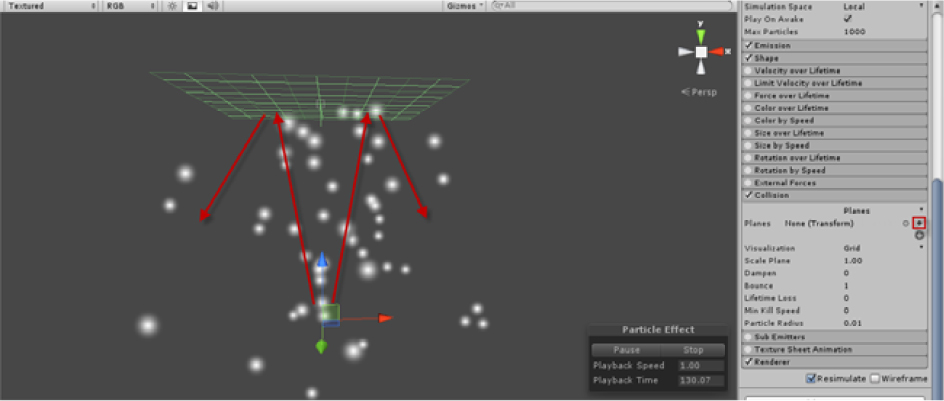
2. In the inspector, enable the Collision Module by clicking the circle next to its name. Click the small plus sign next to the Planes property and a plane should appear (see Figure 16.6). Notice how the particles are already bouncing off of the plane. Move and rotate the plane around and see how it affects the particles.
Figure 16.6. Adding a plane transform.
3. Add a cube to the scene. Position the cube at (0, 4, 0) and give it a scale of (5, 1, 5).
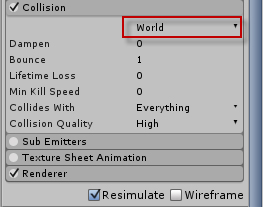
4. Notice how the particles move right through the cube. Set the Collision module to World mode (see Figure 16.7) and notice how the particles now begin to bounce off of the cube. Continue experimenting with the different properties of the module and see how they affect the particles.
Figure 16.7. Changing collision type to World mode.
Sub Emitter Module
This is an incredibly powerful module that enables you to spawn a new particle system at certain events for each particle of the current system. You can create a new particle system every time a particle is created, dies, or collides. This can be used to generate complex and intricate effects (like fireworks). This module has three properties: “Birth”, “Death”, and “Collision”. Each of these properties holds zero or more particle systems to be created on the respective events.
Texture Sheet Module
This module allows you to change the texture coordinates used for a particle over the life of the particle. In essence, this means that you can put several textures for a particle in a single image and then switch between them during the life of a particle. Table 16.9 contains the properties of the Texture Sheet module:
Table 16.9. Texture Module Properties

Renderer Module
The Renderer module dictates how the particles are actually drawn. It is here that you can specify the texture used for the particles and their other drawing properties. Table 16.10 contains the properties of the Renderer module:
Table 16.10. Renderer Module Properties
The Curve Editor
Several values in the various modules listed above had the option to be set as “Constant” or “Curve”. The constant option is fairly self-explanatory. You give it a value and it is that value. What if you wanted that value to change over a period of time though? That is where the new curve system becomes very handy. Using this feature, you have a very fine level of control over how a value behaves. The curve editor can be seen at the bottom of the inspector view (see figure 16.8).
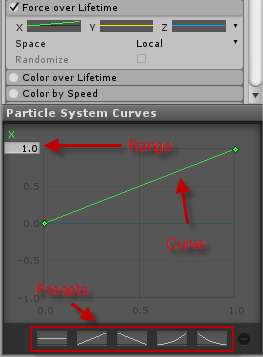
The title of the curve is whatever value you are determining. In Figure 16.8 above, the value is for the force applied along the x axis in the Force over Lifetime module. The range dictates the minimum and maximum values available. This can be changed to allow for a greater (or lesser) range. The curve is the values themselves over a given course of time and the presets are generic shapes that you can give to the curve.
The curve is moveable at any of the key points. These key points are show as visible points along the curve. By default, there are only two key points: one at the beginning and one at the end. You can add a new key point anywhere on the curve by right clicking it and choosing “Add Key Point”.
Let’s take a moment to get familiar with the curve editor. In this exercise you will be changing the size of the particles emitted over the duration of one cycle of the particle system.
1. Create a new project or scene. Add a particle system and position it at (0, 0, 0).
2. Click the dropdown arrow next to the “Start Size” property and chose “Curve”.
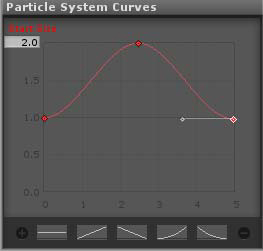
3. Change the range of the curve from 1 to 2. Right click on the curve at about the mid-point and add a key. Do the same for the end of the curve. Now drag the mid-point to the top of the curve editor which will give it a value of 2 (see Figure 16.9). Notice how the particles emitted change in size over the 5 second cycle of the particle system.
Figure 16.9. Start Size curve settings.
Summary
This hour you were introduced to particle systems in Unity. You learned the basics of particles and particle systems. You then went on a lengthy review of the many modules that make up the Unity particle system. You wrapped the hour up by looking at the functionality of the curve editor.
Q&A
Q. Are particle system inefficient?
A. They can be. It depends on the settings you give them. A good rule of thumb is to only use a particle system if it provides some value to you. They can be great visually, but don’t overdo it.
Workshop
Take some time to work through the questions here to ensure you have a firm grasp on the material.
Quiz
1. What is the term for a 2D image that always faces the camera?
2. What is the name of Unity’s new particle system?
3. Which module controls how a particle is drawn?
4. True or False: The curve editor is used for creating curves that change values over time.
Answers
1. A billboard.
2. The Shuriken particle system.
3. The Renderer module.
4. True.
Exercise
In this exercise you are going to experiment with some existing particle effects as well as attempt to create your own. First, it is worth noting that the particle effects that are included with Unity were made using the older system. This means that they will not have the same modules or settings. This is completely fine and is useful for comparing how the old system works in relation to the new system. Since this exercise is both a chance to play around with existing effects and to create your own, there is no correct “solution” for you to look at. Just follow the steps here and use your imagination.
1. Import the particle effects package by clicking “Assets->Import Package->Particles”. Be sure to leave all assets checked and click “Import”.
2. Locate the “Fire” folder which is located under the newly created “Standard Assets” and “Particles” folders. Click and drag the “Fire” and “Flame” prefabs into the scene. Experiment with positioning and settings of these effects.
3. Continue experimenting with the rest of the provided particle effects (be sure to check out the Dust and Water effects!).
4. Now that you have seen what it possible, see what you can create yourself. Try out the various modules and try to come up with your own custom effects.