
Hour 15. Game 3: Captain Blaster
What You’ll Learn in This Hour:
• How to design the game Captain Blaster
• How to build the Captain Blaster world
• How to build the Captain Blaster entities
• How to build the Captain Blaster controls
• How to further improve Captain Blaster
Let’s make a game! In this Hour we will be making a 2D scrolling shooter game titled Captain Blaster. You will start by designing the various elements of the game. From there, you will begin building the scrolling background. Once the idea of motion is established, you will begin building the various game entities. After the entities are done, you will construct the controls and gamify the project. You will finish the chapter by analyzing the game and identifying places for improvement.
Tip: Completed Project
Be sure to follow along in this hour to build the complete game project. If you get stuck, however, a completed copy of the game can be found in the book assets for Hour 15. Take a look at it if you need help or inspiration!
Design
You have already learned what the design elements are in Hour 7. This time you will get right into them.
The Concept
As mentioned above, Captain Blaster is a 2D scrolling shooter style game. The premise is that the player will flying around a level, destroying meteors and trying to stay alive. The neat thing about 2D scrolling games is that the player themselves don’t actually have to move at all. The scrolling background simulates the idea that the player is going forward. This reduces the required player skill and allows you to create more challenges in the form of enemies.
The Rules
The rules for this game will state how to play, but will also allude to some of the properties of the objects. The rules for Captain Blaster are as follows:
• The player plays until they are hit by a meteor. There is no win condition.
• The player can fire bullets to destroy meteors. The player earns one point per meteor destroyed.
• Players can fire two bullets per second.
• The player will be bounded by the sides of the screen.
• Meteors will come continuously faster until the player loses.
The Requirements
The requirements for this game are very simple. The requirements for Captain Blaster are:
• A background texture to be outer space.
• A ship model and texture.
• A meteor model and texture.
• A game controller. This will be created in Unity.
• A bouncy physics material. This will be created in Unity.
• Interactive scripts. These will be written in MonoDevelop.
The World
As this game takes place in space, the world will be fairly simple to implement. The idea is that the game will be 2D and tiles will move vertically behind the player to make it seem like the player is moving forward. In actuality, the player with be stationary. Before you get the scrolling in place though, you will need to set your project up. Start with these steps:
1. Create a new project in a folder named “Captain Blaster”. Add a directional light to your scene.
2. Create a “Scenes” folder and save your scene as “Main”.
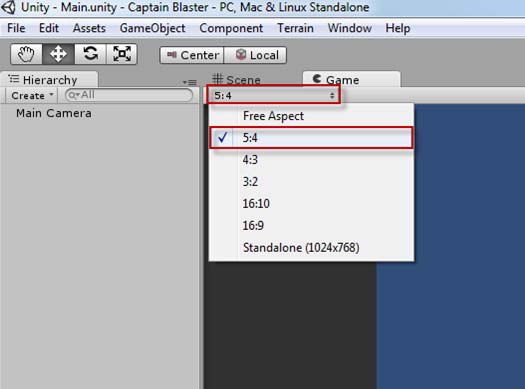
3. In the game view, change the aspect ratio to “5:4” (see Figure 15.1)
Figure 15.1. Setting the game aspect ratio.
The Camera
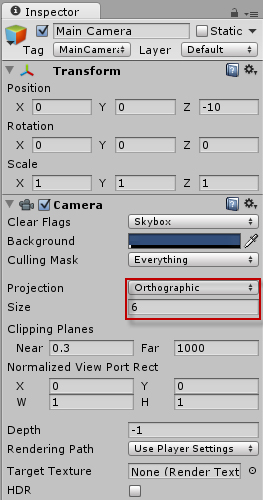
Now that the scene is set up properly, it is time to work on the camera. In this case, you will want an orthographic camera. This camera lacks depth perspective and is great for making 2D games. To set up the main camera:
1. Position the camera at (0, 0, -10) with no rotation.
2. Change the “Projection” property to “Orthographic”.
3. Set the “Size” property to 6 (see Figure 15.2 for a list of the camera’s properties).
Figure 15.2. The main camera properties.
The Background
The scrolling background can be a little tricky to get set up correctly. Basically, you will have two background objects moving down the screen. As soon as the bottom object goes off screen, you place it above the screen. You keep flipping back and forth between them and the player never knows. To create the scrolling background:
1. Add a cube to the scene. Rename the cube “Background” and place it at (0, 0, 0). Give the cube a scale of (15, 15, .1).
2. Create a new folder named “Textures” in the project view. Locate the file “Star_Sky.png” in the book assets for Hour 15 and click and drag it into the new “Textures” folder.
3. Create a new folder named “Scripts” in the project view. Create a new script in the folder named “BackgroundScript” and drag it onto the background cube. Put the following code in the script:
public float speed = -2;
// Use this for initialization
void Start () {
}
// Update is called once per frame
void Update () {
transform.Translate(0f, speed * Time.deltaTime, 0f);
if(transform.position.y <= -15)
{
transform.Translate(0f, 30f, 0f);
}
}
4. Duplicate the background cube and place it at (0, 15, 0). Run the scene. You should notice the background seamlessly stream by.
Note: Seamless Scrolling
You may notice a small line in the above scrolling background. This is due to the fact that the image used for the background wasn’t made specifically to tile together. Generally, this isn’t very noticeable and the actions of the game will more than cover up for it. If you desire a more seamless background in the future, however, you will want to use an image made to tile together.
Game Entities
In this game there are three primary entities that need to be made: the player, the meteor, and the bullet. The interaction between these items is also very simple. The player fires bullets. Bullets destroy meteors. Meteors destroy the player. Since the player can technically fire a large number of bullets, and since a large number of meteors can spawn, you will need a way to clean them up. Therefore, you will also need to make triggers that destroy bullets and meteors that enter them.
The Player
Your player will be a space ship. The models for both the space ship and the meteors have graciously been provided to you by Duane Mayberry (www.duanesmind.co.uk) and can be found in the book assets for Hour 15. To create the player:
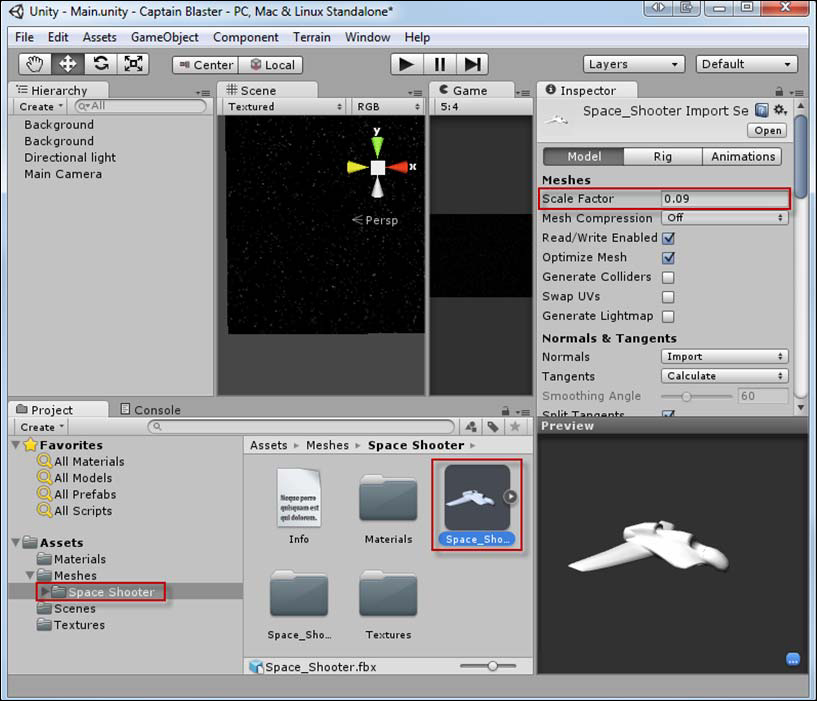
1. Create a new folder and call it “Meshes”. In the book assets for Hour 15, locate the folder named “Space Shooter” and drag it into the newly created “Mesh” folder (this will import it).
2. Under the “Meshes” folder there should now be a “Space Shooter” folder. Locate the “Space_Shooter.fbx” file in there and change the “Scale Factor” in the editor to .09 (see Figure 15.3).
Figure 15.3. The space shooter model.
3. Click and drag the “Space_Shooter.fbx” from the project view into the scene view. Notice that it is facing the wrong way. Give it a position of (0, -4, -5) and a rotation of (270, 0, 0).
4. Locate the “Textures” folder under the “Space Shooter” folder and click and drag the “1K_Body-TXTR.jpg” file onto the space ship model in the scene view.
5. Add a capsule collider to the space ship. Put a check in the “Is Trigger” property. Set the radius to .62, the height to 1.71 and the direction to “Z-Axis” (see Figure 15.4).
Figure 15.4. The capsule collider settings.

You should now have a nice, textured, upward facing space ship ready to destroy some meteors!
The Meteors
The steps for the meteors will be very similar to that of the space ship. The only difference is that the meteors will end up in a prefab for later use.
1. Locate the folder “Meteor1” and drag it into the “Meshes” folder you created previously.
2. Locate the “Meteor1.fbx” file in the new “Meteor1” folder and in the inspector view, change the “Scale Factor” to .5.
3. Drag the “Meteor1.fbx” file into the scene view. Position it at (0, 0, -5) and give it a rotation of (0, 0, 0) and a scale of (1, 1, 1) (the mesh get imported with some rotation and scale already applied).
4. In the “Textures” folder, locate the file “Meteor1_TXTR.png” and drag it onto the meteor in the scene.
5. Add a rigidbody to the meteor and uncheck the “Use Gravity” property. Add a capsule collider to the meteor as well.
6. Create a new folder named “Prefabs”. Create a new prefab in that folder named “Meteor”. Click and drag the “Meteor1” object from the hierarchy view onto the newly created prefab. Delete the Meteor1 object from the scene.
You now have a reusable meteor just waiting to cause havoc.
The Bullets
Bullets will be very simple in this game. Since they will be moving very quickly, they won’t need any detail. To create the bullet:
1. Add a capsule to the scene. Position it at (0, 0, 0) with a scale of (.1, .1, .1). Add a rigidbody to the capsule and uncheck the “Use Gravity” property.
2. If you don’t already have one, create a “Materials” folder and create a new material inside named “BulletMaterial”. Give the material a bright green color. Apply the material to the bullet.
3. Create a new prefab named “Bullet”. Click and drag the capsule onto the bullet prefab. Now delete the capsule from the scene.
That’s the last of the primary entities. The only thing left to make is the triggers that will prevent the bullets and meteor from traveling forever.
The Triggers
The triggers are simply two cubes which will sit above and below the screen. Their job is to catch any errant bullets and meteors:
1. Add a cube to the scene and name it “Trigger”. Position it at (0, -9, -5) and give it a scale of (15, 1, 1).
2. In the inspector view, be sure to put a check in the “Is Trigger” property of the “Box Collider” component.
3. Duplicate the trigger and place the new one at (0, 9, -5).
Now all of your entities are in place and it is time to begin turning this scene into a game.
Controls
There are various script components that will need to be assembled in order to make this game work. The player will need to be able to move the ship and shoot bullets. The bullets and meteors will need to be able to move automatically. A meteor spawn object will keep the meteors flowing. The triggers will need to be able to clean up objects and a control will need to keep track of all of the action.
The Game Control
The game control is very basic in this game, so you will add that first. Create an empty game object and name is “GameControl”. Create a new script called “GameControlScript” and attach it to the game control object. Overwrite the contents of the script with the following code:
using UnityEngine;
using System.Collections;
public class GameControlScript : MonoBehaviour {
//is the game still going?
bool isRunning = true;
int playerScore = 0;
void Start () {}
void Update () {}
public void AddScore()
{
playerScore++;
}
public void PlayerDied()
{
isRunning = false;
}
void OnGUI()
{
if(isRunning == true)
{
GUI.Label(new Rect(5, 5, 100, 30), "Player Score: " + playerScore);
}
else
{
GUI.Label(new Rect(Screen.width / 2 - 100, Screen.height / 2 - 50, 200, 100), "Game Over. Your score was: " + playerScore);
}
}
}
In the above code you can see that the control is responsible for drawing the GUI, keeping the score, and knowing when the game is running. The control has two public functions: PlayerDied() and AddScore(). PlayerDied() is called by the player when a meteor hits it. AddScore() is called by a bullet when it kills a meteor. Finally, the GUI is drawn depending on the game state.
The Meteor Script
Meteors are basically going to fall from the top of the screen and get in the player’s way. Create a new script and call it “MeteorScript”. In the “Prefabs” folder, select the Meteor prefab. In the inspector view, locate the “Add Component” button (see Figure 15.5). Click “Add Component->Scripts->Meteor Script”.
Figure 15.5. The “Add Component” button.

Overwrite the code in the meteor script with the following:
using UnityEngine;
using System.Collections;
public class MeteorScript : MonoBehaviour {
float speed = -5f;
//random rotation
float rotation;
void Start () {
rotation = Random.Range(-40, 40);
}
void Update () {
transform.Translate(0f, speed * Time.deltaTime, 0f);
transform.Rotate(0f, rotation * Time.deltaTime, 0f);
}
}
The meteor is very basic. It has variables for both its speed and rotation. The rotation exists just to make the meteor look a little different from each other. In the Start() method, the rotation is randomly determined to be a number between -40 and 40. In the Update() method, the meteor is moved down the screen and then rotated around the y axis based on the rotation variable. Notice that the meteor is not responsible for determining collision.
The Meteor Spawn
So far, the meteors are just prefabs with no way of getting into the scene. What you need is an object responsible for spawning the meteors at an interval. Create a new empty game object. Rename the game object “MeteorSpawn” and place it at (0, 7, -5). Create a new script named “MeteorSpawnScript” and place it on the meteor spawn object. Overwrite the code in the script with the following:
using UnityEngine;
using System.Collections;
public class MeteorSpawnScript : MonoBehaviour {
//meteor spawning timers
float spawnThreshold = 100;
float spawnDecrement = .1f;
//meteor prefab
public GameObject meteor;
void Start () {}
void Update () {
//randomly determine if meteor spawns
if(Random.Range(0, spawnThreshold) <= 1)
{
//create a meteor at a random x position
Vector3 pos = transform.position;
Instantiate(meteor, new Vector3(pos.x + Random.Range(-6, 6), pos.y, pos.z), Quaternion.identity);
spawnThreshold -= spawnDecrement;
if(spawnThreshold < 2)
{
spawnThreshold = 2;
}
}
}
}
This script is doing a few interesting things. The first thing is that it is creating two variables to manage the meteor timing. It also declares a GameObject variable which will be the meteor prefab. In the Update() method, the script generates a random number between 0 and the spawnThreshold variable (100 for starters). If the random number is equal to or less than 1, then a meteor is spawned. You can see that the meteor is spawned at the same y and z coordinate as the spawn point, but the x coordinate is offset by a number between -6 and 6. This is to allow the meteors to spawn across the screen and not always in the same spot. Finally, the spawnThreshold is reduced by the spawnDecrement. If the spawnThreshold ever gets below 2, it is set to 2 instead. Effectively, this bit of code makes the meteors spawn faster and faster over time. As the total range becomes reduced, the likelihood of randomly getting a number that is 1 or below goes up. Thus, the meteors will spawn more rapidly.
In the Unity Editor, click and drag the “Meteor” prefab from the project view onto the “Meteor” property of the “Meteor Spawn Script” component of the meteor spawn object (try saying that fast!). Run the scene and you should notice meteors spawning across the screen (they come slowly at first).
The Trigger Script
Now that you have meteors spawning everywhere, it is a good idea to begin cleaning them up. Create a new script called “TriggerScript” and attach it to both the upper and lower “Trigger” objects you created previously. Add the following code to the script. Ensure that the code is outside of a method but inside of the class:
void OnTriggerEnter(Collider other)
{
Destroy(other.gameObject);
}
This basic script simply destroys any object that enters it. Since the player cannot move vertically, you don’t need to worry about them getting destroyed. Only bullets and meteors can enter the trigger.
The Player Script
Right now meteors are falling down and the player and they can’t get out of the way. You will need to create a script to control the player next. Create a new script called “PlayerScript” and attach it to the space ship. Replace the code in the script with the following:
using UnityEngine;
using System.Collections;
public class PlayerScript : MonoBehaviour {
//player speed
public float speed = 10f;
//bullet prefab
public GameObject bullet;
//Control Script
public GameControlScript control;
//player can fire a bullet every half second
public float bulletThreshold = .5f;
float ellapsedTime = 0;
void Start () {}
void Update () {
//keeping track of time for bullet firing
ellapsedTime += Time.deltaTime;
//move the player sideways
transform.Translate(Input.GetAxis("Horizontal") * speed * Time.deltaTime, 0f, 0f);
//spacebar fires. The current setup calls this "Jump"
//this was left to avoid confusion
if(Input.GetButtonDown("Jump"))
{
//see if enough time has passed to fire a new bullet
if(ellapsedTime > bulletThreshold)
{
//fire bullet at current position
//be sure the bullet is created in front of the player
//so they don't collide
Instantiate(bullet, new Vector3(transform.position.x, transform.position.y + 1.2f, -5f), Quaternion.identity);
//reset bullet firing timer
ellapsedTime = 0f;
}
}
}
//if a meteor hits the player
void OnTriggerEnter(Collider other)
{
Destroy(other.gameObject);
control.PlayerDied();
Destroy(this.gameObject);
}
}
A lot of work is done in this script. It starts by creating variables for the speed, the bullet prefabs, the control script, and bullet timing.
In the Update() method, the script starts by getting the current time. This is used to determine if enough time has passed to fire a bullet. If you remember the rules, the player can only fire a bullet ever half second. The player is then moved along the x axis based on input. After that, the script determines if the player is pressing the space bar. Normally in Unity, the space bar is considered a “Jump” action. This could be named in the Input Manager, but it was left as it is to avoid any confusion. If it is determined that the player is pressing the space bar, the script checks the elapsed time against the bulletThreshold (currently half a second). If the time is greater, the script creates a bullet. Notice that the script creates the bullet just a little above the ship. This is to prevent the bullet from colliding with the ship. Finally, the elapsed time is reset to 0 so the count for the next bullet firing can start.
The last part of the script contains the OnTriggerEnter() method. This will get called whenever a meteor hits the player. When that happens, the meteor is destroyed, the control script is informed that the player died, and then the player is destroyed.
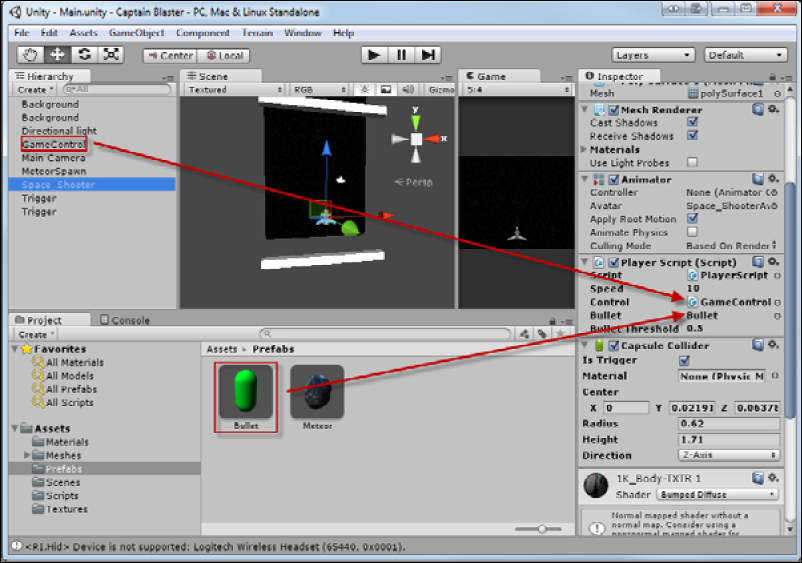
Back in the Unity editor, click and drag the bullet prefab onto the “Bullet” property of the player script. Likewise, click and drag the game control object onto the player script to give it access to the control script (see Figure 15.6). Run the scene and notice how you can now move the player. The player should be able to fire bullets (though they don’t move). Also notice that the player can now die and end the game.
Figure 15.6. Connecting the player script.
The Bullet Script
The last bit of interactivity you need is to make the bullets move and collide. Create a new script called “BulletScript” and add it to the bullet prefab. Replace the code in the script with the following:
using UnityEngine;
using System.Collections;
public class BulletScript : MonoBehaviour {
float speed = 10f;
//Game Control Script
GameControlScript control;
void Start () {
//Since this is instantiated, we must find
//the game control at run time
control = GameObject.Find("GameControl").GetComponent<GameControlScript>();
}
void Update () {
//move upward
transform.Translate(0f, speed * Time.deltaTime, 0f);
}
//neither bullet nor meteor is a trigger, so we need
//to use a different collision method here
void OnCollisionEnter(Collision other)
{
Destroy(other.gameObject);
control.AddScore();
Destroy(this.gameObject);
}
}
The major difference between this script and the meteor is that this script needs to account for collision and the player scoring. The script declares a variable to hold the control script, just like the player. Since the bullet isn’t actually in the scene view, however, it needs to get access to the control script a little differently. In the Start() method, the script searches for the GameControl object and then calls the GetComponent() method to find the script attached to it. The control script is then stored in the variable “control”.
Since neither the bullet nor the meteor has a trigger collider on it, the use of the OnTriggerEnter() method will not work. Instead, the script uses the method OnCollisionEnter(). This method does not read in a Collider variable. Instead it reads in a Collision variable. The differences between these two methods are irrelevant in this case. The only work being done is destroying both objects and telling the control script that the player scored.
Go ahead and run the game. You will notice that the game is now fully playable. While you cannot win (that is intentional) you certainly can lose. Keep playing and see how high of a score you can get!
Improvements
It is time to improve the game. Like the previous games, there are several places left intentionally basic. Be sure to play through the game several times and see what you notice. What things are fun? What things are not fun? Are there any obvious ways to break the game? It is worth noting that a very easy cheat has been left in the game to allow players to get a high score. Can you find it?
Here are some things you could consider changing:
• Try modifying the bullet speeds, firing delay, or bullet flight path.
• Try to allow the player to fire two bullets side by side.
• Try adding a different type of meteor.
• Give the player extra health; maybe even a shield.
• Allow the player to move vertically as well as horizontally.
This is a common genre, and there are many ways you can make it unique. Try and see just how custom you can make the game. It is also worth noting that as you learn about particle systems later in this book, this game is a prime candidate for trying them out.
Summary
This hour you made the game Captain Blaster. You started by designing the game elements. From there, you build the game world. You constructed and animated a vertically scrolling background. From there you built the various game entities. You added interactivity through scripting and controls. Finally, you examined the game and looked for improvements.
Q&A
Q. Are the meteors supposed to spawn this slow?
A. The game causes meteor spawn rate to grow slowly over time. If they are spawning too slowly for you, feel free to reduce the threshold.
Q. Did Captain Blaster really achieve the military rank of “Captain” or is it just a name?
A. It’s hard to say as it is all mostly speculation. One thing is for certain, they don’t just give space ships to Lieutenants!
Q. Why delay bullet firing by half a second?
A. Mostly it is a balance issue. If the player can fire too fast, then the game has no challenge.
Q. Why use a capsule collider on the ship?
A. Efficient and accurate collision detection can be difficult. A larger collider would have covered the wings and made for more accurate detection. Such a collider, however, would allow “false positives” when meteors were beside the cockpit. In this way, it is a tradeoff. The best way would be to use multiple colliders to maximum accuracy. This method was avoided to keep things simple.
Workshop
Take some time to work through the questions here to ensure you have a firm grasp on the material.
Quiz
1. What is the win condition for the game?
2. How does the scrolling background work?
3. Which objects had rigidbodies? Which objects had colliders?
4. True or False: The meteor is responsible for detecting collision with the player.
5. What is the simple way for players to cheat the game?
Answers
1. Trick question. The player cannot win the game. The highest score, however, allows the player to “win” outside of the game.
2. Two cubes with the same texture are stacked on top of each other. They then “leap frog” across the camera to seem endless.
3. The bullets and meteors had rigidbodies. The bullets, meteors, player, and triggers had colliders.
4. False.
5. That is still up to you to find out. This is just here to remind you to look if you haven’t already.
Exercise
This exercise will be a little strange compared to the ones you have done so far. A common part of the game refinement process is to have the game play tested by people who aren’t involved with the development process. This allows people who are completely unfamiliar with the game to give honest, first experience feedback. This is incredibly useful. The exercise then, is to have other people play the game. Try to get a good diverse group of people. Try to get some avid gamers and some people who don’t play games. Furthermore, try and get some people who are fans of this genre and some people who aren’t. Compile there feedback into groupings of good features, bad features, and things that can be improved. Furthermore, try and see if there are any commonly requested features that currently aren’t in the game. As a last part, see if you can implement or improve your game based on the feedback received.