Hour 15. Applets and Web Pages
In this hour, you will learn how to embed Java applets inside web pages. As explained in Hour 12, “Programming with Java,”, Java applets are small programs that travel with web page code and execute on the user’s computer. Generally, you’ll want to keep your applets small because they load with the user’s web page. Unlike standalone Java applications, which can be much larger, the more efficient your applets are, the faster they load with a web page and the more likely your users are to be happy with the load time.
As you’ll see, the Java language does not change whether you’re programming an applet or any other kind of program. The way you set up a Java applet is different from the way you set up a standalone application but once you’ve set up the applet’s outline, the code that does the work is straight Java.
The highlights of this hour include
![]() Using an appletviewer and web page for applets
Using an appletviewer and web page for applets
![]() Generating the Java outline, or skeleton, for an applet
Generating the Java outline, or skeleton, for an applet
![]() Generating a Java applet skeleton that utilizes Swing
Generating a Java applet skeleton that utilizes Swing
![]() Using HTML code to carry your applet to your users
Using HTML code to carry your applet to your users
About Writing Java Applets
When you write a Java program that you want transmitted over the Internet, remember that the program embeds itself in the web page. The language behind all web pages is HTML and you’ll learn all about HTML—if you’re not already familiar with it—in Hour 16, “HTML5 and CSS3.” If you’re not yet familiar with HTML, you don’t need to understand much HTML to make Java applets work. This hour explains only the HTML commands needed to embed a Java applet because the focus for this section is primarily Java.
Although the Java language does not differ when you write Java applets versus other Java programs, you will need to set up your program differently when it is an applet.
Many Java developers use the appletviewer tool to test the applets they run. Instead of compiling the Java applet and transporting the applet to a web browser to test the applet, appletviewer enables the Java programmer to test applets without using a browser. Fortunately, you don’t even need to use appletviewer to test the Java applets that you write because NetBeans enables you to test both applets and standalone Java programs from within the development system.
Creating a Java Applet
One of the best ways to learn how to create, test, and run Java applets is to create one yourself and go through the process of testing and running the applet. This hour spends some time walking you through the creation of a Java applet as well as testing the applet and viewing the applet inside a web browser.
The Java Applet Skeleton
Many Java applets follow the same pattern to set up the initial procedure and to work within a web page. If you want to create a Swing-enabled applet to take advantage of windows and dialog boxes, you will use the applet outline shown in Listing 15.1. Be warned, however, that programming with Swing requires that you learn some extra non-Java fundamentals. Swing makes it easier for you to place graphical user interface (GUI) controls on your applet but you must learn how Swing generates those controls. You can glean some information about Swing from NetBeans’ online help.
If you use the NetBeans New File command to create a Swing-based Java applet, it creates this applet skeleton for you. The name of the applet, NewJApplet.java, will change if you have NetBeans create several applets over time because NetBeans will not overwrite existing files. A second Java applet’s file and class name will be NewJApplet1.java, the next would be NewJApplet2.java, and so on.
LISTING 15.1 A Swing-based Java applet uses this program outline.
import javax.swing.JApplet;
/**
*
* @author Greg Perry
*/
public class NewJApplet extends JApplet {
/**
* Initialization method that will be called after the applet is loaded into
* the browser.
*/
public void init() {
// TODO start asynchronous download of heavy resources
}
// TODO overwrite start(), stop() and destroy() methods
}
Listing 15.1 simply creates a Java applet using the Swing library so that subsequent statements that you add to the code will be able to access the Swing library. You may see other comments that NetBeans adds to the code if you generate this yourself; some comments have been removed from Listing 15.1 so you can focus on what’s important for this section of the hour. To create this applet’s outline:
1. With the project you began last hour open (named FirstProject or something of your own choosing), click the New File button or choose the menu command File, New File. The New File dialog opens.
2. Choose Java in the Categories pane and JApplet in the File Types pane, then click Next.
3. If you don’t like the Class name provided by default, change it.
4. Click Finish. The Swing applet is created with the outline open for editing in the source code editor.
Inheriting from the class javax.swing.JApplet brings the Swing object libraries into your program. Loading these Swing classes causes your applet to load a little slower than it otherwise would and consumes more web page downloading bandwidth. Of course, the user interface elements such as message boxes that you gain with the Swing classes often outweigh the slight extra load times needed for Swing applets.
Finishing an Applet
As you gain familiarity with Java, you’ll soon learn which object library or libraries you need to employ. For example, to use graphics in your Java applet, you’ll need the java.awt package that includes the Graphics library you need for drawing text onto a window. Use the following command to import these libraries:
import java.awt.*; // import the graphics library
Note
Importing a graphics library doesn’t necessarily mean that you are writing a graphical applet. Many routines in the java.awt.Graphics library use graphics to produce non-graphical output, such as text. Placing text in a window, for example, is easily achieved when you use the drawString() method found in java.awt.Graphics.
The init() method is a method you’ll want to put into your applets. When you inherit from the JApplet class, you inherit all methods from that class including one called the init() method; but the init() method that you inherit does nothing. You must redefine the method for your specific applet. Therefore, when you write an applet by extending the JApplet class, you will have to supply an init() method of your own.
Tip
resize() is always the first method executed in your applet. Put all initialization code inside init().
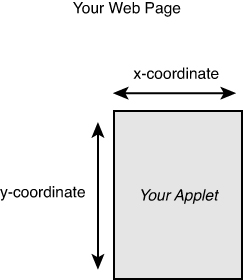
Almost every init() that you write will call the resize() method, just as the skeleton did and just as the complete applet in Listing 15.2 does. Notice the name, JANoSwng.java, indicating that the code contains no Swing routines. The resize() method simply informs your class of your applet’s window size in the target web page. You also can insert other code inside init() that you want executed right after the initial loading of your applet. resize() requires two arguments: the first determines the width, in pixels, of your applet’s window, and the second determines the height of your applet’s window (see Figure 15.1).
LISTING 15.2 Completing the text-based Java applet
/*
* JANoSwng.java
*/
import java.applet.*; // used for all applets
import java.awt.*; // used to draw text onto window
public class JANoSwng extends Applet {
/* creates a new applet */
public void init() {
resize(320, 240); // applet's window size
}
public void paint(Graphics g) {
// change subsequent text color to red
g.setColor(Color.red);
// write a simple message in the window
g.drawString("Potrzebie!", 75, 100);
}
}
Whenever your applet includes a method that also appears in the class method from which you extended your applet, as does init() in this case, your extended applet’s method will always override the original class method. You can be assured that your init() will execute in place of the original Applet class’s init().
The paint() method also should appear in applets you create, at least those that do not use the Swing class, and paint() should follow init(). Your applet executes paint() every time your applet window needs redrawing. In a graphical environment, parts of your screen have to be redrawn quite often. For example, you might hide a window and, when you unhide the window, the hidden portion must reappear. Perhaps your user minimizes the web page down to a taskbar icon and then maximizes the window or resizes the window. As long as you’ve supplied a paint() method—and you must—you can be assured that your applet window will reappear properly with the text, colors, and whatever else appears there.
Look more closely at Listing 15.2’s paint() lines:
public void paint(Graphics g) {
// change subsequent text color to red
g.setColor(Color.red);
// write a simple message in the window
g.drawString("Potzrebie!", 75, 100);
}
Unlike init(), paint() requires an argument inside its parentheses. The argument is a value that the paint() method operates on. Although Graphics g is a strange argument, the parameter represents your applet’s web page graphical window. The Graphics g designation is a Java standard designation for your applet’s window.
Whatever paint() does to the value named g happens to your applet’s window. The g is known as a graphics device context. A graphical application does not actually write to your screen; instead, it writes to windows. The Graphics g argument tells your applet where to write, namely, the window inside the applet’s enclosing web page.
The next line ought to make sense to you:
g.setColor(Color.red);
Remember that the g represents your web page applet’s window. If you discern that this statement sets your applet window to red, you are almost correct. Actually, the statement sets all subsequent colors to red. Executing multiple setcolor() methods between each line of output, you are able to send different colors to the same window.
When you see a period following an object (the object, g, represents your applet’s window), the value to the right of the period always will be a method or a value. You know that setColor() is a method because of the parentheses that follow its name. The setColor() method is an internal Graphics class method that sets all subsequent output to a specific color. The color must appear inside the parentheses. The color inside the parentheses is the setColor() argument.
Windows is capable of displaying several million colors. As with the Windows Application Programming Interface (Windows API), a set of routines that C++ programmers use when writing Windows programs, there are several ways to represent all the shades of colors that can appear on your screen. You can specify some standard colors easily. If you don’t get too picky on just that right shade of yellow you’ve always loved on your sun porch, you can specify one of the colors from Table 15.1 for the argument inside setColor(). Notice that you must precede the color name with the Color object. The Color object is a symbolic object, defined inside the java.awt class package, which represents colors. You can specify a named value by following the Color and separating period with one of the named color values in Table 15.1.

As you can see, the syntax is a little tricky but setColor() is not necessarily hard to understand. For example, you could later print some green text on your applet’s window by placing the following statement before you print the text:
g.setColor(Color.green);
After printing green text, you then could call setColor() once more to set the color back to red like this:
g.setColor(Color.red);
Referring back to Listing 15.2, once the applet sets the color red, the applet sends two words to the applet window with the following line:
g.drawString("Potrzebie!", 75, 100);
The drawString() method is commonly used to send strings to the applet’s window. Because drawString() respects the color set by setColor(), the text, "Potrzebie!", will appear in red. Notice the g before the method name. The g happens to be the name of this window, passed to the paint() routine like this:
public void paint(Graphics g)
The g refers to the graphics context which is the applet’s window. Any name could be used. You could use any variable in place of g and then preface the methods inside paint() with that variable name.
The second and third parameters of drawString() represent the starting x, y coordinates where you want the text to appear. In other words, init() creates an applet window that runs 320 pixels across by 240 pixels down. Then drawString() starts drawing its text, “Potrzebie!”, exactly 75 pixels down and 100 pixels across the applet window.
OOP-Based Coding
This applet’s setColor() method demonstrates part of the object-based nature of OOP code. For example, in non-OOP languages, the procedures are more important than the data. In OOP languages, the data, or more accurately, the objects, have the primary focus. When you want to set the applet window’s printing color, what is the object—the color, the setColor() method, or your applet’s window? The applet’s window is the object. The window is the target of the color-setting procedure.
The very first item in this applet’s setColor() line is g, which represents your applet’s graphical drawing window as described earlier in this section. Everything else on the line does something to that object. The object g, referring to your applet window, gets its color chosen with the setColor() method. Inside setColor(), another less-obvious object appears named Color. In other words, you want to set a particular color object to a particular color. The phrase Color.red does just that, it sets the object in question, Color, to red. That object, the red color, is then passed through the setColor() method to the graphic applet window named g.
Applets, unlike other types of Java programs, are not intended to be run directly. A web page must be created, the applet is placed on that page, and the page is loaded in a web browser.
For testing purposes, you can run an applet in NetBeans directly. With JANoSwng.java open in the source code editor, choose the menu command Run, Run File or hit Shift-F6. The applet is run by the appletviewer tool, which should look like Figure 15.2.
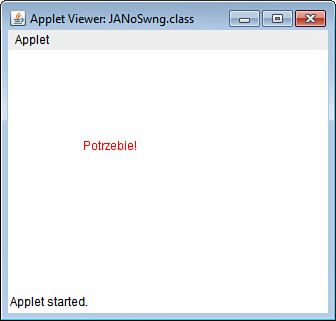
The only thing that appletviewer displays is the applet window, which for this applet displays the text “Potrzebie!”
Placing the Applet Inside the Web Page
Remember that the primary purpose of an applet is to appear on an Internet user’s computer when that user loads the web page that contains the applet. Listing 15.3 contains a sample HTML file that forms the skeleton of many HTML files that embed Java applets.
LISTING 15.3 An HTML file that carries a Java applet
<HTML>
<HEAD>
<TITLE>First Java Applet</TITLE>
</HEAD>
<BODY BGCOLOR="#CCCCCC">
<H1>First Java Applet</H1>
<APPLET
CODE = JANoSwng.class
WIDTH=320
HEIGHT=240 >
</APPLET>
</BODY>
</HTML>
Don’t get too caught up with the HTML at this time because in Hour 16, you’ll learn what all the HTML code means. For now, just know that the <APPLET> command (called a tag in HTML terminology) tells the web page the name of the compiled Java class that is to be embedded and the width and height of the applet’s window, which, not coincidentally, is the same width and height values that the applet’s init() method prepares for.
Note
HTML also supports the <OBJECT> and <EMBED> tags to place Java applets on web pages, but the Java Plug-in recommends that the <APPLET> tag be used because it is the simplest to use.
The <HTML> and </HTML> tags always mark the beginning and end of an HTML file. The <HEAD> and </HEAD> tags mark the beginning and end of the web page’s primary header, which usually contains a title and other information about that page. You can see that this header has a title, delimited with <TITLE> and </TITLE>, that simply contains the name of the Java applet. The <BODY> and </BODY> tags delimit the body of the web page and generally comprise the largest portion of the web page, including the page document’s contents.
The <BODY> tag contains an attribute that’s given a value like this: BGCOLOR="#CCCCCC". The BGCOLOR attribute sets the background color of a page, using the value “CC” for red, green, and blue. This makes the page gray, so that it does not blend in with the white applet window.
The <H1> and </H1> tags enclose a headline on the page at the largest size. (There also are <H2> through <H6> tags.)
Obviously, the lines that follow the <H1> tag specify the applet information. They are the following:
<APPLET
CODE = JANoSwng.class
WIDTH=320
HEIGHT=240 >
</APPLET>
The <APPLET> tag requires extra settings that many of the other tag commands do not require. These settings are called attributes. The <APPLET> tag indicates that the web page is to load an applet at that particular page location; thus, the tag must contain the applet information, such as the applet name. The web page must have this correct information so that the page can properly locate the applet and display the applet in an appropriate window. The <APPLET> tag can span several lines for readability, as done here.
The CODE attribute names the class of the applet that is to execute. For now, remember that a class is generally the same as an applet program because most applets contain a single class and the class contains all the functioning applet code. Therefore, the class will generally be your Java filename (with the java extension).
The WIDTH and HEIGHT attributes always are required for all applets that you embed in a web page. The web browser must be told the size of your applet’s window (the applet will appear on the page in a window). Finally, the </APPLET> ending tag indicates that the applet parameter information is complete.
Caution
The applet must reside in the same folder as the HTML file unless you preface the name with its location, as the following CODE attribute does: CODE="http://www.example.com/JavaApps/JANoSwng.class"
To create an HTML file, you need a text editor. The text editor enables you to create a text file, similar to the way that a word processor enables you to create a document. The file should have the .html filename extension.
NetBeans can be used to create and edit HTML files. Click the New File button, choose the category Other and file type HTML Page, and click Next. Give the file a name (but leave off the .html extension—NetBeans will provide it automatically) and click Finish. The new HTML file opens for editing.
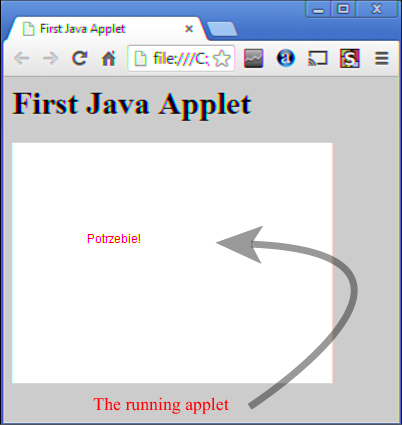
Viewing the Applet Inside the Web Page
Once you’ve compiled the Java applet, you may have to copy the compiled applet, called JANoSwng.class, to the same folder in which you’ve created your HTML source code. You now have, in the same folder, the HTML source code (you never compile HTML source code) and the compiled Java class file. Follow these steps to see your applet run in your web browser:
1. In your file system, go to the folder that contains the web page and JANoSwng.class.
2. Open the web page (such as by right-clicking it and using the Open With command to pick a browser).
3. Your applet should appear in its own window, such as the one in Figure 15.3.
Summary
This hour provided a quick overview of how to work with Java applets. You understand how standalone Java applications work and you know how embedded Java applets work. You may not yet be a Java expert but you do know your way around the language and you are on your way to understanding object libraries.
You now have an idea of how applet authors create their applets and place those applets inside web pages using HTML code tags. The applets should be much smaller than regular, standalone Java applications because the Java applet must download to the user’s computer with the web page and download times can be slow.
The next hour moves on to different programming languages and HTML5 and CSS3, the latest and greatest standards for creating web pages. Visual Basic, which you’ll learn about in Hour 20, “Programming with Visual Basic 2012,” is not a true object-oriented language as Java is, but you will see how parts of Visual Basic work with objects such as command buttons that you drag with your mouse onto the Windows screen.
Q&A
Q. How much of an HTML expert must I be to use Java applets effectively?
A. In some companies, people other than Java programmers write HTML code, so you don’t have to know much HTML at all. Nevertheless, as you’ll see in Hour 16, HTML is an extremely simple language, far simpler, actually, than JavaScript. So, many Java programmers learn HTML.
Q. What’s the best way to learn which Java library classes are available for me to use?
A. One concern of all Java newcomers is knowing which class packages are available and learning how to use them. The chicken-before-the-egg paradox appears here because if you were first given a list of every class method name, how would you know when to use the methods and how would you know what each one did? Even with descriptions, you would experience information overload because many hundreds of methods exist and some are dual-purpose and overlap others in functionality.
Now that you know the language basics, such as data types, applet insertion, and control statements, much of learning more about Java requires analyzing other Java applications to see what object libraries programmers use most and to learn what those libraries do.
Workshop
The quiz questions are provided for your further understanding.
Quiz
1. Why do you want to keep your Java applets small?
2. What is the purpose of the appletviewer?
3. What features can the Swing library add to a Java applet?
4. What drawback, albeit a small one, does the Swing library sometimes give Java applets?
5. What does the resize() method do?
6. What does the init() method do?
7. What filename extension does a Java source applet use?
8. What filename extension does a compiled Java applet use?
9. What HTML command embeds a Java applet into the surrounding web page?
10. What do the HTML WIDTH and HEIGHT commands specify?
Answers
1. Keep Java applets small so they load quickly.
2. The appletviewer enables you to test Java applets without using a web browser.
3. The Swing library enables you to add command buttons, list boxes, text boxes, and other Windows controls to your Java applets and programs.
4. The Swing library can add overhead and size to an applet.
5. resize() determines the applet’s window size.
6. init() is always the first procedure that an applet executes.
7. Java applet source code uses the .java extension.
8. Compiled Java applets use the .class extension.
9. The <OBJECT> tag (or the <APPLET> tag) embeds Java applets in web pages.
10. The two commands specify the width and height of the applet’s window and often match the applet’s resize() arguments.