
4. Connecting to Networks and Devices
In This Chapter
![]() Connecting your device to wireless networks and cellular networks
Connecting your device to wireless networks and cellular networks
![]() Connecting Bluetooth devices
Connecting Bluetooth devices
![]() Connecting your device to a virtual private network
Connecting your device to a virtual private network
To get the most out of your Android device, you’ll want to connect it to wireless networks as often as possible, and to cellular networks if it is a phone or has cellular capability. You’ll likely also want to connect it to Bluetooth devices, such as keyboards or headphones, to make full use of its features. You may also want to connect your device to a virtual private network, or VPN, to establish a secure connection to a server across the Internet.
Using Airplane Mode
Android’s Airplane mode feature turns off all of your device’s wireless communications. Airplane mode is primarily designed for those times when you’re in an airplane and FAA regulation or crew intransigence forbids you from using wireless communications. But you can also use Airplane mode at any time to save power.
To turn on Airplane mode, open the Quick Settings panel and tap the Airplane Mode icon, changing the icon from an outline to solid white. A white airplane icon appears at the right end of the status bar, just to the left of the battery icon, to remind you that Airplane mode is on.
To turn off Airplane mode, open the Quick Settings panel and tap the Airplane Mode icon again.
![]() Tip
Tip
You can also turn Airplane mode on or off by opening the Settings app, tapping the More button in the Wireless & Networks section, and then checking or unchecking the Airplane Mode check box on the Wireless & Networks screen. Usually, though, it’s easier to use the icon on the Quick Settings panel. On some devices, you may find an Airplane Mode switch directly on the Settings screen, which is handy.
While Airplane mode is on, you can turn on Wi-Fi and establish connections to wireless networks if necessary. You can also turn on Bluetooth so that you can use Bluetooth devices.
![]() Tip
Tip
Turning on Airplane mode generally enables your device to charge faster.
Taking Control of Cellular Connections
If your Android device is a phone or a cellular-capable tablet, you’ll want to manage its cellular connections. This means using data roaming deliberately rather than by accident to avoid extra charges, making sure you keep within your data plan (likewise), and switching between 3G and 4G networks as needed to maintain connectivity.
Displaying the Mobile Networks Screen
Most of the settings you’ll need for controlling your cellular connection are on the Mobile Network Settings screen (see Figure 4.1). To reach this screen, open the Settings app, tap the More button in the Wireless & Networks area, and then tap the Mobile Networks button.
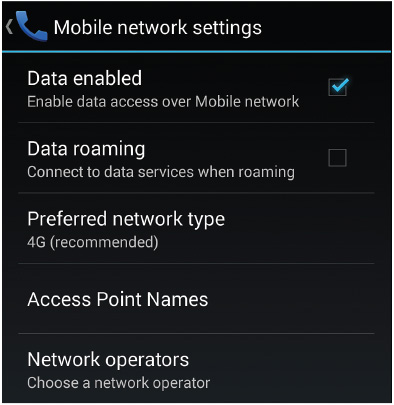
FIGURE 4.1 From the Mobile Network Settings screen, you can control data roaming and select your preferred network type.
Enabling and Disabling Data and Roaming
The Mobile Network Settings screen has two check boxes: the Data Enabled check box and the Data Roaming check box. It’s essential you understand the difference between the two.
The Data Enabled check box controls whether your device can transfer data across the cellular connection—for example, getting your email. This uses the data allowance on your cellular plan. Normally, you’ll want to keep the Data Enabled box checked so that you can receive data. You’ll turn it off only if you run through the data on your data plan and need to avoid racking up extra charges.
![]() Note
Note
Your device may show a different name for the data roaming control, such as the Global Data Roaming Access check box.
The Data Roaming check box controls whether your device can transfer data when it’s connected to other carriers’ cellular networks. Normally, when you’re on your home turf, you’ll want to use your regular carrier. (That’s why you chose it, I hope.) But when you go outside your carrier’s area, especially if you go outside the country, you may need to connect to another carrier to get your device working.
Connecting to another carrier’s network can be expensive for calls, so check the cost first. Double-check the costs for data roaming because they can be exorbitant. Some carriers have the grace to warn you (usually by sending a text message) when you cross country borders and start roaming; some even point out what roaming will cost you. But don’t rely on such warnings.
![]() Tip
Tip
When using data roaming, transfer as little data as possible. Downloading movies or TV shows is obviously unwise, but you should also watch out for other data hogs such as streaming audio and email attachments. Instead of streaming audio, put your music on your device for when you travel. For email, reduce the sync frequency or set it to never sync, checking manually for messages when necessary—and preferably when you have a Wi-Fi connection rather than a cellular connection.
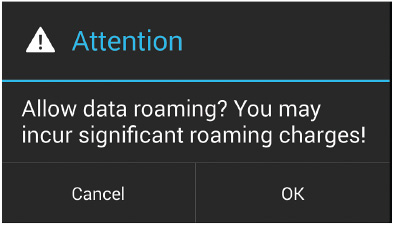
When you check the Data Roaming box, the Attention dialog box (see Figure 4.2) opens to warn you that you may incur significant charges. Tap the OK button if you’re sure you want to use roaming.
Choosing Between 3G and 4G Networks
If you have both 3G and 4G networks available, you should tell your device which you want to use. Tap the Preferred Network Type button on the Mobile Network Settings screen to display the Preferred Network Type dialog box (see Figure 4.3), and then tap the appropriate radio button. These vary depending on your device and carrier, but you’ll see options such as 4G, 3G, or 2G; or Global, LTE/CDMA, or GSM/UMTS.
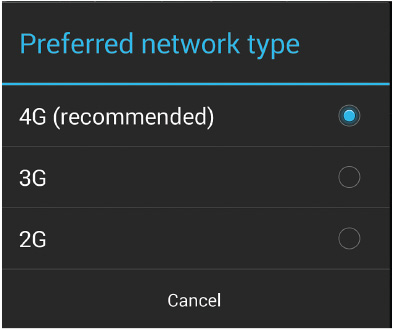
FIGURE 4.3 In the Preferred Network Type dialog box, tap the radio button for the network type you want to use.
Configuring a New Access Point
Cellular devices connect to a carrier’s network through access points. The Access Point Name (APN) setting on your device controls which access point your device uses.
Normally, your device’s SIM card causes the device to connect to the right APN, so you don’t need to change the setting. But in special circumstances you may need to specify the APN for your device. To do so, tap the Access Point Names button on the Mobile Network Settings screen, and then work on the APNs screen. Here you can tap an existing APN to edit its settings or tap the Add (+) button to set up a new APN from scratch.
![]() Tip
Tip
If you mess up your APN settings, tap the Menu button on the APNs screen, and then tap Reset to Default on the menu.
Connecting to a Different Carrier
To connect to a different carrier, tap the Network Operators button on the Mobile Network Settings. The Available Networks screen appears, and Android automatically searches for carriers. You can then tap the carrier to which you want to connect.
To return to your normal carrier, tap the Choose Automatically button on the Available Networks screen.
Keeping Within Your Data Plan
Android includes a Data Usage tool to help you keep within your data plan and not overrun your mobile data limit. On most devices, you can set a limit for your data usage and set a warning level to let yourself know you’re approaching the cutoff point.
Open the Settings app and tap the Data Usage button in the Wireless & Network section to display the Data Usage screen (see Figure 4.4).
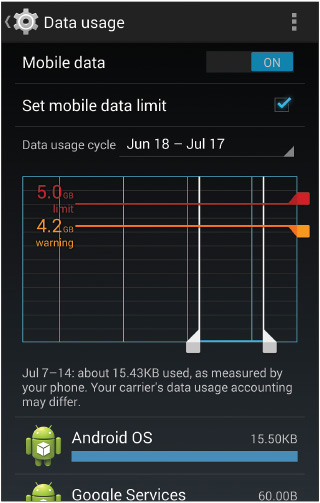
Here you can set the Mobile Data switch to On or Off to control mobile data as a whole. Normally, you’ll want to leave it On unless you’ve run out of data plan.
Setting a Warning Level and a Limit
To set a limit for data usage, tap the Set Mobile Data Limit check box, tap the OK button in the Limiting Data Usage dialog box that opens, and then drag the red bar up or down the diagram to set the limit. Drag the orange bar up or down to set the warning level.
Tap the Data Usage Cycle pop-up menu and choose the dates to use for the billing cycle. You can either tap one of the suggested date ranges on the pop-up menu or tap Change Cycle and set the appropriate date in the Usage Cycle Reset Date dialog box.
To see how much data you’ve used in a specific time frame, tap the white handles and drag the left start bar and the right end bar to the appropriate points on the timeline.
Identifying Data Hogs
Look at the list at the bottom of the Data Usage screen to identify data hogs. The list items are shown in descending order of appetite, so you can easily see which apps have been greediest.
Tap an app to display the Data Usage screen for that app alone. Figure 4.5 shows an example for Chrome. Use the Data Usage cycle pop-up menu and the histogram at the top to specify the time period you want to see. You can then look at the Foreground readout and Background readout to see how the app has been using data.
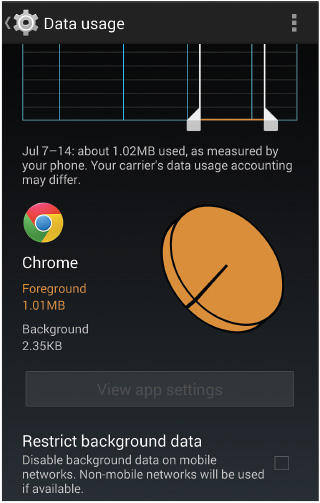
FIGURE 4.5 On the Data Usage screen for an app, you can check the Restrict Background Data box to prevent the app from using mobile data when it is in the background.
If you don’t want the app to use mobile data when it’s in the background, check the Restrict Background Data box.
Working on the Data Usage Screen’s Menu
The menu on the main Data Usage screen (see Figure 4.6) contains essential commands for managing your data usage:
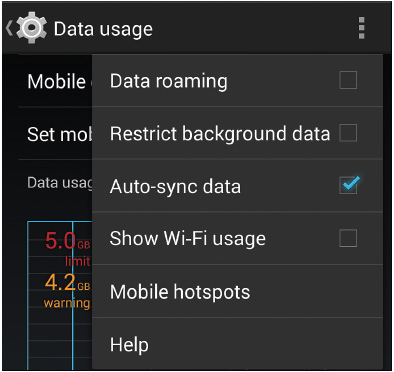
![]() Data Roaming. Check this box to turn on roaming. Because roaming may rack up charges, the Allow Data Roaming? dialog box opens to confirm the action. Tap the OK button if you want to go ahead.
Data Roaming. Check this box to turn on roaming. Because roaming may rack up charges, the Allow Data Roaming? dialog box opens to confirm the action. Tap the OK button if you want to go ahead.
![]() Restrict Background Data. Check this box to prevent all apps and services from using mobile data when they’re in the background. Android displays the Restrict Background Data? dialog box to warn you that restricting background data prevents some apps and services from working unless they have a Wi-Fi connection. Tap the OK button if you want to proceed.
Restrict Background Data. Check this box to prevent all apps and services from using mobile data when they’re in the background. Android displays the Restrict Background Data? dialog box to warn you that restricting background data prevents some apps and services from working unless they have a Wi-Fi connection. Tap the OK button if you want to proceed.
![]() Auto-Sync Data. Check this box to enable Android to sync data automatically.
Auto-Sync Data. Check this box to enable Android to sync data automatically.
![]() Show Wi-Fi Usage. Check this box to display Wi-Fi data usage on a separate tab. Being able to check Wi-Fi usage is useful if you’re on a metered Wi-Fi connection (such as at a hotel) or if you suspect an app of hogging Wi-Fi bandwidth. Otherwise, if you’re on an all-you-can-eat Wi-Fi connection, you probably don’t care how much data you’re shifting over it.
Show Wi-Fi Usage. Check this box to display Wi-Fi data usage on a separate tab. Being able to check Wi-Fi usage is useful if you’re on a metered Wi-Fi connection (such as at a hotel) or if you suspect an app of hogging Wi-Fi bandwidth. Otherwise, if you’re on an all-you-can-eat Wi-Fi connection, you probably don’t care how much data you’re shifting over it.
![]() Mobile Hotspots. Tap this button to display the Mobile Hotspots screen (see Figure 4.7), and then check the box for each Wi-Fi network that is a hotspot rather than a regular wireless network. You can then restrict apps in the background from using the hotspots.
Mobile Hotspots. Tap this button to display the Mobile Hotspots screen (see Figure 4.7), and then check the box for each Wi-Fi network that is a hotspot rather than a regular wireless network. You can then restrict apps in the background from using the hotspots.
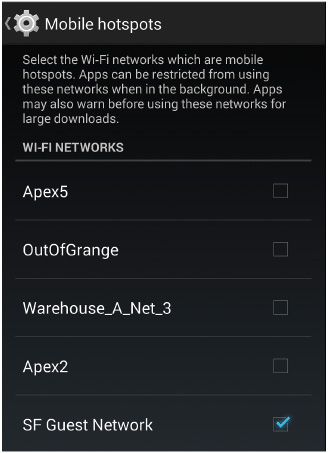
FIGURE 4.7 On the Mobile Hotspots screen, check the box for each available Wi-Fi network that is a hotspot.
The other difference that marking hotspots makes is that when your device is connected to a known hotspot, apps may also warn you before downloading large files.
Managing Your Wi-Fi Connections
Even if you’ve got a cellular device with a generous data plan, Wi-Fi tends to be essential to getting the most out of your device. In this section, you’ll learn how to find and identify networks; connect to them using passwords, WPS, and Wi-Fi Direct; install digital certificates; whitelist your device; configure IP settings; connect through a proxy server; and more.
Turning Wi-Fi On and Off
You can quickly turn Wi-Fi on or off by opening the Quick Settings panel and tapping and holding the Wi-Fi icon. When Wi-Fi is off, this icon shows the text “Wi-Fi”; when Wi-Fi is on and your device has connected to a wireless network, the icon shows three pieces of information (see Figure 4.8):
FIGURE 4.8 The Wi-Fi icon on the Quick Settings panel shows the current Wi-Fi network’s name, strength, and whether it is transferring data upstream and downstream.
![]() The network’s name under the icon (abbreviated if necessary).
The network’s name under the icon (abbreviated if necessary).
![]() The connection’s strength—one to four of the gray bars turn white.
The connection’s strength—one to four of the gray bars turn white.
![]() Note
Note
The bars on the Wi-Fi icon appear orange when your device is establishing a connection.
![]() Whether the connection is transferring data. An up arrow indicates data going to the server, while a down arrow indicates data coming to your device.
Whether the connection is transferring data. An up arrow indicates data going to the server, while a down arrow indicates data coming to your device.
![]() Tip
Tip
Instead of using the icon on the Quick Settings panel to turn Wi-Fi on or off, you can set the switch on the main Settings screen or the switch on the Wi-Fi screen.
When you turn Wi-Fi on, Android checks to see if any of the Wi-Fi networks to which you’ve previously connected your device are available. If a network is available, Android connects to it.
![]() Tip
Tip
For instant access to the Wi-Fi screen, create a Settings shortcut to it on the Home screen.
Connecting to Wi-Fi Networks
To choose which Wi-Fi network your Android device connects to, open the Wi-Fi screen in one of these ways:
![]() Tap the Wi-Fi icon on the Quick Settings panel.
Tap the Wi-Fi icon on the Quick Settings panel.
![]() Open the Settings app and tap the Wi-Fi button (not the Wi-Fi switch) on the Settings screen.
Open the Settings app and tap the Wi-Fi button (not the Wi-Fi switch) on the Settings screen.
If the Wi-Fi switch on the Wi-Fi screen is set to Off, set it to On. Android then searches for available networks and displays a list of them. If a network to which you’ve previously connected is available, Android connects to it.
If no such network is available, or if you want to connect to a different network, tap it on the Wi-Fi screen. If the network requires a password, Android displays a dialog box (whose title bar bears the network’s name) to prompt you for it (see Figure 4.9). Type the password—check the Show Password box if you need to see what you’re typing—and then tap Connect to connect.
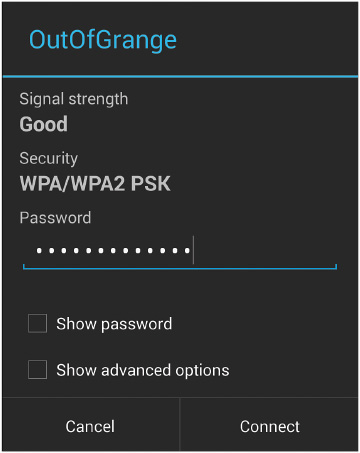
FIGURE 4.9 Android prompts you to enter the password for the wireless network you’re trying to join.
If the Wi-Fi network you’re expecting to see doesn’t appear on the Wi-Fi screen, tap the Menu button and then tap Scan on the menu to force another scan. If the network still doesn’t appear, you may need to provide the network name; see the next section for details.
Each Wi-Fi network has a network name to identify it. The administrator assigns the name when setting up the network. The name contains alphanumeric characters—letters and numbers—and has a maximum length of 32 characters.
![]() Note
Note
The technical term for a wireless network’s name is service set identifier, or SSID.
When setting up a Wi-Fi network, the administrator can decide whether to have the router broadcast the network’s name—as networks normally do—or whether to create a closed network, one that doesn’t broadcast its name.
![]() Note
Note
Creating a closed network is one of the security measures an administrator can take for a wireless network. It is only moderately effective: Casual intruders may miss the network, but anyone with a Wi-Fi scanner will still be able to detect the network.
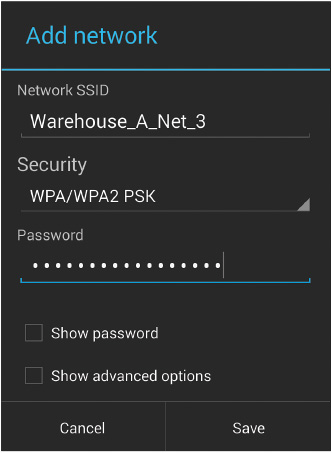
Connecting to a Closed Network
To connect to a closed network, you need to provide the network name as well as the password or other security measure. Tap the + button, which appears at the bottom of the Wi-Fi screen on a phone and at the top of the Wi-Fi screen on a tablet, to display the Add Network dialog box (see Figure 4.10). Then enter the details and tap the Save button.
![]() Tip
Tip
You can also use the Add Network dialog box to add an open network that is not currently in range.
After adding the closed network to the list on the Wi-Fi screen, you can tap the network to connect to it.
Setting Up a Network Using WPS
Some Wi-Fi routers include a feature called Wi-Fi Protected Setup (WPS) to help you set up networks securely. If your router includes WPS, and you have direct access to the router, you can set up the wireless network easily on your Android device. Android supports two types of WPS:
![]() WPS. You press a hardware button on your Wi-Fi router to permit the connection.
WPS. You press a hardware button on your Wi-Fi router to permit the connection.
![]() WPS PIN Entry. You enter a PIN in your Wi-Fi router’s configuration interface to permit the connection.
WPS PIN Entry. You enter a PIN in your Wi-Fi router’s configuration interface to permit the connection.
WPS is mostly used by Wi-Fi routers designed for the home market. It is a moderately secure way of establishing a connection to a Wi-Fi network.
To connect via WPS, tap the WPS button (the icon with curling arrows going up and down). The WPS Setup dialog box opens (see Figure 4.11).
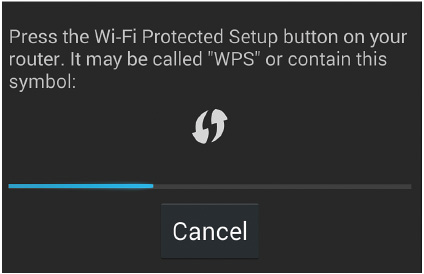
FIGURE 4.11 To set up a Wi-Fi network using WPS, tap the WPS button on the Wi-Fi screen, and then press the WPS button on your Wi-Fi router.
To connect via WPS PIN Entry, tap the Menu button on the Wi-Fi screen, and then tap WPS PIN Entry on the menu. The WPS PIN Entry dialog box opens, showing the PIN you need to enter on your Wi-Fi router (usually through a browser-based configuration utility). After you enter the PIN correctly, your device can connect to the network.
Using Wi-Fi Direct
Wi-Fi Direct is a Wi-Fi standard for connecting two devices to each other without using an access point, enabling you to share files between the devices or share one device’s Internet connection with the other. Wi-Fi Direct uses WPS to negotiate the link between the devices.
![]() Caution
Caution
Only some Android devices support Wi-Fi Direct. If the Wi-Fi Direct item doesn’t appear on the menu on the Wi-Fi screen in Settings, your device doesn’t support Wi-Fi Direct.
Here’s how to establish a connection using Wi-Fi Direct:
1. On the Wi-Fi screen on each device, tap the Menu button and then tap Wi-Fi Direct on the menu. The Wi-Fi Direct screen appears, displaying a list of peer devices and a list of remembered groups (see Figure 4.12).

![]() Tip
Tip
If the Wi-Fi Direct screen shows a generic name (such as Android_54d8) for your device, tap the Rename Device button, type a descriptive name (such as Nexus 5), and then tap the OK button. If the Rename Device button doesn’t appear on your device, tap the Menu button and then tap Configure Device to reach a screen that enables you to rename the device.
2. Tap the device to which you want to connect. The word Invited appears under the device’s name while Wi-Fi Direct waits for the user of the other device to accept the invitation to connect.
3. After Wi-Fi Direct establishes the connection, the word Connected appears under the device’s name in the Peer Devices list. You can now transfer files as needed between the devices.
4. When you are ready to stop using Wi-Fi Direct, tap the connection. The Disconnect? dialog box opens.
5. Tap the OK button.
Troubleshooting Wi-Fi Direct Connections
Wi-Fi Direct is great when it works, but often it doesn’t. You may find that other devices don’t appear on the Wi-Fi Direct screen, even when they’re physically right next to your device. Or you may find that the device is listed, but Wi-Fi Direct fails to establish a connection to the device you tap. Or Wi-Fi Direct may connect, but your device doesn’t enable you to transfer the file type you want to.
If you’re having trouble with Wi-Fi Direct, tap the Back button to return from the Wi-Fi Direct screen to the Wi-Fi screen. Turn Wi-Fi off, wait a few seconds, turn it back on, and then tap the Menu button and tap Wi-Fi Direct to display the Wi-Fi Direct screen again. If Wi-Fi Direct still isn’t working, try turning off your device and then restarting it.
At this point, you’ll probably want to turn to a different means of connection. NFC and Bluetooth are both options, but if you need to transfer large files, you’ll do better with an app such as SuperBeam or HitcherNet. Each offers a limited free version to persuade you to pay for an upgrade. For example, SuperBeam plays ads at you until you pay the premium for the Pro version, which offers extra features and no ads.
Installing Digital Certificates
For some connections, you may need to use a digital certificate to authenticate your device to a server. A digital certificate is a unit of encrypted code that you install on your device and tell it to use for specific tasks.
You can install a digital certificate either from an email message or from a folder on your device. You start the installation process in different ways, but the rest of the process is the same.
To start installing a digital certificate from an email message, tap the attachment button for the digital certificate in the message. The Extract Certificate dialog box opens.
If you receive a digital certificate in an email message but you don’t want to install it now, tap the Menu button on the attachment and tap Save on the menu to save the file to your Downloads folder.
To start installing a digital certificate from a folder, follow these steps:
1. Open the Settings app.
2. Tap the Security button in the Personal section.
![]() Note
Note
You may need to tap a different button on your device, such as Security & Screen Lock. The button for installing digital certificates from the SD card may also have a different name (such as Install from SD Card), but you should have no trouble finding it.
3. Tap the Install from Storage button in the Credential Storage section. The Open From panel appears.
4. Navigate to the folder that contains the certificate.
5. Tap the certificate. The Extract Certificate dialog box opens.
In the Extract Certificate dialog box, type the password for the certificate. Normally, you’ll need to find this out from the person who sent you the certificate.
Tap the OK button, and the Name the Certificate dialog box opens (see Figure 4.13). Type a descriptive name in the Certificate Name box so that you can easily distinguish this certificate from any others on your device. Then tap the Credential Use pop-up menu and tap the appropriate button:
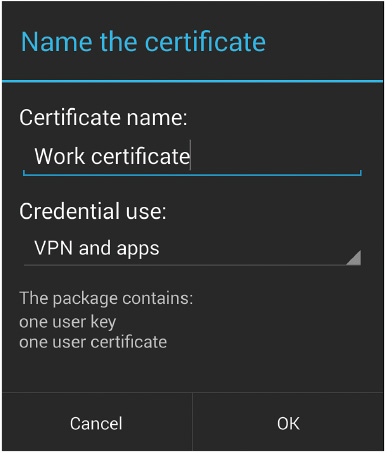
FIGURE 4.13 In the Name the Certificate dialog box, type a descriptive name for the certificate and specify what you will use it for.
![]() VPN and Apps. Tap this button to make this digital certificate available for connecting to VPN servers or for use in apps (such as for connecting to an Exchange Server system).
VPN and Apps. Tap this button to make this digital certificate available for connecting to VPN servers or for use in apps (such as for connecting to an Exchange Server system).
![]() Wi-Fi. Tap this button to make this digital certificate available for connecting to Wi-Fi networks.
Wi-Fi. Tap this button to make this digital certificate available for connecting to Wi-Fi networks.
Tap the OK button to close the Name the Certificate dialog box. Android installs the certificate and briefly displays a readout saying that it has been installed.
Choosing Advanced Wi-Fi Settings
The Wi-Fi screen gives you access to the essential settings for configuring Wi-Fi networks, but to take full control of Wi-Fi, you’ll need to configure advanced settings. Tap the Menu button on the Wi-Fi screen to open the menu, and then tap Advanced to display the Advanced Wi-Fi screen (see Figure 4.14).
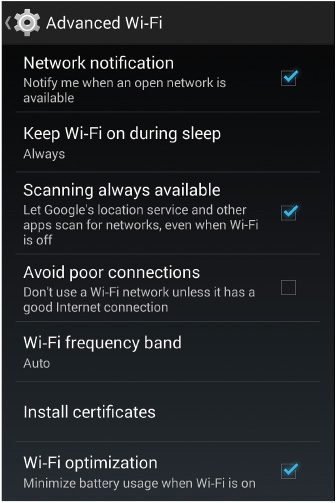
FIGURE 4.14 From the Advanced Wi-Fi screen, you can set your device to keep Wi-Fi on during sleep, avoid poor connections, and use specific frequency bands.
![]() Note
Note
Your device may not have all the options shown on the Advanced Wi-Fi screen here. For example, it may lack the Wi-Fi Optimization button or the Avoid Poor Connections button. Conversely, it may have extra features such as a Sort By button, which enables you to sort available wireless networks by signal strength or alphabetically.
These are the settings you can choose:
![]() Network Notification. Check this box to have Android notify you when an open network is available. Some devices call this Wi-Fi Notifications rather than Network Notification.
Network Notification. Check this box to have Android notify you when an open network is available. Some devices call this Wi-Fi Notifications rather than Network Notification.
![]() Keep Wi-Fi On During Sleep. Tap this button to display the Keep Wi-Fi On During Sleep dialog box, and then tap the Always radio button, the Only When Plugged In radio button, or the Never radio button.
Keep Wi-Fi On During Sleep. Tap this button to display the Keep Wi-Fi On During Sleep dialog box, and then tap the Always radio button, the Only When Plugged In radio button, or the Never radio button.
Selecting the Never radio button in the Keep Wi-Fi On During Sleep dialog box on a phone or cellular-capable tablet will increase your data usage because apps will use the cellular connection to check for data. Normally, it’s best to choose Only When Plugged In if you need to conserve battery power. Choose Always if having the latest data available is more important than battery power.
![]() Scanning Always Available. Check this box to allow the Google Location Service and other apps to scan for Wi-Fi networks even when Wi-Fi is turned off. Uncheck this box if you want “off” to mean “off.”
Scanning Always Available. Check this box to allow the Google Location Service and other apps to scan for Wi-Fi networks even when Wi-Fi is turned off. Uncheck this box if you want “off” to mean “off.”
![]() Avoid Poor Connections. Check this box if you want to let Android reject a Wi-Fi network that has a poor Internet connection. This setting can save you the frustration of struggling to use a poor connection, but if you’re stuck somewhere with only poor connections available, you may need to uncheck this box to get online at all.
Avoid Poor Connections. Check this box if you want to let Android reject a Wi-Fi network that has a poor Internet connection. This setting can save you the frustration of struggling to use a poor connection, but if you’re stuck somewhere with only poor connections available, you may need to uncheck this box to get online at all.
![]() Wi-Fi Frequency Band. To control which frequency band your device uses, tap this button, and then tap the appropriate radio button in the Wi-Fi Frequency Band dialog box: Auto, 5 GHz Only, or 2.4 GHz only.
Wi-Fi Frequency Band. To control which frequency band your device uses, tap this button, and then tap the appropriate radio button in the Wi-Fi Frequency Band dialog box: Auto, 5 GHz Only, or 2.4 GHz only.
![]() Install Certificates. Tap this button to start installing digital certificates. This is an alternative way of beginning the installation process explained in “Installing Digital Certificates,” earlier in this chapter.
Install Certificates. Tap this button to start installing digital certificates. This is an alternative way of beginning the installation process explained in “Installing Digital Certificates,” earlier in this chapter.
![]() Wi-Fi Optimization. Check this box to minimize battery usage while Wi-Fi is turned on. This is normally a good idea.
Wi-Fi Optimization. Check this box to minimize battery usage while Wi-Fi is turned on. This is normally a good idea.
![]() Note
Note
You can also make Android forget a wireless network. See the section “Forgetting a Network,” later in this chapter.
Whitelisting Your Device on a Wi-Fi Network
Some Wi-Fi networks use whitelists to determine which devices are allowed to connect to them. A whitelist is a list of approved MAC addresses on devices.
MAC is the abbreviation for Media Access Control. A MAC address is a unique hexadecimal identifier (such as f8:a9:d0:73;c4:dd) burned into the network hardware of a device.
You can find your device’s MAC address in two places:
![]() The MAC Address readout on the Advanced Wi-Fi screen. Open the Settings app, tap the Wi-Fi button, tap the Menu button, and then tap Advanced on the menu.
The MAC Address readout on the Advanced Wi-Fi screen. Open the Settings app, tap the Wi-Fi button, tap the Menu button, and then tap Advanced on the menu.
![]() The Wi-Fi MAC Address readout on the Status screen or in the Status dialog box. Open the Settings app, tap the About Phone button or the About Tablet button (or the About Device button on some devices), and then tap the Status button.
The Wi-Fi MAC Address readout on the Status screen or in the Status dialog box. Open the Settings app, tap the About Phone button or the About Tablet button (or the About Device button on some devices), and then tap the Status button.
![]() Caution
Caution
If you’re administering a wireless network, a whitelist of MAC addresses is a useful security measure for preventing unauthorized devices from connecting. But it’s not foolproof, because software can spoof (fake) an authorized MAC address that an attacker has grabbed using a network sniffer tool.
There’s no way to copy the MAC address, so you’ll need to write it down. You can then give it to your network’s administrator to add to the MAC whitelist—or, if the network is your own, add the address yourself.
Configuring IP Settings Manually
To connect to a wireless network, your device must have suitable Internet Protocol (IP) settings: the IP address, the gateway address, the network prefix length, and the DNS server addresses. Typically, the device receives these settings automatically from the network, but you can also set them manually if necessary.
Most Wi-Fi networks use Dynamic Host Configuration Protocol (DHCP), a protocol in which a DHCP server or DHCP allocator automatically provides IP addresses and network configuration information to devices that connect. DHCP is an efficient way of sharing available IP addresses among devices, so it’s widely used. But some networks use static IP addresses instead, assigning a particular address to each device. For such networks, you must configure your device’s IP settings manually.
You can configure IP settings either when setting up the network in the first place (tap the network on the Wi-Fi screen) or afterward by tapping and holding the network’s button on the Wi-Fi screen and then tapping Modify Network on the pop-up menu. Either way, you work in the dialog box for the network. This dialog box’s title bar shows the network’s name.
Tap to check the Show Advanced Options box, and the dialog box expands to show the Proxy controls and the IP Settings controls.
You’ll look at the Proxy controls in the next section. For now, tap the IP Settings pop-up menu and then tap Static instead of DHCP. The dialog box expands again (see Figure 4.15) to reveal the following fields for you to fill in:
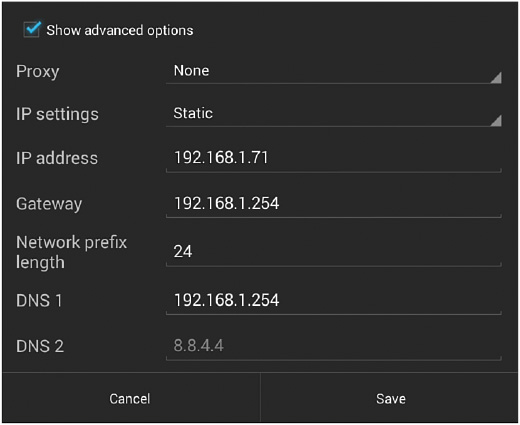
FIGURE 4.15 Choose Static in the IP Settings pop-up menu if you need to enter a static IP address and other network information.
![]() IP address. Type the static IP address for your device.
IP address. Type the static IP address for your device.
![]() Note
Note
Normally, you’ll be using an IPv4 address, which consists of four groups of numbers in the 0–255 range, separated by periods—for example, 192.168.1.44 or 10.0.0.250. If you’re connecting to an IPv6 network, the address consists of six hexadecimal groups separated by colons—for example, fe80:0000:faa9:d0fe:fe72:c4dd. If a group consists of zeros, you can collapse it to nothing, simply putting a pair of colons to indicate where it would be. For example, the previous address can also be written fe80::faa9:d0fe:fe72:c4dd, with the group of zeros removed.
![]() Gateway. Type the IP address of the network gateway or router.
Gateway. Type the IP address of the network gateway or router.
![]() Network Prefix Length. Leave the default setting, 24, unchanged for IPv4 networks. For IPv6 networks, type the length the administrator has specified, such as 64.
Network Prefix Length. Leave the default setting, 24, unchanged for IPv4 networks. For IPv6 networks, type the length the administrator has specified, such as 64.
![]() Tip
Tip
The Network Prefix Length setting replaces the subnet mask setting (such as 255.255.255.0) that was previously used for IPv4 networks.
![]() DNS 1. Type the IP address of the first DNS server your administrator or ISP has given you, or use Google’s primary DNS server, 8.8.8.8.
DNS 1. Type the IP address of the first DNS server your administrator or ISP has given you, or use Google’s primary DNS server, 8.8.8.8.
![]() DNS 2. Type the IP address of the second DNS server your administrator or ISP has given you, or use Google’s secondary DNS server, 8.8.4.4.
DNS 2. Type the IP address of the second DNS server your administrator or ISP has given you, or use Google’s secondary DNS server, 8.8.4.4.
Tap the Save button after you make your choices.
Connecting Through a Proxy Server
Instead of directly connecting to websites, your device can connect through a proxy server. This server fulfills network requests for your device, either by providing data that the server has previously cached or by relaying the requests to a suitable server. For example, instead of requesting a web page directly from the web server, your device requests it from the proxy server. The proxy server either delivers the web page from its cache, quickly providing the data and reducing Internet use, or requests the web page from the web server and passes it along to your device.
![]() Tip
Tip
Normally, you’d connect through a proxy server in a corporate or organizational setting, where the proxy server not only caches data but also prevents access to blocked sites. You can also connect through a proxy server with the aim of disguising the location where the network requests are coming from.
To set up a Wi-Fi connection to use a proxy server, follow these steps:
1. On the Wi-Fi screen, tap and hold the Wi-Fi connection, and then tap Modify Network on the pop-up menu to open the configuration dialog box for the network.
2. Tap to check the Show Advanced Options box. The dialog box expands to show the Proxy controls and the IP Settings controls.
3. Tap the Proxy pop-up menu and then tap Manual instead of None on the menu. The proxy settings appear (see Figure 4.16).
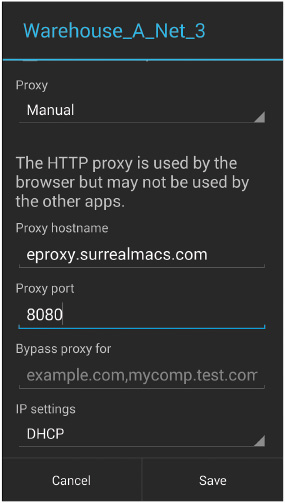
FIGURE 4.16 Choose Manual in the Proxy pop-up menu to display the fields for configuring a Wi-Fi connection to use a proxy server.
4. Type the proxy server’s hostname (such as eproxy.surrealmacs.com) or IP address (such as 208.42.68.13) in the Proxy Hostname box.
5. Type the port number in the Proxy Port box. The default port is 8080.
6. In the Bypass Proxy For box, type any domains or hosts that you want your device to access without the requests going through the proxy server.
7. Tap the Save button to close the dialog box and save the changes.
Improving Your Wi-Fi Connections
By this point, your Android device should be establishing connections to the Wi-Fi networks you want to use. But what if the connections aren’t working as well as you need them to?
First, if your device keeps dropping the connection and then having to reestablish it, try turning Wi-Fi off and back on again. If that doesn’t help, try powering down your device and restarting it. Restarting is tedious if you’re in a hurry, but it can clear up any number of niggling problems.
If the connection is still problematic, and it’s a network that you administer, restart the wireless router.
Second, look at the connection’s status to see if anything is obviously wrong. Open the Wi-Fi screen in the Settings app and tap the button for the network to which your device has connected. In the dialog box that opens (see Figure 4.17), look at the Signal Strength readout. This readout uses plain English terms—Excellent, Good, Fair, Poor, and Out of Range—to indicate the connection’s strength or lack thereof. If the Signal Strength is Poor, you may want to try another wireless network instead if one is available.
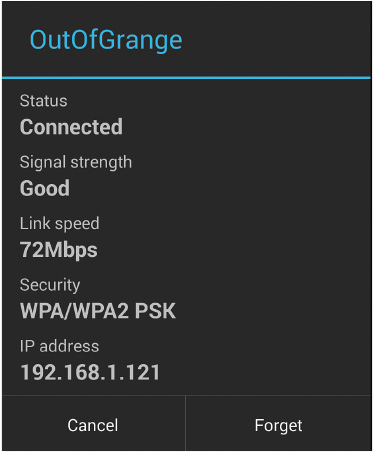
FIGURE 4.17 Look at the Signal Strength readout and Link Speed readout to identify anything obviously wrong with a Wi-Fi connection.
Look also at the Link Speed readout. If the speed is lower than usual, try dropping the connection and then reconnecting. The easiest way to drop the connection is to set the Wi-Fi switch to Off for a moment, and then set it back to On.
![]() Note
Note
Android usually connects at the highest link speed possible. But if you establish the connection when your device is relatively far from the wireless access point and the signal is correspondingly weak, you may get a low link speed that persists even when you move your device closer to the wireless access point. If this happens, drop the connection and reconnect to try to get a higher link speed.
Third, you may need to change channels to get a decent connection. A wireless network can use any of a variety of channels, which the administrator can choose using whatever configuration utility the wireless access point provides. If many of the wireless networks in your immediate vicinity use the same channels, you may get lower throughput.
To see which network is using which channels, you can install a Wi-Fi analyzer app or Wi-Fi stumbler app from the Play Store. Many are available with different features, but most show you the available networks, their relative signal strength, and the channels they are using. Armed with this information, you can set your wireless network to avoid the channels your neighbors are using.
![]() Tip
Tip
A Wi-Fi analyzer app or Wi-Fi stumbler app is also useful for locating available wireless networks when you need to get online.
Forgetting a Network
When you no longer want to use a particular network, you can tell your device to forget it. Tap the network’s button on the Wi-Fi screen to display the dialog box for the network, and then tap the Forget button.
![]() Note
Note
You can also tap and hold the network on the Wi-Fi screen, and then tap Forget Network on the pop-up menu.
If your device cannot connect to a network to which it has successfully connected before, forget the network and then rejoin it, entering the password again.
Sharing Your Device’s Internet Connection
If you have a phone or a cellular-capable tablet, you can share your cellular Internet connection with your computer or other devices. You have three options for sharing:
![]() USB Tethering. Connect your device to your computer via USB and enable the computer to use the device’s Internet connection across the USB cable.
USB Tethering. Connect your device to your computer via USB and enable the computer to use the device’s Internet connection across the USB cable.
![]() Portable Wi-Fi Hotspot. Share your device’s Internet connection via Wi-Fi with multiple devices.
Portable Wi-Fi Hotspot. Share your device’s Internet connection via Wi-Fi with multiple devices.
![]() Bluetooth Tethering. Share your device’s Internet connection via Bluetooth with other devices. You’ll look at this in the section “Sharing an Internet Connection via Bluetooth Tethering,” later in this chapter.
Bluetooth Tethering. Share your device’s Internet connection via Bluetooth with other devices. You’ll look at this in the section “Sharing an Internet Connection via Bluetooth Tethering,” later in this chapter.
![]() Note
Note
Some cellular providers disable the Portable Wi-Fi Hotspot feature unless you pay an extra fee for it.
To control sharing, you use the Tethering & Portable Hotspot screen (see Figure 4.18). To display this screen, open the Settings app, tap the More button in the Wireless & Networks section, and then tap the Tethering & Portable Hotspot button.
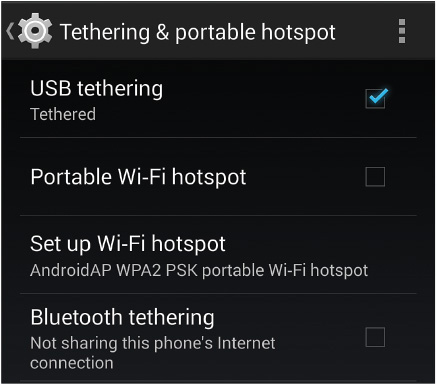
FIGURE 4.18 From the Tethering & Portable Hotspot screen, you can set up USB tethering, portable Wi-Fi hotspot, or Bluetooth tethering.
![]() Caution
Caution
Sharing your device’s cellular connection puts more stress on the device and may cause it to wear out sooner. For this reason, you may decide to use Internet sharing only when absolutely necessary rather than everyday.
Sharing the Internet Connection via USB Tethering
To share your device’s Internet connection via USB sharing, connect your device to your computer via USB and then check the USB Tethering box.
![]() Tip
Tip
Windows normally picks up the tethered connection immediately without your intervention. On Mac, you may need to select the tethered network interface manually: Click the Apple menu and then click System Preferences, and then click Network in the System Preferences window. In the Network pane, click your device’s name in the list of network interfaces, and then click the Apply button.
Sharing the Internet Connection via Portable Wi-Fi Hotspot
To share your device’s Internet connection via Portable Wi-Fi Hotspot, first set up the hotspot. Tap the Set Up Wi-Fi Hotspot button on the Tethering & Portable Hotspot screen and choose suitable settings in the Set Up Wi-Fi Hotspot dialog box (see Figure 4.19):
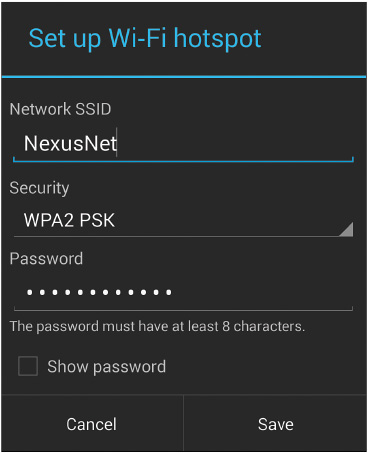
![]() Network SSID. Type a name that you can easily identify from other nearby Wi-Fi hotspots. Many people leave the default name, AndroidAP, so it’s a good idea to change the name.
Network SSID. Type a name that you can easily identify from other nearby Wi-Fi hotspots. Many people leave the default name, AndroidAP, so it’s a good idea to change the name.
![]() Security. Tap this pop-up menu and choose WPA2 PSK.
Security. Tap this pop-up menu and choose WPA2 PSK.
![]() Note
Note
The other choices on the Security pop-up menu are None and WPA PSK. Don’t use None, because any device within Wi-Fi range will be able to use your hotspot. Use WPA PSK if you find that older devices can’t connect to the hotspot because they don’t support WPA2 PSK.
![]() Password. Type the password for the connection. Use at least 8 characters for the password, and preferably 12–20 characters. (If you choose None in the Security pop-up menu, the Password field disappears.)
Password. Type the password for the connection. Use at least 8 characters for the password, and preferably 12–20 characters. (If you choose None in the Security pop-up menu, the Password field disappears.)
![]() Caution
Caution
Sharing your Internet connection via Portable Wi-Fi Hotspot can eat through your data plan at high speed. Use the Data Usage screen in the Settings app to monitor how much data your device has used and how much remains.
Tap the Save button to close the Set Up Wi-Fi Hotspot dialog box, and your hotspot is ready for use. Check the Portable Wi-Fi Hotspot box on the Tethering & Portable Hotspot screen to turn on the hotspot. Computers and devices can then connect to the hotspot using the same techniques as for any other wireless network.
![]() Note
Note
The maximum number of simultaneous connections for the hotspot depends on the device but is usually between three and eight. Android doesn’t give you any indication of how many clients have connected to the hotspot, so it can be hard to tell how much use it’s getting.
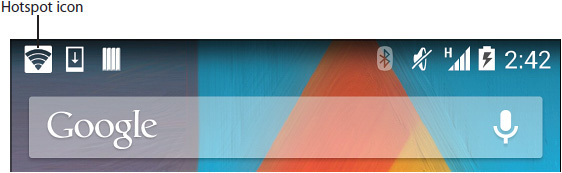
While the hotspot is active, the hotspot icon appears at the left end of the status bar (see Figure 4.20), and the notifications panel displays a notification that you can touch to go straight to the Tethering & Portable Hotspot screen. To turn off the hotspot, uncheck the Portable Wi-Fi Hotspot box on the Tethering & Portable Hotspot screen.
Connecting Bluetooth Devices
Most Android devices include Bluetooth capabilities, enabling you to wirelessly connect a wide variety of devices through the Bluetooth protocol. For example, you can connect Bluetooth headphones to listen to music comfortably or connect a Bluetooth keyboard so that you can enter text at full speed in documents. If your device is a phone or a cellular-capable tablet, you can also use Bluetooth to share its Internet connection with other devices.
The first time you connect a Bluetooth device, you must pair it with your Android device. After pairing the devices, you can subsequently connect them quickly and easily.
Pairing a Bluetooth Device with Your Android Device
Here’s how to pair a Bluetooth device with your Android device:
1. Open the Settings app.
2. Tap the Bluetooth button to display the Bluetooth screen.
3. Set the switch to On.
4. Turn on the Bluetooth device and make it visible via Bluetooth.
![]() Note
Note
To make a device visible, you may need to press a dedicated button or press its other control buttons in combination. Typically, the device gives an indication that it is visible—for example, flashing lights of different colors or emitting beeps—so you’ll know when you’ve got it right.
5. If the Bluetooth device doesn’t appear in the Available Devices list on your Android device (see Figure 4.21), tap the Search for Devices button.
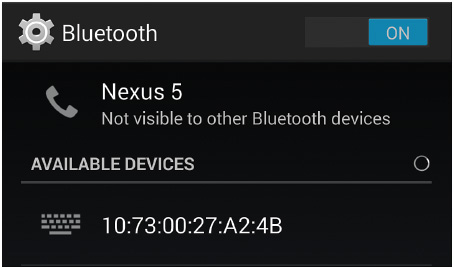
FIGURE 4.21 Tap the Bluetooth device’s button in the Available Devices list to start pairing it with your Android device.
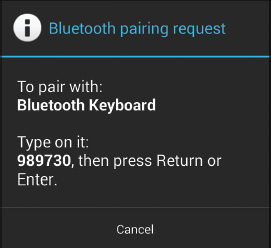
6. If the Bluetooth Pairing Request dialog box opens (see Figure 4.22), type the code shown and press Enter or Return.
7. When the pairing is complete, the Bluetooth device appears in the Paired Devices list. Tap the Settings button (the icon with three horizontal sliders) to display the Paired Bluetooth Device screen (see Figure 4.23).
FIGURE 4.23 Use the Paired Bluetooth Device screen to rename a Bluetooth device, unpair it, or turn off its profile.
8. If you want, tap the Rename button, type a descriptive name in the Rename dialog box, and then tap the OK button.
![]() Note
Note
On the Paired Bluetooth Device screen, you can uncheck the device’s box in the Profiles list to stop using a device for the purpose shown. For example, Android lists a keyboard as an input device. You can uncheck the box to stop using the keyboard for input temporarily.
![]() Tip
Tip
When you’re not using Bluetooth, turn it off to save battery power and to prevent other devices from trying to connect to your device via Bluetooth. The quickest way to turn Bluetooth on and off is by opening the Quick Settings panel and then tapping and holding the Bluetooth icon.
Transferring Files to Another Device via Bluetooth
You can transfer files to another device via Bluetooth by using the Share feature.
1. Open the app that owns the files.
2. Select the files. How you do this depends on the app, but in many apps, you can turn on Selection mode by tapping and holding a file.
3. Give the Share command. This also depends on the app, but in many apps you can either tap the Share button on the toolbar or tap the Bluetooth button on the toolbar.
4. In the Share Via dialog box, tap Bluetooth to display the Bluetooth Device Chooser screen.
5. Tap the device to which you want to send the files.
The target device then receives a prompt about the files. If the user accepts the file, Android transfers it.
When another device tries to transfer a file to your device via Bluetooth, your device displays a Bluetooth Share notification. Tap the notification to display the File Transfer dialog box (see Figure 4.24), and then tap the Accept button or the Decline button, as appropriate. You can then go to the file by tapping the Bluetooth Share: Received File notification in the notifications panel or by tapping the Menu button on the Bluetooth screen and then tapping Show Received Files on the menu.
Sharing an Internet Connection via Bluetooth Tethering
To share your device’s Internet connection via Bluetooth, check the Bluetooth Tethering box on the Tethering & Portable Hotspot screen. Other devices can then connect to your device via Bluetooth and use its Internet connection to access the Internet.
The general theory is plain enough, but as usual, the devil is in the details. If you’re looking to use an Android device to share the Internet connection via Bluetooth, you’re in the right place. The following subsections explain how to pair Android devices via Bluetooth and share an Internet connection.
Pairing Two Android Devices
To pair another Android device with your device, first make your device visible by tapping the button at the top of the Bluetooth screen. This button shows the device’s Bluetooth name and the readout “Only visible to paired devices.” When you tap the button, the readout changes to “Visible to all nearby Bluetooth devices” and a countdown of the remaining visibility time (see Figure 4.25).
FIGURE 4.25 Tap your device’s name on the Bluetooth screen to make it temporarily visible via Bluetooth.
![]() Tip
Tip
You can change your device’s Bluetooth name by tapping the Menu button, tapping Rename Phone or Rename Tablet on the menu, typing the new name in the Rename Phone dialog box or the Rename Tablet dialog box, and then tapping the Rename button.
On the other device, tap the button for your device in the Available Devices list on the Bluetooth screen. If your device doesn’t appear there, tap the Search for Devices button.
You can change how long your device remains visible for Bluetooth devices. On the Bluetooth screen, tap the Menu button and then tap Visibility Timeout on the menu to open the Visibility Timeout dialog box. You can then tap the appropriate radio button—2 Minutes, 5 Minutes, 1 Hour, or Never Time Out.
Each device then displays the Bluetooth Pairing Request dialog box. Verify that each instance of the dialog box shows the same number, and then tap the Pair button on each device. Android establishes the connection, and each device appears in the Paired Devices list on the other device.
Sharing the Internet Connection via Bluetooth on an Android Device
Now that you’ve paired the devices, you need to turn on the Internet Access profile for the device that will use the shared Internet connection.
On this device, tap the Settings button to the right of the device’s name in the Paired Devices list on the Bluetooth screen. On the Paired Bluetooth Device screen that appears, check the Internet Access box in the Profiles list. You can then use the Internet connection, but Android turns off the Internet Access profile when the device locks.
Using VPNs
Virtual private networking (VPN) enables you to create a secure connection to a server across an insecure network. You’d typically use a virtual private network (also abbreviated VPN) for connecting across the Internet to a work network.
![]() Tip
Tip
Here are two more uses for VPN. First, when you connect to a Wi-Fi hotspot, you can use a VPN to secure your Internet traffic against snooping. Second, when you need to make your device appear to be in a different location than it actually is. For example, if you subscribe to a U.S.-based media service, you may not be able to access it when you travel abroad. But by connecting to a VPN server within the United States, you can make your computer appear to be in the country, enabling you to use the service. Leading VPN services include IPVanish (www.ipvanish.com), StrongVPN (www.strongvpn.com), and CyberGhost VPN (www.cyberghostvpn.com).
Setting Up a VPN Connection
To set up a VPN connection on your Android device, you’ll need to know the following:
![]() VPN type. This can be PPTP, L2TP/IPSec PSK, L2TP IPSec RSA, IPSec Xauth PSK, IPSec Xauth RSA, or IPSec Hybrid RSA.
VPN type. This can be PPTP, L2TP/IPSec PSK, L2TP IPSec RSA, IPSec Xauth PSK, IPSec Xauth RSA, or IPSec Hybrid RSA.
![]() Server address. This can be a server name (such as vpnserv.notionalpress.com) or an IP address (such as 209.14.241.1).
Server address. This can be a server name (such as vpnserv.notionalpress.com) or an IP address (such as 209.14.241.1).
![]() L2TP secret. This is a text string used for securing some L2TP connections.
L2TP secret. This is a text string used for securing some L2TP connections.
![]() IPSec identifier. This is a text string used for some IPSec connections.
IPSec identifier. This is a text string used for some IPSec connections.
![]() IPSec preshared key. This is a text string used for some IPSec connections.
IPSec preshared key. This is a text string used for some IPSec connections.
![]() Note
Note
For some types of VPN, you may also need to provide a digital certificate. See the section “Installing Digital Certificates,” earlier in this chapter, for instructions on installing a digital certificate.
Ask the VPN’s administrator for this information. Ask also for your username and password for the VPN connection. You don’t need these for setting up the connection, but you’ll need them when you connect.
Armed with the right information, follow these steps to set up the VPN on your device:
1. Open the Settings app.
2. Tap the More button in the Wireless & Networks section to display the Wireless & Networks screen.
3. Tap the VPN button to display the VPN screen.
4. Tap the + button to open the Edit VPN Profile dialog box (see Figure 4.26).
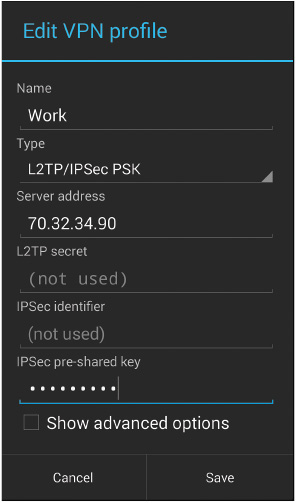
5. Type a descriptive name in the Name box.
6. Tap the Type pop-up menu and select the type, such as L2TP/IPSec PSK. The Edit VPN Profile dialog box changes to display fields for the information required.
7. Fill in the other information required for the VPN using the data the administrator has given you.
If you need to fill in DNS search domains, DNS servers, or forwarding routes, check the Show Advanced Options box to reveal the fields in which you can enter this information.
8. Tap the Save button. The VPN appears on the VPN screen.
Connecting via the VPN
After you’ve set up a VPN connection, you can connect via the VPN using the following steps:
1. Tap the VPN’s button on the VPN screen. The Connect To dialog box opens (see Figure 4.27), showing the VPN’s name (for example, Connect to Work for a VPN called “Work”).
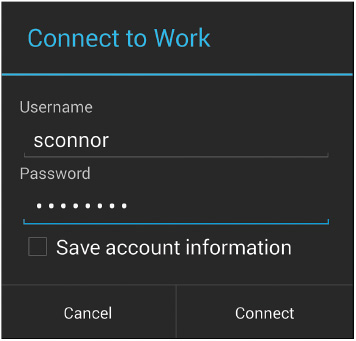
FIGURE 4.27 In the Connect To dialog box for the VPN, check the Save Account Information box if you want to save your credentials for future use.
![]() Tip
Tip
Early versions of KitKat (Android 4.4) had some bugs in the VPN software, which Google had recoded for KitKat. If your device has trouble establishing VPN connections, can establish connections but cannot transfer data over them, or unexpectedly disconnects from the VPN, make sure you have updated it to the latest version of Android.
2. Type your username and password.
3. Check the Save Account Information box if you want to save your username and password so you don’t have to type them next time.
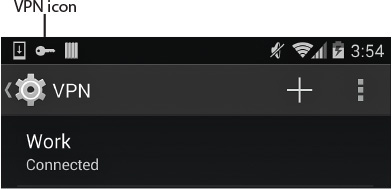
4. Tap the Connect button. Android connects to the server and displays the readout “Connected” under the connection’s name. The VPN symbol appears in the status bar (see Figure 4.28).
After connecting, you can work across the VPN connection in much the same way as a local network connection. Normally, the speeds will be much slower across the VPN, so you may need to be patient while transferring data.
When you’re ready to stop using the VPN, tap its button on the VPN screen or on the Notifications panel. The VPN Is Connected dialog box opens (see Figure 4.29), and you can tap the Disconnect button to disconnect the connection.
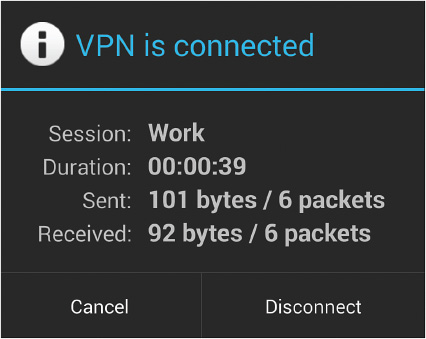
FIGURE 4.29 Tap the Disconnect button in the VPN Is Connected dialog box when you’re ready to disconnect the VPN.