6. Taking Gmail to the Pro Level
In This Chapter
![]() Setting up and configuring your Gmail accounts
Setting up and configuring your Gmail accounts
![]() Managing your messages and dealing with problem mail
Managing your messages and dealing with problem mail
![]() Setting up two-step verification on your accounts
Setting up two-step verification on your accounts
Your Android device gives you access to Gmail everywhere you go, so chances are you’ll want to maximize your usage of Gmail. Your first move in this chapter is to get all your Gmail accounts set up on your device. Your second move is to configure all those accounts to work the way you prefer and to fully exploit the features that Gmail offers.
After that, you’ll put those features into use triaging and reading your messages, writing messages and managing your mail, and dealing with problem mail and problem senders. You’ll also learn how to search for messages using advanced search operators and how to set up 2-Step Verification to protect your Gmail account.
Setting Up Your Other Gmail Accounts
Normally, you’ll have set up your primary Gmail account while setting up your device for the first time. Now is the time to set up any other Gmail accounts you have.
Here’s how to add a Gmail account to your device:
1. Open the Settings app from the Quick Settings panel or the Apps screen.
![]() Tip
Tip
You can also get to the Settings app from within the Gmail app, but doing so takes longer and is barely worthwhile. Open the menu panel and tap Settings to display the Settings screen. Then tap the Menu button there, tap Manage Google Accounts, and then tap the Continue button in the dialog box that opens.
2. Tap the Add Account button to display the Add an Account screen.
3. Tap the Google button to display the Add a Google Account screen.
4. Tap the Existing button to display the Sign In screen.
5. Type your email address and password, tap the Next button, and then tap the OK button in the confirmation dialog box.
![]() Tip
Tip
When you type your email address, you can omit the “@gmail.com” part of the address. Settings fills that in for you automatically.
6. On the Google Services screen, uncheck the Keep Me Up to Date with News and Offers from Google Play box unless you really want to receive these messages.
7. On the Set Up Payment Info screen, tap the Add Credit or Debit Card radio button or the Redeem radio button and tap the Continue button if you want to set up a means of payment now. Otherwise, tap the Skip button.
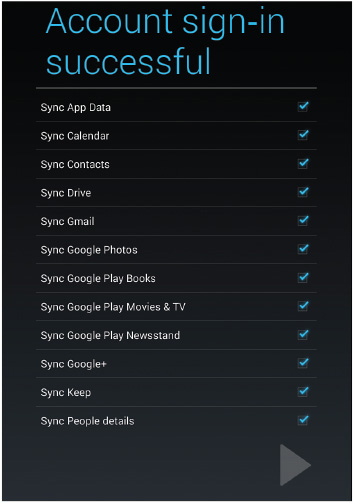
8. On the Account Sign-In Successful screen (see Figure 6.1), tap to uncheck the box for any item you don’t want to sync.
9. Tap the Next button to make Settings finish setting up the account. The main Settings screen then appears.
Configuring Your Gmail Accounts to Work Your Way
The Gmail app provides a wide variety of settings that you can configure to make your Gmail accounts work the way you prefer. To get started with configuration, open the menu panel and tap the Settings button to display the Settings screen. As you can see in Figure 6.2, this screen contains a General Settings button and a button for each of your Gmail accounts, enabling you to configure each of them separately.
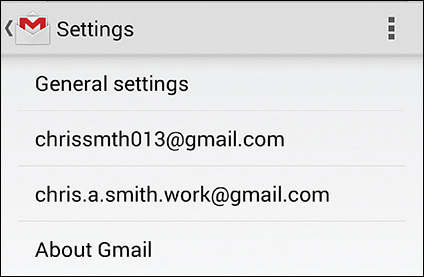
FIGURE 6.2 The Settings screen gives you access to general settings and to each of your Gmail accounts.
Choosing General Settings
Normally, you’ll want to start by tapping the General Settings button to display the General Settings screen (see Figure 6.3) so that you can choose options for how the Gmail app works overall.
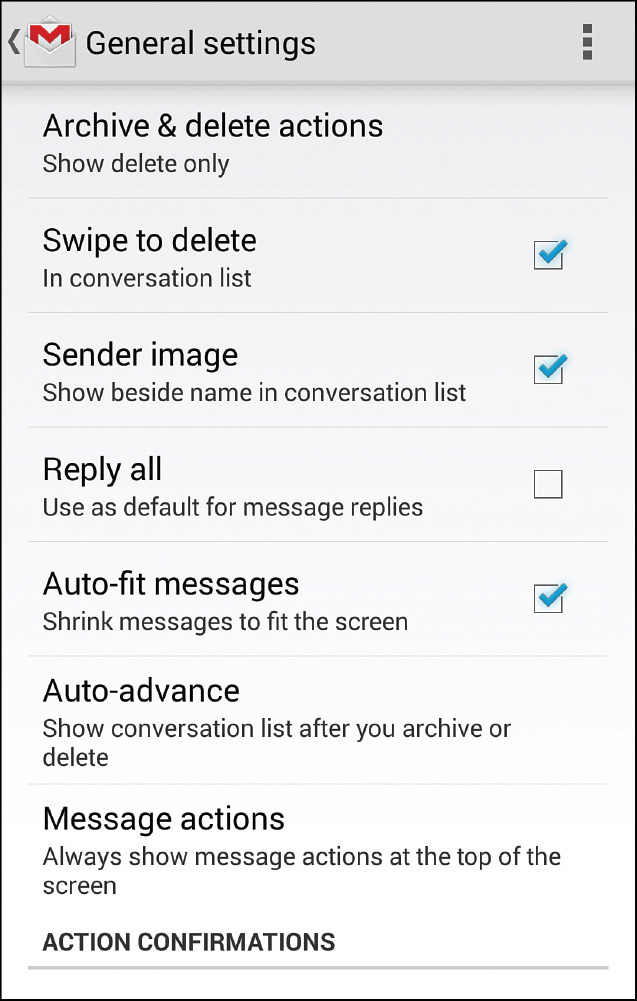
FIGURE 6.3 The General Settings screen enables you to choose Gmail-wide settings such as Archive & Delete, Auto-Advance, and Action Confirmations.
Controlling Archiving and Deletion
Gmail gives you all the space you need to keep all your messages indefinitely and encourages you to archive your old messages instead of deleting them. Some people think keeping all their old messages is a good idea, while others prefer to keep only important messages. Depending on which you prefer, you can set the Gmail app to show only the archive action, only the delete action, or both the archive and delete actions.
To choose which actions appear, tap Archive & Delete Actions, and then tap the appropriate radio button in the Archive & Delete Actions dialog box: Show Archive Only, Show Delete Only, or Show Archive & Delete.
The second setting on the General Settings screen changes depending on your choice for the Archive & Delete Actions setting: If you select the Show Archive Only radio button or the Show Archive & Delete radio button, the Swipe to Archive check box appears. If you select the Show Delete Only radio button, the Swipe to Delete check box appears.
Check this box if you want to be able to archive messages—or delete messages, if you chose Show Delete Only—by swiping them off the conversation list. This action is usually helpful unless you find yourself performing it by accident—for example, when being jostled on public transit.
Choosing Sender Image, Reply All, and Auto-Fit Messages Settings
Check the Sender Image box if you want the sender image to appear to the left of the sender’s name in the conversation list. The sender image shows the sender’s photo if it’s available in your contacts; otherwise, it displays the first letter of the sender’s name. You can tap the sender image to select a message quickly.
Check the Reply All box if you want to use Reply All as the default action for replying to messages that have multiple recipients.
![]() Caution
Caution
Check the Reply All box only if you’re required to include all recipients in your replies. Some companies and organizations require this. Otherwise, use Reply All manually and sparingly to help keep down unnecessary emails.
Check the Auto-Fit Messages box if you want the Gmail app to automatically shrink messages to fit on your device’s screen. This setting is usually helpful unless you find it makes the messages too small to read.
Configuring Auto-Advance
The Auto-Advance feature enables you to control what the Gmail app displays next when you deal with a message by archiving or deleting it. Your choices are to display the next newer item, display the next older item, or return to the conversation list so that you can pick the next item you want to deal with. What to choose here depends on the messages you receive and the way you prefer to work with them.
Tap the Auto-Advance button to display the Advance To dialog box, and then tap the Newer radio button, the Older radio button, or the Conversation List radio button, depending on which you want.
Choosing Whether to Show Message Actions
On a phone, your next choice is whether to make the message action buttons appear at the top of the screen even when you scroll down the message. The message action buttons are the star button, Reply button, and message Menu button that appear at the top of the message. These buttons always appear at first, but you can choose to keep displaying them always, only when your device is in portrait orientation, or not display them once you scroll down.
To control when the message action buttons appear, tap the Message Actions button, and then tap the Always Show radio button, the Only Show in Portrait radio button, or the Don’t Show radio button.
Choosing Action Confirmations
In the Action Confirmations section of the General Settings screen, you can check or uncheck the Confirm Before Deleting box, the Confirm Before Archiving box, or the Confirm Before Sending box to control which actions the Gmail app confirms and which it doesn’t.
![]() Tip
Tip
Action confirmations can be useful if you use your device in a moving or busy environment, such as on public transit. If you’re stationary and have a sure touch, you may prefer to turn confirmations off.
After you finish on the General Settings screen, tap the Back button to return to the Settings screen.
Configuring Account-Specific Settings
Apart from the General settings, Gmail’s remaining settings are account-specific, so you can set them differently for your various accounts if you need to.
To start configuring account-specific settings, tap the button for one of your accounts on the Settings screen. Figure 6.4 shows an account settings screen on a phone.
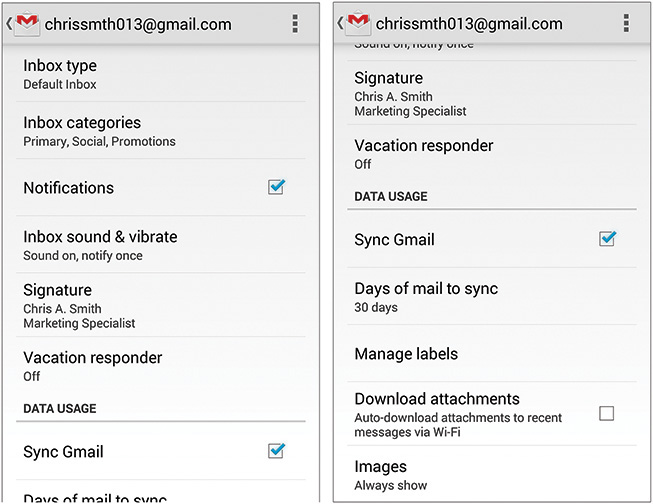
FIGURE 6.4 The account-specific settings screen enables you to configure your Inbox, notifications, sync options, labels, and more.
Configuring Your Inbox
Your first choice on an account settings screen is the Inbox type. You can configure it either as a Default Inbox or as a Priority Inbox. Here’s what those terms mean:
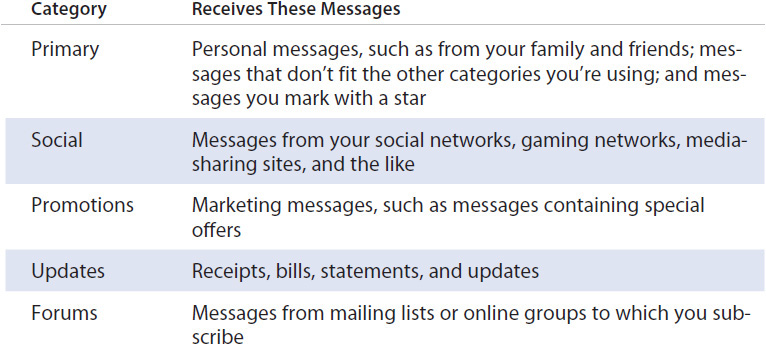
![]() Default Inbox. A Default Inbox gives you a choice of categories into which you can have it organize your messages. Table 6.1 explains the categories. The Primary category always appears, but you can choose which of the other categories to display.
Default Inbox. A Default Inbox gives you a choice of categories into which you can have it organize your messages. Table 6.1 explains the categories. The Primary category always appears, but you can choose which of the other categories to display.
![]() Priority Inbox. A Priority Inbox gives you a way to separate your most important messages from the rest. Gmail assesses your incoming messages, decides which are important, and places those in the Priority Inbox.
Priority Inbox. A Priority Inbox gives you a way to separate your most important messages from the rest. Gmail assesses your incoming messages, decides which are important, and places those in the Priority Inbox.
![]() Note
Note
You can train Gmail to recognize important messages for your Priority Inbox. You’ll learn how to do this later in this chapter.
To choose which categories to use in your Default Inbox, tap the Inbox Categories button and then check or uncheck the boxes on the Inbox Categories screen (see Figure 6.5).
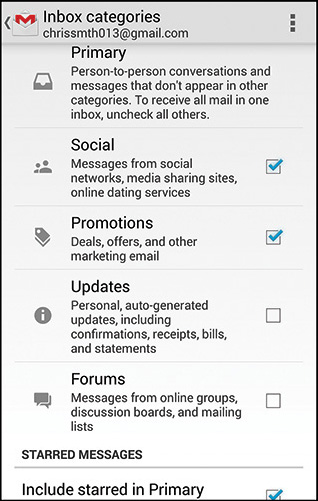
FIGURE 6.5 On the Inbox Categories screen, check the box for each category you want to use in your Default Inbox.
![]() Note
Note
By default, the Gmail app places any message you mark with a star in your Primary category. This behavior is normally helpful, but if you don’t want it, uncheck the Include Starred in Primary box on the Inbox Categories screen.
If you want to receive notifications when messages arrive in your Inbox, check the Notifications box. You can then tap the Inbox Sound & Vibrate button or the Priority Inbox Sound & Vibrate button and choose options on the Sync & Notify screen (see Figure 6.6). These are the options:
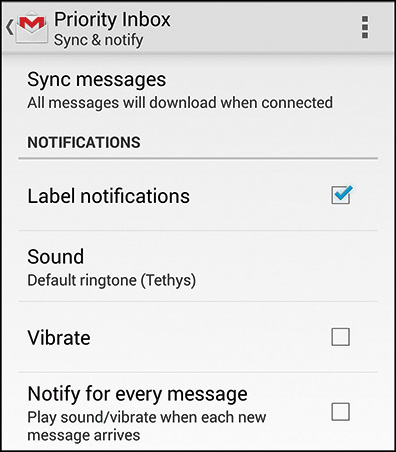
FIGURE 6.6 On the Sync & Notify screen, choose which notifications to receive. You can also choose which messages to sync.
![]() Sync Messages. Tap this button to display the Priority Inbox dialog box (for a Priority Inbox) or the Primary dialog box (for a Default Inbox). You can then tap the Sync: None radio button, the Sync: Last NN Days radio button (which shows the number of days you choose in the Days of Mail to Sync dialog box, discussed later in this chapter), or the Sync: All radio button.
Sync Messages. Tap this button to display the Priority Inbox dialog box (for a Priority Inbox) or the Primary dialog box (for a Default Inbox). You can then tap the Sync: None radio button, the Sync: Last NN Days radio button (which shows the number of days you choose in the Days of Mail to Sync dialog box, discussed later in this chapter), or the Sync: All radio button.
If your device doesn’t have a vibration motor, you’ll see the Priority Inbox Sound button instead of the Priority Sound & Vibrate button. Similarly, you’ll see the Inbox Sound button instead of the Inbox Sound & Vibrate button.
![]() Label Notifications. Check this box to receive notifications for messages with certain labels. This is the overall control for receiving label notifications. You then specify the labels for which to receive notifications as discussed in the section “Managing Your Labels,” later in this chapter.
Label Notifications. Check this box to receive notifications for messages with certain labels. This is the overall control for receiving label notifications. You then specify the labels for which to receive notifications as discussed in the section “Managing Your Labels,” later in this chapter.
![]() Sound. Tap this button, tap the ringtone you want to use for the notification, and then tap the OK button.
Sound. Tap this button, tap the ringtone you want to use for the notification, and then tap the OK button.
![]() Vibrate. Check this box if you want your device to vibrate to notify you of messages. This box appears only if your device has a vibration motor.
Vibrate. Check this box if you want your device to vibrate to notify you of messages. This box appears only if your device has a vibration motor.
![]() Notify for Every Message. Check this box if you want Gmail to notify you for every incoming message, not just for the first message of a batch.
Notify for Every Message. Check this box if you want Gmail to notify you for every incoming message, not just for the first message of a batch.
Saving Time with Signatures
If you need to sign the messages you send from this account in a consistent way, you can create a signature for the account. A signature is text that the Gmail app automatically inserts in each outgoing message—each new message, each reply, and each forwarded message you create.
Tap the Signature button on the account settings screen to open the Signature dialog box. Type in the text—you can create multiple lines by tapping the Enter key—and then tap the OK button.
![]() Tip
Tip
At this writing, the Gmail app enables you to have only one signature per account. It automatically inserts the signature in every outgoing message; you can’t create a signature and turn it off temporarily. If you need more flexibility with signatures, create text shortcuts for the lines you want to have available, such as your position and company or your contact data, and use them to insert custom signatures as needed in your messages.
Creating a Vacation Responder
The Gmail app includes a built-in Vacation Responder feature that you can set up to respond automatically to incoming messages. Here’s how to set up Vacation Responder:
1. Tap the Vacation Responder button on the account settings screen to display the Vacation Responder screen (see Figure 6.7).
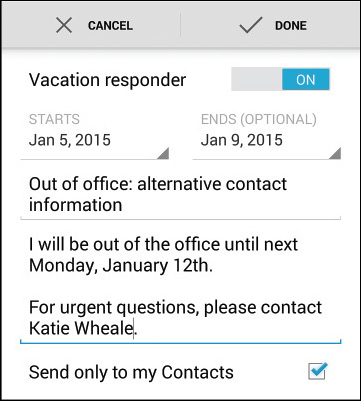
2. Tap the Starts button and choose the date.
3. Tap the Ends (Optional) button and choose the end date if necessary.
4. Tap the Subject field and type the message subject.
5. Tap the body text field and type the body text.
6. Check the Send Only to My Contacts box if you want to send the message only to your contacts. Checking this box is often a good idea because it prevents sending vacation messages to promotional messages (unless you’ve added such senders to your contacts).
7. Set the Vacation Responder switch to the On position.
8. Tap the Done button.
Choosing Which Messages to Sync
In the Data Usage section of the account settings screen, choose which messages to sync. Normally, you’ll want to check the Sync Gmail box to sync your Gmail messages with the Gmail app on your device. Then tap the Days of Mail to Sync button and use the dial in the Days of Mail to Sync dialog box to set the number of days. Tap the OK button to apply your choice.
Managing Your Labels
As you’ll know if you’ve used the service for any length of time, Gmail uses labels instead of folders. So instead of moving a message to a folder for storage, you simply mark it with one or more labels. You can then browse or search by label to find the messages you need.
![]() Tip
Tip
The advantage of labels over folders is that you can apply multiple labels to an individual message, enabling yourself to locate the message by browsing or searching any of those labels. By contrast, with folders, you can put a message in only a single folder; to get a message into multiple folders, you need to make an extra copy of the message for each folder beyond the first.
To use labels effectively, you’ll need to make sure each account has the labels it needs. At this writing, you can’t create labels by using the Gmail app on your Android device. Instead, open a browser, log in to your Gmail account, and then create the labels. You can do this on your Android device, but if you have a computer handy, you might want to use that instead.
Here’s how to create a new label using your browser:
1. Click or tap the Create New Label link to open the New Label dialog box (see Figure 6.8).

FIGURE 6.8 Use your browser to create a new label in your Gmail account. You can choose to nest the label under an existing label.
2. Type the name in the Please Enter a New Label Name box.
3. To nest the label under another label (like a subfolder), click or tap the pop-up menu, and then click or tap the existing label. The browser checks the Nest Label Under box automatically, so you don’t need to check it manually.
4. Click or tap the Create button.
After you’ve customized your list of labels, you can choose notification settings for each label using the Gmail app on your Android device like this:
1. On the account settings screen, make sure you’ve checked the Notifications check box. If this check box is unchecked, notifications are off for the account as a whole, so you can’t set notifications for individual labels.
2. Tap the Manage Labels button to display the Label Settings screen (see Figure 6.9).
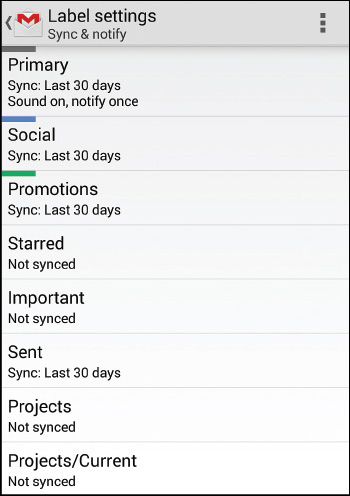
FIGURE 6.9 On the Label Settings screen, tap the label for which you want to configure notifications.
3. Tap the label you want to configure. The settings screen for the label appears, and you can choose settings as explained in the section “Configuring Your Inbox,” earlier in this chapter.
Triaging and Reading Your Messages
Now that you’ve configured your Gmail accounts to your satisfaction, you’re ready to deal with your messages quickly and smoothly.
In this section, you learn how to navigate among your accounts and labels, work in the conversation list, and read your messages.
Navigating Among Your Accounts and Labels
To navigate among your Gmail accounts and your labels, tap the menu button in the upper-left corner of the screen, or tap the Gmail logo or the current mailbox name. In the menu panel that opens, tap the account, the Inbox, or the label that you want to view.
Working in the Conversation List
The conversation list (see Figure 6.10) presents a list of your messages with the newest at the top. You can refresh the conversation list by tapping the conversation list, pulling down the screen a little way, and then releasing the list. Alternatively, tap the Menu button and then tap Refresh on the menu.
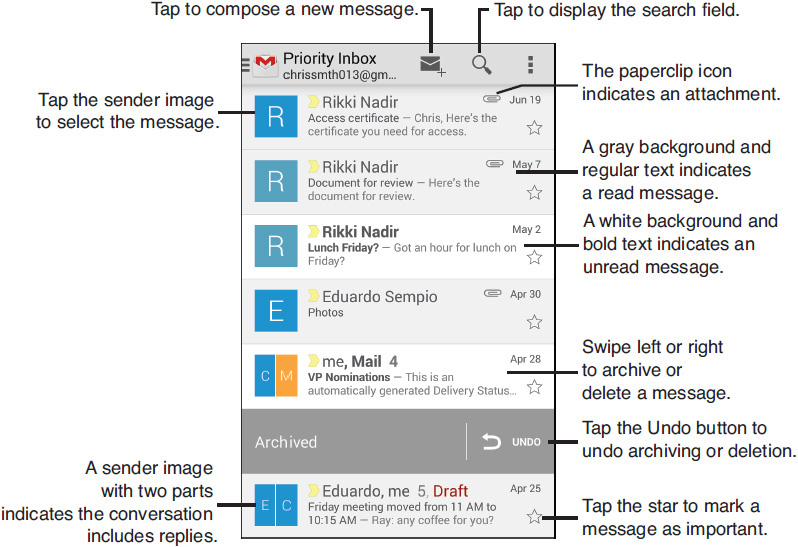
FIGURE 6.10 The conversation list provides an easy-to-navigate list of your messages and conversations.
Each unread message appears with its sender name and subject in boldface against a white background. Each unread message has a gray background, and the sender name and subject appear in regular (nonbold) font.
![]() Tip
Tip
The yellow arrow to the left of a message’s sender indicates that Google considers the message important. The reason may be that you are the only recipient or that you have marked similar messages as important.
The sender image (or sender initial) square to the left of the sender name gives you a quick way of seeing who the message is from. If the conversation includes replies, the sender image is divided into two rectangles that show the first initial of the last two senders.
If you turn off sender images, you can select a message by tapping and holding it. Doing so turns on Selection mode, and you can then tap other messages to select them.
Tap the sender image square to select the message; the square changes to display a white check mark on a gray square. Selecting a message puts the conversation list into Selection mode, and three buttons for manipulating the selected messages appear at the top of the screen (see Figure 6.11):
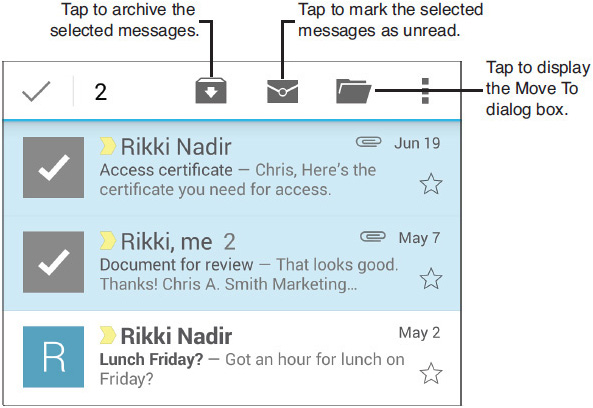
FIGURE 6.11 Use the three buttons at the top of the conversation list to archive the selected messages, mark them as unread, or move them to a folder.
![]() Archive. Tap this button to archive the selected messages.
Archive. Tap this button to archive the selected messages.
![]() Mark as Unread. Tap this button to mark the selected messages as unread.
Mark as Unread. Tap this button to mark the selected messages as unread.
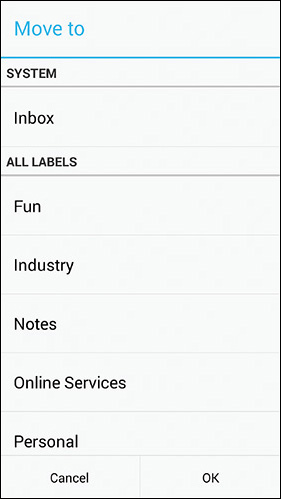
![]() Move To. Tap this button to display the Move To dialog box, in which you can tap the label to which you want to move the selected messages.
Move To. Tap this button to display the Move To dialog box, in which you can tap the label to which you want to move the selected messages.
Also in the conversation list, you can swipe a conversation left or right off the list to archive or delete it, depending on the Archive & Delete Actions setting you chose on the General Settings screen. The Archived bar or Deleted bar appears, confirming the action you’ve taken with the conversation. You can tap the Undo button at the right end of the Archived bar or Deleted bar if you’ve gotten rid of the wrong message.
If Gmail identifies an unimportant message as important, select the message, tap the Menu button, and then tap Mark Not Important on the menu. If you do this consistently, Gmail gradually learns which messages are important to you and which are not.
Reading Your Messages
Tap a message in the conversation list to open it for reading. You can then use the controls shown in Figure 6.12 to take actions with the message:
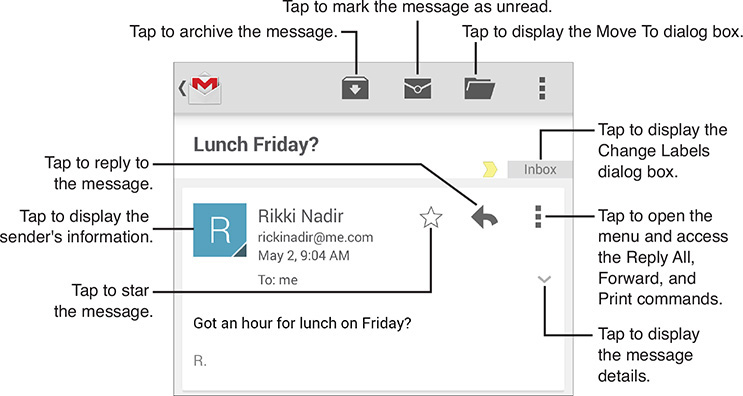
FIGURE 6.12 After opening a message for reading, you can reply to it, forward it, archive it, or move it.
![]() Reply to the message. Tap the Reply button.
Reply to the message. Tap the Reply button.
![]() Reply to all recipients of the message. Tap the message’s Menu button—the Menu button to the right of the sender’s name—and then tap Reply All on the menu.
Reply to all recipients of the message. Tap the message’s Menu button—the Menu button to the right of the sender’s name—and then tap Reply All on the menu.
![]() Forward the message. Tap the message’s Menu button and then tap Forward on the menu.
Forward the message. Tap the message’s Menu button and then tap Forward on the menu.
![]() Print the message. Tap the message’s Menu button and then tap Print on the menu.
Print the message. Tap the message’s Menu button and then tap Print on the menu.
![]() Delete the message. Tap the main Menu button and then tap Delete on the menu.
Delete the message. Tap the main Menu button and then tap Delete on the menu.
![]() Star the message. Tap the star icon to the left of the Reply button.
Star the message. Tap the star icon to the left of the Reply button.
![]() View the message details. Tap the Message Details button (the downward arrow below the message’s Menu button) to display the From field, To field, and Date field.
View the message details. Tap the Message Details button (the downward arrow below the message’s Menu button) to display the From field, To field, and Date field.
![]() Change the message’s labels. Tap the current label button above the message’s Menu button to display the Change Labels dialog box, check the box for each label you want to apply, and then tap the OK button.
Change the message’s labels. Tap the current label button above the message’s Menu button to display the Change Labels dialog box, check the box for each label you want to apply, and then tap the OK button.
![]() Display the sender’s information. If a black triangle appears at the lower-right corner of the sender image, tap the image to display the sender’s information. If the triangle doesn’t appear, the information isn’t available.
Display the sender’s information. If a black triangle appears at the lower-right corner of the sender image, tap the image to display the sender’s information. If the triangle doesn’t appear, the information isn’t available.
![]() Archive the message. Tap the Archive button on the toolbar.
Archive the message. Tap the Archive button on the toolbar.
![]() Mark the message as unread. Tap the Mark as Unread button on the toolbar.
Mark the message as unread. Tap the Mark as Unread button on the toolbar.
![]() Move the message to a label. Tap the Move To button on the toolbar to display the Move To dialog box, and then tap the destination label.
Move the message to a label. Tap the Move To button on the toolbar to display the Move To dialog box, and then tap the destination label.
![]() Note
Note
If the message is part of a conversation, you can tap the Show Quoted Text button to display the quoted text and tap the resulting Hide Quoted Text button to hide it. Tap the Older Messages button to view older messages in the conversation.
Writing and Sending Messages
Gmail makes writing and sending messages easy: Tap the Compose button (the envelope icon with a + sign at its lower-right corner) at the top of the conversation list; fill in the recipient, subject, and message body on the Compose screen; and then tap the Send button, the arrow button to the left of the menu button.
You can also change the account, add Cc or Bcc recipients, and attach files:
![]() Choose the account. If you have set up multiple Gmail accounts, tap the Account pop-up menu and then tap the account to use.
Choose the account. If you have set up multiple Gmail accounts, tap the Account pop-up menu and then tap the account to use.
![]() Add Cc or Bcc recipients. On a phone, tap the Menu button and then tap the Add Cc/Bcc button on the menu to display the Cc and Bcc fields. On a tablet, tap the +CC/BCC button to the right of the To field to display them. Tap the Cc field or the Bcc field as appropriate, start typing the contact’s name or email address, and then tap the contact in the pop-up list of matches.
Add Cc or Bcc recipients. On a phone, tap the Menu button and then tap the Add Cc/Bcc button on the menu to display the Cc and Bcc fields. On a tablet, tap the +CC/BCC button to the right of the To field to display them. Tap the Cc field or the Bcc field as appropriate, start typing the contact’s name or email address, and then tap the contact in the pop-up list of matches.
![]() Attach a file to the message. Tap the Menu button and then tap Attach File on the menu. Use the Open From panel to select the source of the file, such as Images or Videos, and then tap the file to select it. The file appears as a large button showing the file’s name. If you need to remove the file, tap the X button.
Attach a file to the message. Tap the Menu button and then tap Attach File on the menu. Use the Open From panel to select the source of the file, such as Images or Videos, and then tap the file to select it. The file appears as a large button showing the file’s name. If you need to remove the file, tap the X button.
![]() Tip
Tip
If you want to label a message you’re composing, save it as a draft by either tapping the Menu button and then tapping Save Draft on the menu or by tapping the Back button twice. You can then open the Drafts folder, label the message, and then reopen it so that you can send it.
![]() Note
Note
If you decide not to send the message, you can discard it. To discard the message, tap the Menu button and then tap Discard on the menu.
Labeling and Archiving Your Messages
To keep your messages in order, you will normally want to label them and archive them.
![]() Labeling. Labeling assigns one or more labels, such as Personal or Work, to the message, enabling you to find it later by browsing through those labels or searching with them. When you label a message, it remains in the same folder, such as your Inbox.
Labeling. Labeling assigns one or more labels, such as Personal or Work, to the message, enabling you to find it later by browsing through those labels or searching with them. When you label a message, it remains in the same folder, such as your Inbox.
![]() Archiving. Archiving moves a message out of your Inbox.
Archiving. Archiving moves a message out of your Inbox.
Between them, labeling and archiving have an effect similar to moving a message to a folder in other email systems. But because you can label and archive messages separately, Gmail gives you more flexibility. The Move To command and Move To dialog box enable you to label and move a message in a single move.
You can label either the message you have open for reading or selected messages in the conversation list by tapping the Menu button and then tapping Change Labels on the menu. The Change Labels dialog box opens (see Figure 6.13), and you can check the boxes for the labels you want to apply, and then tap the OK button.
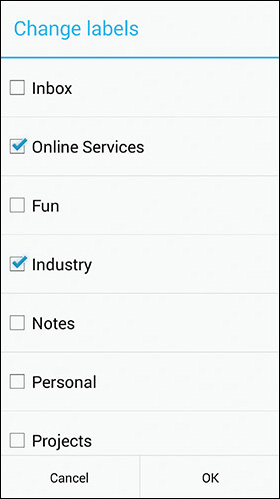
FIGURE 6.13 Use the Change Labels dialog box to label a message and leave it in its current location.
![]() Tip
Tip
You can also open the Change Labels dialog box by tapping a label’s button on a message you’ve opened for reading.
![]() Note
Note
Gmail uses the Inbox label to determine which messages should appear in the Inbox. Removing the Inbox label from a message moves it out of the Inbox; applying the Inbox label to a message makes it appear in the Inbox.
To archive a message, tap the Archive button at the top of the screen for either a message you have opened for reading or for selected messages in the conversation list.
To label a message and archive it at the same time, tap the Move To button either for the message you have open for reading or the messages you have selected in the conversation list. The Move To dialog box opens (see Figure 6.14), and you can tap the label to which you want to move the message.
Dealing with Problem Mail and Problem Senders
If you receive spam or phishing messages, you can report them to Google. With the message either open for reading, or with the message or messages selected in the conversation list, tap the main Menu button and then tap Report Spam or Report Phishing on the menu.
![]() Tip
Tip
Gmail doesn’t give you a way to block specific senders, but you can create filters to put messages from them straight into the Trash. Using a web browser, log in to your Gmail account; if you’re using your Android device, you’ll need to open the menu and check the Request Desktop Site box. Click or tap the down-arrow button at the right end of the Search box, choose the details in the Filter pane, and then click the Create Filter with This Search button.
For heavier-duty blocking, you can use an e-mail proxy provider that filters your messages for you and permits only those messages that pass your specified criteria to reach you.
Searching for Messages
When you need to locate particular messages, you can search for them. You can do a straightforward search using one or more keywords, but you can also use advanced search operators and Boolean operators for more power.
Searching with Keywords
To search for messages using keywords, tap the Search icon at the top of the conversation list and type the keywords. If the Gmail app displays a list of suggested matches, tap the appropriate one.
![]() Tip
Tip
When you use multiple keywords, Gmail search for messages containing them all. For example, if you search for relocation project, Gmail searches for messages containing both relocation and project. To search for an exact phrase, place the keywords in quotation marks—for example, “relocation project.”
The results list appears, and you can tap the message you want to view.
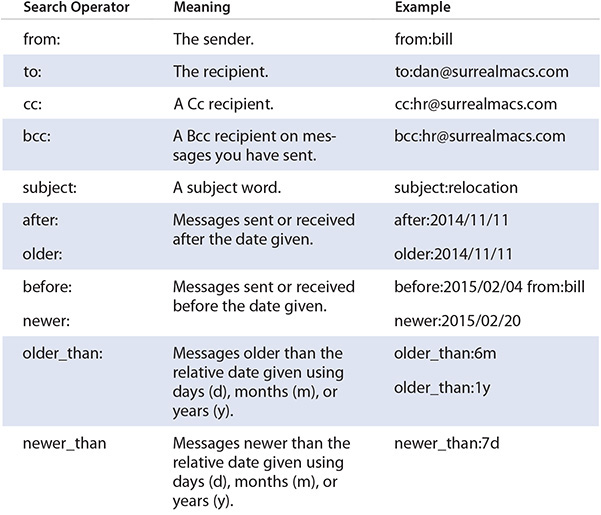
Searching with Advanced Search Operators
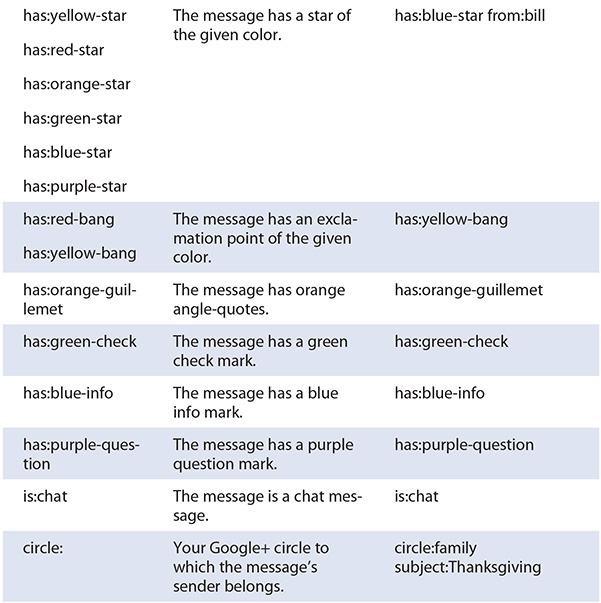
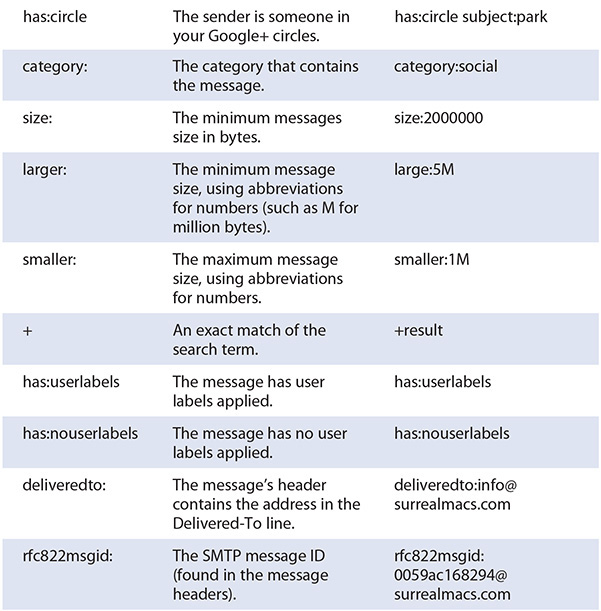
For more advanced searching, use operators in your searches. Table 6.2 explains the search operators, with examples.

Searching with Boolean Operators and Grouping
As you saw earlier, when you enter multiple search terms, Gmail searches for messages that contain them all. This is a Boolean AND operator: Searching for budget spreadsheet 2015 is the equivalent of searching for budget AND spreadsheet AND 2015.
You don’t need to specify the AND operator, but you can if you want. You can also use the OR operator and the NOT operator:
![]() OR. Use the OR operator to search for one item or another item. For example, subject:relocation OR subject:planning.
OR. Use the OR operator to search for one item or another item. For example, subject:relocation OR subject:planning.
![]() NOT (–). Use the NOT operator, represented by the minus sign (–), to specify items you don’t want to find. For example, from:bill –meeting.
NOT (–). Use the NOT operator, represented by the minus sign (–), to specify items you don’t want to find. For example, from:bill –meeting.
You can use parentheses to group terms together. For example, you can use subject:(office project) to messages whose subject lines contain both “office” and “project” (but not necessarily the phrase “office project”).
Setting Up 2-Step Verification
To protect your Google account against attackers, you should set up 2-Step Verification for it. This process uses your phone as well as your password to help keep attackers out of your account.
Here’s how 2-Step Verification works: Each time you sign in to your Google account using a computer or device on which you haven’t signed in before, Google accepts your username and password but then prompts you for a code that it has just sent to your phone. Type in that code, and you can choose whether to authorize that computer or device so that you don’t need to enter a code for it again in future.
You can set up 2-Step Verification either using a computer or just your Android device. The following sections explain what to do.
Setting Up 2-Step Verification Using a Computer
If you use a computer as well as your Android device, use the computer to set up 2-Step Verification like this:
1. Open a web browser and go to the Gmail website.
2. Sign in to your Google account by providing your username and password.
3. Click your name or picture in the upper-right corner of the window, and then click Account to display the settings screen for the account.
4. Click the Security tab to display the Security screen.
5. In the Password box, tap the Setup link on the 2-Step Verification line to display the Signing In with 2-Step Verification screen.
6. Tap the Start Setup button.
7. Enter your password, and then click the OK button.
8. On the Set Up Your Phone screen, enter your phone number and select the Text Message (SMS) radio button or the Voice Call radio button, as appropriate.
If you don’t know your Android device’s phone number by heart, open the Settings app, tap the About Phone button, tap the Status button, and then look at the My Phone Number readout.
9. Tap the Send Code button to send the verification code to your phone (or to receive a phone call).
10. On the Verify Your Phone screen, type in the verification code and click the Verify button.
11. On the Trust This Computer? screen, check or uncheck the Trust This Computer box as needed, and then click the Next button.
![]() Caution
Caution
Check the Trust This computer box only if this is your own computer or you entirely trust all the other people who use it.
12. On the Confirm screen, click the Confirm button.
Reinforcing Your 2-Step Verification Security
After setting up 2-Step Verification, use the settings on the 2-Step Verification screen to add security mechanisms.
First, go to the Verification Codes tab and click the Add a Phone Number button to add a backup phone in case yours go missing. Then click the Print or Download button in the Backup Codes area to print or download backup codes you can use to get into your account if you have problems with you phone. Backup codes are also useful for travel, when you may have trouble connecting.
Next, click the App-Specific Passwords tab, click the Manage Application-Specific Passwords button, and follow through the process for setting passwords for specific apps, such as Mail apps, that access your Google account.
Last, click the Registered Computers tab and use its controls to configure your list of registered computers. These are computers you can use to manage your account when your phone isn’t available, such as when it pits its delicate electronics against gravity or water.
Setting Up 2-Step Verification Using an Android Device
If you use your Android device on its own, without a computer, you may be able to set up 2-Step Verification directly on the device by using the Google Authenticator app. Open the Play Store app on your device, search for Google Authenticator, tap the correct search result, and then install the app. When the installation completes, tap the Open button to open Google Authenticator, and then follow the prompts for choosing the appropriate Google account and setting up 2-Step verification on it.
![]() Note
Note
If Google Authenticator cannot sign you in, it may prompt you to sign in using the web interface instead. Follow the prompts to complete the verification. If Google Authenticator prompts you to continue on a computer instead, do so.
Logging In to Your Account with 2-Step Verification Enabled
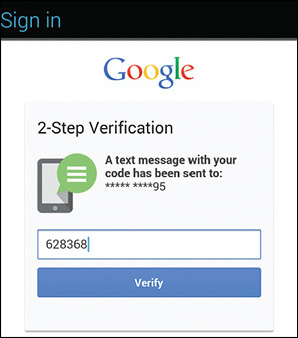
After you enable 2-Step Verification, you need to go through the extra step of verification the first time you log in to your Google account using a computer on which you haven’t logged in to your account. Google apps such as Gmail will refuse your password and prompt you to log in using the web-based interface instead.
When you do, the 2-Step Verification dialog box shown in Figure 6.15 appears. The device on which you verified the account receives a text with a six-digit verification code. Type the code, tap the Verify button, and the app will be able to log in.