
7. Becoming Expert with the Email App
In This Chapter
![]() Setting up your email accounts
Setting up your email accounts
![]() Sending and receiving messages
Sending and receiving messages
![]() Configuring your accounts to work the way you prefer
Configuring your accounts to work the way you prefer
As you read in the preceding chapter, Android includes the Gmail app for connecting to Google’s Gmail service. For all other email types, Android provides the Email app.
Using the Email app, you can connect to mail servers running the widely used POP and IMAP protocols as well as to web-based email services (such as Microsoft’s Hotmail and Outlook) and to Exchange Server systems.
The Email app is easy to use—after you’ve set up your accounts in it. Setting up accounts can be tricky, so you’ll dig into its details at the beginning of the chapter. You’ll then look at how to use the Email app’s features to compose, read, and manage your messages. At the end of the chapter, you’ll examine how you can configure the general settings and account-specific settings to make the app work the way you prefer.
Setting Up Your Non-Gmail Accounts
You can set up an account in the Email app for each non-Gmail account you need to use on your device.
You can set up most accounts using only the email address and password for the account, leaving the Email app’s automatic-configuration feature to determine the mail server addresses and security type needed. For other accounts, you may need to know the addresses of the incoming mail server and the outgoing mail server, the security types they use, and whether the outgoing mail server requires you to log in before sending messages.
You should first see if the Email app can set up the account for you. If automatic setup fails, the Email app automatically falls back to manual setup, leaving you to enter the required information for the mail servers.
Gathering the Information Needed to Set Up an Email Account
Before starting to set up your email account, make sure you have the information you need. It’s better to have all the information available, and not need all of it when the Email app detects some of the details, than to have to give up partway through and find out the missing pieces of information.
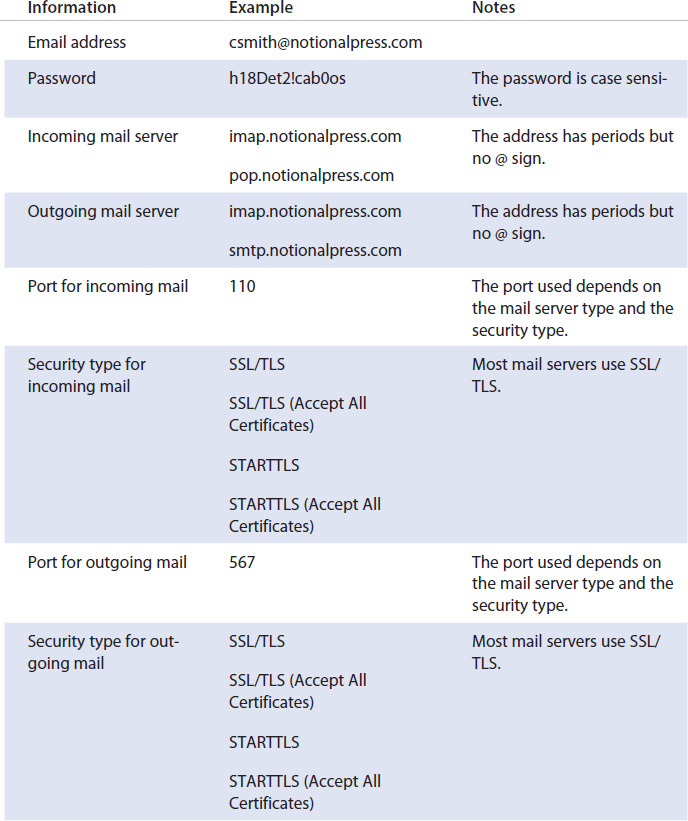
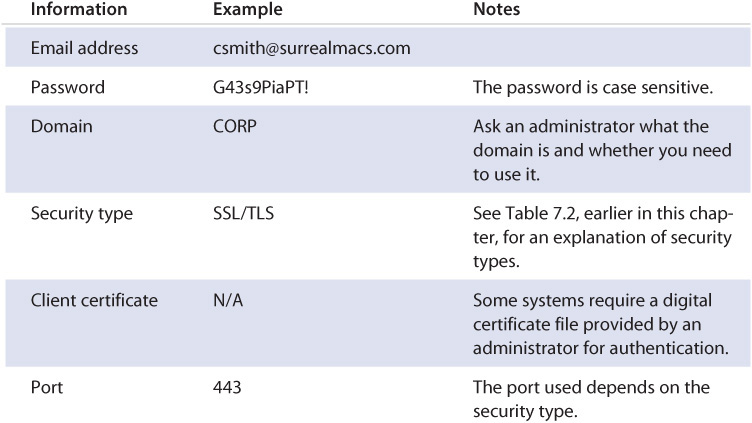
Table 7.1 explains the information you will need and the information you may need, with examples of what each item looks like.
Understanding POP3, IMAP, SMTP, and Exchange
POP3, IMAP, SMTP, and Exchange are four technologies widely used for mail servers. POP3 and IMAP are protocols that email clients (such as the Email app on your Android device) use to communicate with incoming mail servers—the servers from which you receive your messages. SMTP is a protocol used for many outgoing mail servers—the servers that send your messages for you. Exchange is Microsoft’s Exchange Server technology for email, scheduling, and calendars.
POP is the acronym for Post Office Protocol, and POP3 is version 3 of Post Office Protocol. IMAP is the acronym for Internet Mail Access Protocol, a newer protocol than POP3. SMTP is the abbreviation for Simple Mail Transfer Protocol, a protocol for sending mail.
The main difference between POP3 and IMAP is that POP3 is mostly designed to download your messages to your email client, removing them from the server, whereas IMAP is designed to enable you to view and manage your messages on the server without downloading it to your email client.
The advantage of IMAP is that, with your messages on the server, you can view and manage them from multiple devices. So if you view a message using your Android device, the message is marked as having been read in your laptop computer’s mailbox as well. And if you delete a message on your laptop, it disappears from your Android device’s mailbox too.
Your email provider will tell you which account type—POP3, IMAP, or Exchange—to specify when setting up your account. If your email provider gives you the choice between POP3 and IMAP, you’ll normally want to choose IMAP for your Android device so that you can access your messages on other computers and devices as well.
Understanding Security Types for Email Accounts
When setting up an email account manually, you need to specify the security type used to secure the connection. Normally, you must choose the right security type to make the email account work at all.
The Email app offers these five security types:
![]() None. This option transmits all data using plain text. You may occasionally need to use this option to check whether an email account is functional. If so, change the security type and password immediately afterward.
None. This option transmits all data using plain text. You may occasionally need to use this option to check whether an email account is functional. If so, change the security type and password immediately afterward.
![]() SSL/TLS. Secure Sockets Layer (SSL) and Transport Layer Security (TLS) are widely used protocols for securing communications between a computer or device and a server. TLS is based on SSL and is more secure than SSL. SSL and TLS use digital certificates to secure the connection and check that the certificates are valid and issued by a trusted certificate authority (CA). This is the security type you will normally use for an email account.
SSL/TLS. Secure Sockets Layer (SSL) and Transport Layer Security (TLS) are widely used protocols for securing communications between a computer or device and a server. TLS is based on SSL and is more secure than SSL. SSL and TLS use digital certificates to secure the connection and check that the certificates are valid and issued by a trusted certificate authority (CA). This is the security type you will normally use for an email account.
![]() SSL/TLS (Accept All Certificates). This security type uses SSL and TLS but accepts any digital certificate instead of rejecting certificates that are invalid, out of date, issued by an untrusted certificate authority, or self-signed. (Developers use self-signed certificates for testing code.) You may need to use this security type for some accounts, but accepting all certificates is generally unsafe.
SSL/TLS (Accept All Certificates). This security type uses SSL and TLS but accepts any digital certificate instead of rejecting certificates that are invalid, out of date, issued by an untrusted certificate authority, or self-signed. (Developers use self-signed certificates for testing code.) You may need to use this security type for some accounts, but accepting all certificates is generally unsafe.
![]() STARTTLS. STARTTLS is a protocol extension that can upgrade an existing insecure connection to a secure connection without changing the port used (as would normally happen). STARTTLS enables servers to make better use of their ports. Despite its name, STARTTLS can use SSL instead of TLS for the secure connection.
STARTTLS. STARTTLS is a protocol extension that can upgrade an existing insecure connection to a secure connection without changing the port used (as would normally happen). STARTTLS enables servers to make better use of their ports. Despite its name, STARTTLS can use SSL instead of TLS for the secure connection.
![]() STARTTLS (Accept All Certificates). As with SSL/TLS (Accept All Certificates), this security type uses STARTTLS but accepts any digital certificate instead of rejecting certificates that would normally be unacceptable. You may need to use this security type for some accounts or for testing, but accepting all certificates is generally unsafe.
STARTTLS (Accept All Certificates). As with SSL/TLS (Accept All Certificates), this security type uses STARTTLS but accepts any digital certificate instead of rejecting certificates that would normally be unacceptable. You may need to use this security type for some accounts or for testing, but accepting all certificates is generally unsafe.
Setting Up an Email Account
Here’s how to set up an account:
1. Open the Email app by tapping its icon on the Apps screen or on a Home screen.
![]() Note
Note
If you haven’t already set up an account in Email, the app displays the first Account Setup screen when you open it.
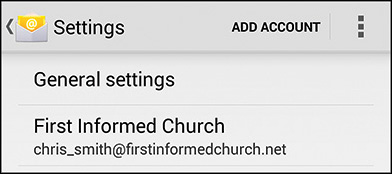
2. Tap the Menu button and then tap Settings to display the Settings screen (see Figure 7.1).
3. Tap the Add Account button. The first Account Setup screen appears (see Figure 7.2).
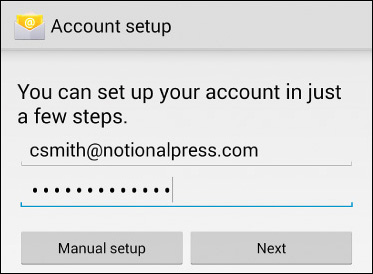
FIGURE 7.2 On the first Account Setup screen, you can tap the Next button to try automatic setup or tap the Manual Setup button to retain full control of the configuration.
4. Type or paste your email address in the upper box.
5. Type your password in the lower box.
6. Tap the Next button if you want the Email app to try to set up the account automatically. Otherwise, tap the Manual Setup button to display the second Account Setup screen (see Figure 7.3).
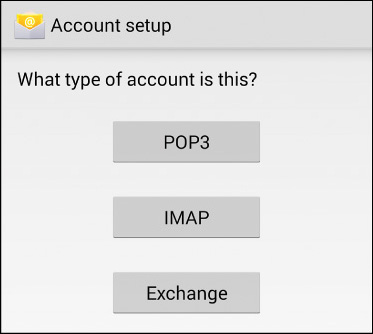
FIGURE 7.3 Specify the account type by tapping the POP3 button, the IMAP button, or the Exchange button on this Account Setup screen.
![]() Note
Note
If automatic setup succeeds, go to step 17. Otherwise, tap the Manual Setup button and continue from step 7.
7. Tap the POP3 button, the IMAP button, or the Exchange button, as appropriate. See the sidebar titled “Understanding POP3, IMAP, SMTP, and Exchange” earlier in this chapter for an explanation of these terms. The next Account Setup screen appears (see Figure 7.4); on a tablet, this screen has the heading Incoming Server Settings.
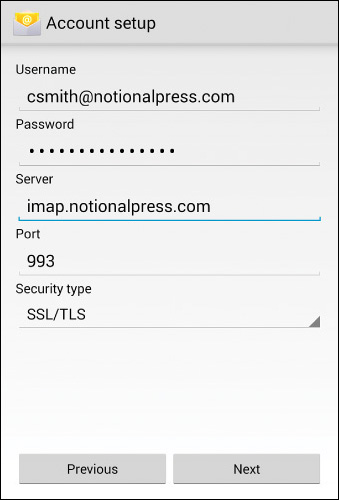
FIGURE 7.4 On this Account Setup screen, enter the server address, choose the security type, and correct the port if necessary.
![]() Note
Note
The Account Setup screens that appear after this point differ for the different account types. This section shows the IMAP screens and explains the differences in the POP3 screens. You’ll learn how to set up an Exchange account in the next main section.
8. Type the server name, such as imap.notionalpress.com, in the Server box.
9. Tap the Security Type pop-up menu and choose the security type: None, SSL/TLS, SSL/TLS (Accept All Certificates), STARTTLS, or STARTTLS (Accept All Certificates). The Email app enters the normal port for that security type in the Port box.
Look back to the sidebar titled “Understanding Security Types for Email Accounts” earlier in this chapter for an explanation of the security types.
![]() Caution
Caution
Avoid using the None security type or either of the Accept All Certificates security types. Most likely, you should use the SSL/TLS security type.
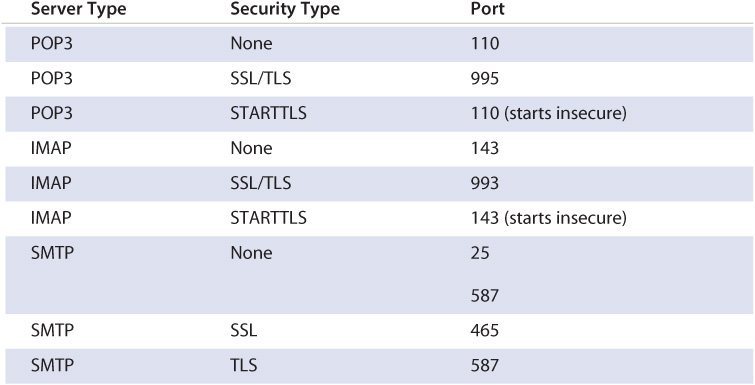
10. If your email provider has told you to use a different port than the Email app has chosen, type the port number in the Port box. Table 7.2 explains the ports normally used by mail servers.
![]() Note
Note
For a POP3 server, tap the Delete Email from Server pop-up menu and then tap the Never button or the When I Delete from Inbox button, as appropriate.
11. Tap the Next button. The Email app checks the incoming server and makes sure the account name, password, and security type are valid. If so, the next Account Setup screen appears for you to set up the outgoing mail server (see Figure 7.5). On a tablet, this screen bears the name Outgoing Server Settings.
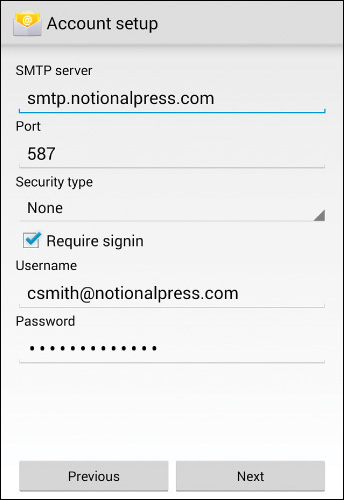
FIGURE 7.5 On this Account Setup screen, specify the outgoing server address, security type, port, and whether to sign in.
If the Couldn’t Finish dialog box appears after you tap the Next button, it normally means that the information you’ve provided is wrong. Tap the Edit Details button to return to the Account Setup screen you were on, verify each piece of information, and correct any mistakes. If you get the same error again, check that your Internet connection is working. For example, tap the Home button, tap the Chrome icon, and verify that Chrome can load a website.
12. Enter the outgoing server’s address, such as smtp.notionalpress.com, in the Outgoing Server box.
![]() Tip
Tip
The Email app automatically fills the SMTP Server box on the Account Setup screen for the outgoing mail server with “smtp.” and a name derived from the incoming mail server name you provided. If your email provider uses a different name, you will need to edit the suggested name.
13. Tap the Security Type pop-up menu and then tap the security type: None, SSL/TLS, SSL/TLS (Accept All Certificates), STARTTLS, or STARTTLS (Accept All Certificates). The Email app enters the normal port for that security type in the Port box.
14. If your email provider has told you to use a different port than the Email app has chosen, type the port number in the Port box. Again, look at Table 7.2 for details of the normal ports.
15. If your email provider requires you to sign in to send messages, check the Require Signin box and enter the appropriate username and password in the boxes below.
![]() Tip
Tip
Your sign-in username may be different from your email address; for example, it may be the portion of your email address before the @ sign (such as csmith for the email address [email protected]). If in doubt, ask your email provider.
16. Tap the Next button. The Email app tries to validate your SMTP settings. If it succeeds, the Account Settings screen appears (see Figure 7.6). On a tablet, this screen has the name Account Options.
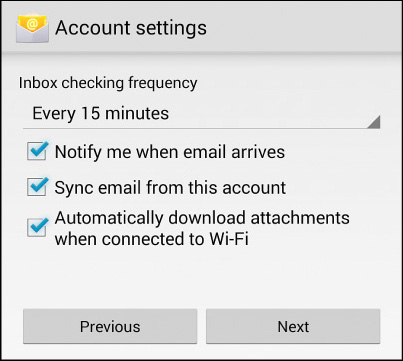
FIGURE 7.6 On the Account Settings screen, choose how frequently to check for email, whether to receive notifications, and whether to sync email.
As with the incoming server, if the Couldn’t Finish dialog box appears after you tap the Next button on the Account Setup screen for the outgoing server, it normally means that the information you’ve provided is wrong. Tap the Edit Details button, verify each piece of information, and correct any mistakes.
17. Tap the Inbox Checking Frequency pop-up menu and then tap the frequency with which to check for new messages: Never, Every 5 Minutes, Every 10 Minutes, Every 15 Minutes, Every 30 Minutes, or Every Hour.
18. Check the Notify Me When Email Arrives box if you want the Email app to display a notification when new messages arrive. If new messages arrive in a batch, the app displays a single notification for the batch rather than a separate notification for each message.
19. Check the Sync Email from This Account box to make the Email app sync this account. Normally, you’ll want to do this.
20. Check the Automatically Download Attachments When Connected to Wi-Fi box if you want the Email app to download attachments automatically when your device has a Wi-Fi connection instead of a cellular connection. This setting is usually handy unless you often receive large attachments that you don’t want to download.
![]() Note
Note
The Automatically Download Attachments When Connected to Wi-Fi check box appears only on phones and cellular-capable tablets.
21. Tap the Next button. The final Account Setup screen appears (see Figure 7.7).
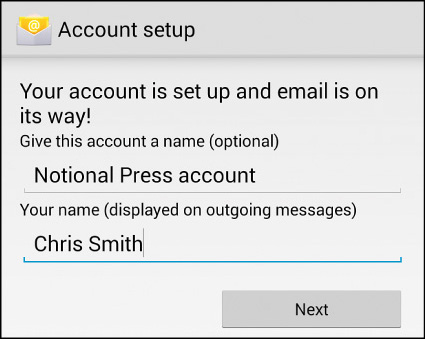
FIGURE 7.7 On the final Account Setup screen, give the email account a descriptive name and enter your name the way you want it to appear on messages you send.
22. In the Give This Account a Name (Optional) box, type a descriptive name for the account. This name is to help you distinguish this account from your other accounts; the more accounts you have, the more important it is to have easily distinguishable names.
23. In the Your Name (Displayed on Outgoing Messages) box, type your name the way you want it to appear on messages you send. For example, you may want your full name to appear, including your middle initial.
24. Tap the Next button. The Settings screen appears, with the new account now on it.
25. Tap the Settings button at the top of the screen or tap the Back button to return to your Inbox.
Setting Up Exchange Server Accounts
Setting up an Exchange Server account in the Email app works in largely the same way as setting up another account, but you have to jump through several more hoops to set it up. The Email app can set up some Exchange Server accounts automatically with just the email account name and password, but for others, you will need to fill in the server and domain details.
Setting up an Exchange Server account on your Android device requires you to give the Exchange administrator permission to administer your device remotely. The administrator can take a wide range of actions on your device, up to and including remotely wiping it of all its content. Normally, the administrator won’t wipe your device unless it goes missing, presumed stolen; however, the administrator can wipe the device any time, intentionally or by accident.
If your Android device is one that your company or organization has supplied, this is fine, but you should either avoid storing any personal files on the device or make sure that you have backups of all your personal files elsewhere in case an administrator nukes the device.
If your company or organization allows you to bring your own device (BYOD) to work and set it up to access your Exchange Server account, you need to decide whether having access to your Exchange data is worth the potential loss of your personal data.
Getting the Information Needed for Your Exchange Server Account
Before trying to set up your Exchange Server account on your device, make sure you have all the information required. Table 7.3 shows the details. Normally, you’ll need to get the information from the Exchange Server administrator.
![]() Tip
Tip
Using the right domain can be crucial to getting your Exchange Server account to work. Exchange Server systems tend to be complex, and it is hard to guess the domain name. What’s especially awkward is that you may not need to enter a domain name at all, but usually only the administrator can tell you whether or not to enter it.
Entering Your Exchange Server Account Details
Here’s how to set up your Exchange Server account:
1. Open the Email app by tapping its icon on the Apps screen or on a Home screen.
![]() Note
Note
If you haven’t already set up an account in Email, the app displays the first Account Setup screen when you open it. Go to step 4.
2. Tap the Menu button and then tap Settings to display the Settings screen.
3. Tap the Add Account button to display the first Account Setup screen.
4. Type or paste your email address in the upper box.
5. Type your password in the lower box.
6. Tap the Next button if you want the Email app to try to set up the account automatically. Otherwise, tap the Manual Setup button to display the second Account Setup screen.
Exchange Server setups can be complex, but the Email app is quite good at detecting server settings, so you may want to try automatic setup. If you need to use a digital certificate for authentication, you must use manual setup.
7. Tap the Exchange button. The Email app tries to retrieve account information from the server. It then displays suggested settings on the second Account Setup screen (see Figure 7.8).
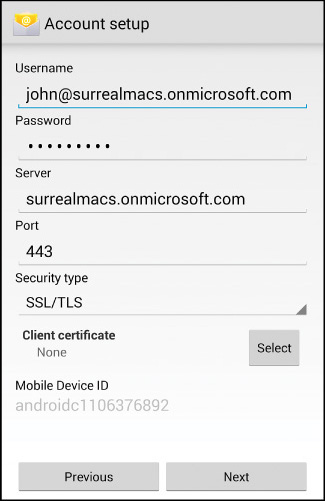
FIGURE 7.8 On the second Account Setup screen, specify the Exchange server name, the security type, and the port. You can also select a client certificate for authentication.
![]() Tip
Tip
For some systems, you may need to enter in the Username box the domain followed by a backslash and your full email address. For example, if your email address is [email protected], you would enter [email protected]. This looks awkward, especially if it’s too long to fit in the DomainUsername text box, but it is correct and it does work.
8. Edit the server name in the Server box if necessary.
9. Tap the Security Type pop-up menu and then tap the security type: None, SSL/TLS, or SSL/TLS (Accept All Certificates). The Email app enters the normal port for that security type in the Port box.
![]() Caution
Caution
Normally, you will use the SSL/TLS security type. Don’t use the SSL/TLS (Accept All Certificates) security type, much less the None “security” type.
10. If your Exchange Server administrator has told you to use a different port than the Email app has chosen, type the port number in the Port box.
![]() Tip
Tip
Exchange Server normally uses port 443 for SSL/TLS and port 80 for no security. These are standard web ports (port 443 for https, giving secure access, and port 80 for open access) because your device is accessing the Exchange Server across the Web.
![]() Note
Note
If your Exchange Server administrator has given you a digital certificate to use for authentication, tap the Select button to the right of the Client Certificate readout. In the Choose Certificate dialog box that opens, tap the certificate you want to use, and then tap the Allow button. The Client Certificate readout then displays the certificate’s name.
11. Tap the Next button. The Email app attempts to validate the server settings. If it succeeds, the Remote Security Administration dialog box opens (see Figure 7.9).
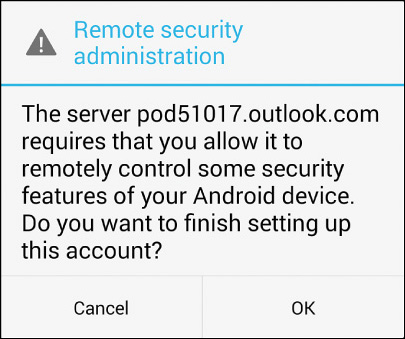
FIGURE 7.9 In the Remote Security Administration dialog box, tap the OK button if you want to proceed with setting up the Exchange Server account.
12. Tap the OK button. The Email app displays the Account Settings screen shown in Figure 7.10.

FIGURE 7.10 On the Account Settings screen, choose how often to check email, whether to receive notifications for messages, and which items to sync.
13. Tap the Inbox Checking Frequency pop-up menu and then tap the frequency with which to check for new messages: Automatic (Push), Never, Every 5 Minutes, Every 10 Minutes, Every 15 Minutes, Every 30 Minutes, or Every Hour.
![]() Tip
Tip
The Push setting for Inbox Checking Frequency causes the mail server to “push” new messages to your device as soon as they arrive instead of waiting for the device to check for new messages. Choose Push to get your messages more quickly at the cost of some battery power.
14. Tap the Days to Sync pop-up menu and choose what to sync: Last Day, Last Three Days, Last Week, Last Two Weeks, Last Month, or All.
15. Check the Notify Me When Email Arrives box if you want the Email app to display a notification when new messages arrive. If new messages arrive in a batch, the app displays a single notification for the batch rather than a separate notification for each message.
16. Check the Sync Contacts from This Account box if you want to sync your contacts to your device. Syncing the contacts is usually helpful.
17. Check the Sync Calendar from This Account box if you want to sync your Exchange Server calendar appointments to your device. This too is usually helpful.
18. Check the Sync Email from This Account box to make the Email app sync this account. Normally, you’ll want to do this.
19. Check the Automatically Download Attachments When Connected to Wi-Fi box if you want the Email app to download attachments automatically when your device has a Wi-Fi connection instead of a cellular connection. This setting is usually handy unless you often receive large attachments that you don’t want to download.
20. Tap the Next button. The final Account Setup screen appears.
21. In the Give This Account a Name (Optional) box, type a descriptive name for the account—for example, Exchange (Work).
22. Tap the Next button. The Activate Device Administrator? screen appears (see Figure 7.11).
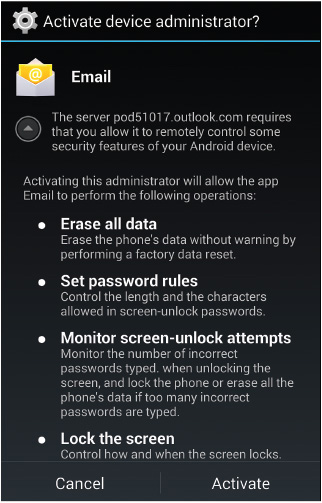
FIGURE 7.11 On the Activate Device Administrator? screen, read the changes an administrator can make to your device remotely. Tap the Activate button if you still want to set up your Exchange Server account.
23. Read the details of what the administrator can do: Erase All Data, Set Password Rules, Monitor Screen-Unlock Attempts, Disable Cameras, and so on.
24. Tap the Activate button if you want to proceed. The Email app activates the device administrator. The Settings screen appears, showing your Exchange Server account.
25. Tap the Settings button at the top of the screen or tap the Back button to return to your Inbox.
Deleting an Account from the Email App
If you no longer need a particular email account on your device, you can delete it from the Email app. To delete the account, you use the Settings app like this:
1. Open the Settings app.
2. In the Accounts section, tap the button for the account type. For example, to delete an IMAP account, tap the IMAP button. The appropriate screen appears, such as the IMAP screen.
![]() Note
Note
On some devices, you’ll need to tap the Email button, not a button with the account type.
3. In the Accounts list, tap the account name. The Sync screen for the account appears.
4. Tap the Menu button and then tap the Remove Account button. Android displays the Remove Account? dialog box, warning you that removing the account will delete all its messages, contacts, and other data (see Figure 7.12).
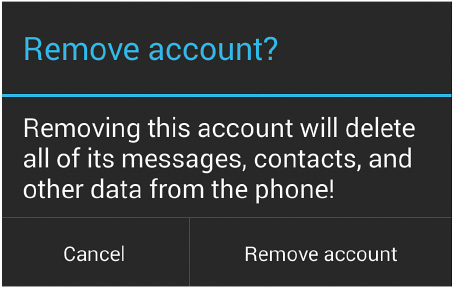
FIGURE 7.12 Tap the Remove Account button in the Remove Account? dialog box to remove an email account from your device.
5. Tap the Remove Account button. On some devices, you may see a different button, such as a Continue button.
Sending and Receiving Messages
By this point, you should have all your non-Gmail email accounts set up in the Email app, so you’re ready to send and receive messages. The Email app makes sending and receiving as easy as possible by packing a lot of information and functionality into an apparently straightforward interface.
Creating and Sending a Message
To create a new message, tap the Compose icon (the envelope icon with a plus sign) at the top of the screen. The Compose screen appears, and you can create the message by making these moves in any order:
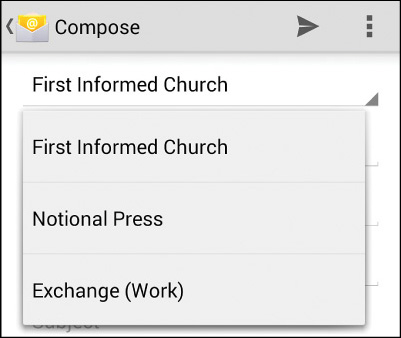
![]() Choose the account. If you have set up multiple accounts in the Email app, tap the Account pop-up menu and then tap the account to use (see Figure 7.13).
Choose the account. If you have set up multiple accounts in the Email app, tap the Account pop-up menu and then tap the account to use (see Figure 7.13).
![]() Note
Note
When you start a new message from the Inbox for a particular account, the Email app selects that account as the sending account. When you start a message from the Combined View Inbox, the Email app uses the first account in the list.
![]() Add To recipients. Tap the To box and start typing the contact’s name or email address; then tap the contact in the pop-up list of matches that appears (see Figure 7.14).
Add To recipients. Tap the To box and start typing the contact’s name or email address; then tap the contact in the pop-up list of matches that appears (see Figure 7.14).
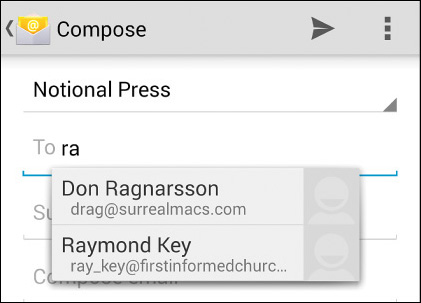
FIGURE 7.14 Start typing the recipient’s address, and then tap the address in the pop-up list of matches.
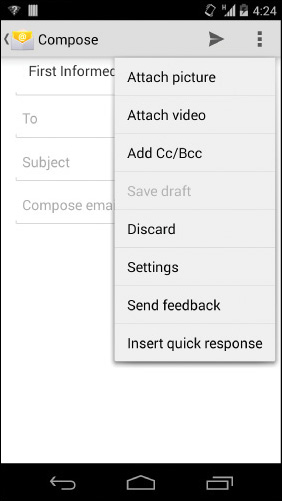
![]() Add Cc or Bcc recipients. On a phone, tap the Menu button and then tap the Add Cc/Bcc button on the menu (see Figure 7.15) to display the Cc and Bcc fields. On a tablet, tap the +CC/BCC button to the right of the To field to display them. Tap the Cc field or the Bcc field as appropriate, start typing the contact’s name or email address, and then tap the contact in the pop-up list of matches.
Add Cc or Bcc recipients. On a phone, tap the Menu button and then tap the Add Cc/Bcc button on the menu (see Figure 7.15) to display the Cc and Bcc fields. On a tablet, tap the +CC/BCC button to the right of the To field to display them. Tap the Cc field or the Bcc field as appropriate, start typing the contact’s name or email address, and then tap the contact in the pop-up list of matches.
If you need to make certain you don’t send a message before it is complete, leave the To field (and the Cc field and Bcc field, if you’ve displayed them) empty until you finish writing the message. If you then tap the Send button by mistake, the Email app gives you a Recipient Error dialog box instead of sending the message.
![]() Add the subject. Tap the Subject field and type or paste the text. Make it brief but descriptive to make sure the recipient can easily see what the message is about.
Add the subject. Tap the Subject field and type or paste the text. Make it brief but descriptive to make sure the recipient can easily see what the message is about.
![]() Add the message body. Tap the Compose Email prompt in the body area and then type or paste in the message text.
Add the message body. Tap the Compose Email prompt in the body area and then type or paste in the message text.
![]() Tip
Tip
When you are sending a message to a list of people who may not know each other, put your address in the To field and all the other addresses in the Bcc field. That way, each recipient sees only your address and her own address, not the addresses of the other recipients.
![]() Attach a picture to the message. Tap the Menu button and then tap the Attach Picture button on the menu. Navigate to the picture and tap it. The picture appears as a thumbnail in the message. A bar across the bottom of the thumbnail shows the filename, its size, and the word Image (to help you distinguish it from other file types). The bar also has an X button that you can tap to delete the attachment.
Attach a picture to the message. Tap the Menu button and then tap the Attach Picture button on the menu. Navigate to the picture and tap it. The picture appears as a thumbnail in the message. A bar across the bottom of the thumbnail shows the filename, its size, and the word Image (to help you distinguish it from other file types). The bar also has an X button that you can tap to delete the attachment.
![]() Attach a video to the message. Tap the Menu button and then tap the Attach Video button on the menu. Navigate to the video and tap it. The video appears as a button that includes the filename, the size, and an X button that you can tap to delete the attachment.
Attach a video to the message. Tap the Menu button and then tap the Attach Video button on the menu. Navigate to the video and tap it. The video appears as a button that includes the filename, the size, and an X button that you can tap to delete the attachment.
![]() Caution
Caution
The Email app has a 5MB limit on video size. The reason is that many mail servers reject messages with large attachments. If you select a video that will make the message too big, the Email app displays a pop-up message saying “File not attached. 5 MB limit reached” for a moment.
To attach a file other than a picture or a video to a message, you need to start the message from a file-management app rather than from the Email app. Open your file-management app (for example, ES File Explorer), select the file, give the Share command, and then tap Email in the Share Via dialog box. The Email app starts a new message with the file attached. Address and send the message as usual.
Starting an Email Message from the People App
You can quickly start a message in the Email app from the People app. This move is useful when you need to browse the People app to find the relevant contacts.
After you find the contact, tap the contact’s picture to display the contact information pop-up panel, tap the Email icon to display the email addresses, and then tap the appropriate address to start a message. If the Complete Action Using dialog box opens, tap the Email button, and then tap the Just Once button or the Always button, as appropriate.
When the message is ready for sending, tap the Send button, the arrow button near the upper-right corner of the screen.
![]() Note
Note
If you decide not to send the message, you can save it as a draft (as discussed later in this chapter) or discard it. To discard the message, tap the Menu button and then tap the Discard button on the menu.
Receiving and Reading Messages
While the Email app is running, it automatically checks for new messages at the frequency you chose in the Inbox Checking Frequency pop-up menu when setting up each account. If you chose the Never setting, or if you need to check immediately, you can check for new messages manually either by pulling down and releasing the conversation list in the Inbox or by tapping the Menu button and then tapping Refresh.
The conversation list (see Figure 7.16) packs a lot of status information into the list of messages:
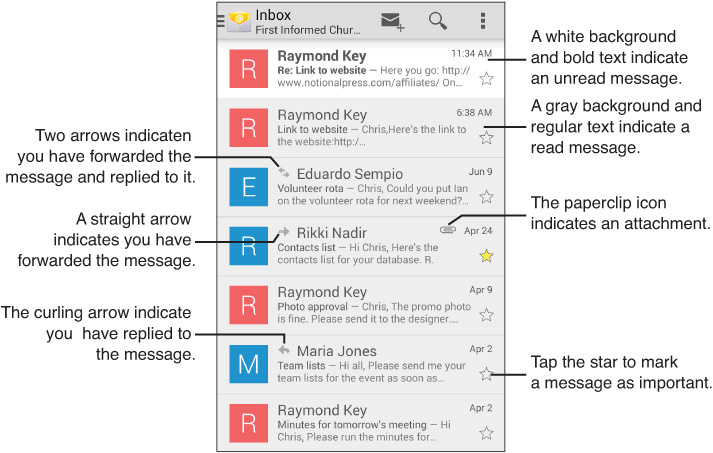
![]() Unread messages have a white background and bold text on the sender name and subject.
Unread messages have a white background and bold text on the sender name and subject.
![]() Read messages have a gray background and regular (nonbold) text.
Read messages have a gray background and regular (nonbold) text.
![]() A paperclip icon indicates one or more files attached to the message.
A paperclip icon indicates one or more files attached to the message.
![]() A curling leftward arrow to the left of the sender name indicates that you have replied to the messages.
A curling leftward arrow to the left of the sender name indicates that you have replied to the messages.
![]() A straight arrow pointing right and positioned to the left of the sender name indicates that you have forwarded the message.
A straight arrow pointing right and positioned to the left of the sender name indicates that you have forwarded the message.
![]() A two-arrow icon, with the arrows pointing left and right, to the left of the sender name indicates that you have both forwarded the message and replied to it.
A two-arrow icon, with the arrows pointing left and right, to the left of the sender name indicates that you have both forwarded the message and replied to it.
![]() You can tap the star outline to mark a message as important, turning the star to gold.
You can tap the star outline to mark a message as important, turning the star to gold.
You can scroll up and down to reach other messages.
To search for messages, tap the Search icon at the top of the screen, type your search terms in the Search Email box that appears, and then tap the Search icon on the keyboard. The Results list appears. Tap the Back button to return from the search results to your mailbox.
Tap a message in the conversation list to open it for reading. You can see the message’s content and use the controls to manipulate it. Figure 7.17 shows the details.
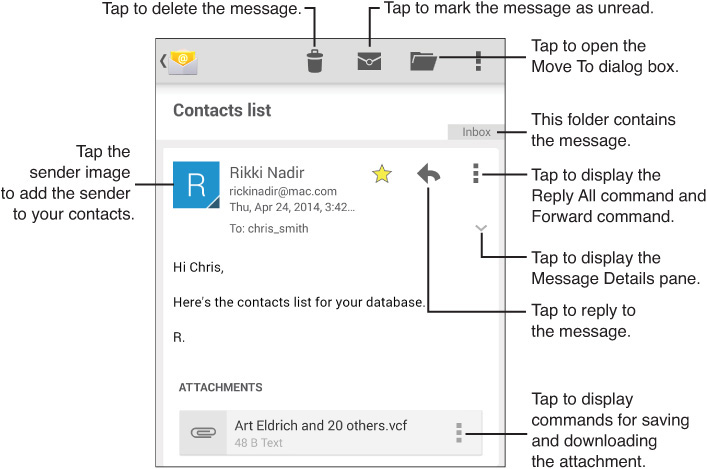
FIGURE 7.17 The message screen includes controls for deleting the message, moving it to a folder, or simply replying to it.
![]() Tap the Delete button (the trash icon) to delete the message.
Tap the Delete button (the trash icon) to delete the message.
![]() Tap the Unread button (the closed envelope icon) to mark the message as unread, even though you have opened it. You might want to mark a message as unread to remind yourself to read it later.
Tap the Unread button (the closed envelope icon) to mark the message as unread, even though you have opened it. You might want to mark a message as unread to remind yourself to read it later.
![]() Tap the Reply button to reply to the message.
Tap the Reply button to reply to the message.
![]() To reply to all recipients on a phone, tap the Menu button within the message, and then tap the Reply All button. On a tablet, tap the Reply All button, the button with a two-headed arrow.
To reply to all recipients on a phone, tap the Menu button within the message, and then tap the Reply All button. On a tablet, tap the Reply All button, the button with a two-headed arrow.
![]() To forward the message on a phone, tap the Menu button within the message, and then tap the Forward button. On a tablet, tap the Forward button, the button with the arrow pointing to the right.
To forward the message on a phone, tap the Menu button within the message, and then tap the Forward button. On a tablet, tap the Forward button, the button with the arrow pointing to the right.
![]() Tap the sender image or sender letter to add the sender to your contacts.
Tap the sender image or sender letter to add the sender to your contacts.
![]() Tap the downward arrow to display the Message Details pane, which shows the sender’s name and address, the To address, and the date and time.
Tap the downward arrow to display the Message Details pane, which shows the sender’s name and address, the To address, and the date and time.
![]() If the message has an attachment, tap the Menu button on the attachment to display commands for saving and downloading the attachment.
If the message has an attachment, tap the Menu button on the attachment to display commands for saving and downloading the attachment.
![]() Swipe left to display the next message, or swipe right to display the previous message.
Swipe left to display the next message, or swipe right to display the previous message.
When you’re ready to return to the Inbox, tap the Back button.
Replying to Messages and Forwarding Messages
To reply to a message, tap the Reply button on the message screen. The Email app starts a reply to the message’s sender and displays it for you to enter the text.
If the message has multiple recipients and you want to reply to all of them, give the Reply All command: On a phone, tap the Menu button within the message, and then tap the Reply All button; on a tablet, simply tap the Reply All button. The Email app starts a reply to the message’s sender, puts all the recipients (apart from you) in the Cc field, and displays the reply for you to enter the text.
![]() Tip
Tip
When replying to all recipients, you may sometimes want to prune down the list to only those people who really need the reply. To remove an address, touch its button, and then touch the Delete button on the onscreen keyboard.
![]() Note
Note
If the message had Bcc recipients, you don’t see their addresses (other than your own, if you were one of them), and your reply to “all” recipients doesn’t go to them.
Apart from what to say in the message (I can’t help you with that), you have two choices here:
![]() Quote Text. Check this box to include the original message in your reply. Including the original is usually helpful because the recipient can look at the original message to remind himself what he wrote. If the original message was long, or if you’re replying to a chain of replies, you may want to delete those parts of it that are no longer relevant.
Quote Text. Check this box to include the original message in your reply. Including the original is usually helpful because the recipient can look at the original message to remind himself what he wrote. If the original message was long, or if you’re replying to a chain of replies, you may want to delete those parts of it that are no longer relevant.
![]() Note
Note
On some devices, you’ll see different controls for quoting text (such as an Original Message check box) and responding inline (such as an Edit Original Message Information button).
![]() Respond Inline. When you check the Quote Text box, the Email app places the insertion point above the quoted text so that you can write your reply in a block at the top of the message. If you want to write your reply between the paragraphs of the quoted message, tap the Respond Inline button.
Respond Inline. When you check the Quote Text box, the Email app places the insertion point above the quoted text so that you can write your reply in a block at the top of the message. If you want to write your reply between the paragraphs of the quoted message, tap the Respond Inline button.
![]() Tip
Tip
Responding inline is especially useful when you are addressing (or rebutting) specific points in the original message.
To forward a message, give the Forward command: On a phone, tap the Menu button within the message, and then tap the Forward button; on a tablet, just tap the Forward button. The Email app starts a forwarded message, adding Fwd: to the beginning of the Subject line. You can then address the message, tap the Compose Email prompt, and type whatever text is needed to explain what you’re forwarding.
![]() Note
Note
When forwarding a message, you can tap the Respond Inline button to add your comments in between the paragraphs of the existing message.
Setting Up and Using Quick Responses
To help you write messages quickly and accurately even on the smallest device, the Email app includes a Quick Responses feature. Quick Responses are canned snippets of text that you set up ahead of time and then insert in your messages as needed.
You can create different Quick Responses in each of your email accounts. This enables you to easily respond to different message categories. For example, you might use an informal “Catch you later” response on a personal email account and a more formal request to contact one of your colleagues for advice on a work account.
Setting Up Your Quick Responses
Here’s how to set up your Quick Responses:
1. In the Email app, tap the Menu button and then tap Settings to display the Settings screen.
2. Tap the account whose Quick Responses you want to set up.
3. Tap the Quick Responses button to display the Quick Responses screen (see Figure 7.18).
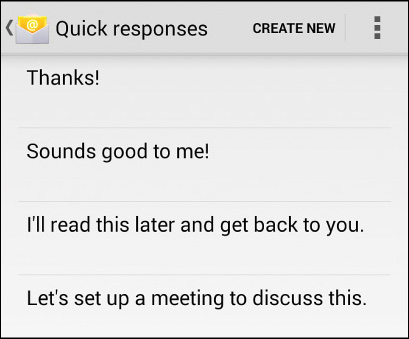
FIGURE 7.18 From the Quick Responses screen, you can create a new Quick Response or edit or delete an existing one.
![]() Note
Note
If you don’t see the Quick Responses button on the Settings screen, look for a button such as Composing and Sending. Tap it and see if the Quick Responses button is on that screen. Not all devices include Quick Responses.
4. To create a new response, tap the Create New button, type the text in the Quick Response dialog box that opens, and then tap the Save button.
![]() Tip
Tip
You can create multiple-line Quick Responses. Just tap the Enter key at the appropriate place to create a new line.
5. To edit or delete an existing Quick Response, tap it. In the Quick Response dialog box that opens, either edit the text and then tap the Save button, or tap the Delete button.
When you finish creating your Quick Responses, tap the Back button three times to return to your Inbox.
Using Your Quick Responses
After setting up your Quick Responses, you can use them in your messages. Tap the Menu button, tap Insert Quick Response to open the Insert Quick Response dialog box, and then tap the Quick Response you want to use.
Saving and Reopening Drafts
Sometimes when you’re writing a message, you may need to leave it and turn your attention to other email—for example, a message from your boss that requires an instant reply.
When this happens, save the message as a draft by tapping the Back button twice: The first tap hides the onscreen keyboard, and the second saves the message as a draft. A pop-up message appears briefly saying that the message has been saved as a draft.
When you’re ready to resume writing the message, tap the button in the upper-left corner of the Inbox or the current mailbox to display the navigation panel, and then tap the Drafts button. The Drafts folder opens, and you can tap the message to open it for editing.
Navigating Your Mailboxes
To navigate among your accounts and mailboxes, tap the button in the upper-left corner of the screen to display the navigation panel (see Figure 7.19), and then tap the account, view, or mailbox you want to view. For example, tap one of the account radio buttons to display the Inbox for that account, or tap the Combined View radio button to display the contents of all your Inboxes.
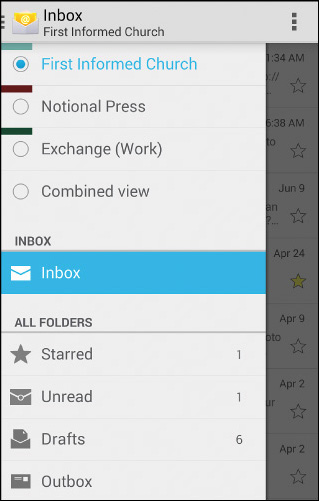
FIGURE 7.19 Use the navigation panel to switch to the account, view, or mailbox you want to display.
After you’ve chosen what to display, use these moves to work with the messages:
![]() Select messages. Tap the sender image or sender initial for a message to select it. You can then tap the Delete button (the trash icon) to delete the selected messages or tap the Unread icon or the Read icon to change the messages’ status.
Select messages. Tap the sender image or sender initial for a message to select it. You can then tap the Delete button (the trash icon) to delete the selected messages or tap the Unread icon or the Read icon to change the messages’ status.
![]() Delete a message quickly. Swipe a message off the list to the left or right. The Deleted bar appears, confirming that you have deleted the message. If you got the wrong victim, tap the Undo button at the right end of the Deleted bar to undo the deletion.
Delete a message quickly. Swipe a message off the list to the left or right. The Deleted bar appears, confirming that you have deleted the message. If you got the wrong victim, tap the Undo button at the right end of the Deleted bar to undo the deletion.
![]() Note
Note
If swiping a message off the conversation list doesn’t work, you need to enable the feature. Tap the Menu button, tap the Settings button, tap the General button, and then tap to check the Swipe to Delete box.
![]() Open a message. Tap the message to open it for reading.
Open a message. Tap the message to open it for reading.
Choosing General Settings
To get the most out of the Email app, you’ll need to configure your accounts to suit your needs. The Email app has plenty of settings you can configure. The settings fall into two categories: General settings that you configure to control how the app itself works and account-specific settings that you can set differently for each account as needed.
Start by tapping the Menu button and then tapping the Settings button to display the main Settings screen. Then tap the General Settings button to display the Settings screen for general settings (see Figure 7.20).
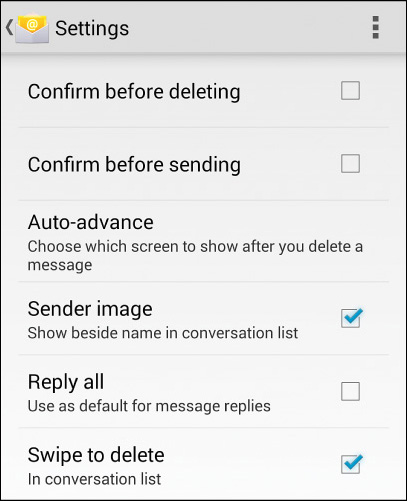
FIGURE 7.20 This Settings screen includes general settings such as confirmations, auto-advance preference, and swiping to delete messages.
![]() Note
Note
Some devices have different settings, or different arrangements of settings, on the Settings screen. Be prepared to take a few minutes exploring the settings your device offers so that you can make the most of them.
You can choose six settings on the Settings screen:
![]() Confirm Before Deleting. Check this box to make the Email app confirm each deletion.
Confirm Before Deleting. Check this box to make the Email app confirm each deletion.
![]() Tip
Tip
The Confirm Before Deleting setting and the Confirm Before Sending setting are useful if you use your device in a crowded or moving setting, such as public transit, where it’s easy to tap the wrong button. If you use your device in a stationary setting, you may find the confirmations irksome.
![]() Confirm Before Sending. Check this box to make the Email app confirm the sending of each message.
Confirm Before Sending. Check this box to make the Email app confirm the sending of each message.
![]() Auto-Advance. This setting enables you to control which item the Email app displays next after you delete or move a message. Tap the button to display the Set Auto-Advance Preference dialog box and then tap the Newer radio button, the Older radio button, or the Conversation List radio button, as appropriate.
Auto-Advance. This setting enables you to control which item the Email app displays next after you delete or move a message. Tap the button to display the Set Auto-Advance Preference dialog box and then tap the Newer radio button, the Older radio button, or the Conversation List radio button, as appropriate.
![]() Sender Image. Check this box to make the conversation list display photos for any senders whose mug shots are in your address book.
Sender Image. Check this box to make the conversation list display photos for any senders whose mug shots are in your address book.
![]() Reply All. Check this box to use Reply All as the default action for replying to messages that have multiple recipients.
Reply All. Check this box to use Reply All as the default action for replying to messages that have multiple recipients.
![]() Caution
Caution
Be careful with the Reply All setting. Usually, it’s best to reply to all recipients only manually after due deliberation.
![]() Swipe to Delete. Check this box if you want to be able to delete a conversation from the conversation list by swiping it to the left or right.
Swipe to Delete. Check this box if you want to be able to delete a conversation from the conversation list by swiping it to the left or right.
Choosing Account-Specific Settings
As you read earlier in this chapter, you can choose various settings while setting up an email account on your device. If you need to change any of the settings later, or you want to add an email signature that will enter your details automatically in messages you send, you can work on the settings screen for the account.
To get started, tap the Menu button, tap Settings, and then tap the account name on the Settings screen. The account’s settings screen appears (see Figure 7.21), and you can choose the following settings:
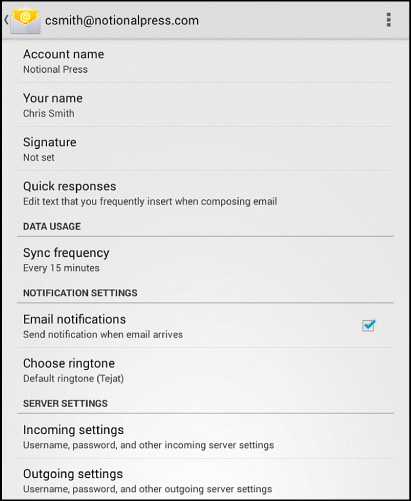
FIGURE 7.21 Use the controls on an account’s settings screen to make the account behave the way you prefer.
![]() Account Name. Tap this button to change the descriptive name for the account.
Account Name. Tap this button to change the descriptive name for the account.
![]() Your Name. Tap this button to change the name displayed on messages you send.
Your Name. Tap this button to change the name displayed on messages you send.
![]() Signature. Tap this button to display the Signature dialog box, in which you can type or paste the text you want the Email app to insert automatically at the end of outgoing messages. You can create multiple lines by tapping the Enter key.
Signature. Tap this button to display the Signature dialog box, in which you can type or paste the text you want the Email app to insert automatically at the end of outgoing messages. You can create multiple lines by tapping the Enter key.
![]() Quick Responses. Tap this button to set up your Quick Responses, as explained earlier in this chapter.
Quick Responses. Tap this button to set up your Quick Responses, as explained earlier in this chapter.
![]() Sync Frequency. Tap this button to display the Sync Frequency dialog box, in which you can choose how frequently the Email app checks for mail. If the Push setting is available, choose it if you want to get your messages as soon as possible.
Sync Frequency. Tap this button to display the Sync Frequency dialog box, in which you can choose how frequently the Email app checks for mail. If the Push setting is available, choose it if you want to get your messages as soon as possible.
![]() Download Attachments. Check this box to download attachments on recent messages automatically when your device has a Wi-Fi connection.
Download Attachments. Check this box to download attachments on recent messages automatically when your device has a Wi-Fi connection.
![]() Email Notifications. Check this box to make the Email app give you a notification when you receive messages.
Email Notifications. Check this box to make the Email app give you a notification when you receive messages.
![]() Choose Ringtone. Tap this button to choose the ringtone used for the email notification.
Choose Ringtone. Tap this button to choose the ringtone used for the email notification.
![]() Vibrate. Check this box to make your device vibrate when the Email app gives you a notification. This check box appears only if your device includes vibration (the tablet shown in Figure 7.21 does not).
Vibrate. Check this box to make your device vibrate when the Email app gives you a notification. This check box appears only if your device includes vibration (the tablet shown in Figure 7.21 does not).
![]() Incoming Settings. Tap this button to display the screen for configuring your incoming mail server.
Incoming Settings. Tap this button to display the screen for configuring your incoming mail server.
![]() Outgoing Settings. Tap this button to display the screen for configuring your outgoing mail server.
Outgoing Settings. Tap this button to display the screen for configuring your outgoing mail server.