
8. Browsing with Chrome
In This Chapter
![]() Sharing bookmarks and tabs among your Chrome-enabled devices
Sharing bookmarks and tabs among your Chrome-enabled devices
![]() Using Chrome’s hidden features
Using Chrome’s hidden features
![]() Configuring Chrome for optimum performance
Configuring Chrome for optimum performance
This chapter shows you how to get the most out of Chrome, the Google-built browser that comes with Android. You’ll learn how to make the most of Chrome’s integration with your Google account to share bookmarks and tabs among your Chrome-enabled devices and to send web pages from Chrome on your desktop computer to Chrome on your Android device for either online viewing or offline viewing.
This chapter will also show you where to find the many clever features hidden in and behind Chrome’s apparently straightforward interface. You’ll learn how to configure Chrome for best performance and to keep your private information secure, because even the apparently harmless activity of browsing the Web exposes you to a wide variety of attacks.
Some Android devices come with other browsers as well as Chrome or instead of it. For example, most Samsung smart phones and tablets include Samsung’s browser, which is usually called Internet but also sometimes called Browser, as well as Chrome. Chrome is free, so if your device doesn’t have Chrome, open the Play Store app, search for google chrome, and install it.
Choosing Essential Chrome Settings
To get the most out of Chrome and to protect yourself online, spend a few minutes configuring the app with suitable settings before you use it on the Web.
Launch Chrome by tapping its icon on the Home screen or the Apps screen. Chrome displays the Most Visited tab, from which you can quickly open one of your frequently visited websites. For now, tap the Menu button to open the menu, and then tap the Settings button to display the Settings screen (see Figure 8.1).
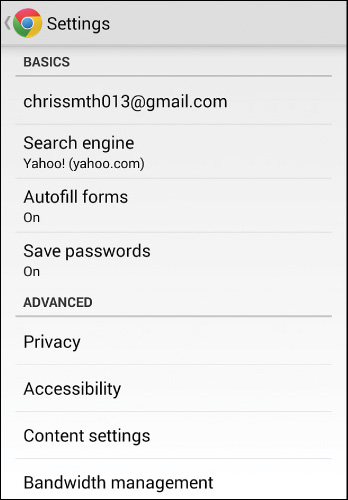
FIGURE 8.1 From the Settings screen, you can change your Google account and search engine; configure the Autofill Forms feature; and choose settings for privacy, accessibility, content settings, and bandwidth management.
Configuring Your Google Account
To get Chrome to sync the material you want, you must set it up with your Google account. The first item in the Basics section of the Settings screen is a button that shows the account that Chrome is set up to use. If this is the wrong account, you can change it easily enough; but even if it’s the right account, you should make sure it’s set to sync the right items. You should also encrypt some or all of the data you’re syncing.
So tap the button with the Google account name to display the settings screen for the account (see Figure 8.2).
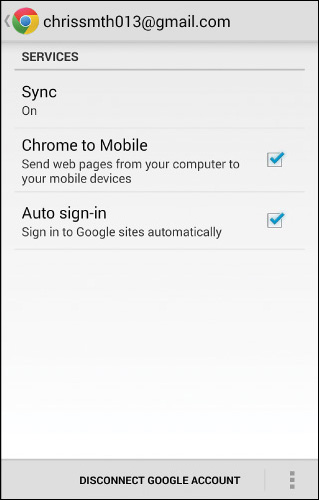
FIGURE 8.2 On the settings screen for your Google account, you can configure syncing, Chrome to Mobile, and Auto Sign-In.
![]() Note
Note
If Chrome is using the wrong Google account, tap the Disconnect Google Account button and then tap the Disconnect button in the Disconnect Google Account dialog box that opens. The Settings screen then appears again. Tap the Sign In to Chrome button to display the Google Account dialog box, tap the appropriate account, and then tap the Sign In button.
To set up syncing, tap the Sync button and work on the Sync screen (see Figure 8.3).
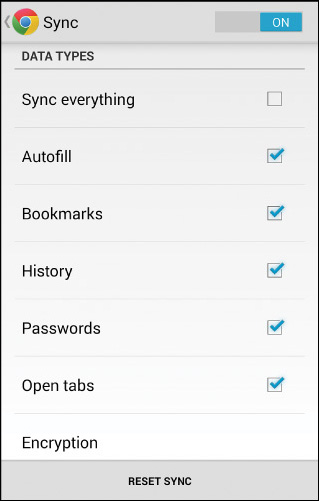
FIGURE 8.3 On the Sync screen, choose which data types to sync with your Google account and whether to apply encryption.
You can turn sync on or off by moving the switch at the top of the screen. Normally, you’ll want to keep sync turned on so that you can enjoy its benefits.
Check the Sync Everything check box if you want to sync all the items. This is normally your best move unless you don’t want to sync particular items, such as history or passwords. If you want to pick and choose, uncheck the Sync Everything check box, and then check the check box for each item you want to sync:
![]() Autofill Forms. Autofill Forms automatically fills in standard data, such as your address, in web forms. See the section “Setting Up Autofill Forms,” later in this chapter, for details.
Autofill Forms. Autofill Forms automatically fills in standard data, such as your address, in web forms. See the section “Setting Up Autofill Forms,” later in this chapter, for details.
![]() Bookmarks. Your bookmarks enable you to quickly return to the web pages you mark. You can share bookmarks among the devices on which you use Chrome.
Bookmarks. Your bookmarks enable you to quickly return to the web pages you mark. You can share bookmarks among the devices on which you use Chrome.
![]() History. Your history contains the list of web pages you’ve visited using Chrome on your devices.
History. Your history contains the list of web pages you’ve visited using Chrome on your devices.
![]() Passwords. Chrome can store your passwords and enter them automatically for you.
Passwords. Chrome can store your passwords and enter them automatically for you.
![]() Open Tabs. Chrome syncs the list of open tabs with your Android device, enabling you to pick up your browsing seamlessly on your phone or tablet viewing the same pages you left open on your computer.
Open Tabs. Chrome syncs the list of open tabs with your Android device, enabling you to pick up your browsing seamlessly on your phone or tablet viewing the same pages you left open on your computer.
Your next move is to set up encryption on what you’re syncing. You can encrypt only your passwords if you want, but normally it’s best to encrypt all the data you sync.
Tap the Encryption button to display the Encryption dialog box, and then tap the radio button for the setting you want:
![]() Encrypt Passwords with Google Credentials. Tap this radio button to use your Google account credentials to encrypt your synced passwords. At this writing, this radio button is usually dimmed and unavailable; the setting appears to be available only in Chrome on the desktop.
Encrypt Passwords with Google Credentials. Tap this radio button to use your Google account credentials to encrypt your synced passwords. At this writing, this radio button is usually dimmed and unavailable; the setting appears to be available only in Chrome on the desktop.
![]() Encrypt All with Passphrase. Tap this radio button to encrypt all your data using a passphrase of your choice that you enter in the Encrypt All with Passphrase dialog box. This is the more secure option. Choose a strong password and commit it to memory. Chrome stores the passphrase on your device and doesn’t send it to Google.
Encrypt All with Passphrase. Tap this radio button to encrypt all your data using a passphrase of your choice that you enter in the Encrypt All with Passphrase dialog box. This is the more secure option. Choose a strong password and commit it to memory. Chrome stores the passphrase on your device and doesn’t send it to Google.
![]() Tip
Tip
To create a strong password, use at least 8 characters and preferably 12 to 20. Combine uppercase and lowercase letters with numbers and symbols (such as $ or %). Avoid using any word or misspelling of a word in any language.
![]() Caution
Caution
After you encrypt all your synced data using a passphrase, you cannot change to encrypting only passwords unless you completely reset synchronization. To reset synchronization, tap the Reset Sync button at the bottom of the Sync screen, and then follow the prompts.
After choosing your sync options, tap the Back button to return to the settings screen for your Google account. You can then choose two other settings in the Services list:
![]() Chrome to Mobile. Check this box to turn on the Chrome to Mobile extension, which enables you to send a web page from your computer to your Android device. See the section “Using Chrome to Mobile,” later in this chapter, for details.
Chrome to Mobile. Check this box to turn on the Chrome to Mobile extension, which enables you to send a web page from your computer to your Android device. See the section “Using Chrome to Mobile,” later in this chapter, for details.
![]() Auto Sign-In. Check this box to allow Chrome to sign you into Google sites automatically.
Auto Sign-In. Check this box to allow Chrome to sign you into Google sites automatically.
Tap the Back button on the settings screen for your Google account to go back to the Settings screen.
Choosing Your Search Engine
Chrome can use several different search engines. To choose the one you want, tap the Search Engine button on the Settings screen, and then tap the appropriate button on the Search Engine screen.
The available search engines vary depending on your device’s manufacturer and your location. But you’ll typically be able to choose from the major engines such as Google, Yahoo!, and Bing.
Setting Up Autofill Forms
The Autofill Forms feature enables you to store data you need for filling in online forms, such as your name, address, and credit card details. You set up Autofill Forms by turning it on and adding your profile and any credit cards you want to be able to use easily.
On the Settings screen, tap the Autofill Forms button to display the Autofill Forms screen (shown in Figure 8.4 with a profile and a credit card added). Set the switch to On, and then tap the Add Profile button to display the Add Profile screen. Fill in the data you want to be able to use in the appropriate fields—Full Name, Address Line 1, and so on—and then tap the Save button. Lather, rinse, and repeat until you’ve set up all the profiles you need.
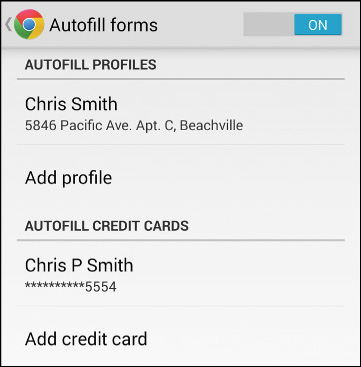
If you want to save your credit card data, tap the Add Credit Card button to display the Add Credit Card screen, type in the data, and then tap the Save button.
![]() Note
Note
At this writing, Autofill Forms doesn’t enable you to assign descriptive names (such as Capital One Visa or Work MasterCard) to your cards, so you need to be able to identify them by their last four digits.
Working with the Save Passwords Feature
Chrome can save your passwords for websites. This has two advantages: First, you don’t have to laboriously type the passwords on your device’s onscreen keyboard; and second, you can easily use passwords that are longer, more complex, and more secure.
To set Chrome to save your passwords, tap the Save Passwords button on the Settings screen to display the Save Passwords screen, and set the switch at the top to the On position. Now, when you visit a website and enter your password, Chrome prompts you to allow it to save your password. Tap the Yes button or the Never button, as appropriate; if you want to postpone the decision until next time, tap the X button to close the prompt box.
The Saved Passwords section at the top of the Save Passwords screen lists the sites for which you’ve saved passwords. To delete a password, tap it, and then tap the Delete button on the Settings screen that appears.
Choosing Privacy Settings and Clearing Browsing Data
Chrome includes a handful of privacy settings that you should configure to protect your privacy. From the Privacy screen, you can also clear your browsing data to remove potentially sensitive information.
Tap the Privacy button on the Settings screen to display the Privacy screen (see Figure 8.5). You can then choose these five settings:
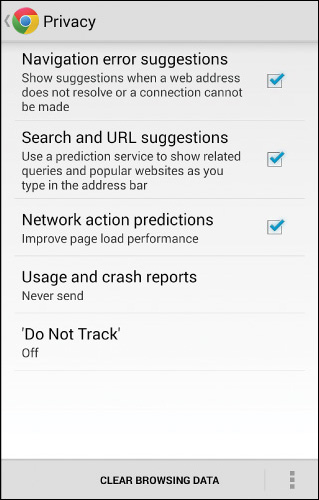
FIGURE 8.5 The Privacy screen includes controls for choosing which suggestions to see and for clearing your browsing data.
![]() Navigation Error Suggestions. This setting controls whether Chrome displays suggestions for web addresses it cannot resolve or reach. For example, if you type in qupublishing.com (missing the e) instead of quepublishing.com, Chrome cannot resolve the address. With Navigation Error Suggestions turned on, Chrome suggests the correct website. With Navigation Error Suggestions turned off, Chrome simply reports that the web page is not available.
Navigation Error Suggestions. This setting controls whether Chrome displays suggestions for web addresses it cannot resolve or reach. For example, if you type in qupublishing.com (missing the e) instead of quepublishing.com, Chrome cannot resolve the address. With Navigation Error Suggestions turned on, Chrome suggests the correct website. With Navigation Error Suggestions turned off, Chrome simply reports that the web page is not available.
![]() Search and URL Suggestions. This setting controls whether Chrome displays suggestions from a prediction service when you type in the omnibox. The suggestions may be helpful, but they could compromise your privacy.
Search and URL Suggestions. This setting controls whether Chrome displays suggestions from a prediction service when you type in the omnibox. The suggestions may be helpful, but they could compromise your privacy.
![]() Network Action Predictions. This setting controls whether Chrome looks up the IP addresses of all the links on the current web page so that it can more quickly load the page for whichever link you click.
Network Action Predictions. This setting controls whether Chrome looks up the IP addresses of all the links on the current web page so that it can more quickly load the page for whichever link you click.
![]() Usage and Crash Reports. To control whether Chrome sends anonymized reports about your usage of the app and any crashes that occur, tap this button, and then tap the appropriate radio button in the Usage and Crash Reports dialog box: Always Send, Only Send on Wi-Fi, or Never Send. If you want to help Google develop Chrome, Only Send on Wi-Fi is the best choice.
Usage and Crash Reports. To control whether Chrome sends anonymized reports about your usage of the app and any crashes that occur, tap this button, and then tap the appropriate radio button in the Usage and Crash Reports dialog box: Always Send, Only Send on Wi-Fi, or Never Send. If you want to help Google develop Chrome, Only Send on Wi-Fi is the best choice.
![]() ‘Do Not Track’. If you want to request that websites not track you, tap this button to display the ‘Do Not Track’ screen, and then set the switch to the On position.
‘Do Not Track’. If you want to request that websites not track you, tap this button to display the ‘Do Not Track’ screen, and then set the switch to the On position.
![]() Caution
Caution
Some websites don’t honor the Do Not Track request, so don’t rely on Do Not Track to protect your privacy.
If you want to clear your browsing data, tap the Clear Browsing Data button to display the Clear Browsing Data dialog box (see Figure 8.6). You can then check the box for each item you want to delete:
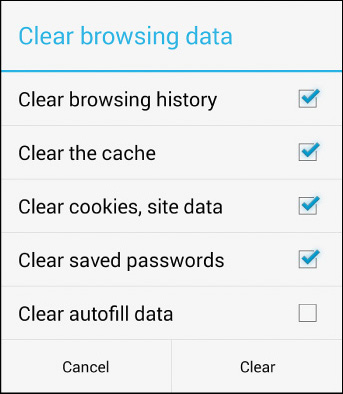
FIGURE 8.6 In the Clear Browsing Data dialog box, check the check box for each item you want to clear, and then tap the Clear button.
![]() Clear Browsing History. Your browsing history is the list of web pages you have visited.
Clear Browsing History. Your browsing history is the list of web pages you have visited.
![]() Clear the Cache. The cache contains data that Chrome has stored temporarily to enable itself to quickly load web pages when you return to them.
Clear the Cache. The cache contains data that Chrome has stored temporarily to enable itself to quickly load web pages when you return to them.
![]() Clear Cookies, Site Data. Cookies are small text files that web servers store on your device to help them track what you do on their websites. For example, some websites use cookies to implement shopping carts or to give you a quick-access list of products you have browsed recently.
Clear Cookies, Site Data. Cookies are small text files that web servers store on your device to help them track what you do on their websites. For example, some websites use cookies to implement shopping carts or to give you a quick-access list of products you have browsed recently.
![]() Tip
Tip
You can delete data for websites one by one instead of deleting all your cookies and site data. You can also refuse cookies. See the section “Choosing Content Settings,” later in this chapter.
![]() Clear Saved Passwords. This setting enables you to get rid of all your saved passwords at once instead of deleting them one by one, as discussed earlier in this chapter.
Clear Saved Passwords. This setting enables you to get rid of all your saved passwords at once instead of deleting them one by one, as discussed earlier in this chapter.
![]() Clear Autofill Data. This setting deletes your Autofill data. See the section “Setting Up Autofill Forms,” earlier in this chapter.
Clear Autofill Data. This setting deletes your Autofill data. See the section “Setting Up Autofill Forms,” earlier in this chapter.
After making your choices, tap the Clear button.
Choosing Accessibility Settings
If you find the size of text on web pages hard to read, you can use Chrome’s Text Scaling feature to enlarge it. Tap the Accessibility button on the Settings screen to display the Accessibility screen, and then drag the Text Scaling slider until the text in the Preview box is the size you want. You can then apply text scaling by double-tapping a paragraph on a web page.
Some websites request web browsers not to let you zoom in on the site. Usually, the reason is that the website designer wants to ensure you view the site at a standard size for artistic reasons. This may make the site unreadable on a small screen even if you have good eyesight.
To deal with this problem, check the Force Enable Zoom check box on the Accessibility screen. Chrome then enables you to zoom in even if the website requests no zooming.
Choosing Content Settings
Next, tap the Content Settings button to display the Content Settings screen (see Figure 8.7). “Content Settings” sounds pretty harmless, but the settings here can make a huge difference to your browsing and your security, so take a minute to choose suitable settings.
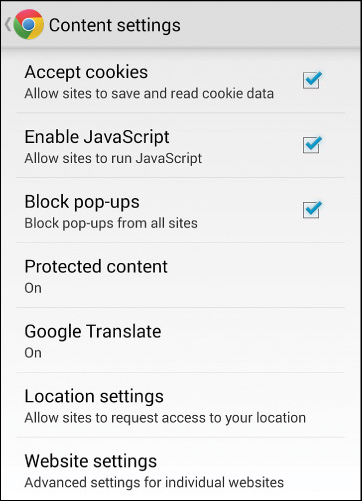
These are the content settings:
![]() Accept Cookies. Check this box to allow Chrome to accept cookies, the text files that web servers use to track your movements on their sites.
Accept Cookies. Check this box to allow Chrome to accept cookies, the text files that web servers use to track your movements on their sites.
![]() Caution
Caution
Turning off cookies helps protect your privacy, but it prevents many websites from working properly.
![]() Enable JavaScript. Check this box to allow websites to run scripts (small programs) written in the JavaScript scripting language. Websites use JavaScript to display dynamic content, such as displaying a moving series of images or news headlines.
Enable JavaScript. Check this box to allow websites to run scripts (small programs) written in the JavaScript scripting language. Websites use JavaScript to display dynamic content, such as displaying a moving series of images or news headlines.
![]() Tip
Tip
JavaScript is different from Java, which is a full-power programming language with capabilities that can threaten a computer’s security. Many security experts recommend disabling Java on desktop computers to help avoid problems. Android devices don’t normally run Java, so it’s not a threat.
![]() Block Pop-Ups. Check this box to prevent websites from displaying pop-up windows. Blocking pop-ups is a good idea, but you may need to disable pop-up blocking for all the features on some websites to work.
Block Pop-Ups. Check this box to prevent websites from displaying pop-up windows. Blocking pop-ups is a good idea, but you may need to disable pop-up blocking for all the features on some websites to work.
![]() Protected Content. Some websites provide premium videos that require Chrome to authenticate your device, proving it is authorized to play the videos. To enable Chrome to authenticate your device, tap the Protected Content button and set the switch on the Protected Content screen to On.
Protected Content. Some websites provide premium videos that require Chrome to authenticate your device, proving it is authorized to play the videos. To enable Chrome to authenticate your device, tap the Protected Content button and set the switch on the Protected Content screen to On.
![]() Tip
Tip
If you enable protected content but find that websites cannot authenticate your device, you may need to reset its credentials. To do so, tap the Reset Device Credentials button on the Protected Content screen, and then tap the Delete button in the Confirm Device Credential Deletion dialog box that opens.
![]() Google Translate. If you want to enable Chrome to use Google Translate to translate pages written in other languages, tap this button and set the switch on the Google Translate screen to the On position.
Google Translate. If you want to enable Chrome to use Google Translate to translate pages written in other languages, tap this button and set the switch on the Google Translate screen to the On position.
![]() Location Settings. To control whether sites can request your location, tap this button, and then set the switch on the Location screen to the On position or to the Off position, as needed.
Location Settings. To control whether sites can request your location, tap this button, and then set the switch on the Location screen to the On position or to the Off position, as needed.
Setting the switch on the Location screen to the Off position disables Location Services for all apps, not just for Chrome. Normally, it’s best to set the switch to the On position and confirm or deny the individual location requests when Chrome displays them. Judge the requests individually: Some websites require your location—for example, to provide information about novel dining experiences within strolling distance—but others are just plain nosy.
![]() Website Settings. Tap this button to display the Website Settings screen (see Figure 8.8), which displays a list of the websites that have stored data on your device. You can tap a website to display its Settings screen and then tap the Clear Stored Data button to delete the data. Tap the Clear All button in the Clear Stored Data dialog box that opens to confirm the deletion.
Website Settings. Tap this button to display the Website Settings screen (see Figure 8.8), which displays a list of the websites that have stored data on your device. You can tap a website to display its Settings screen and then tap the Clear Stored Data button to delete the data. Tap the Clear All button in the Clear Stored Data dialog box that opens to confirm the deletion.
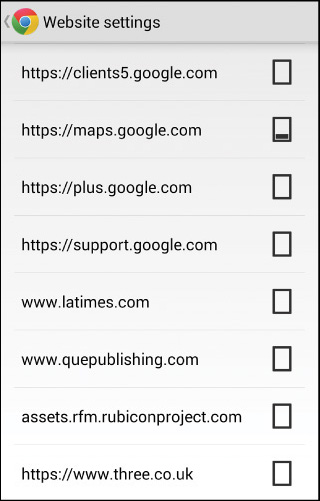
FIGURE 8.8 Tap a website to display the screen for clearing its data. The rectangles give a rough idea of how much data each website has stored on your device.
Managing Bandwidth and Preloading
Chrome can preload web pages linked to the current page so that you can display a page faster when you tap its link. To control whether Chrome preloads pages, tap the Bandwidth Management button on the Settings screen, and then use the options on the Bandwidth Management screen (see Figure 8.9).
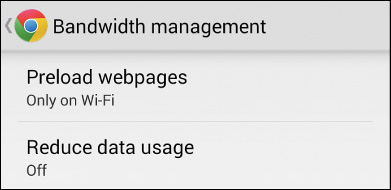
FIGURE 8.9 On the Bandwidth Management screen, choose whether to preload web pages and whether to use the Reduce Data Usage feature.
Tap the Preload Webpages button to display the Preload Webpages dialog box, and then tap the appropriate radio button: Always, Only on Wi-Fi (usually the best choice), or Never.
![]() Note
Note
On a noncellular device, check or uncheck the Preload Webpages box on the Bandwidth Management screen to control whether Chrome preloads web pages.
![]() Caution
Caution
Preloading web pages can greatly increase the amount of data that Chrome transfers, so you should avoid preloading web pages over a cellular connection unless you have a generous or unlimited data plan.
The second button on the Bandwidth Management screen, Reduce Data Usage, enables you to reduce the amount of data Chrome transfers by having Google’s servers compress the web pages you request. To do this, tap the Reduce Data Usage button and then set the switch on the Reduce Data Usage screen to On. Using the Reduce Data Usage feature also turns on Chrome’s Safe Browsing system, which helps protect you against malicious web pages and malware.
The Reduce Data Usage feature is well worth trying. However, if you find that it prevents you from accessing premium data services that your carrier provides, turn it off.
Browsing the Web with Chrome
Now that you’ve configured Chrome to suit your device, your eyes, and the way you browse, you’re ready to use the app to browse the Web.
Navigating Among Web Pages
With Chrome open, you can quickly navigate from one web page to another. Figure 8.10 shows Chrome open on a phone with the main controls labeled.

Here’s how to navigate among web pages:
![]() Type in an address. Tap the omnibox—the address box at the top of the screen—and type or paste in the address.
Type in an address. Tap the omnibox—the address box at the top of the screen—and type or paste in the address.
![]() Tip
Tip
If the address appears as a link in another app, tap the link to open it in Chrome. For example, tap a link in an email message to open the linked page in Chrome. If the address appears but isn’t a link, select it, copy it, and then paste it into the Chrome omnibox.
![]() Open a linked page in the same tab. Tap the link.
Open a linked page in the same tab. Tap the link.
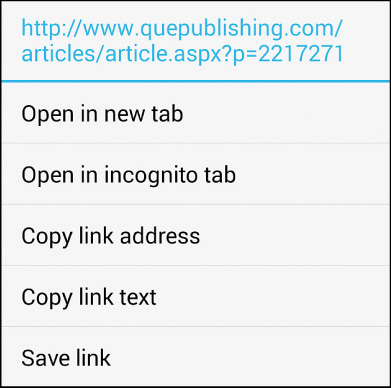
![]() Open a linked page in a new tab. Tap and hold the link, and then tap Open in New tab on the pop-up menu (see Figure 8.11).
Open a linked page in a new tab. Tap and hold the link, and then tap Open in New tab on the pop-up menu (see Figure 8.11).
![]() Tip
Tip
To reload the current web page, tap the Reload button at the right end of the omnibox. You may want to reload the page to get updated information from it.
If your device has multiple browsers installed, you can set one of them as the default browser. Your default browser is the one that opens when you tap a link in another app—for example, a link in an email message.
If you’re not sure whether you have a default browser set, tap a link in another app and see what happens. (If you don’t have a convenient link, send yourself an email message containing a link.) If a browser opens, that’s the default. If the Complete Action Using dialog box opens, showing you a choice of browsers, tap the browser you want to make the default, and then tap the Always button.
If you want to change your default browser, open the Settings app and tap the Apps button to display the Apps screen. Swipe left twice to display the All screen, and then locate the default browser in the alphabetical list. Tap the browser’s button to display its App Info screen and then tap the Clear Defaults button.
Now tap a link in another app, and the Complete Action Using dialog box opens. Tap the browser you want to use, and then tap the Always button.
Managing and Switching Tabs
Chrome enables you to open multiple web pages at the same time by opening each page in a separate tap. You can open new tabs as needed, switch among your open tabs, and close any tabs you no longer need.
You can open a new tab in a variety of ways:
![]() From the menu. Tap the Menu button and then tap the New tab button.
From the menu. Tap the Menu button and then tap the New tab button.
![]() From a link. Tap and hold the link, and then tap Open in New Tab on the pop-up menu.
From a link. Tap and hold the link, and then tap Open in New Tab on the pop-up menu.
![]() From the Tabs screen on a phone. Tap the Tabs button to display the Tabs screen (see Figure 8.12), and then tap the New Tab button. The Tabs button is the icon to the right of the omnibox, the icon showing two page outlines and the current number of tabs.
From the Tabs screen on a phone. Tap the Tabs button to display the Tabs screen (see Figure 8.12), and then tap the New Tab button. The Tabs button is the icon to the right of the omnibox, the icon showing two page outlines and the current number of tabs.
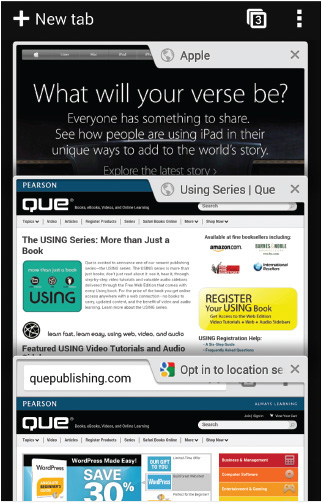
FIGURE 8.12 Use the Tabs screen on a phone to open new tabs, close existing tabs, or display a different tab.
![]() From the tab bar on a tablet. Tap the short, blank tab button at the right end of the tab bar.
From the tab bar on a tablet. Tap the short, blank tab button at the right end of the tab bar.
To manage your tabs on a phone, tap the Tabs button and work on the Tabs screen. Here you can do the following:
![]() Examine a tab. Tap a tab and drag your finger down to display more of the tab in the tab list.
Examine a tab. Tap a tab and drag your finger down to display more of the tab in the tab list.
![]() Display a tab. Tap the tab to display the web page full screen.
Display a tab. Tap the tab to display the web page full screen.
![]() Close a tab. Tap its X button or swipe it to the right off the list.
Close a tab. Tap its X button or swipe it to the right off the list.
![]() Close all tabs. Tap the menu button and then tap Close All Tabs.
Close all tabs. Tap the menu button and then tap Close All Tabs.
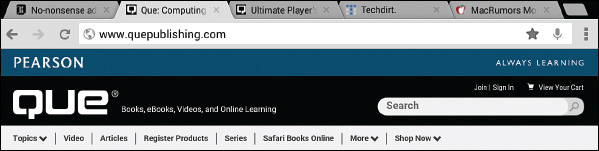
On a tablet, your open tabs appear on the tab bar (see Figure 8.13), and you can simply tap the tab you want to display. To close a tab, tap its X button.
![]() Tip
Tip
On a tablet, you can drag your tabs into a different order if you want. For example, you may want to group related tabs together for reference.
Making the Most of Bookmarks
When you want to be able to easily return to a web page, create a bookmark for it. You can store bookmarks on your device, but to get more out of them, you can sync your bookmarks via your Google account, making bookmarks you create on your computer available on your Android device, and vice versa.
Creating a Bookmark
![]() Note
Note
A bookmark stores only the address of a web page, so when you return to the bookmark, you see the latest version of the page. For example, if you bookmark the home page of a news site, the page will often have changed by the time you return.
To create a bookmark for the current web page on a phone, tap the Menu button and then tap the empty start button in the upper-right corner of the menu. The Add Bookmark screen appears, and you can name the bookmark and assign it to a folder.
To create a bookmark for the current web page on a tablet, tap the empty star button at the right end of the omnibox. The Add Bookmark dialog box opens, and you can name the bookmark and assign it to a folder.
The Add Bookmark screen and then Add Bookmark dialog box work in the same way:
![]() Name. Enter the name for the bookmark in this box. Chrome suggests the web page’s title, but you’ll usually do better to type a short but descriptive name.
Name. Enter the name for the bookmark in this box. Chrome suggests the web page’s title, but you’ll usually do better to type a short but descriptive name.
![]() URL. This box shows the web page’s address. You can change the address, but if you started from the right page, you shouldn’t need to change it.
URL. This box shows the web page’s address. You can change the address, but if you started from the right page, you shouldn’t need to change it.
![]() Folder. This box shows the folder into which Chrome will put the bookmark. To change the folder, tap the button, and then tap the right folder on the Choose a Folder screen or in the Choose a Folder dialog box. You can tap the New Folder button to create a new folder within the current folder.
Folder. This box shows the folder into which Chrome will put the bookmark. To change the folder, tap the button, and then tap the right folder on the Choose a Folder screen or in the Choose a Folder dialog box. You can tap the New Folder button to create a new folder within the current folder.
![]() Save. After naming the bookmark and picking the folder, tap the Save button to save the bookmark.
Save. After naming the bookmark and picking the folder, tap the Save button to save the bookmark.
![]() Tip
Tip
Bookmarks are great, but if you need to go to a particular web page very frequently, put it on your Home screen. Go to the page in Chrome, tap the Menu button, and then tap Add to Homescreen on the menu. The Add to Homescreen dialog box opens, and you can type the text for the shortcut in the Title box and then tap the Add button.
Going to a Bookmark
After creating a bookmark, you can go back to the site in moments:
1. Tap the Menu button and then tap Bookmarks on the menu to display the Bookmarks screen.
2. Navigate to the folder that contains the bookmark.
3. Tap the bookmark to go to it.
![]() Tip
Tip
To delete a bookmark, tap and hold it until the pop-up menu appears, and then tap Delete Bookmark. To edit the bookmark or move it to a different folder, tap and hold the bookmark, and then tap Edit Bookmark on the pop-up menu.
Returning to a Tab You Recently Closed
To visit a tab you’ve recently closed, open the Bookmarks screen, and then tap the Recent Tabs button at the bottom. You can then tap the tab you want to reopen.
![]() Note
Note
On a phone, the Recent Tabs button appears as a folder with two arrows, one pointing up and the other pointing down. On a tablet, the Recent Tabs button bears the text Recent Tabs.
Viewing Your Chrome Tabs Open on Other Devices
If you’ve chosen to sync your open tabs from other devices that use the same Google account and the Chrome browser, you can easily view those tabs on your Android device. Open the Bookmarks screen, tap the Recent Tabs button at the bottom, and then go to the Other Devices list. Tap the tab for the page you want to see, and you can pick up your browsing where you left off.
Returning to a Page You Visited Earlier
When you want to return to a page that you visited earlier but that you didn’t bookmark, you can use your history to find the page quickly. The history is a list of the web pages you have visited, with the most recent page first.
To view your history, tap the Menu button, and then tap History on the menu. The History screen appears. You can browse to find the page you want, or tap the Search History box and type a search term. When you find the relevant history item, tap it to go straight to that page.
![]() Note
Note
If you’ve signed in to your Google account, the History screen displays the history from all your devices that are signed in to the same account. This enables you to browse more seamlessly no matter which device you’re using.
![]() Tip
Tip
If your history contains potentially embarrassing items, you can delete them by tapping the X button at the right end of their buttons. If there are too many sensitive items to delete individually, you can clear your history instead. See the section “Choosing Privacy Settings and Clearing Browsing Data,” earlier in this chapter, for details.
Browsing Incognito
Normally, when you browse the Web, your browser adds the web pages you visit to your history list so that you can revisit them if you want. History can be a great way of returning to the past, but at times you may want to turn it off so that you can browse the Web without Chrome saving the details of where you went.
![]() Caution
Caution
Incognito browsing prevents pages from being added to your history list, but the websites you visit can still track your movements, as can your ISP. Don’t assume incognito browsing means anonymity.
When you want to turn off history, open an incognito tab by tapping the Menu button and then tapping the New Incognito Tab button. Chrome displays the tab, using different coloring and the incognito symbol (a head with hat, shades, and turned-up collar) to make clear that the tab is incognito (see Figure 8.14).

FIGURE 8.14 Open an incognito tab when you want to browse without adding the pages you visit to your history.
Chrome keeps incognito tabs separate from regular tabs so that you can easily distinguish the two. Here’s how to switch between incognito tabs and regular tabs:
![]() Phone. Tap the Tabs button to display the Tabs screen. Swipe right to move from the list of incognito tabs to the list of regular tabs; swipe left to go from regular tabs to incognito tabs.
Phone. Tap the Tabs button to display the Tabs screen. Swipe right to move from the list of incognito tabs to the list of regular tabs; swipe left to go from regular tabs to incognito tabs.
![]() Tablet. Tap the Switch Tabs button, the button that appears at the right end of the tab bar.
Tablet. Tap the Switch Tabs button, the button that appears at the right end of the tab bar.
![]() Caution
Caution
When you finish using incognito mode, you must close all your incognito tabs to get rid of the details of your incognito browsing session.
Requesting a Desktop Site
Many websites offer both a desktop version of web pages and a mobile version. The desktop version of a page is designed for a larger screen and a mouse or similar pointing device, whereas the mobile version of a page is designed for a smaller screen and touch-based controls. As a result, the desktop version and mobile version may differ hugely from one another.
![]() Note
Note
Some web servers don’t honor the request for the desktop version.
Normally, when you access a web page using the Chrome browser on your Android device, the web server delivers the mobile version of the page. If that is not what you want, tap the Menu button and then tap Request Desktop Site, checking the box. Chrome reloads the web page, displaying the desktop version this time.
![]() Note
Note
The Request Desktop Site feature remains turned on for the tab on which you checked the box, but you need to turn it on separately for each new tab you open.
Using Chrome to Mobile
The Chrome to Mobile feature enables you to send a web page from Chrome on your computer to your device for either online viewing or offline viewing. Chrome to Mobile is an extension that you install on your computer. You then set up Chrome to Mobile with your mobile device so that you can send pages to the device.
![]() Tip
Tip
Sending a page for offline viewing can be a great way to carry web pages with you when you don’t have an Internet connection or you don’t want to burn through your cellular data plan.
![]() Note
Note
If you don’t already have Chrome installed on your computer, install it (for free) from the Chrome Browser page on Google’s website, www.google.com/chrome/browser/. After installing Chrome, sign in to it by clicking the Sign In button in the upper-right corner of the screen and then providing your Google account details.
Installing Chrome to Mobile on Your Computer
Here’s how to install Chrome to Mobile:
1. In Chrome on your computer, display the Settings screen. On Windows, click the Menu button and then click Settings. On the Mac, click the Chrome menu and then click Preferences.
2. Click Extensions in the left column to display the Extensions screen.
3. Click the Get More Extensions link to display the Chrome Web Store.
4. Click the Search box and type chrome to mobile.
5. Click the Free button on the Chrome to Mobile result in the Extensions list. The Add “Chrome to Mobile” dialog box opens.
6. Click the Add button. Chrome adds the extension and displays a pop-up message saying it has done so.
Setting Up Your Mobile Device
After installing Chrome for Mobile, set up your mobile device so that Chrome for Mobile knows about it. Follow these steps:
1. Click the Chrome to Mobile icon at the right end of the omnibox, just to the left of the Bookmark star. The Chrome to Mobile dialog box opens.
2. Click the Connect Your Mobile Device button. The Chrome to Mobile screen appears, listing the permissions that the extension requires.
3. Click the Accept button.
Sending Pages to Your Device
After installing Chrome to Mobile, you can send the current web page to your device with just a few clicks. Follow these steps:
1. Click the Chrome to Mobile icon at the right end of the omnibox. A dialog box opens (see Figure 8.15).
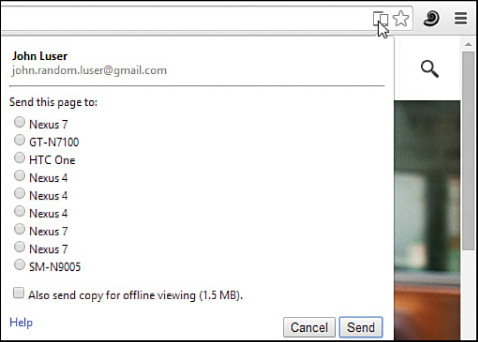
FIGURE 8.15 Click the Chrome to Mobile button, click the radio button for the target device, and then click the Send button.
2. Click the radio button for the device to which you want to send the page.
3. If you want to send an offline copy, check the Also Send Copy for Offline Viewing check box.
4. Click the Send button.
The page opens in a new tab in Chrome on your device, so it’s ready for reading when you switch to your device.
![]() Tip
Tip
Chrome to Mobile also enables you to send a web page from your computer to an iOS device. You’ll need to install the Chrome app from the App Store on your iOS device.