
14. Using Samsung TouchWiz
In This Chapter
![]() Using Quick Settings, the Toolbox, and Multi Window
Using Quick Settings, the Toolbox, and Multi Window
![]() Exploiting the Camera app, the browser, S Beam, and S Pen
Exploiting the Camera app, the browser, S Beam, and S Pen
![]() Improving performance by turning off TouchWiz features
Improving performance by turning off TouchWiz features
Most Samsung Android devices come with Samsung’s TouchWiz skin. TouchWiz is a heavy skin that makes a huge difference to the way that devices look and work, all the way from the Home screen and the Quick Settings panel to the Internet browser app and the Camera app.
In this chapter, you’ll take a whirlwind tour of the main features of TouchWiz, concentrating on what you need to know to use your device effectively.
![]() Caution
Caution
Samsung has a vast number of different devices, ranging from miniature phones to colossal tablets, and these devices run many different versions of TouchWiz. This chapter covers Android 4.4 (KitKat) running on typical Samsung hardware, but your device may well have some differences. If so, explore the commands available to see if Samsung has put the features described here in a different place.
Getting Up to Speed with TouchWiz Essentials
In this section, you get up to speed on the essentials of the TouchWiz interface, including its custom buttons, how you navigate the Home screen and the Apps screen, and the gestures you can use to control your device.
Should You Create a Samsung Account?
Samsung’s software heavily encourages you to create a Samsung account both while setting up your Android device and afterward. A Samsung account is free, and you can set up one in moments, but it’s worth evaluating whether you need an account rather than simply going ahead.
The main point of a Samsung account is to enable you to store certain data online and sync it among your devices. Inevitably, storing that data in a Samsung account gives Samsung information about you and the ways in which you use your Android device.
Some of Samsung’s apps, such as the S Health app and the S Translator app, require you to have a Samsung account in order to use the app at all. Other apps don’t require a Samsung account to use the app but do require an account for some features. For example, the Internet app enables you to sync your browsing across your computers and devices by using your Samsung account. If you don’t need to use apps such as S Health, and if you don’t need to sync data in apps such as the Internet app, you may not need to get a Samsung account.
Using the Buttons in TouchWiz
Instead of the default Android set of three soft buttons (the Back button, the Home button, and the Recent Apps button, looking from left to right), Samsung devices have a physical Home button located below the screen. On current devices, the Recent Apps soft button appears to the left of the Home button, and the Back soft button appears to the right.
![]() Note
Note
Samsung devices designed for Android Jelly Bean (4.1 and 4.2) and older versions have a Menu soft button to the left of the physical Home button and the Back soft button to the right of the Home button.
The Home button works as usual—but with one added feature:
![]() Press. Displays the Home screen panel you were using last. Press again to display your main Home screen panel.
Press. Displays the Home screen panel you were using last. Press again to display your main Home screen panel.
![]() Press and hold. Opens Google Now.
Press and hold. Opens Google Now.
![]() Note
Note
Samsung devices that don’t have a Recent Apps button require you to press and hold the Home button to display the Recent Apps screen, not to open Google Now.
![]() Double-press. Opens S Voice, Samsung’s voice-driven assistant.
Double-press. Opens S Voice, Samsung’s voice-driven assistant.
Navigating the Home Screen
In TouchWiz, the Home screen (see Figure 14.1) consists of a horizontal series of panels among which you navigate by swiping left or right. Some versions of TouchWiz include My Magazine as the leftmost Home screen panel by default.

FIGURE 14.1 The TouchWiz Home screen is a series of panels among which you can move by swiping left or right.
My Magazine is a feature that provides a personalized set of current information based on the interests you exhibit. To customize My Magazine, open it, tap the Menu button, tap Settings, and then check the boxes for the topics you want to see. If you don’t find My Magazine useful, you can turn it off, as you’ll see in a moment.
![]() Tip
Tip
In some versions of TouchWiz, the Home screen panels work as a carousel. That is, you can swipe left or right to switch among the panels as usual, but when you reach the last panel or the first, you can swipe again to wrap around to the first panel or the last.
Customizing Your Home Screen
To start customizing your Home screen, pinch inward with two fingers on it. TouchWiz opens the Home screen for customization (see Figure 14.2). You can then make these changes:

![]() Rearrange the Home screen panels. Tap the thumbnail for a panel and then drag it to where you want it.
Rearrange the Home screen panels. Tap the thumbnail for a panel and then drag it to where you want it.
![]() Note
Note
On some versions of TouchWiz, opening the Home screen for customization displays the thumbnails of all the Home screens on the screen at once, but not the Wallpapers, Widgets, and Home Screen Settings buttons. On these versions of TouchWiz, you can rearrange the Home screen panels using the same techniques as described here. To change the wallpaper, or to add apps, widgets, and folders, tap and hold open space on the Home screen, and then tap the appropriate button in the Home Screen dialog box that opens.
![]() Remove a Home screen panel. Tap the thumbnail for the panel and then drag it up to the Remove icon. When the Remove icon turns red, release the thumbnail.
Remove a Home screen panel. Tap the thumbnail for the panel and then drag it up to the Remove icon. When the Remove icon turns red, release the thumbnail.
![]() Add a Home screen panel. Scroll the thumbnails all the way to the left, and then tap the + button on the last panel.
Add a Home screen panel. Scroll the thumbnails all the way to the left, and then tap the + button on the last panel.
![]() Note
Note
You can have up to seven Home screen panels on TouchWiz.
![]() Change the wallpaper. Tap the Wallpapers button to display the Set Wallpaper dialog box. Tap the Home Screen button, the Lock Screen button, or the Home and Lock Screens button, as appropriate. On the screen that appears, select the wallpaper, and then tap the Set Wallpaper button.
Change the wallpaper. Tap the Wallpapers button to display the Set Wallpaper dialog box. Tap the Home Screen button, the Lock Screen button, or the Home and Lock Screens button, as appropriate. On the screen that appears, select the wallpaper, and then tap the Set Wallpaper button.
![]() Add a widget. Tap the Widgets button to display the Widgets screen. Navigate to the widget, tap and hold its icon until the Home screen panel thumbnails appear, and then drag the icon to the panel and position where you want it to appear.
Add a widget. Tap the Widgets button to display the Widgets screen. Navigate to the widget, tap and hold its icon until the Home screen panel thumbnails appear, and then drag the icon to the panel and position where you want it to appear.
![]() Choose Home screen settings. Tap the Settings button to display the Home Screen Settings screen. Here you can tap the Transitions Effects button to select a transition effect or uncheck the My Magazine box to remove the My Magazine feature from the Home screen.
Choose Home screen settings. Tap the Settings button to display the Home Screen Settings screen. Here you can tap the Transitions Effects button to select a transition effect or uncheck the My Magazine box to remove the My Magazine feature from the Home screen.
When you finish customizing the Home screen, tap the Back button to hide the customization options again.
Using Gestures to Control Your Samsung Device
Samsung has built a large number of gestures into TouchWiz to give you options for interacting with your device. The gestures are well worth knowing about even if you choose not to use them. Some gestures work for both phones and tablets, but others are specific to phones.
The following list explains the gestures:
![]() Air Browse or Air Gesture. Wave your hand above the phone’s front sensor to give a command. For example, wave your hand over the sensor from right to left to perform the air equivalent of a left swipe on the screen. This feature’s name varies depending on the version of TouchWiz.
Air Browse or Air Gesture. Wave your hand above the phone’s front sensor to give a command. For example, wave your hand over the sensor from right to left to perform the air equivalent of a left swipe on the screen. This feature’s name varies depending on the version of TouchWiz.
![]() Note
Note
The selection of gestures available depends on the device you have and the version of TouchWiz it’s running, so you may need to spend a few minutes roaming through the Settings app to learn about all the gestures you can use.
![]() Tip
Tip
To enable or disable the gestures, work on the Motions and Gestures screen or the Motions screen in the Settings app (depending on the version of TouchWiz).
![]() Air View. Hover your finger over an item onscreen to display a preview of information about it. For example, hold your finger over an event in the S Planner calendaring app to display details of the event.
Air View. Hover your finger over an item onscreen to display a preview of information about it. For example, hold your finger over an event in the S Planner calendaring app to display details of the event.
![]() Direct Call. Pick up the phone to call the contact you have currently displayed in the Phone app or the Contacts app.
Direct Call. Pick up the phone to call the contact you have currently displayed in the Phone app or the Contacts app.
![]() Smart Alert. Pick up the device to view the calls and messages you have missed.
Smart Alert. Pick up the device to view the calls and messages you have missed.
![]() Zoom. When browsing photos in the Gallery app, tilt the device away from you to zoom out on the current photo, or tilt it toward you to zoom in. When you get the hang of it, this gesture is more useful than it sounds.
Zoom. When browsing photos in the Gallery app, tilt the device away from you to zoom out on the current photo, or tilt it toward you to zoom in. When you get the hang of it, this gesture is more useful than it sounds.
![]() Browse an Image. When you’ve zoomed in on a photo, you can display different parts of it by turning the device this way and that.
Browse an Image. When you’ve zoomed in on a photo, you can display different parts of it by turning the device this way and that.
![]() Mute/Pause. You can mute the current music or an incoming phone call by turning the device over and laying it facedown. In theory, you can also pause music by putting your palm—or a convenient flat object—over the device’s screen, but this gesture seldom works in my experience.
Mute/Pause. You can mute the current music or an incoming phone call by turning the device over and laying it facedown. In theory, you can also pause music by putting your palm—or a convenient flat object—over the device’s screen, but this gesture seldom works in my experience.
![]() Palm Swipe to Capture or Capture Screen. This feature also appears as the Palm Motion check box on the Motion Control screen in some versions of TouchWiz. Swipe across the screen from right to left or from left to right using the side of your hand to capture what is onscreen. (The side of your hand is the fleshy part below the palm, between your little finger and your wrist.) This gesture may feel awkward at first, but it usually works.
Palm Swipe to Capture or Capture Screen. This feature also appears as the Palm Motion check box on the Motion Control screen in some versions of TouchWiz. Swipe across the screen from right to left or from left to right using the side of your hand to capture what is onscreen. (The side of your hand is the fleshy part below the palm, between your little finger and your wrist.) This gesture may feel awkward at first, but it usually works.
![]() Tip
Tip
If your device is running too slowly, you may need to turn off some gestures and other features. See the section “Improving Performance by Turning Off TouchWiz Features,” later in this chapter, for details.
Customizing the Apps Screen
To launch an app that’s not on your Home screen, you touch the Apps button to display the Apps screen as usual, and then touch the app’s icon.
![]() Tip
Tip
In TouchWiz, the Apps screen panels are on a carousel, so after you swipe to the last panel (or the first), you can swipe again to wrap around to the first panel (or the last).
If you have many apps, you may want to customize the Apps screen so that you can find those you want more easily. Here’s what you can do:
![]() Create a folder. Tap the Menu button and then tap Create Folder. In the Create Folder dialog box that opens, type the name for the folder and tap the + button to display a screen of apps with a check box on each. Check the box for each app you want to add to the folder, and then tap the Done button.
Create a folder. Tap the Menu button and then tap Create Folder. In the Create Folder dialog box that opens, type the name for the folder and tap the + button to display a screen of apps with a check box on each. Check the box for each app you want to add to the folder, and then tap the Done button.
![]() Change the view. Tap the Menu button and then tap View As or View Type, depending on the version of TouchWiz. In the View As dialog box or the View Type dialog box, tap the radio button for the view you want. Depending on the version of TouchWiz, your choices may be among Customizable Grid, Alphabetical Grid, and Alphabetical List; or between Custom and Alphabetical Order (see Figure 14.3). If you choose Customizable Grid or Custom, tap the Menu button again, tap Edit, and then drag the icons into the order you want. Tap the Back button when you finish.
Change the view. Tap the Menu button and then tap View As or View Type, depending on the version of TouchWiz. In the View As dialog box or the View Type dialog box, tap the radio button for the view you want. Depending on the version of TouchWiz, your choices may be among Customizable Grid, Alphabetical Grid, and Alphabetical List; or between Custom and Alphabetical Order (see Figure 14.3). If you choose Customizable Grid or Custom, tap the Menu button again, tap Edit, and then drag the icons into the order you want. Tap the Back button when you finish.

![]() Uninstall or disable apps. You can uninstall any app you’ve installed. You cannot uninstall any of the built-in apps, but you can disable them instead. Tap the Menu button and then tap Uninstall/Disable Apps. A black circle containing a red – sign appears on the upper-right corner of each app. Tap this circle to display the Uninstall Application dialog box (for an app you’ve installed) or the Disable Application dialog box (for a built-in app). You can then tap the Uninstall button or the Disable button, depending on the dialog box. Tap the Back button when you finish.
Uninstall or disable apps. You can uninstall any app you’ve installed. You cannot uninstall any of the built-in apps, but you can disable them instead. Tap the Menu button and then tap Uninstall/Disable Apps. A black circle containing a red – sign appears on the upper-right corner of each app. Tap this circle to display the Uninstall Application dialog box (for an app you’ve installed) or the Disable Application dialog box (for a built-in app). You can then tap the Uninstall button or the Disable button, depending on the dialog box. Tap the Back button when you finish.
![]() Tip
Tip
To get back the apps you’ve disabled, tap the Menu button, and then tap Show Disabled Apps. To get back the apps you’ve hidden, tap Show Hidden Apps. On the resulting screen, check the box for each app you want to enable or unhide, and then tap the Done button.
![]() Hide apps you don’t want to see. Tap the Menu button and then tap Hide Apps. Check the box for each app you want to hide, and then tap the Done button.
Hide apps you don’t want to see. Tap the Menu button and then tap Hide Apps. Check the box for each app you want to hide, and then tap the Done button.
![]() Note
Note
Only some versions of TouchWiz enable you to hide apps. If your version doesn’t, create a folder instead and park the unwanted apps in it.
Working with Quick Settings and Settings
TouchWiz customizes the Quick Settings panel and the Settings app heavily, so if you’re used to stock Android, you’re in for some changes—and some welcome improvements.
Using the Notifications Panel and the Quick Settings Bar
When you want to see your notifications, pull down from the top of the screen with one finger. The Notifications panel opens (see Figure 14.4), showing the list of notifications, which you can navigate as usual:

FIGURE 14.4 In TouchWiz, the Quick Settings bar appears at the top of the Notifications panel, giving you access to essential settings.
![]() Open the app that raised the notification. Tap the notification.
Open the app that raised the notification. Tap the notification.
![]() Expand the notification. If the notification contains extra information, tap it and draw your finger down to expand it. For example, you can expand a Gmail notification about multiple messages to display details of the messages.
Expand the notification. If the notification contains extra information, tap it and draw your finger down to expand it. For example, you can expand a Gmail notification about multiple messages to display details of the messages.
![]() Remove a notification. Swipe left or right to remove the notification from the list.
Remove a notification. Swipe left or right to remove the notification from the list.
![]() Clear all notifications. Tap the Clear button.
Clear all notifications. Tap the Clear button.
![]() Open the Settings app. Tap the Settings button.
Open the Settings app. Tap the Settings button.
![]() Display the Quick Settings panel. Tap the Quick Settings panel button.
Display the Quick Settings panel. Tap the Quick Settings panel button.
TouchWiz adds a Quick Settings bar across the top of the Notifications panel to give you even faster access to the settings you use most. Here’s how to use the Quick Settings bar:
![]() Turn a feature on or off. Tap the button for the feature. If the button doesn’t appear on the first section of the Quick Settings bar, scroll left as needed.
Turn a feature on or off. Tap the button for the feature. If the button doesn’t appear on the first section of the Quick Settings bar, scroll left as needed.
![]() Display a feature’s screen in the Settings app. Tap and hold the button for the feature until the related screen appears.
Display a feature’s screen in the Settings app. Tap and hold the button for the feature until the related screen appears.
![]() Customize the Quick Settings bar. Open the Quick Settings panel (discussed next) and tap the Edit button to display the Notification Panel screen (see Figure 14.5). You can then check or uncheck the Brightness Adjustment box to control whether the Brightness slider appears, tap the Recommended Apps and use the Recommended Apps screen to control whether the recommended apps list appears (and which apps it contains), and use the Active Buttons area to set up the list of buttons you want to have in the Quick Settings bar and the order in which they appear. You can add a button to the Quick Settings bar by dragging it from the Available Buttons list to the Active Buttons list. Similarly, drag a button from the Active Buttons list to the Available Buttons list to remove that button from the Quick Settings bar.
Customize the Quick Settings bar. Open the Quick Settings panel (discussed next) and tap the Edit button to display the Notification Panel screen (see Figure 14.5). You can then check or uncheck the Brightness Adjustment box to control whether the Brightness slider appears, tap the Recommended Apps and use the Recommended Apps screen to control whether the recommended apps list appears (and which apps it contains), and use the Active Buttons area to set up the list of buttons you want to have in the Quick Settings bar and the order in which they appear. You can add a button to the Quick Settings bar by dragging it from the Available Buttons list to the Active Buttons list. Similarly, drag a button from the Active Buttons list to the Available Buttons list to remove that button from the Quick Settings bar.
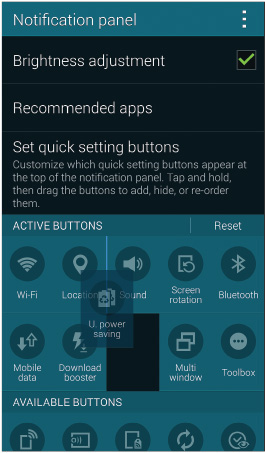
FIGURE 14.5 On the Notification Panel screen, choose Brightness Adjustment and Recommended Apps settings, and then drag the Quick Settings buttons into your preferred order.
Using the Quick Settings Panel
When you want access to the full range of Quick Settings, open the Quick Settings panel (see Figure 14.6). You can open it either by dragging down from the screen with two fingers or by opening the Notifications panel and then tapping the Quick Settings icon.
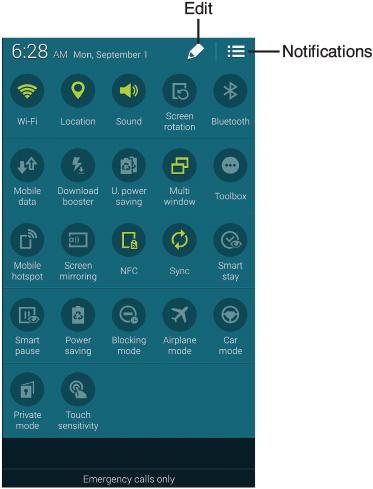
FIGURE 14.6 From the Quick Settings panel, you can turn a feature on or off by tapping its button, or display the related screen in Settings by tapping and holding the button.
Tap a button in the Quick Settings panel to turn the feature on (so that its icon appears in green) or off (the icon appears in gray).
Tap and hold a button in the Quick Settings panel to display the screen on which the feature appears in the Settings app.
Navigating the Settings App
The Settings screen in stock Android is arguably a bit plain, with its straightforward list of settings and its monochrome icons. Perhaps to compensate, TouchWiz goes over the top with a heavily customized Settings screen that features colorful icons—and, in some versions, multiple ways to view them.
Choosing Between Grid View and List View
In some versions of TouchWiz, you can choose whether to display the Settings screen in Grid view (shown on the left in Figure 14.7), List view (shown on the right in Figure 14.7), or Tab view (shown in Figure 14.8):
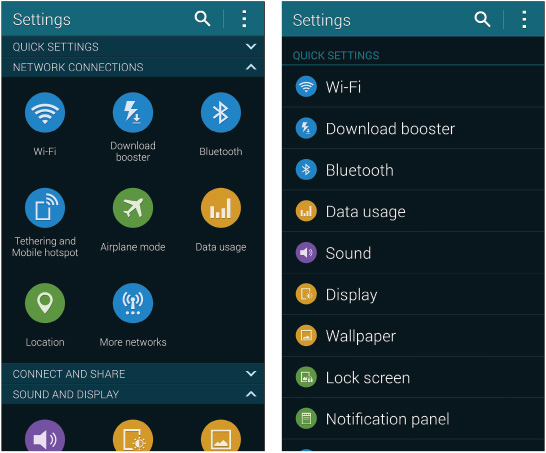
FIGURE 14.7 Some versions of TouchWiz offer Grid view (left) and List view (right) for the Settings screen as well as Tab view.

![]() Grid view. This view displays large icons laid out in a grid pattern, separated by type into sections such as Quick Settings, Network Connections, Connect and Share, and Sound and Display. You can collapse and expand sections by tapping their headings.
Grid view. This view displays large icons laid out in a grid pattern, separated by type into sections such as Quick Settings, Network Connections, Connect and Share, and Sound and Display. You can collapse and expand sections by tapping their headings.
![]() List view. This view shows a long list of settings broken up into sections by headings, starting with the Quick Settings section. You can’t collapse the sections, so you may need to scroll way down. Alternatively, tap the Search icon and search for the setting you need.
List view. This view shows a long list of settings broken up into sections by headings, starting with the Quick Settings section. You can’t collapse the sections, so you may need to scroll way down. Alternatively, tap the Search icon and search for the setting you need.
![]() Tab view. This view divides the settings onto different tabs, which you navigate by tapping the appropriate tab button at the top of the screen. The tabs depend on the version of TouchWiz, but may include Quick Settings, Connections, and Device.
Tab view. This view divides the settings onto different tabs, which you navigate by tapping the appropriate tab button at the top of the screen. The tabs depend on the version of TouchWiz, but may include Quick Settings, Connections, and Device.
![]() Tip
Tip
You can customize the Quick Settings section of the Settings screen to put the icons you find most useful at the top of the screen (or on the first tab in Tab view). Open the Settings app, tap the Menu button, and tap Edit Quick Settings. You can then check the box for each item you want (up to a maximum of 12 items) and tap the Save button to save the changes.
Finding the Settings You Need
The Settings app in TouchWiz contains so many settings that it can be hard to find those you need. When you need a major feature, the quickest way to access it is often to open the Quick Settings panel and then tap and hold the relevant icon.
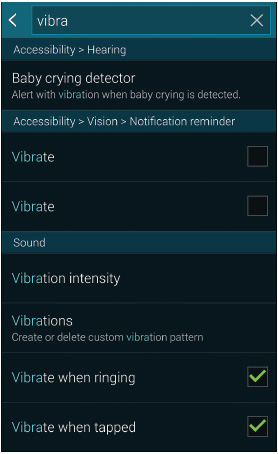
Alternatively, open the Settings app (using whichever technique you prefer) and tap the Search button at the top. Start typing a keyword, and you’ll get a screen full of matches (see Figure 14.9). You can then tap the right setting to display the screen that contains it.
Using the Toolbox
Some versions of TouchWiz include a feature called the Toolbox that enables you to put up to five of your most-needed apps just a couple of taps away from use. Here’s how to use the Toolbox:
![]() Turn on the Toolbox. Either open the Notifications panel and tap the Toolbox icon on the Quick Settings bar, or open the Quick Settings panel and tap the Toolbox icon. The Toolbox appears as a gray circle containing three horizontal dots; after a few seconds of inactivity, it fades to become less conspicuous.
Turn on the Toolbox. Either open the Notifications panel and tap the Toolbox icon on the Quick Settings bar, or open the Quick Settings panel and tap the Toolbox icon. The Toolbox appears as a gray circle containing three horizontal dots; after a few seconds of inactivity, it fades to become less conspicuous.
You can reposition the Toolbox as needed. Just tap the gray circle and drag it to where you want it onscreen.
![]() Open the Toolbox and launch an app. Tap the gray circle to open the Toolbox (see Figure 14.10), and then tap the app you want to launch.
Open the Toolbox and launch an app. Tap the gray circle to open the Toolbox (see Figure 14.10), and then tap the app you want to launch.

![]() Edit the Toolbox. Tap and hold the Toolbox icon, and then drag it to the Edit icon that appears at the top of the screen. On the settings screen for the Toolbox that appears, check the box for each app you want to include (up to five apps) and then tap the Save button.
Edit the Toolbox. Tap and hold the Toolbox icon, and then drag it to the Edit icon that appears at the top of the screen. On the settings screen for the Toolbox that appears, check the box for each app you want to include (up to five apps) and then tap the Save button.
![]() Remove the Toolbox. Tap and hold the Toolbox icon, and then drag it to the Remove icon that appears at the top of the screen. Alternatively, either open the Notifications panel and tap the Toolbox icon in the Quick Settings bar, or open the Quick Settings panel and tap the Toolbox icon there.
Remove the Toolbox. Tap and hold the Toolbox icon, and then drag it to the Remove icon that appears at the top of the screen. Alternatively, either open the Notifications panel and tap the Toolbox icon in the Quick Settings bar, or open the Quick Settings panel and tap the Toolbox icon there.
Using Multi Window
TouchWiz includes a Multi Window feature that enables you to split the screen between two apps. They can be two different apps or two instances of the same app. Only some apps work in Multi Window—those that appear in the Multi Window panel.
Multi Window is great for tablets, where you have enough screen space to use the apps productively alongside each other, but some phones also offer Multi Window. You can turn Multi Window off if you don’t need it.
Here’s how to use Multi Window:
![]() Display the Multi Window panel. Tap and hold the Back button until the panel appears on the left side of the screen (see Figure 14.11).
Display the Multi Window panel. Tap and hold the Back button until the panel appears on the left side of the screen (see Figure 14.11).

FIGURE 14.11 Tap and hold the Back button to display the Multi Window panel, and then tap the first app you want to launch.
![]() Note
Note
If you don’t use the Multi Window panel for a few seconds, the panel disappears, leaving only a > button on the left of the screen. You can tap this button to open the Multi Window panel. Tap the corresponding < button to close the Multi Window panel.
![]() Open the apps. Tap the first app (scroll down as needed) and then drag it into the pane in which you want it. Tap the second app and drag into the other pane.
Open the apps. Tap the first app (scroll down as needed) and then drag it into the pane in which you want it. Tap the second app and drag into the other pane.
![]() Tip
Tip
If you frequently use the same apps together, create a pair of apps so you can open them more easily. Open the apps and arrange them in the panes the way you want. Tap the > button to open the Multi Window panel, and then tap the up-arrow button at the bottom. On the menu section that appears, tap the Create button. In the Create Window Group dialog box, edit the suggested name for the pair—the app names—and then tap the OK button. The pair of apps then appears at the top of the list in the Multi Window panel.
![]() Work in the apps. With the apps open (see Figure 14.12), you can work in the apps much as usual—except that you have only half the amount of space for each. A white line appears around the active app. Tap the other app when you need to make it active.
Work in the apps. With the apps open (see Figure 14.12), you can work in the apps much as usual—except that you have only half the amount of space for each. A white line appears around the active app. Tap the other app when you need to make it active.
![]() Resize the window panes. Tap the white dot or blue dot on the line between the panes and drag it up or down, or left or right, as needed.
Resize the window panes. Tap the white dot or blue dot on the line between the panes and drag it up or down, or left or right, as needed.
![]() Switch the window panes. Tap the white dot or blue dot to display the control buttons (see Figure 14.13), and then tap the Switch Windows button, the icon with the two arrows.
Switch the window panes. Tap the white dot or blue dot to display the control buttons (see Figure 14.13), and then tap the Switch Windows button, the icon with the two arrows.
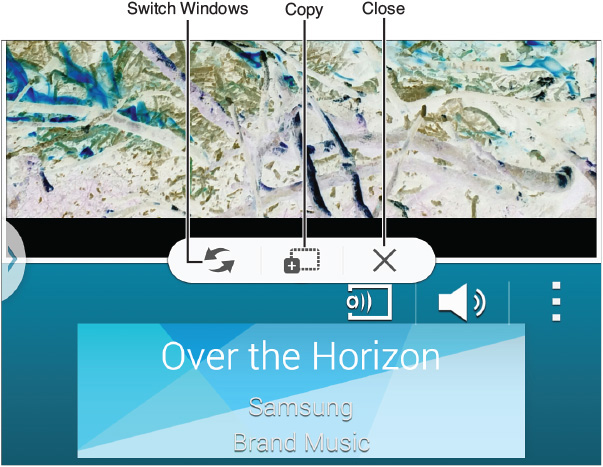
FIGURE 14.13 The Multi Window menu enables you to switch the window panes, copy text or an image from one window to another, or close a pane.
![]() Tip
Tip
Some versions of Multi Window include other control buttons, such as a Full Screen button for expanding the current pane to take up all the screen.
![]() Copy text or an image from one window to another. Tap the pane that contains the content, so that a white outline or blue outline appears around it. Tap the white dot or blue dot to display the control buttons, and then tap the Copy button, the icon with a dotted rectangle and a plus sign. Tap the paragraph or the image and drag it to the other window until it snaps into place.
Copy text or an image from one window to another. Tap the pane that contains the content, so that a white outline or blue outline appears around it. Tap the white dot or blue dot to display the control buttons, and then tap the Copy button, the icon with a dotted rectangle and a plus sign. Tap the paragraph or the image and drag it to the other window until it snaps into place.
![]() Close a window pane. Tap the pane you want to close, so that a white outline or blue outline appears around it. Tap the white dot or blue dot to display the control buttons, and then tap the Close button (the X button).
Close a window pane. Tap the pane you want to close, so that a white outline or blue outline appears around it. Tap the white dot or blue dot to display the control buttons, and then tap the Close button (the X button).
![]() Hide the Multi Window panel. When you finish using the Multi Window panel, tap and hold the Back button until the panel disappears.
Hide the Multi Window panel. When you finish using the Multi Window panel, tap and hold the Back button until the panel disappears.
Understanding the Samsung Hub, S Apps, and Samsung Apps
Samsung provides a wide range of apps for its Android devices. Some of the apps come preinstalled, whereas others are available for free download. As usual, the specifics depend on the device you’re using and the version of TouchWiz it’s running. This section summarizes the apps briefly so that you’re clear what’s what.
![]() Samsung Hub. Most Samsung devices come with the Samsung Hub app, which is designed as a one-stop shop for audio, video, and other media files. On older versions of TouchWiz, you’ll see separate apps: Music Hub, Video Hub, and so on. These apps require a Samsung account.
Samsung Hub. Most Samsung devices come with the Samsung Hub app, which is designed as a one-stop shop for audio, video, and other media files. On older versions of TouchWiz, you’ll see separate apps: Music Hub, Video Hub, and so on. These apps require a Samsung account.
![]() GALAXY Apps. Formerly Samsung Apps, this app gives you access to Samsung’s App Store for its mobile devices. You can browse using the Best Picks tab, the For GALAXY tab, or the Top tab, which offers “top” categories such as New, Most Downloaded, or Price: Low to High. Many of the apps are free, but others you must pay for.
GALAXY Apps. Formerly Samsung Apps, this app gives you access to Samsung’s App Store for its mobile devices. You can browse using the Best Picks tab, the For GALAXY tab, or the Top tab, which offers “top” categories such as New, Most Downloaded, or Price: Low to High. Many of the apps are free, but others you must pay for.
![]() Caution
Caution
If the Samsung Apps app displays the Updates screen, you may need to tap the Update button to update it before you can use it. (Tapping the Update Later button often opens a Notice dialog box telling you that Samsung Apps will close if you don’t update it now.) Updating Samsung Apps is a good move, but make sure your device is connected to a Wi-Fi network rather than using a cellular connection.
On the Updates screen, don’t check the box called I Want to Keep Samsung Apps Up to Date at All Times. This May Result in Additional Charges unless you have an unlimited data plan or a Wi-Fi–only device. Instead, use the Update button to update Samsung Apps manually as needed.
![]() S Voice. S Voice is a voice-driven assistant that you can ask for information in the same way that you can ask Google Now.
S Voice. S Voice is a voice-driven assistant that you can ask for information in the same way that you can ask Google Now.
![]() S Note. S Note is a note-taking app designed for the Galaxy Note series. It includes handwriting and drawing features for the S Pen stylus.
S Note. S Note is a note-taking app designed for the Galaxy Note series. It includes handwriting and drawing features for the S Pen stylus.
![]() Memo. Memo is a straightforward note-taking app for devices that don’t have the S Pen. You can enter text using the keyboard, and you can insert existing pictures or new photos you take.
Memo. Memo is a straightforward note-taking app for devices that don’t have the S Pen. You can enter text using the keyboard, and you can insert existing pictures or new photos you take.
![]() S Planner. S Planner is a calendar app that can sync data with various calendar accounts including Google Calendar and the calendar feature of Exchange Server.
S Planner. S Planner is a calendar app that can sync data with various calendar accounts including Google Calendar and the calendar feature of Exchange Server.
![]() S Health. S Health is a health-management app that you can use to track your fitness goals and weight, calculate your nutritional needs and how you attempt to fulfill them, and measure activity using a pedometer and other features. If your device has a heart-rate sensor, you can use it to measure your heart rate. Note that you must remain “still and quiet,” and the results are “not for medical or clinical use,” which arguably reduces their worth.
S Health. S Health is a health-management app that you can use to track your fitness goals and weight, calculate your nutritional needs and how you attempt to fulfill them, and measure activity using a pedometer and other features. If your device has a heart-rate sensor, you can use it to measure your heart rate. Note that you must remain “still and quiet,” and the results are “not for medical or clinical use,” which arguably reduces their worth.
![]() Tip
Tip
Two things here. First, S Health requires a Samsung account (as does S Translator, discussed next). Second, when creating your profile in S Health, check the Hide My Profile Information from Other S Health Users box on the Create Profile screen unless you are certain that you want to share your information.
![]() S Translator. S Translator is a translation app that enables you to translate words and phrases quickly between various languages including English, French, German, Spanish, Russian, and Korean. You can either type a phrase or speak it.
S Translator. S Translator is a translation app that enables you to translate words and phrases quickly between various languages including English, French, German, Spanish, Russian, and Korean. You can either type a phrase or speak it.
Using the Camera App’s Extra Features
Samsung devices include a heavily customized Camera app. This section tells you what you need to know to get the most out of this app.
![]() Tip
Tip
Because of the complexity of the Camera app, it’s a good idea to spend some time working through the settings and modes to find out which are useful to you and which you can safely ignore.
Mastering the Essentials of the Camera App
After launching the Camera app by tapping its icon on the Home screen or the Apps screen, you can take photos quickly. Here are the essentials of the Camera app (see Figure 14.14):
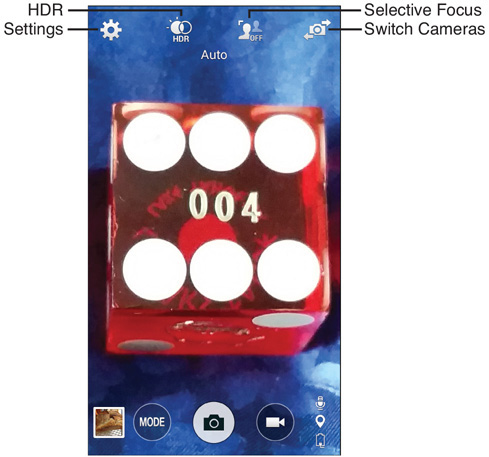
FIGURE 14.14 From the main Camera screen, you can access the Settings screen, turn on HDR or Selective Focus, or simply take a photo or a video.
![]() Zoom in or out. Place your finger and thumb on the screen and pinch apart to zoom in or pinch together to zoom in.
Zoom in or out. Place your finger and thumb on the screen and pinch apart to zoom in or pinch together to zoom in.
![]() Tip
Tip
You can open the Camera app from the lock screen by tapping the Camera icon in the lower-right corner and swiping upward. If the Camera icon doesn’t appear on the lock screen, open the Settings app, tap the Lock screen button, and then check the Camera Shortcut box.
![]() Focus. Tap the point on the screen where you want to focus.
Focus. Tap the point on the screen where you want to focus.
![]() Take HDR photos. Tap the HDR icon at the top of the screen so that the HDR (High Dynamic Range) readout appears instead of the Off readout.
Take HDR photos. Tap the HDR icon at the top of the screen so that the HDR (High Dynamic Range) readout appears instead of the Off readout.
![]() Take Selective Focus photos. Tap the Selective Focus icon at the top of the screen and follow the prompts.
Take Selective Focus photos. Tap the Selective Focus icon at the top of the screen and follow the prompts.
![]() Note
Note
The Selective Focus feature enables you to adjust the focus on the photo after you take it. Selective Focus requires the subject of the photo to be positioned in the foreground with an appreciable distance between it and the background. Only some devices have Selective Focus.
![]() Switch to the front camera. Tap the Switch Cameras button to switch from the rear camera to the front camera; tap again to switch back.
Switch to the front camera. Tap the Switch Cameras button to switch from the rear camera to the front camera; tap again to switch back.
Making the Most of the Camera Modes
The Samsung Camera app includes a large number of different modes to help you take various kinds of shots. Different versions of the Camera app have different modes, but your device likely offers some (maybe most) of the following modes—and maybe a bunch more modes:
![]() Auto. Use this mode for general shooting—in other words, when you don’t have a good reason to use any of the other modes.
Auto. Use this mode for general shooting—in other words, when you don’t have a good reason to use any of the other modes.
![]() Beauty Face. Use this mode for taking portraits of individual people you want to make look good at the expense of reality. Beauty Face detects the face in the shot and attempts to improve it by enlarging the eyes and removing blemishes. Results vary.
Beauty Face. Use this mode for taking portraits of individual people you want to make look good at the expense of reality. Beauty Face detects the face in the shot and attempts to improve it by enlarging the eyes and removing blemishes. Results vary.
![]() Shot & More. This mode has a group of submodes based on taking a series of shots in rapid succession and then using some or all of them. The submodes are Best Photo, Best Face, Drama Shot, Eraser, and Panning Shot. When you tap the Shutter button in Shot & More mode, the Camera app takes a burst of photos. It then displays the list of submodes so that you can select which to use out of those that are available. Depending on what you have photographed, only some of the submodes are available. For example, the Best Photo submode enables you to select which photos to keep from the burst; and the Best Face submode enables you to select the best version of each person’s face in a group shot and merge them into a single photo.
Shot & More. This mode has a group of submodes based on taking a series of shots in rapid succession and then using some or all of them. The submodes are Best Photo, Best Face, Drama Shot, Eraser, and Panning Shot. When you tap the Shutter button in Shot & More mode, the Camera app takes a burst of photos. It then displays the list of submodes so that you can select which to use out of those that are available. Depending on what you have photographed, only some of the submodes are available. For example, the Best Photo submode enables you to select which photos to keep from the burst; and the Best Face submode enables you to select the best version of each person’s face in a group shot and merge them into a single photo.
In some versions of TouchWiz, the Camera app lists the Shot & More modes separately as Best Photo, Best Face, and Drama Shot.
![]() Panorama. Turn on this mode when you want to take a panorama photo such as a landscape. The Camera app displays arrows to guide your movements of the camera.
Panorama. Turn on this mode when you want to take a panorama photo such as a landscape. The Camera app displays arrows to guide your movements of the camera.
![]() Virtual Tour. This mode enables you to create an interactive visual tour of a room or a building. The Camera app displays arrows and prompts to guide you where to point the lens, and takes photos automatically when it is pointing the right way.
Virtual Tour. This mode enables you to create an interactive visual tour of a room or a building. The Camera app displays arrows and prompts to guide you where to point the lens, and takes photos automatically when it is pointing the right way.
![]() Dual Camera. This mode enables you to position a photo or video of yourself (taken on the front camera) on the picture or video you’re taking with the rear camera.
Dual Camera. This mode enables you to position a photo or video of yourself (taken on the front camera) on the picture or video you’re taking with the rear camera.
![]() Tip
Tip
Tap the Manage Modes button on the Modes panel to display the Manage Modes screen, on which you can uncheck the box for any mode you want to remove from the Modes panel. Tap the Done button when you finish. Tap the Download button on the Modes panel to download other modes for free from the GALAXY Apps service.
Setting the Camera to Take the Photos and Videos You Want
The Camera app’s modes are great for quickly taking substantially different types of photos, but you’ll also want to dig into the settings that the Camera app offers in order to get exactly the photos you want.
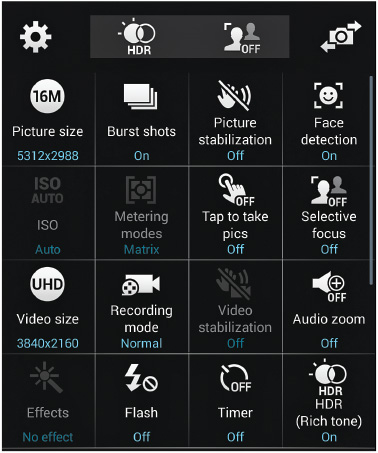
Different versions of the Camera app not only have different settings but also lay them out in different ways. Typically, you tap the Settings button (the gear icon) to open the Settings panel. Figure 14.15 shows the top part of the Settings panel on a Galaxy S 5; you scroll down to display further settings.
These are the settings that your device may offer:
![]() Picture Size. Normally, you’ll want to shoot at the highest resolution available unless you need a different aspect ratio, such as 4:3 instead of 16:9.
Picture Size. Normally, you’ll want to shoot at the highest resolution available unless you need a different aspect ratio, such as 4:3 instead of 16:9.
![]() Burst Shots. Tap this button to toggle burst shooting on or off. Burst shooting is great for action, children, and pets, but turn it off if you find you trigger it unintentionally.
Burst Shots. Tap this button to toggle burst shooting on or off. Burst shooting is great for action, children, and pets, but turn it off if you find you trigger it unintentionally.
![]() Picture Stabilization. Tap this button to toggle stabilization on or off. Stabilization can be a big help for getting good photos in low light conditions if you don’t use a tripod or other means of holding the camera steady. Turning on picture stabilization may disable other features, such as ISO adjustment.
Picture Stabilization. Tap this button to toggle stabilization on or off. Stabilization can be a big help for getting good photos in low light conditions if you don’t use a tripod or other means of holding the camera steady. Turning on picture stabilization may disable other features, such as ISO adjustment.
![]() Tip
Tip
If you find that your device’s Camera app takes too long to snap a photo, turn off the Picture Stabilization feature. This feature may be on by default, and it adds a delay before the Camera app can take a photo.
![]() Face Detection. Tap this button to toggle face detection on or off.
Face Detection. Tap this button to toggle face detection on or off.
![]() ISO. Tap this button to adjust the light sensitivity of the cameras’ sensors. It’s best to use the Auto setting unless you need to make the camera more sensitive—for example, to shoot moving subjects in low light.
ISO. Tap this button to adjust the light sensitivity of the cameras’ sensors. It’s best to use the Auto setting unless you need to make the camera more sensitive—for example, to shoot moving subjects in low light.
![]() Caution
Caution
The higher the ISO value you use, the more likely it is that you’ll get “noise”—incorrectly colored dots or areas—in your photos.
![]() Metering Modes. Tap this button to switch among the light-metering modes. Your choices are typically Center-Weighted (the default), Matrix, and Spot.
Metering Modes. Tap this button to switch among the light-metering modes. Your choices are typically Center-Weighted (the default), Matrix, and Spot.
![]() Tip
Tip
Use Center-Weighted light metering when your subject is in the middle of the photo. Use Matrix light metering when you need to balance the light across the photo as a whole. Use Spot light metering when you will tap the point in the photo where you want to measure the light.
![]() Tap to Take Pics. Tap this button to toggle on or off the feature that enables you to take photos by tapping the screen. This feature is useful when you’re shooting in conditions too bright to see the controls onscreen easily, but it’s less useful when you’re trying to adjust the focus and exposure for a shot—each tap on the screen takes a photo.
Tap to Take Pics. Tap this button to toggle on or off the feature that enables you to take photos by tapping the screen. This feature is useful when you’re shooting in conditions too bright to see the controls onscreen easily, but it’s less useful when you’re trying to adjust the focus and exposure for a shot—each tap on the screen takes a photo.
![]() Selective Focus. Tap this button to turn on the Selective Focus feature. Normally, it’s easier to tap the Selective Focus button at the top of the screen.
Selective Focus. Tap this button to turn on the Selective Focus feature. Normally, it’s easier to tap the Selective Focus button at the top of the screen.
![]() Video Size. Tap this button to display the Video Size dialog box, and then tap the video size you want.
Video Size. Tap this button to display the Video Size dialog box, and then tap the video size you want.
![]() Caution
Caution
Use the UHD (3840×2160-pixel) video size only when you need the highest resolution, because the footage takes up a huge amount of storage space. UHD resolution is four times higher than Full HD (1920×1080-pixel) resolution.
![]() Recording Mode. Tap this button to display the Recording Mode dialog box, which enables you to choose among available recording modes. The modes depend on the camera; you should always have a Normal mode (the default); you’ll usually have a Limit for MMS mode for taking short, small videos suitable for sending in MMS messages; and you may also have a Slow Motion mode, a Fast Motion mode, and a Smooth Motion mode.
Recording Mode. Tap this button to display the Recording Mode dialog box, which enables you to choose among available recording modes. The modes depend on the camera; you should always have a Normal mode (the default); you’ll usually have a Limit for MMS mode for taking short, small videos suitable for sending in MMS messages; and you may also have a Slow Motion mode, a Fast Motion mode, and a Smooth Motion mode.
![]() Video Stabilization. Tap this button to toggle video stabilization on or off. It’s a good idea to use video stabilization if you’re not using a tripod or other support to keep your device steady.
Video Stabilization. Tap this button to toggle video stabilization on or off. It’s a good idea to use video stabilization if you’re not using a tripod or other support to keep your device steady.
![]() Note
Note
Video stabilization may not be available at the highest resolution your camera supports.
![]() Audio Zoom. Tap this button to toggle audio zoom on or off. When audio zoom is on, zooming in on a subject also zooms the audio in that direction.
Audio Zoom. Tap this button to toggle audio zoom on or off. When audio zoom is on, zooming in on a subject also zooms the audio in that direction.
![]() Effects. Tap this button to display the Effects list, which enables you to apply an effect to the photo you’re shooting. Tap the No Effect “effect” to remove the current effect.
Effects. Tap this button to display the Effects list, which enables you to apply an effect to the photo you’re shooting. Tap the No Effect “effect” to remove the current effect.
![]() Flash. Tap this button to cycle through the three Flash states: On, Auto, and Off.
Flash. Tap this button to cycle through the three Flash states: On, Auto, and Off.
![]() Timer. Tap this button to display the Timer dialog box, and then tap the delay you want: Off, 2 Sec, 5 Sec, or 10 Sec.
Timer. Tap this button to display the Timer dialog box, and then tap the delay you want: Off, 2 Sec, 5 Sec, or 10 Sec.
![]() HDR (Rich Tone). Tap this button to toggle HDR on to get a better color and lighting balance. Normally, it’s easier to tap the HDR button at the top of the screen.
HDR (Rich Tone). Tap this button to toggle HDR on to get a better color and lighting balance. Normally, it’s easier to tap the HDR button at the top of the screen.
![]() Location Tags. Tap this button to turn location tagging on or off.
Location Tags. Tap this button to turn location tagging on or off.
![]() Tip
Tip
Adding location data enables you to sort your photos by locations and see exactly where each photo was taken. But if you share your photos with others, the location data may be a threat to your privacy.
![]() Storage Location. Tap this button to switch between storing the photos and videos you take on your device’s built-in storage and storing them on an SD card you have inserted.
Storage Location. Tap this button to switch between storing the photos and videos you take on your device’s built-in storage and storing them on an SD card you have inserted.
![]() Review Pics/Videos. Tap this button to toggle the review feature, which automatically displays each photo or video you take so that you can see if it is good enough. Review is useful for leisurely shooting, but turn it off when you are shooting live action.
Review Pics/Videos. Tap this button to toggle the review feature, which automatically displays each photo or video you take so that you can see if it is good enough. Review is useful for leisurely shooting, but turn it off when you are shooting live action.
![]() Remote Viewfinder. Tap this button to display the Remote Viewfinder dialog box, which enables you to allow another Samsung device to view and control what the camera on your device is seeing. In the Remote Viewfinder dialog box, tap the Easily Connect via NFC button or the Wi-Fi Direct Settings button, as needed, and then follow the prompts to set up the remote viewing and control.
Remote Viewfinder. Tap this button to display the Remote Viewfinder dialog box, which enables you to allow another Samsung device to view and control what the camera on your device is seeing. In the Remote Viewfinder dialog box, tap the Easily Connect via NFC button or the Wi-Fi Direct Settings button, as needed, and then follow the prompts to set up the remote viewing and control.
![]() White Balance. Tap this button to display the White Balance dialog box, and then tap the Auto radio button, the Daylight radio button, the Cloudy radio button, the Incandescent radio button, or the Fluorescent radio button, as needed.
White Balance. Tap this button to display the White Balance dialog box, and then tap the Auto radio button, the Daylight radio button, the Cloudy radio button, the Incandescent radio button, or the Fluorescent radio button, as needed.
![]() Tip
Tip
Use the Auto setting for White Balance unless you find that it’s not dealing well with the light. In this case, tap the radio button for the predominant lighting type. Use the Cloudy setting for shooting outdoors in the shade on sunny days as well as when it is actually cloudy.
![]() Exposure Value. Tap this button to display the Exposure Value slider, which you can adjust either by dragging the slider button or by tapping the – button at the left end or the + button at the right end.
Exposure Value. Tap this button to display the Exposure Value slider, which you can adjust either by dragging the slider button or by tapping the – button at the left end or the + button at the right end.
![]() Tip
Tip
Increase the exposure if the picture looks too dark with automatic exposure control. For example, if you’re photographing a person positioned in front of a bright background such as a beach and the ocean, you may need to increase the exposure to avoid having the subject’s face in shadow. Decrease the exposure if the picture looks light and washed out.
![]() Grid Lines. Tap this button to display the grid lines onscreen, which you can use to compose your photos and videos.
Grid Lines. Tap this button to display the grid lines onscreen, which you can use to compose your photos and videos.
![]() Volume Key. Tap this button to display the Set the Volume Key To dialog box, and then tap the Take Pictures radio button, the Record Video radio button, or the Zoom radio button, as needed.
Volume Key. Tap this button to display the Set the Volume Key To dialog box, and then tap the Take Pictures radio button, the Record Video radio button, or the Zoom radio button, as needed.
![]() Voice Control. Tap this button to toggle the Voice Control feature on or off. Voice Control enables you to take a shot by saying one of four control words: “Cheese,” “Shoot,” “Smile,” or “Capture.” Voice Control is good for group shots including yourself or for self-portraits using the rear camera.
Voice Control. Tap this button to toggle the Voice Control feature on or off. Voice Control enables you to take a shot by saying one of four control words: “Cheese,” “Shoot,” “Smile,” or “Capture.” Voice Control is good for group shots including yourself or for self-portraits using the rear camera.
![]() Reset Settings. Tap this button to reset the Camera’s settings to their default values.
Reset Settings. Tap this button to reset the Camera’s settings to their default values.
Browsing with Samsung’s Internet Browser
Most Samsung devices include Samsung’s browser, which is usually called Internet but also sometimes called Browser and is usually set as the default browser with a shortcut on the Home screen. We’ll call it “the Internet app” here for clarity. The Internet app is pretty easy to use and offers standard features such as bookmarks, history, and private browsing (which it calls Incognito mode).
Grasping the Essentials of the Internet App
The Internet app has a straightforward interface, as you can see in Figure 14.16.
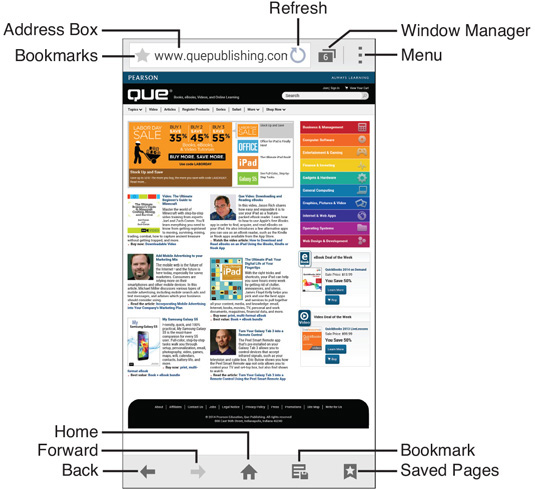
FIGURE 14.16 The Internet app has a straightforward interface with an address box, Back and Forward buttons, a Home button, and a Bookmarks button.
![]() Note
Note
The Internet app hides its controls by default as soon as you leave the top of a page to which you’ve navigated, but you can display them at any time by tapping the screen and dragging your finger down a short way.
You can go to a web page by tapping the address box, typing the address, and then tapping the Go button on the keyboard; or by following a link on another page.
You can navigate back to the previous page by tapping the Back button. After you’ve gone back, you can tap the Forward button to go forward again.
You can tap a link to open its page in the same window, or tap and hold to display a dialog box of actions. You can then tap the Open in New Window command to open the linked page in a new window.
![]() Tip
Tip
Many web pages attempt to detect whether the browser you’re using is on a mobile device or a full-bore computer and display mobile versions of pages for mobile devices. To request the desktop version of the current page, tap the Menu button and then check the Desktop View box. This setting persists for the current window until you either uncheck the Desktop View box or close the window.
Switching from the Internet App to Chrome
If the Internet app doesn’t suit you, use Chrome instead. Many Samsung devices include Chrome, so look on the Apps screen or in the Google folder to see if it’s there. If not, open the Play Store app and download it.
You’ll then want to stop the Internet app from being your default browser. With the Internet app running, open the Recent Apps screen, tap and hold the Internet icon, and then tap App Info. On the App Info screen for the Internet app, tap the Clear Defaults button.
Now set Chrome as your default browser. Go to your email app, find a link in a message, and tap it. In the Complete Action Using dialog box that opens, tap the Chrome button, and then tap the Always button. After you’ve done this, Chrome always opens when you tap a link in another app.
Saving Pages and Reading Them Later
When you don’t have time to read an interesting page you’ve found, tap the Menu button and then tap Save Page. You can then go to your Saved Pages list by tapping the Saved Pages icon at the bottom of the screen and tap the page to open it.
![]() Tip
Tip
Saving a page saves it in its current state, so when you return to it, you see the page as it was when you saved it. By contrast, when you return to a bookmark, you see the latest version of the page. Save a page instead of creating a bookmark when you need to be able to refer to the page as it was.
To delete a saved page, tap and hold until the Internet app goes into Selection mode and selects it. You can then check or uncheck the boxes for other saved pages as needed and tap the Delete button (the Trash icon) to delete them.
Returning to Web Pages with Bookmarks
The Internet app makes it easy to bookmark web pages and then return to them. You can add a bookmark like this:
1. Go to the page you want to bookmark.
2. Tap the Bookmarks button (the bookmark icon with a star on it) to display the Bookmarks screen.
![]() Note
Note
In some versions of the Internet app, the Bookmarks button appears at the bottom of the screen. In others, it appears at the top of the screen.
![]() Tip
Tip
In some versions of the Internet app, you can tap the Menu button and then tap Add Bookmark to start creating a bookmark for the current page. You may also be able to tap the gray star icon to the left of the address in the address box.
3. Edit the bookmark’s name to something short and easily identifiable.
4. Choose the folder in which to save the bookmark.
5. Tap the Save button.
To go to a bookmark, tap the Bookmarks button to display the Bookmarks screen, navigate to a different folder if necessary, and then tap the bookmark for the page you want to view.
![]() Tip
Tip
You can change the order of your bookmarks by tapping the Menu button on the Bookmarks screen, tapping Change Order, and then using the dotted handles to drag the bookmarks into the order you want. Tap the Done button when you finish.
Opening Multiple Windows and Navigating Among Them
Like any decent browser, the Internet app enables you to open multiple windows so that you can have multiple pages open at the same time. You can switch from window to window as needed and close any window that you no longer require.
You can open a new window in either of these ways:
![]() Tap and hold a link, and then tap Open in New Window in the dialog box that opens.
Tap and hold a link, and then tap Open in New Window in the dialog box that opens.
![]() Tap the Window Manager button (the icon to the right of the address box at the top of the screen, which shows the current number of windows) to display the Window Manager screen, and then tap the New Window button in the upper-right corner.
Tap the Window Manager button (the icon to the right of the address box at the top of the screen, which shows the current number of windows) to display the Window Manager screen, and then tap the New Window button in the upper-right corner.
Figure 14.17 shows the Window Manager screen, which you also use to navigate among windows and close windows.

FIGURE 14.17 On the Window Manager screen, tap the – button to close a window, or tap the window whose contents you want to display.
Loading Your Favorite Pages onto the Quick Access Screen
Some versions of the Internet browser include a Quick Access feature that you can use to get to your favorite pages quickly. To add a page to the Quick Access screen, open the page, tap the Menu button, and then tap Add to Quick Access. On the screen that appears, edit the name in the Title box as needed and then tap the Save button.
You can then tap the Windows button to display the Window Manager screen, tap the + button to display the Quick Access screen, and then tap the icon for the page you want to display.
Adding a Web Page Shortcut to Your Home Screen
When you need to be able to access a particular web page quickly, add a shortcut for it to your Home screen. Go to the page, tap the Menu button, and then tap Add Shortcut to Home Screen (or Add Shortcut to Home in some versions of the Internet app).
Browsing Incognito
When you want to browse without adding the trail of pages you visit to your history, tap the Menu button and then tap Incognito mode. The Internet app opens an Incognito mode tab that stores the details of the pages you visit only during the Incognito mode session (so that you can navigate back and forward as needed) and then disposes of them.
When you no longer need to use Incognito mode, close the Incognito mode tab.
Syncing Open Pages Through a Samsung Account
The Internet app enables you to sync your open web pages across your computers and devices by signing in to your Samsung account on each computer or device.
To sign in to your Samsung account on your Samsung device, tap the Menu button in the Internet app, and then tap Settings. On the Settings screen, tap the Account button in the Basics section, and then follow the prompts to sign in.
Sharing via S Beam
As well as the standard Android Beam feature, Samsung devices include a feature called S Beam. S Beam is basically Android Beam on mild steroids and is available only on Samsung devices. When S Beam works, it can transfer large files more quickly than Android Beam can.
S Beam uses Near Field Communication (NFC) to set up a Wi-Fi Direct connection between the devices, enabling faster data connections than Android Beam, which uses NFC to set up a Bluetooth connection. (Wi-Fi Direct is faster than Bluetooth.) S Beam usually takes longer to establish a connection than Android Beam does, but not enough to worry about.
To use S Beam, make sure Android Beam is on. On many Samsung devices, you can turn Android Beam on and off quickly by tapping the NFC icon on the Quick Settings panel; on some devices, the S Beam icon appears on the Quick Settings panel by default, and you can turn on both S Beam and Android Beam (if it is off) by tapping the S Beam icon.
If NFC or S Beam does not appear on the Quick Settings panel on your device, you can either customize the Quick Settings panel to add the icons or use the controls in the Settings app instead. In Tab view, you’ll find the NFC button in the Connect and Share section of the Connections tab.
![]() Tip
Tip
If you just want to be able to share files easily via beaming, turn on both NFC (standard Android Beam) and S Beam. Bring your Samsung device back to back with the device to or from which you want to beam content, and let the devices sort out which type of beam to use.
Making the Most of the Galaxy Note’s S Pen
The Samsung Galaxy Note series of oversized phones and tablets include the S Pen pointing device. The S Pen is a short stylus with which you can tap objects and draw onscreen more accurately than with your finger. You can still use your finger whenever you want. The S Pen also has a control button that you press to access other features.
Removing the S Pen from its holder wakes the Galaxy Note if it’s sleeping, so you don’t need to press the Power button or the Home button.
The bane of having a stylus is losing it. To help you avoid this, turn on the S Pen Keeper feature: Open the Settings app, tap the Controls tab, tap the S Pen button, and then check the S Pen Keeper box on the S Pen screen. Now, when you leave the S Pen behind and start moving away, the Galaxy Note warns you that the S Pen is missing. Be warned that this feature works only with the screen off. If the screen is on, you can escape from the S Pen without the Galaxy Note protesting.
Here are three neat moves you can perform with the S Pen:
![]() Write an Action Memo. Press and hold the S Pen button and tap the screen twice. The Action Memo window appears above whichever screen is currently displayed, and you can scribble a note and then tap the Save button (the check mark). Action Memo stores the quick memo with your other memos, which you can access through the Action Memo app (which you can run from the Apps screen).
Write an Action Memo. Press and hold the S Pen button and tap the screen twice. The Action Memo window appears above whichever screen is currently displayed, and you can scribble a note and then tap the Save button (the check mark). Action Memo stores the quick memo with your other memos, which you can access through the Action Memo app (which you can run from the Apps screen).
![]() Tip
Tip
The Galaxy Note screens are pressure sensitive, so the harder you press with the S Pen, the heavier the line it draws. Go easy with this feature. When you need thicker lines in the S Note app, tap the Pen Settings button and then adjust the Line Weight slider to give the line you want without digging holes in the screen.
![]() Capture a screenshot. Line up what you want to capture onscreen. Press and hold the S Pen button, and then tap the S Pen to the screen and hold it still for a second. The screen flashes and the Galaxy Note plays a shutter sound as it takes the photo. The screenshot then appears full screen with a control bar at the top. You can then annotate or crop the screen and tap the Save button to save it.
Capture a screenshot. Line up what you want to capture onscreen. Press and hold the S Pen button, and then tap the S Pen to the screen and hold it still for a second. The screen flashes and the Galaxy Note plays a shutter sound as it takes the photo. The screenshot then appears full screen with a control bar at the top. You can then annotate or crop the screen and tap the Save button to save it.
![]() Air Command. By default, when you remove the S Pen from its holder, the Galaxy Note displays the Air Command pop-up panel (see Figure 14.18). You can then tap Action Memo to start an action memo, tap Scrap Booker to draw around an area on the screen that you want to add to your scrap book, tap Screen Write to capture the screen and then write on the capture, tap S Finder to search using the S Finder feature, or tap Pen Window to draw a window in which you can then open an app (from a selection the Galaxy Note automatically offers you) to work with it on top of the current app.
Air Command. By default, when you remove the S Pen from its holder, the Galaxy Note displays the Air Command pop-up panel (see Figure 14.18). You can then tap Action Memo to start an action memo, tap Scrap Booker to draw around an area on the screen that you want to add to your scrap book, tap Screen Write to capture the screen and then write on the capture, tap S Finder to search using the S Finder feature, or tap Pen Window to draw a window in which you can then open an app (from a selection the Galaxy Note automatically offers you) to work with it on top of the current app.

![]() Tip
Tip
You can also display the Air Command pop-up panel by pressing the button on the S Pen.
Improving Performance by Turning Off TouchWiz Features
If your Galaxy Note is running slowly, you may be able to improve performance by turning off some of the TouchWiz features.
![]() Strip useless widgets off the Home screen. Like most Android devices, Samsung’s phones and tablets seem convinced that the more widgets on the Home screen, the fuller your life will be. But the widgets can slow down your device, so getting rid of any you don’t need can improve performance.
Strip useless widgets off the Home screen. Like most Android devices, Samsung’s phones and tablets seem convinced that the more widgets on the Home screen, the fuller your life will be. But the widgets can slow down your device, so getting rid of any you don’t need can improve performance.
If your Samsung device is running slower than usual, try restarting it: Press and hold the Power button until the Device Options dialog box appears, and then tap the Restart button. As with most computers and devices, restarting your Samsung device can clear up any number of slowdowns and niggling problems.
![]() Turn off Multi Window. You can turn off Multi Window temporarily by tapping and holding the Back button. But if you don’t want to use Multi Window at all, open the Settings app, tap the Device tab, and then set the Multi Window switch to Off.
Turn off Multi Window. You can turn off Multi Window temporarily by tapping and holding the Back button. But if you don’t want to use Multi Window at all, open the Settings app, tap the Device tab, and then set the Multi Window switch to Off.
![]() Close any apps you’re not using. Tap the Recent Apps button, scroll up to the top, and swipe any apps you’re not using off the list. This could hardly be easier to do, but it can give you an appreciable performance boost.
Close any apps you’re not using. Tap the Recent Apps button, scroll up to the top, and swipe any apps you’re not using off the list. This could hardly be easier to do, but it can give you an appreciable performance boost.
![]() Tip
Tip
Another way to speed up your Samsung device is to replace the default TouchWiz launcher with another launcher. See Chapter 3, “Customizing Your Device,” for a discussion of alternative launchers.
![]() Turn off gestures you don’t need. As you saw earlier in this chapter, Samsung’s gestures for controlling your device are clever and can be helpful. But if you don’t use some of the gestures, or if you don’t use any, don’t waste processor power trying to track your movements. Open the Settings app and locate the options for controlling gestures. Where you find these depends on the version of TouchWiz. In Tab view, tap the Controls tab, and then tap the Motions and Gestures button (if it appears) or the Motions button. You can then turn off gestures such as Direct Call, Smart Alert, Mute/Pause, or Browse an Image, depending on the version of TouchWiz.
Turn off gestures you don’t need. As you saw earlier in this chapter, Samsung’s gestures for controlling your device are clever and can be helpful. But if you don’t use some of the gestures, or if you don’t use any, don’t waste processor power trying to track your movements. Open the Settings app and locate the options for controlling gestures. Where you find these depends on the version of TouchWiz. In Tab view, tap the Controls tab, and then tap the Motions and Gestures button (if it appears) or the Motions button. You can then turn off gestures such as Direct Call, Smart Alert, Mute/Pause, or Browse an Image, depending on the version of TouchWiz.
![]() Turn off S Voice access via the Home button. Unless you find accessing S Voice by pressing and holding the Home button highly convenient, turn off this feature and access S Voice from the Apps screen instead. Press and hold the Home button one last time to access S Voice; then tap the Menu button and tap Settings. On the Settings screen, uncheck the Open via the Home Key box in the Wake-Up section.
Turn off S Voice access via the Home button. Unless you find accessing S Voice by pressing and holding the Home button highly convenient, turn off this feature and access S Voice from the Apps screen instead. Press and hold the Home button one last time to access S Voice; then tap the Menu button and tap Settings. On the Settings screen, uncheck the Open via the Home Key box in the Wake-Up section.
Turning off S Voice access via the Home button makes TouchWiz display the Home screen more quickly when you press the Home button because it doesn’t have to wait to see if the press is a press-and-hold move.
Turning Off Developer Animations on TouchWiz
Samsung TouchWiz includes several animation settings that you can turn off on the Developer Options screen in the Settings app. You may want to try turning off these animations if you’re trying to get the best performance out of your Samsung device.
First, you may need to make the Developer Options icon available, because it’s hidden by default. Open the Settings app and locate the About Device icon, either in the System section of the long-screen version of Settings or at the bottom of the General tab in the tabbed version of Settings. If the Developer Options icon doesn’t appear just before the About Device icon, tap the About Device to display the About Device screen, go to the Android Version button, and tap that button three times. A readout appears, saying you are four steps from becoming a developer; tap the button four more times, and you’ll see a message that Developer Options have been turned on. Tap the Back button to return to the Settings screen.
Now tap the Developer Options button to display the Developer Options screen and scroll down to the Drawing section. You can now tap the Window Animation Scale button to display the Window Animation Scale dialog box, and then tap the Animation Is Off radio button to turn off the animation. Repeat the move with the Transition Animation Scale button and the Animator Transition Scale button to turn these animations off as well.