
15. Using HTC Sense
In This Chapter
![]() Getting up to speed with HTC Sense
Getting up to speed with HTC Sense
![]() Phoning and playing music
Phoning and playing music
![]() Using the Camera’s extra features
Using the Camera’s extra features
If you have an HTC device, the chances are high that it’s running the HTC Sense skin. This thick skin makes HTC devices look and behave in a substantially different way to standard Android devices.
In this chapter, you’ll look at the ways in which HTC Sense differs from standard Android, how you can navigate quickly and effectively in the skin, and how you can make the most of its many features.
Taking a Five-Minute Tour of the Essentials
HTC Sense makes a wide range of changes to essential Android navigation. This section tells you what you need to know about the soft buttons, the long screens, the tabbed screens, the three-finger gestures, and more.
Unlocking Your Phone
To unlock your phone, swipe up on the lock screen. If you have an unlock method set, the phone then prompts you for it. For example, the keypad appears so that you can type in your PIN.
![]() Tip
Tip
Some HTC devices have a fingerprint reader on the back and enable you to set up one or more fingerprints to unlock the device. As long as you don’t need to protect that part of the back of your phone with a case, this unlock method is easy and moderately secure.
Getting the Hang of the Soft Buttons
Instead of the three soft buttons—the Back button, the Home button, and the Recent Apps button—that stock Android devices use, HTC Sense uses two: the Back button on the left and the Home button on the right.
The Back button works as normal: You tap it to go back to the screen you were on previously, or to cancel out of a dialog box from which you don’t want to proceed.
![]() Tip
Tip
Here’s a little difference in HTC Sense that makes a big difference: When you’re navigating within an app that uses < buttons to return to the previous screen, such as in the Settings app, you must actually tap the < button to go back instead of tapping either the button or the screen’s name next to it. This means you must tap the button more precisely than on stock Android. As usual, you can tap the Back soft button instead.
With the Home button, you can use four moves:
![]() Tap. This displays the Home screen, as usual.
Tap. This displays the Home screen, as usual.
![]() Double-tap. This displays the Recent Apps screen.
Double-tap. This displays the Recent Apps screen.
![]() Tap and hold. This launches Google Now, as usual.
Tap and hold. This launches Google Now, as usual.
![]() Tap and swipe up. This also launches Google Now, just for variety.
Tap and swipe up. This also launches Google Now, just for variety.
Navigating the Long Screens
Unlike the Apps screen on standard Android, which divides into panels among which you can scroll or swipe horizontally, the Apps screen on HTC Sense scrolls vertically. You can swipe up or down to move to the next screen’s worth of apps (assuming that the Apps screen contains enough apps to fill the screen).
![]() Tip
Tip
Tap the status bar to jump to the top of the Apps screen or the Settings screen.
HTC Sense also customizes the Settings screen. Unlike some skins, which divide the settings into tabs for easy navigation, HTC Sense keeps the Settings screen as a single long list, as it is in stock Android, but breaks up the categories differently.
Navigating the Tabs
Many of HTC’s custom apps include screens with multiple tabs arranged horizontally. You can navigate among these tabs in three ways:
![]() Swipe left or right. This is usually the quickest way.
Swipe left or right. This is usually the quickest way.
![]() Tap the current tab, and then tap the target tab on the pop-up menu. Figure 15.1 shows an example in the Music app.
Tap the current tab, and then tap the target tab on the pop-up menu. Figure 15.1 shows an example in the Music app.
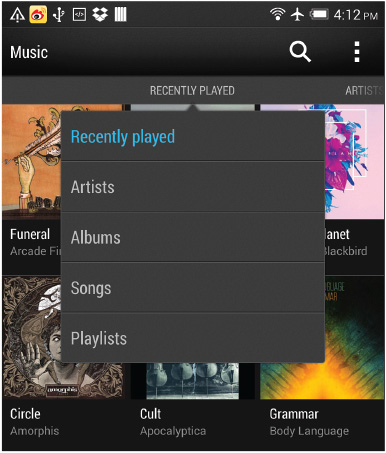
FIGURE 15.1 In tabbed apps such as the Music app, you can navigate among tabs by swiping left or right, by tapping the current tab and then tapping the target tab on the pop-up menu, or by tapping another tab’s name.
![]() Tap the target tab. Only two or three tab buttons appear at a time, so this means of switching tabs is often less convenient than the others.
Tap the target tab. Only two or three tab buttons appear at a time, so this means of switching tabs is often less convenient than the others.
![]() Tip
Tip
You can control which tabs appear and in which order by tapping the Menu button and tapping Edit Tabs. On the screen that appears, uncheck the box for any tab you want to remove; then tap the handles on the right side and drag the tabs into your preferred order. Some apps have tabs that you cannot hide, such as the Phone tab and the People tab in the Phone app.
Getting to Grips with the Three-Finger Gestures
HTC Sense supports most of the gestures you can use in stock Android, such as the tap-and-hold gesture, the double-tap gesture, the pinch-inward gesture and the pinch-outward gesture, and so on. But HTC Sense also enables you to use two three-finger gestures:
![]() Three-finger swipe. Swipe up the screen with three fingers to display the Choose a Device bar for selecting a device on which to play your music or display your photos or videos. When you’re done with the device, swipe down the screen with three fingers to disconnect from the device.
Three-finger swipe. Swipe up the screen with three fingers to display the Choose a Device bar for selecting a device on which to play your music or display your photos or videos. When you’re done with the device, swipe down the screen with three fingers to disconnect from the device.
![]() Three-finger tap. Tap the screen with three fingers in the HTC Car app to activate Voice Command mode.
Three-finger tap. Tap the screen with three fingers in the HTC Car app to activate Voice Command mode.
Navigating and Customizing the Quick Settings Panel
HTC Sense makes substantial changes to the Quick Settings panel (see Figure 15.2). You open the Quick Settings panel by either tapping the Quick Settings button at the upper-right corner of the Notifications panel or by dragging down or swiping down with two fingers from the top of the screen.

FIGURE 15.2 In HTC Sense, you use the buttons on the Quick Settings panel to turn features on or off. You tap the individual Menu buttons to access the Settings screens.
Each button in the Quick Settings panel is for turning the feature on or off or for quickly adjusting its settings. For example, you tap the Wi-Fi button to turn Wi-Fi on or off, and you tap the Brightness button to cycle among the preset brightness levels.
As you can see in Figure 15.2, many of the buttons have a small Menu button in the lower-right corner. You tap this Menu button to display the screen for the feature in the Settings app. For example, tapping the Menu button on the Bluetooth button on the Quick Settings panel displays the Bluetooth screen in the Settings app.
To make the Quick Settings panel easy to use, customize the panel by tapping the Edit button and then working on the Quick Settings screen (see Figure 15.3):
![]() Move an item to a different position. Tap the item’s handle and drag the item up or down the list.
Move an item to a different position. Tap the item’s handle and drag the item up or down the list.
![]() Hide an item. Tap the item’s handle and drag the item to the Hidden Items section of the list.
Hide an item. Tap the item’s handle and drag the item to the Hidden Items section of the list.
![]() Display a hidden item. Tap the item’s handle and drag the item from the Hidden Items section of the list to the upper section.
Display a hidden item. Tap the item’s handle and drag the item from the Hidden Items section of the list to the upper section.
![]() Stop editing. Tap the Done button.
Stop editing. Tap the Done button.
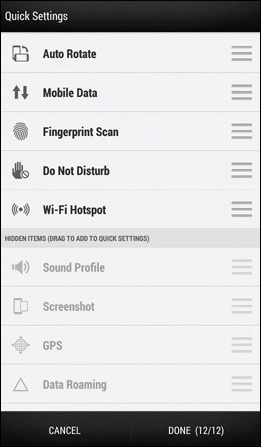
FIGURE 15.3 You can edit the contents of the Quick Settings panel by dragging items to different positions or to the Hidden Items section.
Setting Up the Lock Screen on Your HTC Phone
If you don’t apply a means of screen security, you simply swipe upward on the lock screen to unlock your phone.
HTC Sense offers four standard means of unlocking—Face Unlock, Pattern, PIN, and Password—plus fingerprint unlocking on some models. You can apply a means of unlocking by opening the Settings app, tapping the Security button, and then tapping the Screen Lock button.
When you first set up a means of screen security, HTC Sense displays the Lock Screen Previews dialog box (see Figure 15.4), prompting you to hide message previews and missed call previews from your lock screen. Tap the OK button if you want to implement this security measure; tap the Cancel button if you don’t mind the possibility of other people seeing this information.
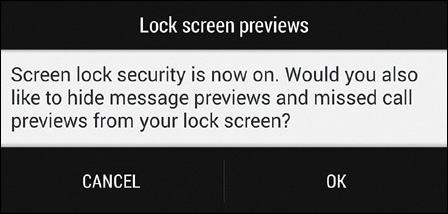
FIGURE 15.4 HTC Sense enables you to hide message previews and missed call previews from your lock screen.
This prompt is handy, but if you want to configure the lock screen exactly the way you want it, tap the Notification Settings button in the Lock Screen section of the Security screen. The Notification screen appears (see Figure 15.5), and you can check or uncheck the five boxes—Phone, Voice Mail, Text Messages, Emails, and Calendar—to control what notifications the lock screen shows and what it suppresses.
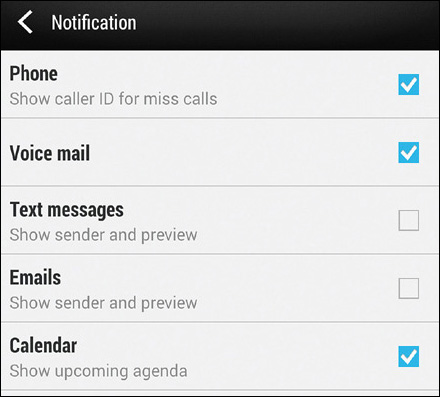
FIGURE 15.5 On the Notification screen, choose which notifications you want the lock screen to show.
![]() Tip
Tip
To tighten up security on your HTC phone, you can make it display the Security screen on waking rather than displaying the lock screen. To do this, check the Bypass Lock Screen on Wake box on the Security screen in the Settings app.
If you want to be able to control your music from the lock screen, check the Music Playback box in the Lock Screen section of the Security screen. Displaying the music controls on the lock screen is usually helpful.
![]() Tip
Tip
If you’re brave enough to let your child use your HTC phone, you can use Kid Mode to limit the damage that the little darling can wreak. Kid Mode creates a virtual sandbox that enables your child to play her favorite games without being able to access any of your data. To get started, put a bombproof case on your pride and joy, and then tap the Kid Mode icon on the Apps screen.
Making the Most of the Home Screen
In HTC Sense, the Home screen consists of a series of panels among which you can swipe horizontally. As you swipe, a narrow bar appears momentarily at the bottom of the screen with a blue line to indicate which of the Home screens you’re currently on.
In HTC Sense, the Home screen includes HTC BlinkFeed, a feature that displays tiles containing the latest information from the social networks and news sources you choose. Figure 15.6 shows BlinkFeed.
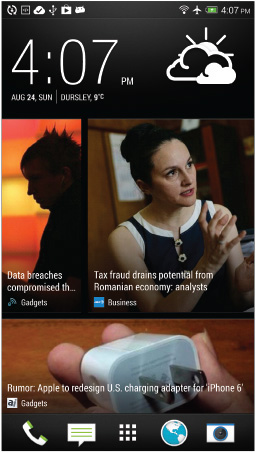
FIGURE 15.6 HTC BlinkFeed displays a customizable selection of feeds from news sources and social networks.
![]() Tip
Tip
To update HTC BlinkFeed with the latest information, tap the screen, pull down a short way for a moment, and then release it.
As you’d imagine, you tap a tile in HTC BlinkFeed to display the full story or topic. On the resulting screen, you can either read the topic—the straightforward approach—or tap the Read Later button to add it to your reading list.
![]() Tip
Tip
After you use the Read Later command to add items to your reading list, the Reading List button appears near the top of the slideout menu in HTC BlinkFeed. Tap this button to display the Reading List screen, and then tap the item you want to read.
At the bottom of the Home screen is the launch bar, which contains shortcuts to your key apps.
Customizing HTC BlinkFeed
To make the HTC BlinkFeed feature useful to yourself, you’ll want to customize it. HTC BlinkFeed can display a wide range of different information, ranging from the hottest stories to stories that focus tightly on your interests.
![]() Tip
Tip
If you don’t want to use HTC BlinkFeed, tap and hold on one of the regular Home screens (not the HTC BlinkFeed screen) until it switches to Customization mode. You can then tap the BlinkFeed On button in the upper-left corner to turn off BlinkFeed. Tap the resulting BlinkFeed Off button if you want to turn HTC BlinkFeed back on later.
Removing an Item from HTC Blinkfeed
To remove an item from HTC BlinkFeed, tap and hold the item until the Actions dialog box opens, and then tap the Remove button.
Adding an Item to HTC Blinkfeed
Here’s how to add an item to HTC BlinkFeed:
1. In HTC BlinkFeed, swipe right to display the slideout menu.
2. Tap the + button to display the Topics & Services screen (see Figure 15.7).
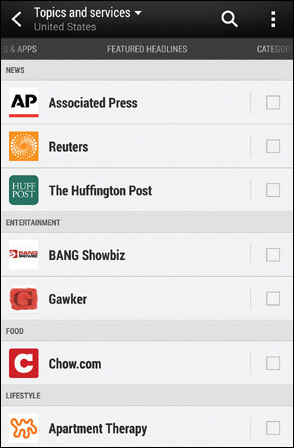
FIGURE 15.7 On the Topics & Services screen, check the box for each item you want to add to HTC BlinkFeed.
![]() Note
Note
If a screen appears showing the Connect with Facebook button and the I’ll Select Interests on My Own button, tap the appropriate button. The Topics & Services screen then appears.
![]() Tip
Tip
For some services, you can choose which regional edition to get. Tap the pop-up menu button at the top of the screen, and then tap the locale or region you want.
3. Swipe left or right, or tap the tabs at the top of the screen, to display the tab you want. The tabs are Services & Apps, Featured Headlines, Categories, and Custom Topics.
4. If the item you want has a check box, check the box to add that item. If the item has no check box, it’s a category of items, so you can tap the button to display a screen showing the items. You can then check the box for each item you want.
5. Tap the Home button to go back to the Home screen. HTC BlinkFeed updates to show the items you selected.
You can quickly post to your social networks from HTC BlinkFeed. Swipe right to display the slideout menu, tap the Menu button, and then tap Compose to display the Post To dialog box. Tap the social network to which you want to post, compose your post using the usual techniques, and then tap the Post button.
Customizing Your Highlights Topics
The Highlights feed in HTC BlinkFeed displays the latest status updates and the top trending articles from your feed sources. You can customize the Highlights feed to show only those items from particular sources.
In HTC BlinkFeed, open the slideout menu by swiping right; then tap the Menu button and tap Settings to display the Settings screen. Tap the Choose Highlights Topics button to display the Choose Highlights Topics screen, and then uncheck the boxes for any topics you don’t want to see in the Highlights feed. (All the boxes are checked by default.)
Putting What You Need on Your Home Screens
You can quickly customize your Home screens with the items you find most useful. Tap an open space on one of the Home screens to pop up the customization screen (see Figure 15.8).
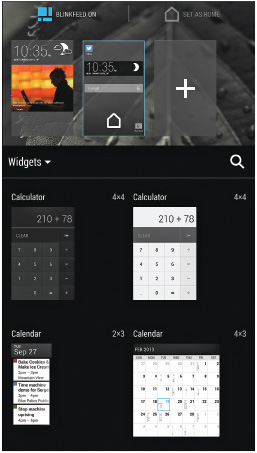
FIGURE 15.8 You can quickly customize your Home screens with the widgets, apps, and shortcuts you need.
From here, you can customize the Home screens like this:
![]() Add a Home screen. Tap the + sign at the right end of the Home screen thumbnails at the top.
Add a Home screen. Tap the + sign at the right end of the Home screen thumbnails at the top.
![]() Remove a Home screen. Tap and hold the Home screen’s thumbnail, and then drag it to the Remove button that appears at the top of the screen.
Remove a Home screen. Tap and hold the Home screen’s thumbnail, and then drag it to the Remove button that appears at the top of the screen.
![]() Reorder the Home screens. Tap and hold the thumbnail of the Home screen you want to move, and then drag it to where you want it.
Reorder the Home screens. Tap and hold the thumbnail of the Home screen you want to move, and then drag it to where you want it.
![]() Change your main Home screen. Tap the Home screen that you want to have appear first, and then tap the Set as Home button.
Change your main Home screen. Tap the Home screen that you want to have appear first, and then tap the Set as Home button.
![]() Tip
Tip
The house symbol appears on the thumbnail for the main Home screen.
![]() Turn BlinkFeed off. Tap the BlinkFeed On button.
Turn BlinkFeed off. Tap the BlinkFeed On button.
![]() Add a widget, app, or shortcut. Select Widgets, Apps, or Shortcuts in the pop-up menu, and then scroll the list of those items to the one you want. Tap and hold the item, and then drag it to the appropriate Home screen thumbnail.
Add a widget, app, or shortcut. Select Widgets, Apps, or Shortcuts in the pop-up menu, and then scroll the list of those items to the one you want. Tap and hold the item, and then drag it to the appropriate Home screen thumbnail.
When you finish customizing the Home screens, tap either the Back button or the Home button.
Getting More Out of the Status Bar
The right end of the status bar displays the current time in your chosen format. To display the day and date, tap and hold the status bar for a moment; lift your finger when you’re done.
If you need to manage your battery power closely, add the battery level readout (for example, 84%) to the status bar for quick reference. To do so, open the Settings app, tap the Power button in the Phone section, and then check the Show Battery Level box.
![]() Caution
Caution
Some HTC phones include an option called Fast Boot, which you can enable or disable by checking or unchecking the Fast Boot box on the Power screen in the Settings app. As its name suggests, this option makes the phone shut down and start up more quickly—so it seems like a good thing.
The only problem—and it’s a doozy—is that the Fast Boot option prevents you from performing a factory reset on your phone if you run into trouble. If your phone is still working well enough for you to open the Settings app, you can simply disable the Fast Boot option. But if you forget your password, you will not be able to perform a factory reset to recover your device.
If you use the Fast Boot option, be sure to activate your phone on the Android Device Manager website (www.google.com/android/devicemanager). After you’ve done this, you can use the website to reset your phone in this situation. (Otherwise, you will need to have HTC reset it for you.) If you don’t want to do this, turn off the Fast Boot option.
Navigating the Apps Screen
As usual, you tap the Apps button on the Home screen to display the Apps screen. The launcher bar remains visible at the bottom of the screen, but the middle button changes from the Apps button to a Home button that you can press to return to the Home screen.
To make the Apps screen easier to navigate, you can sort it the way you prefer, hide apps you don’t want to see, and change the grid size.
Sorting the Apps Your Way
To sort the list of apps, display the Apps screen and pull down a little way at the top. A toolbar appears containing the Sort pop-up menu, the Search icon, the Play Store shortcut, and the Menu button.
Tap the Sort pop-up menu, and then tap the sort type you want:
![]() Alphabetical. This straightforward sort at least makes it easy to find your apps by name.
Alphabetical. This straightforward sort at least makes it easy to find your apps by name.
![]() Most Recent. This sort makes Android put the apps you’ve used most recently at the top of the list, where they should be easier to locate. The Most Recent sort works well if you usually run the same apps, but if you run many apps, you may find the most recent ones aren’t the ones you want.
Most Recent. This sort makes Android put the apps you’ve used most recently at the top of the list, where they should be easier to locate. The Most Recent sort works well if you usually run the same apps, but if you run many apps, you may find the most recent ones aren’t the ones you want.
![]() Custom. This sort enables you to drag the app icons into the order you find most useful. After choosing Custom, tap and hold an icon until the screen shrinks (see Figure 15.9). You can then drag the icon to where you want it.
Custom. This sort enables you to drag the app icons into the order you find most useful. After choosing Custom, tap and hold an icon until the screen shrinks (see Figure 15.9). You can then drag the icon to where you want it.
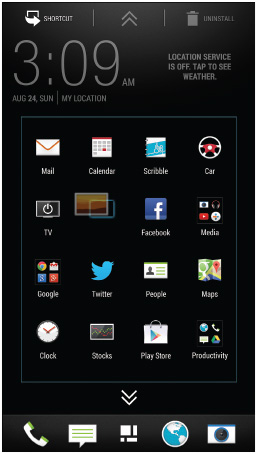
FIGURE 15.9 If you select Custom in the Sort pop-up menu, you can tap and drag the app icons to exactly where you want them on the Apps screen.
![]() Tip
Tip
You can drag the icon to the upward-caret icon at the top to go up a screen’s worth of apps or to the downward-caret icon at the bottom to go down a screen’s worth.
You can quickly create an app shortcut on the Home screen. Tap and hold the app’s icon on the App screen, and then drag it to the Shortcut icon that appears in the upper-left corner of the screen.
Hiding the Apps You Don’t Want to See
By default, the Apps screen displays an icon for each app you install on your device. This feature is handy because it enables you to launch the apps easily. But if you’ve installed some apps you don’t want to see on your Apps screen, you can hide them; when you want them back again, you can unhide them.
Here’s how to hide and unhide apps:
1. On the Apps screen, pull down a little way from the top to display the toolbar.
2. Tap the Menu button and then tap Hide/Unhide Apps. A check box appears on the lower-right corner of each app’s icon.
3. Check the box for each app you want to hide.
4. Tap the Done button. The apps that you hid disappear.
![]() Tip
Tip
The Manage Apps item on the Apps screen’s menu displays the Apps screen in the Settings app. Here, you can view the lists of your downloaded apps, apps on the SD card (if your device has a card), running apps, or all apps; and you can tap an app’s button to display the App Info screen for that app.
Changing the Grid Size
If you want more apps or fewer apps on the Apps screen at the same time, try changing the grid size. Follow these steps:
1. On the Apps screen, pull down a little way from the top to display the toolbar.
2. Tap the Menu button and then tap Grid Size to display the Grid Size dialog box.
3. Tap the 3×4 radio button or the 4×5 radio button, as needed.
Phoning and Gesticulating
HTC Sense includes a custom Phone app that makes placing and taking calls easy. You can also answer calls—or decline them—using gestures.
Getting Around the Phone App’s Five Tabs
The Phone app displays five tabs, among which you can navigate by swiping left or right, using the pop-up panel from the current tab, or tapping another tab:
![]() Call History. This tab displays the calls you’ve received. You can tap the menu on the left side of the toolbar and then tap the filter you want: All Calls, Incoming Calls, Outgoing Calls, Missed Calls, or Recent Calls.
Call History. This tab displays the calls you’ve received. You can tap the menu on the left side of the toolbar and then tap the filter you want: All Calls, Incoming Calls, Outgoing Calls, Missed Calls, or Recent Calls.
![]() Tip
Tip
You can delete some or all calls from your call history by displaying the Call History tab, tapping the Menu button, and then tapping Delete Call History. On the Delete from Call History screen, check the box for each item you want to delete, and then tap the Delete button.
![]() Phone. This tab displays your last caller at the top, in case you need to call that person back, plus a keypad for dialing numbers. When you start dialing a phone number, the app displays matches from your contacts (see Figure 15.10). You can then tap the contact to complete dialing, tap the contact-card icon to display other means of getting in tap with the contact, tap the Matches button to display other contacts with matching numbers, or simply keep dialing.
Phone. This tab displays your last caller at the top, in case you need to call that person back, plus a keypad for dialing numbers. When you start dialing a phone number, the app displays matches from your contacts (see Figure 15.10). You can then tap the contact to complete dialing, tap the contact-card icon to display other means of getting in tap with the contact, tap the Matches button to display other contacts with matching numbers, or simply keep dialing.
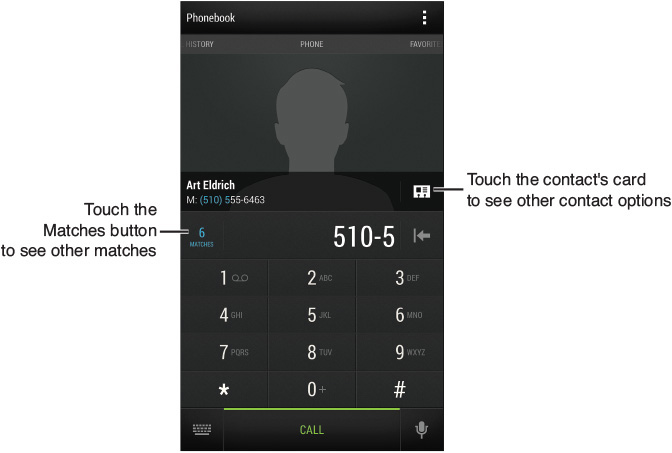
FIGURE 15.10 When dialing a number, you can dial the contact shown, open the contact’s card, or tap the Matches button to see other matches.
![]() Favorites. This tab contains the contacts you have designated Favorites by adding them to the Favorites group.
Favorites. This tab contains the contacts you have designated Favorites by adding them to the Favorites group.
![]() Tip
Tip
Favorites are handy, but for anybody you call all the time, create a Speed Dial entry. Open the contact record, tap the Menu button, and then tap Set Speed Dial. On the Speed Dial screen, tap the Number button and choose the number, and then tap the Location button and tap the speed-dial number in the Select Location dialog box. Tap the Save button to save the change. You can then call that phone number by tapping and holding the assigned number on the keypad on the Phone screen.
![]() People. This tab displays a list showing your contacts from the People app. You can narrow down the list by tapping the pop-up button in the upper-left corner and then using the resulting pop-up panel to specify which accounts and groups to include.
People. This tab displays a list showing your contacts from the People app. You can narrow down the list by tapping the pop-up button in the upper-left corner and then using the resulting pop-up panel to specify which accounts and groups to include.
![]() Groups. This tab displays a list showing your groups from the People app. You can open a group for viewing or tap the Menu button and then tap Edit Groups to edit the list of groups.
Groups. This tab displays a list showing your groups from the People app. You can open a group for viewing or tap the Menu button and then tap Edit Groups to edit the list of groups.
Using Gestures When Your Phone Rings
HTC Sense enables you to use gestures to answer your phone when it rings:
![]() Answer the call. Lift the phone, look at the screen to see who is calling, and then move the phone to your ear.
Answer the call. Lift the phone, look at the screen to see who is calling, and then move the phone to your ear.
![]() Lower the ringing volume. When the phone rings, pick it up to reduce the ringing volume. If this doesn’t work, open the Settings app, tap the Sound button to display the Sound screen, and then check the Quiet Ring on Pickup box.
Lower the ringing volume. When the phone rings, pick it up to reduce the ringing volume. If this doesn’t work, open the Settings app, tap the Sound button to display the Sound screen, and then check the Quiet Ring on Pickup box.
While you’re on the Sound screen in Settings, check the Pocket Mode box if you want your phone to ring more loudly when it’s in your pocket or in a bag. (The phone rings more loudly for an incoming call any time the sensors detect the phone is surrounded.)
![]() Mute the call. Turn your phone facedown. This move works best if your phone is lying faceup on a flat surface, but you can also use it when holding your phone if you don’t mind having the back of the phone face you for a while.
Mute the call. Turn your phone facedown. This move works best if your phone is lying faceup on a flat surface, but you can also use it when holding your phone if you don’t mind having the back of the phone face you for a while.
Enjoying Music with the Sense Music App
HTC Sense includes a custom Music app that has a swipe-based user interface and strong playback features. Tap the Music icon on the Apps screen to launch the Music app. You can then navigate among the five tabs by swiping left or right, using the pop-up menu from the current tab, or tapping another tab’s name, as usual.
The following five tabs appear at the top level of the Music app:
![]() Recently Played. This tab (see Figure 15.11) displays albums you’ve played recently and ones you’ve added recently.
Recently Played. This tab (see Figure 15.11) displays albums you’ve played recently and ones you’ve added recently.

FIGURE 15.11 The Music app has five tabs, including the Recently Played tab and the Artists tab, at the top level.
![]() Artists. This tab displays an alphabetical list of artists.
Artists. This tab displays an alphabetical list of artists.
![]() Tip
Tip
You can get the latest artist photos available for your artists from the Gracenote music database service by tapping the Menu button and then tapping Update Artist Photos.
![]() Albums. This tab displays a grid showing the covers of the albums from which the songs on your device come. You can sort the albums either by the album name or the artist name. To change the sort, tap the Menu button and then tap Sort by Artist Name or Sort by Album Name. (These commands replace each other, so only one of them appears on the menu at any time.)
Albums. This tab displays a grid showing the covers of the albums from which the songs on your device come. You can sort the albums either by the album name or the artist name. To change the sort, tap the Menu button and then tap Sort by Artist Name or Sort by Album Name. (These commands replace each other, so only one of them appears on the menu at any time.)
![]() Songs. This tab displays an alphabetical list of the songs on your device.
Songs. This tab displays an alphabetical list of the songs on your device.
![]() Tip
Tip
You can easily share a song from the Music app. Tap the song’s Menu button and then tap Share to display the Share dialog box, which shows the song’s name in its title bar. You can then tap the Share Music Info button to share the song’s details via Facebook, Twitter, Gmail, or other means; or tap the Share File button to share the song file via means such as Bluetooth, Dropbox, Google Drive, Messages, or Gmail.
![]() Playlists. This tab displays a grid of your playlists, including the Recently Played smart playlist and the Recently Added smart playlist that the Music app automatically provides for you.
Playlists. This tab displays a grid of your playlists, including the Recently Played smart playlist and the Recently Added smart playlist that the Music app automatically provides for you.
Each item has its own menu button that you can tap to display a dialog box of actions for the item. For example, the dialog box for a song includes actions such as Add to Playlist and Add to Queue.
Creating Ringtones Easily from Your Songs
The HTC Music app makes it easy to use a song as a ringtone or to create a ringtone from a song. Navigate to the song you want to use, tap its Menu button to display the Actions dialog box, and then tap Set as Ringtone. In the Set as Ringtone dialog box, you can tap the Phone Ringtone button to use the song as your default phone ringtone, tap the Contact Ringtone button to use it as the ringtone for a particular contact, or tap the Trim the Ringtone button to display the Ringtone Trimmer screen.
After selecting the appropriate part of the song on the Ringtone Trimmer screen, tap the Set As button to display a smaller version of the Set as Ringtone dialog box. You can then tap the Phone Ringtone button or the Contact Ringtone button, as needed.
![]() Tip
Tip
If you already use Google Play Music, go to the Apps section of the Play Store and install the Play Music app on your HTC phone. You can then play the music you have stored online as well as the music on your phone.
Using the Camera’s Extra Features
HTC Sense includes a heavily customized Camera app that offers you a wide variety of features and settings. This section covers the camera’s essentials, the configuration options for a typical HTC phone, and the two headline features: dual capture mode and HTC Zoe.
![]() Note
Note
Many HTC phones include the camera technology that HTC has branded as UltraPixel. Unlike most camera technologies, which have sought to increase the pixel count to improve image quality, UltraPixel uses fewer pixels to get a better picture. HTC claims that because the pixels on UltraPixel sensors are larger, they can capture more photons while the camera’s shutter is open, thus giving better results in low light.
UltraPixel shots look great on a phone’s screen and look pretty good on larger screens. But because the pixel count is substantially lower than that of most directly competing cameras, photo quality deteriorates rapidly if you enlarge the photos a lot or if you crop them. So when you’re using an UltraPixel camera, it is even more important than usual to compose your photos tightly so that they need only minimal cropping. For distant subjects, sticking or clipping a telephoto lens on your HTC phone gives better results than using digital zoom.
Shooting with the Camera App
You can quickly get going with the Camera app: Just tap the Camera icon on the Home screen, and your phone displays the Viewfinder screen showing what the rear camera is seeing (see Figure 15.12). You can then tap the Take Photo button to take a photo or the Take Video button to take a video. Alternatively, tap the Filters button to apply a filter to the preview in the Viewfinder before you take a photo or a video.

FIGURE 15.12 The HTC Camera app gives you instant access to the Zoe feature, to the flash, and to the filters. You can start taking either a photo or video by tapping a button.
![]() Note
Note
On many HTC phones, you can tap and hold the Take Photo button to take a burst of photos.
On the lock screen, slide up the Camera icon to go straight to the Camera app without unlocking your phone.
Tap the Flash button to cycle among the three settings—Auto, On, and Off—as usual. Use the On setting when you need to force the flash to fire to light the foreground against backlighting. Use the Off setting when flash is indiscreet or forbidden. Use the Auto setting the rest of the time.
You can pinch outward to zoom in and pinch inward to zoom out as usual. To quickly switch between the main camera and the front camera, swipe either left or right in the Camera app.
Tap a point on the screen to focus and meter the light there.
![]() Tip
Tip
To lock Automatic Exposure and Auto-Focus at a particular point, tap and hold that point until the “AE and AF locked” readout appears. You can then compose the shot as needed, maintaining the focus and exposure you chose. This capability is great for action shots: Before your kid comes running past you, focus on a point the right distance away, and lock the focus. You’ll then be ready to shoot when she reaches the right point.
![]() Note
Note
After a few minutes of inactivity, the Camera app displays a blank screen and the prompt “Tap the screen to activate the camera.” This lets you get back to shooting more quickly than Android’s standard Camera app, which returns you to the Home screen after a similar period of inactivity.
Configuring the Camera App to Take the Photos You Want
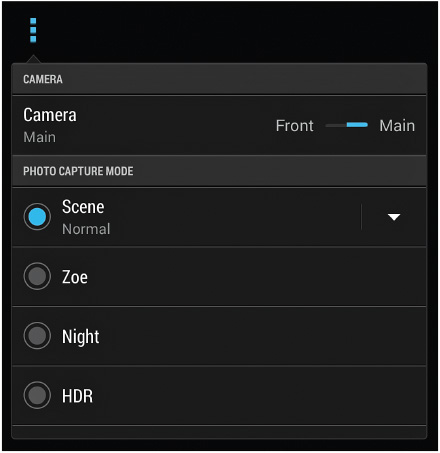
The Camera app has a huge number of settings that you access by tapping the Menu button on the Viewfinder screen and working in the pop-up panel, the top part of which appears in Figure 15.13. Some of these settings are self-explanatory, but others are more complex, so let’s quickly go through them.
Choosing Settings in the Camera Section
The Camera section of the pop-up panel contains the Camera setting, which enables you to switch between the main camera (the rear camera) and the front camera.
Choosing the Photo Capture Mode and Video Capture Mode
To help you shoot good-looking pictures in different lighting conditions, the Camera app provides 11 photo capture modes. There are 4 main modes, one of which has 6 submodes, as explained in the following list:
![]() Scene. Use this mode for shooting regular photos. That means all photos that are not night photos, High Dynamic Range (HDR) photos, or panoramas. Choose the Normal submode for standard photos. Choose the Portrait submode for photos featuring people in which you want to smooth the look of the skin, giving a more flattering look. Choose the Landscape submode for pictures of landscapes and scenery. Choose the Backlight submode when your subject is backlit and you want to avoid the subject being too dark; with this setting, Camera balances the light metering on the assumption the middle of the screen is backlit. Choose the Text submode to maximize the contrast and definition when you are taking a photo of a text document. Choose the Macro submode for close-up shots.
Scene. Use this mode for shooting regular photos. That means all photos that are not night photos, High Dynamic Range (HDR) photos, or panoramas. Choose the Normal submode for standard photos. Choose the Portrait submode for photos featuring people in which you want to smooth the look of the skin, giving a more flattering look. Choose the Landscape submode for pictures of landscapes and scenery. Choose the Backlight submode when your subject is backlit and you want to avoid the subject being too dark; with this setting, Camera balances the light metering on the assumption the middle of the screen is backlit. Choose the Text submode to maximize the contrast and definition when you are taking a photo of a text document. Choose the Macro submode for close-up shots.
![]() Zoe. Use this mode to shoot a series of photos combined with a short video. We’ll look at the Zoe feature later in this chapter.
Zoe. Use this mode to shoot a series of photos combined with a short video. We’ll look at the Zoe feature later in this chapter.
![]() Night. Use this mode for shooting photos in low light.
Night. Use this mode for shooting photos in low light.
![]() Tip
Tip
Use a tripod, monopod, or other means of steadying your phone when using Night mode. This mode slows down the shutter speed and boosts the ISO (the film sensitivity), so it’s doubly important to keep the phone steady while shooting. When you have no means of support, you may be able to take the photo more steadily by using the self-timer than by tapping the Take Photo button.
![]() Sweep Panorama. Use this mode for shooting panorama photos.
Sweep Panorama. Use this mode for shooting panorama photos.
![]() Dual Capture. Use this mode to superimpose a picture from the front camera on the picture from the rear camera. For example, you can enhance (or sully) a beautiful landscape by adding a selfie to it. We’ll look at this feature later in this chapter.
Dual Capture. Use this mode to superimpose a picture from the front camera on the picture from the rear camera. For example, you can enhance (or sully) a beautiful landscape by adding a selfie to it. We’ll look at this feature later in this chapter.
![]() Anti-Shake. Use this mode to enable yourself to get a steady picture in circumstances in which you might otherwise get camera shake, such as when you’re in motion or the light is low.
Anti-Shake. Use this mode to enable yourself to get a steady picture in circumstances in which you might otherwise get camera shake, such as when you’re in motion or the light is low.
![]() HDR. Use this mode when you need to increase the dynamic range of a photo.
HDR. Use this mode when you need to increase the dynamic range of a photo.
![]() Tip
Tip
If you notice the sky looking too white or the rest of the frame too dark when you’re lining up the photo, try switching to HDR. HDR takes multiple exposures and combines them to improve the dynamic range; it’s slower than taking regular photos, so use it for stationary subjects, not for moving subjects.
Similarly, the Camera app provides four submodes of the Scene mode for video:
![]() Normal. Use this mode for standard video shooting.
Normal. Use this mode for standard video shooting.
![]() Slow Motion Video. Use this mode to shoot slow-motion video. The Camera app shoots twice as many frames and then plays them back at normal speed, so the motion lasts twice as long as real time.
Slow Motion Video. Use this mode to shoot slow-motion video. The Camera app shoots twice as many frames and then plays them back at normal speed, so the motion lasts twice as long as real time.
![]() Fast HD (60 fps). Use this mode to shoot video at double-speed to capture movement more accurately without blurring. Fast HD is great for shooting sports, kids, and other mobile subjects.
Fast HD (60 fps). Use this mode to shoot video at double-speed to capture movement more accurately without blurring. Fast HD is great for shooting sports, kids, and other mobile subjects.
Both Slow Motion Video and Fast HD take up twice as much space as regular video, so they can eat through your device’s storage faster than teenagers through pizza.
![]() Video HDR (Full HD). Use this mode to improve the lighting and color balance on videos you’re shooting in tricky light.
Video HDR (Full HD). Use this mode to improve the lighting and color balance on videos you’re shooting in tricky light.
![]() Note
Note
For Video HDR, the Camera app shoots at twice normal speed, varying the exposure for each pair of frames. It then combines each pair of frames into a single frame that should have better lighting and color balance.
Choosing Other Settings
The Settings section of the pop-up panel contains the remaining settings for the Camera app:
![]() Self-Timer. Tap this button and then tap + or – to adjust the number of seconds.
Self-Timer. Tap this button and then tap + or – to adjust the number of seconds.
![]() Crop. Tap this button and then tap the cropping you want: Wide, Regular, or Square.
Crop. Tap this button and then tap the cropping you want: Wide, Regular, or Square.
![]() Video Quality. Tap this button and then tap the video quality you want: Full HD (1920×1080), HD (1280×720), Low (320×240), or MMS (176×44). Normally, you’ll want to use Full HD unless you need to conserve space. The Video Quality options may vary depending on which device you have.
Video Quality. Tap this button and then tap the video quality you want: Full HD (1920×1080), HD (1280×720), Low (320×240), or MMS (176×44). Normally, you’ll want to use Full HD unless you need to conserve space. The Video Quality options may vary depending on which device you have.
![]() Image Adjustments. Tap this button and then tap + or – to adjust the Exposure, Contrast, Saturation, and Sharpness settings.
Image Adjustments. Tap this button and then tap + or – to adjust the Exposure, Contrast, Saturation, and Sharpness settings.
![]() Tip
Tip
Of the four Image Adjustments, the one you’ll need to change most often is Exposure. Increase the exposure if the automatic exposure setting makes the picture look too dark, such as when you have a subject positioned against a bright background. Decrease the exposure if the picture is too light and washed out.
![]() Review Duration. Tap this button and then tap the time period for reviewing the photo you just took. Choose the No Review option if you want to keep shooting and review the shots later. Otherwise, tap 5 Seconds, 10 Seconds, or No Limit.
Review Duration. Tap this button and then tap the time period for reviewing the photo you just took. Choose the No Review option if you want to keep shooting and review the shots later. Otherwise, tap 5 Seconds, 10 Seconds, or No Limit.
![]() ISO. Tap this button and then tap the ISO sensitivity rating you want to use. Your choices are Auto (the best choice unless you need to set the ISO manually), 100, 200, 400, 800, or 1600.
ISO. Tap this button and then tap the ISO sensitivity rating you want to use. Your choices are Auto (the best choice unless you need to set the ISO manually), 100, 200, 400, 800, or 1600.
![]() Note
Note
ISO controls how much light the camera’s sensor captures while the shutter is open for a particular time. Setting a high ISO value (such as 800 or 1600) enables the camera to capture more light, but it also means you’re likely to get more noise (wrongly colored dots) in the photo.
![]() Tip
Tip
If your camera has a MAX ISO setting, use it to set the maximum ISO value you want the Camera app to be able to use. Some HTC cameras aggressively push the ISO setting higher than usual to get better photos in low light. The flipside of this is that shots with strong lighting may become overexposed. By setting MAX ISO to a sensible limit, such as 400, you can prevent the Camera app from running hog-wild with the ISO value and wrecking your photos.
![]() Storage. Tap this button and then tap the SD Card radio button or the Phone Storage radio button, as needed.
Storage. Tap this button and then tap the SD Card radio button or the Phone Storage radio button, as needed.
![]() Continuous Shooting. Tap this button and then check or uncheck the Continuous Shooting box, the Limit to 20 Frames box, and the Auto Review box, as needed.
Continuous Shooting. Tap this button and then check or uncheck the Continuous Shooting box, the Limit to 20 Frames box, and the Auto Review box, as needed.
![]() Camera Options. Tap this button to display the Auto Smile Capture check box and the Geo-Tag Photos check box. Check the Auto Smile Capture box if you want the Camera app to automatically capture a photo when you line up the onscreen aiming box on a smiling face. This feature seems odd, but it often works well. Check the Geo-Tag Photos box to have the Camera app automatically add GPS location data to each photo it takes.
Camera Options. Tap this button to display the Auto Smile Capture check box and the Geo-Tag Photos check box. Check the Auto Smile Capture box if you want the Camera app to automatically capture a photo when you line up the onscreen aiming box on a smiling face. This feature seems odd, but it often works well. Check the Geo-Tag Photos box to have the Camera app automatically add GPS location data to each photo it takes.
The GPS location data can be helpful if you want to be able to sort your photos by locations or see exactly where each photo was taken. But if you share your photos with others, the location data may be a threat to your privacy.
![]() Note
Note
Auto Smile Capture works only for the rear camera. When you have switched to the front camera, the Camera Options section contains the Save Mirror Image check box instead of the Auto Smile Capture check box. Check this box to have the Camera app the mirror image of what it sees—so that in the photo you look the way you do in a normal mirror—instead of the real image.
![]() Shutter Option. Tap this button to display the Tap to Capture check box and the Shutter Sound check box. The Tap to Capture check box controls whether you can take a photo by tapping the screen rather than tapping the shutter button. The Shutter Sound check box controls whether the Camera app plays a shutter sound when you take a picture. Uncheck this box if you need to take photos discreetly.
Shutter Option. Tap this button to display the Tap to Capture check box and the Shutter Sound check box. The Tap to Capture check box controls whether you can take a photo by tapping the screen rather than tapping the shutter button. The Shutter Sound check box controls whether the Camera app plays a shutter sound when you take a picture. Uncheck this box if you need to take photos discreetly.
![]() Lock Focus in Video. Check this box to turn on continuous auto-focus for those times when you are taking a video. Using this feature can reduce blurring at the cost of some battery power.
Lock Focus in Video. Check this box to turn on continuous auto-focus for those times when you are taking a video. Using this feature can reduce blurring at the cost of some battery power.
![]() White Balance. Tap this button and then tap the white balance setting to use: Auto (best for general use), Incandescent (old-style electric bulbs), Fluorescent, Daylight (for bright daylight, such as sunny conditions), or Cloudy.
White Balance. Tap this button and then tap the white balance setting to use: Auto (best for general use), Incandescent (old-style electric bulbs), Fluorescent, Daylight (for bright daylight, such as sunny conditions), or Cloudy.
![]() Tip
Tip
The Auto setting for White Balance usually works well, but you may need to override it when shooting in situations with mixed lighting. For example, if you’re shooting indoors with both fluorescent and incandescent light, you may need to select the White Balance manually.
![]() Grid. Check this box to display the grid, which can help you compose your shots and videos.
Grid. Check this box to display the grid, which can help you compose your shots and videos.
![]() Auto-Upload. If you want to upload your photos automatically to the Internet, tap this button, and set the Auto-Upload switch to On. Tap the Select a Service button and select the account to which you want to upload the photos (for example, your Flickr account). Tap the Frequency button to display the Upload Frequency dialog box and then tap the Immediately radio button, the Daily radio button, or the Wi-Fi Only radio button, as needed.
Auto-Upload. If you want to upload your photos automatically to the Internet, tap this button, and set the Auto-Upload switch to On. Tap the Select a Service button and select the account to which you want to upload the photos (for example, your Flickr account). Tap the Frequency button to display the Upload Frequency dialog box and then tap the Immediately radio button, the Daily radio button, or the Wi-Fi Only radio button, as needed.
![]() Caution
Caution
Unless you take photos with extreme care and consideration, don’t use the Auto-Upload feature. Normally, it is better to take photos freely, review them on your device, delete the duds, and then upload only the best of the rest.
![]() Reset to Default. Tap this button to reset all the Camera settings to their defaults. Doing this can be useful if you have been experimenting with the settings and have messed up something, but can’t identify what. Tap Yes in the Reset to Default dialog box that opens.
Reset to Default. Tap this button to reset all the Camera settings to their defaults. Doing this can be useful if you have been experimenting with the settings and have messed up something, but can’t identify what. Tap Yes in the Reset to Default dialog box that opens.
Shooting Both Ways with Dual Capture Mode
When you want to add yourself to a screen, tap the Menu button and then tap the Dual Capture radio button in the Photo Capture Mode section of the pop-up panel. The feed from the front camera appears in a small window in front of the feed from the rear camera. You can drag the window to where you want it on the main picture; you can also pinch outward to expand it a little.
When you have lined up the shot you want, tap the Take Photo button or the Take Video button as usual.
Bringing Scenes to Life with HTC Zoe
The HTC Zoe feature gives you an easy way to capture a series of photos and save them as a video clip including the ambient sound. Tap the Zoe icon at the top of the Viewfinder screen to turn on Zoe mode; the icon goes blue to indicate that Zoe is on. You can then line up your shot and tap the Take Photo button to start the capture.
As your phone captures the Zoe clip, a red progress indicator gradually runs across the Take Photo button. When it finishes, you can tap the thumbnail to display the Zoe clip, which plays automatically.
Tap the blue Zoe icon at the top of the Viewfinder screen when you’re ready to turn off the HTC Zoe feature again.