16. Using the GoPro Studio Software
In this chapter, you are introduced to the free GoPro Studio software, which is powerful video editing software for the PC and Mac. Topics include the following:
![]() Getting an overview of the GoPro Studio software’s key features and functions, and discovering why this software is the perfect companion for GoPro cameras
Getting an overview of the GoPro Studio software’s key features and functions, and discovering why this software is the perfect companion for GoPro cameras
![]() Discovering how to import content from your camera into the software for editing
Discovering how to import content from your camera into the software for editing
![]() Using video export options offered by the GoPro Studio software
Using video export options offered by the GoPro Studio software
![]() Gaining an overview of other video editing computer software packages and mobile apps
Gaining an overview of other video editing computer software packages and mobile apps
Although you can use GoPro cameras for shooting HD video, after you shoot the video, it needs to be edited prior to being presented to your intended audiences. Although many easy-to-use and versatile video editing software applications are available for PCs and Macs, the GoPro-developed GoPro Studio software is designed specifically for editing video shot using the GoPro cameras.
As a result, this free software, which you can download from GoPro’s website (www.GoPro.com), offers many editing and video enhancement tools that you will not find in most other video editing software or mobile apps.
For example, using GoPro Studio, you can import raw (unedited) video footage shot at different resolutions, Frames Per Second rates, and with varying Fields of View and edit them together into one seamless video presentation. You can also reduce or remove the unwanted fisheye effect that may appear in your raw video footage. At the same time, you can utilize many common video editing and enhancement tools that are built into GoPro Studio.
Without investing a tremendous amount of time editing your videos, you can achieve professional quality results, which can include adding visual special effects, smooth scene transitions, titles, captions, background music, sound effects, voiceovers, and other post production elements into your video projects.
Directly from the GoPro Studio software, you can export and save your video in a variety of industry-standard video file formats.
Just like digital photography and videography, editing video is both a skill and an art form. In this case, the skill involves learning how to effectively use the video editing tools at your disposal and becoming proficient using your video editing software.
The art form aspect of video editing relates to all the creative decisions you need to make during the editing process. For example, the raw footage you decide to use, the music you include, your use of special effects and animated scene transitions, and what wording you use within your titles are all creative decisions that directly impact the story your video project tells or the message it conveys to your audience.
Understanding the Video Editor’s Role
Learning to become an amateur video editor is an entirely different skillset than being a videographer. Your goal as the video editor is to analyze the raw (unedited) video that’s been shot using the GoPro camera, and then choose the best shots and scenes to include in the final video presentation.
Your responsibilities include creatively piecing the best of the raw content together into a presentation that appeals to the intended audience. A good videographer always shoots plenty of extra raw video footage so that the video editor has as much content as possible to work with.
As the video editor, you may start with several hours’ worth of raw video footage but then need to select only the best content to showcase within your much shorter video presentation (which may be only 3 to 5 minutes, for example).
During the video editing process, you need to utilize the video editing software’s tools to seamlessly blend various shots and scenes together so that they tell a coherent story in the least amount of time possible. Most videos on YouTube, for example, are between 3 and 5 minutes in length and are seldom longer than 10 minutes, due to the short attention span of viewers.
When necessary, as the video editor, you also need to choose the best visual special effects, animated scene transitions, frame/image enhancements, and audio (music, sound effects, prerecorded audio, and voiceovers) to enhance the professional quality of your project.
Learning to effectively and efficiently use a powerful video editing software application or mobile app takes time, dedication, and practice. This chapter offers you an overview of what’s possible using the GoPro Studio software on your PC or Mac, as well as an introduction to several other computer software and mobile app options for editing raw video shot using your GoPro camera.
Getting Started
Regardless of which video editing software you use, when you finish filming your video, break down your post production efforts into several key steps. All creative decisions you make from this point forward should be based on what you believe will appeal to your intended target audience, and how you can effectively capture and hold their attention as your video entertains, informs, or achieves its ultimate goal.
These key video editing steps include
• Transferring the raw video content from your GoPro camera’s memory card into your video editing software
• Gathering other production elements to include within your video project, such as digital photos, sound effects, and music tracks
• Storyboarding your video project, and deciding which shots or scenes to edit together and in what order; done in your head or actually drawn out on paper using a storyboard format
• Using the video editing software to trim or edit each video scene, shot, or clip, and then placing that content into your video project
• Adding special effects or visual enhancements to the video footage as needed
• Incorporating visually interesting shot or scene transitions to help your video flow smoothly
• Editing or enhancing the video’s audio, and deciding when and where to include sound effects, appropriate background music, and voiceover narration
• Creating and inserting text-based titles and captions into your video
• Previewing the edited video, and making any final editing decisions to make the project appeal even more to its intended audience
• Saving the edited video, and exporting it into an appropriate file format and resolution, based on how it will be utilized, distributed, or presented
Download GoPro Studio
If you use the GoPro Studio software as your primary video editing tool, begin by downloading the latest version of the software to your PC or Mac. To do this, follow these steps:
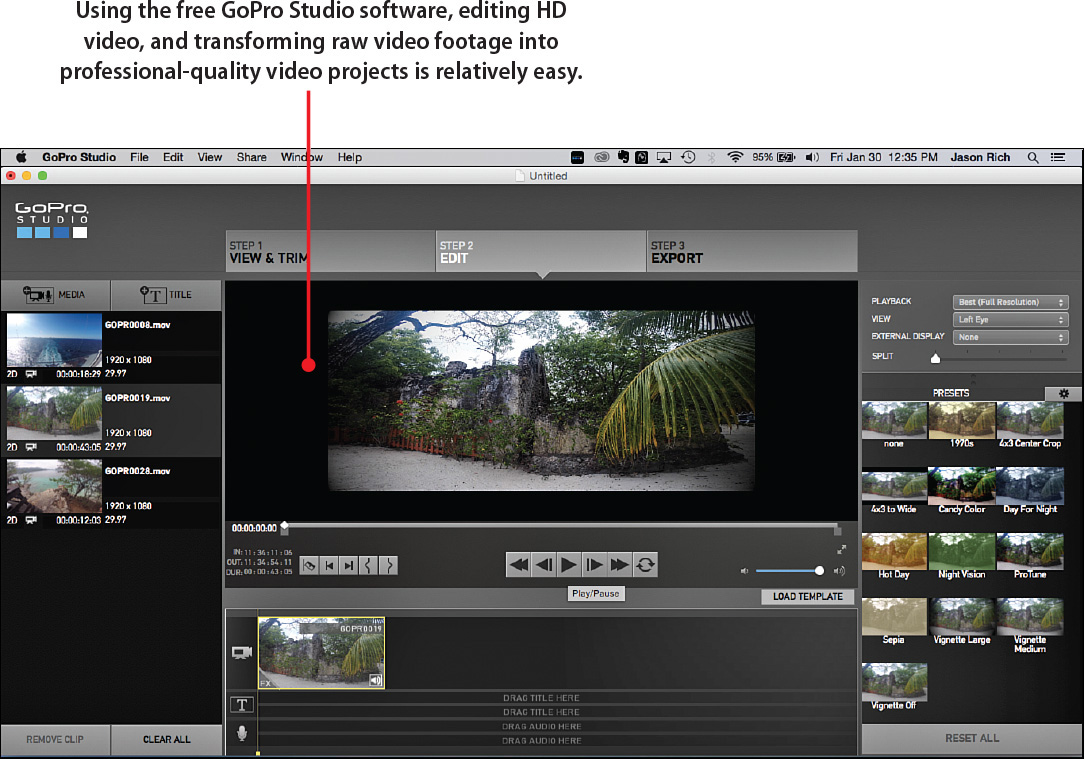
1. Visit the GoPro.com website.
2. Click the Products option.

3. Click the Software & App link.
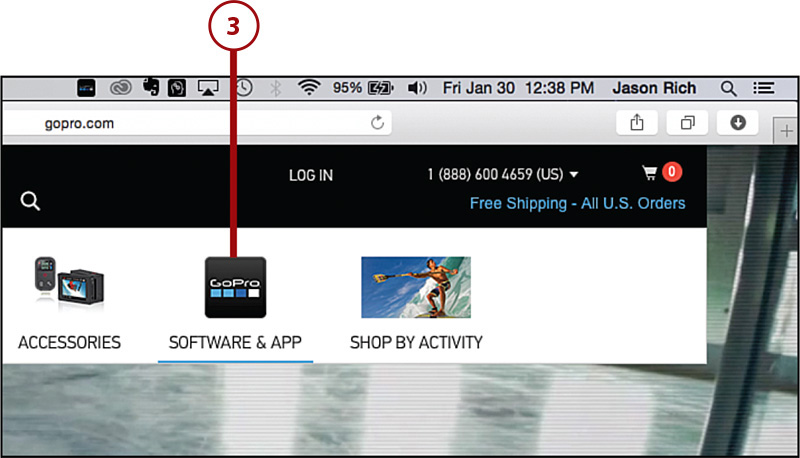
4. Click the GoPro Studio software option on the Capture Create Share page.
5. Click the Download Now button on the GoPro Studio download page.

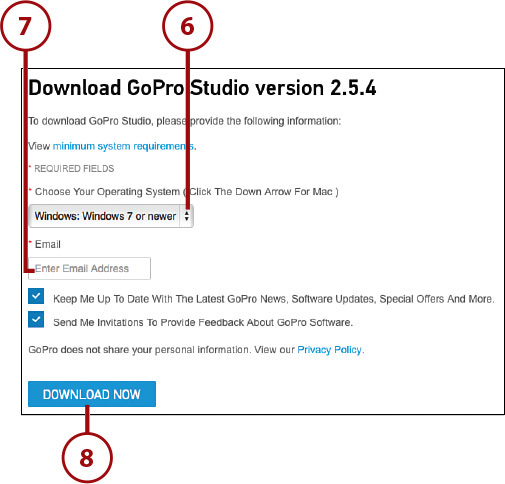
6. Select your computer’s operating system from the pull-down menu.
7. Enter your email address. (Deselect the email subscription options if you prefer.)
8. Click the Download Now button to continue. The software downloads to your computer.
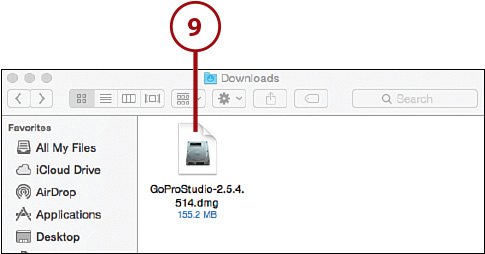
9. When this process is done, double-click the downloaded file’s icon to install it, as shown here on a Mac. Follow any on-screen directions you receive.
Run GoPro Studio
When the installation process finishes, launch the software to begin using it, and follow these steps to complete your setup:
1. Open the GoPro Studio pull-down menu at the top of the screen, and access the Preferences menu. From here, you can adjust options to help you work efficiently. When in doubt, leave an option at its default setting.
Don’t Delete
The Preferences menu has an option that lets you automatically delete data from the camera’s memory card after it’s transferred to your computer. Do not activate this option. Ensure all your content has transferred correctly and is safely stored on your computer before you manually delete the original content from the camera’s memory card.
2. Turn on the AutoSave option by adding a check mark to the option’s check box.
3. Decide how often you want a backup of your work to be created. The default option is every minute. Should the software crash, or if something goes wrong during the editing process, with this feature turned on, you shouldn’t lose more than 1 minute of work.

>>> Go Further: Save Time by Using an Edit Template
Getting to Know GoPro Studio’s Layout
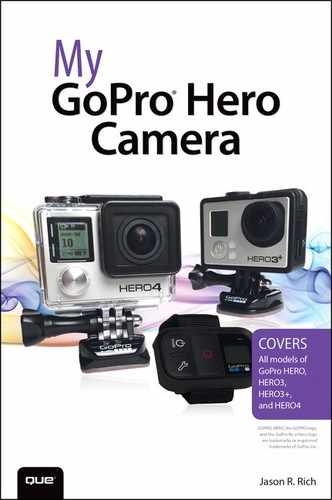
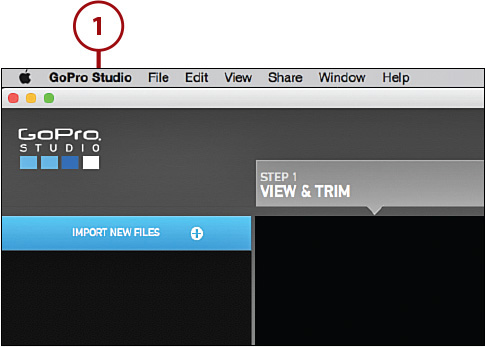
GoPro Studio breaks up the editing process into three main steps: View & Trim, Edit, and Export. You can quickly move between these separate work spaces by clicking the appropriate tab that displays near the top center of the screen.
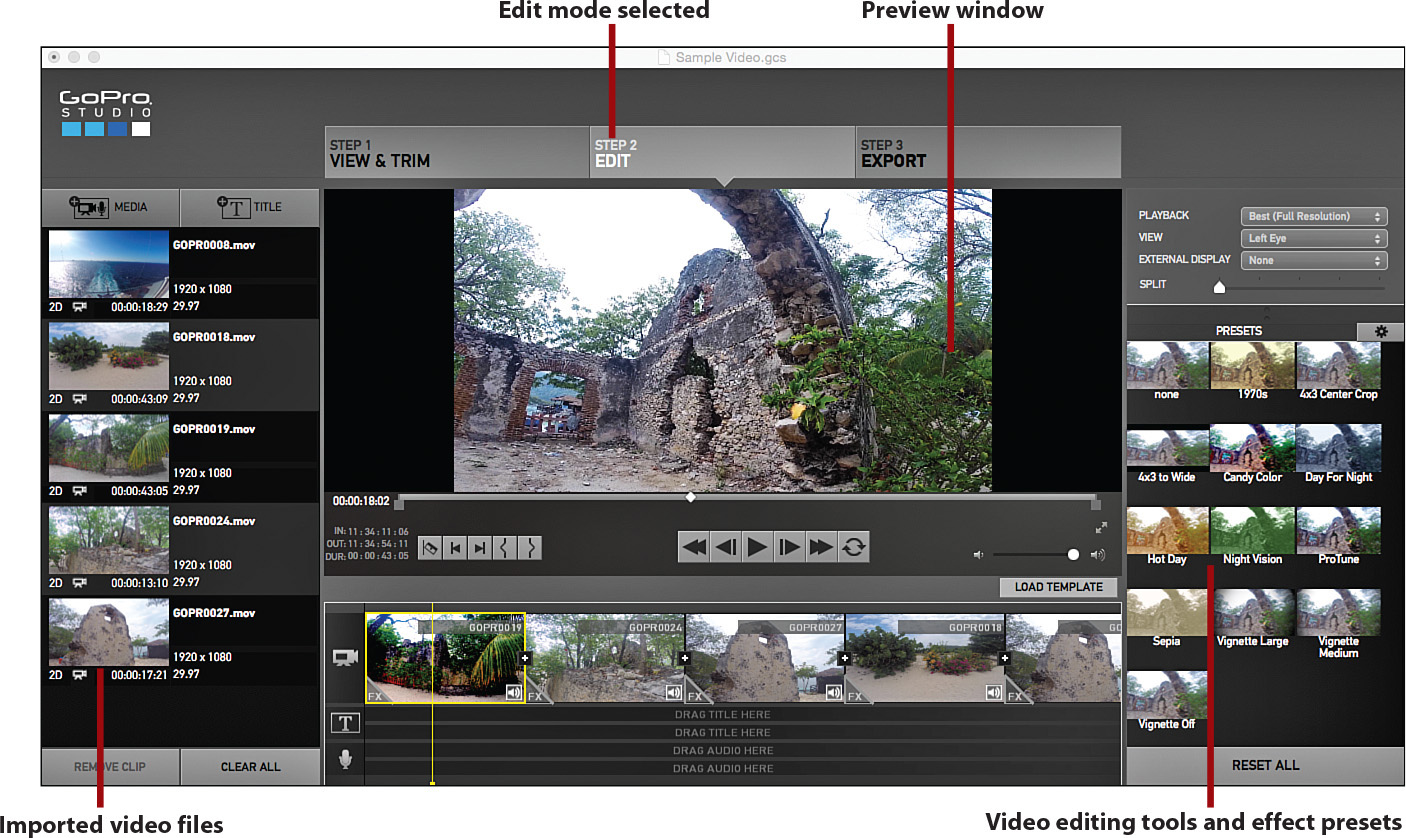
Based on which workspace you use, what displays on the right and left sides of the center Preview window vary. Initially, on the left is the Import New Files area. From here, you can access the tools needed to import raw video footage from your GoPro camera (and other sources) into the editing software.
Within the middle portion of the screen are your Preview Window and Playback Controls. What else displays within the center of the screen varies based on whether you’re in View & Trim mode, Edit mode, or Export mode.
For example, when in Edit mode, the Storyboard Window, as well as icons for accessing and utilizing various other tools needed to piece together your raw video clips and other content to put together your video production, are offered.
What displays on the right side of the screen can also vary. When in Edit mode, for example, some of your available editing tools and Effect Presets become accessible.
To export your content, what displays on the screen includes the tools needed to choose your file export options. The software offers a selection of Export Presets (Mobile, HD720p, HD1080p, Archive, Vimeo, and YouTube), but you can also choose the Custom option to select your own export options and resolution.
You need to understand each of the GoPro Studio’s video editing steps and tools, so you can best use them to meet your needs. As you get to know the software, you can save a lot of time and potential frustration by using a GoPro Studio Edit Template instead of editing the entire video from scratch.
Transferring Raw Video to Your Computer
To import your raw video content into the GoPro Studio software, you can keep your original video files intact, or you can combine video clips shot with different camera settings, and make everything look consistent and smooth within your edited video project.
The first step, however, involves using the GoPro Studio Importer to transfer your raw video content that’s currently stored on your camera’s microSD memory card, and move it into the GoPro Studio video editing software.
You can do this in two ways:
• By connecting your camera directly to your computer using the supplied USB cable (which plugs into the mini-USB port of your camera and the USB port of your computer)
• By connecting an optional memory card reader to your computer via its USB port, and then removing the microSD memory card from the camera and inserting it into the card reader.
Transfer Content to Your Computer
If you use the supplied USB cable to transfer content from your GoPro camera’s memory card to your computer, follow these steps:
1. Launch the GoPro Studio software on your computer.

2. Connect the supplied USB cable to the mini USB port on your camera.
3. Connect the opposite end of the USB cable to your computer.
4. Turn on your GoPro camera by pressing the Power/Mode button for about two seconds.
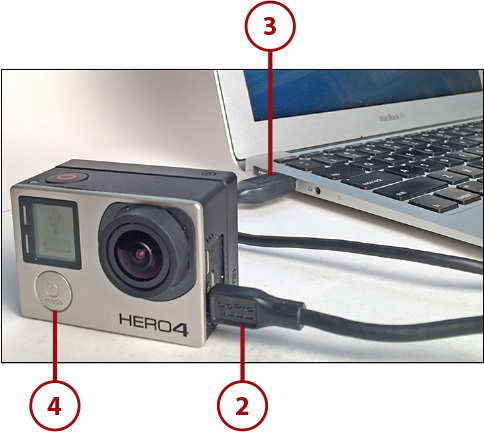
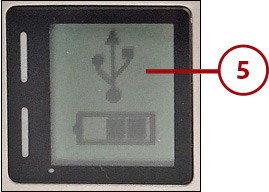
5. Your computer identifies the memory card within your camera, and a connection between your camera and the computer is established. The camera’s Status Screen displays a Connection Established icon.
6. You are then prompted to transfer content from your camera’s memory card to the GoPro Studio software via the GoPro Studio Importer. Choose a storage location to store the imported content and the content transfer process commences. Based on the length of your videos and the resolution they were shot in, this could take several minutes. A progress meter displays on the screen.
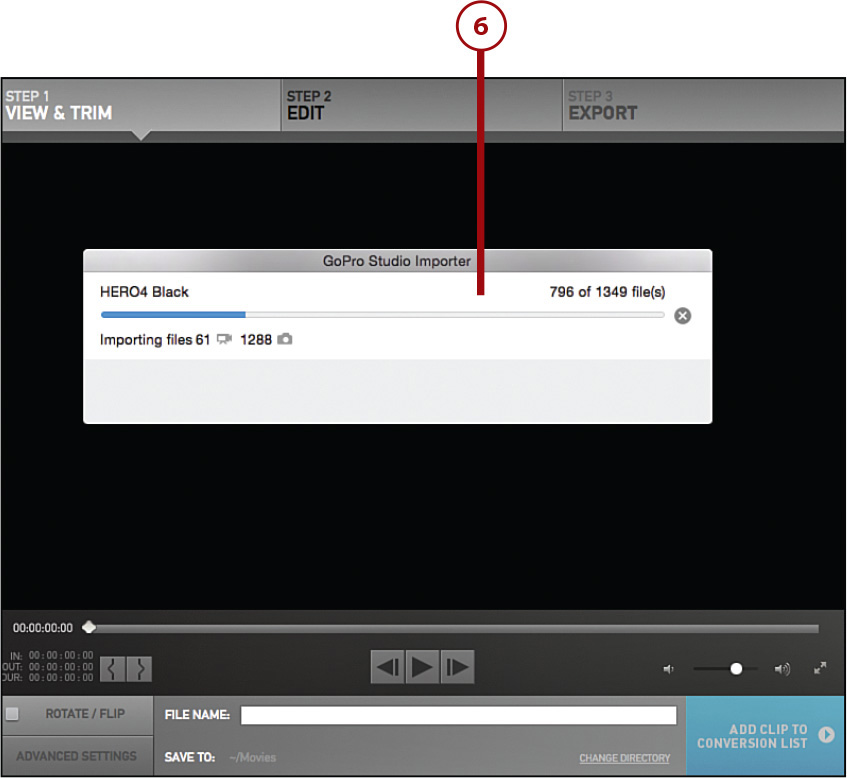
7. Your raw video is imported into the GoPro Studio software and placed within the Import Bin. You can now preview the individual raw video clips and trim them.

What It Means to Trim a Clip
When you trim a video clip, this means you use tools built in to the software to select and edit out or delete portions of the beginning and end (and sometimes content in the middle) of the clip to eliminate unnecessary or unusable footage.
Beginning the Editing Process
The video editing process begins after you import raw video content into the software. You can then preview and trim that content as needed.
At this point, it’s time to create a new project, which ultimately becomes your final edited video. Begin by piecing together your video clips, raw video footage, and scenes, converting these files into the GoPro Studio software’s CineForm file format, and if necessary, making them all compatible prior to incorporating them into your project. Details about each raw clip you have imported and that is being converted displays on the right side of the screen when in the View & Trim workspace.

Select and Convert Clips
After you import content into the GoPro Studio Import Bin (on the left side of the screen), follow these steps to choose video clips or still photos to include within your video project:
1. Make sure you have selected the Step #1 View & Trim tab, if it’s not already selected.
Importing Video
If you don’t have any photos or video in the Import Bin on the left side of the screen, follow the steps in the previous section, “Transfer Content to Your Computer.”
2. Click on a video clip to preview that clip.
3. Use the on-screen controls near the bottom center of the preview window to control the playback.
4. If you want to use the selected video clip within your video project, click on the Add Clip To Conversion List button.
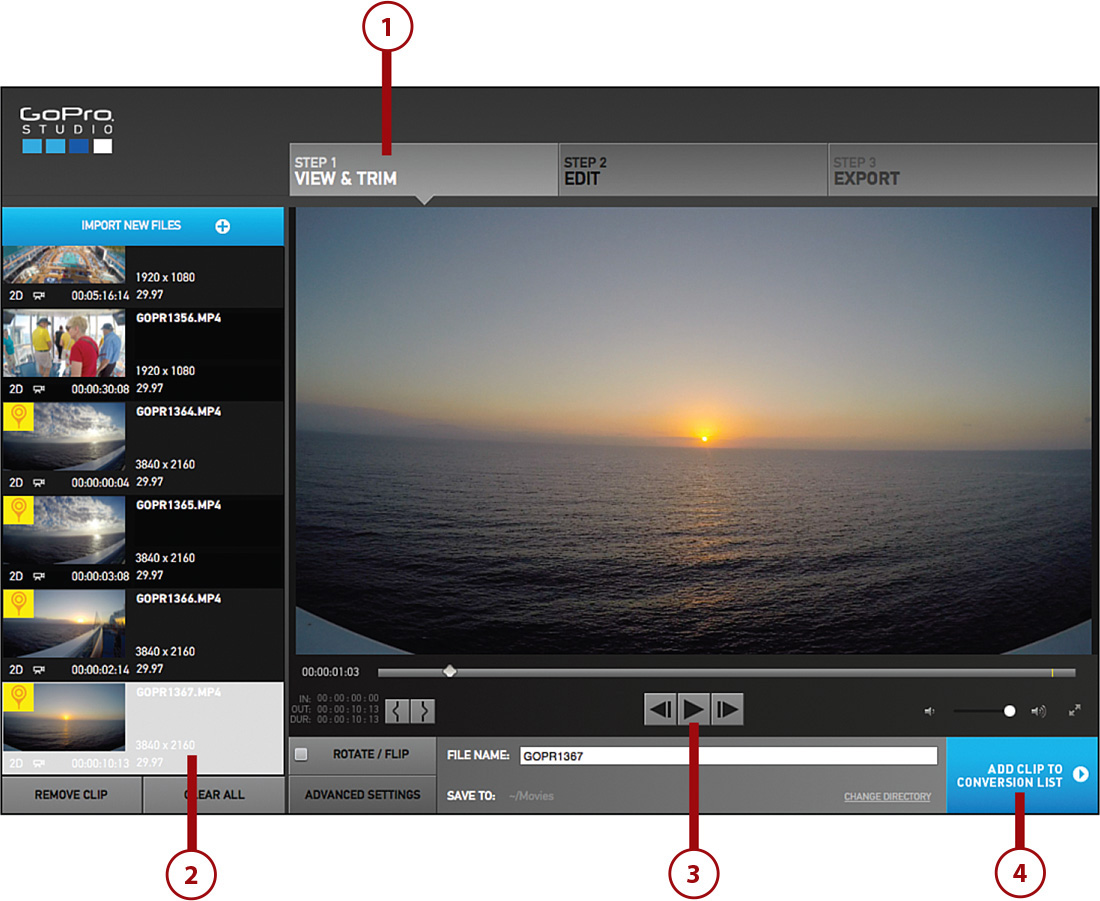
5. A thumbnail for the clip is displayed on the right side of the screen, under the Conversion List heading.
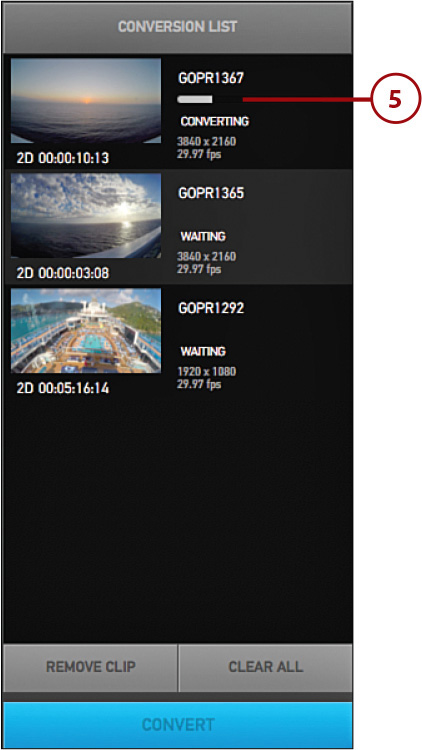
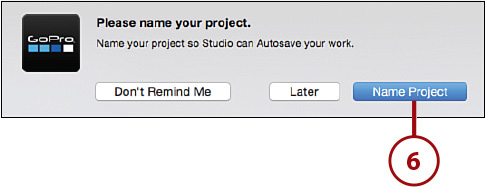
6. The GoPro Studio software automatically prompts you to name your video project, if you haven’t done this on your own. Click the Name Project button when this reminder window appears, and then give your video project a filename.
7. After you’ve selected all the clips you want to use within your video project, click the Convert button. The GoPro Studio software converts the selected video clips into the proper file format for editing. As soon as this conversion process is completed, you’re ready to move on to the GoPro Studio software’s Step #2: Edit.
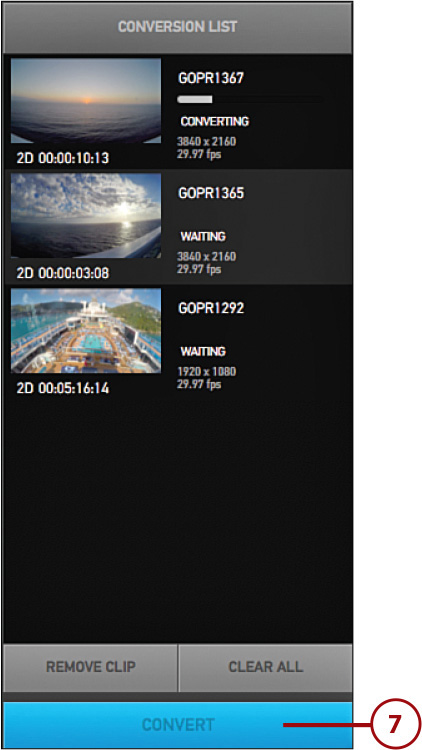
Converting Videos
Click the Convert button, and your selected files are converted one at a time. This could take several minutes, depending on the resolution, the length of the video clips, and the processing power of your computer.
8. Click the Proceed To Step 2 button that replaces the Convert button in the bottom-right corner of the screen (not pictured).
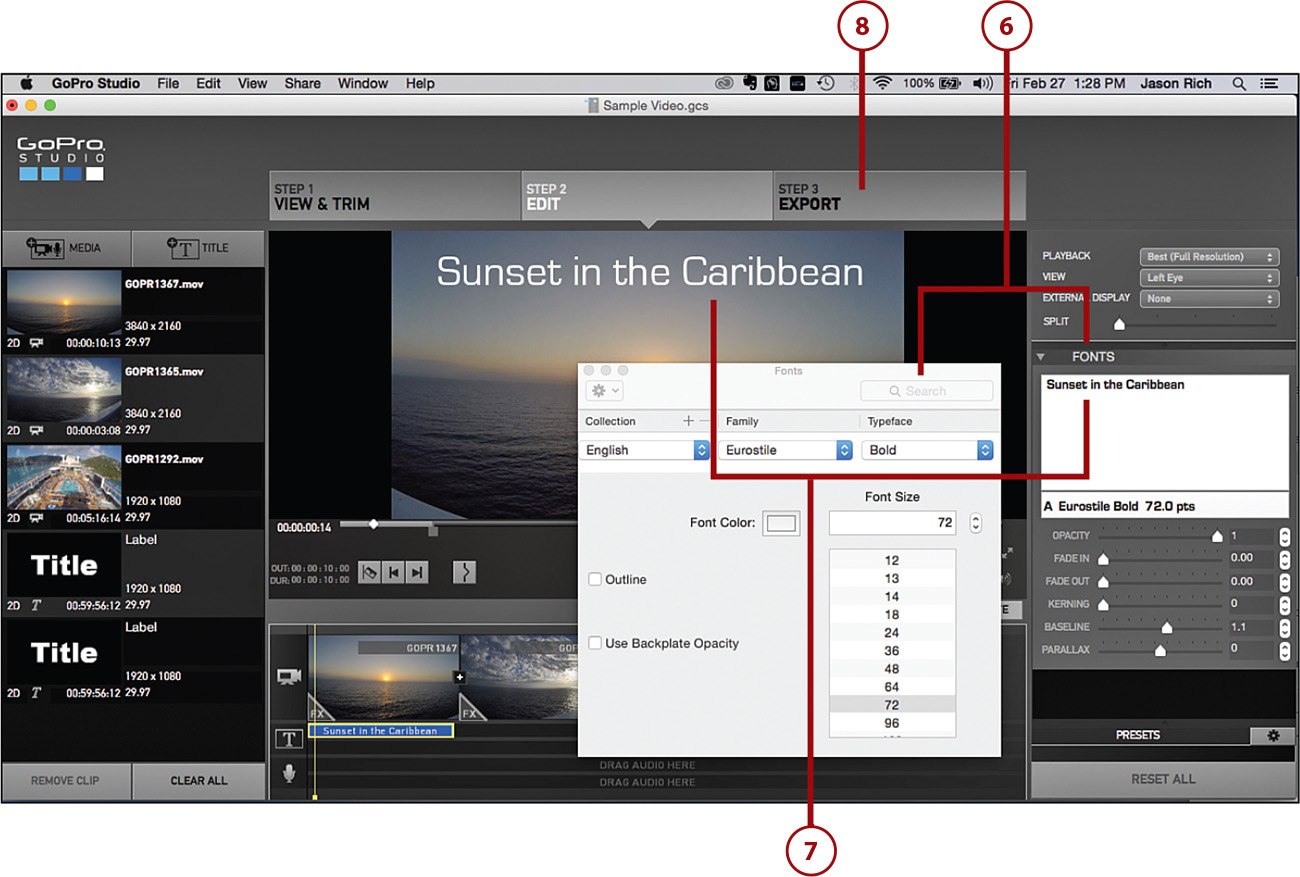
Edit Your Video
Now that you’ve selected the raw video clips (and potentially still images) you want to incorporate into your video project, it’s time to edit the pieces together and add various visual effects, titles, music, and so on.
1. Select a video template, when prompted. (This happens as soon as GoPro Studio finishes converting your videos, per Step 8 of the previous task.)
Video Templates
GoPro Studio’s video templates are created by professional videographers and video editors. Using them makes the video editing process much faster and easier because, after selecting a template, all you need to do is drag and drop in your own video clips and content to create a professional-looking video. If you want total editing freedom, select the Blank template option.
2. Click the Create button to continue.

3. On the left side of the screen are your selected video clips. Click and drag a clip onto the timeline to work with it.
4. Displayed in the center of the screen is your editing/playback window and beneath it is your video timeline, which you can use to arrange and trim your clips.
5. On the right side of the screen are your video editing tools and menus, which you can use to alter image quality and add effects.
Learning to Edit
A full tutorial on how to edit video is beyond the scope of this chapter. Refer to the GoPro Studio manual to discover all the editing tools available to you.

6. Click the arrow next to a tool category to expand it and gain access to more controls.
7. Adding text in the Fonts category, for example, adds labels you can use for titles to your video.
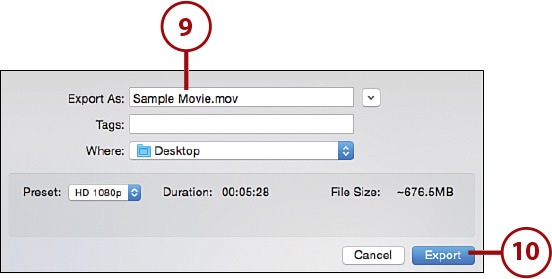
8. After you edit your video, click on the Step #3 Export tab to begin the export process.
9. When prompted, enter a project name, choose the location where you want the exported video saved, and adjust the resolution of the video from the Preset menu.
10. Click Export to create the video file and save it to your computer. You can now share it with others in a variety of ways, such as via email, or by posting it on YouTube or Facebook.
What’s Possible During the Editing Process
When editing your video, you can modify (crop) your video frame, enhance its quality, remove the fish eye effect, trim and combine multiple video clips on the storyboard, add scene/shot transitions, add music and sound effects, add titles, add fade in or fade out effects, and add Effect Presets to your footage to alter its look using visual effects.
Adding Flourishes
As you edit your video, the GoPro Studio software enables you to speed up playback, create a motion blur effect, or use a slow motion effect. These effects work well when presenting action scenes, which the GoPro cameras are good at filming.
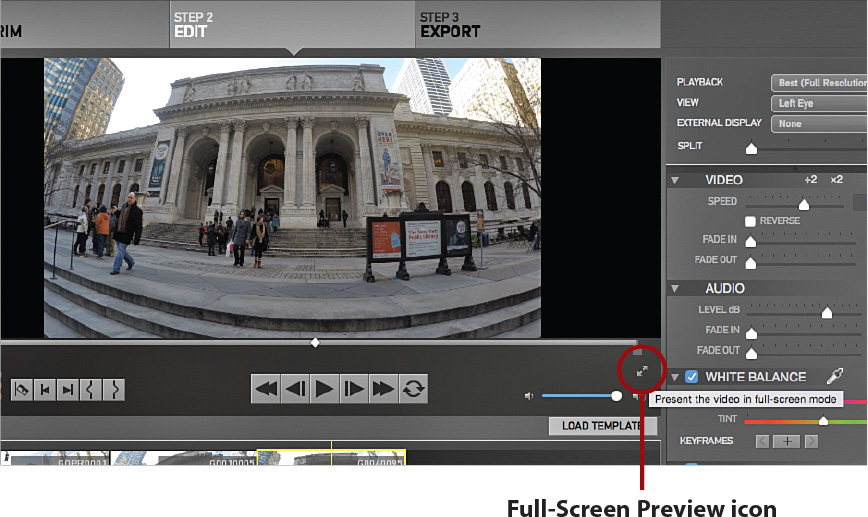
Throughout the editing process, be sure to preview your work in progress (or sections of your video) within the Preview Window, and if necessary, advance frame-by-frame. There’s also a full-screen Preview option available by clicking the full-screen icon.
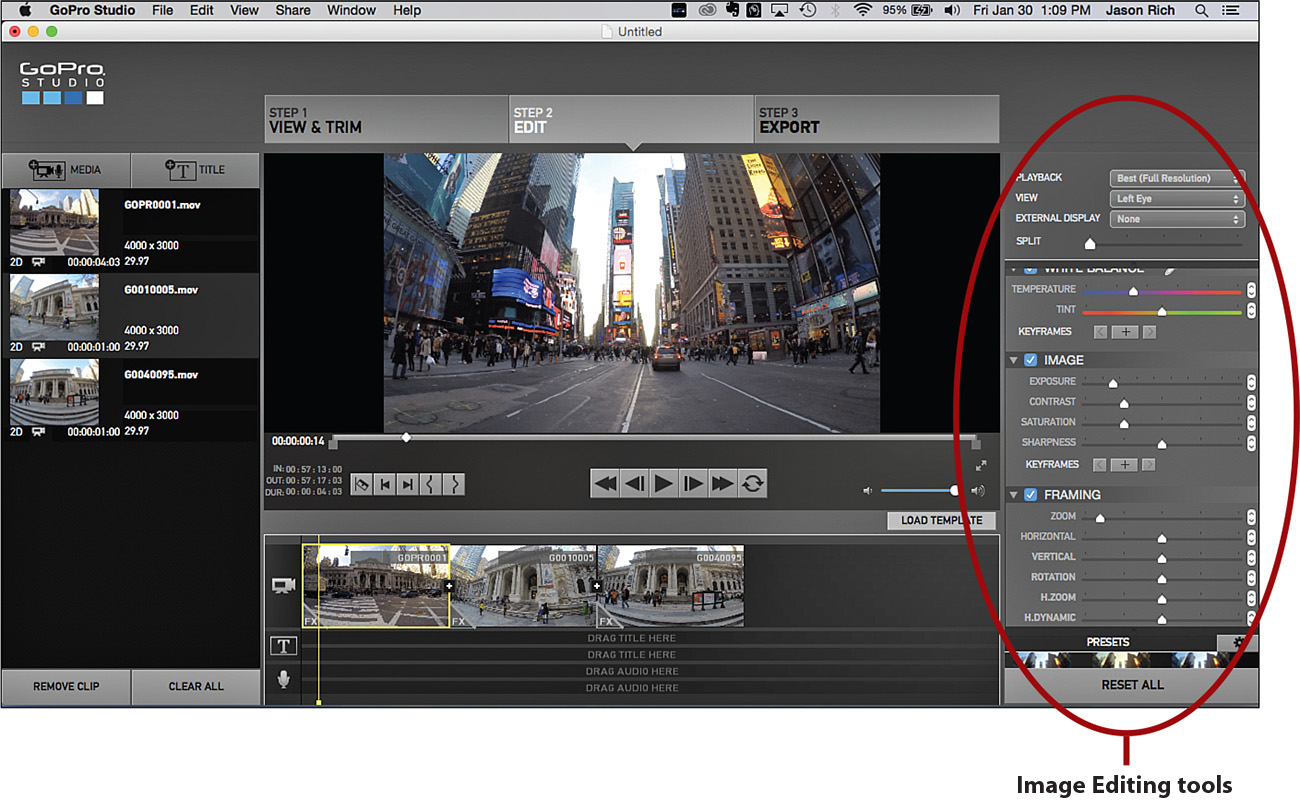
Enhancing Flawed Video Footage
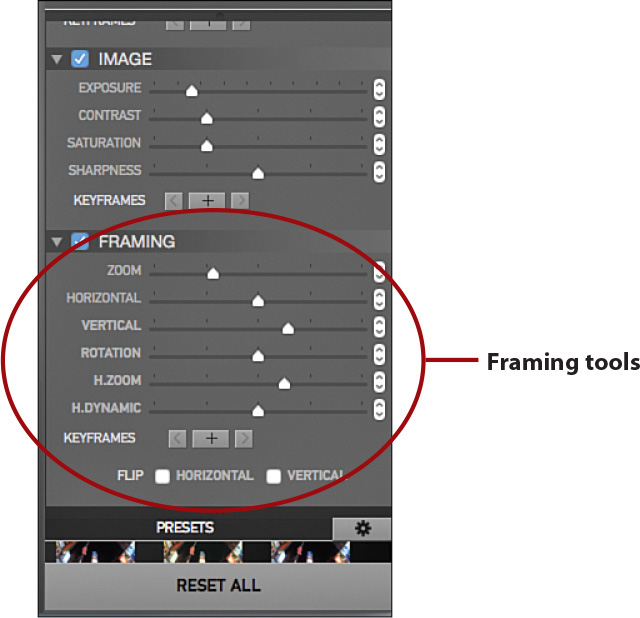
If a particular portion of your video is overexposed, underexposed, or somehow needs to be enhanced, the GoPro Studio software offers editing tools that enable you to reframe and rotate your content, as well as manually adjust things such as White Balance, Exposure, Contrast, Saturation, and Sharpness. This is in addition to the Effect Presets that you can add to video footage to subtly or dramatically alter its appearance.
Effect Presets built into GoPro Studio include Protune, 1970s, 4X3 Center Crop, 4X3 To Wide, Candy Color, Day For Night, Hot Day, Night Vision, Sepia, Vignette Large, Vignette Medium, and Vignette Off. You can also customize these Effect Presets or create your own using the editing tools built in to the software.
The Framing tools enable you to cut away unwanted background content to virtually zoom in on your intended subject or easily reframe your shots. This gives you a tremendous level of additional creative control over your raw footage if, for example, you forgot to film an important close up of your subject.
Considering Sound
In almost any video project, the sounds your audience hears while watching your video can be as important as what’s actually shown. Music, for example, can set a mood. Sound effects can add a sense of realism or authenticity to your video or help to capture someone’s attention, whereas a voiceover narration can be used to explain or convey information.
You can use these audio elements in addition to or instead of the audio that was recorded during the filming process. The GoPro Studio software enables you to edit the recorded audio track separately from the video, plus add music, sound effects, or voiceover tracks to be heard at specific points in your video.
As the video editor, you ultimately decide what’s heard and when it’s heard, just as you determine what your audience sees. You must adjust the audio levels within your video so that they’re at the appropriate volume, and if you mix different types of audio, that each audio element can be heard at the appropriate volume.
If there’s talking during a scene, the music you add should not overpower the voice tracks, and whatever music you do decide to add should be appropriate for that scene.
Saving, Exporting, and Sharing Your Video Projects
If you edit a relatively short video, when you become proficient using the GoPro Studio software, especially if you use one of the Edit Templates, you should create professional quality results within a few hours or less. How much time and effort you invest in your projects is entirely up to you.
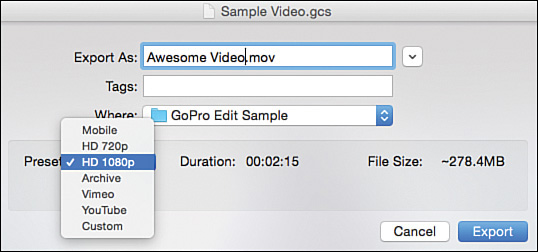
When you finish the editing and you’re satisfied with the result after viewing your video within the Preview window or using the Full-Screen Preview option, the next step is to export your video using a file format and resolution of your choosing.
Based on how you plan to share your video, this determines what format and resolution it should be saved in. Click the Export tab, and then select the Export .MOV option from the Share menu.
You now see a selection of export options. If you plan to upload the video file and share it on YouTube, select the YouTube option. If you plan to play back the video on a high-definition 1080p flat screen television, for example, select the HD 1080p export option. If the video will be viewed only on the screens of mobile devices (smartphones or tablets), choose the Mobile Device option.
After choosing your export options, follow the onscreen prompts to complete the file export and saving process.
Video Editing Tips to Make Your Videos Better
Like any art form, there are no strict rules for editing video. There are, however, strategies that can help you create video projects that your audience can truly enjoy and appreciate.
That being said, your first task should be to identify your audience and then put yourself in their shoes when making all creative decisions. Consider how you want each of your editing decisions to impact your audience.
Most important, when deciding on content to include within your video, get right to the point. Never overwhelm your viewers with too much visual eye candy or distracting audio. Just tell you story or convey your message in a straightforward and entertaining way. Allow the stunning visuals you’ve captured by your GoPro camera to speak for themselves.
The attention span of your audience is relatively short. If your video drags on, is repetitive, or becomes dull to watch, people will simply stop watching, tune out, or surf elsewhere on the Internet and watch something else.
Following are some other items you should consider while editing:
• Focus on your intended audience and tell your story. Set a primary goal for your video, as well as a target length. Are you creating a video just to entertain your audience, or is the goal to convey a message, illicit an emotion from the audience, or educate in some way?
• Use an organized approach. It’s a good idea to first create a “rough cut” of your video and then add in the additional production elements. Begin by watching all your raw video footage and gathering the content you know you’ll want to use. Then collect the most desirable raw footage that you want to use, trim those video clips, and then place them in order using your video editing software. Next, get rid of the unusable shots and ancillary raw footage you know you won’t be using. When you’re satisfied, begin adding in production elements such as scene transitions and music.
• Use shots that will keep your audience’s attention. If you watch any television show or movie, you’ll notice that the editor switches camera angles or shots every 5 to 10 seconds to keep things visually interesting for the audience. This is a good strategy to follow as you edit your videos. If you don’t have footage that showcases multiple camera angles for each shot or scene to choose from, focus on using your most compelling content.
• Use titles and captions to your advantage. Most videos can benefit from an animated title sequence at the beginning that sets the scene and tells people what they’re about to watch. Then, as needed, you can add text-based captions within your video to help move your story along or convey your message using text to accompany your video and audio.
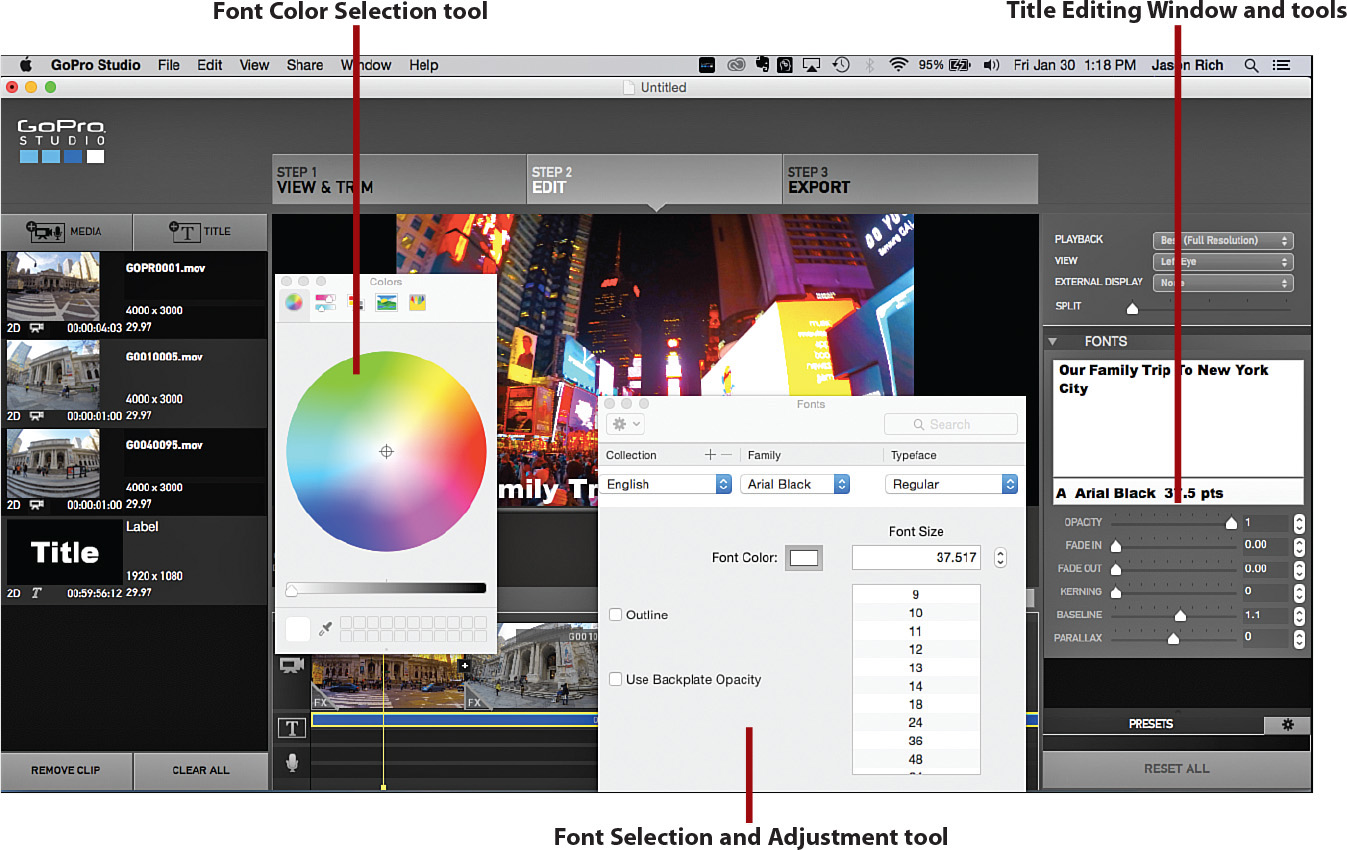
As you choose a font, font style, and type size for your titles and captions, consider that some people may watch your video on a small screen or their smartphone or tablet, instead of a large computer monitor or 52-inch HD television set. Make sure that your titles and captions are easily readable, not too wordy, and aren’t overused.
• Don’t expect Hollywood-style results. Learning to be a skilled video editor, regardless of which video editing software you use, takes time and practice. Start by editing with minimal special effects a few simple video projects. As you become more comfortable using your video editing software, start experimenting with its various features and functions.
Considering Other Editing Software Options
Although the GoPro Studio software offers editing tools that are custom-tailored to the features and functions of your GoPro camera, you always have the option of using third-party video editing software instead of, or in addition to, the GoPro Studio software.
Literally dozens of powerful video editing software packages are available for PCs and Macs. Some are free, whereas others cost money. For example, Apple offers the iMovie software for the Macs and iPad, whereas Microsoft offers its entry-level Microsoft Movie Maker software for PCs. These are straightforward, consumer-oriented video editing applications that are relatively easy to learn.
Wondershare Video Editor (www.wondershare.net/video-editor) and Pinnacle Studio 18 (www.pinnaclesys.com) are two other examples of consumer-oriented PC and Mac video editors that are relatively easy to use but still feature-packed.
For more professional-level editing tools that have a much steeper learning curve and higher price tag, consider using Final Cut Pro X (www.apple.com/final-cut-pro), Avid Media Composer (http://connect.avid.com/media-composer-trial.html), or Adobe Premiere Pro CC (www.adobe.com/products/premiere.html).
You can also do video editing on-the-go using a tablet, such as the iPad. For example, you can transfer video content from your GoPro camera (as long as it’s shot at a resolution your tablet can support) and then use a video editing app to edit and ultimately share your video without using a computer.
Plenty of Video Editing Apps Are Available for the iPad
In addition to the iMovie app for the iPad, you can find a vast selection of other video editing mobile apps within the Photo & Video section of the App Store. For example, there’s Clips Video Editor, Videoshop Video Editor, Cinamatic, iMotion Pro, and the powerful Replay Video Editor.