Build a Hierarchy of Images
To get a better understanding of how to factor real-world images, we’ll look at the hierarchy of the node:latest image at the time of this writing, starting with the very first image in the hierarchy
• debian:jessie: This Dockerfile starts from scratch, meaning it is a base image. It includes a single command to add “rootfs,” the root filesystem which also adds command line tools like bash, cat, and ping. It also sets bash as the default command if you were to create a Debian container.
• buildpack-deps:jessie-curl: This Dockerfile starts from debian:jessie and runs the apt-get package manager to install curl, wget, and ca-certificates.
• buildpack-deps:jessie-scm: This Dockerfile starts from buildpack-deps:jessie-curl and runs the apt-get package manager to install source control management (SCM) tools like Git, Mercurial, and Subversion.
• buildpack-deps:jessie: This Dockerfile starts from buildpack-deps:jessiescm and runs the apt-get package manager to install developer utilities like GCC, Libtool, and Make.
• node: This Dockerfile starts from buildpack-deps:jessie and sets Node up and running by installing certificates, setting environment variables, and downloading/configuring Node. It also sets Node as the default command to run when the container starts.
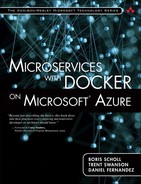
As you can see from the list above, each Dockerfile is factored for reuse, so instead of putting all utilities like curl, Git, and GCC into one Dockerfile, they are in separate Dockerfiles so that developers can pick and choose which dependencies they need for their applications. To better understand how all the Dockerfiles in an image are layered, you can use the free web utility https://imagelayers.io. Figure 4.2 shows a comparison of the NodeJS latest (left side) and slim (right side) Docker images. On the left side you see how all the five Dockerfiles in the listing above are combined into separate Docker layers, starting with the first debian:jessie Dockerfile that adds the rootfs filesystem all the way to the final command to start Node in the node Dockerfile. If you look closely, the only difference between the latest and slim Dockerfiles is that the slim image saves space by skipping the source control management and developer tool Dockerfiles from the buildpack-deps:jessie-scm (122MB) and buildpack-deps:jessie (315MB) Dockerfiles.
FIGURE 4.2: Comparing the latest and slim Docker images using https://imagelayers.io
For your images, you can start from an official image from Docker Hub, and then define separate Dockerfiles with any common tools or utilities your organization wants to reuse, like unit testing frameworks, or web tools like Gulp, NPM, or Bower. This enables you to build a hierarchy of images, similar to the following:
• Start with the official images from the Docker Hub.
• Build a set of team images, represented as Dockerfiles, that inherit from the official image and include common packages, files, utilities, or specific configurations that you want to reuse across microservices.
• Each microservice then has its own image and corresponding Dockerfile that inherits from the team image and includes the microservice code.
![]() Official Image Dockerfiles are Open Source
Official Image Dockerfiles are Open Source
All Dockerfiles that build images are open source. Simply click the Dockerfile links, like the ones from the Docker Hub pictured above, to see exactly how the image was created.
Automated Builds
To make this process easier, and to ensure only quality builds end up in your Docker Hub repository, you can automate the process of building images using continuous integration (CI) tools. For example, the official ASP.NET image uses CircleCI and GitHub hooks to automate updating the official image at http://bit.ly/aspnetci. Similarly, Docker Hub adds the capability to automate building and updating images from GitHub or Bitbucket by adding a commit hook so that when you push a commit, a Docker image build is triggered.
What happens if your base image is updated with a security fix? You can use a repository link which links your image repository to another repository, like the one for your base image. Doing this enables you to automatically rebuild your images based on changes to the underlying base image.
Organize your Images Using Tags
Like official images, when you build your images, you will want to logically organize them by tag based on the matrix of software dependencies and operating systems for your organization. For your application, another common convention, as shown in the Node official image, is to organize by base image, like jessie and slim base images, and then tags for each version (using the major/minor/patch versioning convention). The result might be something like this:
• 2.1.1-slim, 2.1-slim, 2-slim, latest
• 2.1.1-jessie, 2.1-jessie, 2-jessie, latest
• 1.0.1-slim, 1.0-slim, 1-slim
• 1.0.1-jessie, 1.0-jessie, 1-jessie
Remember to keep it simple, as even adding the two operating systems (jessie and slim) creates a large matrix for you to build and maintain. Don’t over-architect dozens of Dockerfiles in a complex hierarchy if you don’t actually need to! Also remember to follow Docker’s best practices for creating Dockerfiles: https://docs.docker.com/engine/articles/dockerfile_best-practices/ which help ensure you’re designing your Dockerfiles to take advantage of Docker’s layering system as much as possible.
Sharing Images in your Organization
Most organizations do not publish their Docker images to public repositories on Docker Hub. Instead, they opt for more private and secure options. There are a number of different options to consider for doing this.
• Docker, Inc. provides a Docker image named registry that you can use and run on any Docker host. In this example, you are fully responsible for managing your images and the underlying data store. As the registry is going to contain all the images your team will use, ensuring you have durable, reliable storage for those images is important. You can find instructions for how to configure the Docker registry image with Azure Blob Storage at http://bit.ly/azureregistry.
• Docker Hub supports private repositories. These repositories can only be accessed by authorized Docker Hub accounts and can be used to securely store images in the public cloud. To view private repository pricing plans, visit https://hub.docker.com/account/billing-plans/.
• For enterprises, Docker also provides Docker Trusted Registry (DTR), which is a private Docker registry that you own and manage, and can run on premises or in your choice of cloud provider. It adds a host of enterprise management features like integration with an enterprise’s LDAP store (for example, Active Directory), user statistics, management, monitoring and commercial support. Azure includes built-in support for Docker Trusted Registry in the Azure Marketplace at http://bit.ly/azuredtr.
• Quay.io is a third-party public Docker registry similar to Docker Hub. It offers private repositories that you pay for on a monthly basis. For more information, visit https://quay.io.
• Quay Enterprise is similar to Docker Trusted Registry. It is a private instance of the Quay.io Docker Registry that you own and manage and can run on premises or in your favorite cloud provider.
Managing Images
Ongoing maintenance of images is also something to consider. Image maintenance tasks include understanding updates to software packages and updates to operating systems such as applying security patches or deploying bug fixes. For large enterprises where IT decisions are typically centralized, management of base images is handled by a central team that is responsible for maintaining the images, ensuring quality, security, and consistency across a team or an organization. In other organizations, where decision making is decentralized, each team or feature crew is responsible for their own image management.
Although Docker security tools really deserve their own chapter in a book, we quickly wanted to mention Docker Bench (https://dockerbench.com), a script created by Docker that is largely based on the Center for Internet Security’s (CIS) Docker 1.6 Benchmark (https://bit.ly/ch4security) that checks for common best practices for deploying Docker containers in production.
Another common maintenance task that all organizations face is image bloat on your Docker hosts. As each image can be 500MB to 1GB, you can easily end up with hundreds of old or unused images in your shared dev or staging environments. To help fix this, you can set up a maintenance script that deletes images that reach a certain age using the docker rmi command.