15. Introducing jQuery
In This Chapter
As JavaScript has developed into a more valuable language over the past two decades, its meaningful usage has become commonplace in today’s web sites. Accordingly, many PHP developers are expected to know a bit of JavaScript as well. Often this means learning jQuery, a popular JavaScript framework.
Although this chapter cannot present full coverage of JavaScript or jQuery, you’ll learn more than enough to be able to add to your PHP-based projects the features that users have come to expect. In the process, you’ll also learn some basics of programming in JavaScript in general, and get a sense of into which areas of jQuery you may want to further delve.
What Is jQuery?
To grasp jQuery, you must have a solid sense of what JavaScript is. As discussed in Chapter 11, “Web Application Development,” JavaScript is a programming language that’s primarily used to add dynamic features to HTML pages. Unlike PHP, which always runs on the server, JavaScript generally runs on the client (JavaScript is starting to be used as a server-side tool, too, although that’s still more on the fringe). PHP, precisely because it is server-side, is browser-agnostic for the most part; very few things you’ll do in PHP will have different results from one browser to the next. Conversely, precisely because it’s running in the browser, JavaScript code often has to be customized for the variations in browsers. For many years, this was the bane of the web developer: creating reliable cross-browser code. Overcoming this hurdle is one of the many strengths of jQuery (www.jquery.com ![]() ).
).
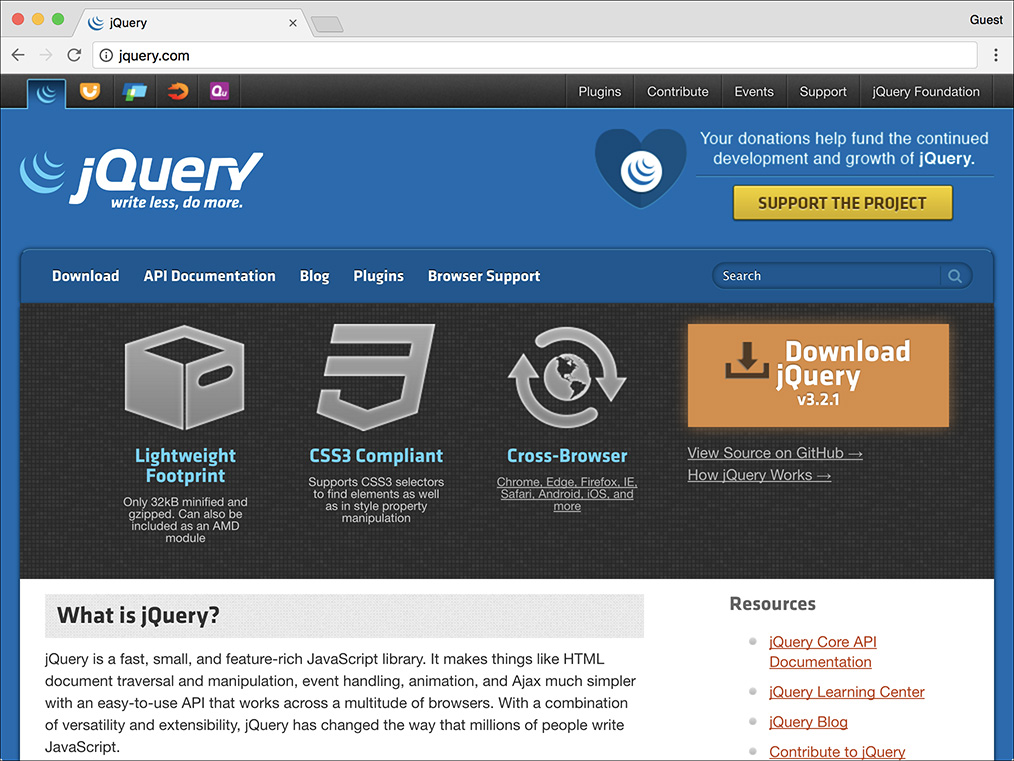
![]() The home page for the jQuery JavaScript framework.
The home page for the jQuery JavaScript framework.
jQuery is a JavaScript framework. A framework is defined as a library of code whose use can expedite and simplify development. The core of the jQuery framework can handle all key JavaScript functionality, as you’ll see in this chapter. But the framework is extendable via plug-ins to provide other features, such as the ability to create a dynamic, paginated, sortable table of data. In fact, several useful user interface tools have been wrapped inside their own bundle, jQuery UI (www.jqueryui.com ![]() ). There’s also jQuery Mobile (www.jquerymobile.com), which supports a touch interface and other features commonly used on smartphones and tablets.
). There’s also jQuery Mobile (www.jquerymobile.com), which supports a touch interface and other features commonly used on smartphones and tablets.
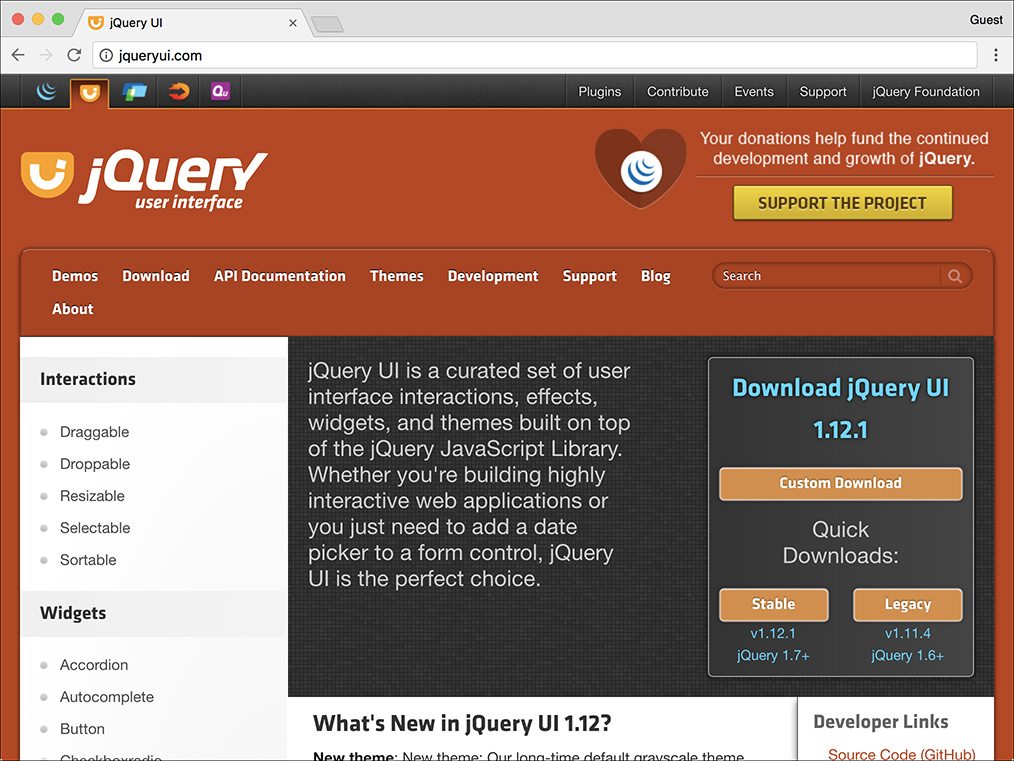
![]() The home page for the jQuery User Interface library (jQuery UI), which works in conjunction with jQuery.
The home page for the jQuery User Interface library (jQuery UI), which works in conjunction with jQuery.
Many JavaScript frameworks are out there, and in no way am I claiming jQuery is the best. I do use jQuery frequently, however, and it quickly earned a place as one of the premier JavaScript frameworks. As you’ll soon see, jQuery has a simple, albeit cryptic, syntax, and by using it, you can manipulate the Document Object Model (DOM) with aplomb. This is to say that you can easily reference elements within an HTML page, thereby grabbing the values of form inputs, adding or removing any kind of HTML element, changing element properties, and so forth.
Before getting into the particulars of using jQuery, I want you to understand that jQuery is just a JavaScript framework, meaning that what you’ll actually be doing over the next several pages is JavaScript programming. JavaScript as a language, though similar in some ways to PHP, differs in other ways, such as how variables are created, what character is used to perform concatenation, and so forth. Moreover, JavaScript is an object-oriented language, meaning the syntax you’ll sometimes see will be that much different than the procedural PHP programming you’ve done to this point (the next chapter introduces object-oriented programming [OOP] in PHP). Because you’ll inevitably have problems—like simply omitting a closing brace—you’llneed to know a bit about how to debug JavaScript. For a quick introduction to that subject, see the sidebar.
For examples of server-side JavaScript, check out Node (www.nodejs.org).
Incorporating jQuery
JavaScript is built into all graphical browsers by default, meaning no special steps must be taken to include JavaScript in an HTML page (users have the option of disabling JavaScript, although statistically few do). jQuery is a framework of code, though; to use it, a page must first incorporate the jQuery library. Including any external JavaScript file in an HTML page involves the script tag, providing the name of the external file as the value of its src attribute:
<script src="file.js"></script>
The jQuery framework file will have a name like jquery-X.Y.Z.min.js, where X.Y.Z is the version number (3.2.1 as of this writing). The min part of the file’s name indicates that the JavaScript file has been minified. Minification is the removal of spaces, newlines, and comments from code. The result is code that’s barely legible ![]() but still completely functional. The benefit of minified code is that it will load in the browser slightly faster because it will be a marginally smaller file size.
but still completely functional. The benefit of minified code is that it will load in the browser slightly faster because it will be a marginally smaller file size.

![]() What the minified jQuery code looks like.
What the minified jQuery code looks like.
The following set of steps will walk you through installing the jQuery library on your server and incorporating it into an HTML page; see the sidebar for an alternative approach.
To incorporate jQuery:
1. Load www.jquery.com in your browser.
2. At the top of the page, click Download jQuery.
3. On the resulting page, download the compressed, production version ![]() .
.
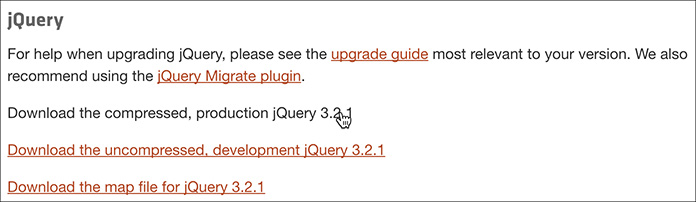
![]() The links for downloading the current version of jQuery.
The links for downloading the current version of jQuery.
4. If the JavaScript loads directly instead of being downloaded, save the page on your computer.
Because the resulting file is just JavaScript, it may load directly in your browser ![]() . If so, save the file as
. If so, save the file as jquery-X.Y.Z.min.js, where X.Y.Z is the actual version number.
This chapter recommends that you download a copy of jQuery and place it in your web directory. Upon doing so, you just need to update the script tag to point to the location of the jQuery file on your site. I want to mention an alternative solution, though: using a hosted version of jQuery. By this, I mean that instead of using a version of the jQuery library stored on your own web server, you could use a version stored elsewhere online. For example, Google provides copies of many JavaScript frameworks for public use (http://code.google.com/apis/libraries/). To use Google’s copy of the jQuery library, you’d use the following code:
<script src="https://ajax.googleapis.com/ajax/libs/jquery/3.2.1/jquery.min.js">
</script>
If you use Google’s hosted version of jQuery, your site (i.e., your site’s visitors) will likely see a performance boost, due to Google’s Content Delivery Network (CDN) and the way browsers cache media.
On the other hand, using a hosted version makes your site’s functionality dependent on another site’s uptime. And your site is more vulnerable from a security perspective since it’s assuming the other site is serving the jQuery library and not a virus. All that being said, it’s fairly safe to say that Google’s uptime and security model is probably better than yours (or mine)!
5. Move the downloaded file to a js folder within your web server directory.
All the JavaScript files to be used by this chapter’s examples will be placed within a subdirectory named js.
6. Begin a new HTML document in your text editor or IDE, to be named test.html (Script 15.1):
<!doctype html>
<html lang="en">
<head>
  <meta charset="utf-8">
  <title>Testing jQuery</title>
</head>
<body>
  <!-- Script 15.1 - test.html -->
</body>
</html>
Script 15.1 This blank HTML page shows how the jQuery library can be included.
1   <!doctype html>
2   <html lang="en">
3   <head>
4      <meta charset="utf-8">
5      <title>Testing jQuery</title>
6      <script src="js/jquery-3.2.1.min.js"> </script>
7   </head>
8   <body>
9      <!-- Script 15.1 - test.html -->
10  </body>
11  </html>
This very first example will simply test the incorporation and basic use of the jQuery library.
7. Within the HTML head, include jQuery:
<script src="js/jquery-3.2.1.min.
js"></script>
The script tag is used to include a JavaScript file. Conventionally, script tags are placed within the HTML page’s head, although that’s not required (or always the case). The value of the src attribute needs to match the name and location of your jQuery library. In this case, the assumption is that this HTML page is in the same directory as the js folder, created as part of Step 5.
8. Save the file as test.html.
Because this script won’t be executing any PHP, it uses the .html extension.
9. If you want, load the page in your browser and check for errors.
As this is just an HTML page, you can load it directly in a browser, without going through a URL. You can then use your browser’s error console or other development tools (see the “Debugging JavaScript” sidebar) to check that no errors occurred in loading the JavaScript file.
Using jQuery
Once you successfully have jQuery incorporated into an HTML page, you can begin using it. jQuery, or any JavaScript code, can be written between opening and closing script tags:
<script>
// JavaScript goes here.
</script>
(Note that in JavaScript, the double slashes create comments, just as in PHP.)
Alternatively, you can place jQuery and JavaScript code within a separate file, and then include that file using the script tags, just as you included the jQuery library. This is the route to be used in this chapter, to further separate the JavaScript from the HTML.
To be clear, an HTML page can have multiple uses of the script tags, and the same script tag cannot both include an external file and contain JavaScript code.
The code placed within a script tag will be executed as soon as the browser encounters it. This is often problematic, though, because JavaScript is frequently used to interact with the DOM; if immediately executed JavaScript code references a DOM element, the code will fail, since that DOM element will not have been encountered by the browser at that point ![]() . The only reliable way to reference DOM elements is after the browser has knowledge of the entire DOM.
. The only reliable way to reference DOM elements is after the browser has knowledge of the entire DOM.
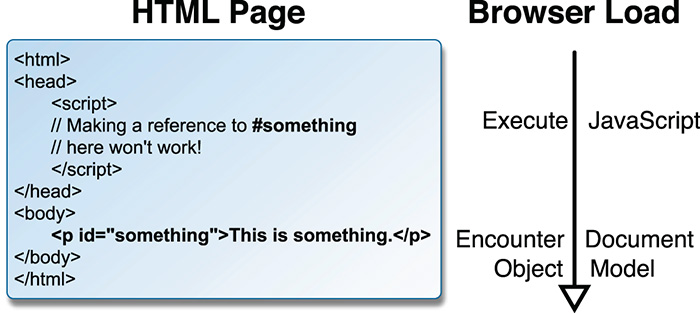
![]() A browser reads a page as the HTML is loaded, meaning that JavaScript code cannot reference DOM elements until the browser has seen them all.
A browser reads a page as the HTML is loaded, meaning that JavaScript code cannot reference DOM elements until the browser has seen them all.
In standard JavaScript, you can have code be executed after the page is completely loaded by referencing window.onload. In jQuery, the preferred method is to confirm that the web document is ready:
$(document).ready(some_function);
As mentioned already, the jQuery syntax can seem especially strange for the uninitiated, so I’ll explain this in detail. First of all, the code is how elements and such within the browser are selected in jQuery. In this case, the item being selected is the entire HTML document. To this selection, the function is applied. It takes one argument: a function to be called. Note that the argument is a reference to the function: its name, without quotation marks. Separately, would have to be defined, wherein the actual work—which should be done when the document is loaded—takes place.
An alternative syntax is to use an anonymous function, which is a function definition without a name. Anonymous functions are common to JavaScript (anonymous functions are possible in PHP, too, but less common). To create an anonymous function, the function’s definition is placed in line, in lieu of the function’s name:
$(document).ready(function() {
 // Function code.
});
Because the need to execute code when the browser is ready is so common, this whole construct is often simplified in jQuery to just:
$(function() {
 // Function code.
});
The syntax is unusual, especially the }); at the end, so be mindful of this as you program. As with any programming language, incorrect JavaScript syntax will make the code inoperable.
To test jQuery, this next sequence of steps will create a JavaScript alert once the document is ready ![]() . After you have this simple test working, you can safely begin using jQuery more practically.
. After you have this simple test working, you can safely begin using jQuery more practically.
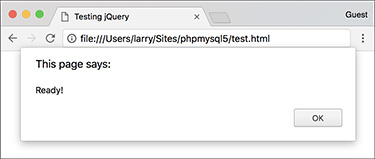
![]() This JavaScript alert is created once jQuery recognizes that the HTML document is ready in the browser.
This JavaScript alert is created once jQuery recognizes that the HTML document is ready in the browser.
To use jQuery:
1. Create a new JavaScript document in your text editor or IDE, to be named test.js (Script 15.2):
// Script 15.2 - test.js
Script 15.2 This simple JavaScript file creates an alert to test successful incorporation and use of the jQuery library.
1   // Script 15.2 - test.js
2   // This script is included by test.html.
3   // This script just creates an alert to test jQuery.
4
5   // Do something when the document is ready:
6   $(function() {
7
8      // Alert!
9      alert('Ready!');
10
11  });
A JavaScript file has no script tags—those are in the HTML document—or other opening tags. You can just begin entering JavaScript code. Again, a double slash creates a comment.
2. Create an alert when the document is ready:
$(function() {
alert('Ready!');
});
This is just the syntax already explained, with a call to alert() in place of the Function code comment shown earlier. The alert() function takes a string as its argument, which will be used in the presented alert box ![]() .
.
3. Save the file as test.js in your web server’s js directory.
4. Open test.html (Script 15.1) in your text editor or IDE.
The next step is to update the HTML page so that it includes the new JavaScript file.
5. After including the jQuery library, include the new JavaScript file (Script 15.3):
<script src="js/test.js"></script>
Script 15.3 The updated test HTML page loads a new JavaScript file.
1   <!doctype html>
2   <html lang="en">
3   <head>
4      <meta charset="utf-8">
5      <title>Testing jQuery</title>
6      <script src="js/jquery-3.2.1.min.js"> </script>
7      <script src="js/test.js"></script>
8   </head>
9   <body>
10     <!-- Script 15.3 - test.html #2 -->
11  </body>
12  </html>
Assuming that the test.js JavaScript file is placed in the same directory as the jQuery library, with the same relative location to test.html, this code will successfully incorporate it.
6. Save the HTML page and test it in your browser ![]() .
.
If you do not see the alert window, you’ll need to debug the JavaScript code.
Tip
Technically, in OOP, a function is called a method. For the duration of this chapter, I’ll continue to use the term “function,” as it’s likely to be more familiar to you.
Tip
The code $() is shorthand for calling the jQuery() function.
Tip
jQuery’s “ready” status is slightly different than JavaScript’s onload: the latter also waits for the loading of images and other media, whereas jQuery’s ready status is triggered by the full loading of the DOM.
Selecting Page Elements
Once you’ve got basic jQuery functionality working, the next thing to learn is how to select page elements. Being able to do so will allow you to hide and show images or blocks of text, manipulate forms, and more.
You’ve already seen how to select the web document itself: $(document). To select other page elements, use CSS selectors in place of document:
![]()
#something selects the element with an id value of something.
![]()
.something selects every element with a class value of something.
![]()
something selects every element of something type (e.g., p selects every paragraph).
Those three rules are more than enough to get you started, but know that unlike document, each of these gets placed within quotation marks. For example, the code $(‘a’) selects every link and $(‘#caption’) selects the element with an id value of caption. By definition, no two elements in a single HTML page should have the same identifying value; thus, to reference individual elements on the page, #something is the easiest solution.
These rules can be combined as well:
![]()
$(‘img.landscape’) selects every image with a class of landscape.
![]()
$(‘#register input’) selects every input element found within an element that has an id of register.
For the next jQuery example, a JavaScript-driven version of the Widget Cost Calculator form, like the one from Chapter 13, “Security Methods,” will be developed. In these next few steps, the HTML page will be created, with the appropriate elements, classes, and unique identifiers to be easily manipulated by jQuery ![]() .
.
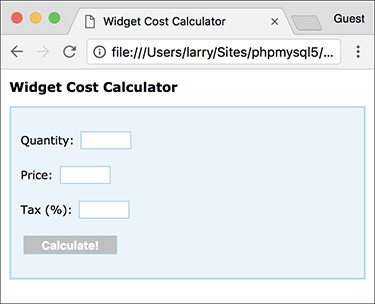
![]() The Widget Cost Calculator as an HTML form.
The Widget Cost Calculator as an HTML form.
To create the HTML form:
1. Open test.html (Script 15.3) in your text editor or IDE, if you haven’t already.
Since this file is already jQuery enhanced, it’ll be easiest to just update it.
2. Change the page’s title (Script 15.4):
<title>Widget Cost Calculator
</title>
Script 15.4 In this HTML page is a form with three textual inputs for performing a calculation.
1   <!doctype html>
2   <html lang="en">
3   <head>
4      <meta charset="utf-8">
5      <title>Widget Cost Calculator</title>
6      <link rel="stylesheet" href="css/style.css">
7      <script src="js/jquery-3.2.1.min.js"></script>
8      <script src="js/calculator.js"></script>
9   </head>
10     <body>
11     <!-- Script 15.4 - calculator.html -->
12  <h1>Widget Cost Calculator</h1>
13  <p id="results"></p>
14  <form action="calculator.php" method="post" id="calculator">
15     <p id="quantityP">Quantity: <input type="number" name="quantity" id="quantity"
       step="1" min="1"></p>
16     <p id="priceP">Price: <input type="number" name="price" id="price" step="0.01"
       min="0.01"></p>
17     <p id="taxP">Tax (%): <input type="number" name="tax" id="tax" step="0.01"
       min="0.01"></p>
18     <p><input type="submit" name="submit" id="submit" value="Calculate!"></p>
19  </form>
20  </body>
21  </html>
3. After the page title, incorporate a CSS file:
<link rel="stylesheet"
href="css/style.css">
To make the form a bit more attractive, some CSS code will style it. You can find the CSS file in the book’s corresponding downloads at LarryUllman.com.
The CSS file also defines two significant classes—error and errorMessage, to be manipulated by jQuery later in the chapter. The first turns everything red; the second italicizes text (but the class will be more meaningful as a way of identifying a group of similar items). In time, you’ll see how these classes are used.
4. Change the second tag so that it references , not :
<script src="js/calculator.js">
</script>
The JavaScript for this example will go in calculator.js, to be written subsequently. It will be stored in the same js folder as the other JavaScript documents.
5. Within the HTML body, create an empty paragraph and begin a form:
<h1>Widget Cost Calculator</h1>
<p id="results"></p>
<form action="calculator.php"
method="post" id="calculator">
The paragraph with the id of results but no content will be used later in the chapter to present the results of the calculations. It has a unique id value, for easy reference. The form, too, has a unique id value. The form, in theory, would be submitted to calculator.php (a separate script, not actually written in this chapter), but that submission will be interrupted by JavaScript.
6. Create the first form element:
<p id="quantityP">Quantity:
Each form input, as originally written in Chapter 13, involved the textual prompt, the element itself, and a paragraph surrounding both. To the paragraph and form input, unique id values are added.
Note that I tend to use “camel-case” style names—quantityP—in object-oriented languages such as JavaScript. This approach just better follows OOP conventions (conversely, I would use quantity_p in procedural PHP code).
7. Create the remaining two form elements:
<p id="priceP">Price:
8. Complete the form and the HTML page:
<p><input type="submit"
The submit button also has a unique id, but that’s for the benefit of the CSS; it won’t actually be referenced in the JavaScript.
9. Save the page as calculator.html and load it in your browser ![]() .
.
Even though the second JavaScript file, calculator.js, has not yet been written, the form is still loadable.
Tip
jQuery has its own additional, custom selectors, allowing you to select page elements in more sophisticated ways. For examples, see the jQuery manual.
Event Handling
JavaScript, like PHP, is often used to respond to events. Differently, though, events in JavaScript terms are primarily user actions within the browser, such as the following:
![]() Moving the cursor over an image or piece of text
Moving the cursor over an image or piece of text
![]() Clicking a link
Clicking a link
![]() Changing the value of a form element
Changing the value of a form element
![]() Submitting a form
Submitting a form
To handle events in JavaScript, you apply an event listener (also called an event handler) to an element; you tell JavaScript that when A event happens to B element, the C function should be called. In jQuery, event listeners are assigned using the syntax
selection.eventType(function);
The selection part would be like $(‘.something’) or $(‘a’): whatever element or elements to which the event listener should be applied. The eventType value will differ based on the selection. Common values are change, focus, mouseover, click, submit, and select: different events can be triggered by different HTML elements. In jQuery, these are all actually the names of functions being called on the selection. These functions take one argument: a function to be called when the event occurs on that selection. Commonly, the function to be invoked is written inline, anonymously. For example, to handle the event of any image being moused-over, you would code
$('img').mouseover(function() {
 // Do this!
});
This construct should look familiar—test.js assigns an event handler that listens for the ready event occurring on the HTML document.
Let’s take this new information and apply it to the HTML page already begun. At this point, an event listener can be added to the form so that its submission can be handled. In this case, the form’s three inputs will be minimally validated, the total calculation will be performed, and the results of the calculation displayed in an alert ![]() . To do all this, you need to know one more thing: to fetch the values entered into the textual form inputs requires the
. To do all this, you need to know one more thing: to fetch the values entered into the textual form inputs requires the val() function. It returns the value for the selection, as you’ll see in these next steps.
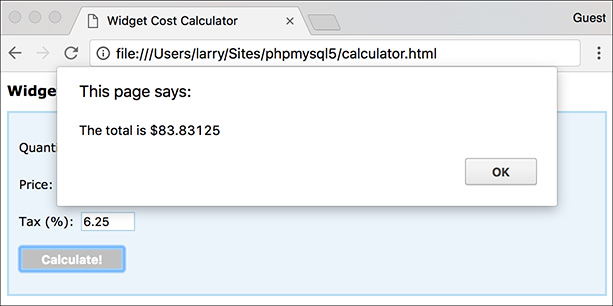
![]() The calculations are displayed using an alert box (for now).
The calculations are displayed using an alert box (for now).
To handle the form submission:
1. Open test.js in your text editor or IDE.
Since the test.js file already has the proper syntax for executing code when the browser is ready, it’ll be easiest and most foolproof to start with it.
2. Remove the existing alert() call (Script 15.5).
Script 15.5 This JavaScript file is included by calculator.html (Script 15.4). Upon submission of the form, the form's values are validated and a calculation performed.
1   // Script 15.5 - calculator.js
2   // This script is included by
    calculator.html.
3   // This script handles and validates
    the form submission.
4
5   // Do something when the document is
    ready:
6   $(function() {
7
8      // Assign an event handler to the
       form:
9      $('#calculator').submit(function() {
10
11        // Initialize some variables:
12        var quantity, price, tax, total;
13
14        // Validate the quantity:
15        if ($('#quantity').val() > 0) {
16
17           // Get the quantity:
18           quantity = $('#quantity').
             val();
19
20        } else { // Invalid quantity!
21
22           // Alert the user:
23           alert('Please enter a valid
             quantity!');
24
25        }
26
27        // Validate the price:
28        if ($('#price').val() > 0) {
29           price = $('#price').val();
30        } else {
31           alert('Please enter a valid
             price!');
32        }
33
34        // Validate the tax:
35        if ($('#tax').val() > 0) {
36           tax = $('#tax').val();
37        } else {
38           alert('Please enter a valid
             tax!');
39        }
40
41        // If appropriate, perform the
          calculations:
42        if (quantity && price && tax) {
43
44           total = quantity * price;
45           total += total * (tax/100);
46
47           // Display the results:
48           alert('The total is $' +
             total);
49
50        }
51
52        // Return false to prevent an
          actual form submission:
53        return false;
54
55     }); // End of form submission.
56
57  }); // End of document ready.
All the following code will go in place of the original alert().
3. In place of the alert() call, add an event handler to the form’s submission:
$('#calculator').submit(function() {
}); // End of form submission.
The selector grabs a reference to the form, which has an id value of calculator. To this selection the submit() function is applied, so that when the form is submitted, the inline anonymous function will be called. Because the syntax can be so tricky, my recommendation is to add this block of code, and then write the contents of the anonymous function—found in the following steps. Note that this and the following code go within the existing $(document).ready() { } block.
4. Within the new anonymous function, initialize four variables:
var quantity, price, tax, total;
In JavaScript, the var keyword is used to declare a variable. It can also declare multiple variables at once, if separated by commas. Note that variables in JavaScript do not have an initial dollar sign, like those in PHP.
5. Validate the quantity:
if ($('#quantity').val() > 0) {
  quantity = $('#quantity').val();
} else {
  alert('Please enter a valid
  quantity!');
}
For each of the three form inputs, the value needs to be a number greater than zero. The value entered can be found by calling the function on the selected element. If the returned value is greater than zero, then the value is assigned to the local variable . Otherwise, an alert box indicates the problem to the user ![]() . This is admittedly a tedious use of alerts; you’ll learn a smoother approach in the next section of the chapter.
. This is admittedly a tedious use of alerts; you’ll learn a smoother approach in the next section of the chapter.
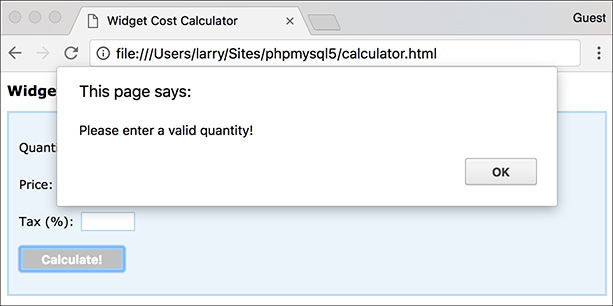
![]() If a form element does not have a positive numeric value, an alert box indicates the error.
If a form element does not have a positive numeric value, an alert box indicates the error.
As a reminder, HTML5 will also validate the inputs in supported browsers. To disable that while testing, add novalidate to the opening form tag:
<form action="calculator.php"
6. Repeat the validation for the other two form inputs:
if ($('#price').val() > 0) {
  price = $('#price').val();
} else {
  alert('Please enter a valid
  price!');
}
if ($('#tax').val() > 0) {
  tax = $('#tax').val();
} else {
  alert('Please enter a valid
  tax!');
}
7. If all three variables have valid values, perform the calculations:
if (quantity && price && tax) {
  total = quantity * price;
  total += total * (tax/100);
This code should be fairly obvious by now: it looks almost exactly as it would in PHP, save for the lack of dollar signs in front of each variable’s name.
8. Report the total:
alert('The total is $' + total);
Again, a crude alert window will be used to display the results of the calculation ![]() . As you can see in this code, the plus sign performs concatenation in JavaScript.
. As you can see in this code, the plus sign performs concatenation in JavaScript.
9. Complete the conditional begun in Step 7 and return the value false:
}
return false;
Having the function return false prevents the form from being submitted to the script that’s identified as the form’s action.
10. Save the page as calculator.js (in the js folder) and test the calculator in your browser.
Note that if you already had calculator.html loaded in your browser, you’ll need to refresh the browser to load the updated JavaScript.
Tip
There are many jQuery plug-ins specifically intended for validating forms, but I wanted to keep this simple (and explain core JavaScript concepts in the process).
Tip
It is possible to format numbers in JavaScript—for example, so they always contain two decimals—but it’s not easily done. For this reason, and because I didn’t want to detract from the more important information being covered, the results of the calculation may not always look as good as they should.
Tip
With jQuery, if the browser supports it, the JavaScript code will perform the calculations. If the user has JavaScript disabled, or if the user has a really old browser, the JavaScript will not take effect and the form will be submitted as per usual (here, to the nonexistent calculator.php).
DOM Manipulation
One of the most critical uses of JavaScript in general, and jQuery in particular, is manipulation of the DOM: changing, in any way, the contents of the browser. Normally, DOM manipulation is manifested by altering what the user sees; how easily you can do this in jQuery is one of its strengths.
Once you’ve selected the element or elements to be manipulated, applying any number of jQuery functions to the selection will change its properties. For starters, the hide() and show() functions …um…hide and show the selection. Thus, to hide a form (perhaps after the user has successfully completed it), you would use
$('#actualFormId').hide();
Similar to show() and hide() are fadeIn() and fadeOut(). These functions also reveal or hide the selection, but do so with a bit of effect added in.
Another way to impact the DOM is to change the CSS classes that apply to a selection. The addClass() function applies a CSS class and removeClass() removes one. The following code adds the emphasis class to a specific blockquote and removes it from all paragraphs:
$('#blockquoteID').addClass
('emphasis');
$('p').removeClass('emphasis');
The toggleClass() function can be used to toggle the application of a class to a selection.
The already mentioned functions generally change the properties of the page’s elements, but you can also change the contents of those elements. In the previous section, you used the val() function, which returns the value of a form element. But when provided with an argument, val() assigns a new value to that form element:
$('#something').val('cat');
Similarly, the html() function returns the HTML contents of an element and text() returns the textual contents. Both functions can also take arguments used to assign new HTML and text, accordingly.
Let’s use all this information to finish off the widget cost calculator. A few key changes will be made:
![]() Errors will be indicated by applying the error class.
Errors will be indicated by applying the error class.
![]() Errors will also be indicated by hiding or showing error messages
Errors will also be indicated by hiding or showing error messages ![]() .
.
![]() Error messages are now displayed next to the problematic form inputs.
Error messages are now displayed next to the problematic form inputs.
![]() The final total will be written to the page
The final total will be written to the page ![]() .
.
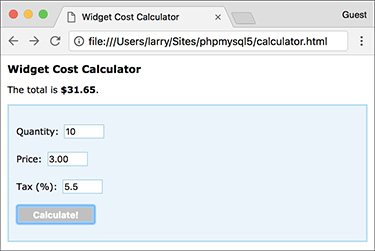
![]() The results of the calculations are now displayed above the form.
The results of the calculations are now displayed above the form.
![]() Alerts will not be used.
Alerts will not be used.
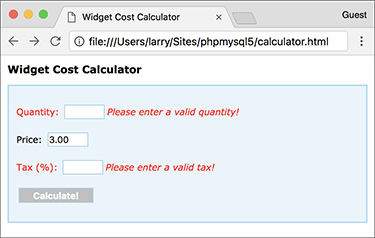
There are a couple of ways of showing and hiding error messages. The simplest, to be implemented here, is to manually add the messages to the form and then toggle their visibility using JavaScript. Accordingly, these steps begin by updating the HTML page.
To manipulate the DOM:
1. Open calculator.html in your text editor or IDE, if you haven’t already.
2. Between the quantity form element and its closing paragraph tag, add an error message (Script 15.6):
<p id="quantityP">Quantity:
Script 15.6 The updated HTML page has hardcoded error messages beside the key form inputs.
1   <!doctype html>
2   <html lang="en">
3   <head>
4      <meta charset="utf-8">
5      <title>Widget Cost Calculator</title>
6      <link rel="stylesheet" href="css/style.css" type="text/css" media="screen">
7      <script src="js/jquery-3.2.1.min.js"></script>
8      <script src="js/calculator.js"></script>
9   </head>
10  <body>
11     <!-- Script 15.6 - calculator.html #2 -->
12  <h1>Widget Cost Calculator</h1>
13  <p id="results"></p>
14  <form action="calculator.php" method="post" id="calculator">
15     <p id="quantityP">Quantity: <input type="number" name="quantity" id="quantity"
       step="1" min="1"><span class="errorMessage" id="quantityError">Please enter a valid
       quantity!</span></p>
16     <p id="priceP">Price: <input type="number" name="price" id="price" step="0.01"
       min="0.01"><span class="errorMessage" id="priceError">Please enter a valid price!
       </span></p>
17     <p id="taxP">Tax (%): <input type="number" name="tax" id="tax" step="0.01"
       min="0.01"><span class="errorMessage" id="taxError">Please enter a valid tax!
       </span></</p>
18     <p><input type="submit" name="submit" id="submit" value="Calculate!"> p>
19  </form>
20  </body>
21  </html>
Now following the input is a textual error, which also has a unique . The span containing the error also uses the errorMessage class. This impacts the message’s formatting, thanks to the external CSS document, and makes it easier for jQuery to globally hide all error messages upon first loading the page.
3. Repeat Step 2 for the other two form inputs:
<p id="priceP">Price:
4. Save the file.
5. Open calculator.js in your text editor or IDE, if it is not already open.
6. Remove all existing alert() calls (Script 15.7).
Script 15.7 Using jQuery, the JavaScript code now manipulates the DOM instead of using alert() calls.
1   // Script 15.7 - calculator.js #2
2   // This script is included by calculator.html.
3   // This script handles and validates the form submission.
4
5   // Do something when the document is ready:
6   $(function() {
7
8      // Hide all error messages:
9      $('.errorMessage').hide();
10
11     // Assign an event handler to the form:
12     $('#calculator').submit(function() {
13
14        // Initialize some variables:
15        var quantity, price, tax, total;
16
17        // Validate the quantity:
18        if ($('#quantity').val() > 0) {
19
20           // Get the quantity:
21           quantity = $('#quantity').val();
22
23           // Clear an error, if one existed:
24           $('#quantityP').removeClass('error');
25

26           // Hide the error message, if it was visible:
27           $('#quantityError').hide();
28
29        } else { // Invalid quantity!
30
31           // Add an error class:
32           $('#quantityP').addClass('error');
33
34           // Show the error message:
35           $('#quantityError').show();
36
37        }
38
39        // Validate the price:
40        if ($('#price').val() > 0) {
41           price = $('#price').val();
42           $('#priceP').removeClass('error');
43           $('#priceError').hide();
44        } else {
45           $('#priceP').addClass('error');
46           $('#priceError').show();
47        }
48
49        // Validate the tax:
50        if ($('#tax').val() > 0) {
51           tax = $('#tax').val();
52           $('#taxP').removeClass('error');
53           $('#taxError').hide();
54        } else {
55           $('#taxP').addClass('error');
56           $('#taxError').show();
57        }
58
59        // If appropriate, perform the calculations:
60        if (quantity && price && tax) {
61
62           total = quantity * price;
63           total += total * (tax/100);
64
65           // Display the results:
66           $('#results').html('The total is <strong>$' + total + '</strong>.');
67
68        }
69
70           // Return false to prevent an actual form submission:
71           return false;
72
73     }); // End of form submission.
74
75  }); // End of document ready.
7. Before the submit event handler, hide every element with the error- Message class:
$('.errorMessage').hide();
The selector grabs a reference to any element of any type that has a class of errorMessage. In the HTML form, this applies only to the three span tags.
8. In the if clause code after assigning a value to the local quantity variable, remove the error class and hide the error message:
$('#quantityP').removeClass
('error');
$('#quantityError').hide();
As you’ll see in Step 9, when the user enters an invalid quantity, the quantity paragraph (with an id value of quantityP) will be assigned the error class and the quantity error message (i.e., #quantityError) will be shown. If the user entered an invalid quantity but then entered a valid one, those two effects must be undone, using the code shown here.
In the case that an invalid quantity was never submitted, the quantity paragraph will not have the error class and the quantity error message will still be hidden. In situations where jQuery is asked to do something that’s not possible, such as hiding an already hidden element, jQuery just ignores the request.
9. If the quantity is not valid, add the error class and show the error message:
$('#quantityP').addClass('error');
$('#quantityError').show();
This code does the opposite of that in Step 8. Note that it goes within the else clause.
10. Repeat Steps 8 and 9 for the price, making that if-else read:
if ($('#price').val() > 0) {
  price = $('#price').val();
  $('#priceP').removeClass('error');
  $('#priceError').hide();
} else {
  $('#priceP').addClass('error');
  $('#priceError').show();
}
11. Repeat Steps 8 and 9 for the tax, making that if-else read:
if ($('#tax').val() > 0) {
  tax = $('#tax').val();
  $('#taxP').removeClass('error');
  $('#taxError').hide();
} else {
  $('#taxP').addClass('error');
  $('#taxError').show();
}
12. After calculating the total, within the same if clause, update the results paragraph:
$('#results').html('The total is
<strong>$' + total + '</strong>.');
Instead of using an alert box, you can write the total message to the HTML page dynamically. One way of doing so is by changing the text or HTML of an element on the page. The page already has an empty paragraph for this purpose, with an value of results. To change the text found within the paragraph, you would apply the function. To change the HTML found within the paragraph, use html() instead.
13. Save the page as calculator.js (in the js folder) and test the calculator in your browser.
Again, remember that you must reload the HTML page (because both the HTML and the JavaScript have been updated).
Tip
jQuery will not throw an error if you attempt to select page elements that don’t exist. jQuery will also not throw an error if you call a function on nonexistent elements.
Tip
In JavaScript, as in other OOP languages, you can “chain” function calls together, performing multiple actions at one time. This code reveals a previously hidden paragraph, adds a new class, and changes its textual content, all in one line:
$('#pId').show().addClass('thisClass').
text('Hello, world! ');
Tip
You can change the attributes of a selection using the attr() function. Its first argument is the attribute to be impacted; the second, the new value. For example, the following code will disable a submit button by adding the property disabled=”disabled”:
$('#submitButtonId').attr('disabled',
'disabled');
Tip
You can add, move, or remove elements using the prepend(), append(), remove(), and other functions. See the jQuery manual for specifics.
Using Ajax
Along with DOM manipulation, another key use of JavaScript and jQuery is Ajax. The term Ajax was first coined in 2005, although browser support was mixed for years. Come 2017, Ajax is a standard feature of many dynamic web sites, and its straightforward use is supported by all the major browsers. But what is Ajax?
Ajax can mean many things, involving several different technologies and approaches, but at the end of the day, Ajax is simply the use of JavaScript to perform a server-side request unbeknownst to the user. In a standard request model—which is to say pretty much every other example in this book—the user may begin on, say, login.html. Upon submission of the form, the browser will be taken to perhaps login.php, where the actual form validation is done, the registration in the database takes place, and the results are displayed ![]() . (Even if the same PHP script both displays and handles a form, the standard request model requires two separate and overt requests of that same page.)
. (Even if the same PHP script both displays and handles a form, the standard request model requires two separate and overt requests of that same page.)
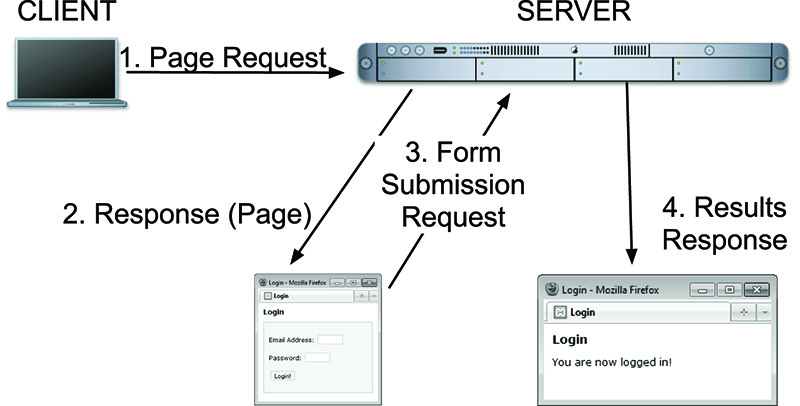
![]() A standard client-server request model, with the browser constantly reloading entire HTML pages.
A standard client-server request model, with the browser constantly reloading entire HTML pages.
With the Ajax model, the form submission will be hijacked by JavaScript, which will in turn send the form data to a server-side PHP script. That PHP script does whatever validation and other tasks necessary, and then returns only data to the client-side JavaScript, indicating the results of the operation. The client-side JavaScript then uses the returned data to update the HTML page ![]() . Although there are more steps, the user will be unaware of most of them and will be able to continue interacting with the HTML page while this process takes place.
. Although there are more steps, the user will be unaware of most of them and will be able to continue interacting with the HTML page while this process takes place.
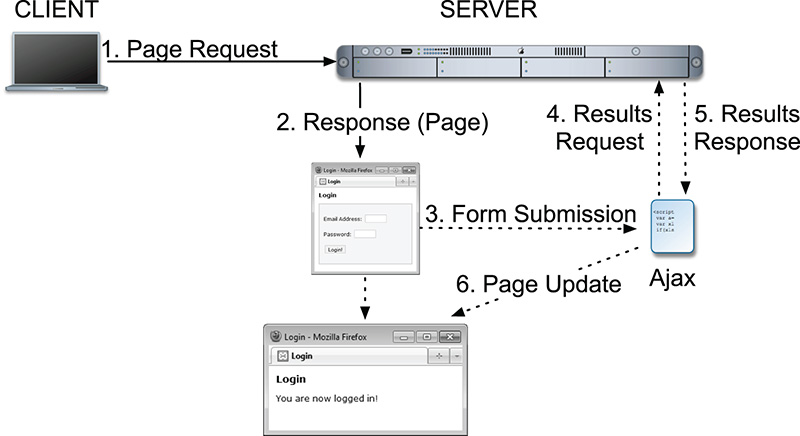
![]() With Ajax, server requests are made behind the scenes, and the browser can be updated without reloading.
With Ajax, server requests are made behind the scenes, and the browser can be updated without reloading.
Tip
The foundation of the Ajax process is a JavaScript object of type XMLHttpRequest, sometimes abbreviated XHR. However, the request can be made over other protocols besides HTTP and other data types are more commonly returned than XML.
Creating the form
Incorporating Ajax into a web site results in an improved user experience, more similar to how desktop applications behave. There can also be better performance, with less data transmitted back and forth (e.g., an entire second page of HTML, like login.php, does not need to be transmitted).
You already know much of the information required for performing Ajax transactions: form validation with JavaScript, form validation with PHP, and using JavaScript to update the DOM. The last bit of knowledge you need is how to perform the actual Ajax request using jQuery. Over the next several pages, you’ll create the HTML form, the server-side PHP script, and the intermediary JavaScript, all for the sake of handling a login form. To shorten and simplify the code a bit, I’ve cut a couple of corners, but I’ll indicate exactly when I do so, and every cut will be in an area you could easily flesh out on your own.
Creating the form
The login form simply needs two inputs: one for an email address and another for a password ![]() . The form will use the same techniques for displaying errors and indicating results as
. The form will use the same techniques for displaying errors and indicating results as calculator.html ![]() .
.
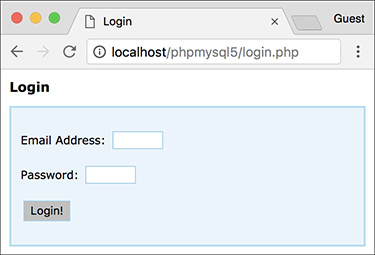
![]() The login form.
The login form.
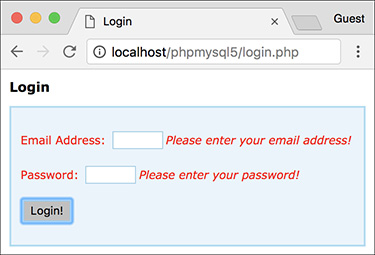
![]() Error messages are revealed beside each form element.
Error messages are revealed beside each form element.
To create the form:
1. Begin a new PHP document in your text editor or IDE, to be named login.php (Script 15.8):
<!doctype html>
<html lang="en">
<head>
  <meta charset="utf-8">
  <title>Login</title>
  <link rel="stylesheet"
href="css/style.css">
Script 15.8 The login form has one text input for the email address, a password input, and a submit button. Other elements exist to be manipulated by jQuery.
1   <!doctype html>
2   <html lang="en">
3   <head>
4      <meta charset="utf-8">
5      <title>Login</title>
6      <link rel="stylesheet"
       href="css/style.css">
7      <script src="js/jquery-3.2.1.min.js">
       </script>
8      <script src="js/login.js"></script>
9   </head>
10  <body>
11     <!-- Script 15.8 - login.php -->
12  <h1>Login</h1>
13  <p id="results"></p>
14  <form action="login.php" method="post" id="login">
15     <p id="emailP">Email Address:
       <input type="email" name="email"
       id="email"><span class="errorMessage"
       id="emailError">Please enter your
       email address!</span></p>
16     <p id="passwordP">Password:
       <input type="password"
       name="password" id="password">
       <span class="errorMessage"
       id="passwordError">Please enter your
       password!</span></p>
17     <p><input type="submit" name="submit"
       value="Login!"></p>
18  </form>
19  </body>
20  </html>
This will actually be a PHP script, not just an HTML file. The page uses the same external CSS file as .
2. Incorporate the jQuery library and a second JavaScript file:
<script src="js/jquery-3.2.1.min.
js"></script>
<script src="js/login.js"></script>
The page will use the same jQuery library as . The page-specific JavaScript will go in . Both will be stored in the folder, found in the same directory as this script.
3. Complete the HTML head and begin the body:
</head>
<body>
  <!-- Script 15.8 - login.php -->
<h1>Login</h1>
<p id="results"></p>
Within the body, before the form, is an empty paragraph with an id of results, to be dynamically populated with jQuery later ![]() .
.
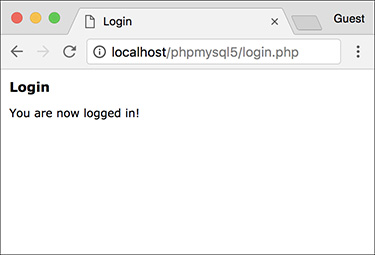
![]() Upon successfully logging in, the form will disappear and a message will appear just under the header.
Upon successfully logging in, the form will disappear and a message will appear just under the header.
4. Create the form:
<form action="login.php"
This form is quite like that in calculator.html. Both form elements are wrapped within paragraphs that have unique id values, making it easy for jQuery to apply the error class when needed. Both elements are followed by the default error message, to be hidden and shown by jQuery as warranted.
5. Complete the HTML page:
</body>
</html>
6. Save the page as login.php and load it in your browser.
Remember that this is a PHP script, so it must be accessed through a URL (http://something).
Creating the server-side script
The previous sequence of steps goes through creating the client side of the process: the HTML form. Next, I’m going to skip ahead and look at the server side: the PHP script that handles the form data. This script must do two things:
1. Validate the submitted data.
2. Return a string indicating the results.
For simplicity’s sake, the PHP script will merely compare the submitted values against hardcoded ones, but you could easily modify this code to perform a database query instead.
In terms of the Ajax process, the important thing is that this PHP script only ever returns a single string ![]() , without any HTML or other markup
, without any HTML or other markup ![]() . This is mandatory, because the entire output of the PHP script is what the JavaScript performing the Ajax request will receive. And, as you’ll see in the JavaScript for this example, the PHP script’s output will be the basis for the error reporting and DOM manipulation to be performed.
. This is mandatory, because the entire output of the PHP script is what the JavaScript performing the Ajax request will receive. And, as you’ll see in the JavaScript for this example, the PHP script’s output will be the basis for the error reporting and DOM manipulation to be performed.
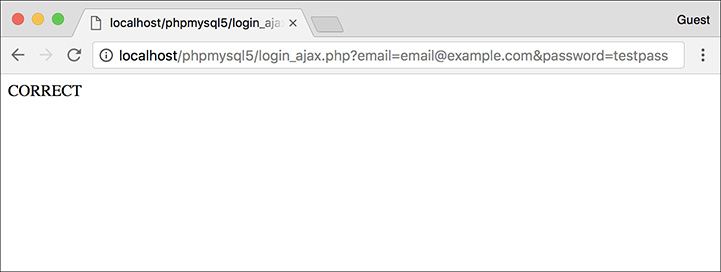
![]() The results of the server-side PHP script when a proper request is made.
The results of the server-side PHP script when a proper request is made.

![]() The HTML source of the server-side PHP script shows that the only output is a simple string, without any HTML at all.
The HTML source of the server-side PHP script shows that the only output is a simple string, without any HTML at all.
To handle the Ajax request:
1. Begin a new PHP document in your text editor or IDE, to be named login_ajax.php (Script 15.9):
<?php # Script 15.9 -
Script 15.9 This PHP script will receive the Ajax request from JavaScript. It performs some validation and returns simple strings to indicate the results.
1   <?php # Script 15.9 - login_ajax.php
2   // This script is called via Ajax from
    login.php.
3   // The script expects to receive two
    values in the URL: an email address and
    a password.
4   // The script returns a string
    indicating the results.
5
6   // Need two pieces of information:
7   if (isset($_GET['email'],
    $_GET['password'])) {
8
9      // Need a valid email address:
10     if (filter_var($_GET['email'],
       FILTER_VALIDATE_EMAIL)) {
11
12        // Must match specific values:
13        if ( ($_GET['email'] ==
          '[email protected]') &&
          ($_GET['password'] == 'testpass')
          ) {
14
15           // Set a cookie, if you want,
             or start a session.
16
17           // Indicate success:
18           echo 'CORRECT';
19
20        } else { // Mismatch!
21           echo 'INCORRECT';
22        }
23
24     } else { // Invalid email address!
25        echo 'INVALID_EMAIL';
26     }
27
28  } else { // Missing one of the two
    variables!
29     echo 'INCOMPLETE';
30  }
31
32  ?>
Again, this script is not meant to be executed directly, so it contains no HTML.
2. Validate that an email address and a password were received in the URL:
if (isset($_GET['email'],
$_GET['password'])) {
A GET request will be made of this script; therefore, the first thing the code does is confirm that both an email address and a password were passed to it.
3. Validate that the submitted email address is of the proper syntax:
if (filter_var($_GET['email'],
FILTER_VALIDATE_EMAIL)) {
Using the Filter extension, the provided email address is also checked for basic syntax.
4. If the submitted values are correct, indicate success:
if ( ($_GET['email'] ==
As already mentioned, this code just compares the submitted values against two static strings. You could easily swap out this code for a database query, like those in Chapter 12, “Cookies and Sessions.” At this point you could also set a cookie or begin a session (although see the following tip for the “gotchas” involved with doing so).
Most importantly, the script simply echoes the word CORRECT, without any other HTML (![]() and
and ![]() ).
).
5. Complete the three conditionals:
       } else {
          echo 'INCORRECT';
       }
    } else {
       echo 'INVALID_EMAIL';
    }
} else {
    echo 'INCOMPLETE';
}
These three else clauses complete the conditionals begun in Steps 2, 3, and 4. Each simply prints a string indicating a certain status. The JavaScript associated with the login form, to be written next, will take different actions based on each of the possible results.
6. Complete the PHP page:
?>
7. Save the file as login_ajax.php, and place it in the same folder of your web directory as login.php.
The two files must be in the same directory for the Ajax request to work.
Tip
It’s perfectly acceptable for the server-side PHP script in an Ajax process to set cookies or begin a session. Keep in mind, however, that the page in the browser has already been loaded, meaning that page cannot access cookies or sessions created after the fact. You’ll need to use JavaScript to update the page after creating a cookie or starting a session, but subsequent pages loaded in the browser will have full access to cookie or session data.
Creating the JavaScript
The final step is to create the JavaScript that interrupts the form submission, sends the data to the server-side PHP script, reads the PHP script’s results, and updates the DOM accordingly. This is the “glue” between the client-side HTML form and the server-side PHP. All the JavaScript form validation and DOM manipulation will be quite similar to what you’ve already seen in this chapter. Two new concepts will be introduced.
First, you’ll need to know how to create a generic object in JavaScript. In this case, one object will represent the data to be sent to the PHP script and another will represent the options for the Ajax request. Here is how you create a new object in JavaScript:
var objectName = new Object();
The next chapter gets into OOP in more detail, but understand now that this just creates a new variable of type Object. The capital letter “O” Object is a blank template in JavaScript (since JavaScript is an object-oriented language, most variables are objects of some type). Once you’ve created the object, you can add values to it using the syntax:
objectName.property = value;
If you’re new to JavaScript or OOP, it may help to think of the generic object as being like an indexed array, with a name and a corresponding value.
The second new piece of information is the usage of jQuery’s ajax() function. This function performs an Ajax request. It takes as its lone argument the request’s settings. As part of the jQuery library, it’s invoked like so:
$.ajax(settings);
That’s the basic premise; the particulars will be discussed in detail in the following code.
To perform an Ajax request:
1. Begin a new JavaScript file in your text editor or IDE, to be named login.js (Script 15.10):
// Script 15.10 - login.js
Script 15.10 The JavaScript code in this file performs an Ajax request of a server-side script and updates the DOM based on the returned response.
1   // Script 15.10 - login.js
2   // This script is included by login.php.
3   // This script handles and validates the
    form submission.
4   // This script then makes an Ajax
    request of login_ajax.php.
5
6   // Do something when the document is ready:
7   $(function() {
8
9      // Hide all error messages:
10     $('.errorMessage').
       hide();
11
12     // Assign an event handler to the
       form:
13     $('#login').submit(function() {
14
15        // Initialize some variables:
16        var email, password;
17
18        // Validate the email address:
19        if ($('#email').val().length
          >= 6) {
20
21           // Get the email address:
22           email = $('#email').val();
23
24           // Clear an error, if one
             existed:
25           $('#emailP').removeClass
             ('error');
26
27           // Hide the error message,
             if it was visible:
28           $('#emailError').hide();
29
30        } else { // Invalid email address!
31
32           // Add an error class:
33           $('#emailP').addClass
             ('error');
34
35           // Show the error message:
36           $('#emailError').show();
37
38        }

39
40        // Validate the password:
41        if ($('#password').val().length > 0) {
42           password = $('#password').val();
43           $('#passwordP').removeClass('error');
44           $('#passwordError').hide();
45        } else {
46           $('#passwordP').addClass('error');
47           $('#passwordError').show();
48        }
49
50        // If appropriate, perform the Ajax request:
51        if (email && password) {
52
53           // Create an object for the form data:
54           var data = new Object();
55           data.email = email;
56           data.password = password;
57
58           // Create an object of Ajax options:
59           var options = new Object();
60
61           // Establish each setting:
62           options.data = data;
63           options.dataType = 'text';
64           options.type = 'get';
65           options.success = function(response) {
66
67              // Worked:
68              if (response == 'CORRECT') {
69
70                 // Hide the form:
71                 $('#login').hide();
72
73                 // Show a message:
74                 $('#results').removeClass('error');
75                 $('#results').text('You are now logged in!');
76
77              } else if (response == 'INCORRECT') {
78                 $('#results').text('The submitted credentials do not match those on file!');
79                 $('#results').addClass('error');
80              } else if (response == 'INCOMPLETE') {
81                 $('#results').text('Please provide an email address and a password!');
82                 $('#results').addClass('error');
83              } else if (response == 'INVALID_EMAIL') {
84                 $('#results').text('Please provide your email address!');
85                 $('#results').addClass('error');
86              }
87
88           }; // End of success.
89           options.url =
             'login_ajax.php';
90
91           // Perform the request:
92           $.ajax(options);
93
94        } // End of email && password IF.
95
96        // Return false to prevent an
          actual form submission:
97        return false;
98
99     }); // End of form submission.
100
101 }); // End of document ready.
2. Add the jQuery code for handling the “ready” state of the document:
$(function() {
});
The JavaScript needs to start with this code in order to set the table once the browser is ready. Because of the complicated syntax, I think it’s best to add this entire block of code first and then place all the subsequent code within the braces.
3. Hide every element that has the errorMessage class:
$('.errorMessage').hide();
The selector grabs a reference to any element of any type that has a class of errorMessage. In the HTML form, this applies only to the three span tags. Those will be hidden by this code as soon as the DOM is loaded.
4. Create an event listener for the form’s submission:
$('#login').submit(function() {
});
This code is virtually the same as that in the calculator form. All the remaining code will go within these braces.
5. Initialize two variables:
var email, password;
These two variables will act as local representations of the form data.
6. Validate the email address:
if ($('#email').val().length >= 6) {
  email = $('#email').val();
  $('#emailP').removeClass('error');
  $('#emailError').hide();
The calculator form validated that all the numbers were greater than zero, which isn’t an appropriate validation for the login form. Instead, the conditional confirms that the string length of the value of the email input is greater than or equal to 6 (six characters being the absolute minimum required for a valid email address, such as [email protected]). You could also use regular expressions in JavaScript to perform more stringent validation, but I’m trying to keep this simple (and the server-side PHP script will validate the email address as well, as you’ve already seen).
If the email address value passes the minimal validation, it’s assigned to the local variable. Next, the error class is removed from the paragraph, in case it was added previously, and the email-specific error is hidden, in case it was shown previously.
7. Complete the email address conditional:
} else {
  $('#emailP').addClass('error');
  $('#emailError').show();
}
This code completes the conditional begun in Step 6. The code is the same as that used in , adding the error class to the entire paragraph and showing the error message ![]() .
.
8. Validate the password:
if ($('#password').val().length >
0) {
  password = $('#password').val();
  $('#passwordP').removeClass
('error');
  $('#passwordError').hide();
} else {
  $('#passwordP').addClass('error');
  $('#passwordError').show();
}
For the password, the minimum length would likely be determined by the registration process. As a placeholder, this code just confirms a positive string length. Otherwise, this code is essentially the same as that in the previous two steps.
9. If both values were received, store them in a new object:
if (email && password) {
  var data = new Object();
  data.email = email;
  data.password = password;
The premise behind this code was explained before these steps. First a new, generic object is created. Then a property of that object named email is created and then assigned the value of the email address. Finally, a property named password is created and then assigned the value of the entered password. If it helps to imagine this code in PHP terms, the equivalent would be
$data = array();
$data['email'] = $email;
$data['password'] = $password;
10. Create a new object for the Ajax options, and establish the first three settings:
var options = new Object();
options.data = data;
options.dataType = 'text';
options.type = 'get';
Here, another generic object is created. Next, a property named data is assigned the value of the data object. This property of the options object stores the data being passed to the PHP script as part of the Ajax request.
The second setting is the data type expected back from the server-side request. As the PHP script login_ajax.php returns (i.e., prints) a simple string, the value here is text. The dataType setting impacts how the JavaScript will attempt to work with the returned response; it needs to match what the actual server response will be.
The type setting is the type of request being made, with get and post the two most common. A GET request is the default, so it does not need to be assigned here, but the code is being explicit anyway.
To be clear, because of the name of the properties in the data object—email and password—and because of the type value of get, the login_ajax.php script will receive $_GET[‘email’] and $_GET[‘password’]. If you were to change the names of the properties in data, or the value of options.type, the server-side PHP script would receive the Ajax data in different superglobal variables.
11. Begin defining what should happen upon a successful Ajax request:
  options.success = function
  (response) {
}; // End of success.
The success property defines what the JavaScript should do when the Ajax query works. By “work,” I mean that the JavaScript can perform a request of the server-side page and receive a result. For what should actually happen, an anonymous function is assigned to this property. In this step, the anonymous function is defined and the assignment line is completed. The code in subsequent steps will go between these curly brackets.
As you can see, the anonymous function takes one argument: the response from the server-side script, assigned to the response variable. As already explained, the response received by the JavaScript will be the entirety of whatever is outputted by the PHP script.
12. Within the anonymous function created in Step 11, if the server response equals CORRECT, hide the form and update the page:
if (response == 'CORRECT') {
  $('#login').hide();
  $('#results').removeClass('error');
  $('#results').text('You are now
  logged in!');
When the user submits the correct credentials—[email protected] and testpass, will return the string CORRECT. In that case, the JavaScript will hide the entire login form and assign a string to the results paragraph, indicating such ![]() . Because incorrect submissions may have added the error class to this paragraph (see Step 13), that class is also removed here.
. Because incorrect submissions may have added the error class to this paragraph (see Step 13), that class is also removed here.
13. If the server response equals INCORRECT, indicate an error:
} else if (response == 'INCORRECT') {
  $('#results').text('The submitted
  credentials do not match those
  on file! ');
  $('#results').addClass('error');
When the user submits a password and a syntactically valid email address but does not provide the correct specific values, the server-side PHP script will return the string INCORRECT. In that case, a different string is assigned to the results paragraph and the error class is applied to the paragraph as well ![]() .
.
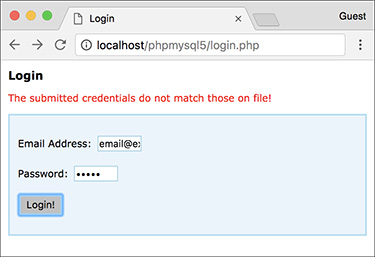
![]() The results upon providing invalid login credentials.
The results upon providing invalid login credentials.
14. Add clauses for the other two possible server responses:
} else if (response ==
These are repetitions of the code in Step 13, with different messages. This is the end of the code that goes within the property’s anonymous function.
15. Add the url property and make the request:
options.url = 'login_ajax.php';
$.ajax(options);
The url property of the Ajax object names the actual server-side script to which the request should be sent. As long as login.php and login_ajax.php are in the same directory, this reference will work.
Finally, after establishing all of the request options, the request is performed.
16. Complete the conditional begun in Step 9 and return false:
} // End of email && password IF.
return false;
If the email and password variables do not have TRUE values, no Ajax request is made (i.e., that conditional has no else clause). Finally, the value false is returned here to prevent the actual submission of the form.
17. Save the page as login.js (in the js folder) and test the login form in your browser.
Tip
Here’s a debugging tip: it often helps to run the server-side script directly ![]() to confirm that it works (e.g., that it doesn’t contain a parse or other error).
to confirm that it works (e.g., that it doesn’t contain a parse or other error).
Tip
An improvement you could make to this process would be to have the server-side PHP script respond in JSON (JavaScript Object Notation) format instead. Search online for details on returning JSON from a PHP script and using JSON in JavaScript.
Tip
Because JavaScript can be disabled by users, you can never rely strictly on JavaScript form validation. You must always also use server-side PHP validation to protect your web site.
Review and Pursue
If you have any problems with the review questions or the pursue prompts, turn to the book’s supporting forum (LarryUllman.com/forums/).
Review
![]() What is JavaScript? How does JavaScript compare to PHP?
What is JavaScript? How does JavaScript compare to PHP?
![]() What is jQuery? What is the relationship between jQuery and JavaScript?
What is jQuery? What is the relationship between jQuery and JavaScript?
![]() How is an external JavaScript file incorporated into an HTML page? How is JavaScript code placed within the HTML page itself?
How is an external JavaScript file incorporated into an HTML page? How is JavaScript code placed within the HTML page itself?
![]() Why is it important to wait until the entire DOM has been loaded to execute JavaScript code that references DOM elements?
Why is it important to wait until the entire DOM has been loaded to execute JavaScript code that references DOM elements?
![]() Why are unique identifiers in the DOM necessary?
Why are unique identifiers in the DOM necessary?
![]() In jQuery, how do you select elements of a given tag type? How do you select elements that have a certain class? How do you select a specific element?
In jQuery, how do you select elements of a given tag type? How do you select elements that have a certain class? How do you select a specific element?
![]() In jQuery, how do you add an event listener to a page element (or elements)? What is an event listener?
In jQuery, how do you add an event listener to a page element (or elements)? What is an event listener?
![]() Why must you reload HTML pages after altering their JavaScript?
Why must you reload HTML pages after altering their JavaScript?
![]() What are some of the jQuery functions you can use to manipulate the DOM?
What are some of the jQuery functions you can use to manipulate the DOM?
![]() What is Ajax? Why is Ajax a “good thing”?
What is Ajax? Why is Ajax a “good thing”?
![]() Why must an HTML page that performs a server-side request be loaded through a URL?
Why must an HTML page that performs a server-side request be loaded through a URL?
![]() How do you create a generic object in JavaScript?
How do you create a generic object in JavaScript?
![]() What impact does the Ajax request’s
What impact does the Ajax request’s type property have? What impact do the names of the properties in the data object have?
Pursue
![]() Head to the jQuery web site and start perusing the jQuery documentation.
Head to the jQuery web site and start perusing the jQuery documentation.
![]() Check out jQuery UI and what it can do for your HTML pages.
Check out jQuery UI and what it can do for your HTML pages.
![]() Use the jQuery documentation, or simply search online, for some of jQuery’s plug-ins. Attempt to use one or more of them in an HTML page.
Use the jQuery documentation, or simply search online, for some of jQuery’s plug-ins. Attempt to use one or more of them in an HTML page.
![]() Once you feel comfortable with the Ajax process, search online for information about performing Ajax requests using JSON to represent the data transmitted back to the JavaScript.
Once you feel comfortable with the Ajax process, search online for information about performing Ajax requests using JSON to represent the data transmitted back to the JavaScript.
![]() See what happens when you reference a DOM element in JavaScript before the entire DOM has been loaded. Witnessing this should help you recognize what’s happening when you inevitably and accidentally fail to wait until the browser is ready before referencing the DOM.
See what happens when you reference a DOM element in JavaScript before the entire DOM has been loaded. Witnessing this should help you recognize what’s happening when you inevitably and accidentally fail to wait until the browser is ready before referencing the DOM.
![]() Update
Update calculator.js so that the results paragraph is initially cleared on each form submission. By doing so, the results of previous submissions won’t be shown upon subsequent invalid submissions.
![]() Modify
Modify login_ajax.php so that it uses a database to confirm successful login.
![]() Modify
Modify login_ajax.php so that it sends a cookie or begins a session. Create a secondary PHP script that accesses the created cookie or session.
![]() Modify
Modify login.php so that it also performs the login validation, should the user have JavaScript disabled. Hint: This is simpler than you might think—just use PHP to handle the form submission (in the same file) as if JavaScript were not present at all.