
4. Essential Commands
A major component of working on a Linux system is the command-line environment. Often referred to as the command-line interface (CLI), this component of Linux provides a huge variety of tools. As a developer, you don’t have to learn how to use all of these tools, but knowing key command-line tools makes the task of developing code a much easier one.
This chapter focuses on the essential Linux commands that all developers should know. This chapter builds on what you learned in Chapter 2 (basic command-line execution) and Chapter 3 (filesystem management commands) and provides you with a solid foundation for working in a Linux command-line shell environment.
Command-Line Tools
At this point you might be wondering “Why command-line tools?” If your experience is primarily with GUI-based systems, such as Microsoft Windows, you might consider the CLI something that belongs in the dark ages of computing. However, good reasons exist for why command-line tools have their place on modern operating systems:
![]() Stability: Many Linux commands were derived from Unix and are essentially decades old. This stability means Linux developers can focus on making more tools rather than reinventing features that already exist.1
Stability: Many Linux commands were derived from Unix and are essentially decades old. This stability means Linux developers can focus on making more tools rather than reinventing features that already exist.1
![]() Speed of development: Developing command-line tools takes much less time than developing GUI-based tools. As a result, the developers who create Linux tools can create command-line tools faster than GUI-based tools.
Speed of development: Developing command-line tools takes much less time than developing GUI-based tools. As a result, the developers who create Linux tools can create command-line tools faster than GUI-based tools.
![]() Scripting: Suppose you want to execute a set of instructions each day. With a GUI-based tool, you would have to do this manually every day. With command-line tools, you can create a script, which is a collection of command-line tools. You will learn more about this in Chapters 7 and 8.
Scripting: Suppose you want to execute a set of instructions each day. With a GUI-based tool, you would have to do this manually every day. With command-line tools, you can create a script, which is a collection of command-line tools. You will learn more about this in Chapters 7 and 8.
![]() Speed of use: Although you might not believe this initially, you can actually perform tasks quicker on the command line (especially if you are good at typing on a keyboard). Normally, GUI-based tools require both mouse and keyboard input (imagine doing a “save as” of a document). This slows you down as you have to take your hands off the keyboard to use the mouse (or vice versa). Additionally, in Linux you can quickly re-execute previous commands as well as bring up previous commands, edit them, and execute them. After you get used to all of this, you can accomplish system tasks more quickly.
Speed of use: Although you might not believe this initially, you can actually perform tasks quicker on the command line (especially if you are good at typing on a keyboard). Normally, GUI-based tools require both mouse and keyboard input (imagine doing a “save as” of a document). This slows you down as you have to take your hands off the keyboard to use the mouse (or vice versa). Additionally, in Linux you can quickly re-execute previous commands as well as bring up previous commands, edit them, and execute them. After you get used to all of this, you can accomplish system tasks more quickly.
![]() Power: You can combine commands to do things the original creator never conceived of doing and complete tasks in a much more elegant, efficient, and useful way.
Power: You can combine commands to do things the original creator never conceived of doing and complete tasks in a much more elegant, efficient, and useful way.
How Many Commands Are There?
As an instructor I have often been asked by students, “Can you provide a full list of all the Linux commands?” I often wonder whether astronomers are ever asked the similar question, “Can you provide a full list of all the stars in the sky?”
Although there are not 100 billion Linux commands, there are many more than you want to commit to a single list. A typical “small” installation with just the basic software will result in at least a couple thousand commands. It isn’t unusual to have more than 10,000 commands on a system that has many of the optional software packages installed.
My advice: Don’t worry about learning about all the commands. Focus on the ones that help you do your job (in this case, those that help you develop code).
Viewing Files
A good number of the files on a Linux filesystem are text files. As a result, a lot of commands exist to view the contents of text files. This section introduces many of these files.
The file Command
Before you attempt to view the contents of a file, first make sure the contents are in text format and not some other format. Linux supports many file types besides just text files, including compressed files, files that contain executable code, and database formatted files. To determine what type of contents a file contains, execute the following file command:
[student@localhost ~]$ file /usr/share/dict/linux.words
/usr/share/dict/linux.words: ASCII text
[student@localhost ~]$ file /bin/ls
/bin/ls: ELF 64-bit LSB executable, x86-64, version 1 (SYSV), dynamically linked (uses shared libs), for GNU/Linux 2.6.32, BuildID[sha1]=aa7ff68f13de25936a098016243ce57c3c982e06, stripped
[student@localhost ~]$ file /usr/share/doc/sed-4.2.2/sedfaq.txt.gz
/usr/share/doc/sed-4.2.2/sedfaq.txt.gz: gzip compressed data, was "sedfaq.txt", from Unix, last modified: Mon Feb 10 09:11:16 2014, max compression
If the output of the file command includes “text”, such as with the command file /usr/share/dict/linux.words, then you can use the commands described in this section to view its contents. However, you don’t want to use these commands to view ELF 64-bit, gzip compressed data, or other non-text file types. In most cases, viewing these files will result in “garbage” being displayed on your screen. In some cases it can even mess up your terminal window.2
The cat Command
For the times when you want to view the contents of a small file, the cat command (short for concatenate) works well:
[student@localhost ~]$ cat /etc/cgrules.conf
# /etc/cgrules.conf
#The format of this file is described in cgrules.conf(5)
#manual page.
#
# Example:
#<user> <controllers> <destination>
#@student cpu,memory usergroup/student/
#peter cpu test1/
#% memory test2/
# End of file
*:iscsid net_prio cgdcb-4-3260
A useful cat option for developers is the -n option, which is used to number lines. This can be helpful when viewing source code scripts that execute with an error message, as shown in Listing 4.1.3
Listing 4.1 The cat -n command
[student@localhost ~]$ ./display.sh
Report of current contents of /etc:
./display.sh: line 5: [-d: command not found
[student@localhost ~]$ cat -n display.sh
1 #!/usr/bin/bash
2
3 echo "Report of current contents of /etc:"
4
5 if [-d /etc]
6 then
7 echo -n "Number of directories: "
8 ls -l /etc | grep "^d" | wc -l
9 echo -n "Number of links: "
10 ls -l /etc | grep "^l" | wc -l
11 echo -n "Number of regular files: "
12 ls -l /etc | grep "^-" | wc -l
13 fi
The more and less Commands
The problem with the cat command comes about when trying to display large files. You will discover that it doesn’t pause at any point during display of the file, but rather it scrolls through the file as if you had some superhero speed-reading skill.
To pause the display while displaying the contents of large files, use the more or the less commands:
[student@localhost ~]$ more /usr/share/dict/linux.words
[student@localhost ~]$ less /usr/share/dict/linux.words
Why Both more and less?
Why two commands that do essentially the same thing? The more command is the original and the less command is an “improved version” of the more command (hence giving rise to the joke “less does more than more”).4
In reality, the extra features provided by the less command are less-often used features, at least for most Linux users. The more command is also useful because it is on every Linux (and Unix, MacOS, and Windows) system in the world. The less command is part of an optional software package and not available by default on many systems.
The more and less commands are also useful for pausing the display of a command that produces a large amount of output. Use the pipe character that was covered in Chapter 3 to send the output of a command to the more command:
[student@localhost ~]$ ls -l /etc | more
While viewing a file with the more or less command, you can use commands to control the display. For example, press the spacebar to scroll down one screen of data. Use the Enter key to move down one line at a time.
See the following for useful commands to control the display while using the more or less commands:
![]() Spacebar Scroll down one screen
Spacebar Scroll down one screen
![]() Enter Scroll down one line
Enter Scroll down one line
![]()
h Displays help screen (summary of commands)
![]()
/{pattern} Search for {pattern}
![]()
n Find next occurrence of previous {pattern}
![]()
:f Displays filename and current line number
The head and tail Commands
Sometimes you might want to display only the top or bottom part of a file. For example, you might want to look at the comments at the top of a source code file. Or, you want to display recent entries of a log file, which are normally placed at the bottom of the file. For these situations, use the head and tail commands.
By default, these commands display ten lines. For example Listing 4.2 demonstrates displaying the top ten lines of the /usr/share/dict/linux.words file.
Listing 4.2 The head command
[student@localhost ~]$ head /usr/share/dict/linux.words
1080
10-point
10th
11-point
12-point
16-point
18-point
1st
20-point
Use the -n option to specify how many lines to display. For example, the command tail -n 5 /etc/passwd displays the last five lines of the /etc/passwd file.
The wc command
To display statistical information about a file, including the number of lines, words, and characters in the file, use the wc command:
[student@localhost ~]$ wc display.sh
13 59 291 display.sh
The output displayed is the number of lines (13), the number of words (59), and number of bytes (291) that are in the display.sh file. Because display.sh is a text file, the number of bytes is actually the number of characters (1 character = 1 byte).
You can limit or modify the output of the wc command by using the following options:
![]()
-c Display number of bytes
![]()
-m Display number of characters (different than number of bytes for non-text files)
![]()
-l Display number of lines
![]()
-w Display the number of words
Finding Files
There is bound to be a time when you have misplaced a file or just cannot remember where a file is stored. In these cases, you can turn to the locate or find commands to search the system for the missing file.
The locate Command
Early each morning a database is created that contains a list of all files and directories on the system. The locate command is used to search this database. For example, to find the linux.words file, execute the following command:
[student@localhost ~]$ locate linux.words
/usr/share/dict/linux.words
The locate command searches for any file that contains the pattern “linux.words,” which might result in more output than expected:
[student@localhost ~]$ locate words | head
/etc/libreport/forbidden_words.conf
/etc/libreport/ignored_words.conf
/usr/include/bits/wordsize.h
/usr/lib64/perl5/CORE/keywords.h
/usr/lib64/perl5/bits/wordsize.ph
The find Command
The locate command is useful, but it does have a couple of drawbacks. One drawback is that it searches a database that was created earlier in the day. So, if you lose a file that you created today, the locate command won’t be able to find this file.
The find command searches the live filesystem, which takes more time than using the locate command (searching databases is much faster), but it does find files that are currently on the filesystem. The syntax for the find command is as follows:
find [starting location] [option/arguments]
For example, to search for the linux.words file, execute the following command:
[student@localhost ~]$ find /usr -name linux.words
find: '/usr/lib/firewalld': Permission denied
find: '/usr/lib64/Pegasus': Permission denied
/usr/share/dict/linux.words
find: '/usr/share/Pegasus/scripts': Permission denied
find: '/usr/share/polkit-1/rules.d': Permission denied
find: '/usr/libexec/initscripts/legacy-actions/auditd': Permission denied
Note the error messages that appear are because directories existed that the current user was not allowed to search. This is one of the reasons why you want to start your search in a subdirectory, not in the / directory. Another reason is because a search of the entire filesystem, starting from the root directory, might take a lot of time.
You can prevent these error messages by using the redirection method discussed in Chapter 3:
[student@localhost ~]$ find /usr -name linux.words 2> /dev/null
/usr/share/dict/linux.words
Another advantage of the find command over the locate command is that the find command can search using a variety of different file attributes. For example, you can search for files that are owned by specific users:
find /home -user student
Commonly used find options for specifying what to search for include the following:
![]()
-mmin n—Display files that were modified n minutes ago. Use -mmin +n to specify “more than n minutes ago” or -mmin -n to specify “less than n minutes ago.”
![]()
-mtime n—Display files that were modified n days ago (technically n*24 hours ago). Can use +n and -n like the -mmin option.
![]()
-group groupname—Display files owned by groupname.
![]()
-size n—Display files of a given size represented by n. Follow the n value with a character to represent a unit of space. For example, -size +10M would display files that were 10 megabytes or larger.
You can change what the find command does when it finds a file. For example, the -ls option can provide detailed information about each file found:
[student@localhost ~]$ find /usr -name linux.words -ls 2> /dev/null
22096370 4840 -rw-r--r-- 1 root root 4953680 Jun 9 2014 ➥/usr/share/dict/linux.words
Commonly used find options for specifying what to do with the files that are found:
![]()
-delete Deletes the file.
![]()
-ls Provides a long display listing of the files that were found (like the ls -l command).
![]() -
-exec { } ; Executes a command on that file that was found. For example:
find /home/student -name sample.txt -exec more {} ;
I know that the syntax here is very strange. In a nutshell, the find command generates a series of commands like this: more file1; more file2; more file3. The {} represents where to place the filename that was found and ; tells the find command “put a semicolon between each command to treat them as separate commands.”
Comparing Files
As a developer, you are going to have different versions of files as you improve and bug-fix existing programs. This can cause confusion because determining whether two files are the same or somehow different is sometimes hard. In these cases, you should use the cmp and diff commands.
The cmp Command
If you only want to determine whether two files are different, not how they are different, then use the cmp command. Based on the output of the following commands, the display.sh and show.sh files contain identical content (this results in no output when cmp is executed) whereas present.sh contains different content:
[student@localhost ~]$ ls *.sh
display.sh present.sh show.sh
[student@localhost ~]$ cmp display.sh show.sh
[student@localhost ~]$ cmp display.sh present.sh
display.sh present.sh differ: byte 66, line 5
The cmp command is also useful for comparing two non-text files. For example, you could compare two files that contain compiled code.
The diff Command
If you want two see how two text files differ, use the diff command:
[student@localhost ~]$ diff display.sh present.sh
5c5
< if [-d /etc]
---
> if [ -d /etc ]
13a14,15
>
> echo "The end of the report"
The output of the diff command is essentially saying, “If you make these changes, then the files will look the same.” Each section starts with a code that includes the line of the first file, what action to take and the line of the second file. For example, 5c5 means “Change line 5 of the first file to look like line 5 of the second file.”
Additional lines after the “code” line indicate what the changes would look like:
< if [-d /etc]
---
> if [ -d /etc ]
The line that begins with < shows the current fifth line of the first file. The --- is just used to separate the lines, and the line that begins with the > shows the current fifth line of the second file.
Shell Features
The bash shell includes a large number of features designed to make it an easier and more powerful command-line environment. Some of these features, such as wildcards and redirection, have already been covered in Chapter 3.
In this section you learn about more bash shell features, including shell variables, aliases, and history. Knowing how to use these features will make it much easier to work in the bash shell and make you a more powerful software developer.
Shell Variables
Just like programming languages use variables to store values, the bash shell also stores critical shell information in variables. To create a variable, use the following syntax: VAR=value. To display a variable, use the echo command and place a $ character in front of the variable name:
[student@localhost ~]$ EDITOR=vi
[student@localhost ~]$ echo $EDITOR
vi
To display all variables, use the set command. There are many predefined variables, so you might want to pipe the output to the more or head command to limit the output. See Listing 4.3 for an example.
Listing 4.3 The set command
[student@localhost ~]$ set | head
ABRT_DEBUG_LOG=/dev/null
BASH=/bin/bash
BASHOPTS=checkwinsize:cmdhist:expand_aliases:extglob:extquote:force_
fignore:histappend:interactive_comments:login_shell:progcomp:promptvars:sourcepath
BASH_ALIASES=()
BASH_ARGC=()
BASH_ARGV=()
BASH_CMDS=()
BASH_COMPLETION_COMPAT_DIR=/etc/bash_completion.d
BASH_LINENO=()
BASH_REMATCH=()
Variables serve three primary purposes:
![]() To store useful information for the user. For example,
To store useful information for the user. For example,
DOCS=/usr/share/docs
![]() To store useful information for the shell or a command. For example, the
To store useful information for the shell or a command. For example, the EDITOR variable is used to tell commands like visudo and crontab which editor to use by default. For this to work, you must convert the variable to an environment variable (see the “Environment Variables” sidebar).
![]() To store script data. When creating bash shell scripts, you will need to store information. Variables are very useful for that purpose (see Chapter 8, “BASH Shell Scripting,” for more details on BASH shell scripting).
To store script data. When creating bash shell scripts, you will need to store information. Variables are very useful for that purpose (see Chapter 8, “BASH Shell Scripting,” for more details on BASH shell scripting).
Environment Variables
By default, variables are only available to the shell they are created in. However, you can tell the shell to pass variables to other commands by making them environment variables.
For example, if you want to pass the EDITOR variable to any command that is executed in the shell, execute the following commands:5
EDITOR=vi
export EDITOR
Aliases
If you find yourself using the find command daily to search the system for new shell scripts:
find / -name "*.sh" -ls
At some point you ask yourself, “Why do I need to type this long command every day?” The fact is, you don’t need to. You can make an alias for this command, which can be much shorter and easier to type. For example:
alias myfind='find / -name "*.sh" -ls'
Now when you execute the myfind alias, it will run that long find command. However, you must create this alias every time you log in and every time you open a new shell. To have this happen automatically, place this alias command in a file named .bashrc in your home directory. You can also use this file to create variables that you want enabled every time you log in to the system.
History
Commands that you execute in a shell are saved in memory so you can execute them again. To see these commands, execute the history command (the output could be hundreds of commands, so limit the output with the tail command):
[student@localhost ~]$ history | tail -n 5
258 alias hidden='ls -ld .*'
259 alias c=clear
260 alias
261 date
262 history | tail -n 5
Each command is assigned a number. You can re-execute a command by using this number with an ! character preceding it:6
[student@localhost ~]$ !261
date
Sun May 1 01:06:21 PDT 2016
You can also bring up the previous command by pressing the up arrow key. This allows you to modify a command before re-executing it.
Permissions
Understanding file and directory permissions is critical for Linux developers because Linux is a multi-user environment and permissions are designed to protect your work from others. To understand permissions, you first need to know the types of permissions that are available in Linux and how these permissions differ when they are applied to files versus when they are applied to directories.
You also need to know how to set permissions. Linux provides two methods: the symbolic method and the octal (or numeric) method.
Viewing Permissions
To view the permissions of a file or directory, use the ls -l command:
[student@localhost ~]$ ls -l /etc/chrony.keys
-rw-r-----. 1 root chrony 62 May 9 2015 /etc/chrony.keys
The first ten characters of the output denote the file type (recall that - is for plain files and d is for directories) and the permissions for the file. Permissions are broken into three sets: the user owner of the file (root in the previous example), the group owner (chrony), and all other users (referred to as “others”).
Each set has three possible permissions: read (symbolized by r), write (w), and execute (x). If the permission is set, the character that symbolizes the permission displays. Otherwise, a - character displays to indicate that permission isn’t set. So, r-x means “read and execute are set, but write is not set.”
Files versus Directories
What read, write, and execute permissions really mean depends on whether the object is a file or directory. For files, it means the following:
![]() Read—Can view or copy file contents.
Read—Can view or copy file contents.
![]() Write—Can modify file contents.
Write—Can modify file contents.
![]() Execute—Can run the file like a program; after you create a program, you must make it executable before you can run it.
Execute—Can run the file like a program; after you create a program, you must make it executable before you can run it.
For directories, it means the following:
![]() Read—Can list files in directory.
Read—Can list files in directory.
![]() Write—Can add and delete files in directory (requires execute).
Write—Can add and delete files in directory (requires execute).
![]() Execute—Can
Execute—Can cd into directory or use in pathname.
The write permission on directories is potentially the most dangerous. If a user has write and execute permission on one of your directories, then that user can delete every file in that directory.
Changing Permissions
The chmod7 command is used to change permissions on files. It can be used in two ways: symbolic method and octal method. With the octal method, the permissions are assigned numeric values:
![]() Read = 4
Read = 4
![]() Write = 2
Write = 2
![]() Execute = 1
Execute = 1
With these numeric values, one number can be used to describe an entire permission set:
![]() 7 =
7 = rwx
![]() 6 =
6 = rw-
![]() 5 =
5 = r-x
![]() 4 =
4 = r--
![]() 3 =
3 = -wx
![]() 2 =
2 = -w-
![]() 1 =
1 = --x
![]() 0 =
0 = ---
So, to change the permissions of a file to rwxr-xr--, you execute the following command:
chmod 754 filename
With octal permissions, you should always provide three numbers, which will change all the permissions. But what if you only want to change a single permission of the set? For that, use the symbolic method by passing three values to the chmod command as shown in Table 4.1.
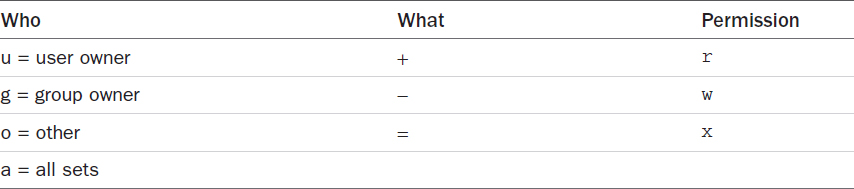
Table 4.1 Symbolic method values
The following demonstrates adding execute permission to all three sets (user owner, group owner, and others):
[student@localhost ~]$ ls -l display.sh
-rw-rw-r--. 1 student student 291 Apr 30 20:09 display.sh
[student@localhost ~]$ chmod a+x display.sh
[student@localhost ~]$ ls -l display.sh
-rwxrwxr-x. 1 student student 291 Apr 30 20:09 display.sh
Developer Tools
Knowing how to view files, modify file permissions, and use shell features are important for all Linux users. Developers also should know how to compress files and how to use the powerful filtering tool, the grep command.
File Compression Commands
As a developer you will be in a position to transfer files from one system to another. You might be downloading software from the Internet, uploading your programs to a server, or sending your programs to someone via email. In all of these cases, knowing how to merge files into a single file and compressing this merged file will be useful. This process makes transporting large amounts of data easy and quick as well as provides something that will take up less disk space.
Many commands in Linux enable you to create compressed files, including the gzip, bzip2, and tar commands.
The gzip Command
The purpose of the gzip command is to create a compressed version of a file. By default, it replaces the original file with the compressed version:
[student@localhost ~]$ cp /usr/share/dict/linux.words .
[student@localhost ~]$ ls -l linux.words
-rw-r--r--. 1 student student 4953680 May 1 09:19 linux.words
[student@localhost ~]$ gzip linux.words
[student@localhost ~]$ ls -l linux.words.gz
-rw-r--r--. 1 student student 1476083 May 1 09:19 linux.words.gz
If you want both the compressed and original file, you have to use the -c option to send the output to standard output and keep the original file. Of course, you don’t really want the output to be sent to the screen, so redirect the compressed output to a file:
[student@localhost ~]$ ls -l linux.words
-rw-r--r--. 1 student student 4953680 May 1 09:19 linux.words
[student@localhost ~]$ gzip -c linux.words > linux.words.gz
[student@localhost ~]$ ls -l linux.words linux.words.gz
-rw-r--r--. 1 student student 4953680 May 1 09:19 linux.words
-rw-rw-r--. 1 student student 1476083 May 1 09:23 linux.words.gz
Note
Typically file extensions, such as .txt and .cvs, are unnecessary in Linux. However, they are important for files that you create with the gzip command. This utility expects the extension of .gz when it uncompresses a file. If you name the file linux.words.zipped, for example, the gzip command will attempt to use the file named linux.words.zipped.gz when uncompressing the file (and this will fail).
To uncompress a gzipped file, use the -d option:8
[student@localhost ~]$ ls -l linux.words.gz
-rw-rw-r--. 1 student student 1476083 May 1 09:23 linux.words.gz
[student@localhost ~]$ gzip -d linux.words.gz
[student@localhost ~]$ ls -l linux.words
-rw-rw-r--. 1 student student 4953680 May 1 09:23 linux.words
The bzip2 Command
The difference between gzip and bzip2 is how they perform the compression operation. In some cases, gzip results in better compression, whereas in others the bzip2 command does. The gzip utility is the older of the two and considered more established, but the bzip2 utility is used fairly often on modern Linux distributions.
Fortunately, the developers of bzip2 decided to use the same options that the gzip utility uses:
[student@localhost ~]$ ls -l linux.words
-rw-rw-r--. 1 student student 4953680 May 1 09:23 linux.words
[student@localhost ~]$ bzip2 linux.words
[student@localhost ~]$ ls -l linux.words.bz2
-rw-rw-r--. 1 student student 1711811 May 1 09:23 linux.words.bz2
[student@localhost ~]$ bzip2 -d linux.words.bz2
[student@localhost ~]$ ls -l linux.words
-rw-rw-r--. 1 student student 4953680 May 1 09:23 linux.words
Which One Should You Use?
Keep in mind that gzip and bzip2 are just two of the compression commands available on Linux. Others include the zip utility and the xz command. With so many to choose from, which should you use?
If you are only concerned about the compressed file being used on Linux, then it really comes down to compression ratio. Try them all, and find out which compresses the best (or the fastest because higher compression is often slower).
If you are considering compressing a file that will be used on other platforms, such as Microsoft Windows, I suggest using zip or gzip because they use a more standard compression algorithm.
The tar Command
The gzip and bzip commands are great for compressing a single file, but what if you want to merge a bunch of files together? Typically, this means using the tar9 command.
To create a tar file (also called a tar ball), use the following syntax:
[student@localhost ~]$ tar -cvf zip.tar /usr/share/doc/zip-3.0
tar: Removing leading '/' from member names
/usr/share/doc/zip-3.0/
/usr/share/doc/zip-3.0/CHANGES
/usr/share/doc/zip-3.0/LICENSE
/usr/share/doc/zip-3.0/README
/usr/share/doc/zip-3.0/README.CR
/usr/share/doc/zip-3.0/TODO
/usr/share/doc/zip-3.0/WHATSNEW
/usr/share/doc/zip-3.0/WHERE
/usr/share/doc/zip-3.0/algorith.txt
You use the -c option to create the tar file. The -v option stands for verbose and results in a list of the files that are being merged into the tar file. You use the -f option to specify the name of the resulting tar file.10
What happens when you try to create a tar file and forget to provide a name for it? You get the following message:11
tar: Cowardly refusing to create an empty archive
To list the contents of an existing tar file, use the -t option (t for table of contents:
[student@localhost ~]$ tar -tf zip.tar
usr/share/doc/zip-3.0/
usr/share/doc/zip-3.0/CHANGES
usr/share/doc/zip-3.0/LICENSE
usr/share/doc/zip-3.0/README
usr/share/doc/zip-3.0/README.CR
usr/share/doc/zip-3.0/TODO
usr/share/doc/zip-3.0/WHATSNEW
usr/share/doc/zip-3.0/WHERE
usr/share/doc/zip-3.0/algorith.txt
To extract the files from the tar ball, use the -x option:
[student@localhost ~]$ tar -xf zip.tar
In the current directory there should now be a usr directory with a directory structure of usr/share/doc/zip-3.0. All the extracted files are in the zip-3.0 directory.
By default, the tar command does not compress. However, you can have the tar command use either gzip or bzip2 to compress by using the -z (gzip) or -j (bzip2) options.
The grep Command
Many tools available on Linux are designed to perform operations on text data, but the most powerful and useful for a software developer is the grep command. This command is designed to act as a filter, only displaying the lines of data that match a pattern.
Origin of the Word grep
Clearly grep is not a real word. So, where did the name come from?
It comes from a feature of the ed editor (an editor that predates the vi editor that you will learn about in Chapter 5). In the ed editor, you could display only the lines that contain a pattern by using the following syntax:
:g/pattern/p
Because the pattern could be a regular expression (regular expressions are covered in the next section), ed documentation typically displayed this command as
:g/re/p
The individual who created the grep command (Ken Thompson) also created the ed feature, so he naturally named the command after the feature.12
For example, to view all the comment lines in a shell script, execute the following command:
[student@localhost ~]$ grep "#" /etc/rc.local
#!/bin/bash
# THIS FILE IS ADDED FOR COMPATIBILITY PURPOSES
#
# It is highly advisable to create own systemd services or udev rules
# to run scripts during boot instead of using this file.
#
# In contrast to previous versions due to parallel execution during boot
# this script will NOT be run after all other services.
#
# Please note that you must run 'chmod +x /etc/rc.d/rc.local' to ensure
# that this script will be executed during boot.
By default, the grep command matches the pattern regardless of whether it is part of another word. You can see the result of this by looking at line 2 of Listing 4.4 where the the is matched within the word then.
Listing 4.4 Matching with grep
[student@localhost ~]$ grep the /etc/bashrc | cat -n
1 # will prevent the need for merging in future updates.
2 if [ "$PS1" ]; then
3 if [ -z "$PROMPT_COMMAND" ]; then
4 if [ -e /etc/sysconfig/bash-prompt-xterm ]; then
5 elif [ "${VTE_VERSION:-0}" -ge 3405 ]; then
6 if [ -e /etc/sysconfig/bash-prompt-screen ]; then
7 # if [ "$PS1" ]; then
8 if ! shopt -q login_shell ; then # We're not a login shell
9 # Need to redefine pathmunge, it gets undefined at the end ➥of /etc/profile
10 if [ "$2" = "after" ] ; then
11 if [ $UID -gt 199 ] && [ "'id -gn'" = "'id -un'" ]; then
12 # and interactive - otherwise just process them to set envvars
13 if [ -r "$i" ]; then
14 if [ "$PS1" ]; then
If you only want to match a pattern as a separate word, use the -w option:
[student@localhost ~]$ grep -w the /etc/bashrc | cat -n
1 # will prevent the need for merging in future updates.
2 # Need to redefine pathmunge, it gets undefined at the end ➥of /etc/profile
Regular Expressions
Chapter 3 discussed wildcards, special characters that the bash shell uses to match filenames in a directory. Wildcards are fairly simple to use, because filenames are typically small and not very complex. However, text within a file can be much more rich and complex. To perform flexible matching with the grep command, use regular expressions (think “wildcards on steroids”).
Regular expressions are a huge topic (seriously, enough to fill up a book larger than the size of this one). As a developer, you don’t need to know everything about regular expressions, so to get you started, I just cover the basics.
As you can see from the following example, the grep command returns results regardless of where on the line the pattern is found:
[student@localhost ~]$ grep "growths" /usr/share/dict/linux.words
growths
ingrowths
outgrowths
regrowths
undergrowths
upgrowths
If you only want to see the lines that begin with the pattern, use the regular expression character ^ at the beginning of the pattern:
[student@localhost ~]$ grep "^growths" /usr/share/dict/linux.words
growths
If you only want to see the lines that end with the pattern, use the regular expression character $ at the end of the pattern.
Remember Listing 4.1?
Listing 4.1 is a bash shell script (with an error) that includes lines like the following:
ls -l /etc | grep "^d" | wc -l
ls -l /etc | grep "^-" | wc -l
ls -l /etc | grep "^l" | wc -l
These lines took the output of the ls -l command and sent it to the grep command to display file times. Lines from the ls -l command that begin with the letter d are directories. By sending this output to the wc command, you get a count of how many directories are in the /etc directory.
In Chapter 8, “BASH Shell Scripting,” you will learn about the rest of what this bash shell script is doing.
Another useful regular expression character is the . character, which represents exactly one character. In the following example, "r..t" matches “root” on lines 1 and 2. For line 3 "r..t" matches “r/ft”:
[student@localhost ~]$ grep "r..t" /etc/passwd | cat -n
1 root:x:0:0:root:/root:/bin/bash
2 operator:x:11:0:operator:/root:/sbin/nologin
3 ftp:x:14:50:FTP User:/var/ftp:/sbin/nologin
Additional useful grep regular expressions (some of which require using the -E option for extended regular expressions) include
![]()
* Matches zero or more of the previous character.
![]()
+ Matches one or more of the previous character (requires using the -E option).
![]()
. Matches any single character.
![]()
[ ] Matches a single character from a subset of characters; [abc] matches either an a, b, or c.
![]()
? Matches an optional character; a? means “match either the character ‘a’ or nothing” (requires using the -E option).
![]()
| Match one or another; abc|xyz matches either abc or xyz (requires using the -e option).
![]()
Escapes the special meaning of a regular expression character; * matches simply a * character.
Note
Regular expressions are extremely useful, not just for the grep command, but many other Linux tools as well as many programming languages. This is a very good topic to expand your knowledge on to become a more powerful developer.
Searching for Files with grep
The find and locate commands are useful for finding files by name, but they can’t find files based on the contents of a file. The grep command can search all files within a directory structure recursively if you use the -r option.
When you use the grep command in this manner, you probably want to use the -l option, which will list matching filenames (rather than listing every line in every file that matches). You probably also want to redirect STDERR to suppress error messages for files and directories that you don’t have permission to. See Listing 4.5 for an example that searches for all bash shell scripts in the /etc directory structure.
Listing 4.5 Searching with grep
[student@localhost ~]$ grep -rl '^#!/bin/bash' /etc/* 2> /dev/null
/etc/auto.net
/etc/auto.smb
/etc/cron.daily/0yum-daily.cron
/etc/cron.daily/man-db.cron
/etc/cron.hourly/0yum-hourly.cron
/etc/init.d/netconsole
/etc/kernel/postinst.d/51-dracut-rescue-postinst.sh
/etc/NetworkManager/dispatcher.d/11-dhclient
/etc/NetworkManager/dispatcher.d/13-named
/etc/pki/tls/certs/renew-dummy-cert
/etc/ppp/ip-down
/etc/ppp/ip-up
/etc/ppp/ipv6-up
/etc/qemu-ga/fsfreeze-hook
/etc/rc.d/init.d/netconsole
/etc/rc.d/rc.local
/etc/rc.local
/etc/sysconfig/network-scripts/ifdown-eth
/etc/sysconfig/network-scripts/ifdown-tunnel
/etc/sysconfig/network-scripts/ifup-aliases
/etc/sysconfig/network-scripts/ifup-eth
/etc/sysconfig/network-scripts/ifup-sit
/etc/sysconfig/network-scripts/ifup-tunnel
/etc/sysconfig/network-scripts/ifup-wireless
/etc/sysconfig/network-scripts/ifdown-ib
/etc/sysconfig/network-scripts/ifup-ib
/etc/sysconfig/raid-check
/etc/vsftpd/vsftpd_conf_migrate.sh
/etc/X11/xinit/xinitrc.d/50-xinput.sh
/etc/X11/xinit/xinitrc.d/zz-liveinst.sh
/etc/X11/xinit/Xclients
/etc/X11/xinit/Xsession
Linux Humor
Who needs to go to the movies? Big screen Hollywood action is available right on your Linux computer. Type the following command, grab some popcorn, and enjoy:
telnet towel.blinkenlights.nl
P.S. To stop the “movie,” hold down the Ctrl button and press the ] key. Then type quit at the telnet> prompt and press the Enter key.
Summary
At this point you should have a solid foundation that will enable you to work in the Linux command-line environment. You learned the essentials, such as how to view a file and make use of bash shell features. You should now know how to secure your files using permissions. In the next chapter you will build on these tools to learn some important system administrative tasks of which developers should be aware.
1 It also means that you can wake up a Unix developer who was cryogenically frozen in the 1970s and that developer would already understand the basics of working in Linux. Note that the process of waking up cryogenically frozen developers is beyond the scope of this book.
2 If you view a non-text file accidentally and it messes up your terminal display with “garbage” characters, type the reset command and press the Enter key. Don’t worry if it looks like garbage when you type the command, it will execute properly and fix your terminal display.
3 Are you wondering what this script actually does? Keep reading this chapter to find out!
4 This is about as funny as Linux jokes get. I apologize for all future Linux jokes made throughout this book.
5 You can also do this in one step: export EDITOR=vi
6 The ! character is often called the bang character in Linux. Other common character nicknames include splat for * and hash for #.
7 Permissions used to be called modes of access, hence the origin of the name chmod (change mode of access).
8 You can also use the gunzip command.
9 The command comes from the phrase Tape ARchive. Or it could be TApe aRchive. You pick.
10 Note that for the tar command, the - character before the options is optional. So, tar cvf is the came as tar -cvf. A handful of Linux commands don’t require the - character before options.
11 Okay, some Linux jokes are a little bit funny.
12 With this new Linux trivia, you are bound to be the life of any party.