2. Importing and Sorting Photos
Lesson overview
As your photo library grows, it becomes increasingly important that you have effective ways to organize and manage your pictures on your computer so that those valuable memories are always accessible. Adobe Photoshop Elements makes it easy to import photos from a variety of sources and provides powerful tools for organizing and searching your collection, including the People, Places, and Events views, where you can intuitively sort and search your images for the faces, locations, and happenings that mean the most to you.
This lesson will get you started with the essential skills you’ll need to import images and keep track of your expanding image collection:
Importing images from folders on your computer
Importing photos from a digital camera
Navigating the Media view
Tagging faces and sorting photos in the People view
Sorting photos by location in the Places view
Grouping photos of special occasions in the Events view

This lesson will take about 90 minutes to complete. To get the lesson files used in this chapter, download them from the web page for this book at www.adobepress.com/PSECIB2020. For more information, see “Accessing the lesson files and Web Edition” in the Getting Started section at the beginning of this book.
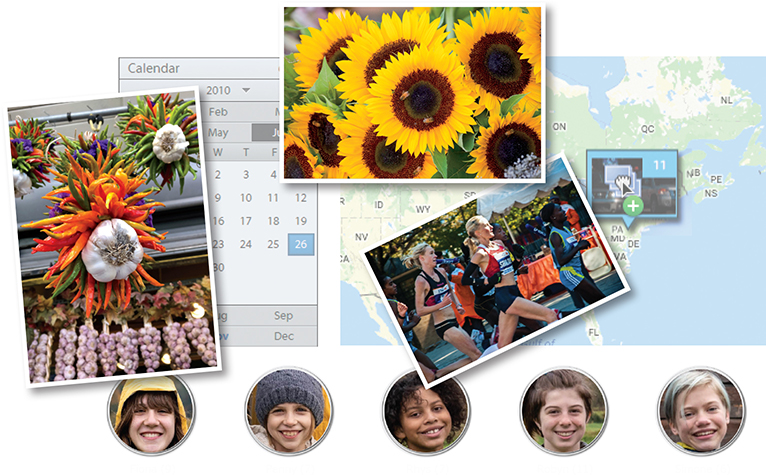
Import photos to your catalog, and then explore the People, Places, and Events views. You’ll discover the many ways the Organizer can help you manage your image library so that you can always find exactly the photo you want, exactly when you want it—no matter how big your catalog, or across how many folders your media files are scattered.
Getting started
![]() Note
Note
Before you start this lesson, make sure you’ve set up a folder for your lesson files, and downloaded the Lesson 2-3 folder from your Account page at www.peachpit.com, as detailed in “Accessing the lesson files and Web Edition” and “Creating a work folder” in the “Getting Started” section at the beginning of this book. You should also have created a new catalog (see “Creating a catalog for working with this book” in Lesson 1). You need to have completed Lesson 1 to follow the exercises in this lesson as written.
In this lesson you’ll be working in the Elements Organizer, where you’ll learn a variety of ways to import media into your catalog and begin to sort your image library.
If Photoshop Elements is still running from the previous exercise, switch to the Organizer now—if not, start Photoshop Elements, and then click the Organizer button to launch the Elements Organizer module.
Check the name of the current catalog, which is displayed in the lower-right corner of the Organizer workspace. On Windows, you can also see the catalog name displayed in a tooltip that appears when you hold the pointer over the Elements Organizer icon at the upper left of the Organizer window.
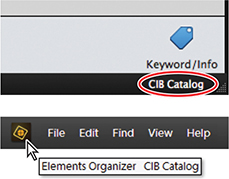
If the CIB Catalog that you created in Lesson 1 is not currently loaded, choose File > Manage Catalogs. Select the CIB Catalog from the list in the Catalog Manager dialog box, and then click Open.
If you don’t see the CIB Catalog listed in the Catalog Manager, refer to the section “Creating a catalog for working with this book” in Lesson 1.
Getting photos
Before you process, print, or share your photos, the first step is to bring them into your catalog via the Elements Organizer. The Organizer provides a convenient, centralized workspace where you can browse, sort, and manage all the images in your library, no matter where the files are stored on your computer.
In the following exercises you’ll import the images for this lesson into your new catalog using a variety of different methods.
Perhaps the most direct and intuitive way to bring media files into the Organizer and add them to your catalog is to use the familiar drag-and-drop technique.
Dragging photos into the Organizer
Use the Windows taskbar, or the macOS Dock, to switch to the Windows Explorer / macOS Finder. Open a new Explorer / Finder window. If necessary, move the Explorer / Finder window enough to see the Elements Organizer workspace behind it.
In the Explorer / Finder window, locate and open the PSE2020CIB / Lessons folder on your hard disk, and then open the downloaded subfolder named Lesson 2-3.
Inside the Lesson 2-3 folder you’ll find three subfolders; drag the Import 3 subfolder onto the Media Browser pane and release the mouse button.
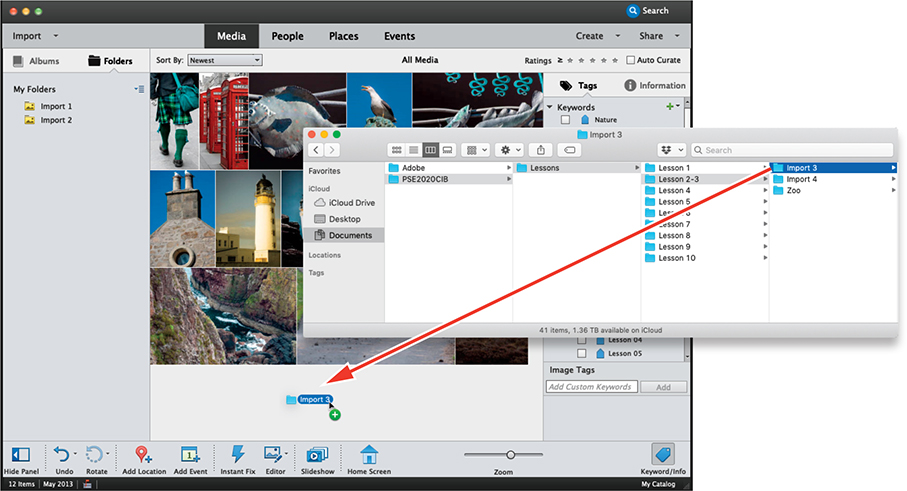
Click the Organizer workspace to bring it back to the front.
Photoshop Elements briefly displays a dialog box while searching inside the Import 3 folder for files to import; then, the Import Attached Keyword Tags dialog box opens.
Importing attached keyword tags
Whenever you import photos that have already been tagged with keywords, the Import Attached Keyword Tags dialog box will appear, giving you the opportunity to specify which tags you wish to import with your images.
In the Import Attached Keyword Tags dialog box, select the Lesson 02-03 box or click Select All; then, click OK.
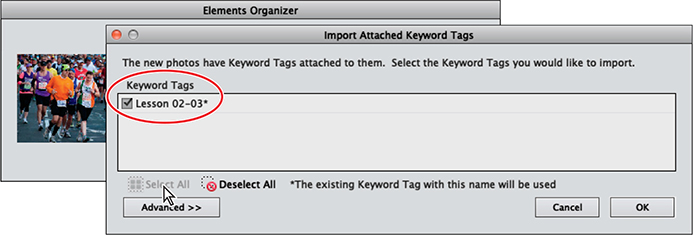
The Elements Organizer dialog box displays a progress bar as the Organizer imports the keywords. The Media Browser now shows only the newly imported images.
![]() Tip
Tip
If you still don’t see the blue badges on the thumbnails in the Media Browser after activating View > Details, use the Thumbnail Size slider above the Media Browser to increase the size of the thumbnails.
Make sure that the Details option is selected as activated in the View menu. Each thumbnail in the Media Browser is marked with a blue tag badge, indicating that it has keywords attached.
If necessary, click the Keyword / Info button at the right of the taskbar below the Media Browser to open the Tags, Information, and Image Tags panels. In the Tags panel, click the triangle beside the Imported Keyword Tags category to expand it and see the newly imported Lesson 02-03 tag nested inside, together with the keyword that you imported in the previous lesson.
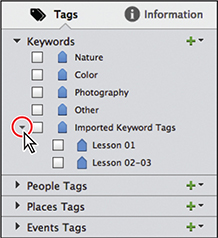
Click the Back button at the upper left of the Media Browser, or the Clear button at the right, to display all the media in your catalog in the Media Browser.

Automatically fixing red eyes during import
The term “red eye” refers to a phenomenon common in flash photography, where the retinas at the back of the subject’s eyes reflect the light of the flash, so that the pupils appear red instead of black. In most cases, Photoshop Elements can fix the problem automatically during the import process, saving you the effort of further editing. This can be a substantial advantage when you’re importing large numbers of images shot indoors or at night, such as photos from social occasions.
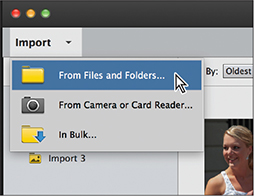
You’ll import the photo for this exercise with the From Files And Folders menu command, as you did for the images in Lesson 1.
Click the Import button at the upper left of the Organizer workspace and choose From Files And Folders from the menu. Alternatively, choose File > Get Photos And Videos > From Files And Folders.
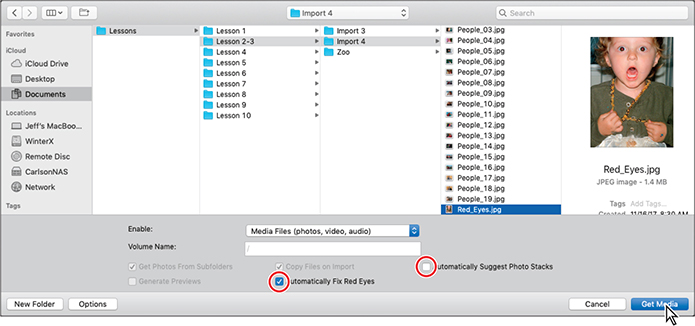
Navigate to and open the PSE2020CIB / Lessons / Lesson 2-3 folder. Open the subfolder Import 4; then, single-click the file Red_Eyes.jpg to select it.
Select the check box to activate the Automatically Fix Red Eyes option. Make sure that the Automatically Suggest Photo Stacks option is disabled; then, click Get Media.
In the Import Attached Keyword Tags dialog box, click Select All; then, click OK.
The newly imported image appears in the Media Browser. If you don’t see the name of the image file below the thumbnail, choose View > File Names.
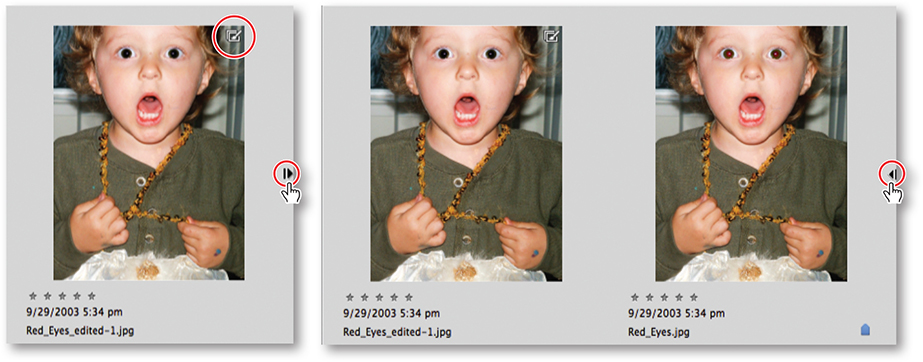
The corrected photo has been stacked on top of the original in a version set. You can identify a version set by the badge in the upper-right corner of the thumbnail, and also by the extension to the file name, which shows that the image has been edited. You’ll learn more about working with version sets in Lesson 3.
![]() Tip
Tip
For some images, the automatic red-eye fix may not be so effective. More tools and techniques for correcting the effect are discussed in Lesson 5.
Click the arrow at the right of the thumbnail once to expand the version set, and then again to collapse it.
Automatic imports using watched folders
You can use watched folders to simplify and automate the process of keeping your catalog up to date. Designate any folder on your hard disk as a watched folder and Photoshop Elements will automatically be alerted when a new file is placed in—or saved to—that folder. By default, the Pictures folder is watched, but you can set up any number of additional watched folders.
You can either choose to have new files that are detected in a watched folder added to your catalog automatically, or have Photoshop Elements ask you what to do before importing the new media. If you choose the latter option, the message “New files have been found in your Watched Folders” will appear whenever new items are detected. Click Import to add the files to your catalog or click Cancel to skip them.
In this exercise you’ll add a folder to the watched folders list.
Choose File > Watch Folders.
In the Watch Folders dialog, activate the Watch Folders And Their Sub-Folders For New Files option. Under Folders To Watch, click Add; then, navigate to and select your Lesson 2-3 folder and click OK.
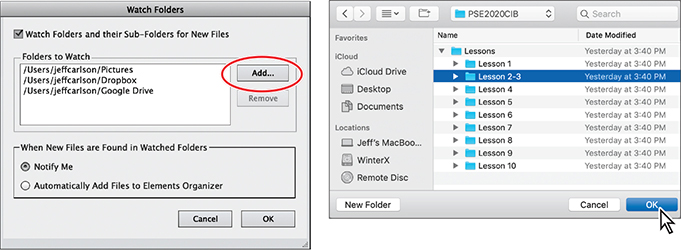
The Lesson 2-3 folder now appears in the Folders To Watch list. To stop a folder from being watched, select it in the list and then click Remove.
Ensure that the Notify Me option is activated, and then click OK to dismiss the Watch Folders dialog box.
Whenever a media file is placed in, or saved to, your Lesson 2-3 folder or any of its subfolders, the Watched Folders dialog will appear, giving you the opportunity to import the file or exclude it. Depending on when and how the new media is added, the notification may not appear until the next time you launch the Organizer.

If you use online services such as Dropbox, OneDrive, or Google Drive to sync your photos from mobile devices, Elements Organizer automatically detects the cloud-based storage folders on your desktop and marks them as watched folders.
Importing images in bulk
The bulk import feature lets you browse the images in any folder on your computer, and include the files from as many folders as you wish in a single import—even though the source folders may be scattered across many locations. You can add entire folders to your bulk import, or exclude one subfolder while including another.
Click the Import button at the upper left and choose In Bulk from the menu. Alternatively, choose Get Photos And Videos > In Bulk from the File menu.
The Import Media dialog opens with your watched folders listed in the pane on the left. The Pictures folder is selected by default; the preview pane shows thumbnails of the images in your Pictures folder as well as those stored in the subfolders nested inside it—all selected for import.
Click the listing for your Lesson 2-3 folder; then, scroll the import preview pane to see the images in the subfolders that are nested inside the Lesson 2-3 folder.
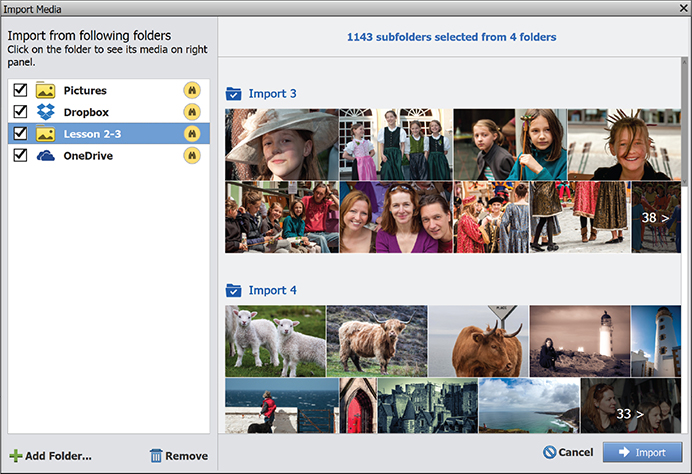
You can add folders to your bulk import by clicking the Add Folder button at the lower left. Remove a selected folder from the list by clicking the Remove button. Any new folder added to the bulk import will be marked as a watched folder by default; to disable the Watched status for a folder that’s included in your bulk import, click to de-activate the adjacent Watched Folder marker (![]() ).
).
Click the last image in the Import 4 folder’s preview selection (marked with the number) to see the rest of the images inside that folder; then, collapse the expanded subfolder by clicking Back at the upper left of the preview pane.
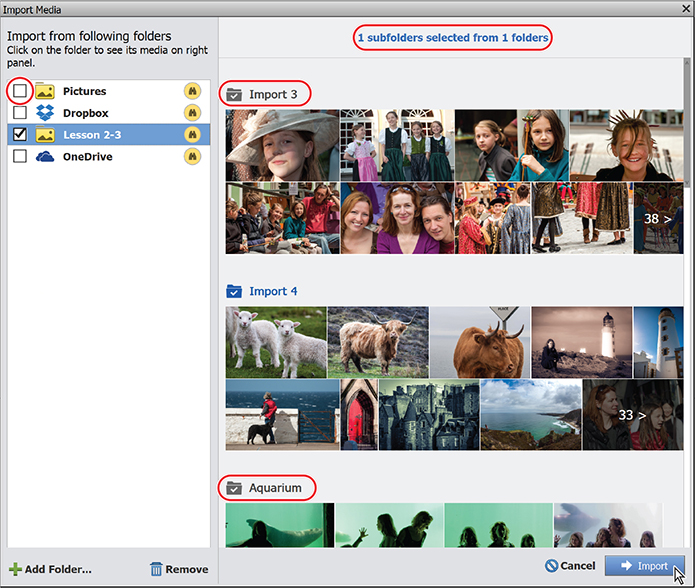
In the import preview pane, click the Import 3 subfolder to deselect it; this folder is already managed by your catalog. Leave the Import 4 folder selected, but deselect the Aquarium, Birds, Bison, Elephant, Giraffe, Monkey, and Siamang subfolders to exclude them from this import.
In the folders list pane at the left of the dialog, deselect your Pictures folder and any other folders to exclude their contents from this import. Check that the header above the preview pane indicates that a single subfolder is selected for import; then, click Import at the lower right.
In the Import Attached Keyword Tags dialog box, select the check box to confirm the Lesson 02-03 tag for import, and then click OK.
When the import process is complete, Photoshop Elements displays a message to let you know that two of the files in the Import 4 folder (the red eyes photo and its edited copy) were already in the catalog, and were therefore not imported. Each file that was not imported is listed, together with the reason it was excluded. Click OK.
Importing from a digital camera or mobile device
![]() Tip
Tip
To get the best results from this exercise, your import should include several batches of pictures taken at different times on the same day.
If you have a digital camera, a memory card, or a mobile device at hand, you can step through this exercise using your own photos. Alternatively, you can follow the process by reading through the steps and referring to the illustrations in the book, and then return to work through this set of exercises when you are prepared.
Connect your digital camera, card reader, or mobile device to your computer. If you’re working on macOS, skip to step 3.
![]() Tip
Tip
You can set AutoPlay to import to Elements Organizer by default. The AutoPlay dialog box will no longer appear when you connect your camera, but you can access the settings at any time on the Devices pane in the Windows Settings.
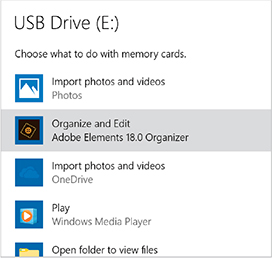
On Windows, the AutoPlay dialog box may appear. You could choose the option Organize And Edit Adobe Elements 18.0 Organizer (and even specify this as the default action when you connect a camera), but for the purposes of this lesson, simply click outside the dialog to dismiss it. If the Photo Downloader dialog box appears automatically, you can skip to step 4; otherwise, continue to step 3.
Click the Import button at the upper left of the Organizer workspace and choose From Camera Or Card Reader.
![]() Tip
Tip
On Windows, you can activate the Automatic Download option to have the Photo Downloader download your photos automatically whenever a camera or card reader is connected to your computer, using the default settings from your Elements Organizer Preferences.
In the Photo Downloader dialog box, choose the name of your connected camera or mobile device from the Get Photos From menu.
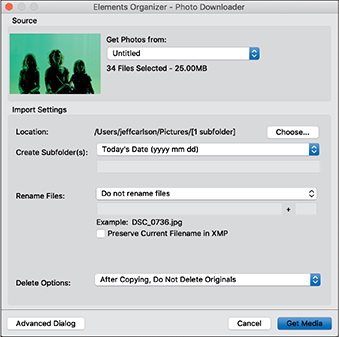
Accept the default target folder listed beside Location, or click Browse / Choose to designate a different destination for the imported files.
From the Create Subfolder(s) menu, choose Today’s Date (yyyy mm dd) as the folder name format; the Location path reflects your choice.
Make sure that the Rename Files menu is set to Do Not Rename Files, and the Delete Options menu is set to After Copying, Do Not Delete Originals. If you’re working on Windows, deactivate the Automatic Download option.
Click Get Media.
That’s all there is to it!
With these basic Photo Downloader settings, the photos will be copied from your camera to a folder named with today’s date, inside your default Pictures folder. Your photos will retain their camera-generated file names.
Advanced Photo Downloader options
In this exercise you’ll explore some advanced options for importing photos from your camera or mobile device that will help to keep your growing image library organized. You can set up your camera import so that Photoshop Elements will automatically apply tags and create groups during the import process, which means that your images will already be organized by the time they arrive in your catalog!
![]() Note
Note
On macOS, the Organizer properly imports the HEIC/HEVC formats captured by current iPhones and iPads. The Windows version requires that you install image extensions, found online at helpx.adobe.com/premiere-elements/using/hevc-decoding-on-windows.html. (If you try, an error message appears with that link.) If you don’t want to deal with all that, you can bypass those formats: on your device, go to Settings > Camera > Format and select the Most Compatible option.
If you have a digital camera, a memory card, or a mobile device at hand with your own photos, you can step through this first exercise using those images; otherwise, simply read through the process and refer to the illustrations in the book, and then return to this exercise when you are prepared.
Repeat steps 1 through 5 from the exercise on the previous page to open the Photo Downloader, specify your camera as the import source, and accept the default destination for the downloaded files.
Without making any other changes to the settings, click the Advanced Dialog button in the lower-left corner of the dialog box.
In advanced mode, the Photo Downloader Dialog displays thumbnail previews of all the photos on your camera or mobile device, and also offers options for processing, tagging, and grouping your images during the import process.
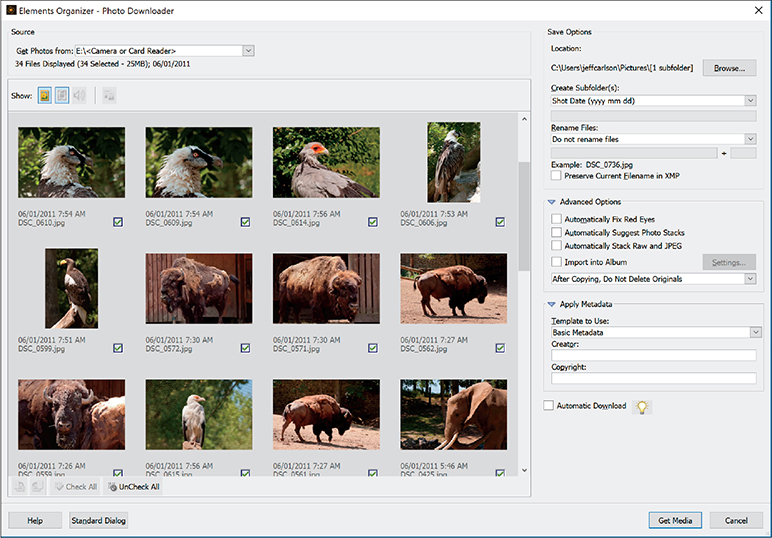
You can exclude a photo from the selection to be imported from your camera or device by clicking the check box below its thumbnail to remove the check mark.
In the next steps you’ll set up the automatic creation of subfolders for files copied from your camera and apply keyword tags to the images as they are imported.
![]() Note
Note
It may take a minute or longer for the Custom Groups (Advanced) option to appear.
Under Save Options, choose Custom Groups (Advanced) from the Create Subfolder(s) menu. Your selection is reflected in the Location pathname.
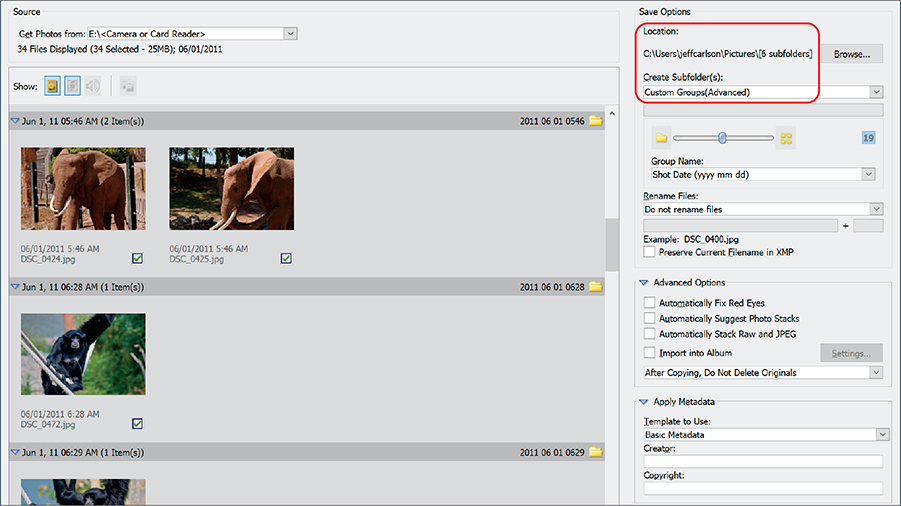
The images have been automatically divided into groups, based on capture time and date. A slider below the Create Subfolder(s) menu enables you to adjust the subdivision, and the box to the right of the slider shows the resulting number of groups. In our example, the automatic capture time grouping has produced six groups.
Experiment by moving the slider to the left to generate fewer groups (sub-folders) or to the right to generate more. Scroll down the list of thumbnails to review the effect of the slider on the grouping of your photos. Note that the number of groups created is displayed in the box to the right of the slider.
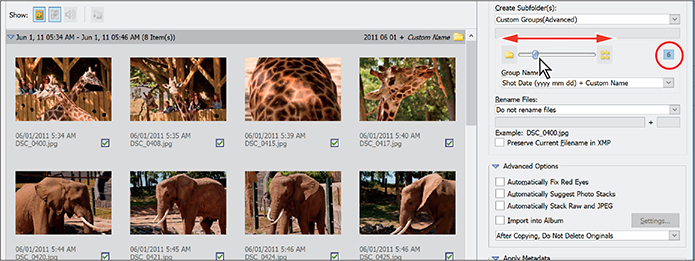
Next you’ll specify custom names for the subfolders that will be automatically created to separate your grouped photos. From the options in the Group Name menu, choose Shot Date (yyyy mm dd) + Custom Name.
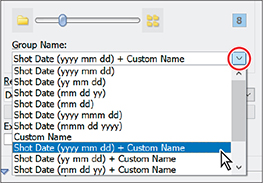
Click the Custom Name field at the right of the separator bar above each group in turn and type a descriptive name in the text box. In our example, we used the animal names Giraffe, Elephant, Monkey, and so on.

Under Advanced Options, activate the option Import Into Album by clicking the check box, and then click the adjacent Settings button. In the Select An Album dialog box, click the green plus sign icon, and then type a name for the new album. For now, you can click Cancel; you’ll learn about creating and working with albums in Lesson 3.

Click Get Media. The photos are copied to your hard disk, organized in subfolders named for your custom import groups. If the Files Successfully Copied dialog box appears, click Yes.
![]() Tip
Tip
The more you take advantage of these advanced options when importing your photos, the less time and effort you’ll need to spend sorting and organizing images, and looking for the photos you want.
The Getting Media dialog box appears briefly while the photos are being imported into your catalog. The imported images appear in the Media Browser, and the Folders view now lists the new source subfolders, named according to the custom groups that you set up in the Photo Downloader dialog box.
Sorting your photos
When you call one of your favorite photos to mind, chances are that your first thoughts will be of the people in the picture, the location where you shot it, and the occasion that took you there. You can probably answer who, where, and when, or at least two of these questions, for the majority of your photographs. In the People, Places, and Events views in the Elements Organizer, Photoshop Elements makes it easy for you to sort, tag, and then search the photos in your library in terms of those faces, places, and happenings.
Up to this point, your time in the Organizer has been spent in the Media view, where you can review all the images in your catalog, or see the contents of a single album or folder. You’ll learn more about working in the Media view in Lesson 3; for now, we’ll continue our exploration of the Organizer with a look at the People view and a test-drive of Photoshop Elements’ powerful face recognition tools.
Automatically finding faces for tagging
Undoubtedly, your growing photo library will include many photos of your family, friends, and colleagues. Photoshop Elements makes it quick and easy to tag the faces in your pictures with the People Recognition feature, taking most of the work out of sorting and organizing a large portion of your catalog. People Recognition automatically finds the people in your photos and makes it simple for you to tag them. Once you begin using the feature, Photoshop Elements learns to recognize the people you’ve already named and will automatically tag their faces whenever they appear in new photos.
Setting up People Recognition
The People Recognition feature, and also the automatic face tagging prompts that it generates, can be disabled. Before continuing with the exercises, you need to make sure that both are activated.
In the Organizer, choose Edit > Preferences > Media-Analysis (Windows) or Elements Organizer > Preferences (macOS).
In the Media-Analysis pane of the Preferences dialog box, make sure that the Run Face Recognition Automatically and Show Smart Tags And Auto Curate options are both activated. Click OK to save your settings and close the Preferences dialog box.
In the View menu, make sure the People Recognition option is activated.
For the purposes of the following exercises, make sure that the Sort By menu at the left of the bar above the Media Browser is set to Oldest. If necessary, click the adjacent Back, or All Media, button to return to the unfiltered Media view.
Tagging faces in the Media Browser
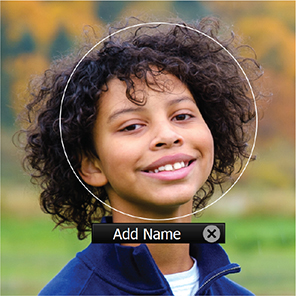
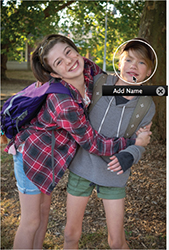
Your first experience of People Recognition will probably be the circular Add Name prompt that appears as you move the pointer over a photo in the enlarged single image view in the Media Browser.
![]() Note
Note
Once People Recognition begins to recognize a particular face, the Add Name prompt changes to read “Is this [name]?” giving you the opportunity to confirm or cancel automatic tagging.
People Recognition displays these hints to help you identify and tag all the people in your photos. You can ignore or disable the hints if you wish, but remember that the more people you identify, the smarter People Recognition gets at tagging the faces of your friends and family automatically.
In the Folders list at the left of the Organizer workspace, click the Import 4 folder. The Media Browser is filtered to display only the contents of that folder.
Scroll down in the Media Browser—or reduce the size of the thumbnails using the Zoom slider in the taskbar—to locate the image People_03.jpg; then, double-click the thumbnail to see the photo enlarged in the single image view.
Move the pointer slowly over each of the faces in the image; white circles with the Add Name prompt appear around four of the five faces in this picture. People Recognition has failed to detect the face partially obscured by a hand.
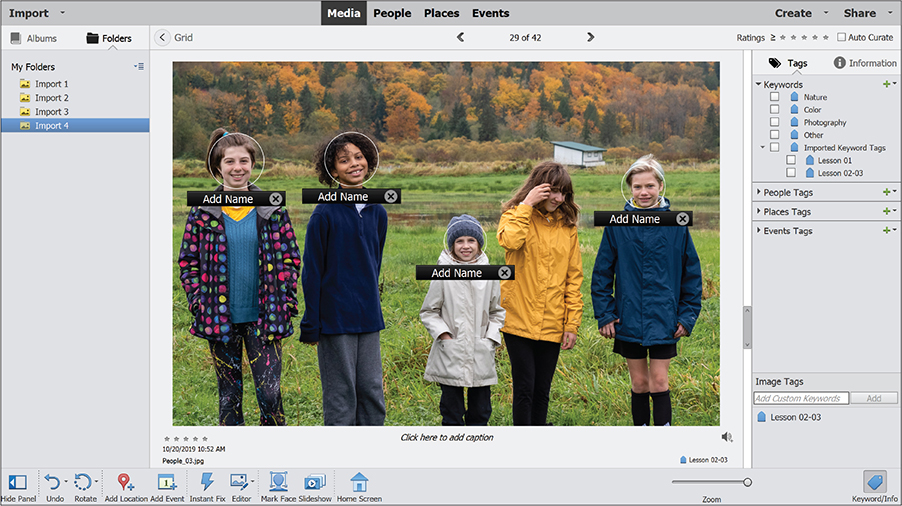
If you don’t see the face tagging prompts when you move the pointer over the photo in single image view, it may be that Photoshop Elements has not yet finished analyzing your recently imported photos.
Click the Add Name text below the tagging circle for the girl on the left. Type the name Robyn, and then press Enter / Return to commit the tag.
When you press Enter / Return, a blue People tag badge appears briefly in the lower-left corner of the enlarged photo in the single image view, confirming that a new tag has been created for Robyn.
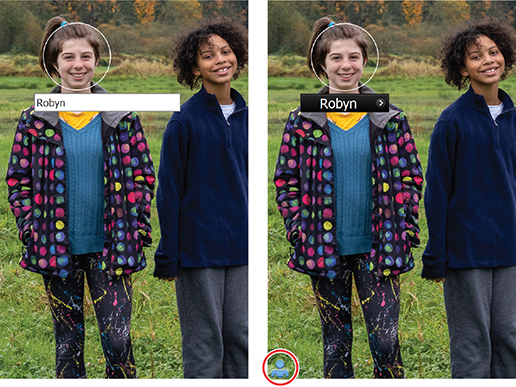
Type Rhys to tag the boy next to Robyn, Penny for the girl beside him, and Simone for the girl at the far right. Be sure to press Enter / Return to commit each tag.
If necessary, click the Tags/Info button at the far right of the taskbar to open the right panel group. On the Tags tab, expand the People Tags panel.
The Image Tags panel at the bottom of the right panel group shows that this photo now has five tags: the imported keyword tag Lesson 02-03, and the four new people tags that you created in this exercise.
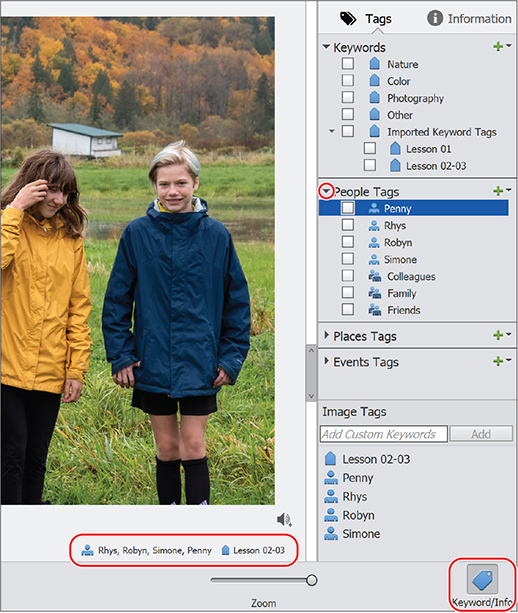
These five tags are also listed at the lower right of the single image view.
As you can see, the people tags display a different badge from the standard keyword tag icon. This makes the photos that are already tagged for people easy to spot in the thumbnail grid.
Keep the photo open in single image view for the next exercise.
Tagging undetected faces
The People Recognition analysis occasionally misses faces that are partially obscured, “broken up” by harsh light and shadow, or photographed at an angle or in profile. You can tag undetected people manually in the single image view.
Click the Mark Face button in the taskbar below the enlarged image.

Drag the new tagging box onto the face that was not detected. Use the handles on the box to resize it so that it frames the face neatly, and then click the green check mark to confirm the placement. Click the Add Name text and type Fiona in the text box; then, press Enter / Return to confirm the new people tag.
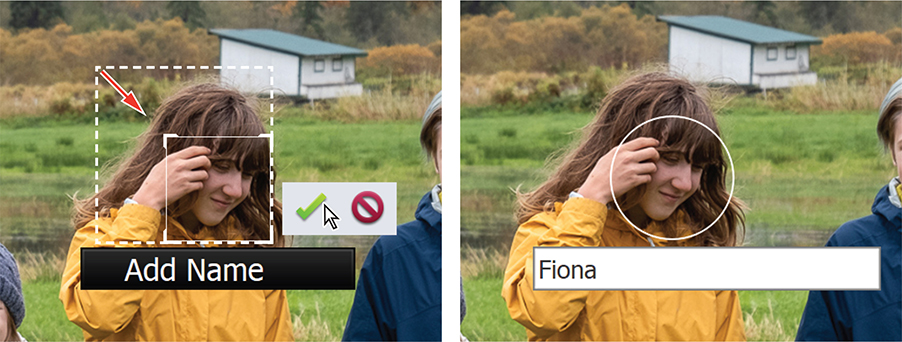
In the right panel, the Fiona tag has been added to the People Tags list, and is now listed in the Image Tags panel as one of six tags attached to this image.
![]() Note
Note
Depending on your operating system and how much experimenting you’ve been doing, the results you see from People Recognition may not be exactly the same as those referred to and illustrated in these exercises; for example, in step 4, you may see an “Is This ‘Penny’?” hint in place of the Add Name prompt.
Press the right arrow key on your keyboard once to navigate to the photo of the two sisters.
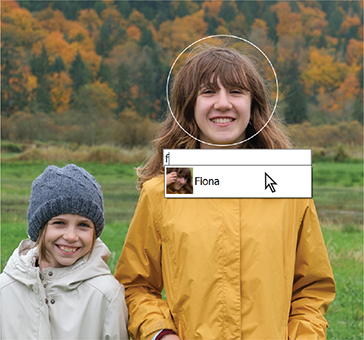
Move the pointer over the taller girl’s face and click the Add Name prompt; then, type the letter F. A menu appears, suggesting the Fiona tag—the only people tag in your catalog that begins with an “F.” Click the Fiona tag to accept it; then, press Enter / Return.
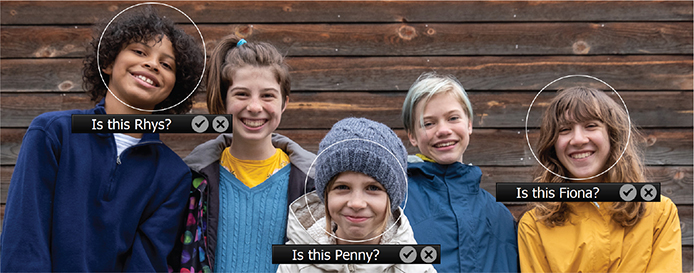
Press the right arrow key on your keyboard five times to navigate to the image People_09.jpg, a photo of the gang in front of a weathered wooden wall. Move the pointer over each kid’s face in turn to see the tagging prompts.
![]() Note
Note
Remember that the People Recognition tagging suggestions may not be exactly the same as those illustrated; however, this should not affect your ability to follow the workflow.
Although you’ve done very little tagging at this point, People Recognition is already learning, correctly identifying two of the three faces in our example.
![]() Note
Note
Even faces that are not obscured are sometimes missed. View the image People_02.jpg and identify Robyn (left) and Simone (right), if they weren’t already recognized.
Click to confirm or dismiss the tagging suggestions (from the left, the kids are Rhys, Robyn, Penny, Simone, and Fiona). If People Recognition does not suggest the right name, click the Add Name prompt and type the first letter of the kid’s name; then, click the existing people tag to accept it and press Enter / Return.
Double-click the image, or click Grid in the bar above the single image view, to return the Media Browser to the thumbnail view, which is still filtered to display only the photos in the Import 4 folder.
Welcome to the People view
Now that you’ve tagged a few faces in the Media Browser, let’s take a look at the People view, where your library is sorted by personnel, making it easy to answer the first question you’re likely to ask about the photo you’re looking for: who?
In the People view, you can let People Recognition help you bulk-process your files, rather than working through your catalog one image at a time as we did in the single image view. To keep this exercise manageable, you’ll start by tagging the people in just a subset of the photos in your catalog; that way, we can avoid dealing with the faces of hundreds of marathon runners.
Click All Media at the left of the bar above the thumbnail grid to display all of the files in your catalog.
The Import 4 folder is no longer selected in the Folders list. The Media Browser now displays all of the photographs in your catalog; the file count in the lower-left corner of the workspace shows the total number of images in your CIB Catalog.
The file names of the photos you’ll use in this exercise all include the word “people.” You can start by using a filename search to isolate these images in the media Browser, and then group them as an album that you can designate as an image source while you’re working in the People view.
Choose Find > By Filename. Type people; then, click OK. The search results bar immediately above the Media Browser shows that your catalog has been filtered so that you see only those items that match your filename search.
Choose Edit > Select All to select all the images returned by the text search; then, select the Albums tab at the top of the left panel. Click the Create New Album or Album Category button (
 ) beside the My Albums header. Make sure you click the green plus sign, not the small arrow beside it.
In the New Album panel at the right of the workspace, type Familiar Faces as the name for the new album; then, click OK in the taskbar below the panel.
Navigating the People view
Select the Familiar Faces album in the My Albums list; then click the word People in the view picker at the top of the Organizer workspace. In the People view, make sure that you’re looking at the Named tab.
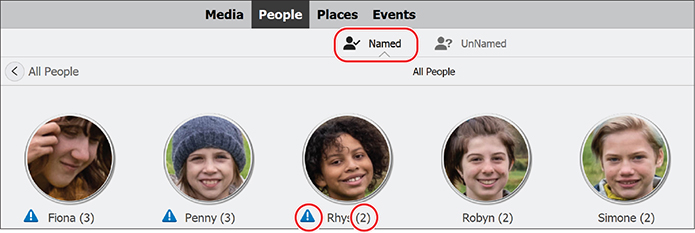
Each stack in the Named people view shows a count of the photos already tagged with that person’s name. A triangular notification badge (
 ) indicates that People Recognition has already found more faces that may belong in the same stack.
The People view displays a stack of photos for each person you’ve tagged. By default, the first image tagged with a new people tag becomes that person’s profile picture—the photo that appears on top of their stack in the People view.
Move the pointer slowly across each stack thumbnail in turn to browse through all the images tagged with the same name.
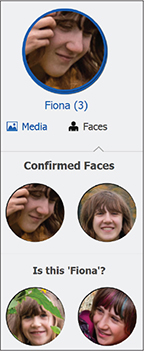
Click the thumbnail for the Fiona stack to expand it and see the faces that are already marked with Fiona’s people tag, as well as People Recognition’s suggestions for inclusion in the stack. Leave the groups as they are, for the moment.
Click the Fiona stack again to collapse it.
Click Unnamed in the bar below the mode picker to switch to the Unnamed people tab.

![]() Note
Note
Depending on your operating system and how much experimenting you’ve been doing, the results you see from People Recognition may not be exactly the same as those referred to and illustrated in these exercises; the stacked groups and the order of the faces presented may vary, but the overall process will be the same.
With such a small selection of photos to analyze, People Recognition shows only two or three unnamed stacks (if any at all). By default, Photoshop Elements displays only the larger groups of faces stacked by People Recognition, in order to keep the Unnamed people view uncluttered.
Deselect the Hide Small Stacks option in the bar above the stack thumbnails.
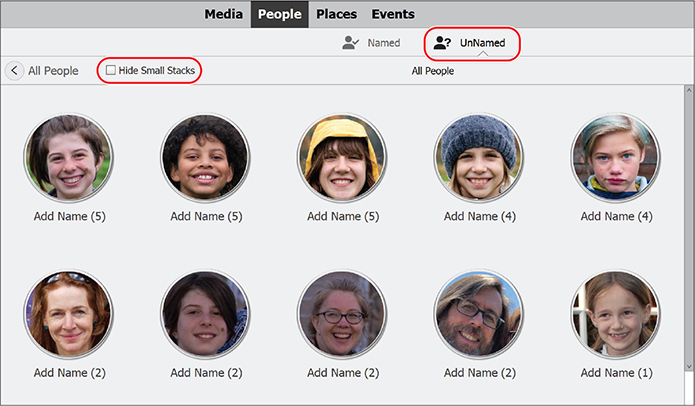
Each stack in the Unnamed people view shows a count of the faces that People Recognition has judged to be similar but cannot name. Move the pointer across a stack thumbnail to quickly browse through all the images in the group.
Tagging faces in the People view
We’ll start by looking at the stacking suggestions made by People Recognition in the Named people view.
Click Named in the bar below the mode picker to switch back to the Named people view. Click the Fiona stack to expand it again.
To confirm or dismiss a face, select it and click either Confirm or Not This Person in the taskbar, or hover the pointer over the suggested face to see a preview of the photo it was found in (below, right); then, click the confirm or cancel icon on the tagging thumbnail.
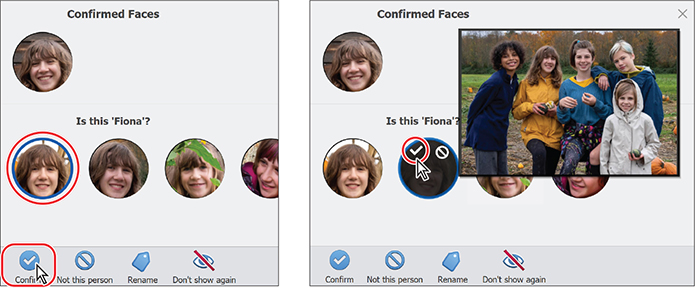
Click the Penny stack. Dismiss any incorrect suggestions. Shift-click the first and last thumbnails to select all the correct suggestions; then, click the Confirm button in the taskbar. Click the profile thumbnail again to collapse the stack.
Repeat the process for the Rhys, Robyn, and Simone stacks, confirming or dismissing the suggested additions to stacks. The Fiona, Penny, and Rhys stacks originally showed notification badges indicating that similar images had been identified; you may now find only confirmed photos. People Recognition has been learning from your actions and reanalyzing accordingly.
Switch back to the Unnamed people view. Click the stack with the bearded man to expand it. In our example, all of the faces in the stack belong together; click the Add Name text and type Jeff; then, press Enter / Return.
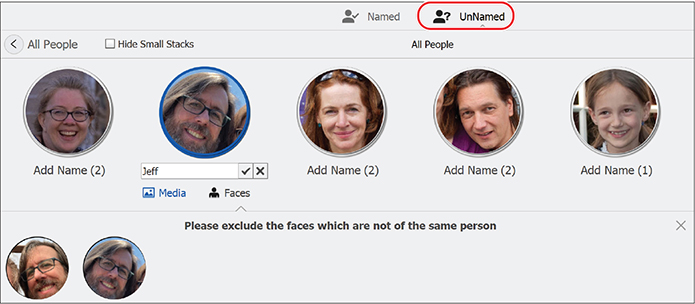
Once a stack is named, it disappears from the Unnamed people view and is added to the Named people stacks. If there is already a named stack for the same person, the two stacks are merged.
When you see multiple unnamed stacks for the same person, Ctrl-click / Command-click to select the matching stacks, and then click the Merge People button in the taskbar. Type the person’s name (in our example it’s Tom) in the Add A Name dialog; then, click OK.

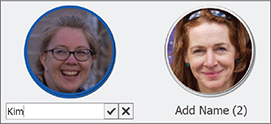
Select the stack with the photo of the woman with glasses. Click the Add Name text and type Kim; then, press Enter / Return.
Select all the remaining stacks and click the Don’t Show Again button in the taskbar. Click OK to confirm the removal of these faces.
![]() Tip
Tip
If you see a blue, triangular alert badge beside a stack, click the stack to see the new faces that have been found; then, confirm or dismiss the tagging suggestions.
Switch back to the Named view and click each stack to check for faces that don’t match. If you dismiss any faces, you’ll need to revisit the Unnamed view to name them.
Click one of the larger stacks in the Named view to expand it. Click Media below the stack thumbnail to see the full photos rather than just the faces.
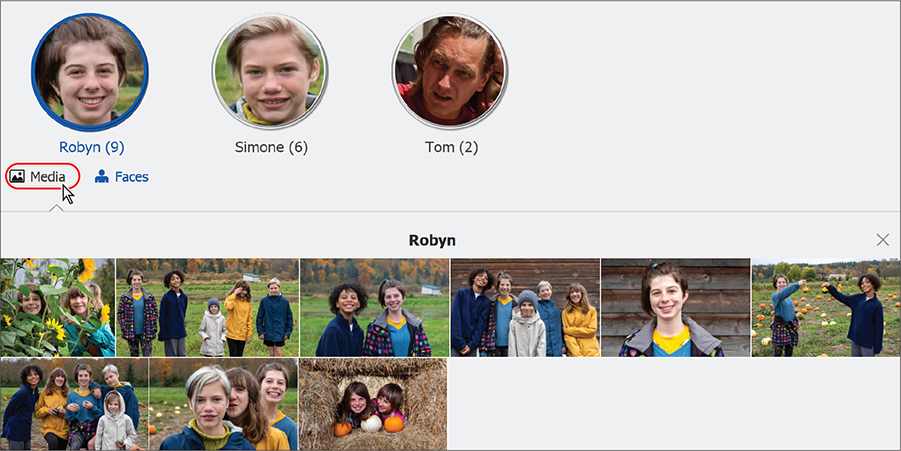
Working with people groups
You can make your people tagging more versatile by grouping your tags. You might find photos of the same person by looking in their personal stack, by filtering your Friends group, or by searching a group created for your basketball team.
If you don’t see the Groups panel at the right of the workspace, click the Groups button (
 ) in the taskbar. Click the Ungrouped listing in the Groups panel. The header above the People stacks indicates that all the people are ungrouped.
Shift-click to select everyone’s stack except Tom’s (sorry, Tom), and then drag them to the Family group in the Groups panel. Click the Family listing; the header above the People stacks shows that all seven people are now listed in that group.
Click the green Create New People Groups button (
 )—not the arrow beside it—in the header of the Groups panel. In the Add Group dialog, type Cousins to name the group. Choose Family from the Group menu; then, click OK.
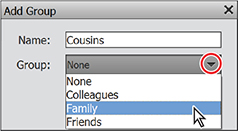
Select the stacks for the five kids, and drag them to the new Cousins group. In the Groups panel, click between the listings for the Cousins and Family groups.
Right-click the Cousins group in the Groups list, and choose Add Group from the menu. Name the new group Sisters. “Cousins” is already selected as the group inside which the new group will be listed. Click OK.
Select the Fiona and Penny stacks. Drag the Sisters tag from the Groups panel onto either of the selected stacks. Click between the Family, Cousins, and Sisters listings; the People view is filtered to show the members of each group.

Click the word Media in the view picker at the top of the workspace to return to the Media Browser; then, click All Media at the upper left of the thumbnail grid. You’ll learn more about the People view in Lesson 3.
Sorting photos by location
Think of that favorite photo again. You’ve answered “who?”—now, let’s ask “where?” Photoshop Elements lets you organize your world in the Organizer’s Places view, where you can put your photographs on the map (quite literally!), making it fun to follow the trail of a family road trip or revisit memories of an exotic vacation.
Adding places tags to photos from the Media view
In this exercise you’ll create some new places: saved locations that you can attach to your photos as tags, so that it’s quick and easy to find that shot you took … where?
Choose Find > By Filename. Type run; then, click OK. The search results bar immediately above the Media Browser shows that your catalog has been filtered so that you see only those items that match your filename search. Make sure the Sort By menu above the thumbnail grid is set to Oldest.
Shift-click, or drag a selection marquee, to select the first six photos in the Media Browser; then, click the Add Location button (
 ) in the taskbar below the Media Browser.
In the Add A Location dialog, type New York in the text box. If the location suggestions menu does not appear quickly, press Enter / Return. Click the suggestion New York City, New York, United States of America; then, click Apply to create the new saved location. When more than one location suggestion is offered, always choose the suggestion with the most detailed location information so that Photoshop Elements can reference it for tagging.

![]() Note
Note
In the Tags panel, the New York City places tag is colored differently from the United States tag; this indicates that it’s the only tag with GPS data and a marker pin on the Places view map.
In the Media Browser, the selected photos are now marked with map pin Places badges. Click the Keyword/Info button at the right of the taskbar, if necessary, to open the right panel group. In the Tags panel, Expand the Places Tags category to see the nested listings for your new places tags.
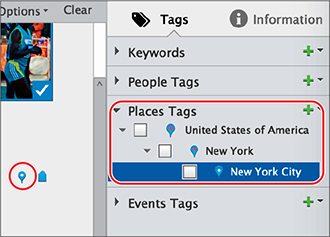
Adding photos to a saved location from the Media view
You can use the places tags in the Tags panel to search your photos, and also to quickly add more images to a group that you’ve already placed on the map.
In the Media Browser, select the next five photos from the “run” search.
Drag the United States of America tag from the Places Tags list to any of the selected photos. Alternatively, you could drag the photos onto the tag.

Hover over the places tag badge on any of the selected photos; a tooltip lists the United States of America tag; to remove it from all the selected photos, right-click the badge and choose Remove From United States of America Place.
With the five photos still selected, drag the New York City tag from the Places Tags list to any of the selected photos. Hold the pointer over the places tag badge; the tooltip shows that applying the New York City tag has automatically added all three tags in the hierarchy.
Click All Media at the left of the bar above the thumbnails to show all of the photos in your catalog in the Media Browser.
A short trip to the Places view
Just as the People view has Named and Unnamed tabs, the Places view has Pinned and Unpinned modes. The Pinned tab displays only the images in your catalog that have location data; the Unpinned view gives you access to those you’ve yet to place.
Now that you’ve added some places tags, you can begin to explore the Places view without finding either tab unpopulated.
Click the word Places in the view picker at the top of the workspace.

The arrangement of the Places view workspace depends on the way it was left the last time you visited. Follow the directions in the following steps to set up the workspace to match what’s described and illustrated in this exercise.
![]() Note
Note
For the sake of visual clarity, the Places view illustrations in this book show the map set to the Streets style, which looks like a road map. Use the menu at the upper left of the map to choose your preferred style.
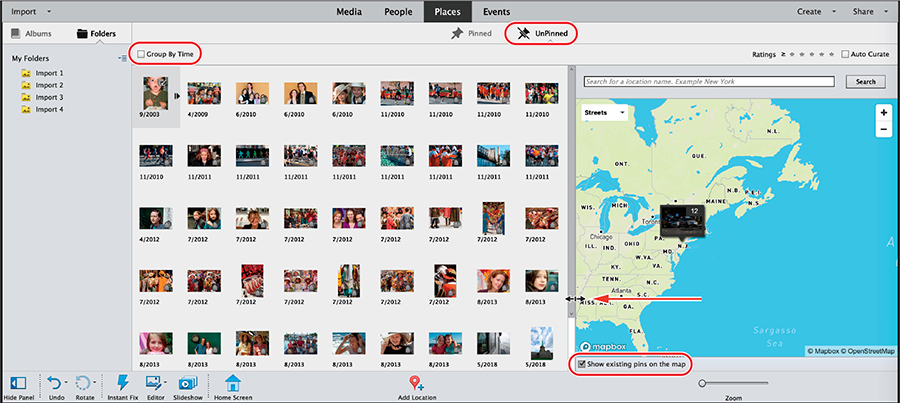
In the Places view, click Unpinned in the bar below the view picker. Disable the Group By Time option at the left of the bar above the photo thumbnails. Use the Zoom slider in the taskbar to reduce the size of the thumbnails so that you can see as many images as possible.
If the Map panel appears significantly narrower in relation to the rest of the workspace than it is in the illustration below, move the pointer over the left edge of the panel; then, when the pointer changes to a double-arrow cursor, drag the edge of the map to the left to make it wider.
If you don’t see two pins on the map, click the Minus sign icon in the corner of the map to zoom out, or drag to pan your view. If you still don’t see the pins, activate the Show Existing Pins On The Map option.
![]() Tip
Tip
If ever the map doesn’t jump when you tell it to, or a pin seems to get lost in the move, choose View > Refresh.
The image counts on the map pins show that there are 12 photos placed at New York and another 31 images attached to a pin located in Scotland.
Move the pointer over the Scottish pin, and then click the arrows at either side of the thumbnail image to see previews of all the photos pinned at that location.
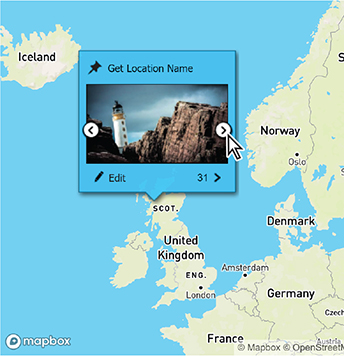
Click the image count at the lower right of the preview to close the map temporarily and show the thumbnail grid, with all the images attached to the pin. Click Back at the upper left above the thumbnail grid to return to the split-screen Places view.
Adding photos to a saved location from the Places view
You can use the places tags in the Tags panel to search your photos, and also to quickly add more images to a group that you’ve already placed on the map.
Activate the Group By Time option at the left of the bar above the thumbnail grid. Drag the Number Of Groups slider to the maximum setting.
Scroll down in the preview pane until you find the November 6, 2011 group. These are the unpinned images from our “run” text search.
![]() Tip
Tip
You can drag photos directly onto the map from the preview pane, in either Timeline or Grid mode, even without an existing pin; however, this method may not generate a places tag in the Tags panel unless you edit the location information for the resultant pin.
Click the check mark at the left of the group name to select all eight photos. You could click the Add Location button and do a text search for New York, as you did in the Media view, but as you already have a pin in the right place, simply drag the selected images to the New York City pin.
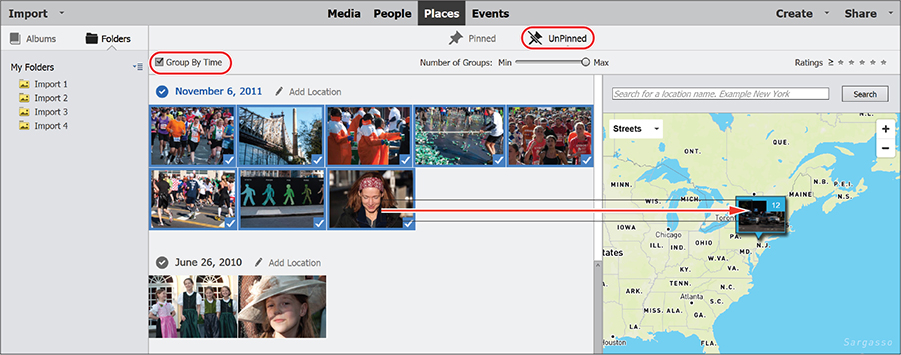
The image count on the New York City pin increases to 20, indicating that the last of our marathon photos were successfully placed. As the November 6, 2011 images are now pinned, they have been removed from the UnPinned Places preview pane.
Click Pinned in the bar below the view picker. Move the pointer over the New York pin to enlarge it; then click the Edit button at the lower left of the pin preview. In the Edit Location dialog, zoom in to the map, if necessary, and then drag the pin to position it on Central Park. Click the green check mark to confirm the move. If necessary, click No to dismiss the Add A Sub-location dialog; then, click Done to dismiss the Edit Location dialog.
Move the pointer over the New York City pin, and then click the image count at the lower right of the preview to close the map temporarily and show the thumbnail grid, with all the images that are attached to that pin.
Click Back at the upper left of the grid to return to the map view, then switch back to the UnPinned view in readiness for the next exercise.
Generating places tags for photos with GPS data
Places tags are created automatically for photos placed on the map using the Add Location command, as you did for the New York photos. However, when you import photos with embedded GPS coordinates—like our Pacific Northwest images—Photoshop Elements shows them on the map but does not generate searchable places tags. If you wish to generate tags for photos like these, you need to edit their location.
Use the map’s zoom button (+) to zoom in on the Washington location until the marker splits to show two separate pins. Click the eastern pin to select the 16 photos attached to that location on the map; then, click the Edit button at the lower left of the enlarged pin preview.
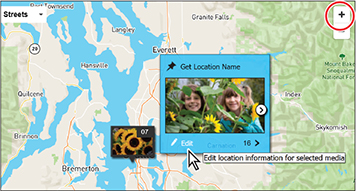
In the Edit Location dialog, type Carnation in the Search box above the map pane and click Search. Click the location suggestion Carnation, Washington, United States of America; then, click the green check icon to confirm the placement of 16 photos at that location. Click Done to close the Edit Location dialog.
If necessary, zoom out far enough to see the other pinned location to the west.
Zoom in to the other pin with nine or ten clicks on the map zoom control (+). Move the pointer over the pin; then click the Edit button. In the Edit Location dialog, drag the location pin north and west to position it over the Pike Place Market Area. Click the green check icon to confirm the operation. Click Done to close the Edit Location dialog.
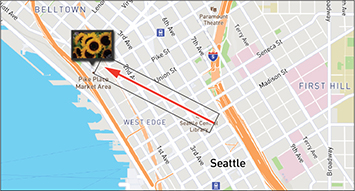
Zoom out enough to see both pins; then, leave the map as it is, in preparation for the next exercise that will bring you to the Places view, in Lesson 3. Click Media in the view picker to return to the Media Browser.
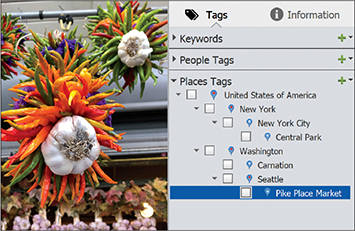
In the Tags panel, the new tags are listed under Places Tags. Each level is listed alphabetically, so New York appears above Washington and Carnation above Seattle.
Right-click the tag Downtown and choose Rename. Type Pike Place Market as the new name for this places tag; then, click OK.
Grouping photos as events
When was your favorite photo taken? Was it at an anniversary dinner? Before your daughter’s school concert? Or during a week-long tropical cruise? The enhanced Events view in Elements Organizer helps you tag your photos by occasion, making it even simpler to search your image library for all those precious memories.
Creating events from the Media Browser
You can select the images from a particular occasion in the thumbnail grid, and then create a new event to group them, without leaving the Media Browser.
![]() Tip
Tip
If you don’t see the capture dates and file names below the thumbnails, choose View > Details, and then View > File Names. If those options are already activated, use the slider to increase the thumbnail size.
Choose Find > By Filename. Type festival; then, click OK. Make sure that the Sort By menu above the thumbnail grid is set to Oldest. The Media Browser shows 15 photos that were all captured on the same date. Select the first five photos in the series and click the Add Event button (
 ) in the taskbar below the Media Browser.
In the Add New Event panel at the right type Medieval Fair to name the new event. You won’t need to alter the date settings; Photoshop Elements has automatically set both the start and end dates to the capture date of the selected photos. When you click the Add Event button without first selecting a group of photos, you can set the start and end dates manually by clicking the calendar buttons at the right. Click Done at the right of the taskbar to confirm the new event.
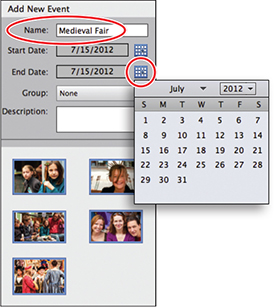
In the Tags panel, expand the Events Tags category to see the new event.
Select the next nine photos in the Media Browser, leaving the last image in the series, Festival_15.jpg, unselected. To add the selected photos to the newly created event, either drag the Medieval Fair tag from the Tags panel to any of the selected images or drag the selection from the thumbnail grid onto the tag.

An invitation to the Events view
Do you like weddings? Sporting events? Street festivals? Road trip vacations? We’ve got them all … what are you waiting for?
Click Events in the view picker at the top of the Organizer workspace to switch to the Events view. If necessary, click Named in the bar below the view picker to switch to the default Named events view. This view mode remains unpopulated until you’ve saved at least one event—currently, its only occupant is your new Medieval Fair stack.
Right now, you’re probably thinking “Where’s the promised sports and scenic views? Bring on the travel!” Patience, please—we’re not yet done with the parade.
Move the pointer slowly across the Medieval Fair stack to see all the images from this event. Stop the pointer when you see your favorite image in the set. To make this photo the top image in the stack—the cover photo—right-click it and choose Set As Cover.
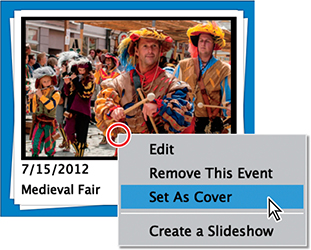
Adding photos to an event
Double-click the Medieval Fair event stack to see all of the photos it contains, and then click the Add Media button (
 ) in the taskbar at the bottom of the workspace.
Under Basic at the left of the Add Media dialog box, make sure that All Media is set as the image source. The source images in the Add Media dialog box are ordered from newest to oldest, so you’ll need to scroll down in the preview pane to find the festival photos.
Click to select the image Festival_15.jpg, a rear view of a parade musician in an orange jacket and plumed hat. Click Add Selected Media at the bottom of the dialog box; then, click Done.

Check the image count in the lower-left corner of the workspace; there are now fifteen images in this Event. Collapse the event and return to the Named events view by clicking Back at the upper left.
Getting smart about creating events
You can avoid the effort of locating the images for a new event manually by letting Photoshop elements find the important occasions in your catalog automatically.
Select the Import 3 folder from the My Folders list in the left panel; then, click Suggested in the actions bar below the view picker to switch from the default Named events view to Suggested events mode.
Drag the Number Of Groups slider to the maximum setting.
In Suggested events mode, Photoshop Elements detects likely event groups amongst the photos in your catalog—or in a selected folder—on the basis of capture dates. Suggested events has separated the New York marathon photos into two stacks.
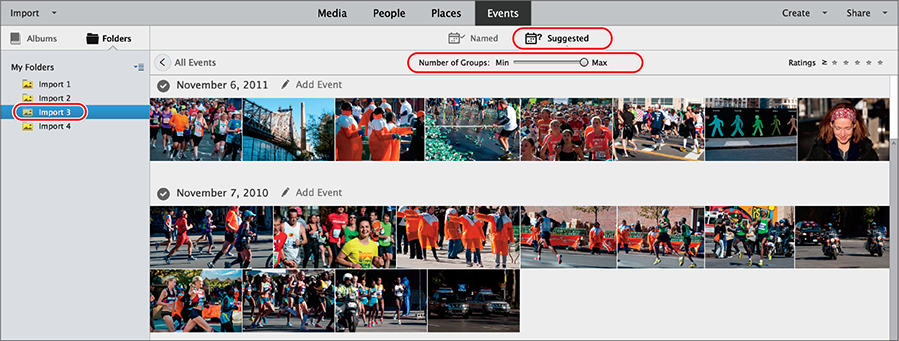
Click Add Event at the right of the header of each of these stacks in turn and type a name in the Name Event dialog box. Check the dates on the two stacks and name the new Events NY Marathon 2010 and NY Marathon 2011. Click OK to create the new event stack.
The October 20, 2019 suggested stack has three photos shot during a visit to a pumpkin patch in Carnation, Washington. Make sure no other stack is selected; then, select this stack and click the Add Event button (
 ) in the taskbar. Name the new Event Pumpkins 2019. Click OK.
Click the Import 4 folder in the left panel and reset the Number Of Groups slider to the maximum setting. The October 20, 2019 stack contains the rest of the photos that belong in the Pumpkins 2019 event. Select the stack and click Media in the view picker at the top of the workspace to switch to the Media view.
Drag the selected photos to the Pumpkins 2019 tag in the Events Tags panel; then, click All Media above the Media Browser and click Events in the view picker to return to the Events view in Suggested events mode.

Creating long events
You can define events that span multiple days just as easily as one-time events.
Return to the Events view and, if necessary, click the All Events button and reset the Number Of Groups slider to the maximum setting. Then, find the Suggested event group dated July 25–24 2018.
Select the group, and then click Add Event to the right of the header. In the Name Event dialog box, type Downtown Seattle Walks to name the new event. Photoshop Elements has already set the start and end dates for the Suggested event to the capture dates of the oldest and most recent photos in the selection. Type Pike Place and waterfront in the Description box; then, click OK to create the event.
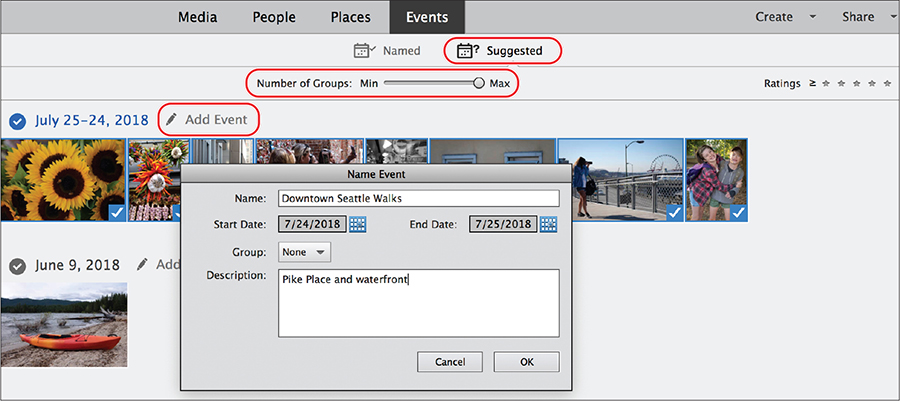
Switch from Suggested events mode to the Named events view.
![]() Note
Note
You’ll return to look at the Smart events mode in greater detail in Lesson 3.
Move the pointer slowly across each stack to review the contents, and then right-click each event to set a new cover photo. Click the Info button ( ) on the Downtown Seattle Walks stack to see the description you entered.

Click Media in the view picker to switch back to the Media Browser.
Congratulations! In this lesson you learned a variety of ways to import media files into your Photoshop Elements catalog, and then used the People, Places, and Events views to sort and tag your images so that finding a photo will be as easy as asking “Who, where, and when?” In the next lesson you’ll look at ways to add even deeper levels of organization to your catalog and discover how to locate exactly the file you want—the payoff for all this organizing! Before you move on, take a minute or two to read through the review questions and answers on the opposite page.
1. Name three ways to import photos from your computer hard disk into your catalog.
2. What is a “watched folder”?
3. Is there a way to generate searchable places tags for photos imported with GPS data?
4. How can you add photos to an existing person, place, or event?
1. This lesson demonstrated three ways to import photos from your hard disk:
Drag and drop photographs from a Windows Explorer/Finder window into the Media Browser pane in the Organizer window.
In the Organizer, choose File > Get Photos And Videos > From Files And Folders, or choose the same command from the menu on the Import button at the upper left of the workspace.
Choose In Bulk, from either of the menus mentioned above, and then select the folders and subfolders on the hard disk that you wish to import.
2. If you designate a folder on your computer as watched, Photoshop Elements is automatically alerted when new photos are saved or added to that folder. By default, the Pictures folder is watched.
3. Although Photoshop Elements will pin photos imported with embedded GPS data on the Places view map, it doesn’t automatically generate corresponding places tags, as it does for photos that you place manually. To generate searchable tags for these photos, you need to relocate them on the map. Select the photos in the Places view; then, click Edit in the enlarged pin preview. In the Edit Location dialog, either move the associated location pin slightly or use the search box to apply a known place name.
4. To add photos to an existing person, place, or event from the Organizer, select the photos you wish to include, and then either drag the selection from the Media Browser to the desired tag in the Tags panel, or drag the tag itself to any of the selected images. To add photos to an established event from the Events view, double-click the event stack to expand it; then, click the Add Media button in the taskbar at the bottom of the workspace, and browse for the photos you wish to add. In the People view, double-click to expand a person’s stack, and then click the Find More button in the taskbar.
