
5. Working with Color and Making Selections
Lesson overview
Photoshop Elements delivers a broad selection of tools and controls for correcting, adjusting, and getting creative with color. Whether you want to make corrections to compensate for inadequate lighting conditions, brighten a smile, or paint the town red, you’ll find a range of solutions, from one-click auto fixes to customizable tools that give you precise control of the adjustments you apply.
This lesson introduces you to a variety of tools and techniques for fixing color problems in your photos:
Using automatic options to correct color
Adjusting skin tones
Whitening yellowed teeth
Removing red-eye and “pet-eye” effects
Making, saving, and loading selections
Changing the color of a pictured object
Replacing a color throughout an image
Working with color management

This lesson will take about 90 minutes to complete. To get the lesson files used in this chapter, download them from the web page for this book at www.adobepress.com/PSECIB2020. For more information, see “Accessing the lesson files and Web Edition” in the Getting Started section at the beginning of this book.

From one-step fixes to more specialized features and techniques, you’ll find that the powerful and versatile color tools in Photoshop Elements are easy to master, giving you the control you need to quickly correct the color balance across an entire image, adjust just one area selectively, or let your creativity run wild.
Getting started
![]() Note
Note
Before you start this lesson, make sure you’ve set up a folder for your lesson files and downloaded the Lesson 5 folder from your Account page at www.peachpit.com, as detailed in “Accessing the lesson files and Web Edition” and “Creating a work folder” in the “Getting Started” section at the beginning of this book. You should also have created a new work catalog (see “Creating a catalog for working with this book” in Lesson 1).
You’ll begin by importing the sample images for this lesson to the CIB Catalog that you created at the beginning of Lesson 1.
Click the Import button at the upper left of the Organizer workspace, and choose From Files And Folders. In the Get Photos And Videos From Files And Folders dialog, navigate to and select your PSE2020CIB / Lessons / Lesson 5 folder. Disable any automatic options that are active; then, click Get Media.
In the Import Attached Keyword Tags dialog, click Select All; then, click OK.
Batch-processing the lesson files
Before you start working with the Lesson 5 images, batch-process them as you did in Lesson 4. At the end of each exercise in this lesson, you can compare the combined auto-fixes to the results that you achieve using various other techniques.
Click the Editor button (
 ) in the taskbar to switch to the Editor. If necessary, click Expert in the mode picker to switch the Editor to Expert mode.
Choose File > Process Multiple Files. In the Process Multiple Files dialog box, click the check boxes to activate all four Quick Fix options. Browse to select the Lessons / Lesson 5 folder as the source for the images to be processed and your My CIB Work folder as the destination for the processed copies.
Activate Rename Files and set the options to add the appendix “_AutoFix” to the existing document names. If necessary, disable the resizing and file conversion options under Image Size and File Type, and then click OK.
Click the Organizer button (
 ) in the taskbar. In the Organizer, click the Import button and choose From Files And Folders. Open your My CIB Work folder. Select the files with names that begin with “05,” and then click Get Media.
In the Import Attached Keyword Tags dialog box, click Select All, then click OK.
Correcting color problems
![]() Tip
Tip
Even when a photo is technically perfect, you may still wish to adjust the color—either across the entire image or just for a particular area or object—to create an effect, such as adding some golden hue to a late afternoon sunset.
Artificial lighting, weather conditions, and mismatched camera settings can result in one of the most common image problems: a color cast that affects the entire image.
For some images your color problem may be more localized, such as red eyes in a photo taken with a flash, or a portrait spoiled by yellow-looking teeth.
You’ll begin this lesson by revisiting and comparing some of the tools for making quick and easy image-wide adjustments in the Quick and Guided Edit modes. Later, you’ll explore methods for fixing red eyes and yellow teeth, and learn how to use the selection tools—an essential skill for making localized edits in Expert mode.
Comparing methods of fixing color
The automatic correction features in Photoshop Elements do an excellent job of bringing out the best in most photographs, but each image—and each image problem—is unique; some photographs require a more hands-on approach.
Photoshop Elements offers a variety of tools and controls for adjusting color; the more techniques you master, the more likely it is that you’ll be able to meet any challenge presented by a difficult photograph.

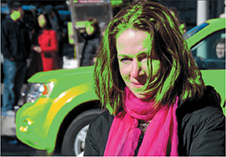
This photo exhibits the overly warm, yellow-orange cast common to many images taken in standard tungsten—or incandescent—lighting.
If you don’t see the Lesson 5 images already isolated in the Media Browser, click the check box beside the imported Lesson 05 keyword tag.
Select the image 05_01.jpg in the Media Browser; then, click the Editor button (
) in the taskbar.
In the exercises in this section, you’ll compare three different techniques for correcting the same color problem, so you’ll create three copies of the original photo.
Click Quick in the mode picker to switch the Editor to Quick mode. Choose Window > Reset Panels. In the actions bar above the Edit pane, make sure that the View is set to After Only, and then choose View > Fit On Screen. If the Adjustments panel is not open at the right of the Quick Edit workspace, click the Adjustments button (
 ) at the right of the taskbar.
Show the Photo Bin, if necessary. Right-click the image in the Photo Bin and choose Duplicate from the context menu. In the Duplicate Image dialog box, click OK to accept the default name, 05_01 copy. Repeat the process to create two more duplicates, 05_01 copy 2 and 05_01 copy 3.
While you’re in Quick Edit or Guided Edit mode, you won’t see image window tabs displayed at the top of the Edit pane; in both these modes you can view only one image at a time in the work area. To see which photos are open in the Editor and which of them is currently active, and also to switch between them, you’ll use the Photo Bin. The name of each image appears as a tooltip when you hold the pointer over its thumbnail in the Photo Bin. Alternatively, right-click anywhere inside the Photo Bin and choose Show Filenames from the context menu.

In the Photo Bin, a blue frame highlights the active image; that is, the photo that you see in the After Only view in the Edit pane.
Correcting color automatically
For the batch processing at the start of this lesson, you applied all four automatic Quick Fix options together. In this exercise, you’ll apply the automatic color adjustment on its own so you can assess the result unaffected by other settings.
In the Photo Bin, click the second photo, 05_01 copy, to make it active; then, choose Before & After - Vertical from the View menu in the actions bar above the Edit pane. Use the Hand and Zoom tools to focus on the faces.
If the tool options pane replaces the Photo Bin when you select the Hand tool or the Zoom tool in the toolbar, click the small menu icon (
 ) at the upper right of the tool options pane and disable Auto Show Tool Options; then, click the Photo Bin button (
 ) in the taskbar to show the Photo Bin.
In the Adjustments panel, expand the Color pane and click the Auto button. Compare the Before and After views. There is a marked improvement; the Auto Color fix has corrected the worst of the orange color cast. Skin tones are slightly cooler and clothing colors a little brighter, but the tonal range is still somewhat flat.

![]() Tip
Tip
If you can’t find the My CIB Work folder, refer to “Creating a work folder” in the “Getting Started” section at the beginning of this book.
Choose File > Save. Name the file 05_01_AutoColor, to be saved in JPEG format to your My CIB Work folder and included in the Organizer but not as part of a version set. Click Save; then, click OK in the JPEG Options dialog box.
Adjusting the results of an automatic fix manually
An automatic fix can serve as a good starting point for some manual fine-tuning.
In the Photo Bin, click the third photo, 05_01 copy 2, to make it the active image; then, expand the Color pane and click the Auto button.
![]() Tip
Tip
To type a new value for any setting, first click to select the number to the right of the adjustment slider.
Click the Saturation tab at the top of the Color pane; then, reduce the setting to –25 to give the color a more natural look. Click the Hue tab and reduce the value to –5 to shift the color away from yellow-green. Increase the Vibrance to a setting of 20 to re-saturate the color a little without affecting the skin tones.

Expand the Balance pane and click the Temperature tab. Reduce the Temperature setting to 40 and increase the Tint value to 15 to further reduce the color cast.
Expand the Exposure pane, and then increase the Exposure setting to 0.8. In the Lighting pane, set the Midtones value to 15.

![]() Note
Note
Why does the Exposure control use decimals instead of whole numbers, like other controls? Exposure in photography is measured in “stops” according to how much light comes through the lens. So when you increase the Exposure control to 1.0, you’re doubling the amount of light in the scene—in this case digitally, not through a lens.
The contrast has improved, the colors are brighter, and the skin tones have lost the “fake tan” look common in photos captured without a flash in tungsten lighting.
Choose File > Save. Name the file 05_01_AutoColorPlus, to be saved in JPEG format to your My CIB Work folder and included in the Organizer but not as part of a version set. Click Save; then, click OK in the JPEG Options dialog box.
Tweaking an automatic fix using color curves
You can use commands from the top half of the Enhance menu to apply the same adjustments as the Auto buttons in the Adjustments panel; these Enhance menu commands are available in Quick and Expert modes, but not in Guided Edit mode.
Both the Quick and Expert Edit modes also offer other methods of enhancing color that give you finer control over the results. These are the commands in the lower half of the Enhance menu. In this exercise, you’ll use one of these options to tweak the adjustments applied by the Auto Color fix button.
In the Photo Bin, click the image 05_01 copy 3 to make it active.
In the Color pane, click the Auto button to apply the automatic Quick Fix correction; then, choose Enhance > Adjust Color > Adjust Color Curves to open the Adjust Color Curves dialog box.
In the Select A Style menu at the lower left of the Adjust Color Curves dialog box, click each color curve preset in turn, noting the effect on the curve in the graph at the right as well as on the After image above it. Select Increase Midtones.
Drag the Adjust Highlights slider to a point about a third of the distance from the default central position to its limit at the right. Drag the Midtone Brightness and Midtone Contrast sliders about half as far to the right; then, click OK.

Choose File > Save. Name the file 05_01_ColorCurves, and set up the usual work file settings. Click Save; then, click OK in the JPEG Options dialog box.
Comparing results
A glance at the Photo Bin will tell you that all three of your saved work files are still open in the Editor. Let’s compare them to the batch-processed AutoFix file.
Right-click the image at the left of the Photo Bin—the original photo—and choose Close from the context menu.
Choose File > Open. Locate and open your My CIB Work folder; then, select the file 05_01_AutoFix and click Open. Click Expert at the top of the workspace to switch to Expert mode.
Choose Preferences > General from the Edit / Adobe Photoshop Elements Editor menu. Activate Allow Floating Documents In Expert Mode; then, click OK.
Floating document windows are now the default for Expert mode. Throughout the rest of this book, however, it will be assumed that you are working with image windows that are docked (consolidated) in the Edit pane. At the end of this exercise you’ll disable floating windows so that you can follow the exercises as written.
Hide the Photo Bin, if necessary, by clicking the Photo Bin button (
). Choose Window > Images > Float All In Windows, and then choose Window > Images > Tile. To synchronize the view across all four image windows, choose Match Zoom, and then Match Location, from the Window > Images menu.
![]() Note
Note
Depending on the resolution of your monitor, you may need to move one of the floating windows to view the tool options pane.
Click the Zoom tool (
 ) in the toolbar; then, click the Tool Options button (
 ) in the taskbar. In the tool options pane, activate the Zoom All Windows option below the Zoom slider. Click the Hand tool (
 ) and activate Scroll All Windows; then, click the Tool Options button to hide the tool options pane. Use the Zoom and Hand tools to focus on the faces in any of the image windows.
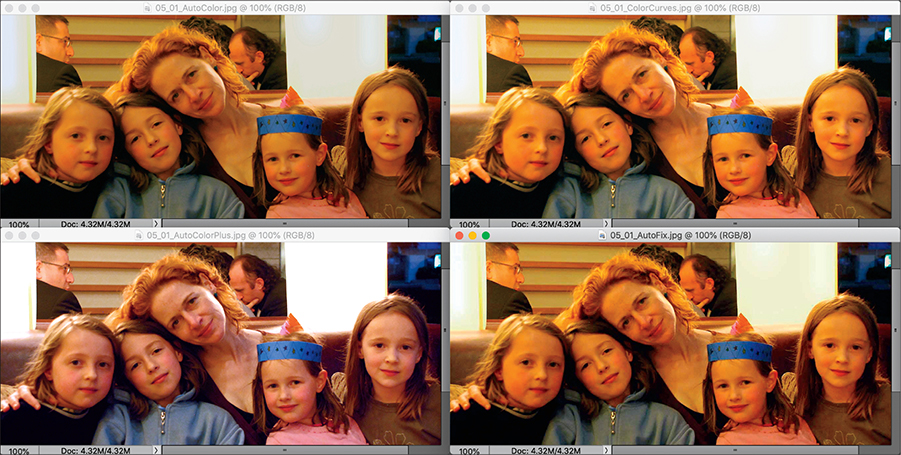
![]() Note
Note
Only one image window is active at any given time. The file name and image details are dimmed in the title bars of all but the currently active image window.
Drag your favorite version out of the tiled arrangement by its header bar, and float the image window in the center of the work area; then, double-click the Hand tool to fit it to the screen. Press Ctrl+Tab / Command+~ or Ctrl+Shift+Tab / Command+Shift+~ to cycle through all the open image windows, bringing each to the front in turn.
Choose Preferences > General from the Edit / Photoshop Elements Editor menu and disable floating documents; then, click OK. Choose File > Close All.
Adjusting skin tones
When your primary concern is the people in your photo, you can correct a color cast across the entire image by concentrating on achieving natural, good-looking skin tones. Photoshop Elements offers tools to do just that in all three Edit modes.
In the Organizer, select the image 05_01.jpg in the Media Browser, and then click the Editor button (
) in the taskbar. Use the Zoom and Hand tools to focus on the faces of the mother and the two daughters sitting closest to her.Choose Enhance > Adjust Color > Adjust Color For Skin Tone. In the Adjust Color For Skin Tone dialog box, make sure the Preview option is activated.
As you move the pointer over the image, the cursor changes to an eyedropper tool. With the eyedropper tool, click the lightly shaded area of skin to the right of center on the youngest sister’s forehead. The color balance of the entire photo is adjusted using the sampled skin tone as a reference.
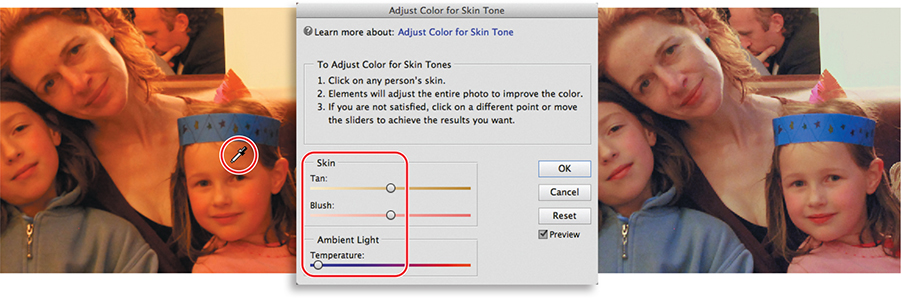
Move the Tan, Blush, and Temperature sliders to achieve the skin tones you want, and then click OK. Choose File > Save As. Name the file 05_01_Skin and save it to your My CIB Work folder with the usual options. Choose File > Close.
Removing a color cast with one click
As you learned in Lesson 4, the Color Cast eyedropper tool provides yet another solution to difficult color balance problems. If you wish to try the Color Cast eye-dropper on the photo you’ve been working with, you can do so in any of the three edit modes. In Quick Edit and Expert modes, choose Enhance > Adjust Color > Remove Color Cast. In Guided Edit mode, select Remove A Color Cast.
Use the Color Cast eyedropper to define a color that should appear temperature-neutral—neither warm nor cool; the color balance is recalculated around that tone. The best choice is a mid gray, though black or white can also work. Choosing the right color can take a little practice. In our sample photo, for example, the zippered sweater that appears to be a neutral gray in the Before image actually contains a lot of cool blue; instead, try sampling the brightest point on the lily in the foreground.

Working with red-eye
![]() Note
Note
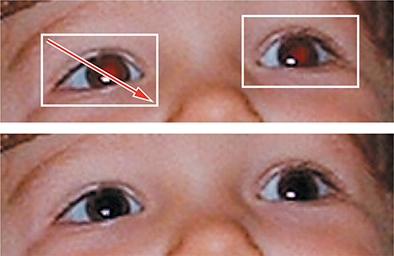
The red-eye effect happens when the camera’s flash is reflected off the retina at the back of the eye, causing the pupil at the center to appear bright red instead of black.
As you learned in Lesson 2, Photoshop Elements can apply an automatic red-eye fix during import so that your images are corrected before they reach the Organizer. However, the automatic solution is not effective for every photo; in this exercise, we’ll look at the manual techniques you can use to deal with those difficult cases.
Using the automatic red-eye fix
If necessary, use the Tags panel or the My Folder list to isolate the Lesson 5 images. Select the images 05_02a.jpg and 05_02b.jpg, and then click the Editor button (
 ) in the taskbar. Switch the Editor to Expert mode.
At the top of the work area, click the name tab for the image 05_02a.jpg to bring that photo to the front. Use the Zoom and Hand tools to focus as closely as possible on both of the girls’ faces; then, choose Enhance > Auto Red Eye Fix.
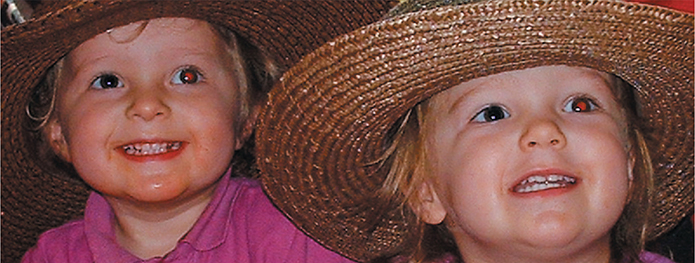
As you can see, the auto correction does a great job with two of the four red eyes. Unfortunately, they’re not even on the same face! The Eye tool may fail to identify a pupil if your photo is out of focus, is poorly exposed, or has a color cast; if possible, try correcting those problems before tackling the red eyes.
Press Ctrl+Z / Command+Z to undo the Auto Red Eye Fix. Keep the file open.
Using the Eye tool to fix red eyes
For stubborn red-eye problems, you can use the Eye tool (![]() ), which you’ll find in the toolbar in both Quick Edit and Expert modes.
), which you’ll find in the toolbar in both Quick Edit and Expert modes.
Zoom and drag the photo to focus the view on the eyes of the girl at the left.
Select the Eye tool (
 ); then, click the Tool Options button () in the taskbar to open the tool options pane, if necessary. Choose Reset Tool from the options menu () at the far right. Click once in each eye, close to center of the pupil.
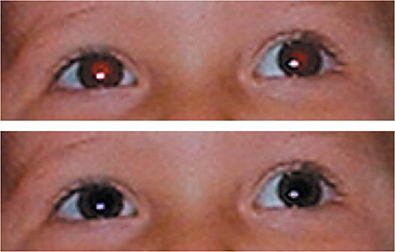
For this example, the Eye tool works perfectly. If you ever find that the red-eye correction is over-extended, blackening portions of the iris or spilling onto the skin around the eye, try clicking at a different point.
Zoom and drag the photo to focus the view on the eyes of the girl at the right.
![]() Tip
Tip
Once again, the Eye tool produces a good result easily. For difficult cases that don’t improve no matter where you click or drag, undo and adjust the Pupil Radius and Darken sliders in the tool options pane before you try clicking or dragging again.
This time, drag a marquee rectangle with the Eye tool around each eye in turn. Experiment with the size and placement of the rectangle to get the best results. If you’re not satisfied, undo and try again. Hold the Alt / Option key to draw the rectangle from its center.
Choose File > Save As. Name the new file 05_02_RedEye, to be saved to your My CIB Work folder in JPEG format and included in the Organizer but not in a version set. Click Save. Accept the JPEG settings and choose File > Close.
Eye treatments for furry friends
As every pet owner knows, animals’ eyes also reflect light from a camera flash. Though the reflection from pets’ eyes is sometimes red, it’s more often blue, green, yellow, or white and will not respond well to the automatic red-eye fix; for these cases, you can switch the Eye tool to Pet Eye mode.
You should still have the image 05_02b.jpg open in Expert mode in the Editor. Select the Eye tool (
); then, click the check box in the tool options pane to switch the tool to Pet Eye mode.Try both of the techniques you practiced in the previous exercise in turn, undoing after each attempt. Experiment with the full range of the Pupil Radius and Darken sliders in the tool options pane until you’re happy with the result.

Choose File > Save As. Name the new file 05_02_PetEye and save it to your My CIB Work folder with all the usual settings; then, choose File > Close.
Brightening a smile
Sometimes a photo can be spoiled by a color problem as simple as yellow-looking teeth. As with the red-eye effect, Photoshop Elements offers an easy solution that’s available in all three Edit modes.

Located in the toolbar in Quick Edit mode and as part of the Perfect Portrait procedure in Guided Edit mode, the Whiten Teeth tool is a preset variant of the Expert mode’s Smart Brush, which functions as both a selection tool and an image adjustment tool. You can use the Whiten Teeth tool (or the Smart Brush with the Whiten Teeth preset loaded) to select the yellowed teeth, exactly as you would with the Quick Selection tool, and the preset whitening adjustment is applied inside the selection.
The Whiten Teeth selection and adjustment is made on a new layer separate from the original image in the Background layer. The edit remains active on its own adjustment layer—so you can return to alter the selection area or the way the adjustment is applied at any time. You can use the tool more than once on the same area, building up multiple layers that you can then blend for a natural effect.

Making selections
By default, adjustments you make are applied across the whole photo. If you wish to edit only a specific area or object, you first need to select it. An active selection is the only area of the image that can be edited; the rest of the photo is protected.
The boundaries of a selection are indicated by a selection marquee: a flashing border of black and white dashes. For selections with soft—or feathered—edges, the selection marquee extends as far as the center-line of the feathering; outside the marquee, the “hardness” of the selection is less than 50%.
You can save a selection and then reuse it or edit it later, saving you time when you’re creating a complicated selection or when you need to isolate the same area again.
Using the Auto Selection tool
![]() Tip
Tip
Sometimes the most powerful features have the smallest footprints. If your photo has a prominent person or object in it, choose Select > Subject, or grab a selection tool and click the Select Subject button in the tool options pane. The Editor automatically discerns the subject and makes a selection, even faster than the Auto Selection tool! You’ll likely need to do some cleanup of the edges, as described on the following pages, but it’s a great first step.
In Quick and Expert modes, the Editor offers a suite of selection tools, each helpful for a different situation or working style. We’ll start by taking a look at the Auto Selection tool.
If necessary, use the Tags panel or the My Folder list to isolate the Lesson 5 images. Select the unedited image 05_07.jpg; then, click the Editor button (
) in the taskbar. Switch the Editor to Expert mode.Select the Quick Selection tool, or whichever variant is currently visible to the right of the Lasso tool in the toolbar. If necessary, click the Tool Options button (
) in the taskbar to open the options pane below the image preview.In the tool options pane, select the Auto Selection tool (
 ). Make sure the New button at the left is activated; then, choose the Rectangle selection style.
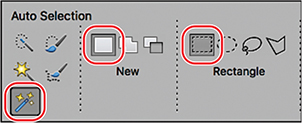
Click outside the image, just beyond the rock’s right edge; then, drag upward and to the left to surround the mermaid and her rock with the marquee.

Photoshop Elements looks for the object’s outline and contracts the selection to fit. The Auto Selection tool can be used as a stand-alone tool, as in this exercise, but it is most effective in combination with the other tools in the group, making quick work of establishing a rough base selection that can then be further edited.
In the tool options, switch from New selection mode to Add To Selection, and change the selection style from Rectangle to Lasso. Zoom in and out by pressing the Control / Command key together with the plus or minus sign key as you work around the selection border, drawing small, rough selections around unselected areas you wish to add. Switch to Subtract From Selection mode and repeat the process to subtract unwanted background areas.
When you’re done, choose Select > Inverse to select the water; then press the Delete key to see how well you did. Choose Edit > Undo Delete; then, choose Edit > Undo Select Inverse, and continue to tweak the selection.
When you’re happy with the result, delete the background as you did in step 6; then choose File > Save As. Add _AutoSelect to the file name and save to your work folder in high-quality JPEG format, to be included in the Organizer but not in a version set. Choose File > Close.
Loading selections
If an image has been saved with layers or saved selections (alpha channels), you can load the alpha channel, or transparent areas of a layer, as an active selection.
![]() Note
Note
The lesson image has been saved in Photoshop file format, which can store layers and saved selections.
In the Organizer, select the unedited image 05_03.psd in the Media Browser; then, click the Editor button (
) in the taskbar.If necessary, switch to Expert edit mode. Hide the Panel Bin by deselecting its name in the Window menu; then, hide the Photo Bin by clicking the Photo Bin button (
) in the taskbar. Choose View > Fit On Screen.Choose Select > Load Selection. In the Load Selection dialog box, choose the saved selection “Bees” from the Source menu; then, click OK.
The saved selection is loaded. The four bees and the central crown of the water lily flower are now surrounded by a flashing selection marquee. The area inside the flashing border has become the active portion of the image; the rest of the photo is protected from the effects of any edits you may execute. In the exercises to follow, you’ll select the flower together with the bees and then use the saved selection to help isolate the petals.
Choose Select > Deselect to clear the current selection.
Using the Selection Brush
Perhaps the most intuitive and controllable way to create a selection is to “paint” it directly onto the image, adding and erasing areas to correct the selection as you go. This exercise and the next focus on the use of two selection tools that let you do just that: the Selection Brush and the Quick Selection tool.
The Selection Brush tool has a Selection mode, in which you paint over the area you want to select for editing, and a Mask mode, which lets you brush a semi-opaque overlay onto the areas you want to protect from editing. The Selection Brush (![]() ) is grouped with the Quick Selection tool (
) is grouped with the Quick Selection tool (![]() ), the Magic Wand tool (
), the Magic Wand tool (![]() ), the Refine Selection Brush (
), the Refine Selection Brush (![]() ), and the Auto Selection tool (
), and the Auto Selection tool (![]() ).
).
Select the Quick Selection tool—or whichever of its variants is currently visible to the right of the Lasso tool in the toolbar—then, click the Tool Options button (
) in the taskbar to open the tool options pane at the bottom of the Edit window.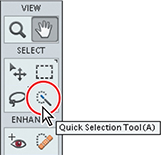
In the tool options pane, click the Selection Brush tool to activate it. In the Selection Brush tool options, make sure that the Add To Selection button at the left is activated (see below); then, choose Selection from the Mode menu, set the Size to 35 px (pixels), and set the Hardness value to 100%. Click the Tool Options button (
) in the taskbar to hide the tool options pane.
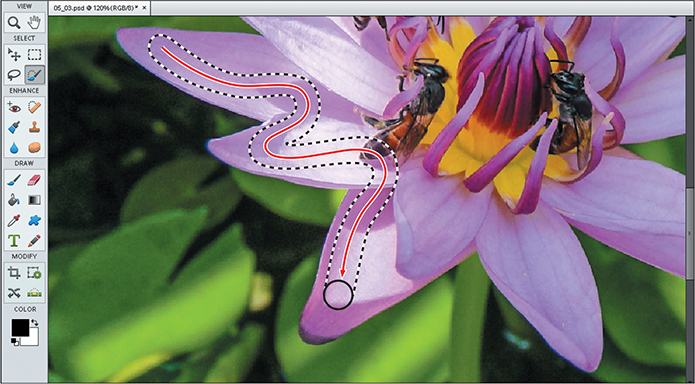
Drag with the Selection Brush to paint a live selection over four or five of the petals at the lower left. Don’t try to paint all the way to the edges; you’ll do that in the next step. You can paint over the bees to include them in the selection.
![]() Tip
Tip
While you paint your selection onto the image, release the mouse button every second or two so that you don’t have to repeat too much work if you need to undo a stroke.
Now you need to reduce the brush size to paint around the edges of the petals, adding to your selection. You could open the tool options to change the brush size, but while you’re working it’s far more convenient to press the left bracket key ([) to reduce the brush size in increments and the right bracket key (]) to enlarge it.
![]() Note
Note
The bracket keys change the brush size in different pixel increments depending on the size of the brush. For a brush above 100, the increments are 25 pixels; from 50 to 99, the increment is 10 pixels; below 50, the brush adjusts in 5-pixel increments; when the brush is set smaller than 10, the increments are reduced to one pixel.
Press the left bracket key ([) five times to reduce the Selection Brush size to 10 pixels, and then paint your selection to the edges of the petals. If you go too far, simply hold down the Alt / Option key to switch the Selection Brush to Subtract From Selection mode, and paint out your mistakes. Use the bracket keys to change the brush size, as needed, until the selection outline completely surrounds the petals in the lower-left quadrant of the flower.
Using the Quick Selection tool
With the Quick Selection tool, all you need to do is click or “scribble” in the area you wish to select and Photoshop Elements will do most of the work. You don’t need to be precise; the quick selection border automatically expands to find the edges of the area you’re selecting by identifying similarities in color and texture.
Click the Selection Brush tool in the toolbar; then, open the tool options pane.
In the tool options pane at the bottom of the workspace, click the Quick Selection tool (
 ); then, make sure the Add To Selection mode is activated. You can set the brush size with the slider and adjust other brush attributes by clicking Brush Settings. For the purposes of this exercise, you can use the default brush with a diameter of 30 px (pixels). Click the Tool Options button in the taskbar to hide the tool options pane.
Starting from inside your active selection, scribble slowly inside the outline of the flower, making sure to draw through areas of different color and brightness—including the bees and the central stamens. Release the mouse button once or twice to see the result. As you draw, Photoshop Elements automatically expands the selection to any area adjacent to your stroke that has similarities in color and texture.

Selecting the flower directly was simple enough, but objects with more complex shapes and a lot of internal detail can sometimes be more difficult. In those cases, it can be more effective to use the Quick Selection tool to select everything but the object, and then invert the selection.
Press Ctrl+D / Command+D to deactivate the current selection; then, drag around the outside of the flower to select the leafy background. Once more, be sure to draw through areas of different brightness.

To turn the selection inside out, choose Select > Inverse. Check the tips of the petals and the angles where they meet; if you’re missing a petal tip, paint it in with the Selection Brush tool. If fragments of background are selected between the petals, hold down the Alt / Option key and paint out the extraneous areas.
The background is now masked, and the water lily flower is selected—together with its furry friends—ready for the next exercise.
Working with saved selections
In this exercise you’ll save your live selection and then modify it by loading the selection that was previously saved with the image file.
With your selection still active, choose Select > Save Selection.
In the Save Selection dialog box, name the selection Flower.
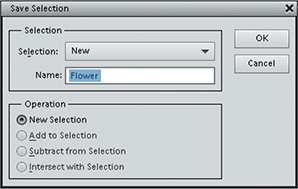
By default, the Selection menu is set to New; the selection will be saved in its own channel. At this setting the alternative Operation options are unavailable; you’ll look at those a little later.
Click OK to close the Save Selection dialog box.
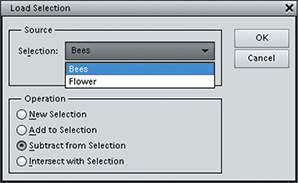
Without deactivating the selection, choose Select > Load Selection. In the Load Selection dialog box, click the Source Selection menu to see your Flower selection listed. Choose the saved selection Bees as the selection to be loaded.
Under Operation, activate Subtract From Selection. This will deselect any areas where the selection you’re loading and the currently active selection overlap. Click OK.
![]() Note
Note
“Add To Selection” combines the saved and current selections. “Intersect With Selection” selects the areas where the two selections overlap.
Choose Select > Save Selection. In the Save Selection dialog box, name the new selection Petals. Make sure that the Selection menu is set to New to save the selection in its own channel, rather than replacing one of the existing selections.
Click OK to close the Save Selection dialog box.
Next, you’ll apply adjustments to the image through your new saved selections.
Editing through selections
Now that you’ve saved different selections from the image, you can use them to do some selective editing, applying different treatments to separate areas of the photo.
Choose Select > Load Selection. In the Load Selection dialog box, choose the Flower selection from the Source Selection menu. Click the check box to activate the Invert option; this will select everything but the flower. Make sure the Operation option is set to New Selection, then click OK.
Choose Enhance > Adjust Lighting > Brightness/Contrast. Reduce the Brightness value to –100, increase the Contrast to 20, and then click OK.
The adjustment to the background lighting has put the flower in the spotlight. As well as focusing attention on the flower, it has also given the photo a different feel, shifting it from mid-day to morning, and perhaps deeper into the forest.
Choose Select > Load Selection. This time, choose the saved Petals selection from the Source Selection menu in the Load Selection dialog box. Make sure that the Operation option is set to New Selection; then, click OK.
The petals look underexposed in some areas and burned-out in others as a result of the dappled light. Let’s bring out some midtone detail and recover some color.
Choose Enhance > Adjust Lighting > Shadows/Highlights. Reduce the default Lighten Shadows value to 0. Increase the Darken Highlights setting to 10% and the Midtone Contrast to 20%, and then click OK.
The petals now have much more color detail, and an improved tonal spread that helps to increase texture and definition.
Choose Enhance > Adjust Color > Adjust Hue/Saturation. Decrease the Hue value to –50. Leave the Saturation and Lightness values unchanged. Click OK.
Changing the color of the petals serves to narrow the focus even further to the bees and their business at the center of the flower.

Choose File > Save As. Name the file 05_03_SavedSelections, to be saved in Photoshop format with all the usual settings. Click Save, and then close the file.
Selecting fine edge detail
The Refine Selection Brush helps you make complex selections—even for difficult subjects like hair, fur, grass, and foliage. You can switch the Refine Selection Brush between four working modes to add to or subtract from a basic selection, to push a misaligned selection border into place, or to smooth jagged edges.
In the Editor, make sure you’re in Expert mode. If necessary, hide the Panel Bin and click the Tool Options button (
) to show the tool options pane. Choose File > Open; then, locate and open the file 05_04.psd.To save you time, we’ve provided the lesson image with a pre-saved base selection. Choose Select > Load Selection; then, click OK to load the saved base selection.
![]() Note
Note
Snap Strength affects how closely the selection will “adhere” to edge detail. The Selection Edge control increases or decreases the tool’s sensitivity; a “soft” setting will detect finer edge detail.
In the tool options pane, select the Refine Selection Brush (
 ); then, set the tool to Add mode. Set the brush size to 900 px, and the Snap Strength and Selection Edge values to their maximums. Reduce the opacity of the selection overlay to 70%.
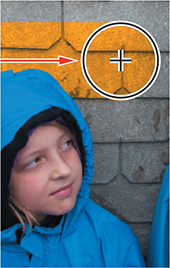
Position the cursor as shown below, so that the outer circle just includes the extremities of the feathers. The area under the gray circle will become “solidly” selected, so make sure the inner circle falls inside the edge detail and does not include any of the background. Press and hold until the selection stops growing (below, center); then, release the mouse button and move the cursor away.

![]() Tip
Tip
The Push Selection and Smooth Selection cursor modes let you further refine the selection by nudging and smoothing the existing selection.
Repeat step 4 in the same position; then, work clockwise around the selection edge, treating each segment twice (or more, if you still see unselected areas). When you reach the area under the narrowing beak, reduce the brush to 500 px, but whenever you change the brush size, be sure to reset the Selection Edge control to its maximum value. If you find that you’ve selected parts of the background, switch the tool to Subtract mode and work the same way, from outside the selection.

When you’re done, click the View swatch in the tool options pane and switch the preview from Overlay to On Black mode. Choose Select > Save Selection, and save your work as a new selection. Save the file in PSD format, and then close it.
Changing the color of a pictured object
Photoshop Elements offers two very different methods for switching a specific color in an image: the Color Replacement tool and the Replace Color dialog box.
![]() Tip
Tip
The color replacement technique that will be most effective depends on the characteristics of the photo that you’re working with and the extent of the changes that you wish to make.
Using the Color Replacement tool
The Color Replacement tool enables you to replace a targeted color in an image by painting over it with another; it’s equally effective for making localized color corrections or as a “magic brush” to enhance a photo creatively.
The cursor for the Color Replacement tool consists of crosshairs at the center of a circle that indicates the brush size. When you drag in the image, the color pin- pointed by the crosshairs is sampled as the target color and the new color is then applied to any pixel inside the cursor circle that matches the targeted color, within the tolerance range set in the tool options bar.
What this means is that you can be quite relaxed as you paint; as long as you keep the crosshairs inside the area of color that you wish to replace, the circle can overlap the neighboring area without changing the color, making it easy to paint right up to the edge. The only pixels affected are those inside the cursor circle that match the targeted color under the crosshairs.
Use the Lesson 05 keyword tag, if necessary, to isolate the Lesson 5 images. Select the image 05_05.jpg; then, click the Editor button (
) in the taskbar.If necessary, switch the Editor to Expert mode. Hide the Panel Bin by unchecking its name in the Window menu; then, hide the Photo Bin by clicking the Photo Bin button (
) in the taskbar. Choose View > Fit On Screen.Click the foreground color swatch below the toolbar to open the Color Picker. Type in the text boxes to set the Hue (H), Saturation (S), and Brightness (B) to values of 200, 80, and 100, respectively. Click OK to close the Color Picker.

Select the Brush tool (
 ) (grouped in the toolbar with the Impressionist Brush and the Color Replacement tool); then, click the Tool Options button () in the taskbar, if necessary, to access the tool settings. In the tool options pane, select the Color Replacement tool at the lower left; then, click the small menu icon () at the far right and choose Reset Tool. Set the brush size to 200 px. Leave the rest of the settings unchanged and hide the tool options pane.
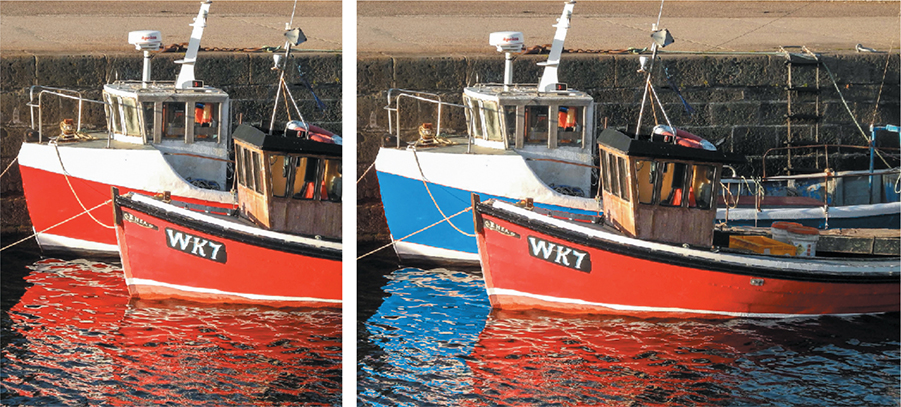
You’ll use the new foreground color to repaint the boat behind the Rhea (WK7).
Click in the upper-left corner of the red paint at the boat’s bow; then drag around the edges of the area bounded by the white paint at the top, the ropes to the right, and the stone wall at the left. Work carefully into the edges, always keeping the crosshairs within the outlines of the red paint. Reduce the brush size by pressing the left bracket key ( [ ) and magnify the view as needed as you move toward the back of the boat, painting over all the red areas. Release the mouse button frequently so you can undo any over-painting without losing too much work.

So far, so easy; the Color Replacement tool automatically adapts the new color for both lit and shaded areas. Now you need to deal with the reflections on the water. Obviously, it won’t be possible to “keep inside the lines” to protect the areas reflecting white, so you’ll change the way the Color Replacement tool operates.
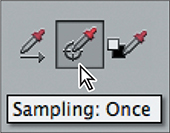
In the tool options pane, switch the sampling mode from Continuous to Once, increase the Tolerance setting to 40%, and set the brush size to 100 pixels.
Zoom in so that you see only the area where the reflections are to be re-colored. Click inside one of the darker red patches close to the blue boat; then, without releasing the mouse button, “scrub” over all the reflections that should now be blue. Take your time, paying attention to any small areas still showing red.
Choose File > Save. Name the file 05_05_BlueBoat, to be saved as a JPEG file to your My CIB Work folder and included in the Organizer but not in a version set. Click Save; then, click OK in the JPEG Options dialog box. Close the file.
Replacing a color throughout an image
Using the Replace Color dialog box can be faster than painting with the Color Replacement tool, but it can be difficult to control—especially when the color of the object you want to change is also present in other parts of the photo. Even with difficult images, you can achieve a good result by using the Replace Color dialog box in conjunction with a selection.
In the following exercises, you’ll switch the colors of two pictured objects, making your changes on a duplicate of the Background layer so that you can easily compare the finished project to the original picture. First, you’ll work on the entire image, which will give you an indication of just where—and how much—the color change will affect the rest of the photo. In the second stage, you’ll use a selection to constrain the changes.
In the Organizer, use the Lesson 05 keyword tag, if necessary, to isolate the Lesson 5 images. In the Media Browser, click to select the image 05_06.jpg, and then click the Editor button (
) in the taskbar.In the Editor, switch to the Expert mode and choose Window > Reset Panels. Hide the Photo Bin, if necessary, by clicking the Photo Bin button (
) in the taskbar; then, double-click the Hand tool or choose View > Fit On Screen. If you don’t see the Layers panel at the right of the workspace, click the Layers button ( ) in the taskbar.
The layers panel shows that this image has only one layer, which is active (selected) by default. Choose Layer > Duplicate Layer and accept the default name. Alternatively, drag the Background layer to the New Layer button (
 ) at the upper left of the Layers panel. With a duplicate layer, you’ll have an original to fall back on should you need it.
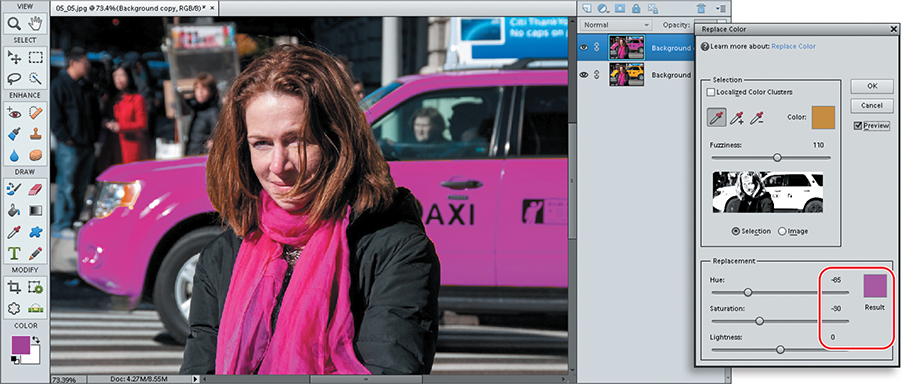
With the new Background Copy layer selected in the Layers panel, choose Enhance > Adjust Color > Replace Color.
In the Replace Color dialog box, make sure that the left-most of the three eyedropper buttons is activated—as in the illustration at the right—and that Fuzziness is set to the default value of 40. Make sure that Preview is activated, and switch the selection preview thumbnail to the Image view option.
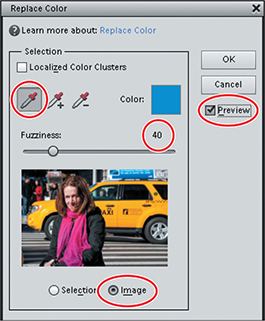
Move the pointer over the thumbnail preview in the Replace Color dialog box and click once with the eyedropper on the yellow taxi. Change the selection preview from Image to Selection so that you can see the extent of the color selection you just made highlighted in white on a black background.
Below the selection preview, either use the sliders or type in the text boxes to set the Hue, Saturation, and Lightness values to 90, 100, and 0, respectively, a bright green that will be easily seen wherever it appears in the image.
To adjust the area of selected color—or color-application area—start by clicking the second of the three eyedropper buttons to switch the eyedropper tool to Add To Sample mode, as illustrated at the right, below; then, click in the main image window in a few areas where the paint on the car still appears yellow.
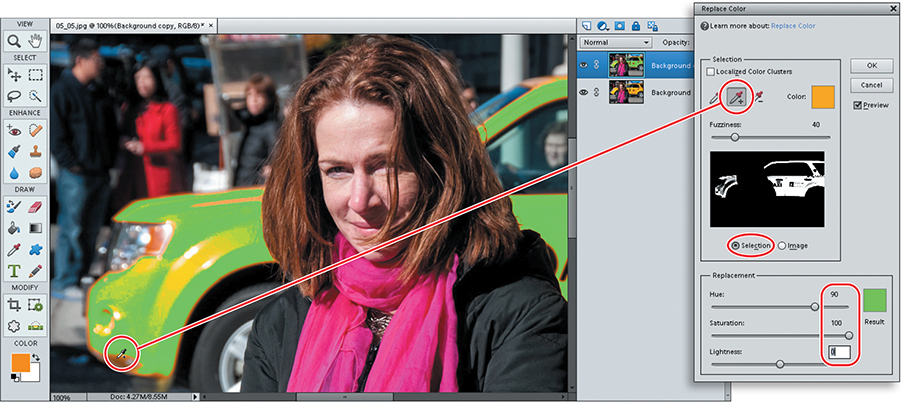
Use the Add To Sample eyedropper again, if necessary, and then drag the Fuzziness slider left and right until you have full coverage on the car. In both the Edit pane and the black and white selection preview, you can see that it’s not possible to change the color of the car using this technique without affecting the woman’s skin and hair, as well as various parts of the background. Click Cancel to close the Replace Color dialog box.
Replacing a color in a limited area of an image
In this exercise you’ll limit the color change to a selected area of the photograph.
Make sure the layer Background Copy is still selected in the Layers panel. In the toolbar, switch to the Quick Selection tool (
). Press the left and right bracket keys ( [ , ] ) to set a workable brush size.
Use the Quick Selection tool to select all the yellow areas of the car. As much as possible, try to include the reddish halo that surrounds the yellow areas (clearly visible on the roof, at the front of the taxi, and around the wheel arches and signage). If you go too far and need to trim the selection, simply hold down the Alt / Option key as you work to switch the Quick Selection tool temporarily to Subtract From Selection mode.
Choose Enhance > Adjust Color > Replace Color. Repeat steps 5 through 8 from the previous exercise. Be sure that you follow the steps in order; you need to sample the original yellow before setting Hue, Saturation, and Lightness to define the replacement color. This time, set the Hue, Saturation, and Lightness values to –85, –30, and 0, respectively, a color that will match the woman’s scarf.
When you’re satisfied with the results, click OK to close the Replace Color dialog box; then choose Select > Deselect, or press Ctrl+D / Command+D.

Repeat the process for the scarf. First, select it with the Quick Selection tool, taking particular care with the shaded areas in the deeper folds, and the areas adjacent to the woman’s hair and under her chin. Then, choose Enhance > Adjust Color > Replace Color, sample the scarf thoroughly, and set the Hue, Saturation, and Lightness values to 70, 60, and 0; a color that would have once matched the taxi.

To compare the edited image to the original, toggle the visibility of the Background Copy layer by clicking the eye icon beside the layer thumbnail. Make the new layer visible again, and then right-click the Background Copy layer and choose Flatten Image from the menu. The image is flattened to a single layer; the layer you edited replaces the original Background layer.
Choose File > Save. Name the file 05_06_ColorSwitch, to be saved to your My CIB Work folder, and included in the Organizer but not in a version set. Click Save; then, click OK in the JPEG Options dialog box. Close the file.
Colorizing a photo
Black and white photos have a special appeal, but occasionally don’t you wish you could see them in color? The new Colorize Photos feature does a pretty good job of adding color where it didn’t exist in the image before—great for giving life to old photos.
Open the file 05_08.jpg in the Editor and switch to the Expert mode, if necessary.
Choose Enhance > Colorize Photo. After analyzing the image, a colorization is chosen. Click between the four options to see the warm and cool options.
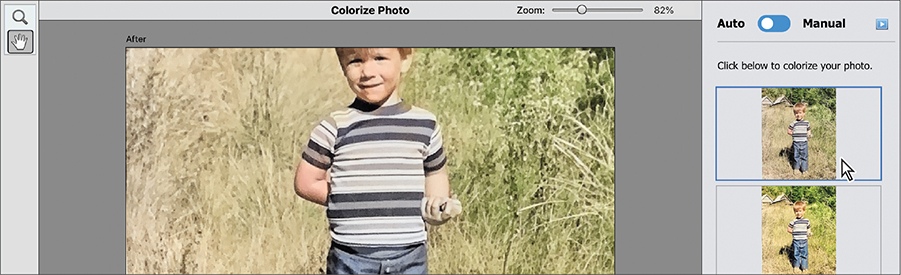
Move the switch at the top from Auto to Manual mode. Notice the boy’s left hand didn’t get the same skin-colored treatment as his other arm and face.
Click the Quick Selection tool (
) in the sidebar and select that hand and arm.
Click the Droplet Tool button and click once within your selection to define the area to be colored manually.
Under Color Palette, click the eyedropper tool, and then click the boy’s right arm.
Click the Before / After button to compare the results of your work, and then click OK to apply the effect.
Choose File > Save. Name the file 05_08_Colorize, to be saved to your My CIB Work folder, and included in the Organizer but not in a version set. Click Save; then, click OK in the JPEG Options dialog box. Close the file.
Working with color management
Moving a photo from your camera to your monitor and from there to a printer or other device can cause an apparent shift in the colors in the image. This shift occurs because every device has a different color gamut, or color space—the range of colors the device is capable of interpreting and reproducing.
To achieve consistent color between digital cameras, scanners, monitors, and printers, you need to use color management. The software acts as an interpreter, translating colors so that each device can reproduce them in the same way. Device-specific color profiles, mathematical descriptions of each device’s color space, help you maintain consistent color. When you save a file, select Embed Color Profile in the Save As dialog box. In Photoshop Elements, you can access the color management controls from the Edit menu in both the Organizer and the Editor.
Setting up color management
Choose Edit > Color Settings; then, select one of these color management options in the Color Settings dialog:
No Color Management uses your monitor profile as the working color space. This setting removes any embedded profiles when opening images and does not apply a profile when saving.
Always Optimize Colors for Computer Screens uses sRGB as the working color space, preserves embedded profiles, and assigns sRGB when opening untagged files. Computer screens are capable of reproducing all of the colors in the sRGB range, so this setting will ensure an accurate display for any device that supports the sRGB color space.
Always Optimize for Printing uses Adobe RGB as the working color space, preserves embedded profiles, and assigns Adobe RGB when opening untagged files. This setting will display your photos based on the colors within the AdobeRGB color space, commonly used for printing images.
Allow Me to Choose lets you choose whether to assign sRGB (the default) or Adobe RGB when opening a file that has an unsupported color profile or no embedded profile at all.
Click OK to close the Color Settings dialog.
Further information on color management, including monitor calibration, can be found in a series of topics in Photoshop Elements Help.
Congratulations, you’ve completed another exercise. Now, take a minute to refresh your knowledge by reading through the review questions and answers on the following page.
1. What makes selections so important for adjusting color?
2. Name at least two selection tools and describe how they work.
3. How does the Color Replacement tool work?
4. What is the difference between the Continuous and Once sampling modes for the Color Replacement tool, and how are they used?
1. A selection defines an area as the only part of a layer that can be altered. The areas outside the selection are protected from change for as long as the selection is active. This enables you to make adjustments selectively, targeting specific areas or objects.
2. The first selection tool you used in this lesson is the Selection Brush tool, which works like a paintbrush. The Quick Selection tool is similar, but is in most cases a faster, more flexible option. There are more selection tools than are discussed in this lesson: The Magic Wand tool selects areas with the same color as that which you click. The Rectangular Marquee tool and the Elliptical Marquee tool make selections of a fixed geometric shape. The Lasso tool lets you draw free-form selections, and the Magnetic Lasso tool helps you draw complicated selections around even irregular object edges. The Polygonal Lasso tool is the tool of choice for selecting straight-sided objects.
3. The Color Replacement tool samples the color under the pointer and replaces it with any color that you choose. The cursor for the Color Replacement tool consists of crosshairs at the center of a circle, indicating the brush size. When you drag in the image, the color under the crosshairs is sampled, and the foreground color is applied to any pixel inside the circle that matches the sampled color, within the tolerance value specified in the tool options pane. As long as you keep the crosshairs inside the area of color that you wish to replace, you can overlap the adjacent area without changing the color, making it easy to paint right up to the edge.
4. In Continuous sampling mode, the Color Replacement tool continuously samples the pixels under the cursor crosshairs, updating the target color as you drag across your image. This is useful for recoloring an area that has varied tones, without increasing the tolerance. In the Once sampling mode, the target color is set with the first click. Use this mode for detailed areas where it’s not easy to keep the crosshairs inside the lines.