Objective group 2
Insert and format text, paragraphs, and sections
The skills tested in this section of the Microsoft Office Specialist exam for Microsoft Word 2019 relate to formatting document content. Specifically, the following objectives are associated with this set of skills:
2.1 Insert text and paragraphs
2.2 Format text and paragraphs
2.3 Create and configure document sections
Word documents are merely containers for their content. You can create content directly in the document or reuse and adapt it from other sources. The way that you present the content—by formatting its appearance and structure and by maintaining consistency—can improve the effectiveness of the document in communicating a specific message.
This chapter guides you in studying ways of inserting text, symbols, and special characters; formatting text; modifying paragraph indentation, spacing, and layout; applying character and paragraph styles; and structuring a document by controlling page breaks, creating independently formatted sections, and formatting content in columns.
Objective 2.1: Insert text and paragraphs
Replace text
See Also This topic is about replacing text through a find-and-replace operation. For information about locating specific text and objects or moving directly to specific types of objects, see “Objective 1.1: Navigate within documents.”
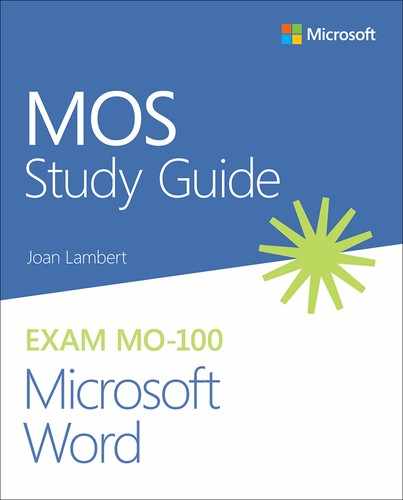
When developing document content, you can ensure that the text in your documents is consistent and accurate by using the Find feature to review every occurrence of a specific word or phrase, or by using the Replace feature to consistently modify text, formatting, or styles. You can replace search terms with other text or special characters from the Replace tab of the Find And Replace dialog box.
To locate and replace text
Display the Replace page of the Find and Replace dialog box by doing any of the following:
In the Navigation pane, click the Search for more things arrow at the right end of the search box, and then click Replace.
On the Home tab, in the Editing group, click Replace.
Press Ctrl+H.
In the Find what box, specify the text or characters you want to locate by entering them directly or by selecting them from the Special list.
See Also For information about the Special list content, including formatting marks, breaks, wildcard characters, special characters, and objects, see “Objective 1.1: Navigate within documents.”
In the Search Options area, select the check boxes of any applicable search options.
Tip The settings in the Search Options area apply only to the search term. They do not affect the replacement term.
With the cursor in the Find what box, from the Format list, select any formatting or styles that will specifically identify the correct search results.
In the Replace with box, enter the text or characters with which you want to replace the search term.
Tip You can’t specify wildcard characters in the Replace With box. You can specify special characters. For example, you can use the Replace feature to remove blank paragraph marks from a document by replacing ^p^p (two paragraph marks) with ^p (one paragraph mark).
With the cursor in the Replace with box, from the Format list, select any formatting or styles that you want to apply as part of the replacement operation.
Click Find Next to find the first occurrence of the search term. Then do any of the following:
Click Find Next to find the next occurrence of the search term.
Click Replace to replace the selected occurrence with the text in the Replace with box and move to the next occurrence.
Click Replace All to replace all occurrences of the search term in the document without individually reviewing them.
Tip You can quickly review all instances of a search term by searching from the Navigation pane and then scrolling through the search results on the Results page of the Navigation pane.
Insert symbols and special characters
Some documents require characters not found on a standard keyboard. These characters might include the copyright (©) or registered trademark (®) symbols, currency symbols (such as € or £), Greek letters, or letters with accent marks. Or you might want to add arrows (such as ↺ or ![]() ) or graphic icons (such as
) or graphic icons (such as ![]() or
or ![]() ). Word gives you easy access to a huge array of symbols that you can easily insert into any document. Like graphics, symbols can add visual information or eye appeal to a document. However, they are different from graphics in that they are keyboard characters displayed in specific fonts.
). Word gives you easy access to a huge array of symbols that you can easily insert into any document. Like graphics, symbols can add visual information or eye appeal to a document. However, they are different from graphics in that they are keyboard characters displayed in specific fonts.

Tip You can insert some common symbols by using keyboard shortcuts. You can review the assigned keyboard shortcuts in the Symbol dialog box and the AutoCorrect Options dialog box.
To insert a common symbol
 On the Insert tab, in the Symbols group, click the Symbol button, and then click the symbol you want to insert.
- Enter any of the following keyboard shortcuts:
To insert a copyright symbol, enter (c) or press Alt+Ctrl+C.
To insert a Euro symbol, enter (e).
To insert a registered trademark symbol, enter (r) or press Alt+Ctrl+R.
To insert a trademark symbol, enter (tm) or press Alt+Ctrl+T.
Tip If you turn off the Replace Text As You Type option in the AutoCorrect settings, the parenthetical code will not convert to the symbol.
To insert any symbol or special character
On the Insert tab, in the Symbols group, click the Symbol button, and then click More Symbols.
In the Symbol dialog box, do either of the following:
On the Special Characters tab, double-click the character you want to insert.
On the Symbols tab, locate and double-click the symbol you want to insert.
Tip The dialog box might be positioned in front of the cursor.
After you insert all the symbols you want, close the Symbol dialog box.
 Open the Word_2-1 document and do the following:
 In the first paragraph, insert the registered trademark symbol (®) after the word Microsoft.
- Replace all instances of (trademark) in the document with the trademark symbol (™). Ensure that you replace only instances in which the word trademark is in parentheses, and no other version of the word.
Tip Enter the trademark symbol in the document, cut it to the Clipboard, and then choose Clipboard Contents as the replacement.
- Save the Word_2-1 document. Open the Word_2-1_results document and compare the two documents to check your work. Then close the open documents.
Objective 2.2: Format text and paragraphs
Format text
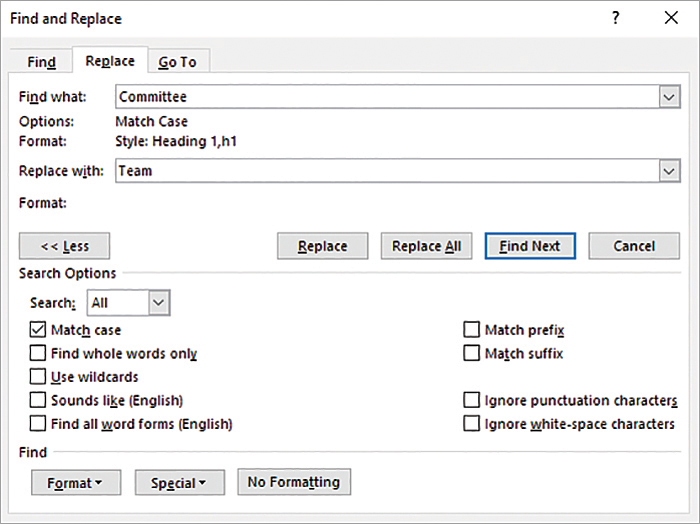
You can apply basic font formatting to text by using the tools available in the Font group on the Home tab and in the Font dialog box. (Some font settings are also available on the Mini Toolbar that appears when you select text.)
Exam Strategy Exam MO-100 requires you to demonstrate that you can apply local font formatting to text. You must be able to change the font, size, color, style, and effects. Ensure that you know which font formatting settings are available only in the Font dialog box.
If you apply a series of formats to a selection of text—for example, if you format a word as 14-point, bold, italic, red text—and then want to apply the same combination of formatting to other text, you can quickly do so by using the Format Painter. When using the Format Painter, you first copy existing formatting from text characters, a paragraph, or an object, and then paste the formatting to other text or objects.
You can use the Format Painter to paste copied formatting only once or to remain active until you turn it off.

To open the Font dialog box
- On the Home tab, in the Font group, click the dialog box launcher.
- Right-click any document text, and then click Font.
- Press Ctrl+D.
To copy existing formatting to other text
Select the text that has the formatting you want to copy.
On the Mini Toolbar or in the Clipboard group on the Home tab, click the Format Painter button once if you want to apply the copied formatting only once, or twice if you want to apply the copied formatting multiple times.
Click or select the text to which you want to apply the copied formatting.
If you clicked the Format Painter button twice, click or select additional text you want to format. Then click the Format Painter button again, or press the Esc key, to turn off the Format Painter.
Apply text effects
In older versions of Word, you could create specialized WordArt text objects that had set combinations of effects applied to them. In Word 2019, you can apply text effects directly to text, or if you want the flexibility of positioning the text anywhere on the page, you can create WordArt objects that have the same text effects applied.
These effects can include outlines, fills, shadows, reflections, glow effects, beveled edges, and three-dimensional rotation. You can modify the effects whether they are applied directly to text or to WordArt objects.
Exam Strategy Creating and modifying WordArt is not tested on the MOS exams for Word 2019.
If you want to simply apply text effects directly to text, you do so from the Text Effects And Typography menu that is available from the Font group on the Home tab. You can apply a preset combination or set each effect independently.

To apply preconfigured text effects to selected text
- On the Home tab, in the Font group, click the Text Effects and Typography button, and then click the effect you want to apply.
Format paragraphs
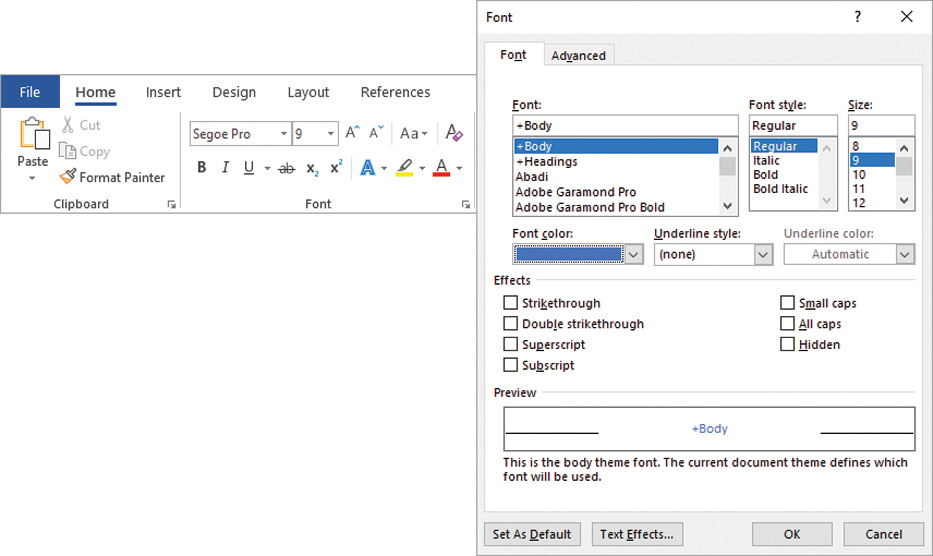
You can change paragraph attributes such as alignment, indentation, spacing, shading, and borders from the Paragraph group on the Home tab, and from the Paragraph dialog box.
See Also For information about the Line And Page Breaks tab of the Paragraph dialog box, see “Objective 2.3: Create and configure document sections.”
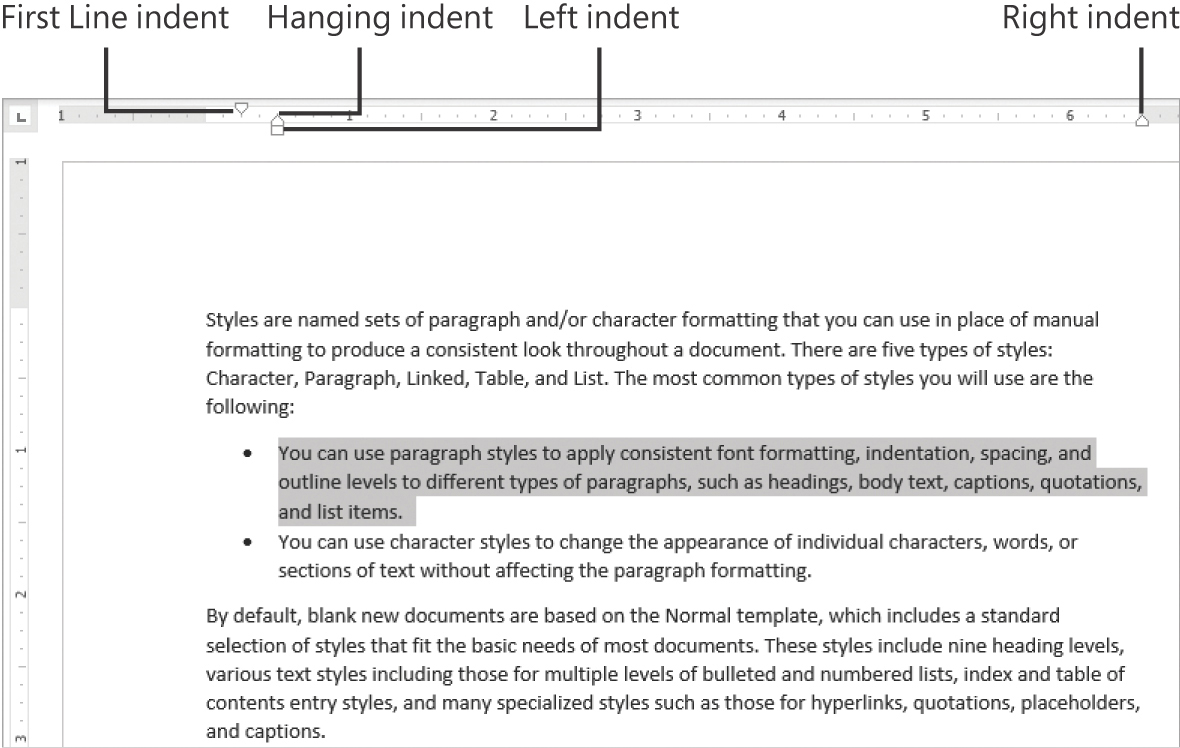
You can control the position of paragraphs between the document margins by setting the paragraph indentation. You can control individual line and paragraph indentation by setting indents from the left and right sides of the paragraph. You can set four types of indents:
First Line indent The paragraph’s first line of text begins at this setting.
Hanging indent The paragraph’s second and subsequent lines of text begin at this setting.
Left indent The left side of the paragraph aligns with this setting.
Right indent The paragraph text wraps when it reaches this setting.
When the rulers are displayed, markers on the horizontal ruler indicate the individual indent settings. You can modify the indent settings on the Layout tab, in the Paragraph dialog box, or by dragging the markers on the ruler.
A paragraph has two vertical spacing measurements: line spacing (the space between the lines within the paragraph) and paragraph spacing (the space before and after the paragraph).
Line spacing and paragraph spacing are initially set by the style that is applied to the paragraph. You can modify the paragraph spacing by manually formatting the paragraph, modifying the style, changing the style set, or changing the paragraph spacing setting for the entire document.
To open the Paragraph dialog box
- On the Home tab or Layout tab, click the Paragraph dialog box launcher.
- On the Home tab, in the Paragraph group, click the Line and Paragraph Spacing button, and then click Line Spacing Options.
- Right-click anywhere in a paragraph, and then click Paragraph.
To set the indentation of selected paragraphs
- Open the Paragraph dialog box, and display the Indents and Spacing tab. In the Indentation area, specify the Left, Right, and Special settings. Then click OK.
- On the Home tab, in the Paragraph group, click the Increase Indent or Decrease Indent button to change only the left indent.
- On the Layout tab, in the Paragraph group, in the Indent area, specify the Left or Right settings.
Tip To increase or decrease paragraph indentation beyond the margins, specify negative Left and Right settings.
- On the horizontal ruler, drag the First Line Indent, Hanging Indent, Left Indent, and Right Indent markers.
To set the spacing of selected paragraphs
- Open the Paragraph dialog box, and display the Indents and Spacing tab. In the Spacing area, specify the Before, After, and Line spacing settings. If you want to maintain the line spacing between paragraphs of the same style, select the Don’t add space between paragraphs of the same style check box. Then click OK.
- On the Layout tab, in the Paragraph group, in the Spacing area, specify the Before or After setting.
- On the Home tab, in the Paragraph group, click the Line and Paragraph Spacing button, and then do either of the following:
Click Add Space Before Paragraph, Remove Space Before Paragraph, Add Space After Paragraph, or Remove Space After Paragraph to change the external spacing. (Only two options will be visible, depending on the current settings of the active paragraph.)
Click 1.0, 1.15, 1.5, 2.0, 2.5, or 3.0 to select a standard line spacing.
To set paragraph spacing for an entire document
- On the Design tab, in the Document Formatting group, click Paragraph Spacing and then click Default, No Paragraph Space, Compact, Tight, Open, Relaxed, or Double.
- On the Paragraph Spacing menu, click Custom Paragraph Spacing. On the Set Defaults tab of the Manage Styles dialog box, in the Paragraph Spacing area, specify the Before, After, and Line spacing settings. Then click OK.
Exam Strategy You can quickly and consistently modify the spacing and indentation of all paragraphs of a specific style by modifying the style. Exam MO-100 requires that you demonstrate the manual application of paragraph formatting. Modifying and creating styles is part of the objective domain for Exam MO-101, “Microsoft Word Expert.”
Apply built-in styles to text
Styles are named sets of paragraph and/or character formatting that you can use in place of manual formatting to produce a consistent look throughout a document. There are five types of styles: Character, Paragraph, Linked, Table, and List. The most common types of styles you will use are the following:
Paragraph styles You can use these styles to apply consistent font formatting, indentation, spacing, and outline levels to different types of paragraphs, such as headings, body text, captions, quotations, and list items.
See Also Paragraph outline levels control the content of the Headings page of the Navigation pane and of tables of contents that you generate by using the Word feature. For information about the Navigation pane, see “Objective 1.1: Navigate within documents.” For information about tables of contents, see “Objective 4.2: Create and manage reference tables.”
Character styles You can use these styles to change the appearance of individual characters, words, or sections of text without affecting the paragraph formatting.
By default, blank new documents are based on the Normal template, which includes a standard selection of styles that fit the basic needs of most documents. These styles include nine heading levels, various text styles including those for multiple levels of bulleted and numbered lists, index and table of contents entry styles, and many specialized styles such as those for hyperlinks, quotations, placeholders, and captions.
You can view the available styles in several locations, including the following:
On the Home tab of the ribbon, the Styles gallery displays samples of selected styles. Part of the Styles gallery is always visible in the Styles group—the number of visible styles depends on the width of your program window and screen resolution. You can scroll the gallery pane or expand it to display all the styles at once.
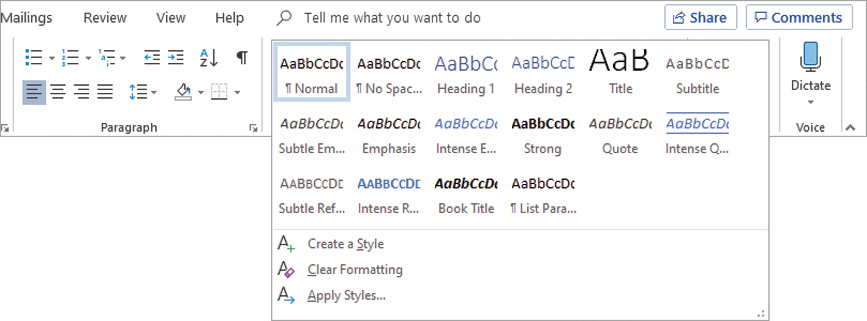
The Styles gallery displaying the recommended built-in styles Tip Only styles that have been added to the Styles gallery appear in it; you can add, remove, and reorder the styles in the gallery to suit your needs.
The Styles pane displays all the currently available styles or a subset thereof that you designate, such as only those that are currently in use. You can display or hide the Styles pane and configure it to display only style names (the default) or samples of the styles.
Tip On the right side of the Styles pane, paragraph marks indicate paragraph styles, the letter a identifies character styles, and a combination of the two identifies linked styles that can be applied to either paragraphs or characters. Pointing to any style displays a ScreenTip detailing the formatting included in the style.

You can adjust the pane widths to maximize the content area At the left side of a document displayed in Draft view or Outline view, the style area pane displays the name of the style attached to each paragraph. (It does not display character styles.) You can turn on or off the display of the style area pane.
See Also For information about modifying the appearance of styles by changing style sets, see “Objective 1.2: Format documents.”
To display the Styles pane in the program window
- On the Home tab, click the Styles dialog box launcher.
To display visual representations of styles in the Styles pane
- At the bottom of the Styles pane, select the Show Preview check box.
To display a specific category of styles in the Styles pane
At the bottom of the Styles pane, click Options.
In the Style Pane Options dialog box, do the following, and then click OK.
In the Select styles to show list, click Recommended, In use, In current document, or All styles.
In the Select how list is sorted list, click Alphabetical, As Recommended, Font, Based on, or By type.
Select the check boxes for the types of formatting you want to show as styles.

To turn on or off the display of the style area pane in the Draft and Outline views
Open the Word Options dialog box, and display the Advanced page.
In the Display area, enter a positive number in the Style area pane width in Draft and Outline views box.

Word displays the style area pane only if its width is set to a measurement greater than zero In the Word Options dialog box, click OK.
To display the style area pane in a document
Display the document in Draft view or Outline view.
If necessary, turn on the display of the style area pane.
To apply a character style
Select the text you want to format, or position the cursor anywhere in a single word you want to format.
In the Styles pane or Styles gallery, click the character style you want to apply.
To apply a paragraph style
Select or position the cursor anywhere in the paragraph you want to format.
In the Styles pane or Styles gallery, click the paragraph style you want to apply.
To modify the content of the Styles gallery
- To add a style to the Styles gallery, right-click the style in the Styles pane, and then click Add to Style Gallery.
- To remove a style from the Styles gallery, right-click the style in the Styles pane or Styles gallery, and then click Remove from Style Gallery.
Exam Strategy Exam MO-100 requires you to demonstrate the ability to apply existing styles. Modifying existing styles and creating new styles are part of the objective domain for Exam MO-101, “Microsoft Word 2019 Expert.”
Clear formatting and styles
From time to time, you might want to remove manually applied formatting or styles from document content.
To remove manually applied formatting
- Select the content that you want to revert to the settings of the applied styles, and then press Ctrl+Spacebar.
To clear styles
- To revert selected content to the Normal style, do either of the following:
In the Styles pane, click Clear All.
On the Home tab, in the Font group, click the Clear All Formatting button.
- To revert all content of a specific style to the Normal style, in the Styles pane, point to the style you want to clear, click the arrow that appears, and then click Clear Formatting. The command name indicates the number of instances of the selected style that are currently applied.
To remove highlighting from selected text
- On the Home tab, in the Font group, click the Text Highlight Color arrow, and then click No Color.
Tip The standard methods for clearing formatting don’t remove highlighting.
Exam Strategy The Microsoft Office Specialist exams must be completed within a specific amount of time. Learn and practice the techniques for performing tasks so that you can do so quickly.
- Open the Word_2-2 document, display the Navigation pane and the Styles pane.
- From the Styles pane, do the following:
- Display all the styles in the document, in alphabetical order.
- Select all paragraphs that are formatted as Heading 3.
- Apply the Heading 2 style to the selected paragraphs. Note the document structure change in the Navigation pane.
- Move to the beginning of the document, and do the following:
- Apply the Heading 1 style to the Financial Summary heading. Note the document structure change in the Navigation pane.
- Use the Format Painter to copy the style from the Financial Summary heading to the Financial Statements and Statement Notes headings.
- Set the paragraph spacing for the entire document to Relaxed.
- Immediately after the document title, select the text A Brief Review of Our Finances. Then do the following:
- Apply the Fill: Green, Accent color 3; Sharp Bevel text effect to the selected text.
- Center the paragraph horizontally on the page.
- Change the space before the Financial Summary heading from 20 pt to 12 pt.
- Save the Word_2-2 document. Open the Word_2-2_results document and compare the two documents to check your work. Then close the open documents.
Objective 2.3: Create and configure document sections
The skills being tested by this objective are those related to controlling the layout of document content on pages by inserting custom page breaks, creating document sections that display content differently from the main document, and laying out the content of a document or section in columns.
You can format text in multiple columns, and manually divide a document into pages or sections. When you define sections, you can set up the pages of each section differently from other sections of the document.
Display content in columns
By default, Word 2019 displays the content of a document in one column that spans the width of the page between the left and right margins. You can choose to display content in two or more columns to create layouts like those used in newspapers and magazines.
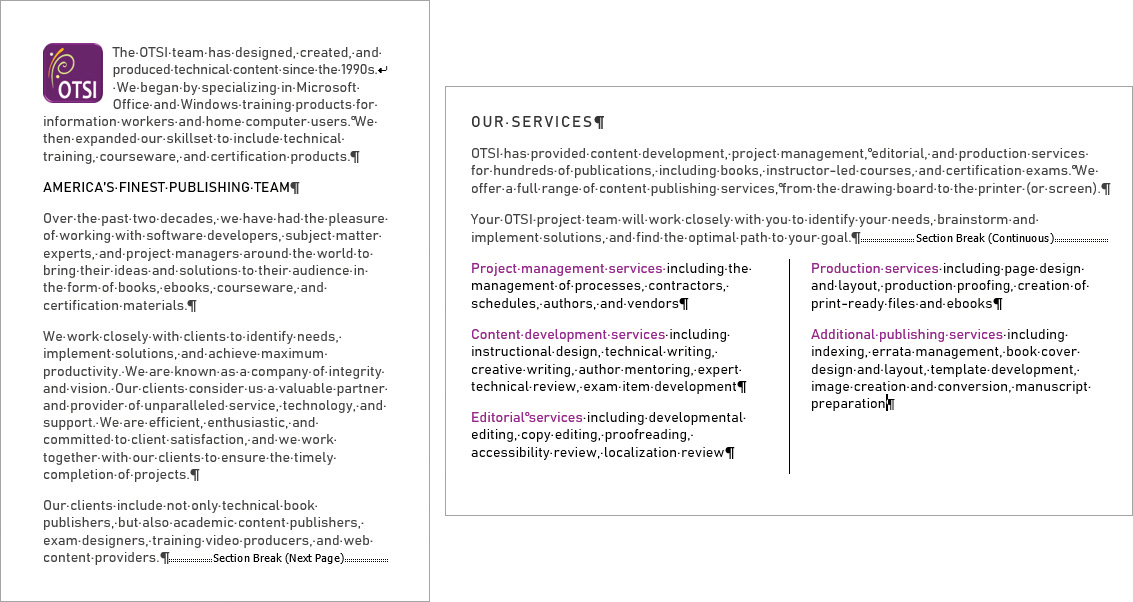
You can format an entire document or a section of a document in columns. When you select part of a document and format it in columns, Word inserts section breaks at the beginning and end of the selection to delineate the area in which the columnar formatting is applied. Content fills the first column on each page and then moves to the top of the next column. When all the columns on one page are full, the content moves to the next page. You can insert column breaks to specify where you want to end one column and start another. Section breaks and column breaks are visible when you display formatting marks in the document.
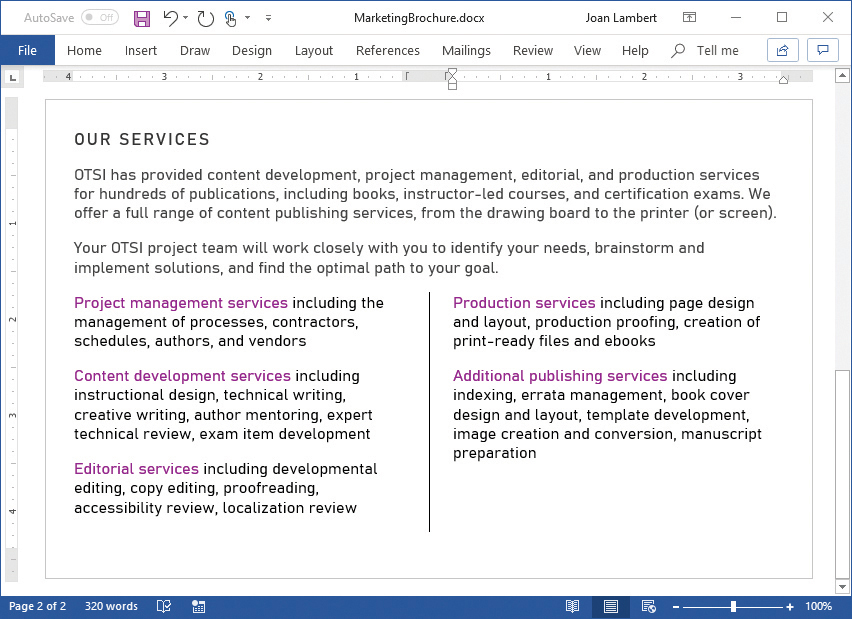
When dividing text into columns, you can choose one, two, or three columns of equal width or two columns of unequal width. If the standard options don’t suit your needs, you can specify the number and width of columns. The number of columns is limited by the width and margins of the page. Each column must be at least a half inch (or 1.27 centimeter) wide.
When you format selected content to display columns, Word automatically inserts section breaks before and after the selected content. (If you format an entire document in columns, no section breaks are inserted.)
To format selected text into simple columns
- On the Layout tab, in the Page Setup group, click the Columns button, and then click the standard column configuration you want.
To manually break column content
- Position the cursor where you want to insert the column break, and then do either of the following:
On the Layout tab, in the Page Setup group, click the Breaks button, and then in the Page Breaks section, click Column.
Press Ctrl+Shift+Enter.
To format all or part of a document in built-in column configurations
Do either of the following:
To format all of the document content in columns, position the cursor anywhere in the document, but do not select content.
To format part of the document content in columns, select the contiguous content.
On the Layout tab, in the Page Setup group, click the Columns button, and then do either of the following:
To format the content in columns of equal width, click Two or Three (specifying the number of columns).
To format the content into one narrow and one wide column, click Left or Right (specifying the location of the narrow column).
To format content in a preset column configuration
Select the contiguous content you want to format in columns, or to format the entire document, position the cursor in the document without selecting content.
On the Layout tab, in the Page Setup group, click the Columns button, and then click More Columns.
In the Columns dialog box, do the following, and then click OK:
In the Number of columns box, enter or select the number of columns (up to 16) that you want to configure.
Clear the Equal column width check box.
In the Width and spacing area, set the width of each nonstandard column and the space between it and the next column. Word automatically updates the width and spacing of other columns to equal the total available space.
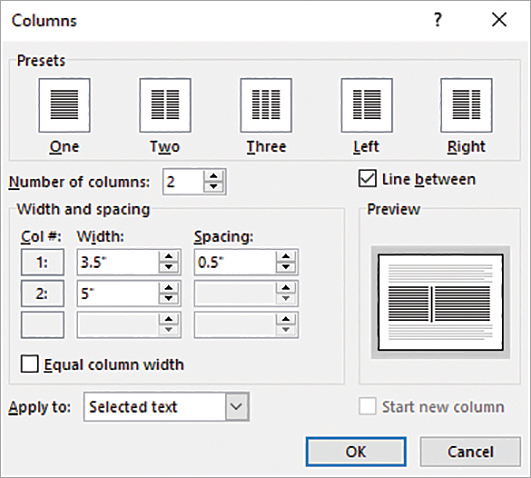
Configure content in up to 16 columns
To display lines between columns
- In the Columns dialog box, select the Line between check box.
To insert a manual column break
- Position the cursor to the left of the text that you want to start the next column, and then do either of the following:
On the Layout tab, in the Page Setup group, click the Breaks button, and then click Column.
Press Ctrl+Shift+Enter.
To revert content to a single column
- Position the cursor in the columnar section, and then do any of the following:
On the Layout tab, in the Page Setup group, click the Columns button, and then click One.
Open the Columns dialog box. In the Presets area, click One. Then click OK.
Delete the section break that defines the columnar section.
Define document pages and sections
When the content of a document exceeds the amount that will fit within the margins of a single page, Word creates a new page by inserting a soft page break (a page break that moves if the preceding content changes). If you want to break a page in a place other than where Word would normally break it, you can insert a manual page break. The content after the page break moves to the top of the next page.
Tip As you edit the content of a document, Word changes the location of the soft page breaks, but not of any manual page breaks that you insert.
If you want to control the page layout more specifically, you can insert a section break. Section breaks have two purposes:
They can act as a “smart” page break and move the following content to the next page, the next even page, or the next odd page.
They can fence off a portion of document content that you want to format differently from other content.
You divide a document into sections by inserting a section break at the beginning of each new section. (It is not necessary to have a section break at the beginning or end of a document.) You can choose from three types of section breaks:
Continuous starts the new section on the same page.
Next Page breaks the page before beginning the new section.
Even Page begins the new section at the top of the next even-numbered page.
Odd Page begins the new section at the top of the next odd-numbered page.
For each section, you can configure independent page setup options, including:
Margins
Pages to print per sheet
Line numbers
Orientation
Headers and footers
Borders
Paper size
Vertical alignment
Shading
You can also format the content within a section into columns, as discussed in the previous topic of this section.
See Also For information about configuring page setup options for a document, see “Objective 1.2: Format documents.”
A common use of section breaks is to set off content that you want to orient vertically on a page from content that you want to orient horizontally so that a single document can include both portrait and landscape pages.
Page and section breaks are visible in a document when paragraph and other formatting marks are shown. When working in a document that includes breaks, display the formatting marks for two reasons: so you don’t accidentally move or delete page, column, or section breaks, and so you can locate the breaks if you want to move or delete them.
When displaying formatting marks, all types of manually placed breaks are shown. Page breaks are represented by dotted lines, section breaks by double-dotted lines, and column breaks by double-spaced dotted lines. Each type of break also has a text label.

If you want a paragraph of text to start a new page regardless of other changes in the document content, you can configure the paragraph formatting to include a page break. When you use this method, the page break is not shown with the formatting marks.
To divide a document into sections
Position the cursor at the beginning of the content with which you want to start the new section.
On the Layout tab, in the Page Setup group, click the Breaks button.
On the Breaks menu, in the Section Breaks section, click Next Page, Continuous, Even Page, or Odd Page to define the starting page of the new section.
To insert a manual page break
Position the cursor to the left of the content that you want to start the new page.
Do any of the following:
On the Insert tab, in the Pages group, click the Page Break button.
On the Layout tab, in the Page Setup group, click the Breaks button, and then in the list, click Page.
Press Ctrl+Enter.
To open the Paragraph dialog box
- On the Home tab, in the Paragraph group, click the dialog box launcher.
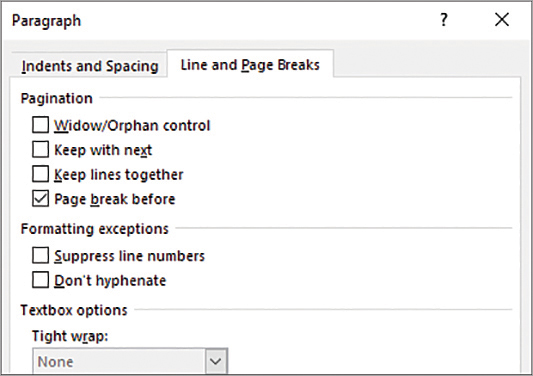
To force a page break before a specific paragraph
Position the cursor anywhere in the paragraph.
Open the Paragraph dialog box, and display the Line and Page Breaks tab.
In the Pagination area, select the Page break before check box. Then click OK.
Tip If a page break should always appear before a specific type of paragraph, such as a heading, you can incorporate the Page Break Before setting into the paragraph’s style.
To insert a section break
- On the Layout tab, in the Page Setup group, click the Breaks button, and then in the Section Breaks section, click one of the following:
To create a section that does not affect page breaks, click Continuous.
To create a section that starts content on the next page, click Next Page.
To create a section that starts content on the next even-numbered page, click Even Page.
To create a section that starts content on the next odd-numbered page, click Odd Page.
To specify different settings for a document section
- Position the cursor anywhere in the section you want to format, and then do either of the following:
On the Layout tab, in the Page Setup group, change the Margins, Orientation, Size, Columns, Line Numbers, or Hyphenation setting. The change will apply to the current section only.
Open the Page Setup dialog box. On the Margins, Paper, and Layout tabs, configure the settings that you want to change for the current section. In the Apply to list, click This section. Then click OK.
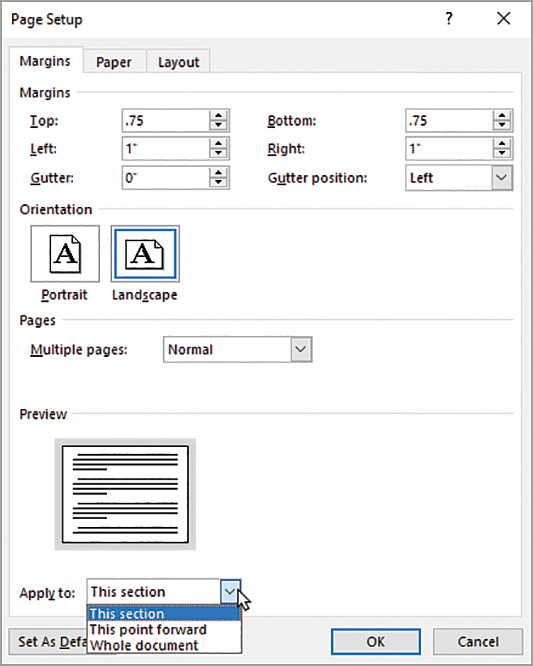
This Section appears in the Apply To list only when the document contains multiple sections
To display formatting marks (including page, section, and column breaks)
- On the Home tab, in the Paragraph group, click the Show/Hide ¶ button.
- Press Ctrl+Shift+8 (Ctrl+*).
To remove a manual page break or section break
Display formatting marks.
Do any of the following:
Click in the left margin to select the page break or section break paragraph.
Drag to select the page break or section break marker.
Position the cursor to the left of the page break or section break marker.
Press Delete.
- Open the Word_2-3 document, and do the following:
- Near the beginning of the document, insert a page break before the Process heading.
- Select the Questions for Team Leaders and Questions for Department Reps headings and the lists that follow them. Format the selection in two columns of equal width. Set the space between the columns to 0.3" and place a vertical line between the columns.
- If necessary, insert a column break before the Questions for Department Reps heading so that each list is in its own column.
- In the Pre-Plan Project section, select the heading, the paragraph, and the list items. Format each of the selected paragraphs to stay on the same page as the paragraph that follows it, and to keep all the lines of each paragraph together.
- Near the end of the document, locate the Carry out project section. Create a separate document section that contains only the content of the Carry out project section, on its own page. For only this section, set the orientation to Landscape and all four margins to 2".
- Preview the document on the Print page of the Backstage view to verify the changes.
- Save the Word_2-3 document. Open the Word_2-3_results document and compare the two documents to check your work. Then close the open documents.