
Chapter 10
Intermediate Workflow
In this chapter, we’ll practice and extend the basic workflow introduced in Section 9.3. This will include adding a new directory to our project, learning how to tell Git to ignore certain files, how to branch and merge, and how to recover from errors. Rather than providing an encyclopedic coverage of Git’s many commands, our focus is on covering practical techniques used every day by software developers and other users of Git.
For reference, important commands from this chapter are summarized in Section 10.5.
10.1 Commit, Push, Repeat
We’ll start by adding an image to our site, which involves making a change to an existing file (index.html) while adding a new file in a new directory. The first step is to make a directory for images:
[website (main)]$ mkdir images
Next, download the image shown in Figure 10.11 to the local directory using curl:
1. Image courtesy of GUDKOV ANDREY/Shutterstock.
$ curl -o images/breaching_whale.jpg
>      -L https://cdn.learnenough.com/breaching_whale.jpg
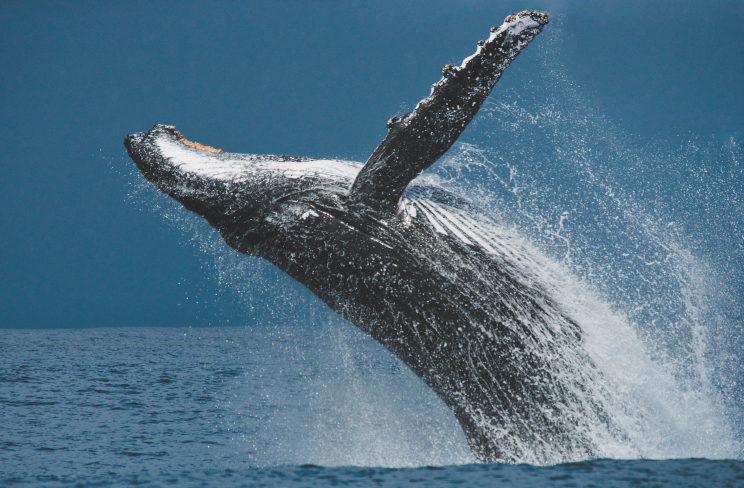
Figure 10.1: An image to include in our website.
(Note here that you should type the backslash character in the first line, but you shouldn’t type the literal angle bracket > in the second line. The is used for a line continuation, and after hitting return the > will be added automatically by your shell program.)
We’re now ready to include the image in our index page using the image tag img. This is a new kind of HTML tag; before we had opening and closing tags like
<p>content</p>
but the image tag is different. Unlike tags like h1 and p, the img tag is a void element (also called a self-closing tag), which means that it starts with <img and ends with >:
<img src="path/to/file" alt="Description">
Note that img has no content between tags because there’s no “between”; instead, it has a path to the source of the image, indicated by src. An alternate syntax uses /> instead of > in order to conform to constraints of XML, a markup language related to HTML:
<img src="path/to/file" alt="Description" />
You might sometimes see this syntax instead of the plain >, but in HTML5 the two are exactly equivalent.
By the way, in the example above the path path/to/file is meta, meaning that it talks about the path rather than referring to the literal path itself. In such cases, it’s important to use the actual path to the file. (Successfully navigating such meta usage is a good sign of increasing technical sophistication (Box 8.2).) In this case, the path is images/breaching_whale.jpg, so the img tag in index.html should appear as shown in Listing 10.1. (This image tag is actually missing something important, which we’ll add in Section 11.2.)
Listing 10.1: Adding an image to the index page.~/repos/website/index.html
<!DOCTYPE html>
<html>
  <head>
    <title>A whale of a greeting</title>
  </head>
  <body>
    <h1>hello, world</h1>
    <p>Call me Ishmael.</p>
    <img src="images/breaching_whale.jpg">
  </body>
</html>
Refreshing the browser then gives the result shown in Figure 10.2. (Note that Listing 10.1 includes the title tag content, thereby incorporating the solution to an exercise in Section 8.6.1.)
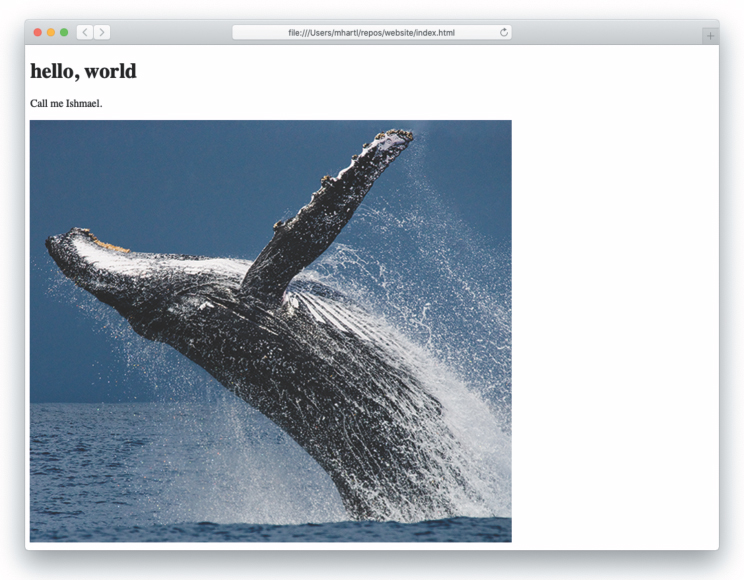
Figure 10.2: Our website with an added image.
At this point, git diff confirms that the image addition is ready to go:
[website (main)]$ git diff index.html
diff --git a/index.html b/index.html
index 706a1be..74043f7 100644
--- a/index.html
+++ b/index.html
@@ -6,5 +6,6 @@
   <body>
     <h1>hello, world</h1>
     <p>Call me Ishmael.</p>
+    <img src="images/breaching_whale.jpg">
   </body>
 </html>
(If you didn’t add the title content in Section 8.6.1, you’ll see an additional line in the diff for that as well.)
On the other hand, running git status shows that the entire images/ directory is untracked:
[website (main)]$ git status
On branch main
Your branch is up to date with 'origin/main'.

Changes not staged for commit:
  (use "git add <file>..." to update what will be committed)
  (use "git restore <file>..." to discard changes in working directory)
        modified: index.html

Untracked files:
  (use "git add <file>..." to include in what will be committed)
        images/

no changes added to commit (use "git add" and/or "git commit -a")
As you might guess, git add -A adds all untracked directories in addition to adding all untracked files, so we can add the image and its directory with a single command:2
2. Technically, Git tracks only files, not directories; in fact, it won’t track empty directories at all, so if you want to track an otherwise empty directory you need to put a file in it. One common convention is to use a hidden file called .gitkeep; to create this file in an empty directory called foo, you could use the command touch foo/.gitkeep. Then git add -A would add the foo directory as desired.
[website (main)]$ git add -A
We then commit and push as usual:
[website (main)]$ git commit -m "Add an image"
[website (main)]$ git push
It’s a good idea to get in the habit of pushing up to the remote repository frequently, as it serves as a guaranteed backup of the project while also allowing collaborators to pull in any changes (Chapter 11).
After refreshing the GitHub repository in your browser, you should be able to confirm the presence of the new file by clicking on the images directory link, with the results as shown in Figure 10.3.
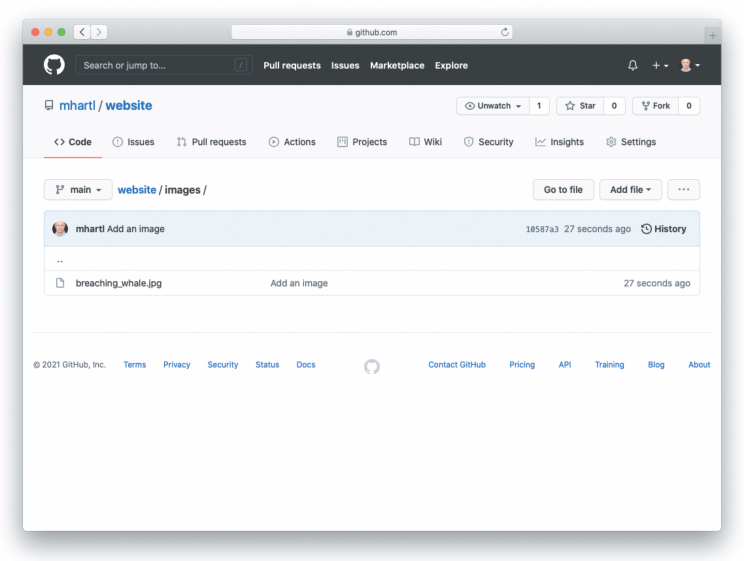
Figure 10.3: The new images directory on GitHub.
10.1.1 Exercises
Click on the image link at GitHub to verify that the
git pushsucceeded.At this point, the number of commits is large enough that the output of
git log -pis probably too big to fit in your terminal window. Confirm that runninggit log -pdrops you into alessinterface for easier navigation.Use your knowledge of
lesscommands (Table 3.1) to search for the commit that added the HTMLDOCTYPE. What is the SHA of the commit?
10.2 Ignoring Files
A frequent issue when dealing with Git repositories is coming across files you don’t want to commit. These include files containing secret credentials, configuration files that aren’t shared across computers, temporary files, log files, etc.
For example, on macOS a common side effect of using the Finder to open directories is the creation of a hidden file called .DS_Store.3 This side effect is so common that more recent versions of Git actually ignore .DS_Store automatically, but we can simulate such a side effect by using touch to create a sample .unwanted_DS_Store file as follows:
3. This happened to me when I ran open images/ while writing Section 10.1, which is what reminded me I should cover it here.
[website (main)]$ touch .unwanted_DS_Store
This file now shows up in the status:
[website (main)]$ git status
On branch main
Your branch is up to date with 'origin/main'.

Untracked files:
  (use "git add <file>..." to include in what will be committed)
       .unwanted_DS_Store

nothing added to commit but untracked files present (use "git add" to track)
This is annoying, as we have no need to track this file, and indeed when collaborating with other users it could easily cause conflicts (Section 11.2) down the line.
In order to avoid this annoyance, Git lets us ignore such files using a special hidden configuration file called .gitignore. To ignore .DS_Store, create a file called .git-ignore using your favorite text editor and then fill it with the contents shown in Listing 10.2.
Listing 10.2: Configuring Git to ignore a file.~/repos/website/.gitignore
.unwanted_DS_Store
After saving the contents of Listing 10.2, the status now picks up the newly added .gitignore file, but it doesn’t list the .DS_Store file, thereby confirming that it’s being ignored:
[website (main)]$ git status
On branch main
Your branch is up to date with 'origin/main'.

Untracked files:
  (use "git add <file>..." to include in what will be committed)
       .gitignore

nothing added to commit but untracked files present (use "git add" to track)
This is an excellent start, but it would be inconvenient if we had to add the name of every file we want to ignore. For instance, the Vim text editor (covered briefly in Section 5.1) sometimes creates temporary files whose names involve appending a tilde ~ to the end of the normal filename, so you might be editing a file called foo and end up with a file called foo~ in your directory. In such a case, we would want to ignore all files ending in a tilde. To support this case, the .gitignore file also lets us use wildcards, where the asterisk * represents “anything”:4
4. Wildcards were discussed in Section 2.2 in the context of the ls command, as in ls *.txt.
*~
Adding the line above to .gitignore would cause all temporary Vim files to be ignored by Git. We can also add directories to .gitignore, so that, e.g.,
tmp/
would arrange to ignore all files in the tmp/ directory.
Git ignore files can get quite complicated, but in practice you can build them up over time by running git status and looking for any files or directories you don’t want to track, and then adding a corresponding pattern to the .gitignore file. In addition, many systems (such as the Ruby on Rails (https://rubyonrails.org/) web framework and the Softcover (https://www.softcover.io/) publishing platform) generate a good starting .gitignore file for you.5 See Chapter 1 of the Ruby on Rails Tutorial (https://www.railstutorial.org/book) for more information.
5. This common practice is further evidence of the ubiquity of Git—at this point, many projects simply assume you’re using it.
10.2.1 Exercises
Commit the
.gitignorefile to your repository. Hint: Runninggit commit -amisn’t enough. Why not?Push your commit up to GitHub and confirm using the web interface that the push succeeded.
10.3 Branching and Merging
One of the most powerful features of Git is its ability to make branches, which are effectively complete self-contained copies of the project source, together with the ability to merge one branch into another, thereby incorporating the changes into the original branch. The best thing about a branch is that you can make your changes to the project in isolation from the main copy of the code, and then merge your changes in only when they’re done. This is especially helpful when collaborating with other users (Chapter 11); having a separate branch lets you make changes independently from other developers, reducing the risk of accidental conflicts.
We’ll use the addition of a second HTML page, an “About page”, as an example of how to use Git branches. Our first step is to use git checkout with the -b option, which makes a new branch called about-page and checks it out at the same time, as shown in Listing 10.3.
Listing 10.3: Checking out and creating the about-page branch.
[website (main)]$ git checkout -b about-page
[website (about-page)]$
The prompt in Listing 10.3 includes the new branch name for convenience, which is a result of the optional advanced setup in Section 11.6.2, so your prompt may differ.
Now that we’ve checked out the new about-page branch, we can visualize our repository as shown in Figure 10.4. The main repository evolution is a series of commits, and the branch effectively represents a copy of the repo at the time the branch was made.6 Our plan is to make a series of changes on the about-page branch, and then incorporate the changes back into the main branch using git merge.
6. Of course, it would be potentially inefficient to copy all the files over to the new branch, since there’s usually a lot of overlap with the old one. To avoid any unnecessary duplication, Git tracks diffs rather than actually making full copies of all files.
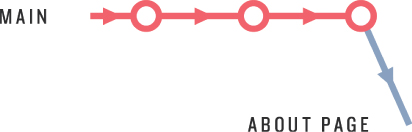
Figure 10.4: Branching off the main branch.
We can view the current branches using the git branch command:
[website (about-page)]$ git branch
* about-page
  main
This lists all the branches currently defined on the local machine, with an asterisk * indicating the currently checked-out branch. (We’ll learn how to list remote branches in Section 11.3.)
Having checked out the branch for the About page, we’re now ready to start making some changes to our working directory. We’ll start by making a new file called about.html to include some information about our project. Because we want the new page to have the full HTML structure (as in Listing 8.8), we’ll copy over the index.html file and then edit it as necessary:
[website (about-page)]$ cp index.html about.html
If this duplication seems a little unclean, it is. For example, what if there were an error in the HTML structure of index.html? Having copied it over to about.html, we’d have to make the correction in both places. As we’ll see in Section 11.3, in fact there is an error, and we will have to make the correction twice. This sort of situation is annoying, and it’s far better to use a site template that avoids unnecessary duplication. We’ll start learning how to do that in Learn Enough CSS & Layout to Be Dangerous (https://www.learnenough.com/css-and-layout).
Throughout the rest of the tutorial, we’ll be editing both index.html and about.html, so this is a good opportunity to use the preferred technique mentioned in Section 7.4 for opening a full project in a text editor. I suggest closing all current editor windows and re-opening the project as follows:
[website (about-page)]$ atom .
By doing this, we can use the “fuzzy opening” feature introduced in Section 7.4.1 to open the files of our choice. In particular, in Atom we can use P to open about.html and start making the necessary changes.
After opening about.html, fill it with the contents shown in Listing 10.4. As always, I recommend typing in everything by hand, which will make it easier to see the diffs relative to Listing 10.1. (The only possible exception is the trademark character ™, added to highlight character encoding issues, which you might have to copy and paste. On a Mac, you can get ™ using Option-2.)
Listing 10.4: The initial HTML for the About page.~/repos/website/about.html
<!DOCTYPE html>
<html>
  <head>
    <title>About Us</title>
  </head>
  <body>
    <h1>About</h1>
    <p>
      This site is a sample project for the <strong>awesome</strong> Git
      tutorial <em>Learn Enough™ Git to Be Dangerous</em>.
    </p>
  </body>
</html>
Listing 10.4 introduces two new tags: strong (which most browsers render as boldface text) and em for emphasis (which most browsers render as italicized text).
We’re now ready to commit the initial version of the About page. Because about.html is a new file, we have to add it and then commit, and I sometimes like to combine these two steps using && (as described in Box 4.2):
[website (about-page)]$ git add -A && git commit -m "Add About page"
At this point, the about-page branch has diverged from main, as shown in Figure 10.5.
Figure 10.5: The about-page branch with a diff from main.
Before merging about-page back in to the main branch, we’ll make one more change. In the editor, use ![]() P or the equivalent to open
P or the equivalent to open index.html and add a link to the About page, as shown in Listing 10.5.
Listing 10.5: Adding a link to the About page.~/repos/website/index.html
<!DOCTYPE html>
<html>
  <head>
    <title>A whale of a greeting</title>
  </head>
  <body>
    <h1>hello, world</h1>
    <a href="about.html">About this project</a>
    <p>Call me Ishmael.</p>
    <img src="images/breaching_whale.jpg">
  </body>
</html>
Listing 10.5 uses the important (if confusingly named) anchor tag a, which is the HTML tag for making links. This tag contains both content (“About this project”) and a hypertext reference, or href, which in this case is the about.html file we just created. (Because about.html is on the same site as index.html, we can link to it directly, but when linking to external sites the href should be a fully qualified URL,7 such as http://example.com/.)8
7. Recall that URL is short for Uniform Resource Locator, and in practice usually just means “web address”.
8. Fun fact: As you can verify by visiting it, example.com is a special domain reserved for examples just like this one.
After saving the change and refreshing index.html in our browser, the result should appear as shown in Figure 10.6. Following the link should lead us to the About page, as seen in Figure 10.7. Note that the trademark character ™ doesn’t display properly in Figure 10.7; this behavior is browser-dependent—as of this writing, the ™ symbol displays properly in Firefox and Chrome but not in Safari. We’ll add code to ensure consistent behavior across all browsers in Section 11.3.
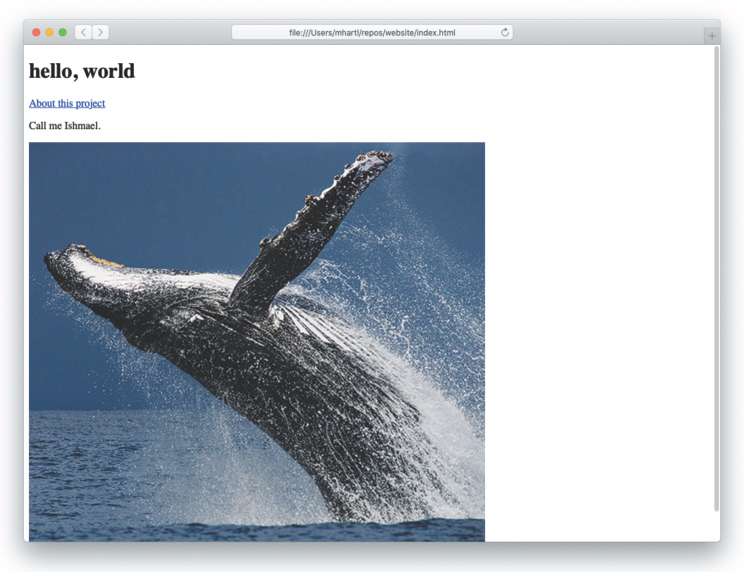
Figure 10.6: The index page with an added link.
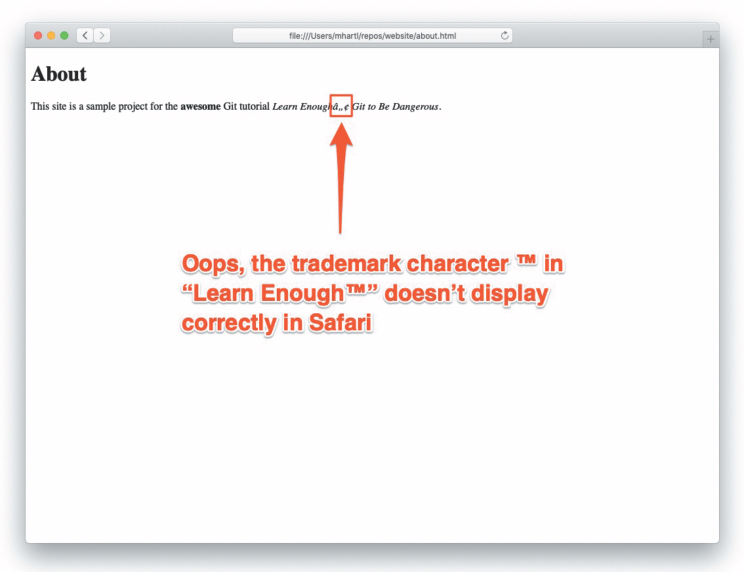
Figure 10.7: A slightly broken About page.
Having finished with the changes to index.html, we can make a commit as usual with git commit -am:
[website (about-page)]$ git commit -am "Add a link to the About page"
With this commit, the about-page branch now appears as in Figure 10.8.
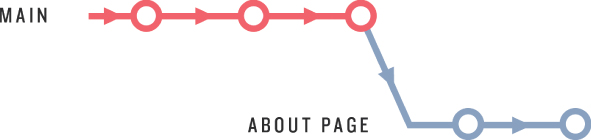
Figure 10.8: The current state of the about-page branch relative to main.
We’re done making changes for now, so we’re ready to merge the About page topic branch back into the main branch. We can get a handle on which changes we’ll be merging in by using git diff; we saw in Section 8.4 that this command can be used by itself to see the difference between unstaged changes and our last commit, but the same command can be used to show diffs between branches. This can take the form git diff branch-1 branch-2, but if you leave the branch unspecified Git automatically diffs against the current branch. This means we can diff about-page vs. main as follows:
[website (about-page)]$ git diff main
The result in my terminal program appears as shown in Figure 10.9. On my system, the diff is too long to fit on one screen, but (as we saw with git log in Section 10.1.1) the output of git diff uses the less program in this case.
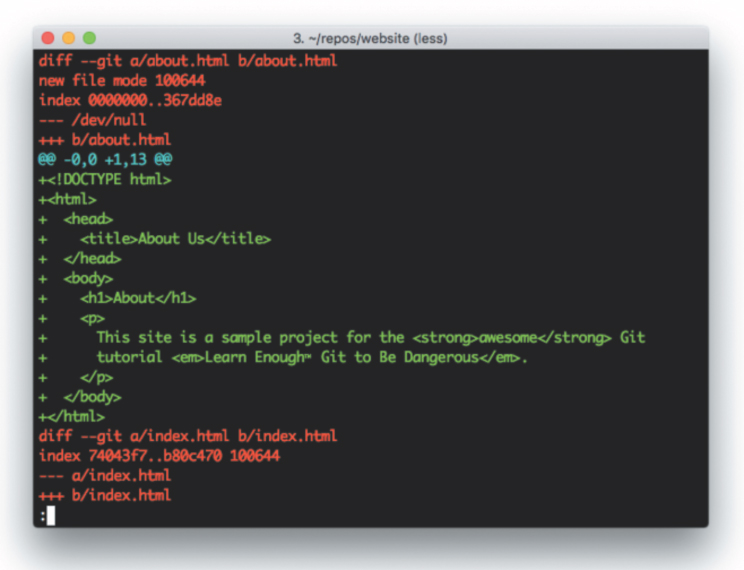
Figure 10.9: Diffing two branches.
To incorporate the changes on about-page into main, the first step is to check out the main branch:
[website (about-page)]$ git checkout main
[website (main)]$
Note that, unlike the checkout command in Listing 10.3, here we omit the -b option because the main branch already exists.
The next step is to merge in the changes on the other branch, which we can do with git merge:
[website (main)]$ git merge about-page
Updating 5a23e6a..cad4761
Fast-forward
 about.html | 13 +++++++++++++
 index.html | 1 +
 2 files changed, 14 insertions(+)
 create mode 100644 about.html
At this point, our branch structure appears as in Figure 10.10.

Figure 10.10: The branches after merging about-page into main.
In the present case, the main branch didn’t change while we were working on the about-page branch, but Git excels even when the original branch has changed in the interim. This situation is especially common when collaborating with others (Chapter 11), but can happen even when working alone.
Suppose, for example, that we discovered a typo on main and wanted to fix it and push up immediately. In that case the main branch would change (Figure 10.11), but we could still merge in the topic branch as usual. There is a possibility that changes on main would conflict with the merged changes, but Git is good at automatically merging content. Even when conflict is unavoidable, Git is good at marking conflicts explicitly so that we can resolve them by hand. We’ll see a concrete example of this in Section 11.2.

Figure 10.11: The tree structure if we made a change to main.
Having merged in the changes, we can sync up the local main branch with the version at GitHub (called origin/main) as usual:
[website (main)]$ git push
Since we probably don’t need the about-page branch any longer, we can optionally delete it, which is left as an exercise (Section 10.3.2).
10.3.1 Rebasing
The most common way to combine branches is git merge, but there’s a second method called git rebase that you’re likely to encounter at some point. My advice for now is: Ignore git rebase. The differences between merging and rebasing are subtle, and conventions for using rebase differ, so I recommend using git rebase only when working on a team where an advanced Git user tells you to; otherwise, use git merge to combine the contents of two branches.
10.3.2 Exercises
Use the command
git branch -d about-pageto delete the topic branch. Confirm by runninggit branchthat only themainbranch is left.In Listing 10.3, we used
git checkout -bto create a branch and check it out at the same time, but it’s also possible to break this into two steps. As a first step, usegit branchto make a branch with the nametest-branch. (This involves passing an argument togit branch, as ingit branch <branch name>.) Then confirm that the new branch exists but isn’t currently checked out by runninggit branchwithout an argument.Check out
test-branchand usetouchto add a file with a name of your choice, then add and commit it to the repository.Check out the
mainbranch and try deleting the test branch usinggit branch -dto confirm that it doesn’t work. The reason is that, in contrast to theabout-pagebranch, the test branch hasn’t been merged intomain, and by design-ddoesn’t work in this case. Because we don’t actually want its changes, delete the test by using the related-Doption, which deletes the branch in question even if its changes are unmerged.
10.4 Recovering from Errors
One of the most useful features of Git is its ability to let us recover from errors that would otherwise be catastrophic. The error-recovery techniques themselves can be dangerous, though, so they should always be implemented with care.
Let’s consider a common scenario where we make an unintentional change to a project and want to get back to the state of the repository as of the most recent commit (a state known as HEAD). For example, it’s a good practice to include a newline at the end of a file so that, e.g., running tail (Section 3.2) gives
[website (main)]$ tail about.html
  .
  .
  .
  </body>
</html>
[website (main)]$
instead of
[website (main)]$ tail about.html
  .
  .
  .
  </body>
</html>[website (main)]$
Of course, we could add such a newline using a text editor, but a common Unix idiom to accomplish the same thing is to use echo with the append operator >>:
[website (main)]$ echo >> about.html # Appends a newline to about.html
Unfortunately, in this context it’s easy to accidentally leave off one of the angle brackets and inadvertently use the redirect operator > instead (Section 2.1):
[website (main)]$ echo > about.html
Go ahead and try the command above; you will discover that the result is to overwrite about.html with a newline, thereby effectively wiping out its contents, as we can verify with cat:
[website (main)]$ cat about.html

[website (main)]$
In a regular Unix directory (Chapter 4), there would be no hope of recovering the contents of about.html, but in a Git repository we can undo the changes by forcing the system to check out the most recently committed version. We start by confirming that about.html has changed by running git status:
[website (main)]$ git status On branch main
Your branch is up to date with 'origin/main'.

Changes not staged for commit:
  (use "git add <file>..." to update what will be committed)
  (use "git restore <file>..." to discard changes in working directory)
        modified:   about.html

no changes added to commit (use "git add" and/or "git commit -a")
This doesn’t indicate the scope of the damage, though, which we can inspect using git diff:
$ git diff
diff --git a/about.html b/about.html
index 367dd8e..8b13789 100644
--- a/about.html
+++ b/about.html
@@ -1,13 +1 @@
-<!DOCTYPE html>
-<html>
-  <head>
-   <title>About Us</title>
-  </head>
-  <body>
-   <h1>About</h1>
-   <p>
-     This site is a sample project for the <strong>awesome</strong> Git
-     tutorial <em>Learn Enough™ Git to Be Dangerous</em>.
-   </p>
-  </body>
-</html>
+
Those minus signs indicate that all of the lines of content are now gone, while the plus sign at the end indicates that there’s nothing left. Happily, we can undo these changes by passing the -f (force) option to checkout, which forces Git to check out HEAD:9
9. The command git reset --hard HEAD is equivalent, but I find the version with checkout to be easier to remember.
[website (main)]$ git checkout -f
We can then confirm that the About page has been restored:
[website (main)]$ git status
On branch main
Your branch is up to date with 'origin/main'.

nothing to commit, working tree clean
The status “working tree clean” indicates that there are no changes, and you can verify by running cat about.html that its contents have been restored. Phew! That was a close one. (It’s worth noting that git checkout -f itself is potentially dangerous, as it wipes out all the changes you’ve made, so use this trick only when you’re 100% sure you want to revert to HEAD.)
Another source of robustness against error is using branches, as described in Section 10.3. Because changes made on one branch are isolated from other branches, you can always just delete the branch if things go horribly wrong. For example, suppose we made the same echo mistake on a test-branch:
[website (main)]$ git checkout -b test-branch
[website (test-branch)]$ echo > about.html
We can fix this by committing the changes and then deleting the branch:
[website (test-branch)]$ git commit -am "Oops"
[website (test-branch)]$ git checkout main
[website (main)]$ git branch -D test-branch
Note here that we need to use -D instead of -d to delete the branch because test-branch is unmerged (Section 10.3.2).
A final example of recovering from error involves the common case of a bug or other defect that makes its way into a project, origins unknown. In such a case, it’s convenient to be able to check out an earlier version of the repository.10 The way to do this is to use the SHAs from the Git log (Section 8.3). For example, to restore the website project to the state right after the second commit, we would run git log and navigate to the beginning of the log. Because git log uses the less interface (Section 3.3), we can do this by typing G to go to the last line of the log. The result on my system is shown in Listing 10.6. (Because SHAs are by design unique identifiers, your values will differ.)
10. The most powerful way to track down such errors is git bisect. This advanced technique is covered in the Git documentation (https://git-scm.com/docs/git-bisect).
Listing 10.6: Viewing the SHAs in the Git log.
commit cad4761db5cce3544b72688329185f97a17badb3
Author: Michael Hartl <[email protected]>
Date:   Thu Apr 1 12:00:55 2021 -0700

     Add a link to the About page

commit 92ac96f80e9f3cbcc750d58777ca9a370aadb7f5
Author: Michael Hartl <[email protected]>
Date:   Thu Apr 1 11:56:21 2021 -0700

     Add About page

commit 5a23e6ac79ec1dfc5109a11780967832b43c30e3
Author: Michael Hartl <[email protected]>
Date:   Thu Apr 1 11:53:56 2021 -0700

     Add .gitignore

commit 10587a3a24f2eaad9659f0cc1d4bb308b169a0c2
Author: Michael Hartl <[email protected]>
Date:   Thu Apr 1 11:44:22 2021 -0700

     Add an image

commit 4471a4e02dfe58a229735704e4ea51ea5fc09f70
Author: Michael Hartl <[email protected]>
Date:   Thu Apr 1 11:19:55 2021 -0700

     Add README file

commit edf4cfa49c0b2a3bcb0f6c21f1cab4d412ce5f0d
Author: Michael Hartl <[email protected]>
Date:   Thu Apr 1 10:44:44 2021 -0700

     Add some HTML structure

commit eafb7bf8e1999eafa63068dabbdb05410bed512a
Author: Michael Hartl <[email protected]>
Date:   Thu Apr 1 10:42:48 2021 -0700

     Add an h1 tag

commit 64f6529494cb0e193f05b0da75702feef854e176
Author: Michael Hartl <[email protected]>
Date:   Thu Apr 1 10:33:24 2021 -0700

     Add content to index.html

commit 44c52d432d294ef52bae5535dc6dcb0993175a04
Author: Michael Hartl <[email protected]>
Date:   Thu Apr 1 10:30:38 2021 -0700

    Initialize repository
To check out the commit with the message “Add content to index.html”, simply copy the SHA and check it out:
[website (main)]$ git checkout 64f6529494cb0e193f05b0da75702feef854e176
Note: checking out '64f6529494cb0e193f05b0da75702feef854e176'.

You are in 'detached HEAD' state. You can look around, make experimental
changes and commit them, and you can discard any commits you make in this
state without impacting any branches by performing another checkout.

If you want to create a new branch to retain commits you create, you may
do so (now or later) by using -b with the checkout command again. Example:

  git checkout -b new_branch_name

 HEAD is now at 64f6529... Add content to index.html

[website ((64f6529...))]$
Note that the branch name in the last line has changed to reflect the value of the SHA, and Git has issued a warning that we are in a “detached HEAD” state. I recommend using this technique to inspect the state of the project and figure out any necessary changes, then check out the main branch to apply them:
[website ((64f6529...))]$ git checkout main
[website (main)]$
At this point, you could switch to your text editor and make any necessary changes (such as fixing a bug discovered on the earlier commit).
If all this seems a little abstract, don’t worry. The main takeaways are (1) it’s possible to “go back in history” to view the project at an earlier state and (2) it’s tricky to make changes, so if you find yourself doing anything complicated you should ask a more experienced Git user what to do. (In particular, the exact practices in such a case could be team-dependent.)
10.4.1 Exercises
The
git checkout -ftrick works only with files that are staged for commit or are already part of the repository, but sometimes you want to get rid of new files as well. Usingtouch, create a file with a name of your choice, thengit addit. Verify that runninggit checkout -fgets rid of it.Like many other Unix programs,
gitaccepts both “short form” and “long form” options. Repeat the previous exercise withgit checkout --forceto confirm that the effects of-fand--forceare identical. Extra credit: Double-check this conclusion by finding the “force” option in the output ofgit help checkout.
10.5 Summary
Important files and commands from this chapter are summarized in Table 10.1.
Table 10.1: Important commands from Chapter 10.
File/Command | Description | Example |
|---|---|---|
| Tell Git which things to ignore |
|
| Check out a branch |
|
| Check out & create a branch |
|
| Display local branches |
|
| Merge in a branch |
|
| Do something possibly weird & confusing | See “Git Commit” (https://m.xkcd.com/1296/) |
| Delete branch (if merged) |
|
| Delete branch (even if unmerged) (dangerous) |
|
| Force checkout, discarding changes (dangerous) |
|