

CHAPTER 12
Mixing

Writing on mixing is a difficult task. Try explaining to someone, without actually being there, how to paint a picture, how to play the blues, or how to remove a spleen.
This chapter is a list of basic starting points. There are, of course, a million different variations on everything mentioned here, and this chapter just scratches the surface.
• The trick is, there is no trick. A good mix is akin to a jigsaw puzzle, where there is a perfect space for every piece and all spaces are covered. The mix should have width and height, and the image should have depth.
There is no one trick that makes a mix sound the best it can be. A lot of small things combine to make the mix sound good. The best mixes come from well-written, well-arranged, well-played, and well-recorded songs.
Pre Mix
• Leave some time between the recording and the mixing. If possible, don't record overdubs and mix on the same day. A good mix normally takes at least a full day and recording something will throw off the flow of the mix.
When you must do an overdub before the mix, use the input button on the recording machine to verify the correct signal flow. As tracks are often crosspatched, or patched into different channel line inputs, it would be a shame to record over the kick drum while intending to repair a vocal part.
• Get plenty of rest. Better engineers approach a mix with every possible advantage. Mixing while tired, hungover, wasted, or just not prepared is not fair to you or the paying client. You should never have to explain why the mix sounds bad.
• Clean up your room. Mix in a non-cluttered environment. Music sounds better in a tidy room, the same way that your car runs better after being washed.
• Normal the console. It can be frustrating to un-mute a channel to find the line trim has been turned up to maximum from the previous session. Switch the console to the proper operating status.
• Clean your workstation. This doesn't mean hosing down the studio; it means uninstalling software that is no longer in use and removing unnecessary files – of course, after making safeties. And yes, it means using appropriate cleaning methods to remove studio gunk and buildup from the monitor, keyboard, and mouse.
• A new generation. If your system is acting up or crashing, remove all preference files. The DAW program will generate new ones. Before you do this, check that every step is done correctly. Please, if this destroys your files, do not sue my publisher.
• Set unity gain. Use the oscillator to set unity gain on your compressors, limiters, delays, and some equalizers. Use a pink noise generator to set levels on the reverb and effects units.
• Use effects templates to retrieve your favorite settings. Use File > Import > Session data to bring in the effects from a previous mix.
• Wire those speakers there. Use familiar speakers, preferably the best professional nearfield monitors available to you, along with the highest caliber speaker cable connected to a studio standard amplifier. Check that the speakers are wired properly.
Setting the correct low end can be tricky unless you can hear exactly how your control room is tuned.
• A/B CDs. If you are not familiar with the mix room, play a favorite CD mixed by a top gun engineer against a project that you recently mixed. Are the high, midrange, and low frequencies all there? A/B the two tracks to get a sense of the room and speaker response.
If, for example, your mixes come across bass heavy, maybe the low end in your mix room is not properly equalized. The same principle applies to midrange and high frequencies as well. Tuned or not tuned, the size, shape, and absorption factors all contribute to the final sound. Once you understand the room, you can judge your own mixes.
• Is the song ‘mix ready?’ Starting fresh is always less distracting than wasting time cleaning up tracks halfway through the mix. Before starting the final mix, confirm that:
- All choice tracks are returning properly and correctly labeled. Label everything including all inputs, outputs, and routing within your program.
- All recording and mix machines are cleaned and aligned.
- All clock rates, parameters, and plug-ins have been checked.
- All files have been correctly loaded and checked.
- All vocals are in time and in tune.
- All music tracks are clean, in time, and in tune.
- All drum tracks, including samples, are just as you want them.
• Check your session notes. Review all the notes on ideas that seemed to work while tracking and overdubbing.
• Listen to the rough mixes. Sometimes a 10 minute mix at the end of the session can sound better than spending 10 hours on it come mix time. Rough mixes may be heavier, lighter, drier, etc. Listen to which direction captures the feeling best and aim the boat that way. Because DAW files are stored in various file folders with one main file, maybe copy the file after you do a rough mix. Name the file with the song title and the date. By also noting the mix with the date, you can go back and reference the settings on a particularly good mix.
• Mix with your heart, not your head. A certain mindset is needed to start fresh on the mix. Paint a mental picture of how you want the mix to sound, then start with a fresh, relaxed attitude.
And just because you aren't supposed to do something is no reason not to do it. Something may not be what you are used to, but, if it seems to work in a track, go along with it. Keep it fun and you get better results. For years I mixed with an ‘I have to make this sound awesome because the big name engineers will hear this’ attitude. Now, who cares – just do what makes the song work, even if it doesn't sound huge.
• Don't start with the best song. When mixing any project of more than a few songs, you will find there are one or two ‘best’ ones. Don't mix these best songs first. Wait until you are knee deep in mixing. Hit your stride, then mix the best songs.
It's like making pancakes. Get the bugs out of the mix with the first few, then proceed.
Setting up to Mix
• Buss transfer. If applicable, transfer all tracks to the smallest number of tapes. Machines need time to lock when they switch from rewind to play, and this lockup adds up to wasted time. Two machines lock faster than three.
• Pattern the tracks the same during all your mixes. Maybe return the drums on the first 12 channels, then the bass tracks on the next channels, then guitars, keyboards, and vocals. Get used to having the same instruments return on the same channels throughout the mixing.
• Return the lead vocal to the middle of the console. Set your vocal sound with your head right between the speakers, not way over to one side.
• Azure mixing or purple pros. Use different colors for the various sections on the scribble strip of tape across the console. Pink, blue, and green page highlighters can represent drums, guitars, or vocals. After mixes, the scribble strip is kept with the mix information. If a mix needs to be recalled, the scribble strip is an essential part. Most DAWs have the same function, allowing different colors for different tracks.
• Check the tracksheet/recording map. As tracks are returned to the console, mark the part off on the tracksheet/recording map. When every musical part on the sheet is checked, all tracks are returning properly. You don't want to mix a song then realize you missed a track.
• Is your DAW slowing down? Maybe consolidate many regions into a few or even one. This may help speed things up.
• Mute unused regions. Rather than deleting regions not in use, maybe mute them to see that they are still there. Then, if they are needed down the road, you don't need to go into the region list and retrieve them.
• Assign the kick drum and bass guitar to one subgroup. The interplay between the kick and the bass is crucial. If one is changed, the other may sound off. When the mix needs a touch more low end, preserve this interplay by moving the subgroup rather than the individual faders.
Subgroup instruments together early, for example all the guitars or all the background vocals, to help when experimenting with different level changes, pans, mutes, and ideas.
• Fix it before you mix it. Go through all the tracks and erase any unwanted noises such as coughs or instrument sounds. If you have a totally automated console, maybe just mute the bad bits. Realize that this is the time to be extra careful about not erasing anything. If automation is not available for the mix, make a digital safety track and practice the cuts, then fix the unwanted bits.
• Eliminate the mistakes. If a section of a track is musically questionable, options include:
- Lowering the level at the worst parts, then raising the level of another track to mask it. If this doesn't work, mute the offending track, as long as the client doesn't object.
- Finding a similar section of the song and sending it to a sampler or ‘cutting and pasting’ it to replace the questionable section.
- Telling the player to re-record the part, but this probably means setting up the amplifiers again and matching the sounds.
- Leaving it out. If the flaw happens early enough in the song, maybe leave the track out until the start of a bridge or chorus, to help build the song. Always check with the producer and/or artist before removing musical parts. The best way is to record the track correctly the first time around.
• Mix with the loop mode. The uniform repetition of the song playing over and over can help with the flow of the mix. Often, like the musicians playing the song, the mixer can get into a ‘creative groove.’
• Set up all your needed effects. All outboard effects should be patched in and checked, with the scribble strip across the console properly labeled. Use a small strip of white tape to label each effect with the appropriate send and return. Maybe patch all the effects for the instrument with the instrument on the console. For example, if the drums return on channels 1 to 9, return the drum effects to channels 10 to 15. Perhaps recall a favorite snapshot as a starting point.
Mixing Basics
• Ask those in charge. Do you know exactly the direction of the mix? Most songs dictate how it should be mixed or how it sounds best, but sometimes the artist or producer or label want you to take it in a bit of a different direction. You should be clear as to how they want the final version to sound. Don't waste time on the vocal reverbs if they want it totally dry.
• Listen to what is there. Start by setting rough levels and panning before you do any processing. This gives you a clearer picture what is and isn't needed for the mix.
• Spending 20 hours on a mix will not make it twice as good as spending 10 hours. At some point, the best has been done and continuing on is fruitless. Put it to bed and go home.
• Bring the best things forward in the mix. The so-called hook of a song is its defining entity, or the central core of what keeps it going. Identify one or two fundamental elements and accentuate them. Enhance the groove and preserve the emotion and feel.
• Build on the best properties. Build the song like a staircase – step by step. Introduce instruments as the song progresses rather than giving the listener everything at once. Create movement throughout the mix by changing the mutes, levels, panning, effects, and processing. What seems obvious and over the top in the studio drives them crazy on the dance floor.
• Solo you can't hear it. As with the recording process, don't press solo too often. It's great to use the solo button to get a basic sense of an instrument or to find a problem, but get in the habit of changing equalization with the rest of the tracks in the monitor mix. When you can't hear the other tracks, you can't effectively equalize a track to fit in.
• Don't spend too long on any single instrument. If you are working on, for example, the drums, get a basic drum sound then move on and tweak it through the mix. Don't spent six hours getting a perfect drum sound, because everything changes when you bring in the rest of the instruments.
• Relax your ears. Don't mix for hours upon hours without taking a silence break. Your ears need time to relax and rejuvenate. Your ears are organs, not muscles – overuse does not make them stronger. If that were the case, I would have a liver of steel.
• Forget the clock. Don't hurry the mix. Be creative and get it right the first time. Expect the mix to take longer than you expect.
• Run the faders at their optimum level. Pushing faders all the way up adds distortion, so set them around or just below zero, their optimum operating level, then fine-tune the levels with the gain trim. This will send appropriate levels to any pre-fader effects.
For clearer, more transparent mixes, set the gain trims as low as possible and set the master buss level at zero. This is crucial on budget consoles when distortion increases as gains are boosted.
With the master fader always set at zero, you know if it has been moved or not and you know where to return to after every fade.
As well as the faders and console, set the outboard equipment at unity gain so there is no overload at any stage of any gear on the mix. Optimum levels mean clarity in the final product.
• Don't go upstairs. Don't mix using the biggest studio monitors unless you are totally familiar with them. Think of the average listener. Using the biggest honking speakers on the planet may make the mixes sound great in the studio, but most listeners use average-size speakers. Make your mixes sound good on smaller speakers so you know that they will sound good on the average car radio or TV speaker.
• Disassociate yourself from the mix. Many times you will fall into the trap of thinking, ‘What will other engineers think?’ or ‘Will the radio play this if I do some radical idea?’ Liberate yourself from any preconceived ideas as to what the mix should sound like.
• If a part doesn't fit, don't try to make it fit. Mute it and be done with it. Each element must be solid. If the song has three guitars playing roughly the same thing, either clean them up or use only one of the tracks as a main one. In the long run, each remaining instrument will have more impact.
‘We spent all night recording that’ is not a valid reason to keep a track that doesn't fit.
• Don't eliminate parts without authorization. The mixer's job is to mix and the producer's job is to tell the mixer what to mix. Don't take it upon yourself to pull musical parts unless you are the producer. The last thing you want is a client calling you a week after the mix asking where his favorite keyboard part is.
Equalizing
• It's there so I must use it. Properly recorded tracks shouldn't need drastic changes in equalization. Overequalization contributes to distortion and vague sounds, and creates peaks at certain frequencies. In a good mix, all relevant frequencies are audible. In a bad mix, all you hear are the equalization peaks.
Equalizers, compressors, and noise gates are tools and should be used for repair. See Chapter 9 to help you determine your individual instrument's equalization and compression settings.
• Consider where the sound will lie in reference to other sounds. Placement of the instrument will influence how it is equalized. If, for example, a non-feature track is hard panned to the left, you may not want to equalize it in the same way as you would if it were a feature track that was panned toward the center. Non-feature tracks should have certain frequencies pulled to increase the clarity of the feature tracks.
• Don't add every frequency to every track. Pick and choose where to add, where to pull, and where to leave alone. Pulling, or notching, frequencies on some instruments opens windows for others. If you have one instrument covering all the low frequencies, you might need to pull some of its frequencies to make space for something else. Determine which tracks take up which frequency areas and where any overlaps occur.
• Keep it musical. Use equalization to enhance the musical tones and downplay the less musical tones. See Figure 5.8 to determine where the musical tones lie.
• Use equalization to curb excess noise. Turn down the high frequencies on a noisy bass amplifier or a noisy reverb return, then run the track through a harmonic distortion device. This may enhance the low-frequency harmonics and bring back the higher harmonics with less noise.
• Depth to infidels. Use equalization, compression, reverb, and panning to place instruments sonically in front, behind, above, or beside one another. A less prominent instrument can appear to be placed in the background by lowering certain frequencies on the track and its effects.
• Places please. Think of a photograph of trees on a hazy day. Trees in the foreground are clear and crisp but those further away are less bright and more hazy. Trees far away are still part of the picture, but unclear.
• Pull one frequency to make other shine. Find and pull a low frequency with a thin Q setting, then boost an octave harmonic of that frequency to bring out more of the musical aspects while maintaining a clean, solid sound. This works well on the bass guitar tracks. For example, if you are adding 880 Hz, add a bit of 1760 Hz and maybe a bit of 440 Hz. These harmonics are octaves of the same note and will bring fullness to a frequency change. This is where cultivating a musical ear helps the recording engineer.
For example, if the lead vocal track has a boost at 3 kHz, maybe pull that frequency on the background vocal tracks to create a ‘bed’ for the lead vocal. Maybe add a touch of reverb to place it more in the background.
• Is equalization really improving the sound? As you change the equalization settings, periodically A/B between the unprocessed sound and the processed sound to see if your changes are an improvement.
• Use level changes rather than EQ changes. With two similar tracks in the mix, pull the higher frequencies from one track and the lower frequencies from the other. Combine these two to get a proper blend of highs and lows. Rather than adding high frequencies with the equalizer, simply raise the level of the brighter track.
• So low the bass and kick. Pull unwanted low lows from some (but not all) of the heavier tracks, such as bass and kick. Determine which tracks, often heavy guitar, bass guitar, or kick drum, are adding unwanted vague rumbles. Rumble is not to be confused with valid low frequencies of the kick drum or the bass guitar.
Listen to where your changes start cutting into the impact of the track, then back off a bit.
• If it sounds good, do it. Sometimes you have to turn a frequency way up, to heck with what all the rules say. And if it sticks out too much in the mix, the mastering engineer will probably ease it off.
• Shave it for later. Shave off the upper and lower frequencies of an instrument if these frequencies are overlapping onto other areas. For example, if a player is only playing high notes on a guitar, maybe the low frequencies should be lowered so they don't interfere with low-end instruments, such as the rhythm guitar or bass guitar. By the same token, maybe shave off the high highs on a kick drum so they don't overlap onto, for example, the high hat track.
Compressing
• There is no wrong or right compression. Some tracks might need lots of compression and some tracks might need none. Some engineers prefer to use as little compression as possible, while other engineers compress everything. Ideally, compression settings should depend on the needs of the song, not the habits of the recording engineer.
• Compress the vocal. Because it is commonly the most important factor of the song, the vocal must stand out. Even though the vocal was probably compressed during the recording process, it may need additional compression in the mixing process. To avoid doubling up on the same settings, use a different compressor when mixing than was used on the tracking session. Note that some recording engineers never ‘double compress’ a vocal.
The compression settings used while recording are a rough estimate of the perfect settings, because, during the recording process, no one knows what the final outcome of the song will be.
Once all instruments are recorded, the engineer can hear exactly what compression settings are needed. For example, if the rest of the instruments are heavily compressed, some of the vocal lines may get lost if the vocal isn't processed similarly.
• Use the best compressor, limiter, de-esser, equalizer, and console strip on the primary instrument, usually the main vocal. Some consoles may have new or updated strips with better processing circuits installed. Use these strips for the vocals. If the studio has only one really great equalizer, use it on the main vocal track to expose the ‘air.’
• Keep all levels consistent throughout the song. Odd notes here and there must be ironed out, whether that means using compression, riding the levels, or even bouncing the offending track to another track with appropriate moves. With consistent levels, you can ride a track knowing exactly how it will react.
• Place a de-esser across the send to the vocal reverb. High sound pressure levels on ‘s’ and ‘t’ can create a spike that may easily overload the input of the effect.
• Instant punch. Good kick drum sounds have the power to rattle your ribcage. That solid punch comes directly from the movement of the speaker. The overcompressed kick drum loses that punch because it can't push the speaker the same way. Set the threshold higher rather than lower, use a high ratio, then raise the level of the kick drum track.
• Yes to de-ess. Use a de-esser in the snare drum track to minimize high hat leakage. A de-esser also works to pull the ‘screech’ or string noise from an acoustic guitar track.
• Use the local buss system. Blocks of tracks, such as drums, electric guitars, and vocals, can benefit from additional overall compression. Use two busses to send the drums into a stereo compressor. Return the compressor back to two channels on the console. Assign these two channels to the main output buss. Set the compressor to a high ratio, fast input, and medium output until you get a real tight, hard sound. Raise the level until it adds enough punch to the drums. Go over the top for a real trashy sound.
• Free samples. Often, if you don't want to use a snare sample, or if one or two of the hits in a song don't ring quite right, sample a good hit from the same song and add it in with the rest of the snare. Then you aren't really changing the sound of the drums, only enhancing it with the same drum sound. Some artists are sticklers about this. They want no ‘foreign’ material, or samples from other sources. However, there is nothing wrong with an off hit or two if that is how the player played it.
• Chains required. If compression isn't quite enough to make the vocal stand out, run the vocal into the sidechain of intrusive instruments – perhaps a piano or lead guitar, maybe even the whole mix. The vocal dictates to the compression, so the other tracks are automatically lowered when the vocal is in. So, when the singing stops, the levels of the other tracks return to normal.
Gates and sidechain
• Open the gates. Insert noise gates on the room tracks and set them to open whenever the drummer hits the snare drum. He hits the drum and the gates on the room tracks open for a large ambient snare sound and then close again. This keeps the kick drum out of the room sound and gives the snare added size.
• Close the gates. You might get a great snare and tom-tom sound but, when you bring up the overhead microphones, there goes the great snare sound. All you hear is wash. Insert noise gates in duck mode on the overheads and set them to close whenever the snare drum hits. This lets the original snare track come through without the influence of the overheads.
Note that this means your cymbals may not come through as expected.
• Gate the signal before sending it to the reverb. Sending a reverb through a gate can cut the reverb off too soon, making it sound unnatural.
• Clean up a track. Set a group of instruments to trigger off of a main track so all the tracks open and close uniformly. This can vastly clean up sloppy tails, when players don't start or end a phrase together. This works great with, among others, bass, background vocals, horns, and keyboards.
Maybe use the kick drum to trigger a bass that is always ahead. Insert the noise gate into the bass channel and set a very fast attack and a slow release. Send the output of the kick drum to the sidechain input of the gate, so the bass track opens when the kick hits. Mess with the settings until the kick drum and bass guitar react as one.
• Use the oscillator to add low end to the kick drum. Sweep the oscillator to find a nice low frequency, preferably in the key of the song being worked on. Send the oscillator through a noise gate, then trigger the input off the existing kick. Whenever the kick hits, the gate opens and this nice low tone is added to the kick drum sound.
Traditionally, recording engineers have used loud oscillator levels to effectively expel annoying record executives from the control room.
• Pink or white, I just can't decide. Use a pink-or white-noise generator to help with the snare sound. Run the signal through the noise gate and trigger it off of the snare drum. The gate opens and then closes with the snare, adding fullness to the snare sound.
• Setting on the ‘duck’ at the bay. The vocal is usually the most important thing in the mix, so clarity is paramount. Try running the main reverb through a noise gate on the ‘duck’ mode. The singer sings and the reverb ducks to give the vocal some room. When he stops, the gate opens and all the reverb returns. This also works great on rhythm guitar as the reverb is only really heard at the tail end of the musical phrase. This tricks the listener into thinking the reverb is on throughout the musical passage.
• Buenos de-ess. To make a vocal cut through, higher frequencies are added, increasing sibilance. A good de-esser will control sibilance problems while maintaining the high frequencies. Use a de-esser on any high pressure spike, such as vocal sibilance, string noise, or even high hat leakage.
• Chop shop. Use the high hat or click track to trigger that choppy, pulsing sound effect. Great on synthesizer tracks.
(1) Use a delay to double the existing quarter-note click track to an eighth-note click track.
(2) Set the noise gate at a very fast attack and release.
(3) Insert the noise gate into the synthesizer track.
(4) Run the output of the delay into the sidechain input of the noise gate.
(5) Mess with it to get the appropriate ‘chop’ sound.
• We have a pulse. For a good pulsing effect, set the auto-panner at extreme left and right. Set the timing to the beat of the song, then monitor one side of the stereo auto-panner from full on to quiet. This pulsing effect works well on, for example, a keyboard pad. Maybe trigger the timing off of the kick, so every pulse happens in time.
• Get the sound you want before adding reverb or delay. Going back and working on a sound that already has effects on it is like untangling a mess of wires after you plug them in.
Effects
Reverb
• What is reverb? Figure 12.1 shows reverb as a series of dense, multiple reflections of varied repeats that are blended into a smooth decaying tail. Reverb in today's studio usually means a digital effects unit or program.
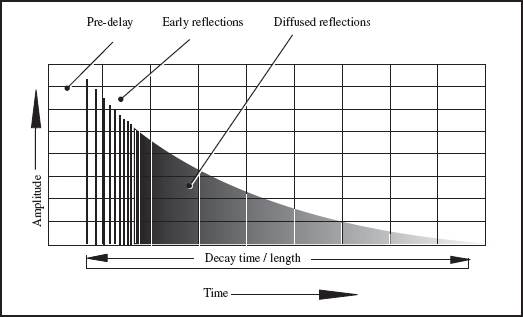
FIGURE 12.1
Reverb
Different companies have different products, but most effects units follow the same pattern. All have presets that are easily changeable to suit every situation. Typical parameters may include:
Halls. Good for all-purpose reverb or echo effect. Parameters allow the user to create any size or makeup of space.
Rooms. Used more for ambiance than reverb. Great for drums and other percussion instruments. Can give life to dead-sounding instruments.
Plates. Vocals and acoustic instruments sound large, lush, and thick when sent through a plate. Before digital reverbs, studios used reverb plates – a metal foil steel plate with a speaker device on one end and a pickup on the other. The signal caused the plate to naturally vibrate. The pickup sent the signal back to the console. A moveable damping pad allowed for different lengths of reverb. Better studios still have a reverb plate or two.
Size. The perceived size of the room that the reverb simulates. When set for a larger hall, the signal would last longer than a small room.
Decay time. The time the effect takes to return to ‘silence’.
Pre-delay. The delay between the send and its effect. In real life, a sound takes time to reach an opposing surface then return, creating a natural pre-delay, or echo. The human ear is used to this effect, so natural-sounding pre-delay enhances depth perception.
Early reflections. The single reflections that occur before the diffuse, reverberant reflections occur.
Diffusion. The denseness of a sound, denser being thicker, darker, and more complex.
Low-/high-frequency roll-offs. Some units have internal roll-offs and allow the user to roll off low or high frequencies.
Crossover frequencies and levels. Some units have crossover settings that allow the user to set where the high/low crossover point is and how much low or high frequencies are desired within the sound. You may, for example, want the high frequencies of the reverb to last a bit longer than the low frequencies.
Input and output levels. I think you know what the input and output controls do.
Mix or wet/dry. This determines how much of the original signal you want returning with the sound. Works great when recording, for example, an in-line guitar track where the signal is routed directly through the unit and then recorded.
• What is the difference between echo, reverb, and ambiance? An echo is specific repeats. Reverb tends to be shorter, more dense repeats, and ambiance is referred to as the shortest of reverbs. You hear echo when you yell in the Grand Canyon. You hear reverb when you yell into the Grand Hotel ballroom. You hear ambiance when you yell into the Grand Hotel washroom.
• Don't put every reverb on every track or every track will be lost in the mud. Make a sound larger by adding something dry for comparison. In a wetter mix, something dry will stand out. In a dryer mix, something wet will stand out. Effects used sparsely will leave more room for all instruments to cut through.
• Don't send everything to one reverb. Send minimal tracks to any one effect. Reverbs are used for placement and depth for each instrument. Sending too much of everything to one effect defeats that placement. But, if two tracks, for example a vocal and a guitar, never play at the same time, you might use the same effects on both of them as the effects would never overlap.
• Send everything to one reverb. Sending, for example, all the drums to the same effect, at proper levels, can place the drums in a specific room or locale, rather than having one effect on the snare and another on the kick, and yet another on the tom-toms.
• Mixing the manufacturers gives more variance. All of the companies that manufacture effects units create their own programs and algorithms for their effects. All equipment the manufacturer releases uses these algorithms.
Using two effects units from the same manufacturer on, for example, a vocal track means two sends are going to the same basic algorithms. When sending the vocal to more than one effects unit, they should have different manufacturers.
Cheaper effects units are not always true stereo. The left side may just be a phase-reversed right side. Listen in mono and the effect disappears. Defeat this by using two similar units in tandem. Split the input, send it into both units, and listen to the left outputs of both units as your stereo returns.
• Don't wash your bottom. Use reverbs sparingly on the low-end instruments such as the bass guitar. Sounds with lots of bottom can add unwanted wash when sent through a long reverb unit.
• Use a reverb to mask minor flaws, such as an abrupt stop or a punch. Camouflage the blips by using a reverb setting that has the same sound quality as the track. Try setting the same equalization on the track and the reverb unit so they both become one, sharing a common space in the mix. Determine what you want before going in and messing with the internal reverb settings.
• Use the reverb plate for the vocals. If you are lucky enough to have a real reverb plate, use it for vocals and principal instruments in the mix. Reverb plates and spring reverbs are great to place an instrument or vocal exactly where you want it. Warning: they may be noisy.
• How long is a pre-delay? Set the pre-delay at anywhere from 40 ms on up to a few hundred milliseconds, depending on where it feels best. The pre-delay is often set at a multiple of the beats per minute of the song. The longer the delay is, the less it becomes a pre-delay and more of an effect itself. The Haas effect determines that any pre-delay less than 40 ms is considered part of the sound itself.
• Give the vocal its own reverb. When the vocal track has its own reverb, you can make all the changes and fine-tuning you want without affecting any other instruments or effects.
• Use two reverbs on the vocal. Sometimes two reverbs combine to give one great reverb sound, for example a short reverb then another longer reverb. A longer reverb with less low end and a longer pre-delay brings out the shorter, brighter one.
• Stereo returns from effects don't necessarily have to remain stereo. Use one side of an effect for specific placement of an instrument, panning the instrument, and the effect the same. Alternatively, pan the instrument to the left then pan the effect return to the right. Maybe pull the high end on the distant side of the reverb.
• Oldie but a goodie. Send a dry signal through a guitar amplifier in the studio. Use a send from the console and set it to work with the amplifier input level. Place close microphones in front of the speaker to get more of an electric sound, or place microphones in the distance, using the room as a live chamber. For ambiance, place two microphones in opposite corners, about a foot out and aimed into the corners.
• Delay left, right? To get a real feeling of depth from a live room, place one microphone in a corner of the live room and the other one in a nearby hallway. Due to microphone placement, the signal will hit one microphone before the other. This creates a slight delay on one side of the audio spectrum. Pan the instrument toward the side with the early hit. In the track, different delays create a real sense of width. Check for phase issues.
• Send one effect into another. There is a world of sounds available just by sending one effect into another, such as reverb effect into a chorus, or chorus into a delay, or delay into a reverb. The combinations are endless.
• Check your reverb returns in mono. Why? Because, even in this age of modern videos, some televisions still have one little speaker, and out-of-phase mono signals will cancel each other.
• Pedal to the metal. Bring in effects pedals, delay pedals, distortion pedals, chorus pedals, and all the gear used traditionally for live guitars. Overload them, distort them, dunk them in the sink – try any combination for creative sounds, as long as it helps the song.
• Pull certain frequencies on a send, then add the same frequencies on the return. Theoretically, they should cancel each other out, but you may end up with some interesting sounds.
• Equalize the send to an effect before equalizing the return. Pulling an errant frequency from a track before it reaches the effect leaves the effect return unprocessed.
• Lower lows. The faster the tempo, the less low end is needed on reverbs.
• Faster songs benefit from shorter reverbs. Leave the long reverbs for the slower songs. You lose all the effect after a certain tempo.
• Set the end point of the reverb to be complete by the time the next beat hits, especially on percussion instruments where long reverbs can overlap into the next beat.
• Long reverbs can clutter important space. Sometimes an equivalent delay can create the illusion of a long reverb without the additional cloudiness. Keep longer reverbs lower in level.
• Place tracks in the distance using a less dense setting. In nature, a sound source loses density with distance. For closeness, try increased density.
In a painting, a light-shaded background pushes the darker shades foreword. Similarly, a dense setting on one effect can push a track with a less dense setting into the background.
• Set the crossover frequency at the key of the song. To set the crossover point, go into the internal parameters of the effects unit and set the point to a note that is the song's key. Because the crossover points are lower in level, this may help open up a frequency area that's already full.
• Rather than equalize a track, maybe equalize the effect instead. Adding a bit of high end on the effect may be enough to bring a track out of the background. Of course, this will affect all tracks being sent to that effect.
• Equalize the output of digital reverbs. Change the settings at the unit rather than at the console. Why introduce another processor (more noise) into the chain at the console?
•Mud wrestling. Be aware of the track equalization being sent to the chorus or harmonizer effects. For example, the equalization on a bass guitar is +3 dB at 100 kHz. Sending all those low frequencies into a harmonizer will return as harmonized mud.
Split the signal into two channels. On the second channel, pull the lower frequencies, then send that signal to the harmonizer. Of course, once you get your sound, switch this second track out of the main mix buss. The returns of the effects will have richer bass frequencies with minimal muddiness.
• Mix up the mix. Send the vocal to a plate and a room, or a hall and an ambience, but try to avoid a room and a room, unless the parameters are really set differently.
• Use contrast for placement. In a wet mix, something dry stands out. In a dry mix, something wet stands out.
• Take the time to fix any vocal tuning issues. Ideally, these will have been addressed during the recording process, but that is not always the case. A good ear can hear if a vocal is out of tune. If you are checking for vocal tuning, don't solo the track – leave a musical instrument in the mix to compare it to. In addition, lower the overall level in the monitors. Tuning is harder to hear as volume increases.
Delay and chorus
• Delay lay delay. Delay is the interval between a sound and its repetition. Echo is a series of repeats of an original sound that get duller and quieter on each repeat. A delay unit in the studio simulates this, allowing the user to set the length, amount of delay, modulation, and many other settings. Delays can be modified to work not only as a standard delay but as a chorus, a flanger, or a doubling effect. Figure 12.2 shows that standard delay units contain:
Feedback regeneration. The amount of signal fed back into itself. A signal with no feedback will delay the original signal once. As the feedback increases, the delay repeats itself as it gets quieter. Set it too high, and each repeat returns a bit louder than the previous one, creating feedback.
Delay time. The distance in time between the original signal and the first repeat of that signal.
Depth, or modulation. This function allows the user to determine the movement of the delay. For example, the delay can be set to shift from 100 to 120 ms, resulting in a less rigid sound.
Speed or VSO. The speed of the modulation sweeping from the highest and lowest settings on the modulation. It can be slow, up to a few seconds, or fast, as fast as a few milliseconds.

FIGURE 12.2
Delay
• What are chorus and flanging? Chorus and flanging are functions of delay, with options that also include depth, modulation, and speed. Chorus is an effect in which a signal is combined with its pitch-detuned replica.
Flanging is an effect in which a signal is combined with its delayed replica. The delay is so short (0–20 ms) that the direct and the delayed signals cannot be resolved – they act like a single sound. Varying the delay creates phase cancellations that move up and down the frequency spectrum. Chorus and flanging really must be heard to be understood.
• Thickly sweet. Return a stereo delay to separate channels on the console, then slightly delay both the left and right sides by a few milliseconds. Try prime numbers. Different settings of depth modulation and delay times can result in flanging or harmonizing. Pan as necessary.
• Whirled series. Rich sound sources with lots of harmonics sound great with a chorus effect. Use chorus to add thickness to acoustic guitars or vocals. Engineers differ in their viewpoints on using a chorus effect on a piano.
• Wide you do that. On slower songs, chorus effect on a bass guitar can give a wider effect. But too much big, thick bottom can eat up valuable headroom, which lowers the level of all the tracks.
• Extra fat. Record a double track to enhance the original. Delay the double by 20 or 30 ms and set a varying delay. Bring it in under the main instrument for fatness and depth. Keep the depth and volume low or risk pitch issues.
•Change for a single. Run the bass through a pitch change program set at an octave higher, or lower – yikes. Bring it in under the primary bass track.
• Use a chorus effect to mask slight pitch problems. Sending a slightly out-of-tune vocal through a chorus effect can mask pitch problems. Sending a really out-of-tune vocal through the chorus effect will accentuate pitch problems.
Sometimes doubling or tripling a vocal track can mask tuning problems, causing the whole vocal to sound somewhat in tune.
• Pitch it. With auto-pitch devices available, no final vocal track should have tuning issues. But get the best vocal you can to avoid the auto-tuner, then only tune what is necessary. Too much auto-tuning can pull all the emotional nuances out of a vocal, though that may be the intended effect.
• I'm down. Harmonize the drum room tracks down to get a thicker, heavier eighties rock drum sound.
• Flange like they used to. The traditional way to flange a sound was to send a track to a second analog tape recording machine. Using the distance between the record head and the playback head on both machines, they would press their thumb against the moving reel, or flange, on the second machine. The original sound meshing with the returning track from the second machine produced the flange effect.
Another old way of getting a natural flange is to place a microphone aimed at the cone as normal. Have someone hold a second microphone by the cable. As the microphone hangs, they slowly spin it around. As the signal goes though the speaker, add the spinning microphone in with the first microphone, then mix them to hear the effect.
•Swish on the verse, swoosh on the chorus. Sometimes you might want the chorus or flanger to swoosh a certain way every time. A slower modulation setting dictates where it randomly swooshes so the effect changes with every pass. To get exactly the same effect every time, record the swoosh onto two tracks a few times until it is exactly right. Maybe help it by changing the modulation settings at the appropriate times, or changing the delay times.
Practice it a few times, recording each one until the recorded effect sounds correct. Once recorded, the effect occurs in the same way every time. It uses two tracks but frees up the effect for other instruments.
• Dig it all delay. When a digital drum signal is sent to a digital reverb input, the reverb reacts in the same way every time. Insert a delay between the send and the input of the digital reverb. Set the delay time short, with no feedback, and adjust the VSO for medium speed and low depth. With a slight varying pitch input, every hit into the digital effect will be slightly different in timing and pitch.
• Delay the ambiance tracks to make the room sound larger. Either use the same delay setting on both the left and right side of the stereo room tracks, or go kooky and set the delays at different times. As ever, watch for phase issues.
• To get a nice, thick guitar sound, buss the signal to a pair of delays, both with short but different delay times – under 100 ms. Pan the guitar to somewhere near the middle space, then add a bit of modulation on each delay and pan them hard left and right. The guitar is occupying that middle space normally lost during hard panning.
• Use a very short delay. To raise a track's high frequencies without adding equalization, send the track through a quality delay set at less than 40 ms. Pull the low frequencies, maybe add some compression, then bring this second track in under the original track.
• Split with an effect. Use a chorus effect to split one track into two, for example changing a mono keyboard pad to stereo.
• What is slapback? Slap, or slapback, is an ancient method of creating analog delay used by our engineering grandfathers. These pioneers created a feedback loop, taking advantage of the distance between the record head and the playback head on vintage analog tape recording machines.
In those days, the term ‘most significant bits’ was used in reference to the studio receptionist.
• Drum slap. For a longer snare drum sound, set the delay at a ⅛ or 1/16 note, then send the snare drum to it. Add some feedback to the delay and bring it in under the original snare drum.
• Delay of the land. For a nice stereo spread effect, set one delay to match the ¼ note beat of the song and set a second delay at two-thirds of the beat. Work with the delay times, panning, and feedback until it suits you.
Strategically set delays can create great spaces and be used for chorusing, looping, reverb, pre-delay, mock stereo, and slap.
• Delay sounds. For more distinction between the vocal track and a delay, set different equalization settings on the delay from on the vocal track. For less distinction between the vocal and the delay, set the equalization to match.
• Halo, I love you. To get that halo effect around the vocal, set a ¼ note delay with the high end pulled a bit. Slowly bring the delay in until you hear it working, then lower it a touch. Turn the overall mix way down and listen for the delay. Try adding reverb and experiment as desired. It should be felt rather than heard. Personally, I'd like to be felt rather than heard.
• Distance yourself from the band. Rather than using the feedback on the delay unit, create feedback by sending the signal from itself through a channel with high frequencies lowered so each delay consecutively lowers in fidelity. This can make the delay sound natural, but not so the listener says, ‘Hey, that vocal is going through an effect.’
• Experiencing long delays. Long delays work great as an effect, but can add clutter if always left in the mix. Maybe clutter is the desired effect.
• Delayed due to snare. If a single snare shot needs to be replaced, delay the hit ahead of it by the exact time distance between snares. Then record the new snare, actually the delayed previous one, over the faulty one. This will require a delay and an extra channel, often a luxury while mixing.
Set proper levels and always double-check when you record into a snare track. Maybe record a safety track first.
• Use two alternate samples for one snare sound. If you must re-do all the snare hits, don't use one sample throughout. Set up a panning system with two samplers. Find two similar snare hits and sample both. Set the panner to trigger with each hit. When one snare hits, the panner is triggered over to the other side, then sends the signal to a second snare sample; after this one hits it goes back to the first sample. This really works well during drum rolls, where a single sampled snare might be revealed.
• Missed her tambourine, man. To place a tambourine hit on every other snare drum hit, use the same ‘panner into samplers’ method as above. With a tambourine hit in one sampler and silence from the other, every other snare hit triggers the tambourine hit.
• Less is louder. All the equalization, reverbs, echoes, and choruses add level to the master buss. Too much of everything means the whole mix lowers in level. Less processing takes up less space so it naturally sounds louder and better.
• Low on effects? So what? You don't necessarily need racks of outboard to do a good mix. One or two reverbs, a delay, and maybe a chorus can get great results.
• Too many effects. With the glut of digital effects and mixing gear available today, it can be easy to overdo it. If an effect helps the flow of the song, that's great, but to add some kooky effect just because you can contributes to unnecessary clutter. Your job is to clear away debris, not add to the mess.
Levels
• Listen to where each track lays in relationship to the others. Bring in all the tracks and set some basic levels and pans. Commonly, the kick and snare drums, bass guitar, and lead vocals are in the middle, with the rest of the instruments strategically panned.
Some engineers start with the drums and bass, as they are the foundation of a song. Some engineers start with the vocals because that is the essence of the song. But every song is different, so use the first few passes to listen to all the tracks, then determine your best approach. A pleasing mix is dependant on the style of music. The guitars and drums should gel together, with the vocal sitting on top.
• Pull the faders down and start over. Sometimes it's hard to get started. If you lose the groove in the levels, just pull down all the faders and start over. Bring each instrument back into the mix and set your new levels.
• Bring the vocal in early. All the instruments will eventually surround the lead vocal. Bring the lead vocal into the mix early to hear what changes are needed in other tracks to keep the vocal sounding good.
• Vocal tones must be consistent. The vocal sound and levels are integral, so any changes in vocal style throughout the song need to be addressed. If the singer goes to a higher register somewhere in the song, this may need different processing from when he is in full voice mode. One setting on the vocal processing may not work with every line in the song.
• Turn down not up. Before changing one track's level, try lowering another track to make the first track jump out a bit. Raising tracks because they keep getting lost means there may be equalization problems. Check your settings to see which frequencies are overlapping.
• A slight change in panning can coax more clarity out of a track. Before changing a track's level, check if a simple change in panning works. When two instruments with the same frequency range are similarly panned, they mesh together. Pan them apart for distinction.
• Keep things from jumping out in the mix. Small level changes might work better than drastic level changes. Mixing isn't about perfect levels, its about getting a feel across to the listener. It's an art, not a science.
• Spotlight. Aim a spotlight on the vocal and, when the vocal is not on, aim the spotlight on a guitar solo or a drum fill. Between vocal lines, push the guitar so the spotlight is on it; pull it down when the vocal returns. Focus on one thing at a time within the mix.
•Let me roll it. For emphasis on snare or tom-tom rolls, boost only the drum reverbs, not the drums themselves. This may give them enough push without actually changing the drum level.
• Vary little. Once the kick and snare are set, don't move their levels, except maybe for drum rolls or emphasis on a part. Raising the kick and snare levels may sound great, but something is lost when the sounds return to their previous level. A song builds to the end, and lowering these levels sounds as if the mix is taking a step backwards.
• Keep the vocal right up front in the mix. In today's popular music, the most important element of the mix is the vocal. Make it sound as rich as possible, with every single note heard.
Placing the vocal in the mix correctly has a lot to do with the singer. Some vocal tracks just sound loud no matter where you place them. A strong vocal performance might not need to be placed as prominently in the mix, as it will naturally project loud and clear.
• It doesn't always have to be loud. Just because you have a great-sounding guitar doesn't mean it always has to be loud. Guitar lines, drum fills, or anything else shouldn't mask the vocal.
• Left, right? Position the panning so tracks are even throughout the song. Not necessarily balanced at the same time but throughout the song. For example, placing a cowbell on the left side during the choruses and a tambourine on the right side during the verses creates a balance in terms of the total song.
• When panning, check in mono. Phase cancellations may cause tracks that are loud and clear in stereo to vanish in mono. Change your panning while in mono to make some instruments disappear and others emerge from the mist.
•You're right, my instrument left. Set stereo pan-pots around 9 o'clock and 3 o'clock, rather than hard panning. Hard-panning stereo tracks such as drum overheads or a piano can remove a crucial middle space. As a rule, lower-frequency instruments are less directional and get panned more toward the middle. Sometimes the bass and kick are not panned exactly at 12 o'clock, but are panned off a bit so they aren't sonically right on top of each other.
Many engineers love hard panning. Old Beach Boys, Beatles, and even Alice Cooper recordings contain lead vocals or drum tracks panned all the way to one side. It was a favorite trick to add dimension to a song.
• Split that guitar in half. Try splitting a guitar track into two channels, then reverse the polarity on one of the two channels. Can be kooky. Check in mono because the signals will cancel out in mono if set at the same level.
• Six dBs of separation. Stereo acoustic guitars sound wonderful as a featured instrument, but stereo instruments take up a lot of space. The more instruments are added to the mix, the less the stereo image remains.
• Divide and conquer. Split one channel into two for flexibility when sending a signal to an effect or through a compressor. Use the second channel to change the reaction of the equipment without changing the sound in the monitors.
The high and low frequencies of a track may need different compression settings. A properly equalized instrument should hit the compressor equally, keeping all levels intact.
Try splitting the return from the vocal into three channels on the console, and process each a bit differently for different sections of the song.
•Mute me on the high Cs. Try different ideas with the mute buttons, for example coming in halfway through the bar. Come in on the two and out on the four, just to hear what happens. Muting one track leaves space for another to shine.
• Use channel mutes to send specific hits. When you want specific reverbs, such as on a single snare hit or a reverb on a certain word within a line, use a send, not a return.
Return the track to a separate channel, turn up the reverb send, and remove the channel from the main stereo buss. Un-mute the channel on the specific hit.
• Speed it up. If a mix doesn't seem to have a lot of life, sometimes speeding up the tempo of the machine a notch or two will add some spark. However, some artists don't like this. I worked on a Rolling Stones record where the producer tried a tempo change as an idea on one song. Keith was not impressed, claiming no one messes with Charlie's grooves.
• Placement in the mix is crucial. Create depth and dimension within the mix by placing instruments close and far. Place drier, brighter instruments up front and duller, ambient instruments in the distance. Aurally place a track in the distance. For example:
- Lower the volume. Louder instruments will appear closer, so lowering the level can lessen that closeness.
- Pan toward one side. There is a one in 360 degree chance that a distant sound originates in front of us. Instruments, such as vocals, panned to the center provide equal energy to both left and right speakers, making the instrument appear close.
- Ease off the high end. When a sound originates in the distance, the high frequencies dissipate before low ones. When you hear a neighbor's stereo, you don't hear the crispness of the track, you hear the low end thud. A track without high frequencies can sound distant.
- Add effects. When a sound originates in the distance, we also hear the wash of the natural echoes and reverbs.
• They panned my mix. Place the instrument using reverb panning. For example, place an instrument at 2 o’ clock and the panning of the reverb at 11 o'clock and 5 o'clock.
• Plug your ears. While mixing, you might lose a bit of objectivity. Try this. Set the volume at a reasonable level. Plug your ears with your fingers, close your eyes, and listen. This seems to give a different perspective of levels, and is a good method of checking the vocal and snare drum levels. Maybe step outside of the room and listen through the closed door. This can give you a good indication of whether something is too loud or soft in the mix.
• Catch a buzz. Listen to the mix through headphones to catch any buzzes, clicks, pops, hums, etc. Tiny flaws sometimes not evident in the monitors can come through loud and clear in the headphones.
Listen through headphones at a low volume for a true feeling of instrument placement and level. A lot of listeners enjoy their music through headphones and earbuds.
• Don't run out of power. If you run out of CPU power because of the number of plug-ins, process (record) some of the files that have compressors, limiters, de-essers, or equalizers, then remove these plug-ins. This will free up processing power because playing back a track requires far less CPU power than playing back a plug-in in real time.
• Smile. Bring in a camera and let the clients take photos of the sessions. Those little throwaway cameras work great, and they keep everyone occupied while you fix that piano track you erased.
Print Prep
• The stage is late – take the buss. If you use overall compression across the master buss, wait until the latter stages of the mix to activate it. As more instruments are added during the mix, the compressor can change the sounds you have already tweaked.
• Two passes to master. Print two passes of the same mix – one mix with no compression and the other with ample compression. Let the mastering engineer choose which he wants to use.
• It's time you converted. If you are mixing to digital format and need conversion, use only the highest quality A to D converters available, even if you must rent them.
• Print alignment tones. Before printing your mix to digital tape, print alignment tones at the head. This gives the mastering engineer the proper references to master. With a standard level of 0 VU on the console, set the input level of digital machines to −12 to −20 dBFS, depending on studio practice.
Some engineers feel these tones are not needed. While these tones are used traditionally on analog machines to adjust operating level, azimuth, bias, and high and low frequencies, these parameters are not user-adjustable on digital machines. This debate continues.
Record a tone on the left side first, then both sides. The mastering engineer reads this information on the label, then confirms that the left and right sides haven't been accidentally switched.
• Mix to two. Record the mix to two available tracks of the digital multitrack. Because the mix occurs at exactly the same time as the tracks are played, punching in and out should be seamless. For example, if a rhythm guitar is a bit low in the second verse, raise it a bit then record, or ‘punch in,’ to the mix for the second verse. Maybe, if space is available, print different passes on separate sets of tracks and build one great mix.
• Mix to analog. Many engineers agree, and for good reason, that mixing to analog sounds better than mixing to digital. If you get the opportunity, mix a project to digital and to an analog mix machine, then A/B the result of your mixing experiment. You can't tout the great sound your digital recorder gets until you can compare it with analog.
• DAT's new to me. Your mixes are important. Use fresh tapes, not ones that have been previously recorded.
• Exercise your tapes. Rewind any virgin mix tapes to the end, then back again. This gets the tape and the machine ‘used’ to each other. On analog tape, this is referred to as exercising.
• Is everything clean and ready? All your equipment must be reliable and maintained to a professional standard. Check that the mix machines have been cleaned, aligned, loaded with formatted tapes and drives (if applicable), and are ready for use.
• Run a safety of all the mixes. DATs, CDs, and hard drives are inexpensive. Safeties are usually always usable if, for some reason, the final mixes become lost or unusable.
•See these CDs? If the final mixes will be printed on CD, set the mix sampling rate to 44.1 kHz – the sampling rate of CDs. The signal will not need to be converted from a different sampling rate for mastering.
• Add some ‘life.’ To polish up a final mix and give it a bit of life, add some overall equalization and compression. Done properly, this can add some life to it, especially if the mix isn't going to be mastered professionally. To set this up:
- Set unity gain on both the best equalizer and the best compressor available.
- Connect a stereo equalizer to the main buss of the console, keeping the L/R sides correct.
- Run the stereo equalizers into a stereo compressor, or vice versa, then back to the stereo buss insert return.
- Start with a high threshold and a low ratio and change them as necessary. A slower attack time may allow some punch to come through before it kicks in. For example, the attack on the drums can pull down the rest of the instruments. A slower attack time would miss the punch of the drums and react to the less transient instruments. Longer release times will decrease the pumping and breathing effect. Unless the mix is routed through a multi-band compressor, the lower frequencies will dominate how the higher frequencies react.
- Less meter movement means fewer dynamic changes. This could mean too much compression on the mix.
- Don't hit the overall mix buss too hard. Turn down the overall buss limiter and use compression on the individual tracks to allow the mix to breathe a bit more. Too much compression inhibits the speaker movement. This means that the volume knob may be set louder but the punch is still missing.
- Are you doing this process after mixing for 12 hours? Maybe wait a few days until your ears are fresh before compressing the mix. Compare your compressed mix with the uncompressed mix, and then compare your mix with some commercially released projects.
Printing
• The printing. Start the mix a second or two before the music starts, for the mastering engineer. In addition, print the mixes as interleaved instead of split mono. Interleaved stores the song as one digital stream so the stereo, or multi-channel, mix integrity is guaranteed to be preserved. Set the mix parameters to the highest word length available.
• Before printing to stereo. Ask a few questions, including:
- Is the low end punchy and solid, with both the kick and the bass guitar holding their own space?
- Are the midrange frequencies clear and full?
- Are the highs crisp, clean, and clear?
- Is each instrument properly panned?
- Is each instrument correctly placed sonically in front of or behind other instruments? All tracks should sound clear individually, yet fit in with the rest of the tracks.
- Do the drums sound like a solid cohesive drum kit, or are too many effects taking away from the groove?
- Do I know all my moves, including all level changes, cuts, pans, special moves, and the final fade?
- Are all levels correct compared with other levels? Specifically, is the snare drum too loud? Turn the master volume down and listen to the level of the snare drum to verify the proper level.
- Does the mix have liquid movement, with builds and releases, ebbs and flows, and interesting changes? Movement in the mix is about bringing things in and out, up and down, back and forth. That motion helps to prevent the music from getting boring.
- Does the vocal stand out, with every syllable clear and audible?
- Is any link in any of the signal flow chains overloading?
- Do all sounds combine to make a single cohesive, solid, interesting piece of music?
- Did that sushi taste funny to anyone else?
• Print hot. As with recording the basic and overdub tracks, print mixes as hot as possible to digital, without overloading. Using hotter levels means the signal is higher into the MSB area. More bits are used so the recording is fuller. better. Take full advantage of the usable space between noise and overload.
• Bring in a few extra hands to mix. Delegate one section of the console to each person and let them do different things during the mix. Often a mix tends to be a one-person job, with others telling them to please try this or that, especially with today's studio automation. When everyone is at the console trying different things as the mix is being printed, there will be many different ideas recorded for edits in different parts of the song.
•The prints of mixes. With today's digital technology, printing a lot of mixes allows you to get exactly what you want. Print mixes with vocals up, vocals way up, vocals down, bass up, bass down, dry, wet, a cappella – it's endless. Take the time to listen and determine which parts of which mix are best.
• Print a mix with no lead vocals. Be sure to turn off the effects on the vocals as well. Previously, this was done so the artist could go on TV and have the music behind him, then do a live vocal. Today it is more for safety's sake, in case something on the vocal track needs to be changed after all the mixes are done. This saves having to do a complete remix just to fix one part. The no-vocal mix can also be used to edit out any naughty words for radio airplay.
• Print a mix with lots of lead vocals. Listen to some old records and hear that some vocals are far louder than the rest of the instruments. Print a few passes with various vocal levels in case a line in the master pass needs fixing. A louder vocal track may keep the song moving if it's a good vocal. When the vocal is too loud, it can diminish the impact of the rest of the tracks.
• Under-mix. Print passes with less. Lower the effects; maybe remove a track or two. Different emotions tend to emerge from different levels in the mix. Don't underestimate the power of a simple, dry mix of a well-written, well-recorded song.
• Over-mix. After everyone agrees that the final mix is done, print an ‘over-the-top’ mix, going a little crazy with the sends and returns – but not so much that the pass is unusable.
Take it over the top, whatever you interpret that to be. What comes across as over-the-top in the studio comes across as dynamics to the listener. Like movies that have evolved from boring still camera scenes to explosions and movement in every scene, listeners today want more than a standard song; they want fast-paced changes. You owe it to yourself, the client, and the whole recording industry to go all the way to outer space if necessary when trying new ideas. No one wants the same old stuff. Wouldn't it be great to be known as a cutting edge recording engineer?
• Let someone else drive the boat. When listening back, let others sit in the engineer's chair. This makes everyone feel more involved in the project. Who doesn't like to sit at a mixing console and hear themselves play? Turn it up so everyone can enjoy it, then retreat to the hallway to rest your ears while everyone else enjoys the mix. This gives you one final chance to listen through the closed doors to the final mix.
After Printing
• Listen to the mix through all speakers, including small speakers, mono speakers, speakers in another room, car speakers, and even headphones and earbuds. Today's portable ‘boom boxes’ are a great reference.
Using various references gives a more rounded and overall landscape from which to listen. If, for example, the vocal isn't loud enough on every set of speakers, maybe you should use the mix with the louder vocals. Listen and compare. If it sounds good on all systems large and small, you have a good mix.
Note that, in the car, the background noise of the vehicle will tell you if all sounds in the mix can be heard. If any sounds are masked by the vehicle noise, make the sounds more apparent.
People love to listen to music in their car. Maybe turn up the bass and the treble on the car stereo to check how that sounds.
•Make safety copies of the final mixes. There is no reason not to have abundant safety masters. Make copies, or clones, of all the mixes and data.
• Proper documentation is paramount. Label everything, documenting all song titles, the band name, producer, engineer, assistant engineer, date, song choice and location, and all other relevant information. Tracks and sections of tracks are commonly shuffled not only from track to track but from format to format. Clearly mark all the choice passes and locations. Without proper labeling you may wade through dozens of passes before finding the pass you want. Note that there is only one master, and that is the final disc that is edited, spaced, mastered, and ready to be duped. Label your mixes as final mixes, not masters.
• Listen up. If your small studio does not have big honking monitors, take the mix to a bigger studio and ask if you can listen on the big speakers.
• Leave the mix until tomorrow. Leave the mix set up overnight so you can return in the morning and do a couple of tweaks and then print a final few passes. But, too much twiddling at this stage can undo all of yesterday's hard work.
• Stacked or what? Mix all of your various versions – master, vocal up, vocal down, solo up, TV, and instrumental – to a new session. Add enough tracks to this session for all the mixes to start at exactly the same point – for example, 1–2 master mix, 3–4 vocal up, 5–6 vocal down. This way, you will be able to quickly edit a new ‘master mix’ comp by editing across all the mixes at once. This new mix will now be ‘in time’ immediately, with no guesswork involved.
• Consolidate crossfades. Improper crossfades can result in noticeable ‘clicks’ at each of these points. Consolidate the file to create a new continuous file, because, the fewer edits a track has, the more easily the hard drive is able to find it and play it back. All hard drives have a finite amount of data they can throughput at once.
• Watch the levels. If you are assembling final mixes yourself, use your ears, not the meters, to match the different levels. Depending on the peak content of a song, the meters may differ from song to song.
Use the meters as a reference, but your ears as the final judge. Better yet, leave it for the mastering engineer.
• Avoid paper labels on your discs. Sure, they look good, but they can gum up the workings of the reader and the paper can slightly change the speed and rotation of the disc, creating glitches, noises, and errors.
• Close the session and finalize the disc. This may sound obvious, but mastering houses get a ton of final mix discs that are unreadable.
Mastering
• What is mastering? ‘Mastering’ is where the mixes are given the final equalization, compression, and (sometimes) assembly. A good mastering engineer will match the sound and levels of all the songs, as well as bringing a transparent ‘radio’ quality to the project. He will have the proper listening space and gear. His trained ear, from years of experience, will bring the final mix up to professional standards, sort of like the icing on the cake. Some mastering houses will forward properly coded masters to the pressing plant.
• What about Bob? Get the best mastering engineer available. You will never regret making a record sound a little bit better.
• Why, master, why? Send the master tapes, or drives, with all the alternate mixes and out-takes, along with all proper paperwork and locations clearly labeled, to the mastering lab. The mastering engineer needs access to alternate mixes. For example, if he feels one section of a song needs louder vocals, he can retrieve whatever he needs from a properly labeled alternate take.
Sending the uncompressed originals is better because clones and copies are subject to human error. More transfers means more chance for lost data.
In addition, if you recorded two versions, one with compression and one without compression, let the mastering engineer hear your compressed versions and get his view on your skills as a mastering engineer.
• Listen to the master. Listen to the changes the mastering engineer is making and ask questions. Compare and analyze the original mixes alongside the new changes. This is the final stage. Don't judge the final result at the mastering lab. Take it around and listen for a few days. Any minor changes are easily communicated to the mastering engineer.