
7
Animation examples
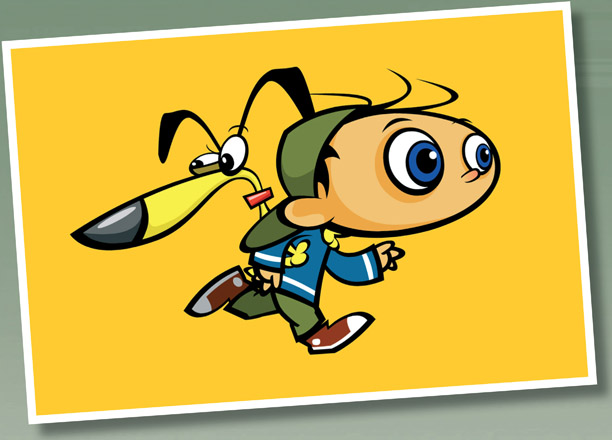
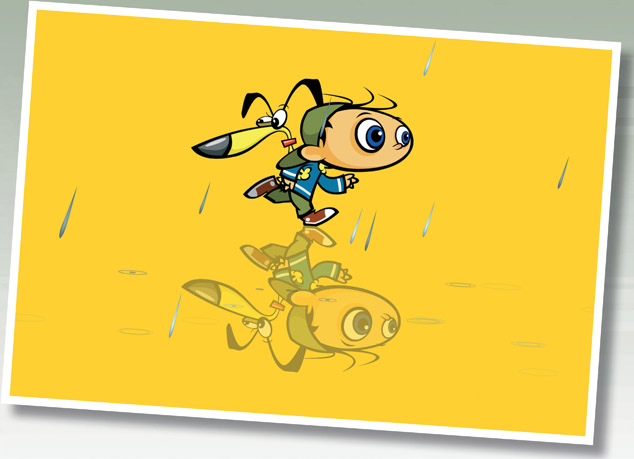
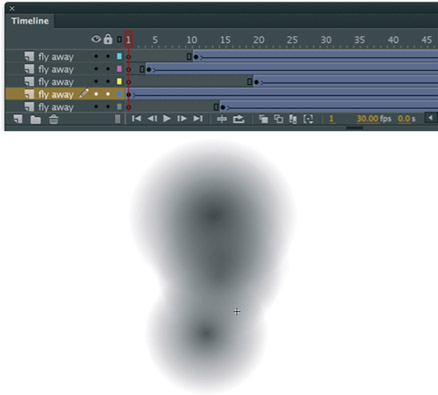
■ Surprisingly, the most impressive of Flash effects are often the simplest to create. The above characters are animated running in place as a looped sequence. It looks cool as it is but if you copy and paste an instance of it, flip it vertically and lower its opacity, you can achieve the sense that the surface they are running on is reflective and maybe even a bit slippery.
I HAVE SPENT MY FAIR SHARE OF TIME ON VARIOUS Flash online forums, reading, learning and providing my own perspective when needed. As a result, I’ve seen what animation techniques and examples Flash users are always requesting. I will often create a sample FLA and make it available for everyone to download and dissect for themselves. It’s very difficult to teach design and animation in text format and, often, a simple FLA can make all the difference.
This chapter contains some of the most popular “How do I…” animation requests from Flash users as far back as Flash version 4. If this chapter teaches you one thing, I hope that it teaches you how to think differently about how you approach Flash as a tool.
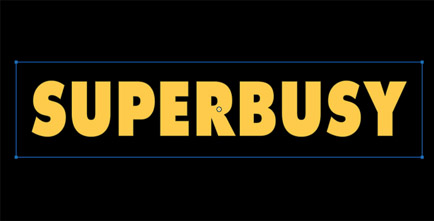
Super text effect

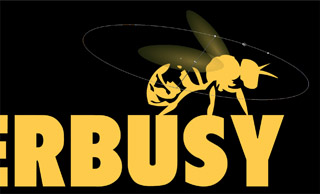
SUPERBUSY RECORDS
SO OFTEN THE SIMPLEST animation technique is the most effective visually. Take this website introduction for Superbusy Records as an example of simplicity at its finest and how to get the most bang for your buck with the basics of Flash animation. The text animation is comprised of basic Motion tweens and scaling, and the bee animation takes advantage of some old-school blurring with a linear gradient. Timing is everything and the fast-paced editing of this animation makes it look more complicated than it truly is.
1 Start off with a text field set to Static and type in your text. Nothing fancy here, just some basic text to get you started.
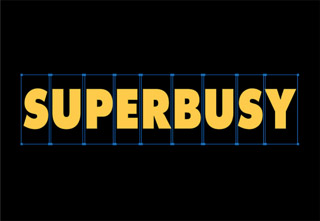
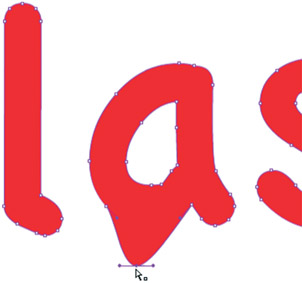
2 Break apart the text field once using ![]() and each letter will be broken apart but still editable. Break apart twice to convert your text to raw vector shapes. Your text will no longer be editable once broken down this far. You can choose to break apart only once if you think you might want to edit the text at a later time.
and each letter will be broken apart but still editable. Break apart twice to convert your text to raw vector shapes. Your text will no longer be editable once broken down this far. You can choose to break apart only once if you think you might want to edit the text at a later time.
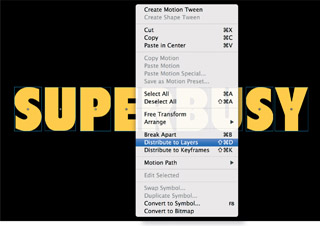
3 Select each letter individually and convert each to a Graphic symbol. Once all letters are converted, select them all, right-click over them and select Distribute to Layers from the context menu.
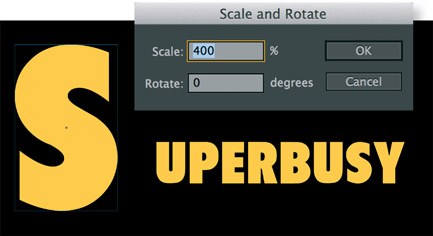
4 Select all layers on a frame somewhere down the Timeline (frame 30 will do) and insert a keyframe for every layer by hitting the F6 key. Go back to frame 1 and select your first letter. Use the Scale and Rotate ![]() to scale it to 400% or greater.
to scale it to 400% or greater.
5 Apply a Motion tween to animate this letter scale from 400% to 100%. Select the keyframe in frame 30 and move it to around frame 5. Play back to test the speed based on your frame rate. Adjust the tempo as necessary by adding or removing frames in the Motion tween.
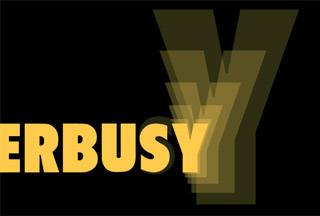
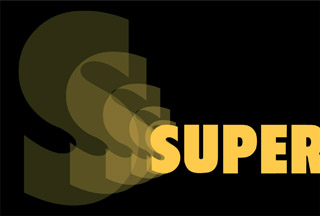
6 Repeat this procedure for each letter. Then stagger each letter’s animation by sliding the Motion tween down the Timeline so each letter animates into place one after the other. Your Timeline tweens should resemble a staircase.

7 The bee graphic is introduced using a simple linear gradient first; then the bee “pops” into position.
8 The bee is a Movie Clip containing a very simple, two-framed animation of the wings. The original wing is replaced with a radial to provide the illusion that it is blurred because it is moving faster than our eye can see.
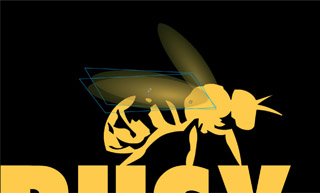
9 The blur animation is comprised of only two frames with the radial gradient slightly rotated between them. The looping of these two frames at 30 frames per second is enough to convince us that they are oscillating at a very high speed. Adding the appropriate sound effect makes it even more convincing.
Hot Tip

You may want to break apart your text into raw vector shapes if you plan on sharing this FLA with someone else on a different computer. If the font you use is not installed on the other machine, then Flash will substitute that font for the default font or a font of your choice. If this project is for a client and they request the FLA, you should make sure they have the same font you are using or break apart the text into shapes.
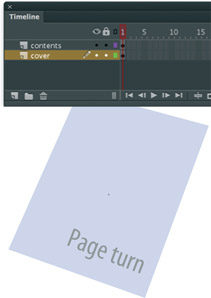
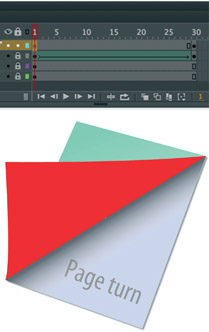
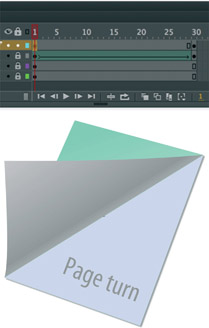
Page turn
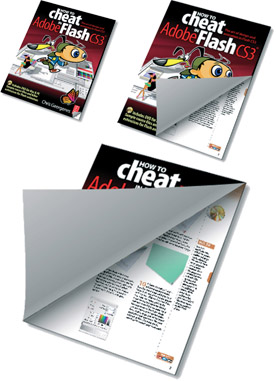
PAGES THAT CURL UP AND AWAY to reveal more pages are always an appealing effect (see what I did there?) for introducing content on your website or as buttons to other web pages. There are variations created entirely with ActionScript, but my AS skills are not anywhere near the level required to generate this effect dynamically. But that doesn’t mean you can’t add some interactivity by placing this animation in a Movie Clip and controlling its playback when the mouse rolls over it. For more robust and dynamically controlled page flip effects, check out:
http://www.pixelwit.com/blog/page-flip/
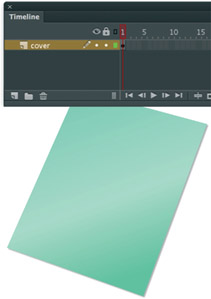
1 Start with a simple rectangle with a linear gradient fill or your own color fill preference. Convert it to a Movie Clip symbol and apply a drop shadow filter to add a little depth.
2 Duplicate the cover symbol, and place it on a new layer above the original. Edit the graphic inside by filling it with a different color. Add some text or an image of your choice.

3 Insert a new layer again above your existing layers. Convert it to a mask layer and draw a shape that spans the lower right corner. Insert a keyframe in frame 30 so that a duplicate of this shape is created.
4 Select the shape in frame 1. With the Free Transform tool ![]() , position the center point at the bottom corner. Hold down
, position the center point at the bottom corner. Hold down ![]() and scale the shape until it is very small.
and scale the shape until it is very small.
5 Holding down ![]() will constrain the shape based on its center point. Apply a Shape tween so the shape grows from small to large. This animation will reveal the content page.
will constrain the shape based on its center point. Apply a Shape tween so the shape grows from small to large. This animation will reveal the content page.
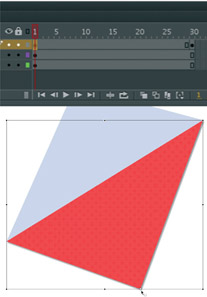
6 Insert a new layer and create a triangular shape that resembles a page curl similar to the example above. The easiest way to make this shape is to start with a rectangle. Turn on the Snap tool and drag one corner until it snaps to another corner. Now that you have made a triangle, move the remaining three corners into the positions as seen in the above example.
7 Mix a linear gradient using three colors. The first and last color swatches should be the brightest and similar in value. The middle swatch should be the same color but darker in value. Fill the curl shape and use the Gradient Transform tool ![]() to rotate and position the gradient so its bottom edge shows a slight amount of the lightest value.
to rotate and position the gradient so its bottom edge shows a slight amount of the lightest value.
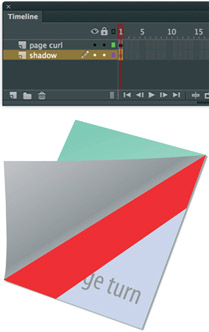
8 Convert the shape from step 7 to a Graphic symbol and double-click it and add a new layer inside this new symbol. Create another shape in this new layer using the rectangle tool for the shadow created by the page curl. This shadow will be cast onto the page below, so draw the shape to span only the area necessary inside the content page.
9 Fill this shape with a linear gradient consisting of two colors. Mix about 50% alpha into the first color and 0% alpha into the second color. Use the Gradient Transform tool ![]() to rotate the shadow so that it fades away from the curl. Convert both shapes to a Graphic symbol.
to rotate the shadow so that it fades away from the curl. Convert both shapes to a Graphic symbol.
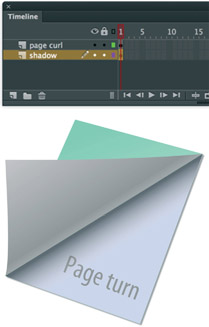
10 Animate the curl just as you animated the mask in steps 4 and 5. Insert a second keyframe in frame thirty and select the curl graphic in frame 1. With the Free Transform tool, move the center point to the lower corner, hold down ![]() and scale it until it is the same size as the mask shape in this frame. Apply a Motion tween.
and scale it until it is the same size as the mask shape in this frame. Apply a Motion tween.
Hot Tip

You can duplicate this effect to create additional page curls, allowing the user to turn more pages to reveal more content. Nest the page curl animation into a Movie Clip symbol and drag multiple instances of it to individual layers. With some basic ActionScript, you can control the page turns during runtime in the Flash player.
Smoke with gradients
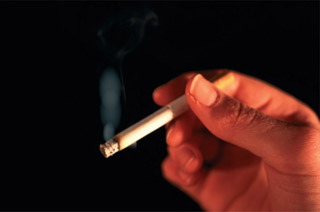
PHOTO: ADOBE STOCK PHOTOS
THERE ARE SEVERAL WAYS TO animate smoke and each technique is based on the style of the smoke itself. Do you need your smoke to be a cartoon style smoke cloud? Maybe you want a more realistic billowing of soft puffy clouds? How about a very stylized smoke effect with curling hard-edged shapes simulating the basic movement of smoke? There are many different ways to achieve the same results in Flash, whether it’s with ActionScript or animation. Flash has always been a blank canvas for us to express ourselves. Let’s take a look at a few ways to approach the dynamics of the smoke cloud.
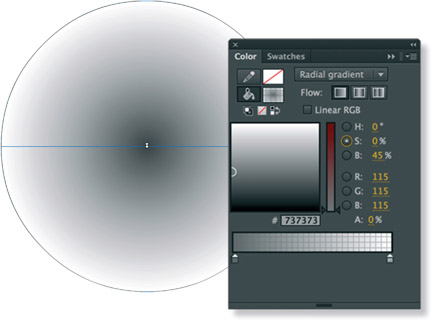
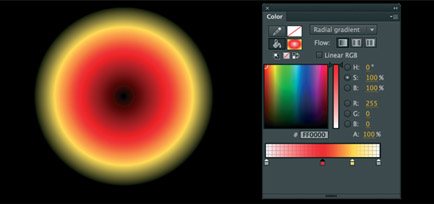
1 Create a radial gradient with a dark gray center and the outer color mixed with 0% alpha. Create a circle with the Oval tool ![]() with this gradient as your fill color (no stroke). Convert this shape to a Graphic symbol.
with this gradient as your fill color (no stroke). Convert this shape to a Graphic symbol.
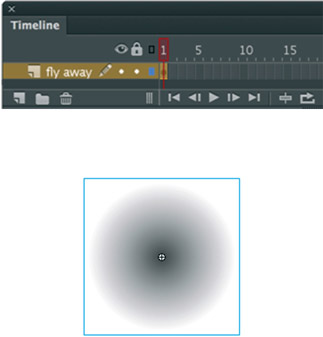
2 Select the Graphic symbol and convert it to a Movie Clip symbol. Double-click this Movie Clip to enter edit mode. This is where the animation will take place.
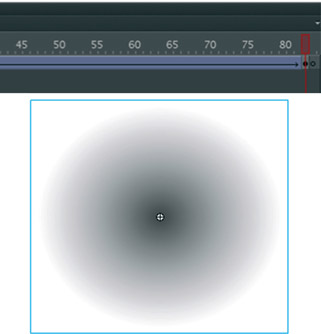
3 Insert a second keyframe several frames down the Timeline. Scale the Graphic symbol to about 200% and move it up about 75 pixels. Apply a Motion tween.
4 Select the entire Motion tween, copy all frames and keyframes, insert a new layer and paste all frames into it. Select the graphic in the first frame and move it a few pixels in any direction. Do the same for the Graphic symbol in the last keyframe. Select the entire Motion tween and drag it down the Timeline a few frames. Repeat this procedure until you have several layers of slightly different animations of your gradient starting small and rising while fading out completely.
5 On the main Timeline, copy and paste the Movie Clip containing your “smoke” animations to a new layer. Drag the keyframe to a frame later in the Timeline; frame 25 will work fine. Select the instance and flip it horizontally to help change its appearance from the original.
6 Since the animation is inside a Movie Clip, it is best to stop the Timeline once the second instance is introduced on the Timeline by adding a stop action. The Movie Clip instances will continue to play and loop. Since they start on different frames, they will overlap to produce a constant flow of smoke.
Hot Tip

The Blur filter, when used excessively, can cause potential performance issues during playback. Test your animation frequently to avoid causing a processor intensive animation. Remember, the Flash player is not like pre-rendered video format. Flash renders on the fly in the Flash player, so too high a frame rate combined with complex animations can demand too much from the player. Optimize your shapes whenever possible and use a realistic frame rate.
Smoke stylized

STYLE WILL ALMOST ALWAYS DICTATE THE animation technique. Often the client will request a specific artistic style based on a pre-existing logo or company identity. The challenge here is to be consistent, not only with the artwork but also with the animation style. A realistic smoke animation would look nice but not match the client’s style preference. It’s time to be inventive and to create a smoke animation that is stylized, yet simple and effective. Oh, and the client needs it yesterday.

1 The easiest way to start is with the final shape you will want as your stylized smoke shape. This shape can be drawn with any of Flash’s drawing tools. I recommend no outlines stroke.

2 Insert a keyframe (F6) in frame 2 and, with the Lasso tool, select a small section at the top end of the smoke shape and delete it.

3 Repeat the process of inserting a keyframe and selecting a small section of your shape and deleting it. Use your keyboard shortcuts to make this task faster and easier.

4 Toggle between F6 and the Delete key while selecting sections of your shape until it has been completely removed from your stage.
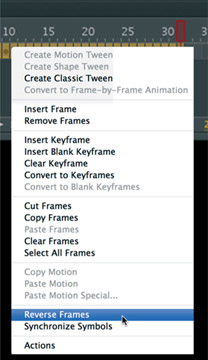
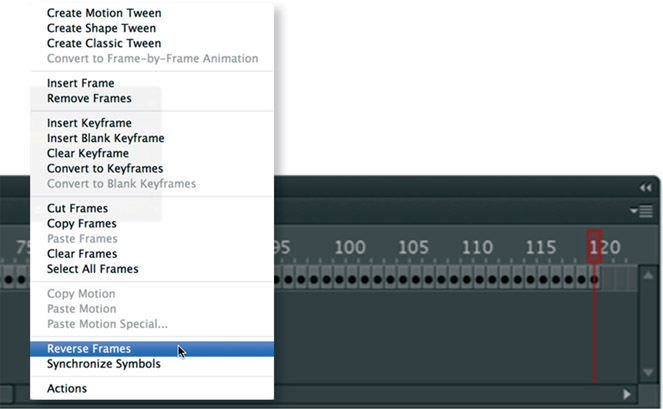
5 Select the entire range of keyframes and then right-click over them to bring up the context menu. Select Reverse Frames. This will reveal your shape when you play back your animation.
6 Copy and paste all frames into a Graphic symbol so it can be reused later. Create a second keyframe down the Timeline and, with the Free Transform tool, skew it and move it up about 30 pixels.
7 Create a third keyframe further down the Timeline and adjust the alpha to 0% so it fades out. Apply another Motion tween and maybe a little more skewing.
8 Add another layer and drag an instance of the same symbol (containing your animated shape) to the stage. Flip it horizontally and repeat steps 6 and 7.
9 Add a third layer and repeat steps 6 and 7 again. Play back your animation frequently and adjust the amount of skewing, tweening and the overall timing as necessary.
10 You may want to apply a bit of easing out to the symbols as they fade away. Although it may not be necessary, it might just add that final touch to your overall effect.
Hot Tip

As you work through this example, you may realize at some point that you are creating a pretty sophisticated frame-by-frame animation sequence that looks like it was made by the hand of a very experienced animator. That’s our little secret. You may choose to use the Eraser tool instead of the Lasso tool and avoid having to use the Delete key entirely. If you have a pressure-sensitive tablet and a stylus with an eraser on one end, you may have the fastest way to pull off this technique.
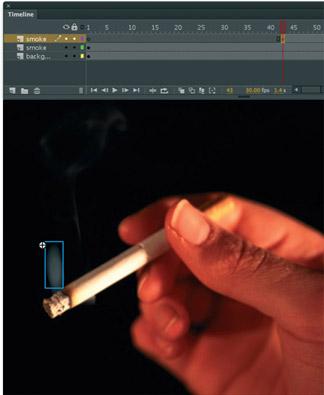
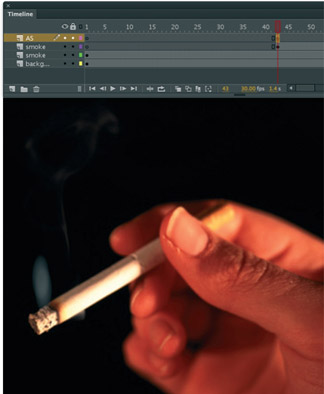
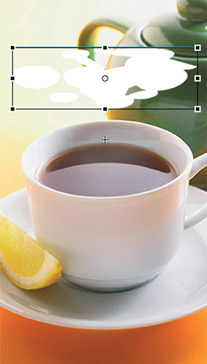
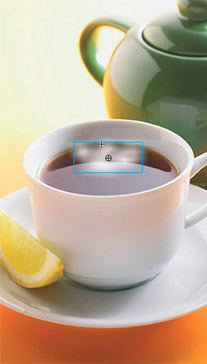
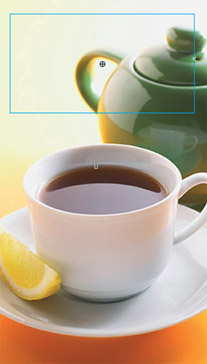
Full steam ahead
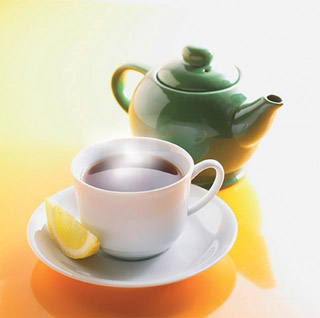
PHOTO: ISTOCKPHOTO.COM
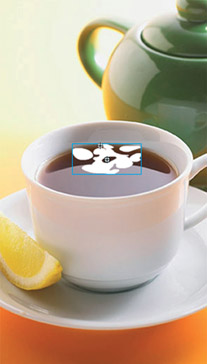
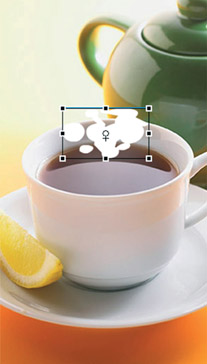
FILTERS ARE ANOTHER GREAT WAY to create realistic smoke or, in this example, steam. Since the image we are working with is an actual photograph, the animation needs to be just as convincing. Without the presence of steam, this cup of tea looks cold and somewhat unappealing. Not only can you use filters to blur objects in Flash, but you can also animate these filters.
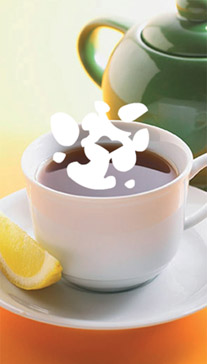
1 Start off by drawing some simple shapes with the Brush tool. They should be random and abstract.
2 Select this shape (or shapes) and convert it to a Movie Clip symbol. With this symbol still selected, convert it to a Movie Clip once again so you end up with two Movie Clips, one nested inside the other.
3 Double-click the Movie Clip symbol on the main Timeline to edit it. Insert a second keyframe a few frames down the Timeline and scale the original Movie Clip symbol as shown above.
4 Insert a third keyframe down the Timeline and scale the Movie Clip even wider and position it a little higher.
5 Go back to the first keyframe and apply a Blur filter using the Filters panel (Window > Properties > Filters).

6 Select the Movie Clip instance in the second keyframe and apply another Blur filter. Increase the amount of blurring so it is slightly more than the blurring in the first keyframe.
7 Select the Movie Clip instance in the third keyframe and apply another Blur filter. Increase the amount of blurring even more than you applied in the second keyframe.
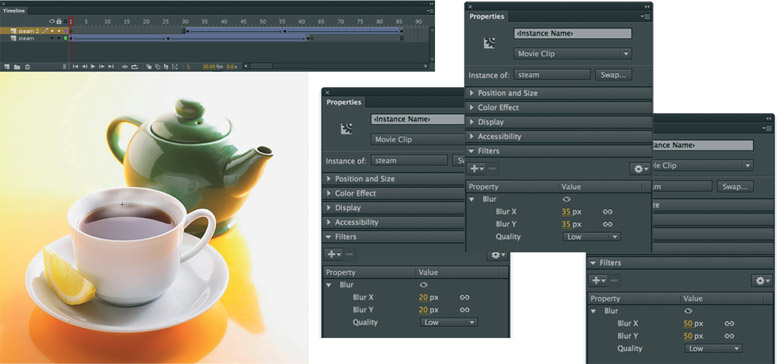
8 Apply Motion tweens to all keyframes. Play back your animation and make adjustments as necessary. You may want to adjust the amount of blurring, alpha or transforming to your animation. You can also create a second steam animation by creating a new layer and drawing more shapes; convert them to a Movie Clip symbol and repeat steps 1 through 7. Then select and drag the entire range of keyframes and frames down the Timeline so they start after the original animation. This will help eliminate the repitition of one single looping steam effect.
Hot Tip

Filters can only be applied to Movie Clip symbols and you must publish Flash Player version 8 or 9. Animated effects involving filters can be very processor intensive. Use them sparingly and test often to make sure playback performance remains acceptable.
Handwriting effect (frame-by-frame)

IN CHAPTER THREE I SHOWED YOU HOW to create the effect of text writing itself using a mask. While the mask technique yields a smaller file size, it doesn’t look as realistic. At the expense of a few extra bytes, you can create a more realistic version of this effect with a little manual labor and patience.

1 The first step is to start with some text. You can either hand write this yourself using the Brush ![]() tool or type some text using the Text
tool or type some text using the Text ![]() tool. This technique requires that the text be actual vector art. If you used the Text tool to type text into a text field, you will need to break it apart until it is actual vector art. To do this, select the text field and use
tool. This technique requires that the text be actual vector art. If you used the Text tool to type text into a text field, you will need to break it apart until it is actual vector art. To do this, select the text field and use ![]() .
.
2 As you can see here, make sure your text field is broken apart until it is converted to vector art. Older versions of Flash required the text field be broken apart once while more recent versions require the text field be broken apart twice.
3 The next step is to insert a keyframe in the timeline on frame 2. Select this frame and press the F6 key. This is the frame where we will start animating.

4 With the frame indicator still on frame 2, work backwards by erasing a small portion of the last letter in the word you created initially. I prefer to use the eraser end of my Wacom stylus but you might prefer to use the eraser tool itself. Once you finish erasing make sure you press the F6 key to insert a new keyframe.

5 Before moving on make sure you have inserted a new keyframe by pressing F6. I typically keep a finger at rest over the F6 key while I’m executing this technique. Make it a habit to erase, press the F6 key, erase more, press the F6 key and so on…
6 Moving from right to left keyframing and erasing the text you will eventually get to the end where your text has been completely erased from the stage. If you scrub the Timeline from right to left you will see the effect take place.
7 The only thing left to do is select the entire range of keyframes, right click over them and select Reverse Frames from the context menu.
Hot Tip

This technique can be very time consuming if you have a large block of text. It will also create a larger file size as each keyframe contains new artwork that will have to be loaded before it can be played if you are publishing to the web. Be aware of this and test your file often if bandwith issues are a concern. I also recommend working in a symbol or copy and paste this effect into a symbol so that it becomes a nested asset. Transforming an effect like this is best when it is contained inside a symbol.
Fireworks

EVERYBODY LOVES FIREWORKS. There’s nothing like a warm summer night under the stars watching the skies light up with the brilliance of pyrotechnics. You can make every day the Fourth of July by animating your own fireworks display, and they’ll be legal in every state. With some simple gradients, a little masking and some tweens, you’ll be hearing “Oohs!” and “Ahhhs!” in no time.
1 Start with a radial gradient with at least four colors. The middle and outer colors should be mixed with 0% alpha. The second and third colors are based on your own fireworks color scheme. Convert the gradient to a Graphic symbol.

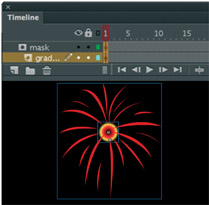
2 You need to create a mask that resembles the shape of exploding fireworks such as in this example. Convert it to a Graphic symbol.
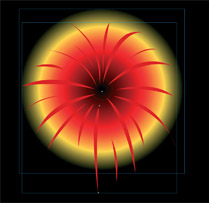
3 Place the radial gradient in the masked layer so when the layers are locked, the gradient shows through the mask only.
4 Scale both the mask and gradient in frame 1 so they are very small. Scale the gradient even smaller than the mask.
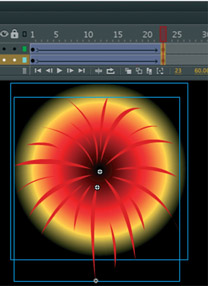
5 Insert keyframes for both layers somewhere down your Timeline and scale them both up about 300%. The gradient should be at least as big as the mask.
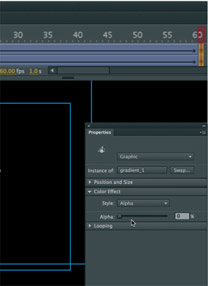
6 Insert two more keyframes much farther down the Timeline and scale both the mask and gradient about 125% more. Fade out the gradient to 0% alpha.
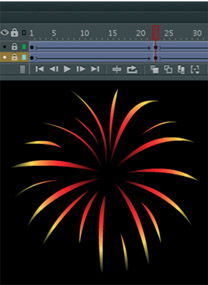
7 Lock both layers and play back or test your movie. You should have a pretty convincing fireworks explosion.
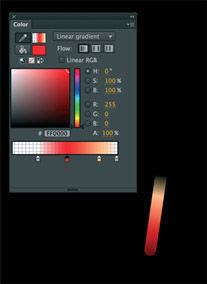
8 Draw a stroke and fill it with a linear gradient that contains two swatches mixed with 0% alpha at both ends.
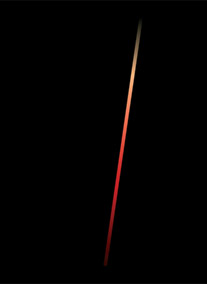
9 Shape tween the gradient so it starts at the bottom of the stroke and ascends until it reaches the top and beyond so it disappears.
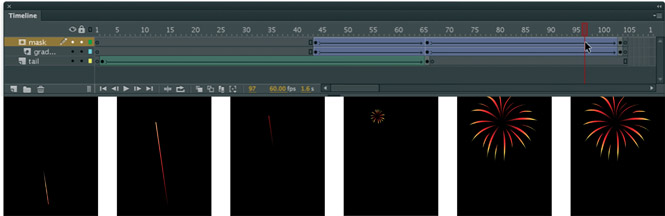
10 Since this stroke and its Shape tweened animation simulate the ascending explosive, you will need to slide the actual fireworks animation down the Timeline to make room for it. At this point, it comes down to artistic license and how you want the entire animation to play out. Here I have the ascent disapear just before the burst effect appears. The speed of the ascent can be adjusted by adding or removing frames during the Shape tween.

11 If you nest this animation in a symbol, you can duplicate it in the Library to create additional fireworks with different colors.
12 Edit the duplicate symbol(s) with a new radial gradient symbol. The darker the background, the more vivid the fireworks will be.

13 Drag multiple instances of your fireworks to the stage and start them on different frames to vary their timing.
Hot Tip

If you have a solid color background such as black, it is best to avoid Motion tweens with alpha because they can be very processor intensive -especially if multiple animations are overlapping. Instead of alpha, tint to the same background color instead. Tint is much more processor friendly and playback will always be better as a result.
Soft reveal
FLASH LACKS THE ABILITY to create masks with soft edges. When you use masks in Flash, you are limited to a hard edge, even if the mask contains a gradient with one color mixed with 0% alpha. Perhaps someday a future version of Flash will support masks with feathered edges. Until then, we need a workaround. So far the only solution I have been able to come up with is not even a mask at all. It’s a simple gradient with at least one color mixed with 0% alpha. In the end, the effect is successful because it is what the viewer doesn’t see that convinces them visually.
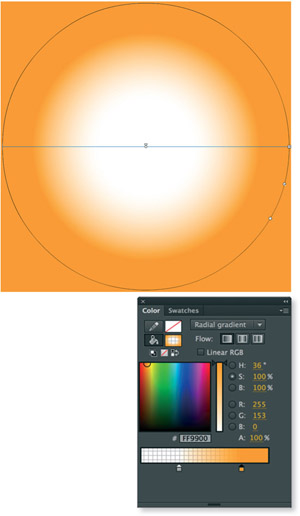
PHOTO: ANDREA ROSE GEORGENES
1 Start with a radial gradient (shown here with orange for clarity) with two colors. The outer color should match the solid color background which you will need for this effect to work. The middle color should be mixed with 0% alpha to make it completely transparent.
Use the Rectangle tool ![]() to make a very large shape with this radial gradient as your fill color.
to make a very large shape with this radial gradient as your fill color.
2 Convert this rectangle to a symbol and place it on a layer above the image you want to reveal. Scale the rectangle large enough so you can see the entire image through the middle color that you made transparent.
In frame 1, position the rectangle so that the image below it is completely obscured from view. This is if you want to start your animation by revealing the image over time.
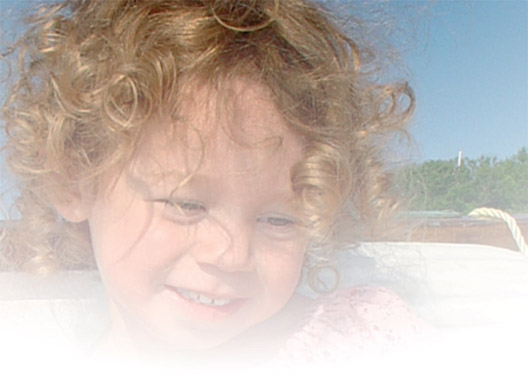
3 Create a second keyframe somewhere down the Timeline and position the gradient so that the image below it is clearly seen through its transparent center. Apply a Motion tween and play back your animation.
Hot Tip

This effect can be achieved not only with a radial gradient, but also a linear gradient. It depends on your needs of course, but a feathered edge can always be achieved if your animation contains a solid color background.
Star Wars text
TEXT EFFECTS ARE ALWAYS a popular request among Flash users - specifically the “Star Wars” effect made famous during the opening scene in the original 1977 film. The effect is relatively simple to create but comes with a price: playback performance can suffer. Proceed with caution and test your animation often. Remember, the text must be legible without giving the reader a headache.
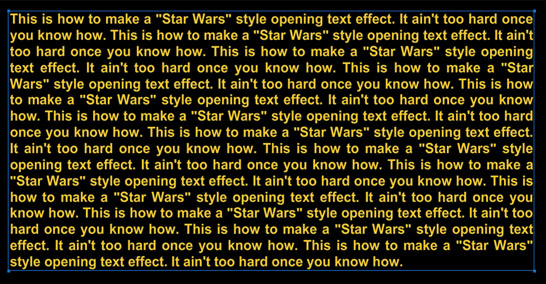
1 Start by typing your block of text. Try to use a simple and bold font that is easy to read. You will be transforming this text and animating it. Since it will be constantly moving, priority should be making sure it is legible and easy to read for the viewer. Select your text field and break it apart until the text becomes raw vector shapes. The amount of vector information will be substantial and will most likely cause some performance issues during playback. This is another reason to choose a font that is as simple and clean as possible as it will produce fewer vector points.
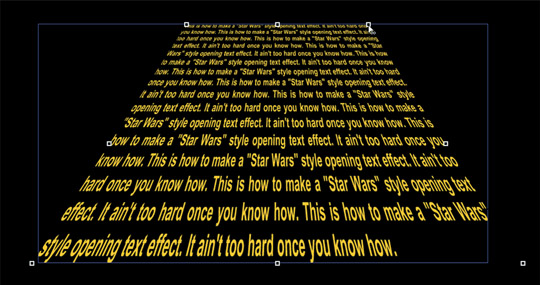
2 The next step is to simulate the perspective needed to provide the illusion that the text is receding. Select the Free Transform tool ![]() and then the Distort (subselection) tool. While holding down the
and then the Distort (subselection) tool. While holding down the ![]() key, drag one of the upper corners horizontally towards the middle of the text. Holding down the
key, drag one of the upper corners horizontally towards the middle of the text. Holding down the ![]() key constrains the proportions of the transformation by distorting the adjacent corner in the opposite direction. Convert this block of text to a Graphic symbol. If you have several blocks of text, it might be best to keep them as smaller individual symbols.
key constrains the proportions of the transformation by distorting the adjacent corner in the opposite direction. Convert this block of text to a Graphic symbol. If you have several blocks of text, it might be best to keep them as smaller individual symbols.
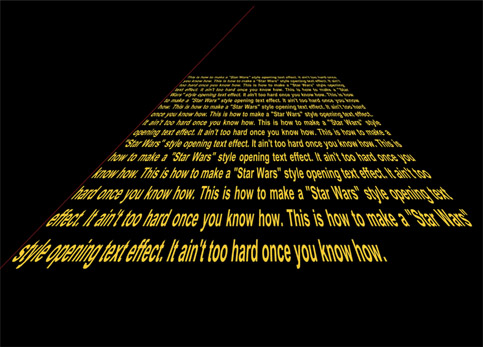
3 Insert a new layer and convert it to a guide layer. Make sure the layer containing your text is not “guided” or linked to it. You can drag the guide layer below your text layer to prevent them from being linked together. Anything on a guide layer will not be included in the exported SWF. Flash CS5 offers a nice feature that provides the option to export or not export hidden layers. This option is accessible by going to File > Publish Settings > Flash tab. On this layer use the Line tool to draw a stroke at the same angle as your text field. Copy and paste it in place, flip it horizontally and position it on the opposite side of your block of text.
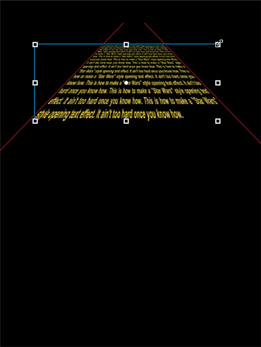
4 Add a second keyframe and scale your text until it fits inside your guides at their smallest point. You will need to insert several frames between these two keyframes and apply a Motion tween.
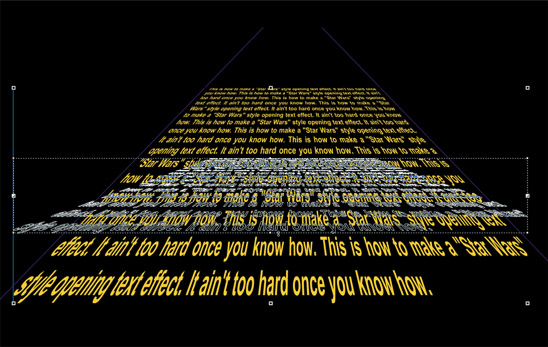
5 the symbol to make it flatter (do not widen it). For smooth playback, you will need a combination of hundreds of frames and a high frame rate. The exact amount depends on the amount of text, the font style and how large (width and height) your movie is. The larger the movie, the more processor intensive it will be. Any animated effect that uses a combination of these factors can cause poor playback performance. Test often and know your target audience.
Hot Tip

You could try this effect with a block of text made in Photoshop that is distorted in the same perspective. Import the text as a bitmap with the same solid color background as your Flash movie. It may result in a more processor-friendly animation sequence but will suffer from loss of quality when scaled. Flash doesn’t scale imported bitmaps very well and the results may not be visually appealing. The trade-off is using crisp vector text with some possible performance issues during playback. Testing often is your best defense.
Color adjustments

MODEL: REBECCA GEORGENES
BEFORE FLASH 8 introduced filter effects, advanced bitmap effects meant having to spend time outside of Flash editing several duplicates of the original image. Depending on the desired effect(s), several different versions of the same image would have to be created and imported into Flash. With Flash CS3 - CS5 and now CC, this process is much easier. Using only one single bitmap image and the Adjust Color filter, you can create some striking color effects with minimal time and effort. The advantages of using this filter technique include smaller file sizes and faster results that can be mixed with any of the other filters.
1 The imported image here has been blurred and adjusted using the Blur and Adjust Color filters.
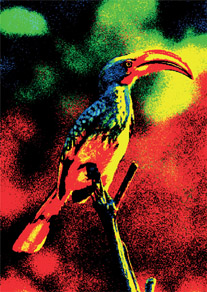
2 Here the Saturation and Hue have been increased as well as the Contrast.
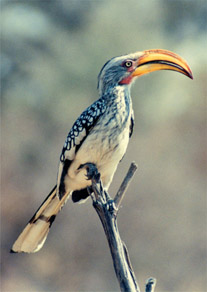
3 Here’s the original image without any filtered effects.

1 To convert a full color image to grayscale, slide the Saturation slider all the way to the left.

2 Click the Reset button in the Filters panel to return each color setting to “0”.
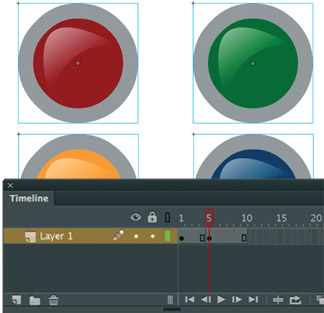
3 To adjust the overall color hue of your image, use the Hue slider. Here the Contrast and Saturation have been slightly adjusted as well.
4 Each of these color adjustments can be keyframed and Motion tweened to create smooth color transitions.
5 Any of these color effects can be visually effective when introducing images for a variety of uses.
6 You can also add some basic ActionScript to control color changes when the user rolls over various menu buttons.


Hot Tip

You can copy a filter effect by clicking on the “Copy Filter” button in the Filter panel. Then you can paste it to another Movie Clip instance elsewhere in your Flash document.
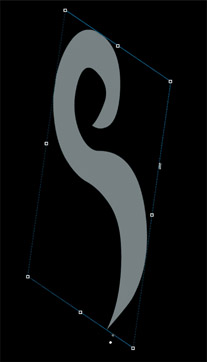
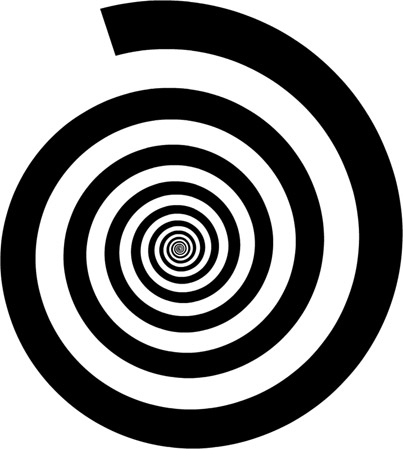
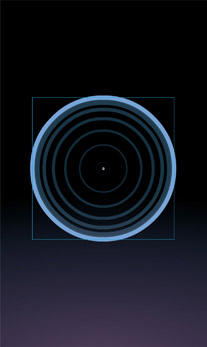
Vertigo
CAUTION: THIS EFFECT may cause temporary headaches and possibly some minor nausea if stared at too long.
Well, perhaps it won’t cause sickness, but it’s a great effect for representing vertigo: a balance disorder that causes a spinning sensation. If you’re familiar with Alfred Hitchcock’s film Vertigo you will already be familiar with how this visual effect can be used to show something or someone spinning out of control. With animation, it can also represent time travel, a wormhole or even the beginning of a dream sequence or hallucination.
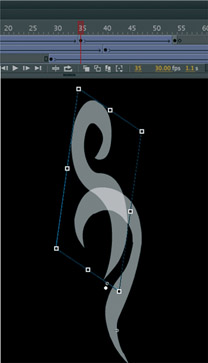
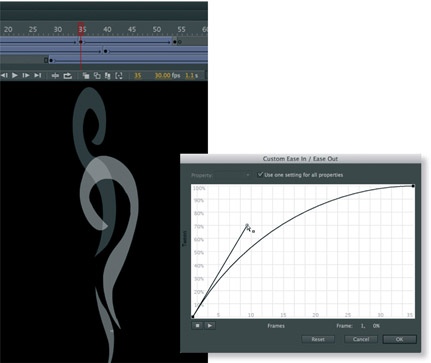
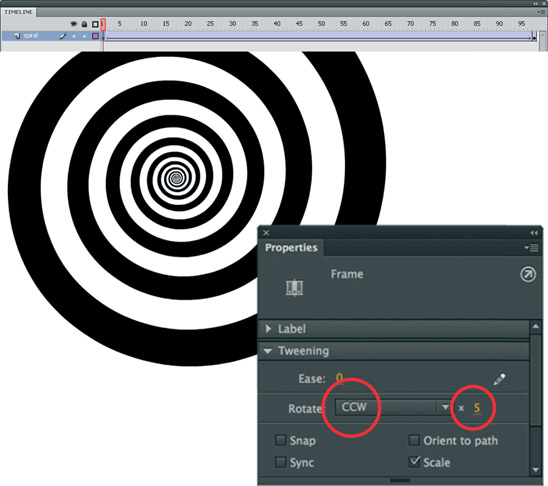
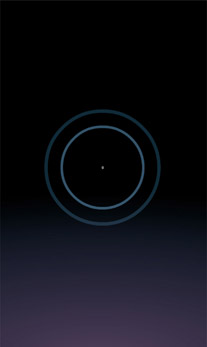
1 The success of this effect is in the one single graphic: the spiral. It was created in Adobe Illustrator using, you guessed it, the Spiral tool. Flash does not have a tool like this so Illustrator proved to be a huge time saver. Of course you can always draw this spiral graphic by hand using the support of a pressure-sensitive stylus, but that would certainly require a very skilled hand.
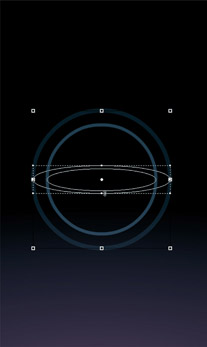
2 Convert your spiral graphic to a symbol. Insert a second keyframe about 100 frames from the first keyframe. Apply a Motion tween. Of course nothing will happen on playback because no change has been made to either instance of the spiral. Select a frame anywhere along the Motion tween and in the Rotate drop-down menu, select CW (clockwise) or CCW (counterclockwise). Type in the number of rotations desired.
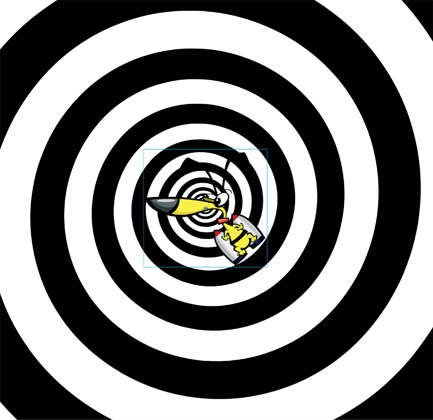
3 This is a great effect to place a character or an object on top of. Place the object in a Movie Clip symbol and rotate it in the opposite direction as your swirl. This will enhance the effect by providing the illusion of the object traveling through time or space and may even induce some minor headaches and nausea.
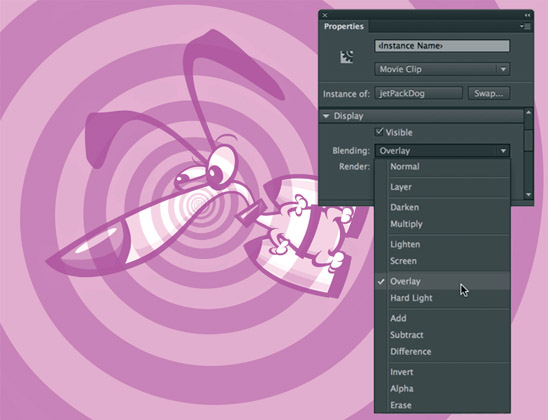
4 It’s time to have some fun! Change the colors of your spiral and then select the character or object (make sure it is in a Movie Clip) and experiment with some of the Blend Modes available from the Properties panel. There are some interesting effects to play around with here that may provide some cool results.
Hot Tip

You can get a lot of mileage from this spiral effect by adding objects that do more than just spin in the center of the spiral. You could add a rocket that is motion tweened from outside the stage into the center of the spiral. You’d want to scale it very small as it reaches the center point of the spiral.
Let it rain
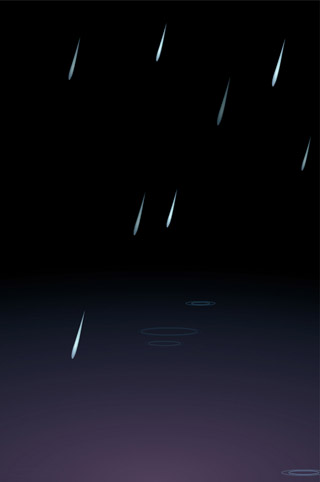
THERE ARE SEVERAL WAYS TO APPROACH animating rain, probably because rain falls in several ways depending on wind conditions. I chose an average style of falling rain that can easily be expanded upon based on your own needs.
Rain, to our advantage as animators, is repetitive. Reusing assets is one of the strengths of Flash. You only need to animate one raindrop and then populate your scene with multiple instances of it. You can then control how your rain acts by adjusting the angle at which it falls, its speed and how many instances of it appear at any given time.
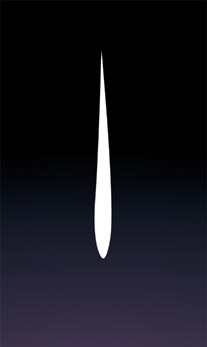
1 Use the Brush tool to draw your rain drop. Gravity suggests that the shape of the drop is thicker and rounder at its bottom. Fill your raindrop with a solid color or a radial gradient for some extra realism. This is a style choice for you to decide.
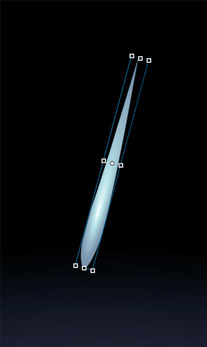
2 Convert your drop to a Graphic symbol and rotate it slightly. The amount of rotation is up to you based on how strong a rain storm you want to have. The more angle your rain has, the more wind is suggested.

3 Insert a keyframe further down the Timeline. In frame 1, position the drop outside of the stage. In your second keyframe, position it near the bottom of your stage area. Apply a Motion tween.
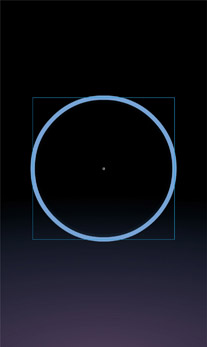
4 Let’s create a ripple effect for the raindrop after it reaches its destination. Using the Oval tool ![]() , draw a circle with a stroke color only. Hold down
, draw a circle with a stroke color only. Hold down ![]() to constrain its proportions. Convert it to a Graphic symbol.
to constrain its proportions. Convert it to a Graphic symbol.
5 Convert it to a Graphic symbol again and double-click it to edit it. Insert a second keyframe and Motion tween it from small to large over approximately ten frames. Select the instance in the last frame and apply 0% alpha so it fades out completely.
6 Copy all frames of your circle animation. Insert a new layer and paste the frames into it. Select all the frames in this new layer and drag them about five frames further down the Timeline.
7 Navigate back to the main Timeline and transform your water drop symbol (containing its animation) by dragging the middle handle along the top or bottom edge (Free Transform tool).

8 Place the symbol containing your ripple animation in a blank keyframe (F7) in the frame after your rain-drop animation. Position the ripple just below the raindrop in its last frame. Copy all frames in this layer.
9 Paste these frames into a new symbol. Add several layers and continue to paste your animation into each one. Select and drag each layer’s animation so that they each start on their own unique frame number.
10 Now that you have a rain sequence nested in a symbol, drag as many instances of this symbol as you need to the stage. Scale them and even tint some darker to suggest more depth to your scene.
Hot Tip

Nature isn’t perfect. You simply can’t find lines in nature that are exactly horizontal or vertical. Rain is the same way in the sense that it rarely falls perfectly straight down. Even a slight breeze will cause raindrops to fall at an angle. You can suggest stronger wind conditions by increasing the angle and speed of your rain drops. Decreasing the angle and speed of your rain animation will suggest a light shower.
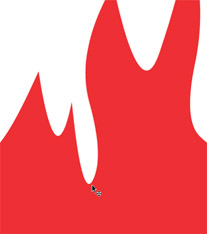
Playing with fire
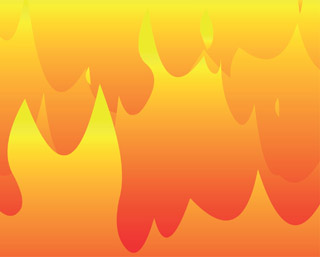
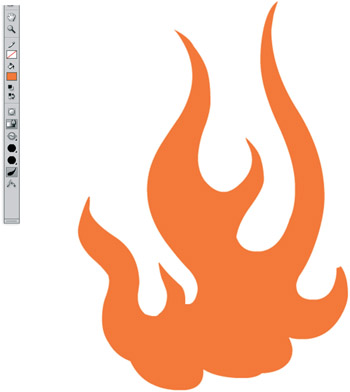
NO FLASH ANIMATION BOOK IS COMPLETE without a topic involving fire. How many times have you ever wanted to animate fire and had no idea how to even approach it? The first technique that comes to mind for animating flames is Shape tweening. It just seems like the appropriate choice because of the nature of fire and how flames dance and flicker. But in my experience, shape tweening doesn’t seem to ever produce realistic results. Often, the shapes “implode” or simply morph in all the wrong ways. The effect of fire is simply not achievable using tweens.
Motion tweens are not an option for the obvious reason that they can only be applied to instances of symbols.
ActionScript might be a solution, but, if you are like me, your scripting skills are not up to the challenge of producing fire from within the Actions panel.
Don’t be frightened by what I am about to say, but frame by frame is the best option for animating fire. Don’t be fooled; it’s not that hard or time-consuming.

1 Start by making several overlapping rectangles (with no stroke outline). Don’t concern yourself with color at this stage of the process; any color will do.
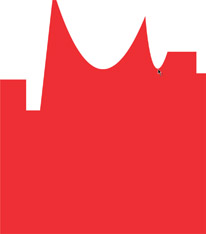
2 Use the Selection tool ![]() to pull edges to create peaks.
to pull edges to create peaks.
3 Fire is naturally unpredictable. Avoid repetition with your shapes.
4 Try to incorporate some shapes with “S”-shaped curves for some added realism.
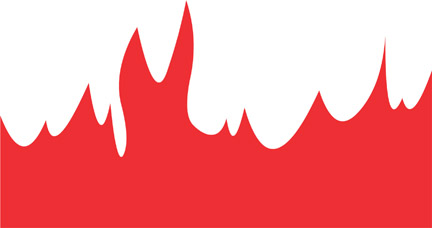
5 Ultimately your flames in frame 1 should look something like this. Try to alternate the direction of each flame. Fire is random and travels in unpredictable ways.
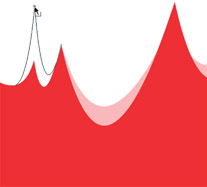
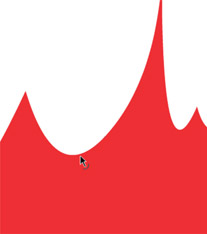
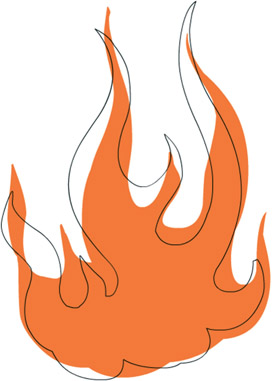
6 Insert a keyframe (F6) on frame 2, turn on Onionskin and begin editing the next frame by pulling each point higher and lower.
7 “Punch” holes in the flames by drawing different colored shapes and deleting them. Fire is not solid; it will break up as it rises into the air.
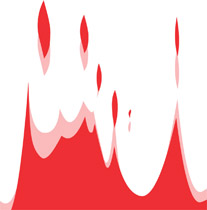
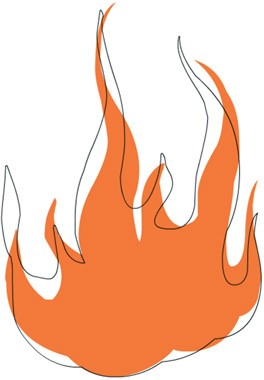
8 Continue to create keyframes and edit the shape of your flames in each one by pulling and pushing with the Selection tool.
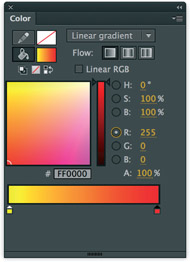
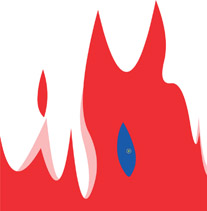
9 Create a Linear gradient using bright red and bright yellow as the two colors.
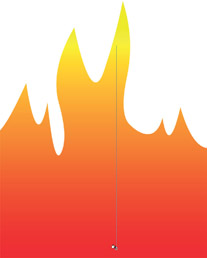
10 In each keyframe, select all and drag the Bucket tool vertically inside your flames to fill them. The gradient will follow the direction you drag in.
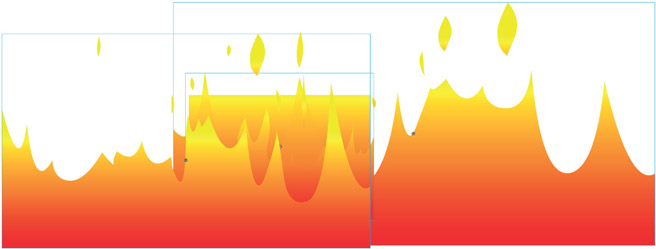
11 Copy all frames of your animation and paste them into a new Graphic symbol. Add three new layers to the main Timeline and drag instances of this symbol to each of them. Delete your original layer. Select one of the instances and flip it horizontally. Scale two of the instances so they are much wider than the stage. Position them off-center from the stage while leaving one of the instances at its original size and position. Create a background shape with the same linear gradient to make it look like the entire scene is ablaze.
Hot Tip

Art imitates life, and there’s no substitute for studying the flames of a real fire. Just as Disney’s animators went to Africa to study real animals in preparation for production of The Lion King, you should also study from life as much as possible. Although your budget may not allow for world travel, something like fire is a bit more accessible.
Torch

CREATING ANIMATIONS FOR GAMES OFTEN requires creating short looping animations that do not generate large file sizes. These short looping animations work well when they can be reused over and over again throughout the game. This flame example was created for a game where the character carried a torch. The tricky thing about fire as we know from the previous example is that it is unpredictable. Animating elemental effects usually requires a hand-drawn technique because automated tools such as tweening are too consistent in their interpolation to be used for the creation of anything random, such as fire. But don’t be intimidated by the thought of hand-drawing each frame because you can use the random nature of fire to your advantage.
1 The first frame is drawn using the brush tool ![]() and a graphics tablet with pressure sensitivity. The idea here is to draw a single shape that has long whispy flame-like shapes coming off of it vertically. I try to make each flame different from the next with the tallest flames towards the center and the shorter flames to the sides.
and a graphics tablet with pressure sensitivity. The idea here is to draw a single shape that has long whispy flame-like shapes coming off of it vertically. I try to make each flame different from the next with the tallest flames towards the center and the shorter flames to the sides.
2 Here I have the original fire drawing on a layer that has been converted to outlines. In a new layer below it is where I draw the next fire drawing. Having the original drawing outline on the layer above helps me use it as a guide. Onionskin would normally be used in this situation but often times the current drawing will hide the edges of the drawing in the previous frame. With an image such as fire it is much easier to draw when you can see the entire outline of the previous drawing.
3 Fire is unpredictable. Keeping this in mind I try to draw the individual flames so that they are animating in different directions. If the flames move in a predictable way then it will not look unrealistic.
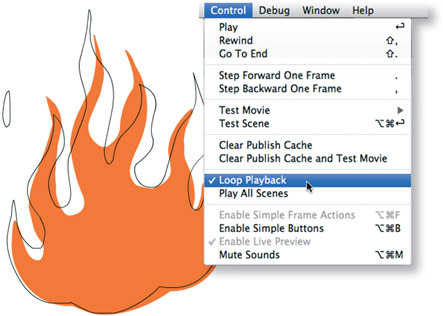
4 Once you have a few frames drawn it is always a good idea to playback the animation in a loop to see how it is shaping up. You can loop the timeline within Flash by choosing Control > Loop Playback.
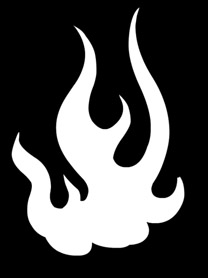
5 This flame animation required 7 individual drawings to complete the loop. The flame color was changed to white because the game background was black.
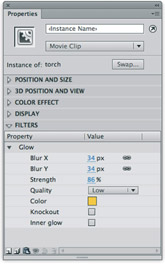
6 All frames were copied into a Movie Clip Symbol so I could apply a Glow filter. Using yellow as my glow color, adjust the amount of Blur and Strength to create a soft glow effect.
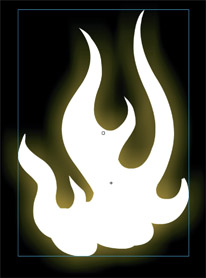
7 Test the movie to see the torch flame come to life complete with the glow filter for added effect.
Hot Tip

Animating natural elements often requires practice, patience and ultimately skill. If you are going for a realistic effect, then be prepared to take the time to study actual flames and how they move in the natural world. Most often elements such as fire, smoke and clouds react to environmental conditions as opposed to influencing them.
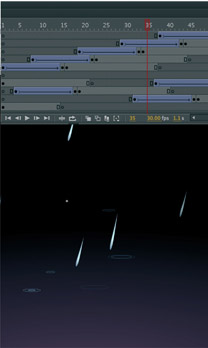
Lightning
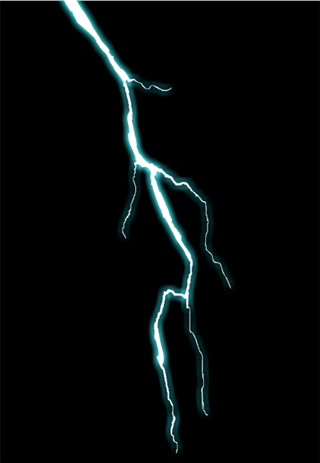
LIGHTNING IS ONE OF THE EASIEST AND most fun elemental effects to animate. Lightning can be used in scenes for atmospheric effect, and it can be very effective to say the least. As an animator, I’m always trying to push my skills as far as they can go, and recently I’ve been trying to learn how to animate special effects. I’ve been taking a 2D animation effects course with Adam Phillips, and I highly recommend it. One of the first lessons is learning how to animate lightning and even though I already knew how, Adam’s lesson provided me with new tips and tricks. This example is a combination of my own technique as well as what I learned from Adam. Learn more about Adam’s course here: bitey.com/2010/08/bca-fx
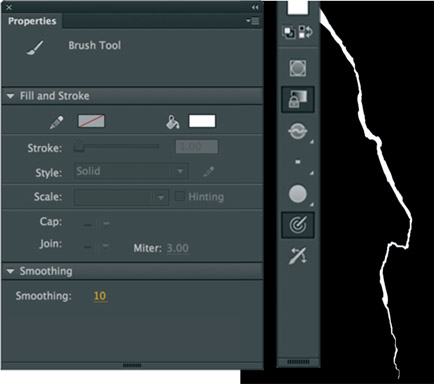
1 The main lightning bolt is drawn using the brush tool ![]() and a graphics tablet with pressure sensitivity. Lowering the amount of smoothing helps achieve a realistic looking bolt due to the imperfections caused by the human hand. Nature is not perfect, and therefore your lightning bolt should have imperfections also. Try to vary the weight of the bolt as well as the direction it goes by drawing with a loose carefree hand.
and a graphics tablet with pressure sensitivity. Lowering the amount of smoothing helps achieve a realistic looking bolt due to the imperfections caused by the human hand. Nature is not perfect, and therefore your lightning bolt should have imperfections also. Try to vary the weight of the bolt as well as the direction it goes by drawing with a loose carefree hand.
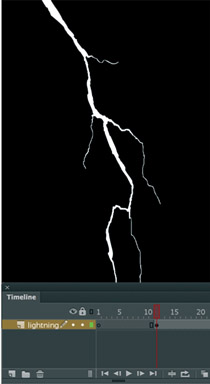
2 You can add thinner branches breaking off from the main lightning bolt itself. These branches are usually very thin so reduce the size of the Brush before drawing them.
3 The frame following the lightning should be completely white. This white frame creates a high contrast effect that leaves a residual image in the viewer’s eye. It is a very powerful and easy effect to create.
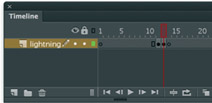
4 The next frame is left blank, exposing just the black background. The frame after that contains a new lightning bolt drawing.
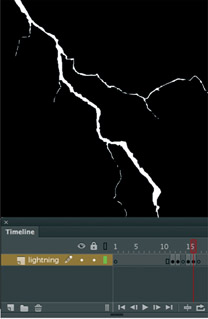
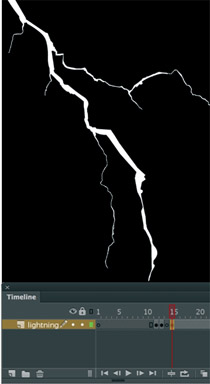
5 Insert a keyframe and select the eraser ![]() tool. Carefully remove areas of the lightning bolt from the outside edges to create the illusion that it is breaking apart.
tool. Carefully remove areas of the lightning bolt from the outside edges to create the illusion that it is breaking apart.
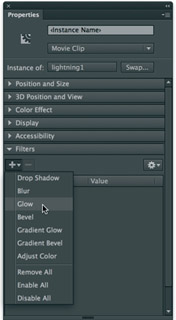
6 As an added effect, convert the first bolt of lightning to a Movie Clip symbol and then apply a Glow filter to it from the Properties panel.
7 The color of the glow is entirely up to you. It can be almost any color depending on the subject matter. Green or blue can suggest a fantasy theme while red may look more real-world.

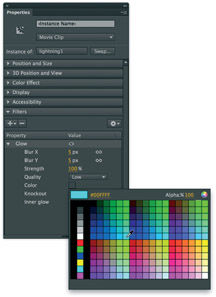
8 With the color selected, adjust the amount of blur and strength using the hot text sliders. It is easy to abuse the blur effect so remember that being subtle usually works better here.
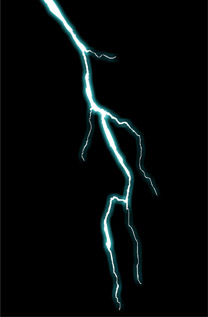
9 Test the movie to see the lightning bolt in action.
Hot Tip

Lightning is a very quick and simple animation technique that can easily be over-animated. Don’t try and animate the lightning bolt into the frame by building it up over a sequence of keyframes. The entire bolt should “enter” the scene in a single frame, fully drawn. If you’ve ever had the opportunity to stand and watch a lightning storm on the horizon, then you’ve noticed that lightning bolts strike within the blink of an eye. Keeping it simple will yield the best results.
Winter wonderland
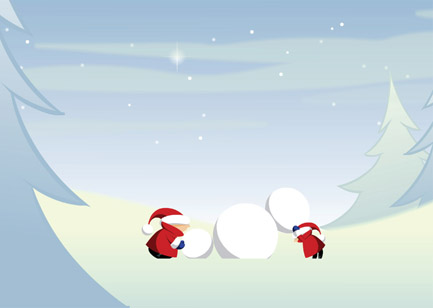
MUDBUBBLE HOLIDAY E-CARD 2002
LET IT SNOW, LET IT SNOW, LET IT SNOW. CREATING constantly falling snow is fun. Like the rain example, snow can be animated several different ways. The easiest way is to Motion tween a snowflake symbol along a Motion Guide path. Other methods include using ActionScript-generated snow but don’t ask me to show how that is done because I admittedly do not know how to write scripts on that level. Let’s stick with my “analog” method of animating in Flash, shall we?
The more snow you create, the more processor intensive your animation becomes. Proceed with caution and test your animation frequently to make sure the constant looping snowfall doesn’t cause unexpected playback issues. There’s nothing worse than creating a cool animation only to find it skips and chugs during playback.
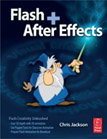
I highly recommend Chris Jackson’s book Flash + After Effects (Focal Press) because he teaches you how to create snow in Adobe After Effects that is easily imported into Flash. His book contains a ton of other cool examples that you’ll find very useful on a day-to-day basis.

1 Start with a snowflake design using the Line tool. It’s hard to make a mistake here since there’s no real way to create an incorrect snowflake pattern. Make one “arm” of the snowflake, convert it to a symbol or as an Object Drawing. Copy it using ![]() and paste it in place using
and paste it in place using ![]() , then rotate it 45 degrees. Repeat until you have pasted enough to complete the pattern.
, then rotate it 45 degrees. Repeat until you have pasted enough to complete the pattern.
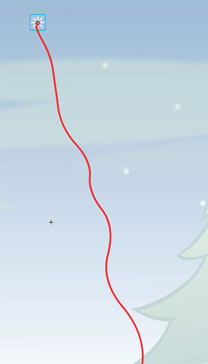
2 Convert your snowflake to a Graphic symbol and then convert the Graphic symbol to a Movie Clip symbol. Double-click the Movie Clip and edit it by inserting a Motion Guide layer. Draw a curvy stroke for the guide and Motion tween your snowflake along the path (traveling downward of course).

3 You now have a Movie Clip containing an animation of a snowflake tweened along a motion guide. Next, in your Library panel, create a new Movie Clip and insert several new layers. Drag an instance of your snowflake Movie Clip into each layer. Position each snowflake Movie Clip randomly throughout your scene. For each layer, select and drag the keyframe in frame 1 to a different frame number so they each start playing at different times. Make sure each snowflake animation begins outside of the viewable area of the stage.
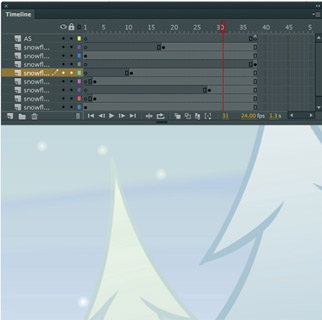
4 Here’s what your Movie Clip’s Timeline should look like (give or take some frames or layers). Notice the stop(); action in the last frame of the top layer. This prevents this Movie Clip from looping. Since all instances of the snowflake Movie Clip are present, they will loop by default.
5 On the main Timeline, place an instance of your Movie Clip containing your snowflake Movie Clips onto the stage in its own layer. You can place multiple instances of this Movie Clip around your stage as many times as you like. But be aware that the more instances of the snowflake animations you have present on the stage, the more processor intensive your movie will be. If maintaining a high frame rate is your priority, you may want to experiment by using a simple oval shape for your snowflake graphic. Remember, fewer vector points means better playback.
Hot Tip

The length of the Motion tween in your guided snowflake can help make the difference between a soft snowfall or a blizzard. Experiment with the number of frames in your tween to get the best results for your particular animation. To animate a blizzard you would need to shorten the length of the Motion tween and populate the scene with an abundance of snowflake instances. You could even try making the Motion Guide path one big “S” turn to suggest a strong wind that is changing direction.
3D perspective

ADAM PHILLIPS - WWW.BITEYCASTLE.COM
ADAM PHILLIPS IS BEST KNOWN FOR HIS AWARD-WINNING Brackenwood series:
http://www.biteycastle.com/content/animation_brk.html.
The rest of his animation is equally as brilliant and I highly recommend treating yourself to his entire website:
Adam has generously provided a couple of killer Flash examples that showcase Flash CC’s 3D capabilities. Flash CC allows you to create 3D effects by moving and rotating movie clips in 3D space on the stage. Flash represents 3D space by including a z axisin the properties of each Movie Clip instance. You can add 3D perspective effects to Movie Clip instances by moving or rotating them along their z axis using the 3D Translation and 3D Rotation tools. Moving an object in 3D space is called a translation and rotating an object in 3D space is called a transformation. You can take advantage of this powerful new 3D feature for scenes like this one where the perspective of a landscape fly-over animation needs to look realistic.

1 Start with a simple background graphic that shows a clear horizon line. Here the sky and ocean are convincingly represented using 2 simple radial gradients. This simple illusion is created due to the alignment of the gradients vertically, thereby making our eye translate the bottom gradient as a reflection.

2 Next some background elements are added to provide depth to the scene. A mountain range divides the sky and ocean while some shoreline elements are positioned in the distance. The plan for this scene is to provide the illusion that we are flying towards the horizon along the shoreline. To set this up from the start, begin with your shoreline objects at their starting point, scaled down at their furthest point away from the “camera”. Convert them to Movie Clip symbols.
3 Distribute each of these Movie Clip objects to layers, then right click over each of them and select Create Motion Tween. Do not use Classic tweens since they are not supported by the 3D Translation and Transformation tools. I recommend going to View > Pasteboard and making sure you can see beyond the stage area of your document. This will help you when positioning your objects beyond the viewable stage area.
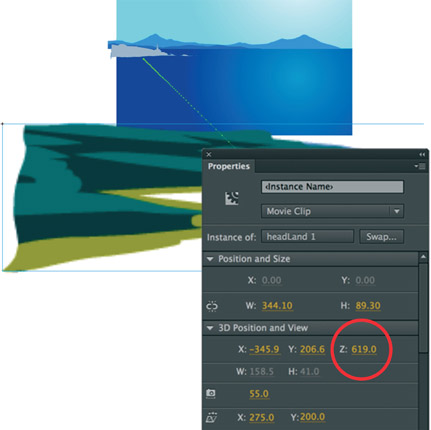
4 Verify the playhead is in the last frame of your tween span in the Timeline. Open the Properties panel and select the first Movie Clip symbol. Use the Z axis hot text slider in combination with the X and Y axis sliders to position your object off the bottom edge of the stage.
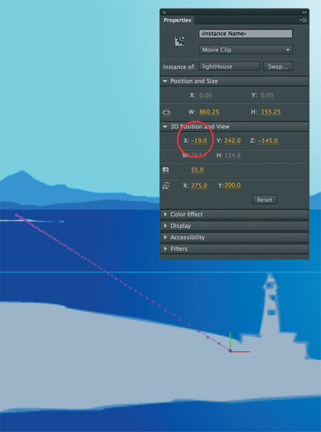
5 Repeat this procedure for all the remaining objects on the stage. You will also want to increase or decrease each tween span to adjust the timing of each object to prevent them from all moving simultaneously.
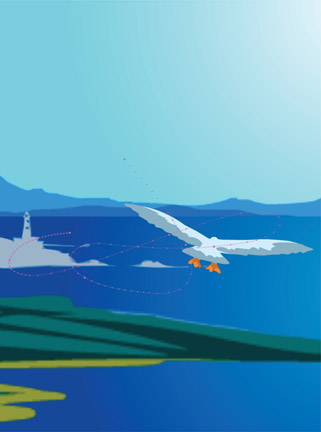
6 Adding the Gull animation to the foreground adds 2 important elements to the scene: it enforces the illusion of depth as well as something interesting to look at. Even though there’s no “camera”, upon playback, the human eye will perceive us as literally flying through the scene.
Hot Tip

It’s worth noting that these 3D tools will not work with objects on mask layers. You can not convert a layer containing 3D objects to a mask layer either.
Sausage grinder
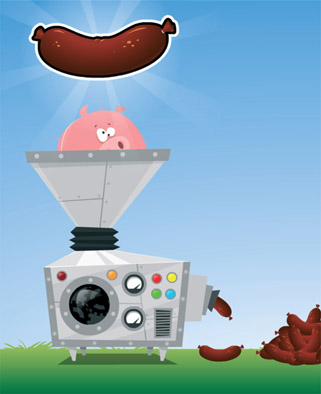
SAUSAGE GRINDER FROM THE GAME SAUSAGE KON - THIBAULT IMBERT & CHRIS GEORGENES
APOLOGIES IN ADVANCE TO ALL vegetarians. Sausage Kong is a Flash game developed by Thibault Imbert (Product Manager, Adobe Flash Player) and myself to help showcase the more advanced features of the latest Flash Player. This is the type of game that gets created when two guys go completely rogue and put their creative minds together sans a babysitter (and when I say “creative” I really mean “twisted”). The reason I chose the grinder animation for this example is because it takes advantage of several design and animation tools in Adobe Flash CC. From the Pencil tool to Motion and Classic tweens, you don’t have to limit yourself to a single tool. It is often the combination of several techniques that make for a better product.
Thibault Imbert: www.bytearray.org
1 The gear was drawn using the Pencil tool ![]() . The light blue circles were used as my guide and drawn using the Oval
. The light blue circles were used as my guide and drawn using the Oval ![]() tool with an outline color only on a different layer below the actual gear layer.
tool with an outline color only on a different layer below the actual gear layer.
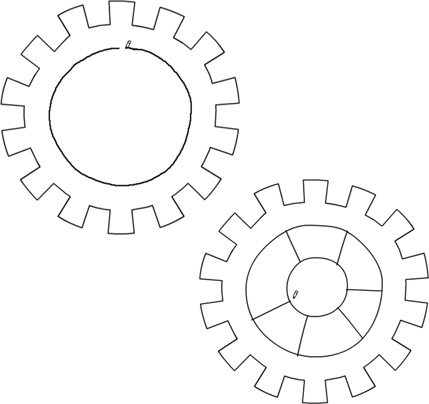
2 Using the pencil tool and the same stroke size, draw 2 inner circles and then attach them by drawing some support sections.

3 Select any overlapping stroke segments and delete them. You can then fill the gear with your color(s) of choice.
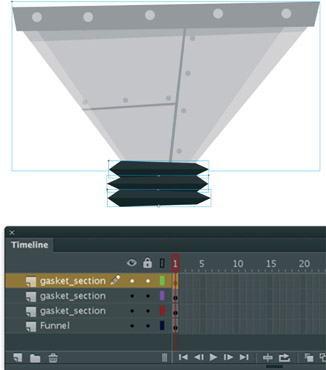
4 The important aspect to this animation is identifying the parts that need to move. Once identified, draw each part separately and convert them to symbols. Here is an exploded view of all the individual parts of the grinder.
5 Convert the gear to a symbol and then copy and paste it to create a 2nd gear. Distribute each gear to its own layer. Right click over each one and select Create Motion Tween.
6 Select each motion span for each gear and in the Properties panel set each gear to rotate using the Rotation tools. Type in the number of rotations as well as the direction (clockwise or counter-clockwise).
Hot Tip

I chose to hand draw the gears as a design choice. The inherent imperfections of drawing freehand lends to a looser style.
SAUSAGE GRINDER FROM THE GAME SAUSAGE KON - THIBAULT IMBERT & CHRIS GEORGENES
7 Both gear animations were converted to a single symbol. I wanted them to be viewed “inside” the grinder so I designed a porthole style window as separate assets. The red shape is the mask that limits the visibility of the gears to the window area only. The gray circle is the background color, the irregular shape seen on top of the gray shape is the window highlight and the bezel is shown at the very top.
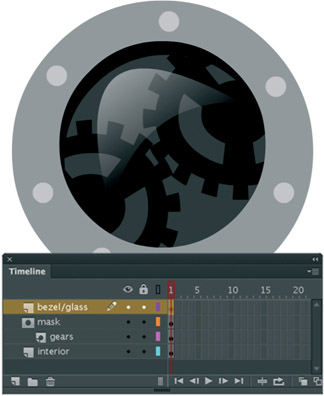
8 Here is the assembled window porthole with the masked gears. You can see the layer ordering of each object in the Timeline. The irregular shape with the alpha gradient is the only artwork inside the bezel. There was no need to provide anything else as this small piece of art was enough to provide the illusion of glass.
9 The meat catcher is made up of 4 different graphics, each converted to a symbol and is distributed to layers. An 8-frame animation was created of the catcher moving up and down in a slightly erratic nature. Those 8 frames were copied and pasted to lengthen the animation Timeline.

10 With the layers converted to outlines it becomes easier to see the subtle motions of the catcher between the frames. A combination of Motion and Classic tweens was used to create this effect.
11 Here’s the exploded view of the pressure gauge. Once again I have used very simple shapes to build this gauge keeping in mind that it will be scaled down quite small, so keeping it simple was crucial. The needle was kept as a separate object because I intended to animate it.

12 With each object distributed to layers I was able to animate the needle moving back and forth. Notice the center point was positioned at the bottom of the needle to allow it to rotate based on where it would be normally hinged.
13 The flashing lights couldn’t be simpler to create. The glass highlight was reused from the porthole (gears) example and the light flashing effect was simply a 2nd keyframe with a brighter “lens” color.

14 Here’s the entire grinder assembled and in fine working order. Check out the source file on the website to see the entire animation.
Hot Tip

Usually several different short looping animations can create a more compelling experience than a single larger motion. I prefer to make everything move small amounts simultaneously, as opposed to animating the entire object as a single asset. It’s a lot more work but usually provides a better result.
From the inside out
I AM A DIGITAL ANIMATOR. A “DIGIMATOR” IF YOU WILL. I LEARNED how to animate on a computer, which is inherently different than the traditional animation process. Sure, it shares some similarities when it comes to animation techniques, but ultimately any animation program can have a mechanical feel to it since we work by selecting options from menus much of the time. The trick I have learned is how to make a software program like Flash feel more organic, as if it were a ball of clay, starting with a basic shape and pushing and pulling it into something unique. Just because the Help docs, online resources or even other books tell you how something can or should be done, don’t take that as carved in stone. Take it as carved in clay, meaning you can continue to expand upon the ways the tools are used, even beyond what you may have read elsewhere. If 100 people were given their own ball of clay, they would all create something unique.
Many years before Flash even existed, I studied everything from art history to sculpture, color theory to lithography and, above all, how to draw. This combination made the progression to the world of computer graphics and animation tremendously helpful. I feel just as comfortable with a mouse or stylus in my hand as I do with pencil, paintbrush, airbrush or printing press. Each tool is just as powerful as the other. A quick and loosely sketched pencil drawing can have just as much impact visually as a full-blown animated action sequence that took three months to complete. It’s the subject matter that counts and this applies to Flash as well.
Several people have asked me why I am so forthcoming with my home-grown tips and techniques and why I’m not afraid that many will use them to emulate my own personal style. As with the ball of clay metaphor, everyone is different, and therefore everyone will express themselves in a unique fashion whether it’s through a ball of clay or an animation program like Flash.
I have spent several years adopting and inventing Flash drawing and animation techniques. This book will show you different ways of approaching Flash and how to make it work for you. Whenever possible, I will try and avoid explaining what is readily available in the Help docs and the multitude of online resources. You bought this book for a reason, to learn what isn’t found anywhere else. You will get a first-hand look at how I create characters and motion graphics from scratch, and learn how Flash, as a tool, can be pushed and pulled, limited only by your imagination.
My philosophy with tools like Flash is to learn as much as I can, then go back to the first 10% of what I learned and take a left turn.