1
What’s new in CC

■ It’s back to basics for Flash CC as the least used tools and features have been removed completely. Most of us weren’t using them anyway, so chances are they won’t be missed.
ADOBE FLASH PROFESSIONAL CC MAY BE PROOF THAT less is more. The least popular and lesser-used features have been stripped from the Flash authoring tool. This lighter, more streamlined version of Flash is the version that finally fits into that polka dot bikini just in time for summer.
Let’s take a look at what’s new in Flash CC and what’s been exiled to the land of misfit features.
Under the hood
WITH EACH NEW UPDATE comes new expectations for Flash to be better, faster and packed with more features. Flash CC is an interesting release because in many ways it meets these expectations and even exceeds them. But in other ways Flash CC may come up short for some users due to features that have been removed completely. This chapter takes a look at how the latest version of Flash stacks up for the designer and animator.

Right off the bat, you will notice something different about Adobe Flash Professional CC. It happens so quickly, there’s a chance you might miss it. Launching Flash CC takes merely seconds thanks to a complete rewrite of its code base to support the Cocoa framework on Mac OS X. My unofficial benchmark testing shows Flash CC takes about 3 seconds to fully launch. Previous versions of Flash, such as CS6, take upwards of 30 seconds or more to launch. The updated code base is not just to speed up start times but more importantly to improve the overall stability and performance of Flash to ensure longevity on OS X.
Based on my experience running Flash CC for several months throughout the prerelease and now the shipped version, this may be the most stable version of Flash I have ever used. Flash CC has yet to crash on my system (Mavericks, the newest Mac OS X) and I have it running nearly all day, every day. I even purposely leave it running while putting my MacBook Pro into sleep mode, just to try and get Flash to crash when waking up the operating system. So far, Flash has proven stable.
Flash Professional CC has been enhanced to support HiDPI displays including Retina Display available on the new MacBook Pro. HiDPI display facilitates a dramatic improvement in image fidelity and resolution. With Flash Professional CS6, which was not native to HiDPI display, the text was not as sharp and images did not have much detailing. The increased resolution of these displays required the Flash Professional user interface to be updated completely and ensure that the content is displayed with appropriate levels of fidelity. With Flash Professional CC, the icons, font, drawing on stage, general content rendering, and the whole IDE itself are displayed with superior clarity and crispness.
By default, Flash Professional CC enables HiDPI display on MAC. However, you could turn off retina display on MAC, and Flash Professional CC will accommodate this change.
Other performance improvements
- Publishing time improved significantly for FLA/XFL files, having a large number of AS linkages with Warnings mode enabled.
- Performance improvements for Import to Stage and Import to Library that ensure the file open dialog launches faster.
- Launch time for Flash Professional has been reduced significantly.
- Significantly reduced time for opening AS & FLA/XFL files.
- Smoother drawing experiences with the live color preview of objects.
- Unlimited pasteboard size.
Darker user interface
SINCE ITS INCEPTION, Flash has sported a very bright interface. From the white of the stage to the light gray menus, Flash has been a beacon of brightness in an otherwise contrasting suite of tools. When Flash became part of the Adobe Creative Suite, the contrast suddenly became more apparent as applications such as Photoshop and After Effects had already converted to a bold, dark interface design. Now with a complete overhaul to its core code base, we have the choice between the light or the dark side of Flash CC.
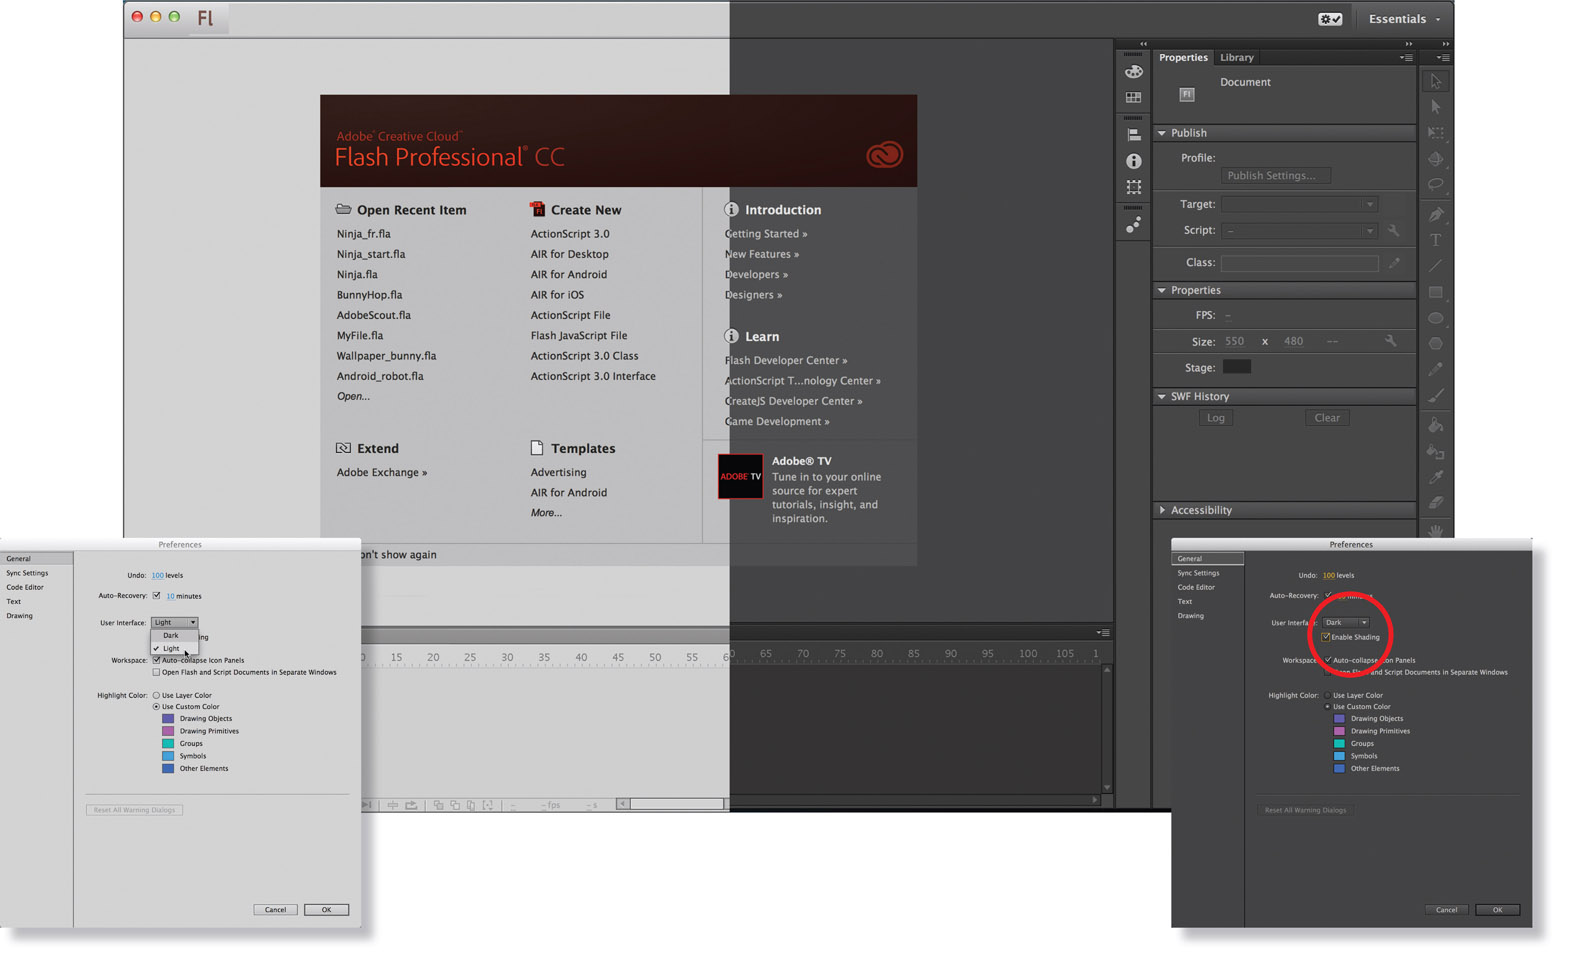
1 Your choice of interface schemes is simply dark or light. Go to Preferences > General and select your color scheme using the User Interface drop-down menu.
2 If you choose the dark interface, you have the option to turn off Shading. With Shading on, some of the menu headers and various other details will have a subtle amount of added depth. With Shading turned off, the effect is substituted for a flat shade of dark gray which provides a cleaner look and slightly faster redrawing of the panels when opened or moved across the screen.
Hot Tip
You can customize the interface further in terms of how objects react when highlighted. In the same section of the Preferences panel you can select custom colors for Drawing Objects, Primitives, Groups, Symbols and Other Elements.
Unlimited pasteboard size
LIFE IS FULL OF LIMITATIONS. Lots of them. Almost everything around us is restricted to some degree of certainty. From warranties to natural resources, a run on stamps, clothing, automobiles and television shows, limitations are a fact of life we’re forced to accept. It’s difficult to find anything that is truly unlimited. Until now.
For the first time ever, Flash CC has an unlimited pasteboard (the area beyond the stage). If you are new to Flash and CC is the first version you’ve ever used, this new feature may not seem like a big deal. But for those of us who have used previous versions of Flash, we were all too familiar with a pasteboard limitation of no greater than 2,880 pixels. We were forced to design and animate within the confines of a limited environment. Flash was The Truman Show of the software world. As of Flash CC the confines of the pasteboard have been lifted, and all is right in the world.
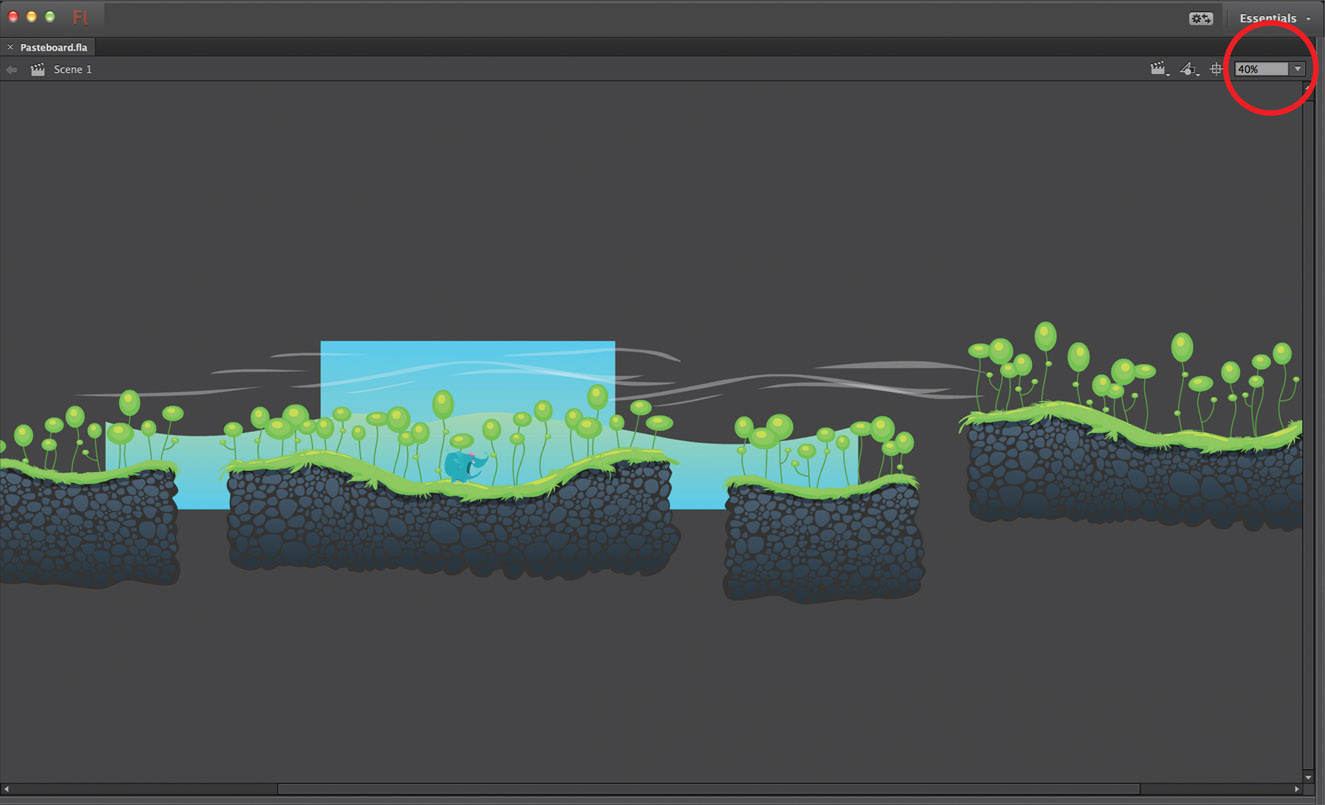
To view the area outside of the stage known as the pasteboard, go to View > Pasteboard. To limit the viewable area to just the stage, repeat the same menu selection. Magnify the stage to a value below 100% (circled) to increase the viewable area. As you position objects further outside of the stage, Flash will automatically increase the pasteboard area to accommodate their size.
Distribute symbols & bitmaps to keyframes
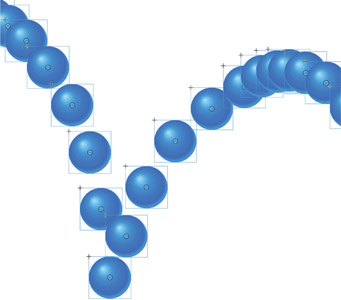
SOMETIMES CERTAIN FEATURES COME along that allow you to take advantage of them in ways they may not have been originally designed. It took some thinking on my part to come up with an example to showcase the new Distribute to Keyframes feature. Once the idea came to me, I quickly realized how much of a game changer this feature could be for anyone using Flash for frame-by-frame animation. Typically, frame-by-frame animation requires an image or a series of images to be drawn or positioned across individual subsequent keyframes, a technique that requires frequent testing to make sure the timing is right. With Distribute to Keyframes, you can create all of your “animation” on a single keyframe with the convenience of seeing the spatial relationship of the object throughout each pose or, in this example, each position.
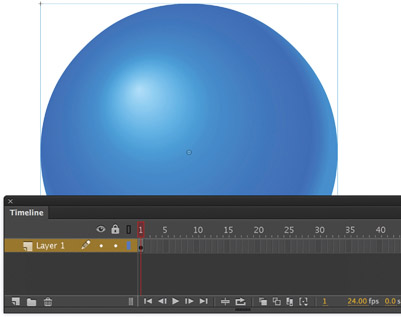
1 In frame 1 of a new document I created a simple ball graphic using the Oval ![]() tool and a radial gradient for depth. The plan is to animate this ball bouncing from left to right across the stage.
tool and a radial gradient for depth. The plan is to animate this ball bouncing from left to right across the stage.

2 Hold down the Option ![]() key and then click and drag the symbol to duplicate it. Position it using the Selection
key and then click and drag the symbol to duplicate it. Position it using the Selection ![]() tool. To simulate gravity the ball must increase speed as it descends, otherwise known as an easing in effect. The distance between each ball gradually increases as the ball arcs downward.
tool. To simulate gravity the ball must increase speed as it descends, otherwise known as an easing in effect. The distance between each ball gradually increases as the ball arcs downward.
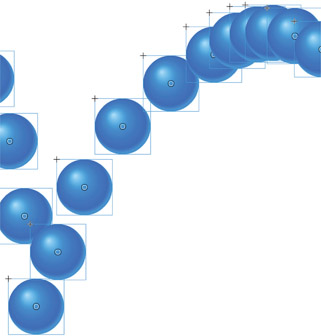
3 Here the duplicate ball symbols are positioned in an acsending arc with the space between each of them decreasing to simulate an easing out movement. The advantage to animating this way is seeing the entire range of motion of the object, which provides a overall sense of timing based on the intended action.
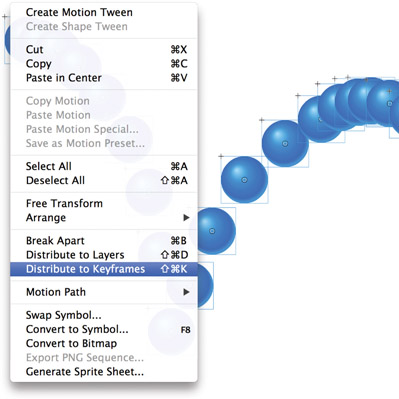
4 With the entire range of motion complete, the hard part is done. Select all ![]() then right-click over any of the selected objects on the stage and select Distribute to Keyframes from the context menu.
then right-click over any of the selected objects on the stage and select Distribute to Keyframes from the context menu.
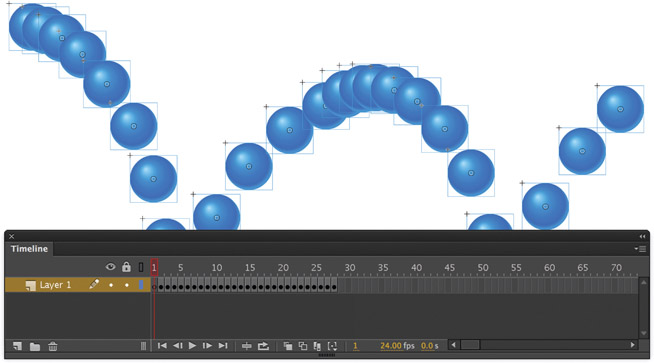
5 Flash CC will distribute each selected object to its own keyframe. Play the timeline to see the animation of the ball bouncing. The timing will be dictated by a combination of the document frame rate as well as the relative placement of each object. Creating animation using the Distribute to Keyframes method has become a part of my workflow whenever possible. In situations such as the ball bouncing example, it can be a real time saver to create your animation as a single image first, and then let Flash do the hard part by distributing everything to keyframes.
Hot Tip

Distribute to Keyframes will work with objects other than symbols. You can distribute grouped objects, Object Drawings and imported bitmaps. Distribute to Keyframes will even work with multiple objects of various formats. Select any combination of bitmaps, symbols, grouped objects and Object Drawings and you can still distribute them all to keyframes with a single command.
Swap multiple symbols and bitmaps

OFTEN IT IS THE SIMPLEST OF features that can make the biggest differences. Whenever we get the chance to automate repetitive tasks, our productivity increases and workflows get easier. Swapping symbols has been a Flash workflow feature for as long as Flash has been around. Up until Flash CC, however, we have only been able to swap one symbol at a time. If you’ve ever had to endure the process of manually swapping a large number of symbols, then I’m happy to tell you those days are now over.

1 There is nothing complicated about this example, but more often than not we find ourselves needing to perform repetitive, mundane tasks. Each balloon is a separate symbol, and the task at hand is to swap each one with a different symbol so that they are all instances of the same balloon symbol. Previous versions of Flash dictated that we repeat the swap for each individual symbol which is no longer the case in Flash CC.
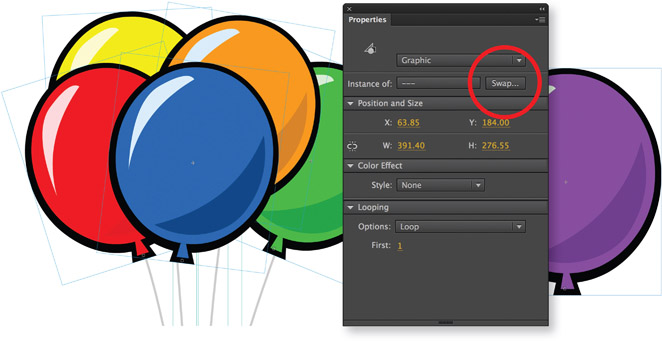
2 Select all symbols you want to swap for a different symbol. Hold down the ![]() key to select multiple symbols.
key to select multiple symbols.
3 The replacement symbol already resides in the library represented by the purple balloon. In the Properties panel click the Swap button.
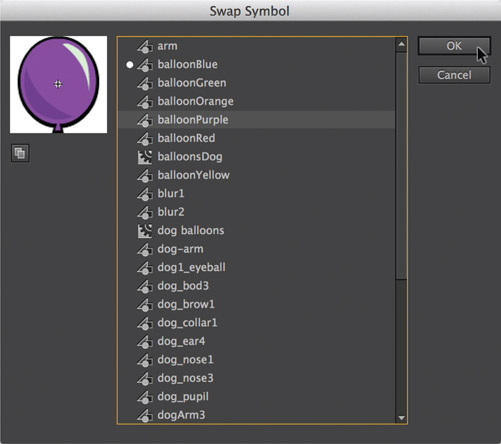
4 In the Swap Symbol panel select the symbol to replace the selected symbols on the stage and then click OK.

5 Each of the selected symbols on the stage have now been swapped to a the newly selected symbol. We have never been able to achieve swapping of multiple symbols in previous versions of Flash, as simple as it may be.
Hot Tip

You cannot swap a symbol for a bitmap or a bitmap for a symbol. You can only swap symbols for symbols or bitmaps for bitmaps. Of course if your bitmap has been converted to a symbol, then you can convert it to a different symbol.
Toggle guides and masks
MULTIPLE LAYER SELECTION: YOU can now select and assign/modify properties to multiple layers using the Layer Properties dialog. Convert layers to Guides or Masks with the Toggle Guides and Toggle Masks options. In addition to Guides and Masks, other layer properties include:
- Lock Others
- Hide Others
- Expand Folders
- Collapse Folders
From within the Layer Properties panel you can change the layer color and height across multiple selected layers.
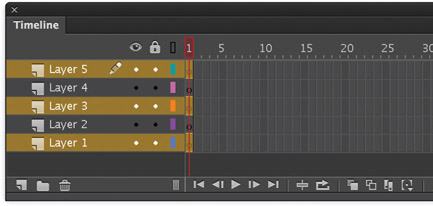
1 Select multiple layers by holding down the Control ![]() key and clicking on each layer in the Timeline panel. If you want to select all layers, hold down the Shift
key and clicking on each layer in the Timeline panel. If you want to select all layers, hold down the Shift ![]() key, select the first layer and then the last layer. All the layers in between will also be selected.
key, select the first layer and then the last layer. All the layers in between will also be selected.
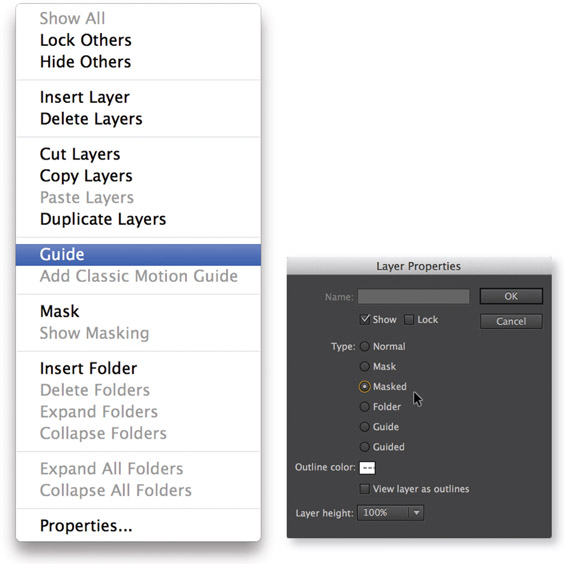
2 Right-click over any of the selected layers to bring up the context menu. The options available to you in Flash CC are Lock and Hide Others, Insert and Delete layers, Cut, Copy, Duplicate layers and convert all selected layers to Guide or Mask layers. You can also select Properties to access the Layer Properties panel. From here you can toggle layer visibility, lock or unlock and select the layer type.
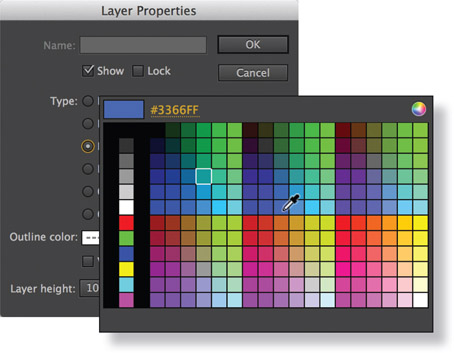
3 In addition to layer types, a new outline color can be applied by clicking on the color swatch and selecting a new color from the popup palette. The new color will be assigned to all selected layers.
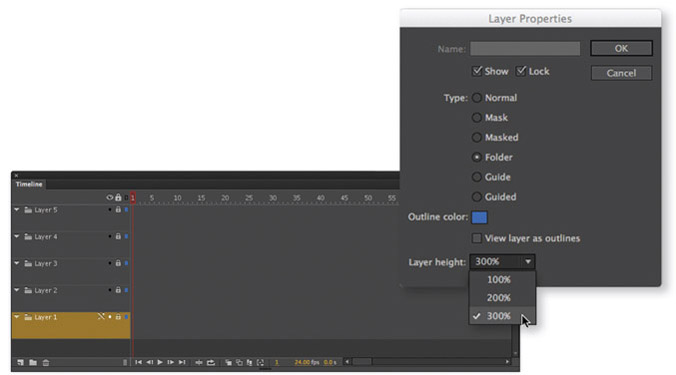
4 Click the Layer Height drop-down menu to select a new layer height. You can choose between 100%, 200% and 300% layer heights. Click OK, and all selected layers will adopt your new settings.
Hot Tip
If you convert a layer property from Normal to Folder and then back to Normal again, you will need to insert at least 1 frame before drawing or placing objects on the stage. Press the F5 (Insert Frames) key to insert at least 1 frame in the converted layer to allow objects to be added to your scene as intended.
Scale to Anchor point

CHANGING THE STAGE size in Flash has been limited to the right and bottom sides of the stage in previous versions. The composition of your design was ignored during this process as well. If you have ever wanted to scale the stage along with the contents of your Flash document, you would have to do so manually, which can get complicated if your document contains long animations. In Flash CC we can now scale the stage size and its content together based on any one of nine anchor points.

1 The Flash document has its stage size set to 1024 × 768 pixels. This example will show you how to scale the stage size along with the entire contents of the timeline. Even if your Flash document contains long timeline animations, everything will be scaled according to the stage size and anchor point. Scaling the stage is very useful if you have a project that you want to publish to various devices or mediums that have varying aspect ratios. Imagine being able to author content for output to video to be uploaded to YouTube or Vimeo but then scale that same content for an iPhone or Android smartphone or tablet.
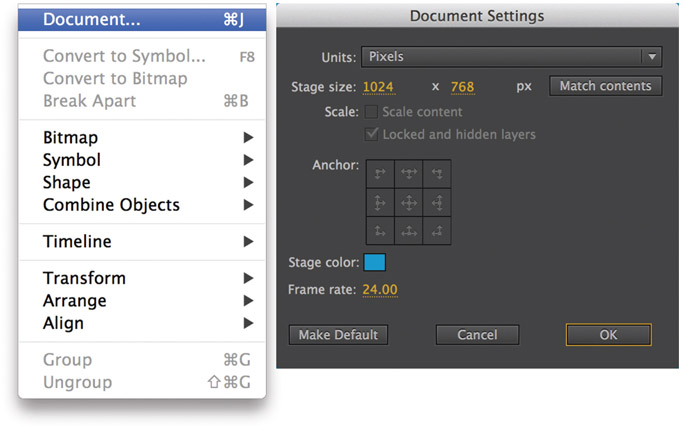
2 Open the Document Settings panel by going to Modify > Document or ![]() . You will find several options within the Document Settings panel that include stage size, scale, anchor, stage color and frame rate.
. You will find several options within the Document Settings panel that include stage size, scale, anchor, stage color and frame rate.
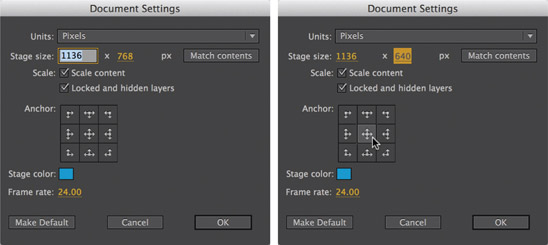
3 To enable the scaling of the document contents, click to select either the width or height text fields of the stage size. Type in a new value for both the width and height. In this example I have chosen a new stage size of 1136 × 640 to support the iPhone 5 screen resolution. The Scale checkbox will become active, allowing you to select it, by clicking in the box to allow the content to scale. You can also choose to scale locked and hidden layers as an option. The Anchor feature allows you to select how the content is positioned. Click on any one of the 9 squares to determine the placement of your content. For this example I selected the middle square so that all my content is centered based on the new width and height. Click the OK button.

4 Flash will change the stage width and height as specified in the Document Settings panel and scale the entire content of the timeline based on the selected anchor point. Pictured to the right is the new size 1136 × 640 that publishes perfectly for the iPhone 5 screen resolution.
DragonBones extension

DRAGONBONES IS AN OPEN SOURCE 2D skeleton animation program that contains a Flash Professional design panel and an AS3-based library. The design panel converts Flash vector animation to a texture atlas (also known as a Sprite Sheet). DragonBones integrates well with the Starling Framework, which takes advantage of GPU accelerated animation. The DragonBones extension is both designer and developer friendly. Animations can be handled entirely by the designer who can then export the necessary data to be handed off to a developer for game integration. To learn more and download the DragonBones extension, visit http://dragonbones.github.io. For more information on the Starling Framework, visit http://gamua.com/starling.
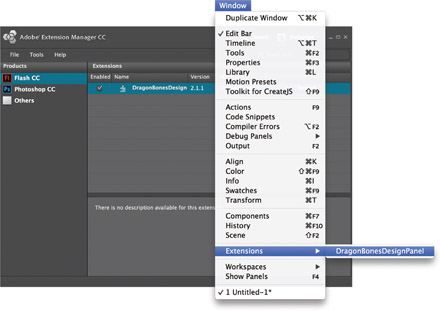
1 Download the DragonBones extension from http://dragonbones.github.io. Once downloaded, double-click the XMP extension file to launch the Adobe Extension Manager CC to install DragonBones for Flash CC. If Flash CC is already running, you will need to restart the application. With Flash CC running, launch the DragonBones extension by going to Window > Extensions > DragonBonesDesignPanel.
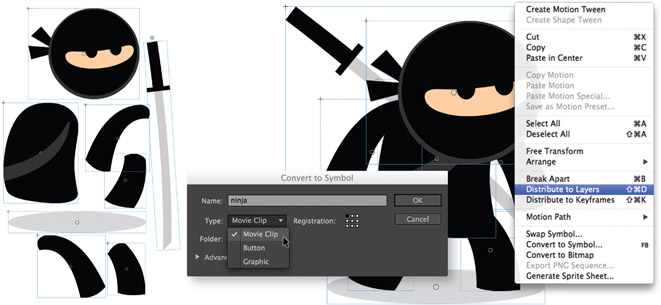
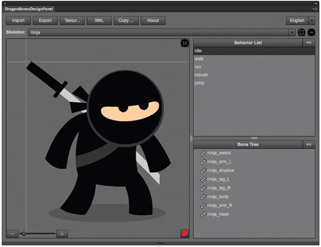
2 The DragonBones extension uses characters that are setup in traditional Flash fashion. Objects are converted to symbols and organized in cut-out animation style. The ninja pictured above is comprised of 8 different symbols, each in their own layer and within a Movie Clip symbol.
3 The entire character is converted to a Movie Clip symbol. Edit the Movie Clip symbol, select all the symbols of the character, right-click over them and select Distribute to Layers from the context menu.
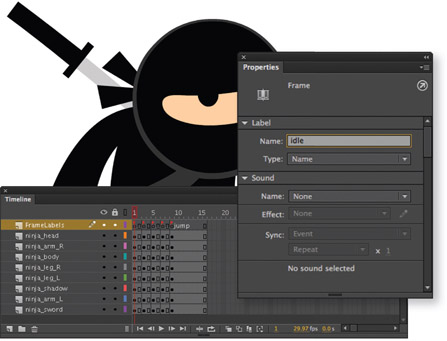
4 Add a new layer to the Movie Clip timeline containing the character to be animated. Create Blank Keyframes (F7) on every other frame and add the following frame labels: idle, walk, run, crouch and jump. The DragonBones extension will reference these frame labels once the Movie Clip has been imported later in this example.
5 The animator needs only to create 2 poses per animation state as DragonBones will do all the interpolation. For the idle animation I just want to create the ninja standing still, yet with a subtle motion as if he’s breathing a little heavy. Insert Keyframes (F6) in frame 2.
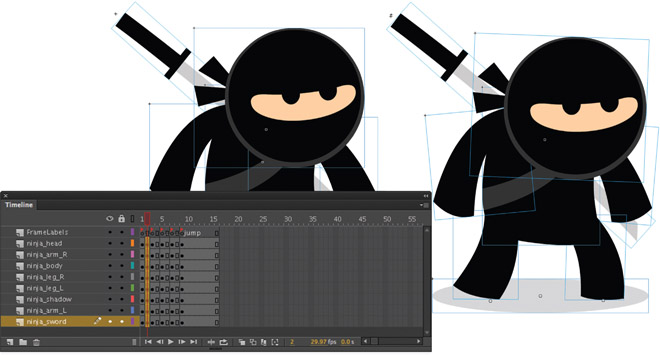
6 In frame 2 each symbol of the ninja character is in a slightly different position. It’s hard to notice but the head has been moved down a few pixels, the arms rotated inward slightly, the body also repositioned as well as the sword and legs.
Hot Tip
DragonBones will only work with the same set of symbols across the entire timeline. Keep your characters simple because you will not have the luxury of swapping symbols throughout the animations. If you do, the DragonBones workflow will break and cause errors.
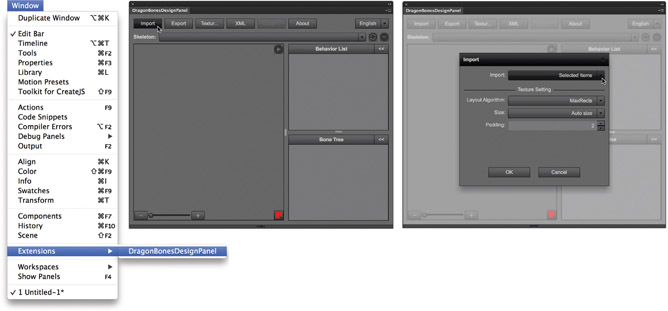
1 Launch the DragonBones panel by going to Window > Extensions > DragonBonesDesignPanel. To begin working with DragonBones you must import the Movie Clip symbol containing the character poses and frame labels. Make sure the Library panel is open and the Movie Clip is selected. In the DragonBones panel click the Import button. In the Import popup panel, select Selected Items from the Import drop-down menu
2 DragonBones will import the selected Movie Clip and display its contents in the preview panel on the left, the frame label data in the Behavior List panel on the right and the Bone Tree hierarchy just below that. You will notice that DragonBones has applied motion to the poses in the selected frame label using a tweening engine.
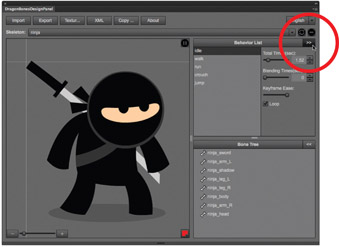
3 You will likely want to adjust the timing of the animation as well as some easing. To access the behavior controls, click on the double arrow to expand the window. You will find Total and Blending time controls as well as Keyframe Easing and a Loop option.
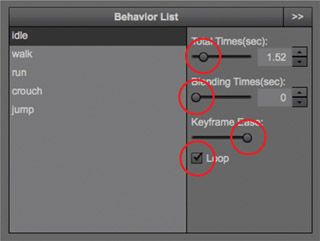
4 Adjust the total length of the animation by using the slider, up or down arrows or selecting the numeric value and typing in the desired duration manually. The longer the duration, the slower the animation will be. Blending Times is the number of tween frames needed to switch from one motion to another. If you enter a blending time value of 5, then 5 tweened frames will be used to transition from one motion to the currently selected motion.
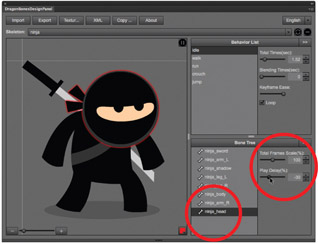
5 You can select each bone independently in the Bone Tree window and adjust their behaviors individually using the sliders to the right. The Total Frames Scale slider controls the number of frames of the selected bone relative to the total frames of motion. The Play Delay slider controls the delay of the current bone relative to the motion it belongs to. What the 2 sliders can do is provide a secondary motion to your animations which adds a level of realism.
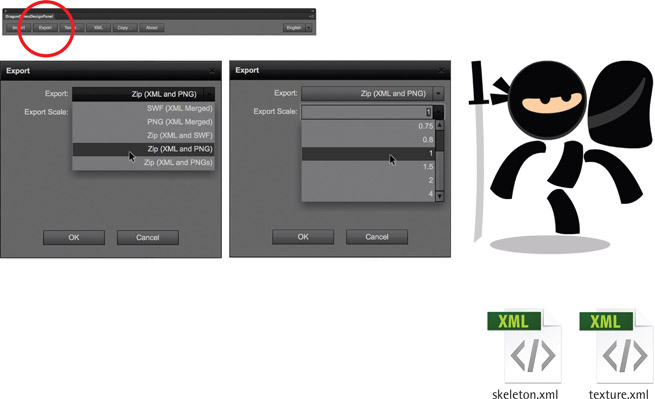
6 When you are finished adjusting each behavior, it is time to export the animations by clicking the Export button. In the Export drop-down menu, choose from several export options based on your needs. Here I have selected Zip (XML and PNG) format. In Export Scale dropdown box, you can set the scale of the exported texture atlas to export assets with different dimensions for devices with different resolutions. The PNG file is the atlas (or Sprite sheet) generated by DragonBones and contains all the character assets. The texture.xml file contains the atlas sheet data while the skeletal.xml file contains the animation data file. If you are purely a designer/animator, your work here is done. You can safely pass the exported XML and PNG files off to the developer who will incorporate them into the game engine.
Hot Tip
I highly recommend experimenting with the slider controls for each bone. With practice you will be able to achieve some realistic motions adjusting the Total Frames Scale and Play Delay values.
Multi-device connectivity
FLASH CC NOW SUPPORTS the testing of applications on multiple devices simultaneously via USB functionality. You can conveniently select from a list of devices of varying screen sizes, OS versions, and hardware configurations directly from your Flash CC application. The advantages here are being able to see how your application looks and performs across a range of platforms before submitting to an official store.
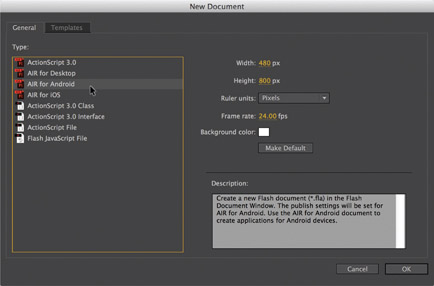
1 Create a new AIR for Android or AIR for iOS document by going to File > New… ![]() . For this example I selected AIR for Android. I have 2 devices connected to my computer via USB: a Galaxy Tab and a Galaxy S4.
. For this example I selected AIR for Android. I have 2 devices connected to my computer via USB: a Galaxy Tab and a Galaxy S4.
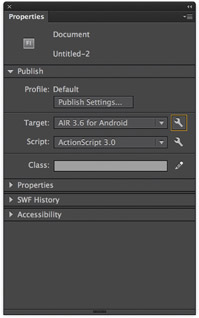
2 In the Properties panel click on the wrench icon to the right of the Target drop-down menu to open the AIR for Android settings.
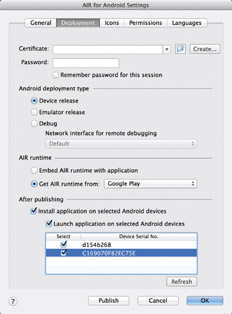
3 In the AIR for Android settings panel you will see the connected devices in the After publishing section at the bottom. If you don’t see a device listed, click on the Refresh button.
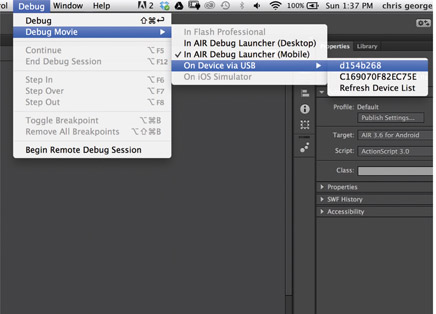
4 You can debug your application from within the Flash CC document by going to Debug > Debug Movie > On Device via USB and selecting the connected device from the list. If you don’t see your device listed, select Refresh Device List.
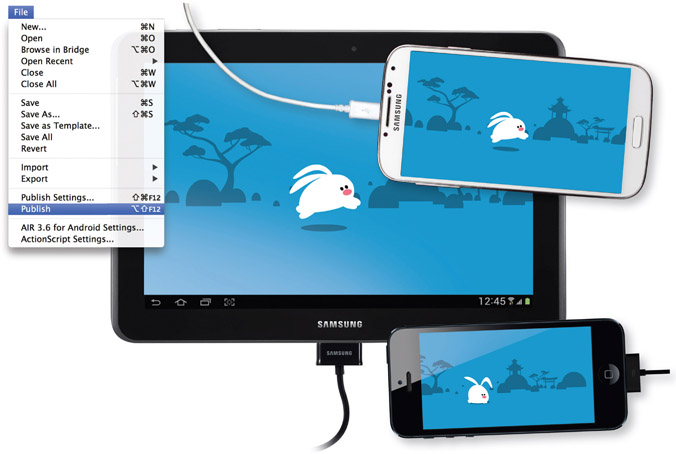
5 To test the application on a connected device(s), go to File > Publish. The application will be installed and will automatically launch.
Hot Tip
If you are having problems with your device not being recognized, make sure USB debugging mode is turned on. You can access this option by going to the system settings for your device and locating the developer tools category. On my Android devices USB Debugging is found under Settings > Developer Options > USB Debugging.
Exporting Video

THIS IMPROVEMENT MAY BE THE most exciting for animators! We’ve needed a reliable way to export our content directly from Flash to video format. In the past, we’ve experienced dropped frames or unexpected quality issues when exporting our animations due to an error-prone process that demanded large amounts of memory. The enhancements to the video exporter are the direct result of integrating the Adobe Media Encoder in Flash CC. This integration simplifies the video export workflow while providing many more encoding options for output to a variety of mediums.
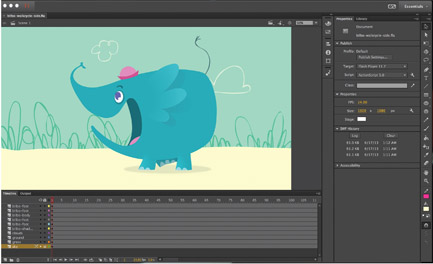
1 The Flash document above contains a timeline based animation using nested Graphic symbols. The entire timeline is about 15 seconds in duration. The stage size is 1920 × 1080 at 24 frames per second.
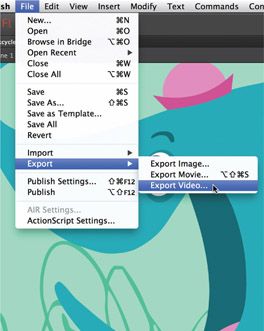
2 To begin the video export process go to File > Export Video…

3 In the Export Video settings panel, make sure Convert video in Adobe Media Encoder is checked. Since my document contains timeline animation, I have selected When last frame is reached as the stopping point of the export process. Click Browse to select the path where to save your video file and then click the Export button. The Recording Flash Content progress bar will display the export process.
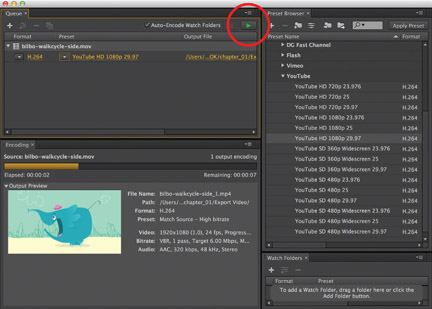
4 Once the video has been exported, the Adobe Media Encoder will launch automatically. The MOV file from Flash will be added to the Queue panel. Using the AME, you can select from a variety of presets in the Preset Browser on the right side. I want to upload my animation to YouTube, so I have selected the H.264 format, specifically the YouTube HD 1080p 29.97 preset in the Preset Browser. When you are ready to export, click the green arrow near the top of the AME to begin the encoding process.
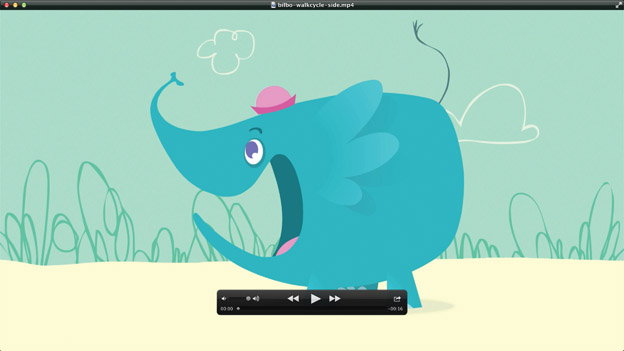
5 With the encoding process complete, the video file can be opened and played in the Quicktime Player to verify the quality of the video is acceptable. In my experience with the new video exporter in Flash CC, each frame is flawless – even at 1920 × 1080 and with no dropped frames.
Hot Tip

The AME includes many presets for encoding your video to broadcast, mobile devices, DVD, Blu-ray, image sequence and web video. You can even create and save your own custom presets.
Find & Replace enhancements
IF ONLY LIFE HAD A FIND AND replace panel. I could imagine a world where if something needed to be fixed, it could be located and remedied with the help of a few input fields and a checkbox or 2. My to-do list would take minutes instead of hours or even days. Find and Replace is not new to Flash, but for the first time, Flash CC introduces a few subtle updates to the panel.
I’ve always considered the Find and Replace panel to be the unsung hero of Flash. Surprisingly, very few Flash users even know it exists, probably because it’s relatively hidden under the Edit menu as opposed to under the Window menu where most of the other panels reside. Once you’ve been introduced to this wonderful time-saving gem, you will find countless ways to use it.
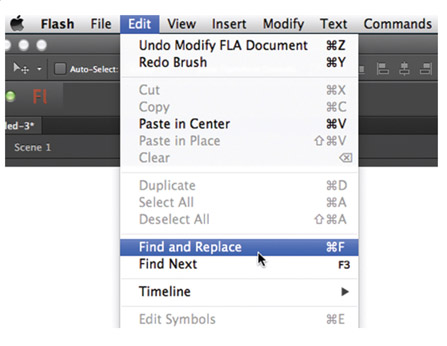
1 The Find and Replace panel can be found under the Edit menu or by pressing ![]() on your keyboard.
on your keyboard.
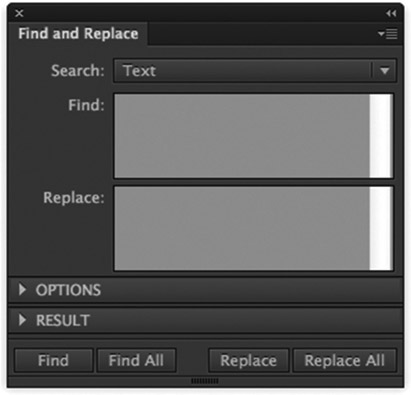
2 The main improvement of this panel is the organization of its features into categories. Each category can be expanded or collapsed based on the content you wish to edit.
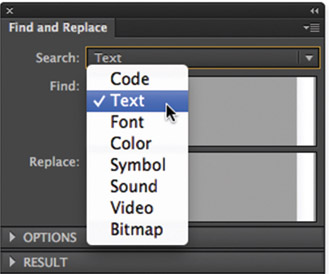
3 Using the Search drop-down menu, select from Code, Text, Font, Color, Symbol, Sound, Video or Bitmap.
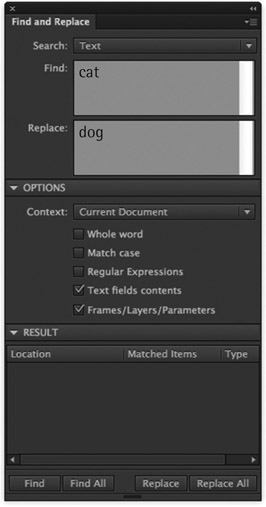
4 You can refine your search by entering specific text in the Find input field, and replace it with text entered in the Replace field.
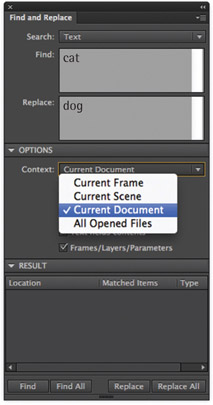
5 In the Options category, select Current Document from the Context drop-down menu, then click Replace or Replace All if there’s more than 1 instance that needs changing.
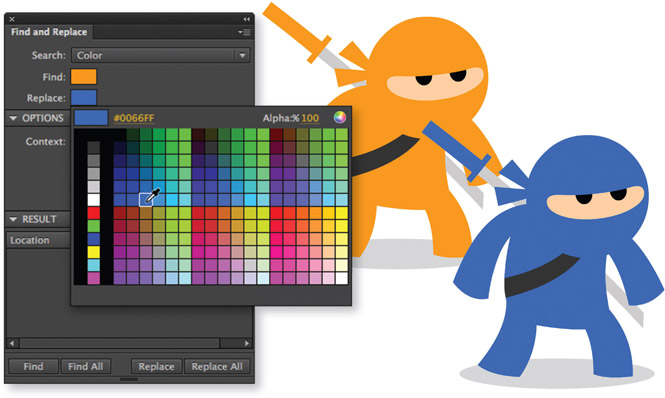
6 Here I am changing the color of the character across several different symbols from orange to blue. I’ve chosen Color from the Search drop-down menu and selected the original color in the Find swatch. In the Replace swatch I have chosen the new color to replace the original color and then clicked the Replace All button.
Hot Tip
If you need to replace assets across multiple documents, make sure they are all open, and then select All Opened Files from the Context drop-down menu in the Context category. The Find and Replace dialog is also integrated into the Actions panel.
Live preview for drawing tools
IF YOU USE THE SHAPE tools often in Flash, this enhancement will be significant for you. In Flash CS6, when drawing on the stage, you only saw the outlines of shapes. In Flash CC this is no longer the case. You can now preview a shape when using the Line, Rectangle and Oval tools instantaneously. The Live Preview feature displays the stroke and fill color for the shape along with the outline in real time as you are drawing.
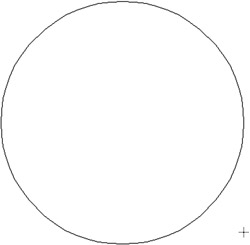
In Flash CS6, the circle shape displays the outline while actively being drawn with the Oval tool.
The circle is filled with color only after the cursor has been released.
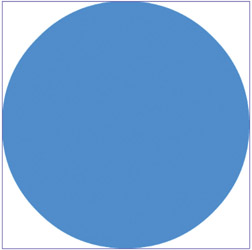
In Flash CC, shapes are filled with color as they are being drawn in real time as shown above using the Rectangle tool.
The circle preview includes the selected fill color
Live Preview also includes strokes (if selected) for shapes as well as strokes made with the Line tool.
Other notable enhancements
Performance improvements
- Publishing time improved significantly for FLA/XFL files having a large number of AS linkages with Warnings mode enabled.
- Performance improvements for Import to Stage and Import to Library ensure that the file open dialog launches faster.
- Unlimited pasteboard size means the area outside the Flash CC stage is endless.
Enhancements to the ActionScript Editor
- The Code Commenting feature can now intelligently comment or uncomment based on your selection of single or multiple lines of code.
- Scintilla, an open source code editing component, has now been integrated with Flash CC.
Enhancements to panels
Several panels have been redesigned in Flash CC to improve efficiency and to provide a better user experience:
- A number of options have been reduced on the Preferences panel to provide a simplified experience.
- Filters UI and Accessibility Properties have been included in the Properties panel.
Changes to the PSD and AI Importers
The experience of importing a PSD file in to Flash CC has been simplified significantly. The following is the list of changes made to the PSD file Import dialog:
- The Layer Panel View has been excluded.
- Hidden layers bundled in to a Layer Comp stay hidden and cannot be selected or edited when importing a PSD or an AI file.
Hot Tip
Many of the improvements to Flash CC are under the hood. Gone are the bells and whistles which have been removed in lieu of a solid core functionality this version has been on improving the very core of Flash: its foundation. Flash CC is much faster and more stable than previous versions which paves the way for a bright future.
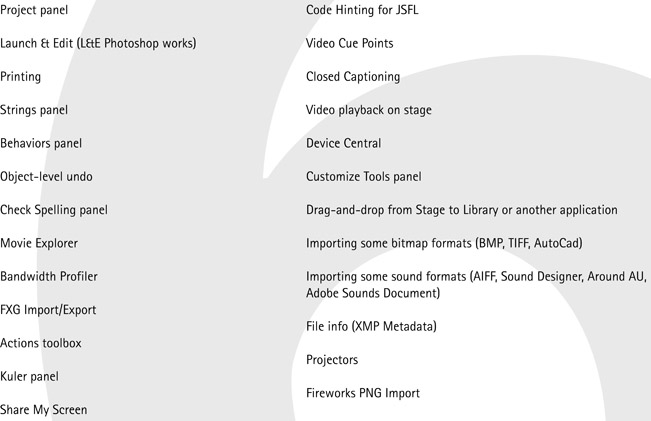
Deprecated features
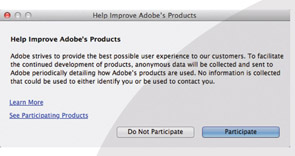
THIS MAY STING A LITTLE. FOR THE first time in the history of Flash, or at least in my recollection, the number of removed features seemingly outweighs the number of added features. But before we freak out, let’s take a moment to learn how and why Adobe made these decisions. When you install and launch Flash for the first time, a popup window asks if you want to participate in the Adobe Product Improvement Program. If you click Participate, you will be helping Adobe improve the very product you love. Don’t worry, involvement in the program requires no effort on your part except using the application. The data collected by Adobe consists of your system information, browser type and version, Adobe product information and feature usage such as menu options and button selections. The information collected is used to develop new features and improve existing ones. In the case of Flash CC, Adobe removed the least used features based on the information collected from those who participated. You can choose to not participate or stop participating at any point.
In memoriam…
ActionScript 1 and 2 Action
Some of you may have seen this coming but for those who didn’t, ActionScript 1 and 2 are no longer supported in Adobe Flash CC. ActionScript 3 is the version of choice moving forward.
TLF Text
If your FLA, created with an older version of Flash Professional, contains TLF Text, then Flash CC will automatically convert it to Classic text upon opening the FLA.
Motion Editor
For some animators, the loss of the Motion Editor may be surprising. Flash CC no longer includes the Motion Editor, which supported the control of individual properties for the new Motion tween model. Motion paths, however, will remain. Not many animators used the Motion Editor but those who tried, including myself, found it somewhat clumsy to use. As a self-contained panel, the Motion Editor felt too disconnected from the main timeline and the object that was being animated on the stage. The Motion Editor demanded a large amount of screen real estate, arguably its own display. As powerful as it was to control each individual property within the same tween span, the implementation of the Motion Editor made the workflow cumbersome. For this reason the Flash team decided to remove it for now, step back and rethink the Motion Editor completely. I can assure you there are many internal discussions about how best to redesign and implement the Motion Editor in a future update.
Deco Tools
Adobe introduced the Deco tool in CS4 and subsequently Deco brushes in CS5. From Vine Fill to Symmetry Brush to Lightning Brush, we had automated animation in the form of brushes. As cool as they were, nobody really used them. I’ll admit, I never did either. I was excited about them at first, but they never became my go-to tool of choice. It seems like this was a similar story for most Flash designers and animators.
Bone Tool
The Bone tool was one of the most promising new Flash features that simply never fulfilled our inverse kinematic needs. It could be said that I was one of the most vocal proponents for getting the Bone feature into Flash. I’ve been part of the Flash prerelease team for as long as I can remember and have always had a direct line of communication to the Flash engineering team. Back in 2004, when Macromedia still owned Flash, the annual Max event was held in New Orleans. I was there as a speaker showing the audience my typical animation workflow of editing the center point of symbols to simulate the hinging of character body parts. After my session was over, Eric Mueller, an engineer on the Flash team, approached me with his laptop and showed me a prototype plugin running inside Flash. That plugin eventually became the Bone tool and was introduced in Flash CS4. Now, 3 versions later, it has been removed. Based on user feedback and analytics, the Bone tool simply didn’t live up to expectations.
Also removed from Flash CC
With all that has been deprecated in Flash CC, your initial reaction may range anywhere from anger to disappointment. It would be easy and a bit justified to react negatively to the decisions Adobe has made for Flash, but let’s take a deep breath, step back and think about this for a minute. Not too long ago the word on the street was that Flash is dead. Marketing buzzwords such as HTML5 and Canvas have seemed to cast a shadow over the term Flash, more specifically the Flash Player. Even I began to consider adopting a completely different animation program.
Amidst all the “Flash is dead” rumors, Adobe was busy examining the data from Flash users participating in the Product Improvement Program and made some executive decisions – completely rebuild the core of Flash for a strong future. This direction is proof that Adobe is investing in Flash long term as a viable authoring tool and an important member of the Creative Cloud family. Think of it as a new beginning, a shedding of old skin, a Flash reimagined.
I taught 2 sessions at Adobe Max this past year and had the distinct pleasure of having members of the Flash engineering team, who came all the way from India, as my assistants. They got to see me use and teach the tool they help build. I then got to know them a little better over lunch; they were warm, receptive and open to ideas that promote a better Flash experience moving forward. Meeting the engineering team put faces behind the application and cemented in my heart and mind that Flash is not only here to stay but more importantly is built by caring people.

Adobe© Creative couldTM
What is the Creative Cloud?
To explain this new direction in as simple as terms possible, I would describe the Adobe Creative Cloud as a subscription-based file storage service. But what separates this from other storage services such as Google Drive, Dropbox and Apple iCloud is that Adobe not only allows you to store and share your files on the Creative Cloud but also download, install and update all your Adobe applications as part of the same service. Installation is performed after you’ve subscribed to the service and downloaded the Adobe Application Manager.
How much does it cost?
The Adobe Creative Cloud offers a multi-tier subscription service based on your needs and history using Adobe products.
Individual plan: $49.99 US per month or about $600 US annually.
Individual CS customer plan: If you’ve been an Adobe customer since CS3, the Creative Cloud membership costs $29.99 monthly ($360 annually). If you are already using CS6 then the Creative Cloud membership will be $19.99 monthly ($240 annually).
Single app plan: Just need a single application? $19.99 per month, and it’s yours along with 20GB of cloud storage.
Team plan: $69.99 per month or $840 annually. If your team is a CS3 or later customer, the price drops to $39.99 monthly.
The idea behind the Creative Cloud subscription service is the more apps you use, the more bang for your buck. Adobe no longer supports perpetual software versions. You will not see another boxed version of any Adobe application nor will you have to wait for 18 months or longer for an updated version.
What does this mean for you?
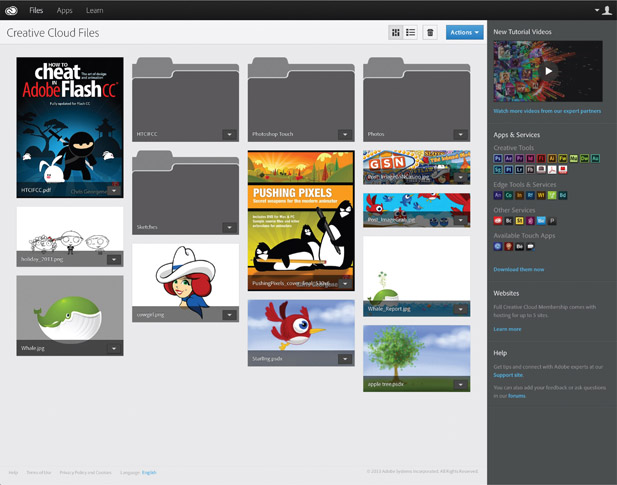
Not only will you have a cloud service to save and share project files with collaborators and clients, you will also have the option to download any application from Adobe’s collection. Don’t need every Adobe app? Fine, just download and use what you need and only when you need it. Adobe Creative Cloud is like your own personal à la carte app store that allows you to pick and choose only the apps you need. Of course, you may be the type that needs all applications all the time. Indulge yourself. Adobe won’t judge you.
Do I own the applications I download?
No. But you never did anyway. When we purchase software we never truly “own” it but rather license it from the developer. There’s a big difference between owning and licensing that isn’t worth getting into here because of all the legalities involved. The biggest advantage of the Creative Cloud apps is that you’ll always have access to the latest updates which will come more frequently than the now deprecated perpetual versions.
Multiple installations

You can install Creative Cloud apps on up to 2 computers regardless of platform. Let’s say you have a Mac at home and use Windows at work. You can install Adobe applications on both, a huge advantage over previous versions of the Creative Suite. In the past, if you needed to install on Mac and Windows, then you needed to purchase 2 different licenses.
Does Adobe own my files?
No. Adobe owning your work would be kind of crazy and not what the Creative Cloud was designed for. Your files belong to you and always will. After all, you created them.

Do I have to save files to the Creative Cloud?

No again. The Adobe Creative Cloud is for the sharing of your files if you decide that’s what you want to do. The Cloud is also great for accessing your files across multiple computers. Alternatively you can save files to your local hard drive the same way you’ve been doing it for years; File > Save as.
Membership cancellation
In the event you want to cancel your Adobe Creative Cloud membership, you will have a 90-day grace period to download your files from your Creative Cloud account.
Behance community
Included with your Creative Cloud subscription is access to an amazing creative community called Behance. If you are looking for inspiration from fellow creatives or looking to get your own creations noticed, Behance will not disappoint. I personally love perusing the Behance site for inspirational work, and your Creative Cloud paid membership gets you the Behance Pro features such as ProSite – a customizable professional portfolio with your own unique URL.
Edge tools and other Creative Cloud perks
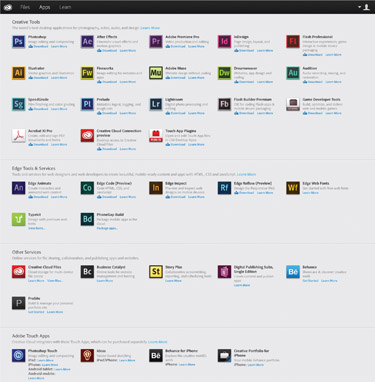
But wait, there’s more! As part of your Creative Cloud subscription you also get access to the Edge suite of tools such as Animate, Code, Inspect, Reflow and Web Fonts. Typekit and PhoneGap Build are also included. Other available services include Business Catalyst, Story Plus, Digital Publishing Suite and more.
Need more information? Visit the Creative Cloud at http://www.adobe.com/products/creativecloud/faq.html