CHAPTER 7
Light and Color
▲ Early Morning Light. By selecting the time of day to shoot, you can control the quality of light in your pictures, as was done in this early morning shot of ties for sale in Venice, Italy.
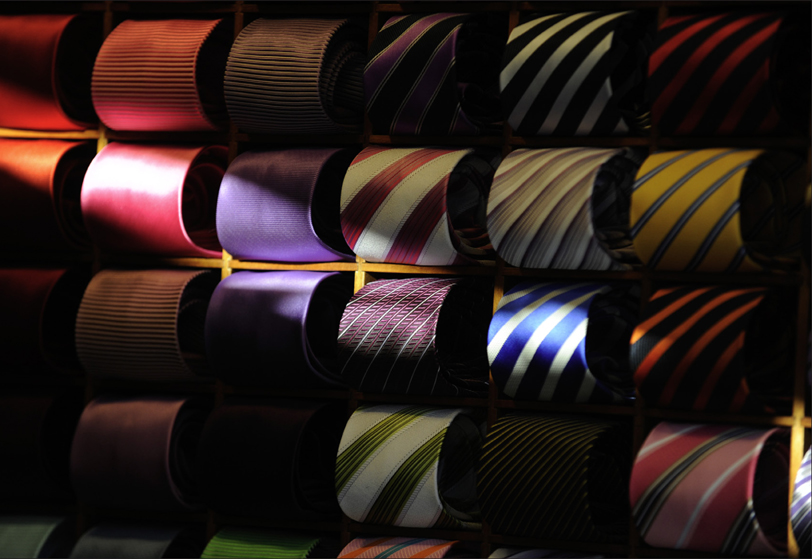
(Photo by Ken Kobré)
This symbol indicates when to go to the Videojournalism website for either links to more information or to a story cited in the text. Each reference will be listed according to chapter and page number. Links to stories will include their titles and, when available, images corresponding to those in the book. Bookmark the following URL, and you’re all set to go: http://www.kobreguide.com/content/videojournalism.
Many times, you have no control over when or where you will shoot when gathering documentary footage. If the subject is a wrestler, you are likely to be in a gym, regardless of the poor quality of the light. If the subject is a new Marine recruit, you’ll need to be there before dawn for roll call. Sometimes, though, on certain stories, you can decide when to shoot and when to interview, or—if all else fails—you can bring your own lights and create whatever atmosphere you need for the shoot.
Lighting conditions can affect the whole feel of a story. Basically, you can control four qualities of light: intensity (bright or dim), contrast (hard or soft), color (warm or cool), and direction (front, side, back, top, bottom).
▲ Notice how the building looks completely different depending on when it was shot—late afternoon, just after sunset, or at night. The choice of when to shoot can completely transform the emotional impact of images.

(Photos by Adam Lau)
▶ Dawn. When possible, start shooting early in the morning. For soft shadows and monochrome colors, dawn is ideal.
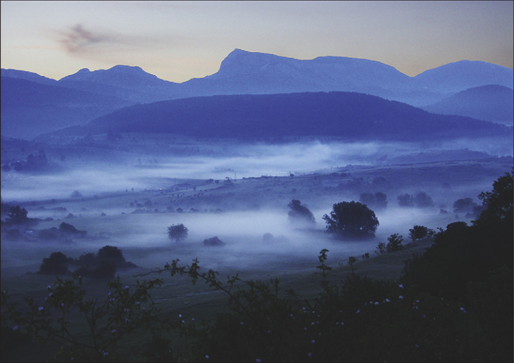
(Photo by Ken Kobré)
▶ Midday. The daytime sun adds strong, deep shadows to this scene of farm workers cutting lavender in France.
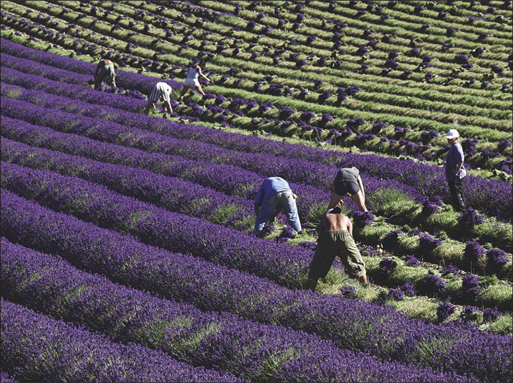
(Photo by Ken Kobré)
TIME OF DAY IS CRITICAL
When shooting video outdoors, timing is everything. Every day, from sunrise to sunset, color changes, intensity changes, and mood changes. If you are shooting a story about the life cycle of rosé wine, you want to record in the fields early in the morning to showcase the vines under the soft dawn light. If you record the same fields later in the day, they will look more ordinary, less magical. Unless you have snagged Clint Eastwood for an interview and want to show off his craggy face, you should avoid the noonday sun. Harsh sunlight is rarely flattering at the noon hour.
▲ Sunset. Don’t put away your video camera as the sun goes down. Here, the sky warmed after sunset, and lights on the buildings in San Miguel de Allende further dramatized the scene at dusk.
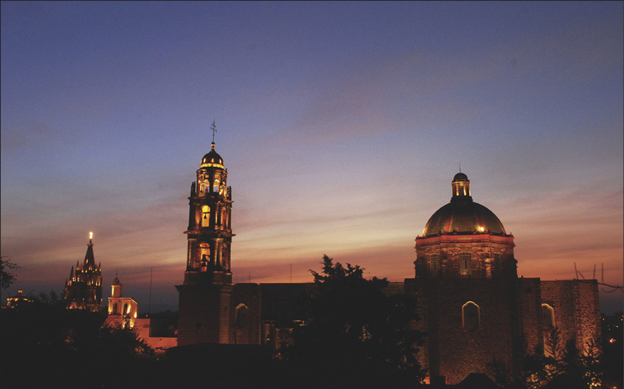
(Photo by Betsy Brill)
▲ Night. Even at night, you can often continue shooting by taking advantage of any possible available light such as the head lamp of this grape harvester.
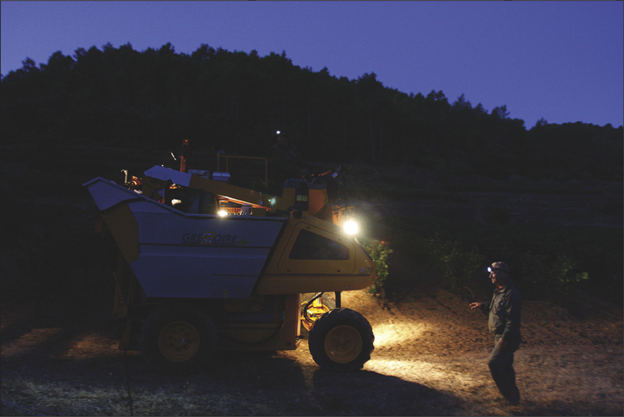
(Photo by Ken Kobré)
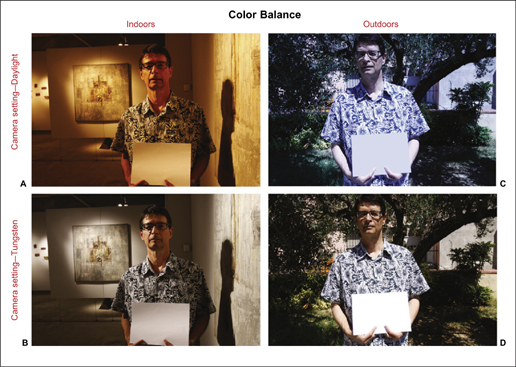
▶ Seeing Color: The Eye versus the Camera. Through the magic of the human brain, our eyes would see the white paper in these photographs as white whether viewed inside or outside the art gallery. Of course, a camera’s sensor does not have our brain’s adaptability. However, many cameras do have a color-correcting feature, usually called “white balance,” that can ensure white is white once the camera is “told” the kind of light under which it is working.
Under the tungsten light inside the gallery, the camera’s daylight setting results in white paper with a yellowish tint (A). But once the tungsten setting is selected, the camera corrects the color to record the paper as white with no color bias (B).
With the camera’s sensor set to tungsten but used outdoors, the paper records with a bluish tint (C). Once the camera’s white balance is set to daylight, white looks white (D).
(Photo by Ken Kobré)
WHITE BALANCE ENSURES CONSISTENT COLOR
Try this experiment: hold out a piece of white paper and take it from a room lit by a lamp directly outside to an area lit by the sun overhead. The white paper is white, right, both indoors and out?
Now, with your video camera’s white balance set to tungsten (the lightbulb symbol), record the white piece of paper while outside in bright daylight. Return to the original room setting where you began and photograph the paper without changing the camera’s white balance setting. Is white still white?
Different light sources reveal different colors. The color of direct sunlight is different (more blue) than the color emitted by tungsten light (yellowish). Fluorescent light is greenish.
Your magical brain is at work. Knowing that the piece of paper is white, your brain psychologically and instantly reinterprets the change in color from one light source to another. Thus you always think you are seeing white paper regardless of the color of the light that actually is tinting it. This phenomenon is known as “color constancy”.
Lacking the psychological ability to know that white paper is white, the video camera simply records the paper as tinted by whatever light rays reflect of it. To the video camera, the white paper looks quite different under the sun than it does under the glow of lightbulbs.
The white balance feature on video cameras is the secret to reproducing colors as the human brain interprets them. This feature detects and attempts to electronically neutralize the color shifts engendered by different light sources and to compensate for whichever light source is available: a fluorescent-lit laboratory, an office lit by tungsten bulbs, a sunlit beach, or the shade under a tree.
We need to tell the camera what color white is.
Auto White Balance Works Most of the Time
Most video cameras have the capability to automatically measure the color of light at a scene and to set the white balance accordingly. In the following circumstances, the camera’s automatic white balance feature works quite well:
• Outside on sunny days
• Inside when all the light is coming from incandescent lightbulbs, such as in a living room
• Inside under fluorescent lights
• Inside under energy-saving bulbs
Also, automatic white balance is usually the preferred choice when you’re moving back and forth from inside to outside, or from sunshine to shade. If you’re attempting to manually adjust the white balance between every venue, even the most perfectly color-balanced images won’t compensate for missed action.
When Auto White Balance Doesn’t Work
The following four situations may challenge your video camera’s auto white balance feature:
• Rooms with mixed light from multiple sources, such as window light mixed with incandescent lamps
• Ballparks or parking lots with sodium-vapor lights
• Rooms with walls painted in strong colors
• Snow-covered fields or ice rinks
Dialing in a Preset White Balance
When shooting for an extended period in one location, consider using the camera’s preset white balance feature. The following settings are available on most video cameras. (Check your camera’s manual.)
• Daylight
• Cloudy
• Shade
• Fluorescent
• Tungsten
• Fluorescent H (for newer daylight-balanced fluorescents)
With a specific light source identified and preset, the camera will not be fooled by strongly colored situations such as a living room painted red or a hospital corridor painted green.
“High definition cameras seem to be much more sensitive to any change in color temperature,” warns John Goheen, of Terranova Pictures. “This is especially true when shooting outdoors. Any change in light from direct sun to shade can change the consistency of color. I find myself color balancing far more often with HD than I ever did shooting with SD formats.” Goheen notes that in the end, you can do color correction during editing. “But, as they say … there’s nothing better than doing it the right way the first time”.
Custom White Balance for Highest Accuracy
For even more consistent color, use the camera’s Custom White Balance feature.
In the comparison pictures shown on this page, the interior of the art gallery has no windows to allow outside light to penetrate. It’s illuminated solely by tungsten lightbulbs. In a situation like this, you could leave the camera on auto white balance and let the camera decide the best color correction, but the results still might have a light yellowish tint. Alternatively, you could select a preset option, in this case incandescent (lightbulb icon), or opt for a custom reading to ensure the most accurate color rendition.
◀ Automatic white balance in this situation left the picture with a slight yellow tint.

(Photo by Ken Kobré)
◀ Custom white balance gives the best result, eliminating the tint that affects the color of the wall and the actual colors of the painting.

(Photo by Ken Kobré)
Keep in mind that neutralizing a scene with the white balance feature on either automatic or custom is not always a good idea. If you’re following a surfer on the beach at sunset, turning the reddish hue of your subject’s white T-shirt into a neutral tone is likely to sap the beauty from the entire scene. In this kind of situation, you should set the white balance to outdoors (the sun symbol) to preserve the warm tones of the setting sun.
Steps for setting a custom white balance. Professional videographers always try to set a custom white balance manually with a white card in order to achieve perfect color balance. Especially in interview situations when the subject is not moving, you almost always have time to get perfect color adjustment. You don’t want your subject to have a bulb-induced golden glow that makes him look like he’s been at the beach when in fact he hasn’t left his library in weeks.
◀ Custom White Balance. To ensure perfect color balance for your shot, stand in the light in which you are going to shoot, point the camera at a white sheet of paper positioned in that light. Then, follow the directions given in “Steps for Setting a Custom White Balance”.
(Photo by Ken Kobré)
▼ Hard light like that from the sun or a spotlight creates sharp, dark shadows on this carnival mask. In the early morning or late afternoon, the sun is close to the horizon. It casts long shadows and, when coming from the side, rakes across the surface of an object, increasing the sense of texture and volume. Hard light works well for lighting objects but is not as effective for lighting people.
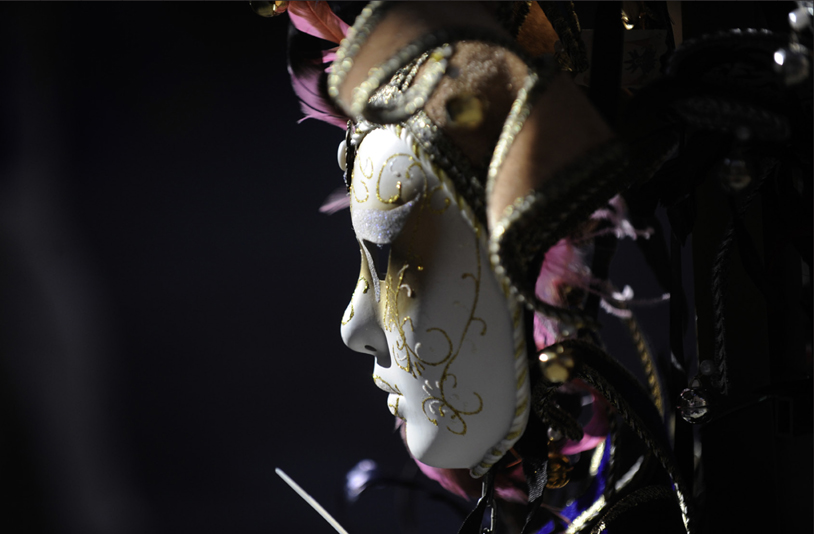
(Photo by Ken Kobré)
Taking the time to manually adjust the white balance will assure accurate, realistic skin tones:
• Stand in the same light conditions as your subject.
• Select “custom white balance” on your video camera.
• Place a white card (objects such as a white shirt will do) in front of the lens so that no shadow strikes it.
• Place the white card near where the interview subject’s face will be, especially if there are multiple light sources in the room.
• Zoom in so that the card (or white object) fills the image frame.
• Press the white balance (WB) button. (See your camera’s manual for specific instructions.)
• Confirm that the camera has created a new custom white balance setting. The camera should convey a message.
• Maintain this setting as long as you continue to shoot under the same lighting conditions.
• Remember to reset the white balance when you move to a new location and a different light source. If you’ve white balanced for the sun, don’t forget to reset the white balance when you move to the shade. If you don’t, your footage may turn blue.
Saving the Day When All Else Fails
No matter how hard you’ve tried, sometimes you forget to set the camera to the correct white balance. Some editing programs do allow adjusting the color during postproduction. This adjustment step is time-consuming but can sometimes rescue what otherwise would be unusable footage. (See Chapter 13, “Editing the Story.”)
QUALITY OF LIGHT
Amateurs are often poorly advised to “stand with their camera where the light comes from over the shoulder.” This setup creates safe but usually uninteresting front light in which the entire subject is evenly lit with precious few shadows visible. Back or side lighting creates a much more dramatic look, with shadows to lend depth and tone to the images.
Light casts shadows that can emphasize or diminish texture and volume. Selecting the most appropriate light depends on the characteristics of your subject and the tale you are telling. Do you want your story’s main characters to look worn, or would you prefer to show them relaxed? Is your subject a farmer or businessperson? Is the point of your story how youthful an older person looks? Or does it concern a young person prematurely aged by disease or drugs? If you want to emphasize a person’s wrinkles, shoot in hard sunlight. The direct rays of the sun leave deep shadows on the face. If you want to soften your interviewee’s appearance, which is usually the situation, avoid that midday sun and shoot under a cool porch awning where the light will be indirect and shadows and highlights will be evened out.
When looking at the quality of light on a scene, consider:
• Direction of the light
• Shadows cast by the light
• Position of the camera
Before you shoot, take a moment to test alternatives to improve the quality of light in your footage:
• Move the camera to another position so as to capture the scene in a more dramatic light.
• Move the subject of an interview to a more flattering, less glaring light.
• Use a reflector to bounce some light into the subject’s face. Even a sheet of white paper can act as a reflector.
• Add artificial light (discussed shortly).
BACKLIGHTING CHALLENGES
A bright light source, such as the sun aimed at the camera, can present challenges for the videojournalist. Sometimes you can use this type of lighting for dramatic effect. But you need to be aware of the pitfalls as well.
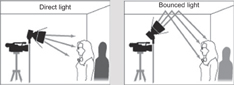
Fill Lighting
When recording an interview outdoors with the sun behind your subject, the person’s face may not be not sufficiently lit. In this case, using a white fill card can brighten the person’s face. When shooting interviews, bring along large white cards, foam core, or a foldable reflector—just in case. The best technique is to hold the reflector in front of a subject whose back is to the sun. The light from the sun coming from behind will bounce of the reflector onto the subject’s face.
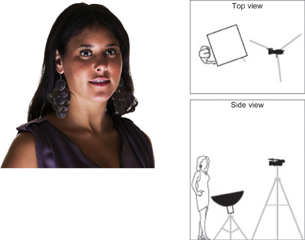
▼ Diffused or soft light illuminates all parts of a scene evenly. The light reaching the courtyard in this picture was diffuse. It bounced off the gray walls and pavement as a young man who had had polio walked upright for the first time with his new braces. The light rays scattered in many directions. Shadows, if they are present at all, are relatively faint. Outdoor diffused light gently bouncing off an area’s walls can be beautiful for interviews, too.
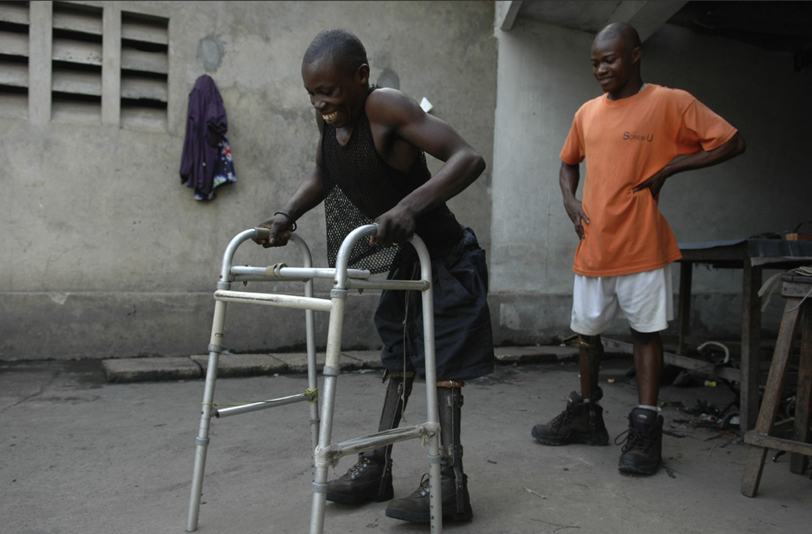
(Photo by Ken Kobré)
▶ A portable passive reflector made from cloth or foam core can bounce light onto an interview subject’s face and so eliminate harsh shadows.
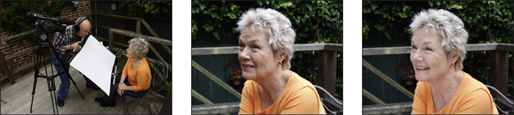
(Photos by Ken Kobré)
The challenge for the one-man-band is obvious. It can be tricky to hold the reflector, run the camera, and carry on an interview all at the same time. Sometimes you can get a bystander to hold the reflector. Alternatively, you might add a light stand to your interview lighting kit and attach the reflector to it.
Stan Heist, an award-winning Baltimore videojournalist turned teacher, observes, “When I worked in a team I would use light reflectors like a Flexfill, but solo it’s pretty tough. Instead, I look for natural reflection (such as a white box truck, a car windshield reflector, even a small legal pad). The principle is the same, but much easier than holding a floppy reflector”.
Lens Flare
You really do want to use a lens shade at all times. Hollywood cameras have huge, boxlike lens shades. If your video camera does not have a lens shade, buy one. And if your video camera can’t accept a lens shade, hold your hand out flat like a visor to block the sun’s direct rays from reaching the lens. (Be sure to watch the monitor or viewfinder so as to keep your hand out of the picture!)
▲ Always use a lens shade or your hand to prevent direct light from entering the lens.

Dirty Lens
When you are shooting a backlit subject—bright light is streaming toward you and into your camera lens—you must be doubly aware of this situation because any dust, dirt, or other particles present on the front element of your lens or UV protective filter will show up onscreen as out-of-focus, distracting blobs in the final footage. Even with the most careful cleaning of lenses and filters, backlighting still brings out tiny particles of dust you may not even have noticed. If you have thoroughly cleaned your lens with a soft cloth or lens tissue and you still see spots when you shoot directly into the sun, your only alternative may be to try reframing your shot so as to avoid the sun’s direct rays.
INDOOR AVAILABLE LIGHT
Whenever possible when shooting video, use a room’s natural light. Shooting under available light is always easier and often better than adding light to a scene. With natural light you don’t have to drag out the lamps, set up the light stands, or run extension cords all over the room.
Natural light is honest. It shows if the person lives or works by window light, overhead fluorescent tubes, or the light of a fireplace. Each light source conveys a different mood.
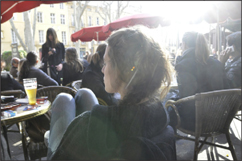
▲ Lens Flare, without Lens Shade. When shooting toward the sun or a lamp, light can strike the lens directly. This can cause bright circles or can degrade sharpness and wash out color, as in this image of a woman at a café. Sometimes lens flare can add excitement or convey warmth. Usually, though, it looks like a mistake.
▲ Avoiding Lens Flare. To avoid lens fare, use a lens shade or block the incoming light with your hand, a magazine, or anything else that may be handy and serve as a visor for your lens.

Your role as videojournalist is to pay attention to what light is available. Note whether the room is lit by north light coming through a skylight or from a 25-watt lamp-shaded lightbulb in the corner. By shooting from different angles and directions, the skillful videojournalist can usually find the ideal way to record the scene unfolding before the lens.
Modern video cameras can perform well practically anywhere there is enough light to read a newspaper. Although setting up complex lighting for a scene in a Hollywood movie is common, most documentary photographers avoid the hassle and prefer to use the light that exists. Remember that if you are concentrating on setting up the perfect lighting, you could be missing the real moments taking place around you.
Look for Natural Light for Interviews
The secret to good lighting is to place your camera or your subject in such a way as to use the natural light to best advantage. Ideally, side light makes the most dramatic light for interviews. Whenever possible, place the interviewee so that one side of the face receives indirect light from a window and the other side is in partial shadow.
Artifical Light
Sometimes, when the level of light is very low, there’s just not enough to capture clear, sharp video images. Though you can rectify this with a still camera by putting the camera on a tripod and slowing down the shutter speed, the option of decreasing the shutter speed does not work as well with a video camera. In video, if the shutter speed is too slow, the resulting footage looks jerky.
◀ A battery-powered portable light attached to the top of his camera enabled this videographer to shoot a guided tour in a dark museum.
(Photo by Ken Kobré)
▼ Window Light When Available. Near a window or lamp, the light probably will be directional, with bright areas fading off quickly into shadow.
(Photo by Ken Kobré)
Outdoors at night or indoors when the light is so low you can barely see your hand, you will need to add some extra light to shoot high quality video. You can, of course, put a light on your camera. Or you can set up one or more lights in the room. Sometimes just one light bounced off a white or light-colored ceiling is enough to improve the quality of video. Depending on your subject and the time you have to set up, you might want to use two or three lights for a portrait-like interview.
Single On-Camera Light
Essentially, any on-camera light directs most of the light to the nearest subject and leaves the farthest subject in the dark. Unfortunately, the on-camera light, because of its small size, also casts harsh, unnatural shadows from the front subject onto the background. Also, a small on-camera light source is generally unsatisfactory because it is unlikely to cover the entire scene captured by a wide-angle lens. When this is the case, the on-camera light brightens the center of the picture but leaves the edges unnaturally dark.
All in all, a portable on-camera light tends to give video footage an artificial “police lineup” look because the light eliminates any of the situation’s natural ambience. Nonetheless, if you are caught in a dark location and have no other choice, an on-camera light can save the day—or night.

On-camera direct light shows photographer Annie Leibovitz in a most unflattering manner. It produced those reflections in her glasses and developed a harsh shadow under her chin.
Bounced light off the ceiling evenly lights the scene. Both Leibovitz and the picture she took are evenly exposed.
If you aim a floodlight straight toward a subject it will often produce a harsh shadow on the rear wall. By aiming the floodlight upward and bouncing the light off the ceiling the harsh wall shadows disappear. This bounce technique produces an even, natural-looking light.
(Photos by Ken Kobré)
Bounce Light for a More Natural Look
If you find that you need to shoot in a cave-like room with barely any illumination, the easiest option is to bounce a light off the ceiling. Put the light on a light stand and aim it almost straight up. Place it out of the camera’s view. Now you can shoot freely with enough light to make a high quality image—with natural-looking illumination.
Here is how the bounced light works. Light rays from a floodlight exit the lamp in a bundle—about 2 or 3 inches in diameter. As they head toward the ceiling, the rays spread out. By the time they reach a typical ceiling, the rays cover an area of the ceiling about 10 feet across. Because the surface of the ceiling has some texture, the rays bounce off it in all directions, evenly lighting a much larger area below. The effect is a shadowless light.
Bounced light has at least two advantages over direct light aimed at a subject. Bounced light eliminates unattractive shadows produced by direct light. Bounce light also helps spread the light across a group evenly, removing the annoying effect of burning out those people in front or letting those in back go dark.
You also can bounce light of a wall, partition, or any other large, white, or light opaque object. Bounced light from a ceiling results in a soft, relatively shadowless effect similar to that produced by fluorescent tubes found in most modern buildings. Light bounced of a wall or partition gives a broad, directional effect similar to light from a window.
Note that you can only use this bounce technique only if the ceilings are not too high. Bouncing the light off the ceiling will not work in a church, a gym or, of course, outside. You can use the bounce light technique while leaving all the room lights as you found them. By combining bounced light and available light, the overall scene is brighter without losing its atmosphere.
Tip
When shooting still photos for multimedia, you can achieve the same effect with a flash that tilts toward a ceiling or wall, or with a pop-up flash bounced to the ceiling with Professor Kobré’s Lightscoop®.
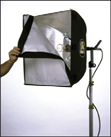
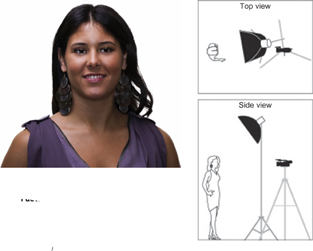
Soft Box for Portraits
Sometimes videographers bring along a lighting kit for interviews. The kit often includes a soft box with the front panel made of a translucent piece of material. The nylon fabric of the soft box is held together with tension rods. The inside of the box is white or silver and the front panel contains several layers of diffusion material. With a light situated inside the box, the setup is mounted on a sturdy stand.
The light travels through the layers of cloth on the front of the soft box. The cloth spreads the rays from the bulb evenly over an area as wide as the front panel of the box. The assembled soft box and light stand are a bit like a portable window through which light passes for a natural, softening effect. The portable window can be moved where it is needed.
With light diffused by a soft box, the demarcation between shadow and highlight on the subject is gradual as opposed to the abrupt hard lines produced from a direct, harsh spotlight. With the soft box, shadows on the background are also less distinct.
For an effect similar to a soft box, you can also direct your light into a white lighting umbrella. For an even softer effect, turn the light around so that it shoots through the umbrella’s fabric.
Placing the soft box or umbrella to the side of the subject creates a dramatic side-lit portrait. Positioning it directly in front will create fewer shadows, effectively deemphasizing wrinkles in someone’s face.
For optimum softness, whether it’s positioned on the side or in front, a soft box or umbrella should be as close as possible to your subject. The closer the light is to the person, the softer the facial shadows. When close enough, the umbrella light almost seems to wrap around the person.
Remember to look in the video camera’s eyepiece or LCD screen to be sure that direct light or the light stand itself is not in the picture.
▲ A soft box distributes the lamp’s rays over a surface as wide as the front of the box. Directing light through a soft box creates a natural look for portraits. The soft box leaves fewer harsh shadows on a subject’s face than direct light.
CAUTION WHEN USING A SPOT OR FLOOD LIGHT
ELECTRICAL CONSIDERATIONS
• Spot and video floodlights draw a lot of current. Turn off toasters, dishwashers, and other high-draw electrical appliances when you’re ready to turn on the video lights. You don’t want to blow out an electrical circuit.
SAFETY CONSIDERATIONS
• Use the correct equipment. Use light modifiers such as umbrellas, soft boxes, and diffusers specifically designed to safely withstand the high temperatures generated by video hot lights. Soft boxes and umbrellas designed for still photography and electronic strobes can catch fire when exposed to the heat of continuous video light sources.
• Bring heavy-duty cords. When using video hot lights, avoid a potential fire by using only heavy-duty extension cords.
• Use weights on light stands. Should someone happen to bump your stand, serious accidents can occur. Sand bags or other heavy weights on the bottom of the light stand can prevent potentially costly disasters.
• Quartz bulbs need special handling. Don’t touch quartz bulbs with your fingers. The natural oil from your fingers sticks to the bulb and causes a heat build up in the spot where you touched it. Over time, that bulb is more likely to blow out. If you have to change the bulb, wait for it to cool down and insert a new one holding onto the glass covering with a facial tissue, handkerchief, or cloth of some kind.
• Wear gloves. Because lights stay on for long periods of time, they get hot. Use special heat-resistant gloves or oven mitts when handling hot lights.
• Move hot lights cautiously. Better yet, let them cool down before moving them.
MOVING THE MAIN LIGHT
High 45° Lighting (Rembrandt Light). This is the ideal position for the main light when setting up an interview.

Bottom-Lighting. Light that comes from below looks distinctly odd in an interview. Light, whether outdoors or indoors, almost never comes from this angle. Lighting from the bottom casts unnatural shadows that can create a menacing effect sometimes called “Halloween lighting”.
Front Lighting. When the main light is placed near the camera, the face looks fatter and skin texture tends to disappear.

Side-Lighting. A main light that is at about a 90° angle to the camera will light the subject brightly on one side and cast long shadows across the other.

Butterfly Lighting. With the light high and aimed downward, the nose shadow leaves a small butterfly pattern on the upper lip. This lighting arrangement is often used for “beauty portraits”.
(Demonstration photos by Dave Hall and Sibylla Herbrich)
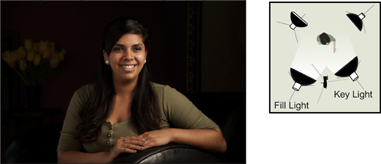
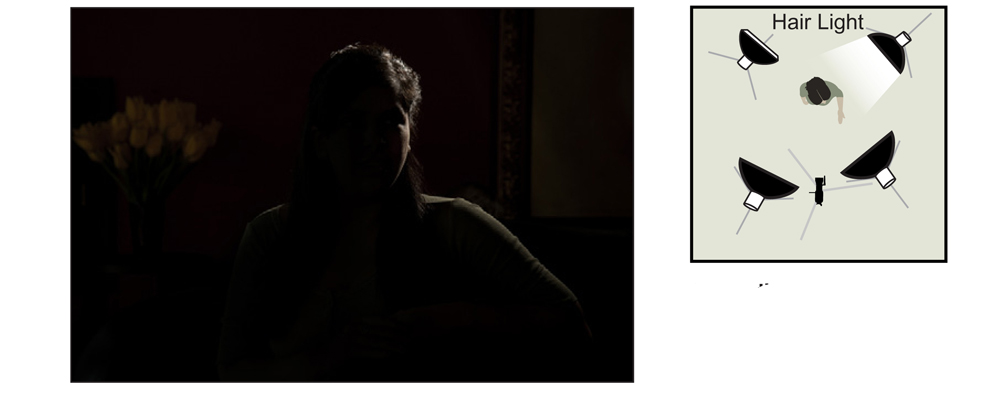
FOUR-LIGHT INTERVIEW SETUP
For high-end interviews like those on programs such as 60 Minutes or the national nightly news programs, lighting technicians set up three or more lights before the camera starts to roll.
This series of pictures shows an interview set up with a main light, fill light, background light, and hair light. The examples show the effect of each light separately and when all used at the same time.
With the main light, often called the key light, high and to the side of the camera at about 45°, shadows model the face, creating a more rounded shape. Both the subject’s eyes receive light. A triangle of light falls on the eye on the shadowed side of the face. A main light in this position is called Rembrandt lighting because the Flemish painter often arranged his sitters so that light fell on their faces in this manner.

The photographer turned on the fill light on the opposite side of the subject to lighten the shadowed side of the face. The photographer could also have used a large white fill card or portable reflector in front or to the side of the subject to achieve the same effect.
Here, only the background light is on. A background light helps to separate the subject from the background.
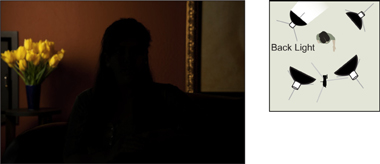
Only the hair light has been turned on for this image. The hair light adds a highlight to the top of the subject’s head and is especially important if the person has dark hair. You can use either a soft box or a light with a snoot—a cone-like device that fits on the front of the light fixture and funnels the light into a small area—to furnish the hair light.
For the final setup, all four soft box lights are on. (Demonstration photos by Dave Hall and Sibylla Herbrich)