
CHAPTER 9
Combining Audio and Stills
▲ Last Roll of Kodachrome. In this video, photographer Robert Cohen narrates and describes how he dug a final roll of expired Kodachrome 200 out of the back of his freezer, carefully and lovingly shot 36 frames at the Missouri State Fair, and then drove the film hundreds of miles to Kansas to have it developed before the only remaining laboratory closed forever.
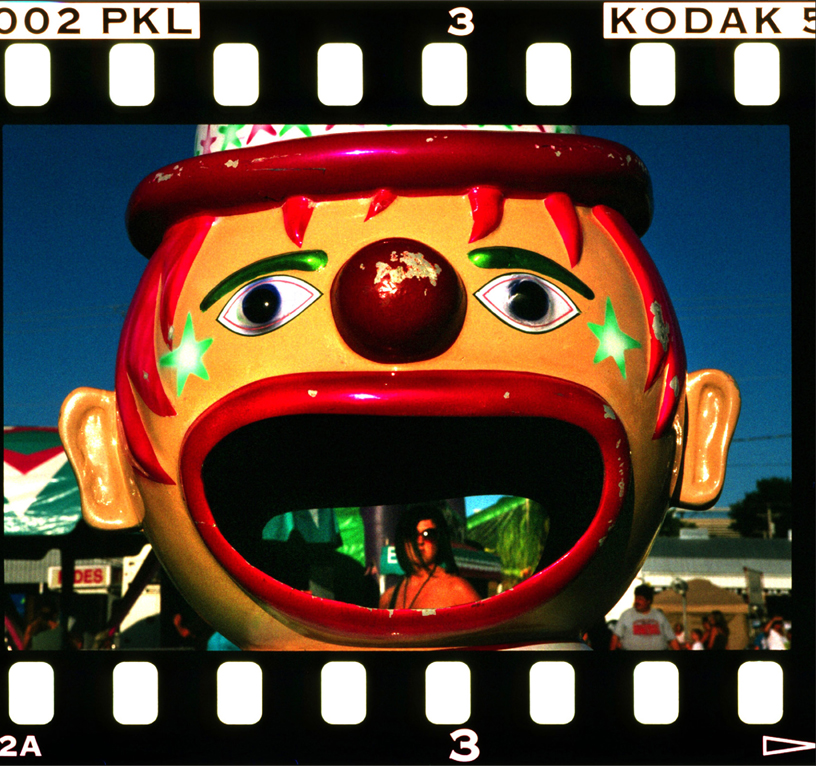
(Photo by Robert Cohen, St. Louis Post Dispatch)
This symbol indicates when to go to the Videojournalism website for either links to more information or to a story cited in the text. Each reference will be listed according to chapter and page number. Links to stories will include their titles and, when available, images corresponding to those in the book. Bookmark the following URL, and you’re all set to go: http://www.kobreguide.com/content/videojournalism.
Slideshows date from the latter half of the 1800s when explorers returning from the North or South Pole, Africa, or the tip of South America shared photographs of their adventures—in slideshows. The black-and-white or hand-tinted color images, fixed on glass plates, were shown using oil-lit “magic lantern” projectors. The images, accompanied by commentary, entranced and excited audiences. For the first time, at the beginning of the 20th century, audiences could not only hear about, but—more important—see for themselves the pyramids of Egypt or Mount Kilimanjaro. In the sliding glass plate slide shows by Jacob Riis, for example, people at last saw for themselves the shocking slum conditions of New York City.
FROM SLIDESHOWS TO MULTIMEDIA
Technology definitely improved with the invention of the lightbulb. Then, starting in the mid-1930s, slideshows evolved for ordinary people via another leap in technology—the advent of 35mm Kodachrome color slide film and the Kodaslide projector.
▲ Lantern slide projector, London 1880.
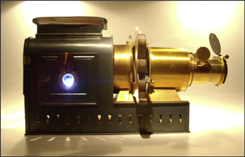
(Photo by Holger Ellgaard)
▶ Lantern slide images on glass plates were projected onto a screen.

(Photo by Andreas Praefcke)
Presentations became more sophisticated but still basically remained limited to projecting single pictures that were (or not) accompanied by the words of a narrator. Eventually some slideshows became what we called “filmstrips” in the 1950s and 1960s. Filmstrips provided the basis for many an elementary school’s geography, science, and history presentations.
Zooming forward a few decades, presenters began to exploit yet another wave of technological innovation to use computers to manage sound abetted by a projector that threw their still images onto multiple screens. Such projections created a sound-and-light multimedia experience.
When personal computers came along, the sound-and-light experience moved into homes, offices, and classrooms—and inevitably they also moved from those flat, white screens to computer monitors connected to the Internet. Rather than an in-person narrator, these new shows included a soundtrack to accompany the still images.
What should we call this hybrid, which now includes audio, still images, and sometimes, even video? We use the term multimedia as a standard throughout this book to indicate a blend of audio with still and/or video images.
INTERLOCKING IMAGES AND SOUND
When producing multimedia, you must keep audio uppermost in your mind. Creating a powerful piece demands that the words and images work together directly because eventually they are presented—and absorbed by the viewer— simultaneously. Still, the audio comes first.
When you shoot pictures and record sound, think of yourself as a radio reporter with a camera. Think: “What interviews and live, natural sound must I collect to communicate my story regardless of whether the audience ever sees the still pictures or video?” Keep the audio uppermost in your mind and isolate it from the pictures at first. Then ask yourself: “Which pictures should I take to reinforce my audio story line?”
▲ Waveform. The louder the sound, the taller the line in this audio editing program.

STILLS VERSUS VIDEO FOR MULTIMEDIA?
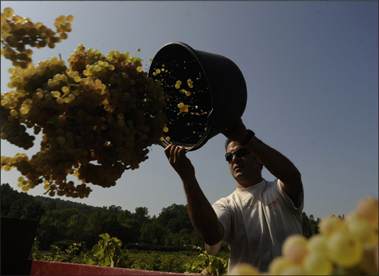
With the availability of inexpensive video cameras, why do photographers shoot stills for a multimedia project instead of video? The answers range from necessity to artistic choice.
The Case for Stills
A still photographer’s unique skill may be necessary. Photographers who have spent their lives shooting stills are likely to be more skilled with a traditional camera that they know intimately rather than with a video camera they don’t know well at all. Assigning someone like the extraordinary still photographer Sebastião Salgado to shoot a video would make no sense at all.
Only still images are available. When Brian Storm of MediaStorm produced the report on the black market trade in endangered animals, photographer Patrick Brown had already shot photographs for a book. Brown had found the still camera easier to use discreetly when trying to shoot in dicey situations. Going back for the same images with a video camera would have incurred huge expense and potential danger— and might not have strengthened the piece.
A video camera can be too obtrusive. Matt Gross, who writes and shoots the New York Times “Frugal Traveler” blog, notes that when he pulls out a video camera—even a tiny one— people on the street tend to shy away from his lens.
Using a still camera, a photographer can shoot a few frames and discreetly slip the camera under an arm or into a coat pocket, whereas a video shooter must record at least 10 seconds to capture sufficient footage for an editable clip. With video, there’s no pulling out the camera for a quick few photos and then nonchalantly strolling away.
▲ Large video cameras can distract subjects.
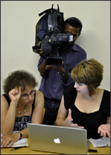
(Photo by Ken Kobré)
Video may be prohibited. At some concerts, sporting events, or theaters, the management doesn’t want spectators with a video camera to record the complete game or performance and later illegally sell or exhibit the results. Sometimes, however, they do allow still cameras. Prohibitions against video in places like these present problems for videojournalists.
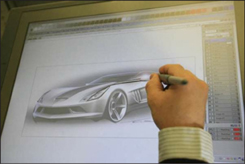
◀ Interchangeable Lens Camera. Shooting with an SLR camera allows the photographer to select a range of lenses from wide-angle to telephoto.
(Photo by Shmuel Thaler, Santa Cruz Sentinel)
A range of lens choice is necessary. Single-lens reflex (SLR) still cameras offer a wide choice of lenses, from fisheye wide-angle to 600mm telephoto. These definitely allow more visual options and greater control over foreground and background sharpness. With hybrid SLR cameras that shoot video as well as stills, this currently crucial difference between video and still cameras is becoming less critical.
▼. Black Market. The multimedia story “Black Market,” about illegal trade in animal parts, was originally shot as still images for a book. Inside Scotland Yard’s animal protection unit, an officer displays a tiger’s head seized during a raid in London.

(Photo by Patrick Brown)
Capturing the “decisive moment” may outweigh continuous action. When shooting stills, the photographer searches for the one perfect moment in which composition, light, movement, and body language all convey a coordinated message. A one-second video clip of the same moment does not carry an aesthetic and emotional wallop equal to a perfectly framed and precisely captured still image. A still image will remain on screen long enough for viewers to absorb its full meaning and artistry.
When Video Is Better
Capture motion. The video camera is ideal for capturing sustained movement, recording the flow of the action. Although the still camera, for which each image is static, captures a quintessential visual moment, the video camera registers what happens before, during, and after the “decisive moment.” Video links all the individual moments together.
Synchronous sound. Video records synchronous sound and images. The mouth of someone speaking moves in exact time with the words the viewer hears. The viewer sees the slap of a boxer’s glove while hearing the punch land in the same instant.
More realistic. Video is more realistic and parallels viewers’ actual experience of the real world. Although a still photo can become an icon, video absorbs viewers in a new world.
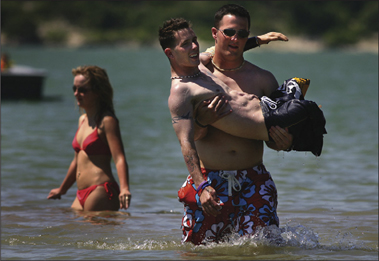
▶ Candid Moment. Jim Enderle of the U.S.S. Wasp is embraced by his wife Cindy and their two sons, Jeffrey, 6, and Lorenzo, 4, at the U.S. Navy Memorial Foundation Homecoming Statue dedication ceremony at Town Point Park in Norfolk, Virginia.

(Roger Richards, Washington Times)
▲ From the Wreckage. In this multimedia story about Detroit’s car industry, the producer used both still images and video![]()
(Kathy Kieliszewski, executive producer, Detroit Free Press)
Some stories are simply better illustrated with video. Brian Kaufman produced a story on a mentally impaired bowler who had thrown multiple perfect 300 games. A story like that is stronger for seeing the man bowling, witnessing his form, his power, his determination. That type of action story would not have been communicated as effectively with stills.
Combining Stills and Video
Many projects mix video and stills. In the Detroit Free Press’s story about the American car industry, “Rising from the Wreckage,” still images help convey history and video provides the medium for current interviews.
Brian Storm, founder of MediaStorm, believes video is best when action is involved and still photography is best for capturing decisive moments.
HOW TO SHOOT STILLS FOR MULTIMEDIA
Still photographers shooting for print are like hawks stalking their prey. One moment. One instant. One press of the shutter and they have swooped in for the capture—a prize-winning photo caught on a CF card.
Shooting stills for a multimedia project does require the eye of a hawk, but one must also develop the ear of a deer to be able to hear and record the perfect sound or quote. Moreover, we need the patience and industry of a beaver to build a complete project that is sure to hold the viewer’s attention.
One Picture is Never Enough
Through multiple pictures and audio, the multimedia shooter needs to present events both before and after the peak action so that the viewer can grasp the storyline and make out the significance of the images.
Although storytelling approaches are often said to be universal, the difference between shooting still images for a print layout and still images for multimedia is not unlike the difference between writing 17-syllable haiku and writing a 500-page novel. Both forms use words, but novels and multimedia use a lot more of them. Rather than photographing one decisive moment, you must capture the telling sequence, which always consists of a series of photos. Kim Komenich, a professor at San Jose State University and award-winning former photojournalist, calls this approach the search for the “decisive sequence.”
An average magazine story in Esquire or Rolling Stone might use six images. A multimedia piece—even a three-minute report— needs forty to sixty or more different images to engage a viewer enough to maintain attention on the pretimed piece. Forty to sixty photos is a lot of pictures.
Simply adding more pictures from a routine assignment can prove to be a photographer’s trap. David Leeson, a photojournalist whose still images have helped win Pulitzer Prizes for The Dallas Morning News, says, “It’s challenging enough to get ten or twelve great storytelling images for a typical print assignment.” He claims that the other twenty-eight or more stills in most multimedia presentations tend to be weak. “Those are the images that would have wound up in File 13—the trash can.”
Gary Reyes of the San Jose Mercury News says that his shooting style changes radically when he is producing a multimedia piece. The newspaper might use only one or two images, but Reyes says he needs about eighteen images— five seconds per image—to complete a one-and-half minute multimedia story. “You don’t want to have to throw in one or two crappy images just to fill out the slideshow. Every frame becomes more important,” he says.
Shoot Sequences Like a Videographer
Videographers covering a story will shoot a series of shots—wide, medium, close-up, reaction, and point-of-view—that they later will edit and combine into a smooth sequence of images that combines into a cohesive series— the building blocks of a complete story. (For a complete description of shooting the sequence, see , “Shooting a Sequence.”)
When shooting stills for multimedia, look for the following:
• Wide shot of the scene (WS). Either use a wide-angle lens or back up to shoot an establishing shot of every scene. Try to find a high angle from which you can take the overall shot.
• Medium shot (MS). Come in as close as you can but not so close that you can’t capture action as it unfolds.
• Close-up (CU). Record individual detail shots of relevant objects such as hands and faces that move along the storyline. Viewer delight lives in those details.
• Reaction shot of observers (RS). How do the people nearby or an audience respond to your subject’s personality, jokes, songs, discussions, or lectures?
• Point-of-view (POV). Let the viewer see the scene through the eyes of the primary character. Show what the character is looking at and, if possible, shoot it from the person’s eye level.
Stills that Add to the Story
Multimedia pieces require unique types of photos not found in typical print stories:
• Watch for transitions to introduce and end sequences. Subjects taking a bus/car/subway to arrive and to leave a place and images of the outside of a building to establish where the action will take place are examples of necessary transition photos.
▲ The Lifeline. Having followed a severely wounded soldier home from Iraq, the videojournalist ended the piece by showing the young man’s resumption of life, albeit a new one without legs.![]()
(Rick Loomis, photographer, Los Angeles Times)
• Shoot continuously. Fire rapidly using the “continuous” camera setting to capture a sustained series of images as your subject jumps, runs, walks, or talks. A series of quick shots, sometimes referred to as a flip-book or animated technique, can help simulate the illusion of real motion in your multimedia piece. When shot and played back fast enough, the resulting images can approach the natural movement captured by a video camera. Photojournalist Ed Kashi employed the technique to dramatic advantage in showing life in “Iraqi Kurdistan.”![]()
• Build up to an event. Arrive before the action starts and record the preparation.
• Capture the closure. Photograph the end of an event, right down to the last guest leaving and the deflated balloons sagging to the ballroom floor. For a story rather than an event, look for a situation that seems to bring the piece to a close.
• Copy photos from a photo album, refrigerator, or wall. These kinds of snapshots or random photos can help provide graphic visual history that will coincide with the stories your characters reveal about their past.
▶ Focus Pull (Rack Focus). Using the technique of focus pull, also called rack focus, you can shift the point of focus from near to far while keeping the camera’s aperture open to its widest setting, and cause the viewer to pay attention to different parts of the picture.

(Photo by Ken Kobré)
• Take portraits of every significant person whose voice is in the story or who is referred to in dialog or an interview. Use clean, simple, backgrounds. Take many portraits. Photograph subjects while talking and while silent. The audience always wants to see the person who is speaking or being referred to.
▲ Portraits are a Must. You will need portraits of everyone you interview for the multimedia piece.
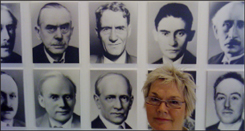
(Photo by Ken Kobré)
• Change focus to change emphasis. Switch focus. Start with the foreground sharp in one frame. Then switch focus so that the background is sharp in the following frame. This approach is excellent for redirecting viewers’ attention from one person or place to another.
• Frame horizontally. When possible, images for multimedia should be framed horizontally. Multimedia players on websites are in the shape of a horizontal box. Vertical pictures will work, but they will be smaller than if they were horizontals, have a black band on either side, and generally look out of place in multimedia pieces.
• Compose the image including some extra space on the edges of the frame that extend beyond the key subject. This wider composition is particularly important if you are not sure how the images will be used in the final presentation. Some projects require 4×3 proportions (the shape of the traditional television screen); others require a 9×16 HD format.
HOW TO RECORD AUDIO FOR MULTIMEDIA
The Challenges of a Circus Performer
Merely trying to hold a weighty single-lens reflex camera and manage all its buttons, dials, and adjustable rings while you are trying to set, activate, and point an audio recorder’s microphone can challenge the most agile and experienced professional. At first, it’s a bit like simultaneously patting your head and rubbing your stomach. When you’ve finally got the knack, you will feel like a circus performer spinning ten plates in the air at the same time.
Some practitioners say, however, that though challenging and risky, documenting people in action on camera while recording their voice at the same time is not only possible, but can even produce riveting dialog.
One downside of simultaneous shooting and recording is that the sound of a still camera’s shutter can be annoying on an audio track. To avoid the clicking sound completely, just stop shooting when a subject is pouring out his or her heart. You can tactfully begin again during pauses.
Some pros recommend that when taking stills, concentrate on stills. When recording audio, focus on that. Once you commit to putting down one piece of equipment and picking up the other, live with that decision. This approach ensures that you are using the right tool for the right job at the right moment.
▲ Interviewing with an audio recorder and separate mic often requires using both hands. Does this storyteller know whether the speaker’s voice is being properly recorded?
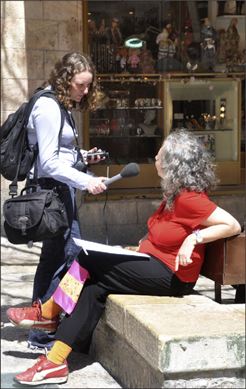
(Photo by Betsy Brill)
Which Comes First, Picture or Sound?
“Which should I work on first, pictures or sound?” muses Nat Meyer of the San Jose Mercury News. “That depends. If there’s sound that I think might be gone in a few minutes, I’ll probably break out my MiniDisc and start recording. If the light is perfect but fading, I’ll most likely make pictures first.”
Meyer is of the school of multimedia producers that accepts the fact that you simply will miss some great sound when you shoot pictures, and you are bound to miss some pictures when you record sound. “For interviews, you can either choose to ask questions before or after the event you’re photographing,” he says. “I’ve done both. The majority of the time I get to an assignment, then talk with a subject for several minutes before shooting a frame. So why not take live audio during those few minutes? Later on, it will also be beneficial to re-interview the person. Once you know what you’ve photographed, you should have a general idea of how you are going to sculpt the slide show. Thus you can ask questions which relate to your vision.”
Brian Storm of MediaStorm is a kindred spirit to Meyer. “I’ve tried shooting and collecting sound at the same time,” says Storm. “It doesn’t work for me very well. Getting good sound takes just as much skill, energy, and focus as getting good pictures; it’s tough to do both things at the same time”
Headphones Are a Must
Wear headphones while recording audio with any device—and in any situation. With headphones in place, you will know whether the sound of the shutter’s click is truly distracting or not really noticeable. Also, only when wearing headphones can you evaluate the general sound levels of the place in which you’re working. This is ultra important for static interviews as well as in active situations. In a restaurant kitchen, for example, the banging of pots can convey a sense of reality to a story. But this ambient noise may also drown out the chef’s tasty advice during the interview. You won’t know for sure what it all sounds like if you can’t hear what is being recorded.
Recording interviews
First, put down the camera. Then:
• Find a quiet place to hold the interview.
• Hold the audio recorder in front of the subject’s mouth about 3 or 4 inches away. Or, place it on a table in front of the person for a sit-down interview but keep it as close as possible to the subject’s mouth. Putting the recorder on a low stand might help.
• Keep the mic just below the person’s chin. If you put the mic directly in front of the subject’s mouth, you will pick up popping sounds created by breaths between statements.
• Feel free to forgo an external mic when interviewing with a handheld audio recorder, as most of these deliver excellent sound.
• Wear headphones attached to the audio recorder to monitor sound levels.
▲ Hold the microphone three or four inches below the interviewee’s mouth, just below the chin for the clearest audio recording. Keep the mic below the subject’s mouth to avoid hearing annoying “pops” as the air comes out of the interviewee’s mouth. And wear headphones so that you will hear what actually is being recorded. Note the use of a windscreen on the recorder to muffe the sound of wind.

(Photo by Ken Kobré)
Shooting and Recording Simultaneously
Sometimes a second pair of hands can be invaluable when you are trying to record sound and images at the same time. If you are working alone on your story, is there someone around whom you might quickly train to help handle the recorder while you shoot? A family member or colleague? Or, perhaps, a bystander in a crowd?
Velcro. One photographer suggests gluing a piece of Velcro® to the audio recorder, then wrapping a band made from the facing piece of Velcro around your wrist. With the recorder attached to your wrist, both hands will remain free to operate the camera. The downside to this clever idea is the proximity of the camera to the microphone. The sound of the shutter clicking is likely to prove annoying in this case. No matter what, always use headphones attached to the audio recorder to monitor the sound.
Voice-activated audio recorder. Place the recorder, camouflaged from view, in your subject’s shirt pocket. Turn the recorder on and just let it run. Use either the built-in mic or a lavalier (“lav”) mic. If there is any “dead sound” as a result of using this technique, you can remove it when editing. The downside to this approach is that because the recorder is on the body of the subject, you can’t wear attached headphones for monitoring sound quality.
Wireless lavalier. To produce the most professional audio results, place a wireless lavalier mic and transmitter on your subject. You will wear the wireless receiver, the audio recorder, and headphones attached to the recorder. This setup will free the person to move about unencumbered by wires—and free you to concentrate on pictures instead of chasing around with a microphone in one hand and your camera in the other. Because a wireless mic is on the subject and not on your camera, it will lessen (though won’t altogether eliminate) the clicking sound from your still camera’s shutter. A wireless mic also allows backing away with a telephoto lens. This arrangement will increase the distance between subject and camera and decrease the loudness of the shutter’s click picked up by the wireless mic.
STORYTELLING WITH AUDIO
Most multimedia reports break down into the following styles of audio: a report with only natural sound, a report with a voice-over correspondent, and a report narrated by the person who also created the visual images.
A Report with Only Natural Sound
▲ Playing Italy’s Finest Violins. A pure audio report with only natural sound is rare but possible. Shooting for the New York Times, David Yoder photographed a story called “Playing Italy’s Finest Violins.” The piece showcases a master violinist who plays historic instruments to keep them in shape. The only sound for the entire piece is the music played by the violinist. Produced by Joshua Brustein, the report also included captions and an accompanying written article by reporter Ian Fisher.![]()
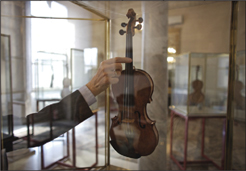
(Photos by Dave Yoder, New York Times)
A Report with a Voice-Over Correspondent
The voice-over correspondent is usually the reporter accompanying a photographer. In the Palm Beach Post’s effective multimedia piece “Train Jumpers,” writer Christine Evans’ voice-over, backed by natural sound, provides facts and conveys heart-rending individual stories that further bring to life Gary Coronado’s powerful, award-winning images. The project successfully documents the dangerous, desperate journey of Central American immigrants to la tierra prometida—the promised land of the United States and the jobs it represents. Coronado rode the rails himself for months to document the treacherous quest for a better life. The reporting/photography package not only captures the perilous journey but also introduces groups trying to help the desperate immigrants who are wounded or mutilated along the way.
A Report Narrated by the Image Maker
Perhaps the most gut-wrenching example of a photographer narrating his own piece is called “The Reach of War: A Deadly Search for Missing Soldiers.” While New York Times photographer Michael Kamber was accompanying a platoon of soldiers on patrol in Iraq, one soldier was killed and others wounded. Kamber’s photographs and eyewitness account bring the viewer directly into the harrowing experience. Kamber’s voice-over explains the story and also provides incredible tension and depth. Kamber not only notes what happened when the soldier was injured but also observes what did not happen. “No screaming, never rushed,” he says of the medic, who stays calm through the ordeal. This kind of personal observation, something a still photograph cannot capture, is priceless in a dramatic story like this.
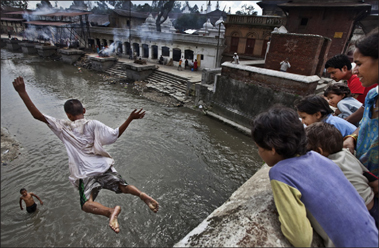
◀ Train Jumping: A Desperate Journey. The photos and story document the attempts of Central American immigrants to jump a train to the United States to find jobs. The writer provided the voice-over.![]()
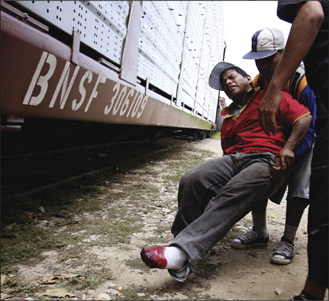
(Photo by Gary Coronado, Palm Beach Post)
EDITING MULTIMEDIA
Along with transitional images, you want to be thinking about visual variety in much the same way you would for a picture page or for a video sequence (more on that later). The edit needs wide, medium, and close-up shots in order to establish the scene, introduce the character, and show the action or conflict.
Image Pacing
In multimedia, good pacing is a delicate achievement. Viewers accustomed to fresh televised images flashing on a screen every few seconds tend to expect the same when watching a multimedia piece. Of course, you cannot regularly achieve a 30-fps image bombardment using stills, but you do not want to bore viewers either. Leaving images on the screen for too long is likely to send them clicking away to another story on the Internet. Conversely, viewers will not have sufficient time to absorb each image if it passes through too quickly. Assess the readability of the image when considering length of time on screen. A complex image with layers and emotion may need a few seconds longer on the screen than a simple image that features only one detail of the scene. As a rule, pictures in a multimedia piece should be on screen for five to eight seconds. A picture on the screen for more than eight seconds will seem to an audience as if it’s been hanging there for an eternity.
When viewing Gary Coronado’s “Train Jumpers” online, watch for the effective pacing of images during a series in which a young man races for a rapidly passing train and misses. ![]()
▼ The Reach of War: A Deadly Search for Missing Soldiers. The photographer not only shot the pictures but also wrote and recorded his own voice-over narrative.![]()
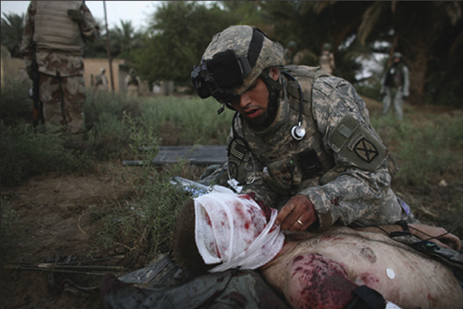
(Photos and story by Michael Kamber, New York Times)
When Images, Sound, and Text Compete
Although many multimedia reports include images, sound, and text, do not assume that viewers will read captions while looking at pictures and listening to audio. Despite all the hype we hear today about multitasking, scientists have proven that the human mind can do only one thing at a time. The brain can move quickly between activities, but it jumps linearly. You might say that the mind “cannot walk and chew gum” at the same time.
Plan your presentation so that viewers can concentrate on watching and listening to your multimedia piece. Think about how you examine a picture layout in a newspaper, magazine, or book. You cannot possibly read the captions at the same moment you are looking at the pictures. In fact, you may look at all the pictures before you return to the captions. Imagine adding narration or dialog to that mix. With a multimedia piece, do not expect the viewer to read slide captions while also listening to the sound and studying the image all at the same time.
Transitions for Multimedia
A transition photo works to bridge concepts and thoughts cohesively.
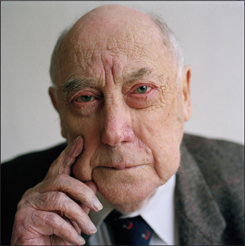
Each picture should have its place and should enhance what the viewer is hearing. Be careful not to be too literal—say dog, see dog—but understand that the pictures and sound must blend together well. In the Los Angeles Times story “Waiting to Die,” Edwin Shneidman compares his aging body to the decaying statue in his yard. With that metaphor in mind, the photographer uses a series of pictures, not only of Shneidman in various states of physical being, but of metaphoric images like two empty chairs that represent his mental state. At 90 years old, Shneidman believes he won’t live to see 91, and a photograph of various timepieces, clocks, and watches on a table in his home are photographed as a still life to reinforce the hard-to-illustrate imagery of time running out. Without these transitional photos so aptly illustrating Shneidman’s state of mind, the multimedia piece could have been nothing more than a series of portraits of a frail old man “waiting to die.” The transitional photos were not throwaway pictures. They were an important bridge that interconnected key storytelling moments in a well-wrought multimedia piece.
▲ Waiting to Die. This elegy-like story uses photos of the subject as well as symbolic images that represent his life.
Ambient sounds can also provide a transition from one section of your story to another. Sometimes you want to start the sound a few seconds before you show the image it goes with. This technique of leading with sound, called split editing, can smooth the transition from one aspect of the story to another. Usually the viewer does not even notice this sleight of hand.
Multimedia Takes Time
Your production time of a linear story will generally be much longer than producing or editing a story in still images. Keep in mind that by production time, we refer to the time spent behind the computer or with other producers— not out in the field recording and photographing. Many producers say that for every minute of final audio you will produce, plan to spend one hour, and for every final video you produce, plan to spend three.
Nancy Donaldson, a multimedia producer at the New York Times, says each project on which she’s worked takes a different amount of time to produce, and she stresses that yours will almost always take longer than you think—especially if you are a beginner. A multimedia news story covering an ambush of U.S. soldiers in Afghanistan was shot and recorded over two days by an embedded photographer. (An embedded photographer eats, sleeps, travels, and ultimately goes on missions with a company of soldiers.)
▲ A transitional photo of these two chairs implies that two people used to sit and talk.![]()
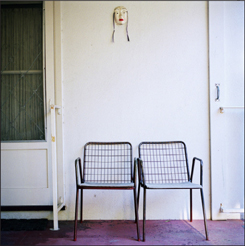
(Photos by Liz O. Baylen, Los Angeles Times)
▲ Ambush and a Comrade Lost. U.S. troops along with Afghan National Army soldiers use night vision goggles to move in the dark to seek information about the death of their fellow soldier, Pfc. Richard A Dewater.![]()
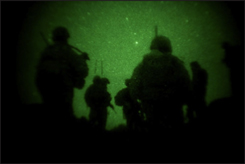
(Photos by Tyler Hicks, produced by Nancy Donaldson, New York Times)
Donaldson then spent two full 10-hour days to produce the piece on deadline. That story took at least 15 hours of work in the field by a photographer and reporter and another 20 hours behind a computer to make a multimedia piece of less than 3 minutes in length. This is a pretty standard amount of time for this type of story. If you are a beginner, plan on spending at least double the time it would take an experienced producer like Nancy Donaldson.
Soundslides: Easy Editing Software
Once you have finished editing the sound, you will begin to combine it with your photos to make a multimedia piece.
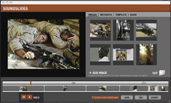
Soundslides is a simple, popular software application that photojournalists use to combine sound and images to create multimedia pieces for the Internet. Since 2005, Joe Weiss’s revolutionary Soundslides software has enabled hundreds of newspapers to produce multimedia pieces for their websites. For the first time, picture stories could be easily narrated—by the reporter, the photographer, the subject—and even augmented with natural sounds. Its low cost and simplicity of use have made Soundslides the preferred product of its genre. The website slogan for Soundslides is “Ridiculously simple storytelling,” and it is precisely that.
The Soundslides program basically digests JPEG photos and sound files and outputs them as a Flash animation file ready to display on the Internet.
First, you might edit your audio track using a separate program like Garage Band or Audacity, Sound Forge, or Sound Studio. Next, upload that audio file into Soundslides as an MP3 file. Then upload a selection of still photographs in the order in which you want them to appear. In the Soundslides program, you can rearrange the photos later if you need to tell your story differently. The length of the audio track determines the final story’s length. Each picture is shown in equal amounts of time as divided by the number of uploaded photographs. A 60-second audio file and 10 photos, for example, result in 6 seconds per photo. You can still manually adjust the duration of each photo’s onscreen time, but the total length of the piece will remain constant based on the 60-second audio file. Soundslides also allows adding panning and zooming movements to the pictures. Check the Web for reviews of various sound editing software packages.![]()
The downside of using Soundslides to produce your multimedia piece is that any change to the audio requires returning to the audio software, making the changes there, and then reimporting it into Soundslides. Then you must reimport the images, and finally, you must reset the pacing of the still pictures. For instance, if you have edited and imported an interview along with some still pictures and then realize you would like to add music, you have to start all over: add the music to the audio track, reimport the new track and the old pictures into Sound-slides and rearrange the pictures and the duration of time they show. (Altering the audio track is likely to result in it being a different length, which means Soundslides will have to redivide the photos to match the new length.)
Alternatives to Soundslides for preparing multimedia presentations include Apple’s Final Cut or Adobe Premiere. Soundslides is easy to learn and quick to use, but Final Cut and Premiere make it easier to edit the audio and pictures simultaneously. They also offer more control over the final piece.
For those who use a PC, Microsoft’s Photo Story 3 is a free alternative to Soundslides. Photo Story 3 allows smoothly combining images and sound.
You also might want to check out some of WordPress’s slide show plug-ins. They come in all favors and work seamlessly if your website uses WordPress.
▲ Soundslides is software used to combine audio with still images.![]()
SECRETS TO SHOOTING SMASHING PICTURES
▶ Get closer. This was the advice of legendary war photographer Robert Capa: “If your pictures aren’t good enough, you’re not close enough.” Often, the key to photographic pizzazz is to move in and capture details, leaving out extraneous background.

(Photo by Pete Erickson)
▶ Frame precisely. A corollary to “get closer” is to “frame precisely.” Framing carefully while coming in close can eliminate parts of a distracting background while still leaving enough of it to provide a sense of place.

(Photo by Juan Gomez)
▶ Be patient. Before starting to shoot, let people get used to you. As they relax, they start to forget the camera is there and go back to work at whatever they were doing before you showed up. You can catch candid shots this way.
(Photo by Ken Kobré)
◀ Throw the background out of focus by using a wide aperture (f/2.2 in this example) so that the busy background won’t distract from main subject. (From the project 21st Century Communism.)

(Photo by Tomas van Houtryve)
◀ Think “variety.” Be imaginative. Take shots from different angles, locations, and distances. In any situation, look for a good subject/object for a close-up, then back off a little for a medium shot, and finally, get high and wide for an overall shot.
(Photo by Shmuel Thaler, Santa Cruz Sentinel)
◀ Use natural light. Don’t use direct flash if you can avoid it. It looks forced and washes out colors and facial features. Instead, adjust your ISO to 800, 1600, or higher. One of these ISO settings will result in sharp indoor photos without fash.

(Photo by Ken Kobré)
▶ Don’t ask people to act or pose for you. Instead, capture them in the middle of an activity so the photo tells us something about their personalities, situation or interests.
(Photo by Jana Asenbrennerova)
▶ Use flash sparingly. Bounce the light if possible. An external flash can be pointed to the ceiling or wall to redirect, broaden, and soften the light. If you’re using the camera’s pop-up flash, consider instead sliding on the Lightscoop®, a mirrored device that will redirect and bounce light from the camera’s pop-up flash.![]()

(Photo by Sherri LeAnn)
▶ Shoot at dusk or at night. These times of day offer interesting shadows and light. Street lamps or even holiday lights—if they’re bright enough—can provide atmosphere. In low light, put the camera on a tripod to allow longer exposures.

(Photo by Pete Erickson)
◀ Avoid posing portraits. People are only human. Asking someone to stand or sit straight up results in uncomfortable-looking, tense postures that say nothing about the person. When taking portraits, a little leaning or slouching is desirable.
(Photo by Jana Asenbrennerova)
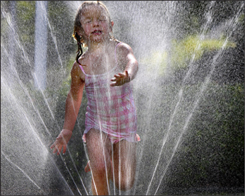
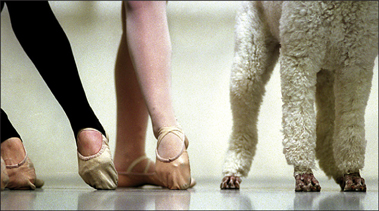
◀ Change your perspective. If you’re photographing young children, for example, try getting down to their level. Witnessing the world from their perspective will add a refreshing point of view to your pictures. Notice how adults, no matter their size, appear gargantuan from a child’s perspective.
(Photo by Shmuel Thaler, Santa Cruz Sentinel)
SECRETS TO SHOOTING SMASHING PICTURES REMINDERS
• Study your camera’s manual. You really do need to learn how to adjust your own camera. Learn about its available functions and locate all buttons, dials, and menu items so that you won’t become befuddled on an assignment.
• Shoot twice as much as you’re used to shooting. Don’t skimp. One difference between an amateur and a professional is that the professional shoots a huge quantity of pictures from a variety of angles, distances, and heights, and then discards all the weak, out-of-focus, poorly composed images, and saves only the best.
• Improve your skills. If you’re looking for a good general book about photography for beginners, try Photography, Barbara London, Jim Stone and John Upton (Prentice Hall). If you’ve got the basics down, go to the next level with Photojournalism: The Professionals’ Approach, Kenneth Kobré (Focal Press/Elsevier).