Chapter 1. Fundamentals
The true power of Merb arises from the framework’s emphasis on hackability. Though misinformed readers may misunderstand this term, thinking Merb means that their site is “pwnd” upon launch, that’s not the hack we’re talking about. Instead, when we say hack, we mean the act of extending the functionality of something beyond its original scope. Merb does this well, and in this chapter we’ll discover how Merb enables this kind of unbounded development by examining the hackability within Merb’s own fundamentals.
To do this, we’ll explore the Merb stack, discuss configuration options, and pull apart internals. If you’re a newcomer to Merb, you’ll pick up the practical know-how to get started using the framework. Experienced developers shouldn’t overlook what’s here, though, because while we’ve designed this chapter as a walk-through of the basics, it’s in no way an installation guide. The digging we do into the internals may reveal aspects of Merb that you have not yet found through routine development. In any case and no matter your background, by the end of this chapter you should be able to concretely identify the design decisions that have made Merb so agile and robust.
1.1 Generating a new application
The easiest way to set up a new Merb application is to use merb-gen. This command is standardly available as part of the Merb bundle. As a developer, you’ll be using it regularly to quickly generate common files used by Merb. One of its uses is the creation of a skeleton for the overall layout of new applications. Below we make our first app, by specifying the option app followed by the name of the application directory.
$ merb-gen app first_app
This creates a new directory named first_app as well as a number of subdirectories and files. Merb uses all of these subdirectories and files to define the application’s desired behavior. To run our first app, we first need to change the directory into its root and fire up Merb using the command merb:
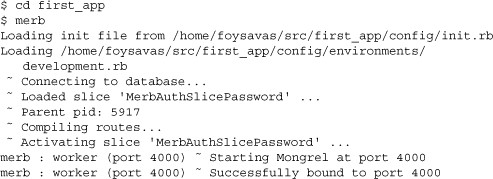
Our Merb app is now running and bound to port 4000. Consequently, if we visit http://localhost:4000, we’ll see a welcome page. We can shut down the Merb server by using Ctrl-C. Note that this may not happen instantaneously as Merb looks to gracefully shut down each of the worker processes.
1.2 The layout of a Merb application
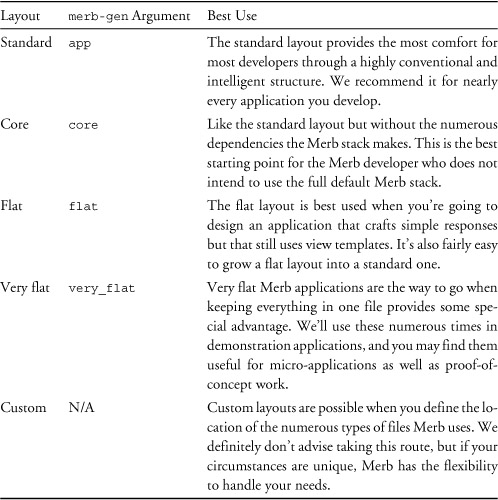
Now that we’ve generated our first application, it’s a good time to bring up the fact that the directory structure and file arrangement we just saw are not set in stone. Merb out-of-the-box is far more versatile than that. Though the layout we just generated is the standard Merb layout, merb-gen itself can produce a few alternative common layouts. These are best used for simpler applications and are known as the flat and very flat layouts.
Table 1.1 describes the various layouts available to you as a Merb application developer. In order to gain an understanding of what code is absolutely necessary to make a Merb application tick, let’s take a detailed look at what’s inside both of these flatter layouts before we move on to studying the standard full layout.
1.2.1 Very flat layout
Using merb-gen, you can easily create a single-file Merb application in the style of Camping or Sinatra. To do this, use the argument very_flat with merb-gen:
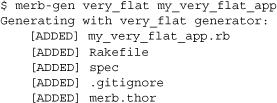
This produces a directory my_very_flat_app containing a single Ruby file along with some other useful files with content similar to the following snippet:
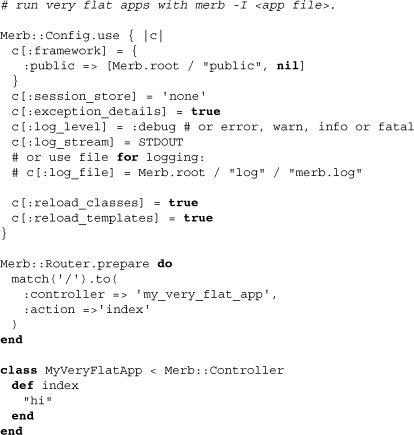
Stepping into its directory is not enough to run a very flat application. The comment on the first line, however, points us in the right direction. Using the -I flag, we can specify the init file for our Merb application:
merb -I my_very_flat_app.rb
Now if you visit http://localhost:4000, you should see the message returned by the value of the index action.
Getting back to the code, there are three sections: one for configuration, another for routing, and finally a controller. Each of these sections is fundamental in Merb application development, and that’s why they’re there. Strictly speaking, though, the configuration section wasn’t necessary in order to send “hi” to your browser. If it wasn’t there, Merb would use its default values instead.
Let’s take a look at the specifics of the config block and see which of the defaults have been overridden. The first of these is the location of public static assets. If you create a directory public/ in the same directory as the application and then add an image, say merb.jpg, you’ll be able to view it at http://localhost:4000/merb.jpg. The second line relating to sessions doesn’t actually override any default but has been included for you to change at will. The third line in the config block switches exception details to true. This allows you to see full exception details on error pages when they occur. For an example, take a look at http://localhost:4000/mybad. With exception details set to true, you will be able to view a stacktrace right in the browser. Set the config value instead to false, and after restarting Merb, you’ll no longer have access to the stacktrace via the browser.
1.2.2 Flat layout
If you want to use view templates, but still prefer a single file for the bulk of your code, a flat layout may be just what you’re looking for. The flat layout is optimal for simple Merb applications that do not use models but still have templates. Using merb-gen once again, you can create a flat app using the --flat option:
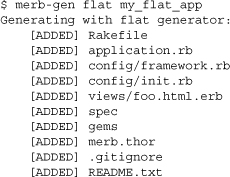
This creates a directory structure as follows:
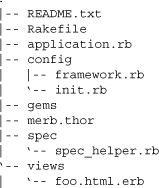
In order to run a flat layout, all we have to do is step into its directory and run merb. You’ll notice that we no longer need to specify a file to include. This is because by default config/init.rb is automatically included.
Incidentally, one of the largest benefits of jumping from the very flat to the flat layout is that the presence of the init file allows us to avoid restarting Merb every time we make changes to application code. Instead, in development mode, Merb automatically checks to see if application files have been updated and reloads the appropriate classes for us. You can try this by running Merb and altering the application.rb index method to say "Something Different" instead of "Hello...". If you check via your browser, the response will have changed without the need to restart Merb.
The principal difference here from the Merb standard layout is that all controller code (and possibly model code) is found in application.rb. Another difference is the inclusion of config/framework.rb. This file is actually what prevents Merb from thinking the application is of the default form by defining the flat layout. You’ll notice that config/framework.rb does this by just defining a hash:

If you change these values, Merb will on boot expect to find particular code in different places.
Let’s say you start with a flat application, but soon decide it needs to grow to the standard layout. You won’t have much trouble accomplishing the transition. Here is a series of terminal commands to help you on your way:

As exhibited above, it’s the removal of the config/framework.rb file that defaults us to the standard layout. Finally, though this will run as an application in standard layout, there may be a few more items of cleanup you’d like to attend to. Here’s a list to keep in mind:
• Pull out the router in config/init.rb and put it in config/router.rb.
• Separate app/controllers/application.rb into as many controllers as needed.
• Alter your controllers to subclass from Application instead of Merb::Controller.
1.2.3 Standard layout
Now let’s take a look at the standard layout. Returning to the directory of the first application that we created with merb-gen, we find the following directory tree:
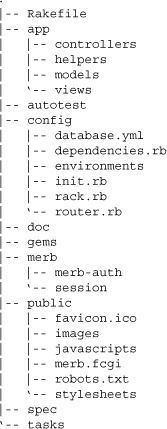
We haven’t included all the files the standard layout creates (there are a lot of them), but just enough to understand the structure. The directories spec/ and autotest/ serve to facilitate the testing of your application. The Rakefile and tasks directories provide common tasks for use in your application. For now, though, what matters most are these three directories: app/, config/, and public/.
The first of these stores all of your application code. To keep everything organized in an MVC way, app/ also has a few subdirectories of its own. By default these include controllers/, helpers/, models/, and views/.
Next up, config/ is a directory we saw in the flat layout. It holds init.rb and a number of other environment configuration files. Unlike the flat layout, however, it has a dependencies.rb file which is referenced in init.rb and by default includes the dependencies making up the Merb stack. Another file in the config directory is router.rb. This defines the routes for your application, mapping requests to specific controller actions. Another file definitely worth noticing is database.yml, which defines database access on a per-environment level.
Finally, the directory public/, which we also saw in the flatter layouts, is meant to hold assets for your application to serve. These may include images, stylesheets, javascripts, and other static files.
1.3 Interactive Merb
Often you’ll want to be able to dig around in a running Merb application. Interactive Merb allows you to do this by giving you an IRB session on a running Merb application. There are two ways to get this kind of console access. The first and simpler way is to add the -i flag to the command merb:

This creates an exclusive interactive instance of your Merb application not bound to any port. If, however, you wanted a Merb application that could respond to web requests as well, then using the -C flag provides a console trap on an otherwise typical Merb instance. To get to this console you have to hit Ctrl-C once Merb is booted. We do this below and then immediately return to server-only mode with the command exit.
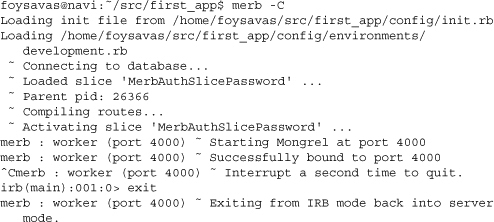
Using interactive Merb during development can often speed up the process since you’ll be able to directly interact with the code you’re writing. Some words of caution, though. First, don’t let this lead to writing complex methods you can’t comprehend, just because they produce the right results. Second, direct interaction can’t take the place of proper behavior testing, so don’t treat it that way. Making either of these mistakes will only put you behind later on, especially when you need to rework or extend what you have.
Another practical situation when interactive Merb is helpful is after you’ve deployed a production application and need to determine why something has seemingly gone wrong and correct it. Whether the bug is the result of a subtle misstep in deployment or an incidental result of rare production data, you’ll be glad you weren’t without console interaction.
1.3.1 Console methods
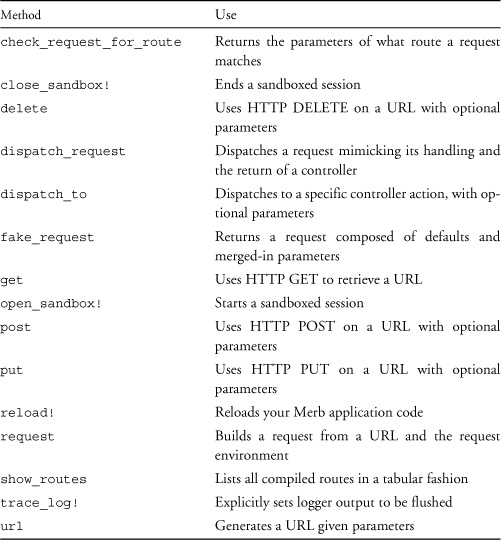
Interactive Merb also comes with a number of console methods, all of which are accessible through the object merb. These let you do things such as conveniently faking requests within interactive Merb. Below we use a helper method to retrieve a response body from a URL using the HTTP GET method on a fresh very flat application.

Table 1.2 lists the methods available on the merb object along with their use.
Table 1.2 merb console methods
1.3.2 Sandboxing
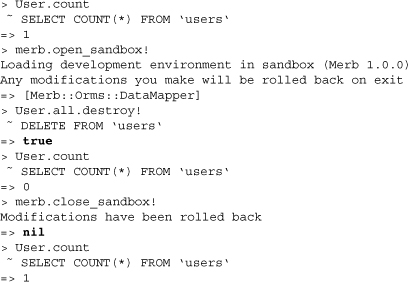
Interactive Merb is capable of sandboxing your activity, allowing you to mess around with database resources only to have all changes reverted when you exit the sandbox. This is extremely useful when you have fixture data (and for those who live dangerously, even production data) that you need to work with. Because we haven’t seen anything that involves databases yet, we’ll leave the following example for you to revisit at will:
1.4 Merb configuration
The config/ directory found in the root of a Merb application holds all the configuration files for your application. Some of these files, like init.rb, are always there. The others depend upon the demands of your application. Let’s take a look at the most typical configuration files that Merb files use and what’s inside each of them.
1.4.1 Init script
The init script is the first thing that Merb runs. As we saw when moving up from the very flat to the flat layout, it provided us with a jump in agility during development through class reloads. The init script itself, though, serves many other purposes, including basic configuration, inclusion of dependencies, and the selection of a testing environment.
1.4.1.1 Gems and load path
In the Merb world, gems are the preferred form of distributing plugins and libraries. Merb developers did not want to create yet another vendor lock-in-inducing plugin system. Instead, RubyGems was chosen since it’s already the standard for distributed packets of Ruby functionality and could work well with the Merb plugin infrastructure.
Additionally, the convenience of the gem-based system allows us to install specific gems within an application, in the directory gems/ in the application’s root directory. When the gems are loaded as dependencies, they are given preference over system-wide gems. The benefit of being able to install version-specific gems in your application is huge, allowing you to
• Share your application code with other developers without worrying about having different versions
• Deploy your application without any need to install all the gem dependencies on the production server
If at some point you want to freeze a specific gem inside your Merb application, you can do so using the install directory -i flag with gem. Here we do this from inside a directory with a gem by issuing the following command:
$ gem -i ~/src/your_app/gems dm-geokit-1.0.0.gem
Note that gem also installs the gem’s listed dependencies into your application for you. You may want to pass in the flag --no-rdoc to save on the size of your application’s gem/ directory.
1.4.1.2 Dependencies
Including gems as dependencies instead of directly requiring has been done primarily so that we can load application-installed gems if they exist. The dependency method also defers loading until after logging has been initiated. With this in mind, you should be able to use the method dependency just as if you were using require. If the string you pass in doesn’t refer to a gem, dependency will attempt to load it as a file via require.
![]()
You can also use the method dependencies to require a few dependencies at once instead of one per line. By passing in hashes, you specify gem version.
![]()
1.4.1.3 after_app_loads
Inside init.rb, you’ll find a method taking a block called Merb::BootLoader.after_app_loads. The boot loader evaluates this passed-in block after most of the application is loaded. This is useful if you need certain classes loaded before including a dependency or defining a constant within a module:
![]()
1.4.1.4 Template engine
You have your choice of template engines when using Merb. In fact, you can use multiple template engines by embedding templates inside one another. Still, when it comes to the template merb-gen, the templates are generated for ERB. If you prefer that they be in Haml when possible, you can change the following lines in init.rb so that the method use_template_engine has the :haml parameter:
![]()
1.4.1.5 Basic configuration
Merb stores configuration settings inside the class Merb::Config. You can do this in two different ways, first by explicitly using the class methods Merb::Config.[] and Merb::Config.[]=:

or instead by passing a block into the method Merb::Config.use:
![]()
1.4.1.6 ORM options
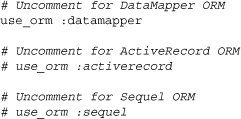
Inside the init script we see the lines for the three most popular ORMs, or Object Relations Mapping libraries, that work with Merb. Enabling any one of them is as easy as uncommenting a line. Below we’ve enabled the DataMapper ORM.
For more information on ORMs, please see Chapter 5 on models, which uses DataMapper and briefly covers the use of both ActiveRecord and Sequel.
1.4.1.7 Testing options
Another thing the init.rb file handles is your choice of testing suite. By default, Merb uses RSpec, and we’ll go over how to use it later on. If, however, you want to use Test::Unit instead, that’s as easy as commenting out one line and uncommenting the other:
![]()
Note that to complete this switch you may also have to install the merb_test_unit gem if it hasn’t been installed already.
1.4.1.8 Inflector
At the bottom of the Merb init script you’ll find details about how to customize the inflector. The inflector is used to take English words (really just nouns) and switch between their singular and plural forms. This may seem odd to include in an MVC framework, but its existence allows us a lot of ease in abstracting URLs and working with RESTful resources (REST stands for Representational State Transfer). That said, you may not end up using the inflector, but in case you do, it’s always there. You can test it in interactive Merb, simply by tacking the methods singular or plural onto strings of nouns:

If, however, you run into a word that is not being pluralized as you need it to be (let’s say, for example, you wanted the plural of forum to be fora), you would be able to use the init.rb file to assure this behavior by adding a line like this:
Extlib::Inflection.word "forum", "fora"
1.4.2 Environments
Merb can standardly run in three different environments: development, testing, and production. Up until now we’ve run Merb only under development mode. You can run Merb in these other modes by specifying the environment after the -e flag with the merb command:
$ merb -e production
Each of these modes runs slightly differently. These differences are defined in the files inside config/environments. For instance, inside config/environment/development.rb, we find
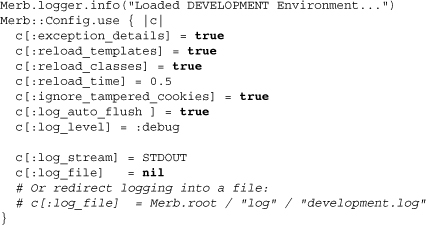
This file uses the method Merb::Config.use, just as init.rb does, to set environment-specific settings. You can also set other constants or whatever environment-specific variables you need in here. We’ve seen some of these configuration settings before. The settings reload_classes and reload_time define what a development environment is by setting application classes to reload periodically. The low log level as well as log auto-flushing also mean that in development mode your application will log everything and write it out as it comes. Let’s take a look at production.rb to make a comparison:
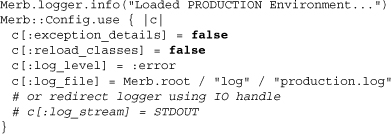
Note that exception details are off, and users of the site will not see backtraces if they run into an error. The reloading of classes is also off to save on performance. Finally, the log level has been pushed up to error, because we don’t want to be dealing with huge logs. The log file has been explicitly set, and by omission, log auto-flushing is off.
The third environment configuration file, test.rb, is used only when running tests. Its environment configuration is decently empty, setting a configuration key :testing to true.
Note that you are able to create your own environments as well as configuration files. To do so, just pass in the same name to the -e flag as the filename of your custom configuration. Here we check via interactive Merb that we’re running in the “staging” environment:
![]()
1.4.3 Router
The Merb file config/router.rb defines the routes used by your application. We’ll cover this in detail in the next chapter, but if you need only the most basic setup, you can rely on the default routes created by the line
default_routes
1.4.4 Logging
By default, all Merb logs are stored in log/ in the Merb root directory. If you’re running Merb under a testing environment, then the log file will be named merb_test.log. Otherwise, it’ll be labeled based on the port number under which it’s running. Typically this means the log filename will be merb.4000.log. You can manually change the location of the log file by setting Merb::Config[:log_file]. This is typically done per the environment and by default results in the log production.log for a Merb application running in production mode. The other log settings that can also be altered as part of Merb::Config are log_level and log_auto_flush. Log level determines the minimal level for a log message to be recorded. Starting from the lowest, these levels are
• Debug—intended for development-only logging used for debugging
• Info—typically used for logging uncommon events so you know when they happened
• Warn—best used to warn developers that a near-miss happened though no error occurred
• Error—occurs when a user experiences an error
• Fatal—logs an error that has killed the server
You can set Merb::Config[:log_level] by using a symbol for any one of these. log_auto_flush, on the other hand, can be set to true or false and will determine whether the log buffer is automatically flushed out to the log file or not.
1.4.4.1 Using logging
Throughout your Merb application you will have access to logging via the Merb.logger. When the logger receives a call to any of the log levels, it logs the string it is given as a parameter. Here are some examples of logger usage:
![]()
If auto-flushing is off, you can manually flush the logs by either using the method flush or using the bang method variant of a log level:
![]()
1.4.4.2 Viewing logs
Unless your Merb application is running as a background process, the first place you see your logs is in the terminal you run it under. If, however, you’re in production mode, you could use the UNIX command tail to actively watch your logs. Here we stream log changes to the terminal by using the flag -f:
$ tail -f log/merb.4000.log
If more than one server is running, you can use a wildcard to stream all the logs. Below we also use the v flag to identify which file has been modified.
$ tail -vf log/*.log
1.4.5 Database
When you use an ORM with Merb, it has to know how to access the database or databases you use in the different environments. We’ll go over ORMs more in depth later on, but for reference let’s take a look at how the file config/database.yml helps DataMapper connect. As the YAML files are broken down into three sections, one for each environment, and since each of these is virtually the same, we’ll look at only one of them:
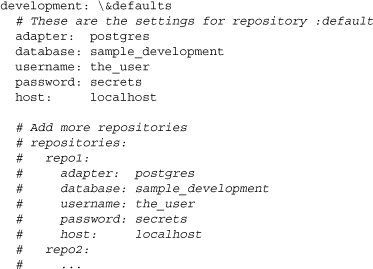
Here, adapter specifies the type of database program you’re running (and incidentally the adapter DataMapper will have to use to communicate with it). The rest of the lines are pretty self-explanatory. However, if you access your development database without a password (don’t ever do such a thing on a production server!), you may wonder how to do it. It’s simple enough; just leave whitespace after password: and before the next line.
The extra repository options commented after the host line are a powerful option. DataMapper allows you to access alternative databases through either more explicit method calls or by specifying when they apply in model files. You can add these extra repositories under repositories by starting each with a name by which to reference it.
Last, on the first line you may have noticed the inclusion of &defaults. This allows us to use these settings as defaults in the other environments. To do this, we’ll use << along with a YAML dereferencer:
![]()
Notice that any one of the settings can be overriden by defining it again after the inclusion of the default.
1.5 Understanding the Merb stack
Merb is a modular web framework. This means that to use it you’ll have to be comfortable with the various gems that it pulls together. We’ll take a glance at each of these and cover fundamentals as they come up.
1.5.1 Extlib
One of the most powerful aspects of programming in Ruby is the ability to open up classes and add in new behavior. In the wrong hands, though, this could lead to many disastrous effects, including the polluting of the Ruby core classes. Consequently, the developers of Merb (and DataMapper) have chosen to limit the number of so-called support classes and maintain them as a shared side project called Extlib. As an application developer, you’ll be glad they did this, because nobody wants the libraries or frameworks they use to crowd up core classes. Anyway, because there aren’t many additions, let’s take a look at Extlib and the classes it extends.
1.5.1.1 ObjectSpace
• ObjectSpace.classes—returns a list of all defined classes
1.5.1.2 Class
• cattr_reader, cattr_writer, cattr_accessor—create a unified class and instance variable in either reader, writer, or accessor form
• class_inheritable_reader, class_inheritable_writer, class_inheritable_accessor—create a class-level variable that is inherited by subclasses in either reader, writer, or accessor form
1.5.1.3 Object
• in?—returns true if the object is in the array (or the array formed by multiple parameters):
![]()
• try_dup—returns a duplicated object if possible. This method is overridden in non-dupe-able classes to return self.
• meta_class—gives you easy access to an object’s singleton class to make metaprogramming painless
1.5.1.4 String
• escape_regex and unescape_regex—allow you to escape or unescape regex special characters in strings:
![]()
• snake_case and camel_case—return a string in either snake or camel case. These are often used to convert class names to filenames and back again:
![]()
• to_const_string and to_const_path—used to convert a constant name to a standard path and back again:
![]()
• /—used to join strings as part of a file path (uses File.join):
"merb"/"core_ext" #=> "merb/core_ext"
• String.translate, String.translations, and t—enable phrase translations with replacements:

1.5.1.5 Time
• to_json—returns an ISO-8601-compatible rendering of the Time object’s properties
• to_datetime—returns the DateTime equivalent
1.5.1.6 DateTime
• to_time—returns the Time equivalent
1.5.1.7 Pathname
• /—returns its receiver plus parameter as path fully expanded
1.5.1.8 blank?
blank? is a method that has been added to numerous classes. In each of these, the blank? method may vary slightly. Here’s a list of the classes to which it’s been applied and what it tests:
• Object—tests if the object is nil; if it is not, it tests first if it responds to empty? and then whether it is empty or not
• Numeric—always responds false
• NilClass—always responds true
• TrueClass—always responds false
• FalseClass—always responds true
• String—asks if the string less whitespace is empty?
1.5.1.9 Logger
Extlib::Logger is the logger used by both Merb and DataMapper. The Merb log is specifically created in a boot loader we’ll see later on, but creating another logger for any of your Ruby applications is easy enough:
logger = Extlib::Logger.new('/tmp/extliblog')
logger.info "Log!!"
1.5.1.10 Mash
Mash is a subclass of Hash designed specifically to allow you to interchangeably use strings or symbols as keys. With Merb, the real impetus for the creation of Mash was being able to refer to request parameters by both the string key they come with and the more Ruby-programmer-friendly symbolic key.
1.5.1.11 SimpleSet
SimpleSet is a simulation of a set where each object is a key in a Hash. This class is used to manage callable actions in Merb controllers.
1.5.1.12 VirtualFile
VirtualFile is really just StringIO with a path accessor. This allows Merb to use strings as inline templates.
1.5.1.13 LazyArray
LazyArray is an Enumerable used by DataMapper as the parent class of DataMapper::Collection. Notably, LazyArray is designed to limit the loading of data sets to only when they are needed. As an application developer, you won’t need to know any of its methods directly, but knowing of their existence is definitely useful in understanding DataMapper’s beauty.
1.5.1.14 Hook
Extlib::Hook is a module used in DataMapper that allows models to associate methods before or after the execution of other methods. It’s similar in use and style to the before and after filters we’ll find in Merb controllers but is built quite differently.
1.5.1.15 Pooling
Extlib::Pooling is a module that allows for the sharing of similar resources with the same purpose. It is used by DataMapper to pool database connections.
1.5.2 Rack
Rack is a Ruby web server interface that shuttles responses from web applications to actual web servers. The simplicity, modularity, and adaptability of Rack’s implementation are truly beautiful. Consequently, it is used not only by Merb but by numerous other Ruby web frameworks. These frameworks not only have the convenience of allowing programming to an interface but have also enjoyed the benefit of sharing the code that finally pushes responses to different web servers.
1.5.2.1 Adapter options
Rack leaves the final decision of which web server to use up to the application developer. The default web server is Mongrel, but you can change this option by passing in an option to Merb on the command line after the -a or --adapter flag or by setting the config variable Merb::Config[:adapter]. Table 1.3 is a list of the adapters available through Rack and the Merb core.
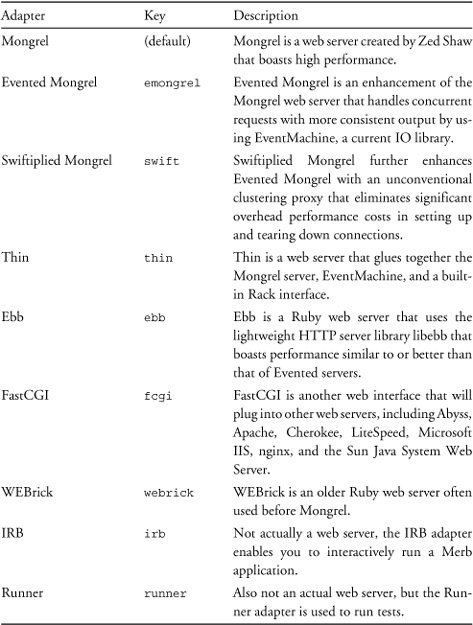
If you feel overwhelmed by the number of web server options, don’t worry: The default Mongrel server will most likely serve all your needs, at least at first.
1.5.2.2 How Rack works
Rack works by passing around a Ruby object that responds to the call method. This call method needs to take one block parameter known as the environment and return an array of three values: status, headers, and body. This design choice makes Rack applications capable of being as small as lambda expressions, which intrinsically accept a call method. Here’s a “Hello World” example using just Rack and Mongrel:

Merb, however, uses Rack in a more complex way than this. Here is the abbreviated source from the Merb core that defines the Merb Rack application:
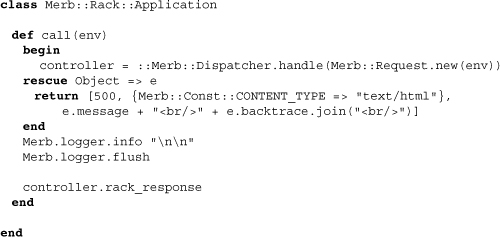
You can see how the call method uses the passed-in Rack environment, which is just the incoming request from the web server, and then ultimately returns a response that Rack passes up to the web server for client distribution. Here are the steps it takes:
1. Create a request object using the Rack environment which contains everything from the incoming request.
2. Use the dispatcher to handle the newly created request object, resulting in a controller object.
3. Rescue any unhandled errors, returning a backtrace if needed.
4. Flush the log.
5. Return the Rack response crafted by the controller.
1.5.3 ORMs
If your applicaton needs to store, retrieve, and manipulate data in complex ways, using a database is a no-brainer. But having to litter your code with SQL queries is painful. Fortunately, a number of ORMs enable you to interact with a database almost without ever having to write a SQL statement. In this book we’ll mostly focus on the DataMapper ORM, which is part of the standard Merb stack. Still, because there are options, the Merb core stays agnostic, and when it comes down to picking the ORM, it’s all up to you. Here are the three officially supported ORMs:
• ActiveRecord is the Rails ORM. If you’re porting a Rails application to Merb, using the ActiveRecord ORM will save you the trouble of having to modify your models.
• DataMapper is a next-generation ActiveRecord-like ORM that innovates past its predecessor. Some of its enhancements include identity maps, lazy loading, strategic eager loading, dirty property tracking, connection pooling, and a Ruby syntax that minimizes or eliminates the need to ever write SQL statements.
• Sequel is a robust ORM offering thread safety, connection pooling, and a very natural DSL for constructing database queries and table schemas. It has numerous well-supported adapters as well as a sophisticated feature set, including prepared statements, bound variables, master/slave configuration, and database sharding.
1.5.4 Plugins
The Merb core stays away from dumping in everything you aren’t going to use just in case you’ll need it in another project. Instead, Merb emphasizes plugins as integral parts of the Merb stack. This keeps your application footprint small, but it also demands knowledge of what plugins exist. The most often used plugins are maintained by the Merb developers themselves and are included in the standard Merb stack. Less often used plugins are distributed by third parties.
1.6 An overview of Merb internals
You don’t need to understand Merb internals for the work you’ll do as an application developer, but taking a look under the hood to understand how it all came together will help you use them better.
1.6.1 Boot loaders
When Merb starts up, the first significant thing it does is run its boot loader. This makes it the best place to start understanding Merb internals. More important, casual knowledge of the startup routine of the Merb boot loader can change your perception of Merb from that of a black box that runs your application code to a framework you can pull apart and extend.
Merb actually uses subclasses of the principal boot loader to define subroutines needed at boot-up. The class Merb::BootLoader thus serves two major functions. First, it is the parent class of all boot loaders. Second, at startup it goes through each of its subclasses and calls a class method named run. With this in mind, let’s take a look at each of the subclassed boot loaders in the order in which they are loaded. We’ll also include excerpts from their run methods. There’s no need to be overwhelmed by the code included (especially since externally defined variables appear). Instead, just let it simmer, and appreciate the fact that you can concretely trace things back to their source.
1.6.1.1 BootLoader::Logger
The first boot loader to be loaded is the logger. We need it to come first so that we can log any issues that may occur during boot-up. Here’s the code from inside the run method of the logger boot loader:
![]()
Note how the Merb::Config variables we saw earlier are used to initiate the logger. Merb.log_file may seem unfamiliar, but it’s really only a method that references Merb::Config['log_file'] or otherwise constructs a default log filename.
1.6.1.2 BootLoader::DropPidFile
When our application is run either as a daemon or as one server among a cluster, we’ll need to store its process ID, so that we can, among other things, kill it later using merb -k. The DropPidFile boot loader does this for us by storing our server’s process ID number in a file found in log/:
![]()
This run method doesn’t reveal much of what goes on, but by default the pidfile is named based on the number of the port on which the server is running. So, for example, the standard pidfile can be found at log/merb.4000.pid. You can change this default by setting Merb::Config[:pid_file] directly within either your config file or an environment file.
1.6.1.3 BootLoader::Defaults
Within the Merb default boot loader, some critical overrides are defined to make up for the inability of a number of browsers to use all the HTTP methods, particularly PUT and DELETE. This is particularly useful in building RESTful routes for resources. Note how the default boot loader overrides some requests to imitate the client being capable of all the HTTP methods:

1.6.1.4 BootLoader::BuildFramework
As we saw in the config section, Merb allows us to designate alternative layouts for our applications. The BuildFramework boot loader gets this working:
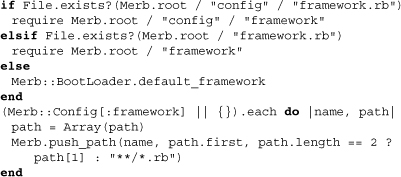
Note how, in the final lines, the inclusion of a second parameter alters the default of '**/*.rb'. This string is known as a glob and is used to recursively search for Ruby files. Changing the glob affects what files are included. This may come in handy in framework definition, where we want to include only one file (set the glob to nil) or only files named in a particular fashion (for example, '*_controller.rb').
1.6.1.5 BootLoader::Dependencies
This boot loader actually does a bit more than load dependencies. It loads the init file, loads the applicable environment configuration file, loads other dependencies you’ve included in the init or environment file, and then finally updates the logger with any changes you may have made.
1.6.1.6 BootLoader::MixinSession
This adds in session functionality by including relevant mixins in both Merb::Controller and Merb::Request. It’s critical that this happens so early because custom subclasses of SessionContainer and SessionStoreContainer may be created through a before_app_loads block:

1.6.1.7 BootLoader::BeforeAppHooks
This boot loader can be used to set or define whatever you need before your application code gets loaded. Plugins often use this hook to include code. The boot loader works by calling all the before load callbacks created by before_app_loads blocks:
Merb::BootLoader.before_load_callbacks.each { |x| x.call }
1.6.1.8 BootLoader::LoadClasses
The LoadClasses boot loader loads all the nontemplate application code. It also records modification times for each file so that they can be used by the ReloadClasses boot loader. Since the code gets fairly complex, we’ll leave it to you to check the source yourself.
1.6.1.9 BootLoader::Templates
This boot loader does nearly the same thing as the LoadClasses boot loader but for templates. Pulling from a template path, it inlines each of the templates for later use by the controllers:
1.6.1.10 BootLoader::MimeTypes
Merb is capable of rendering responses with different MIME types. The MimeTypes boot loader registers the default MIME types and serves as a good example of how you can add your own MIME types in an after_app_loads block:
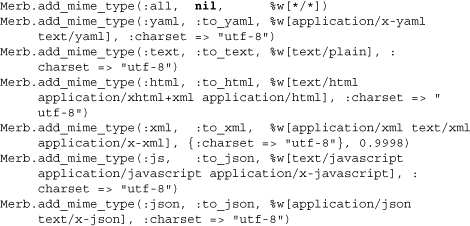
Note that the addition of each MIME type takes an identifying symbol, a transformation method or nil, a list of Accept header values to associate with, and the response header to be sent out.
1.6.1.11 BootLoader::Cookies
This boot loader mixes in cookie functionality in both controllers and requests:
![]()
1.6.1.12 BootLoader::SetupSession
This steps up the defined session containers and default values. Once again, here it’s best to take a look into the source code yourself if your interest is piqued.
1.6.1.13 BootLoader::AfterAppLoads
Analogous to the before_app_loads boot loader, the after_app_loads boot loader calls all the callbacks collected from after_app_loads blocks:
Merb::BootLoader.after_load_callbacks.each {|x| x.call }
1.6.1.14 BootLoader::SetupStubClasses
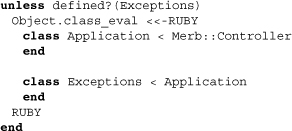
This boot loader creates stubbed classes for Merb::Application and Merb::Exceptions. This is important in making sure exception controllers are available even in very flat applications:
1.6.1.15 BootLoader::ChooseAdapter
This sets the Merb Rack adapter to be used. By this time, if a value was passed in on the command line, it has been used to set Merb::Config[:adapter]:
Merb.adapter = Merb::Rack::Adapter.get(Merb::Config[:adapter])
1.6.1.16 BootLoader::StartWorkerThread
This starts a worker thread that will run deferred blocks as your controllers demand:
Merb::Worker.new
1.6.1.17 BootLoader::RackUpApplication
Here’s the boot loader that sets up Rack. You may want to take your time with it.
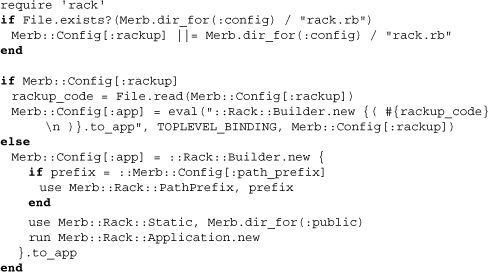
Note that it looks for a file named rack.rb, which we saw when we covered configuration. It then uses the code from that file as part of an eval statement that initializes Rack::Builder. If there is no rack.rb, the boot loader uses the defaults we saw earlier.
1.6.1.18 BootLoader::ReloadClasses
The ReloadClasses boot loader sets up a timed executor to reload classes as needed. You can change the reload time or turn it off completely in your configuration files. The standardly generated environment files set Merb::Config[:reload_classes] to true only in the development environment. Here’s the source from the boot loader that makes use of these configuration variables:

1.6.1.19 BootLoader::ReloadTemplates
Templates are also set to be reloaded by the final boot loader. However, as the code below indicates, you turn this off either by setting Merb::Config[:reload_templates] or by not using the development environment.

1.6.2 Server
A Merb server is a system process that responds to requests on a given port defined in configuration. You can also start clusters of Merb servers, but each runs on its own port and as its own process. The Merb::Server class offers a number of class methods to manage running servers, but the application developer typically accesses these via the merb command. For example, the following command kills a Merb server running on port 4000:
$ merb -k 4000
Using other Merb::Server class methods under the hood, we can start a cluster of ten daemonized Merb servers and then kill each one of them:
![]()
To see exactly how Merb makes these commands work, you can check out the source code for the files lib/merb-core.rb and lib/merb-core/server.rb inside the Merb core.
1.6.3 Requests
The class Merb::Request describes the requests a Merb server receives. Each of these requests will exist for the duration of the creation of a response. We’ll see plenty of these in the next couple of chapters.
1.6.4 Router
The Merb router stores routes that map requests to controller actions. We’ll go over this extensively in Chapter 2.
1.6.5 Dispatcher
The Merb dispatcher is responsible for dispatching incoming requests from a work queue it maintains. Merb is thread-safe, meaning it’s capable of better performance through multithreading, but if the libraries you use make thread safety an issue, the dispatcher is capable of locking requests using mutual exclusion. You can do this in your configuration file as follows:
Merb::Config[:use_mutex]
Alternatively, you can pass in “on” or “off” to the -X flag with the merb command:
$ merb -X on
Most of the methods within lib/merb-core/dispatch/dispatcher.rb, notably handle and redirect, are actually part of Merb::Request but serve to dispatch requests from the work queue. As an application developer, you’ll use only the redirect method; however, in the chapter on controllers (Chapter 3) we’ll demonstrate the path by which a request comes to be handled by using Merb::Request.handle.
1.6.6 Controllers
Merb controllers are the classes that do the actual handling of requests and produce the responses to send out. Since we talk extensively about them in Chapter 3, we’ll defer our discussion until then.
1.6.7 Sessions
Sessions allow for the stringing of otherwise independent requests into a user-specific interaction. We’ll use them heavily in crafting responses as well as in filtering access to controller actions. As we previously saw, Merb is capable of storing sessions in a number of different ways; thus much of the source is dedicated just to this. Fundamentally, though, session functionality is abstracted away from its means of storage and then mixed into both the controller and request classes.
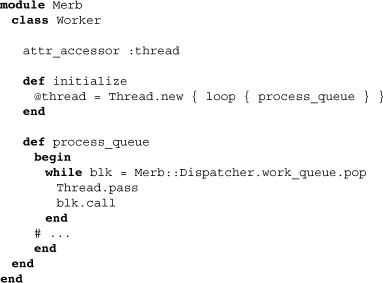
1.6.8 Worker
The Merb worker allows us to run code outside the standard request-to-response cycle. This is perfect for time-intensive tasks that would otherwise delay the sending of a response. We’ll go over the use of workers in more depth in Chapter 3, but the following excerpt from the merb-core source demystifies workers as containers for threads that maintain work queues:
1.7 Conclusion
Merb’s architecture emphasizes modularity, both internally and through its plugin interface. Throughout this book we will encounter aspects of this design decision while examining how it has shaped the tools around it. Application developers should be pleased by Merb’s versatility, as it can provide them with as little or as much as they need. Along with the prospect of custom stacks, a plethora of possibilities are opened, making Merb suitable for whatever a web application may demand.

