9. External Iframe Apps
This chapter is essentially an extension of the preceding one. In Chapter 8 we discussed several elements of OAuth that are relevant to this chapter and to writing external iframe apps on the MySpace platform. We recommend that if you skipped Chapter 8, go back now and read the sections that describe OAuth.
Moving forward in this chapter, we’ll assume you’re familiar with OAuth and with setting up and publishing Web services using Python on Google App Engine (GAE).
In this chapter we’ll take our existing on-site app and port it over to an external iframe, or off-site, app. Be prepared, because there’s a pretty large paradigm shift from an on-site JavaScript app to an off-site app.
With on-site apps, you supply some markup and possibly a few Web services, and the MySpace platform takes care of the rest. Your markup is wrapped in some headers and footers (mostly script tags that pull in the OpenSocial container) so it can be correctly rendered. When a user accesses the page, the MySpace infrastructure takes care of the actual rendering of the page.
When the app starts running, it has very little knowledge of the user; it really knows only the IDs of both the Viewer and the Owner. That means that the app has to send out requests for data when it loads—maybe it requires a friend list, or some details from your servers. These asynchronous requests are sent out while the app idles, perhaps with a loading message and one of those “spinner” graphics twirling away to give the illusion of activity. When the requests come back, the app leaps into action, as it should now have all the data it needs to fully load.
That’s the typical flow of an on-site app, but off-site apps have a very different pattern. For an off-site app, MySpace simply renders an iframe onto the page with the src attribute set to the URL of your choice. Since you control the contents of the URL, you have full control over the app. But this control comes at a cost; you are now responsible for the rendering of the app.
Off-site apps behave much more like traditional Web pages. A request comes in, then it’s picked up by your Web server and passed off for processing to your scripting language of choice, such as PHP, ASP.NET, or Python. The request is then processed.
Let’s say we send off a REST request to the MySpace API for a friend list and also pull some data out of our local database. The friend list and the data are then pushed down onto the page used as the iframe app. In this case, the app has all the data it needs to fully load at render time. The trade-off here is that on-site apps render immediately, then idle while waiting for data. Off-site apps, by contrast, do their waiting for data up front and then completely load.
The other big difference is that with on on-site apps you really have only one page. In our Tic-Tac-Toe app we hide and show various HTML elements to give the illusion of multiple pages. Off-site apps can have multiple actual pages, so markup and JavaScript code can be separated a little more cleanly. Well-known techniques like clicking a button that posts back a form can be used.
As you can see, there are some pros and cons to using an off-site app. The biggest reason for using one would be that you have an existing app somewhere on the Web that you could wrap an iframe around and there you go—you now have an instant MySpace app. So, let’s dig a little deeper into what it would take to accomplish that.
REST APIs
What exactly is a “REST API”? Well, REST stands for REpresentational State Transfer, which isn’t overly helpful as an actual definition. It essentially comes down to how resources are accessed. The underlying assumption with REST is that objects and records exist in one place, their universal resource identifier (URI), on the Internet and stay there. The address is used to state the “who” of the object we wish to work with. This is coupled with an action verb (for example, GET or POST) in the request to state the “what” of what we wish to do.
How a REST Web Service Is Addressed
A REST Web service is addressed via URIs. Say we have a REST Web service that returns data on fruit. To get a list of all the fruit available, we might access a URI like this with a GET request:
http://fakefruitsite.com/fruit
Let’s say that Web service returns a list of available fruit, and one of the fruits listed is apple. We might make a call like this to get a list of the types of apples available:
http://fakefruitsite.com/fruit/apple
Specifically, we might want to know which local producers grow Granny Smith apples:
http://fakefruitsite.com/fruit/apple/grannysmith/producers
And even more specifically, there’s an orchard down the street that we want data on. Each producer would have a unique identifier; this one’s is 12345. We might access the price list for that producer’s Granny Smiths via the following URI:
http://fakefruitsite.com/fruit/apple/grannysmith/producers/12345/pricelist
This is an example of a REST API; we access the actual data we want by addressing the URI in a specific way and use a globally unique identifier (GUID) to drill down to specific entities. MySpace’s APIs follow a similar pattern but replace fruit with MySpace users, GUIDs with MySpace IDs, and price lists with friend lists.
If you are not used to using REST, this may seem a little strange and low-level, but MySpace provides several SDKs to help you out. The beauty of having an SDK is that just about all of this is abstracted away. You’ll see shortly how easy it is to make requests to the MySpace APIs using an SDK.
Setting Up an External Iframe App
Now that we understand what the REST APIs are, let’s take a look at how to set up an app on MySpace that will make use of them. Up until now, our Tic-Tac-Toe app has used MySpace’s OpenSocial container to make requests to the API, has lived on MySpace servers, and has been written entirely in JavaScript.
What if we had an app already written and running on a Web site and wanted to make it a MySpace app? Would we have to completely rewrite the app in JavaScript? And convert all of our server communication to makeRequest? That’s one possibility, but another is to simply “iframe your app.”
What that means is that MySpace provides the ability to load in an external iframe on the Canvas surface instead of loading in the usual MySpace-hosted iframe. Let’s walk through what it might take to convert parts of our Tic-Tac-Toe app to an iframe app.
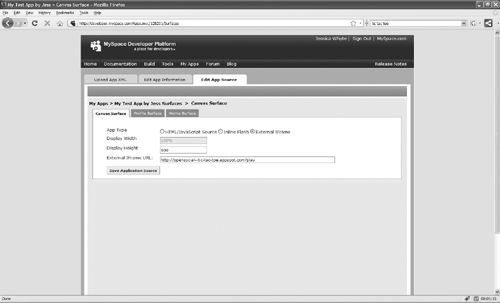
First we’ll need to create a new app by following the instructions found in Chapter 1, Your First MySpace App. Once it’s created, navigate to Edit App Source and click on the Canvas Surface tab (it’s the default tab). Instead of selecting HTML/Javascript Source from the radio buttons at the top, we’ll select External Iframe.
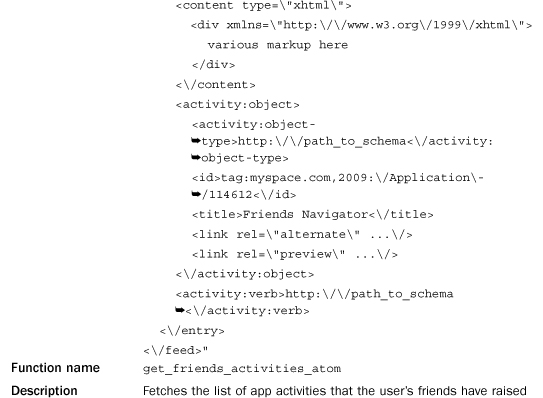
Then, inside the External IFrame URL field, enter the starting point for your app. In our case, and as shown in Figure 9.1, it’s http://opensocial—tic-tac-toe.appspot.com/play.
Figure 9.1 Screen shot of the external iframe URL setup process.
When the Canvas surface for this app loads, it will load the page you entered into the External Iframe URL field instead of loading a MySpace-hosted page. In addition, it will append several parameters to the source of the iframe in order to pass values to your app. An example of this would be the following:

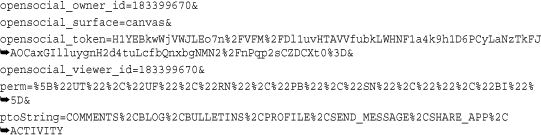
As you can see, our base URL, http://opensocial—tic-tac-toe.appspot.com/play, has several query string parameters appended to it. There are some session-specific values, such as the language and country of the current user, the user ID, and whether the user has the app installed. The app’s ID and OAuth parameters are also passed down. This allows you to verify the request in the same way we verified a signed makeRequest in Chapter 8, Oauth and Phoning Home; essentially the iframe URL becomes an authenticated OAuth request. We’ll discuss the opensocial_token, perm, and ptoString parameters later in the chapter when we discuss cross-domain communication and sending messages.
When our initial page loads, we’ll be able to determine the user’s ID, use the MySpace SDK to fetch any data we might need from the MySpace APIs, and push the data onto the page when it renders. Let’s implement the Play and Invite tabs of our current Tic-Tac-Toe app. The Play tab requires the user’s Profile data, and the Invite tab requires the user’s friend list.
The Server Code
Let’s go back to our code from Chapter 8 and update our app.yaml again. For reference, you can find the Chapter 8 code in this folder:
http://opensocialtictactoe.googlecode.com/svn/trunk/chapter8/opensocial—tic-tac-toe/.
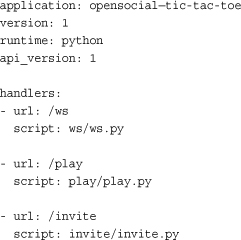
As you can see, we’re going to use two separate pages for the two tabs. The handlers for each (play.py and invite.py) are very similar. Let’s take a look at invite.py in detail and then take a quick look at play.py.
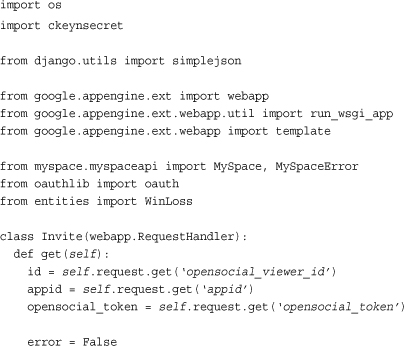
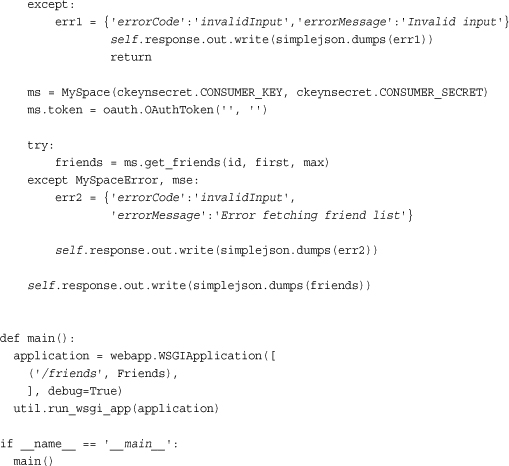
import ckeynsecret includes our consumer key and secret from an external file, and we import the official MySpace SDK using from myspace.myspaceapi import MySpace, MySpaceError. For the request handler itself, we define only a GET handler. Just as in our Chapter 8 code, it starts by checking the incoming user ID and app ID to make sure they’re integers.
To make use of the MySpace SDK (you can download it at http://code.google.com/p/myspaceid-sdk/ and pick the language of your choice), we need to instantiate a MySpace object. All of the API functionality will be done through this object. To initialize the MySpace object, you need to always do the following two things:
ms = MySpace(ckeynsecret.CONSUMER_KEY, ckeynsecret.CONSUMER_SECRET)
ms.token = oauth.OAuthToken('', '')
The first line creates the MySpace object given the consumer key and secret. The second creates an OAuth token; the two parameters are always empty strings when accessing the MySpace API with an OpenSocial app.
Fetching a friend list is as simple as this:
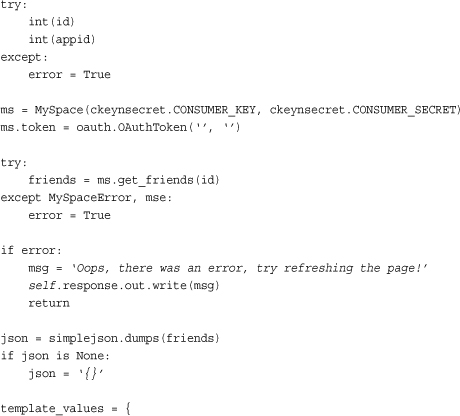
friends = ms.get_friends(id)
That’s all there is to it; the SDK should take care of the rest. Assuming no exception was thrown, we now have the user’s friend list. The circumstances for throwing an exception are mostly permission-related—the user might not have the app installed, might be blocking the app, and so on.
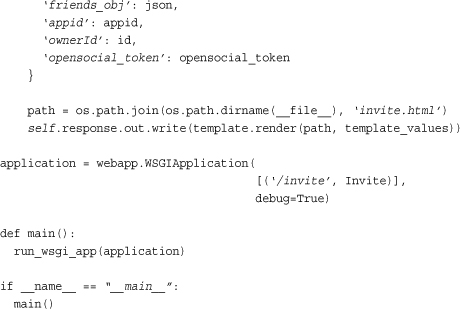
We then get the friend list ready to be pushed down onto the page by using simplejson.dumps(friends). We pass a total of four items down to the page: the friend list, the app ID, the owner ID, and the OpenSocial token.
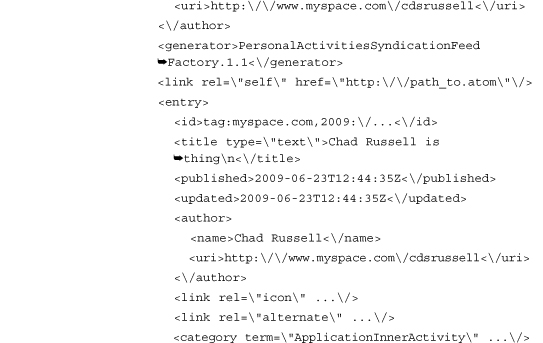
REST API List
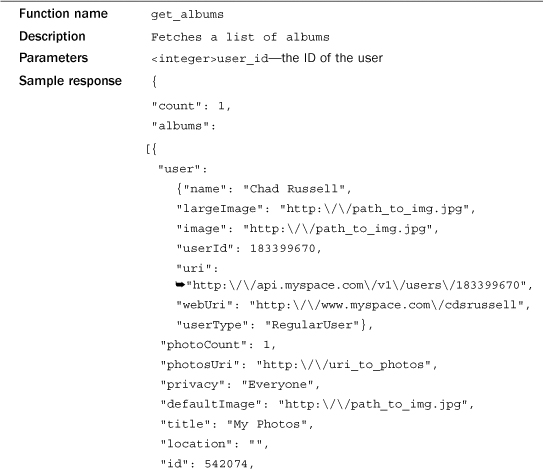
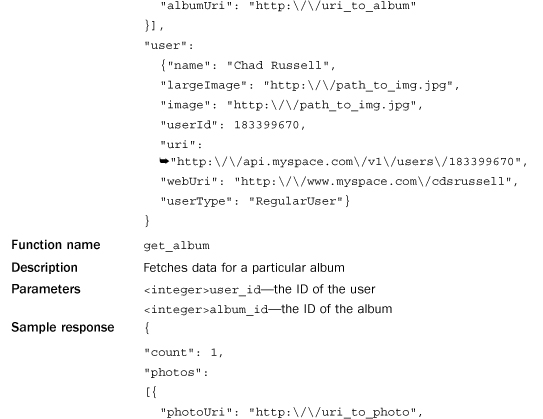
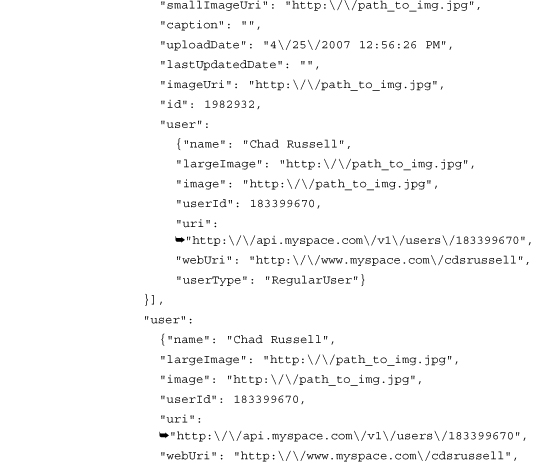
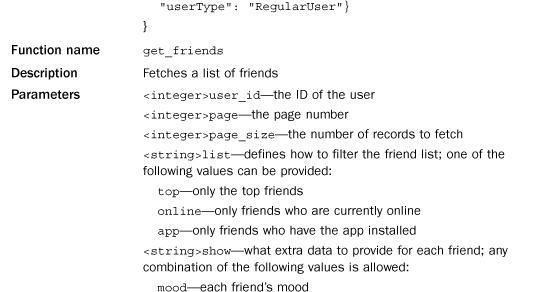
Now that we’ve seen one of the APIs in action, let’s take a look at what other functionality the SDKs support. Table 9.1 describes all of the endpoints supported by the MySpace SDK as of this writing. Some of the data has been truncated for readability, but these are mostly just long URLs. The most important part, the schema of the data, is intact. MySpace also maintains documentation for the APIs (not the SDKs themselves, just the bare endpoints) at http://wiki.developer.myspace.com/index.php?title=MySpace_REST_Resources.
Table 9.1 Overview of Endpoints Supported by the MySpace SDK
Note
In the course of researching all of the available endpoints, we created a test page. If you’re having trouble accessing any of the APIs, this test page might come in handy. The test page comes in two parts. The first is a client-side HTML page, which can be downloaded at http://opensocialtictactoe.googlecode.com/svn/trunk/chapter8/opensocial—tic-tac-toe/index.html.
This page has a series of buttons on it, each corresponding to an endpoint (there are some additional buttons that were used in Chapter 8). Clicking a button causes a Web service request to some Python code, which can be downloaded at http://opensocialtictactoe.googlecode.com/svn/trunk/chapter8/opensocial—tic-tac-toe/test.py. This file determines which endpoint you want to hit and uses the MySpace SDK to make the request. The response is then pushed down onto the client.
If you’re having trouble, try it out for yourself. You may need to change the user ID found in the getter function in index.html to one of your own, along with some of the parameters passed into the getter function. For example, the album ID hard-coded into the file corresponds to the user ID. If you change the user ID, the album will be different.
We hope you’ll find this page useful!
The Client Code
To create the markup and JavaScript for our off-site app, we modified the Canvas surface code from our on-site app. Because it’s mostly the same, we won’t repeat it here. The main difference is that instead of Ajax requests being sent to the API when the app loads, the data is already there. The template object we push down from the Python script has four members: friends_obj, appid, ownerId, and opensocial_token. In our client-side markup, we can use these four template parameters by enclosing the member names in double braces: {{ some_name }}. The space between the braces, and including the braces, will be replaced by actual data at render time.
So the typical flow becomes the following:
1. A user loads our Canvas surface.
2. MySpace creates an iframe with the src attribute pointing to our URL.
3. The iframe loads and the request hits our servers.
4. We interrogate the query string of the request to determine the Viewer’s ID.
5. Using that ID, we make requests against the MySpace API for data.
6. The data comes back (or it doesn’t) and we put that data into a template object.
7. When the page renders, it looks for the double braces; if any are found, and the label matches the name of one of the template members, the template is replaced by actual data.
Our friends_obj parameter contained a JSON object of our user’s friend list. We can access this on the client by doing the following:
var friends = {{ friends_obj }};
The friend list has now made its way from the MySpace API into our server scripts and down to the client in the form of a JavaScript object. It’s now ready to be used on the page.
We also want to pass along pertinent data between pages. Each page in our app is expecting certain data to exist on the query string. These query string parameters are initially set by MySpace. But if a user clicks a link to go to another page, those query string parameters are lost. So when we construct the link that will take the user to the Play page, we add the other template values manually. The Play page has a similar link pointing back to the Invite page:

When a user clicks this link, we pass the three parameters ownerId, appid, and opensocial_token to the receiving page. This is just one of many ways to maintain session state in your app.
Now that we have all of our data pushed down onto the page, we need to make a few more changes in order to get everything working correctly. These modifications are necessary because the friend data isn’t in the same format as it was for an on-site app. We will no longer need to use the getField function to access data; the fields are instead accessed directly from the object. Table 9.1 can be a great help with figuring out where all the data should be. Tools like Firebug and Fiddler (see the Introduction for what these tools are and where to get them) are also invaluable for understanding the data responses.
We first make the body execute a function after it has loaded:
<body onload="runOnLoad()">
The runOnLoad function then initializes a number of things, including saving the friend data:
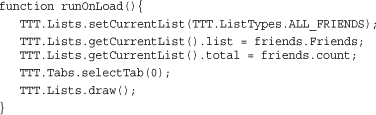
You’ll see that we save the Friends array into the current list, as well as the number of friends returned, so we can correctly page through the results. The draw function is then called, which is where the friend data is used to display the grid of images and names. This function is almost exactly the same as it was in Chapter 2, Getting Basic MySpace Data, so let’s just take a look at the differences:
Here we’re looping through the array of friends, which is held in the object current_list.list. The actual data can be accessed directly from the friend object using the schema found under get_friends in Table 9.1. You can see in the code just shown that we access the user ID, name, and image of each friend to build the markup for the page.
Friends Web Service and Paging
There are a couple more twists and turns before we can fully port our Invite page into an off-site app. The first is how we actually send app invites, bulletins, and activities from an off-site app. This is fairly tricky to accomplish, but we’ll discuss it in detail a little later in the chapter.
The other source of complexity is paging. When a user wants to see the next page of friends, what do we do? Well, we could post back each time the user pages, using essentially the same rendering flow we’re using now and just pushing down the next page of friends.
But what is this? 1996? We can do better than that. Ajax to the rescue again. To accomplish this we’ll set up another Web service, similar to the ones we created in Chapter 8, OAuth and Phoning Home, but this will just handle paging our friend list. When the user asks for another page, we’ll send a Web request back to our servers, which in turn will request the data from the MySpace APIs. (See Chapter 13, Performance, Scaling, and Security, for ideas on how to better scale this solution. Hint: You’ll probably want to cache the pages of friends instead of requesting them anew each time.)
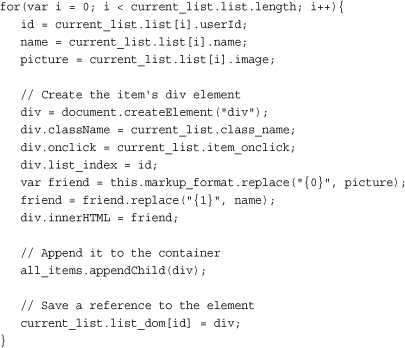
Let’s implement our client-side pager. We don’t want to reinvent the Ajax wheel, so let’s include the Prototype library to make use of its Ajax object.
![]()
To implement our client pager, we maintain the paging state the same way we did in Chapter 3, Getting Additional MySpace Data. The following function takes in three parameters—first and max are the standard paging parameters passed in as integers, and callback is the function that’s executed once the request has completed.
The URL is built and the request is made using the Ajax object of the Prototype library. Let’s take a look at the callback function before we peek at the friends Web service.
The main difference here between an on-site and an off-site app is the error handling. In an on-site app we would use hadError or getErrorCode to determine what happened. But our response is no longer mapped into an opensocial.ResponseItem object, so we’re left to return our own errors as we see fit.
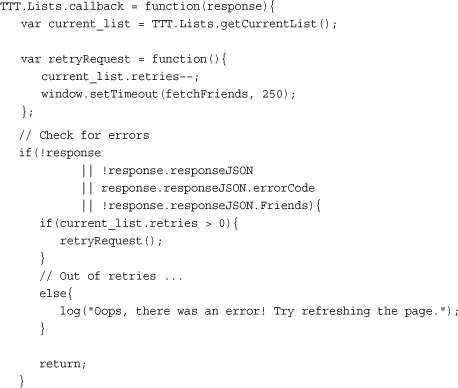
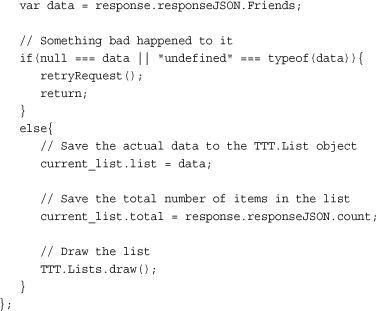
First, as our Web service returns JSON, the meat of the response can be accessed in the responseJSON property. To look for errors we check four things:
1. Is the response null or undefined?
2. Is the responseJSON property null or undefined?
3. Our Web service will return caught errors in an errorCode property; has this property been set?
4. Is the Friends property null or undefined?
If all of those criteria are satisfied, we can be fairly certain we have a valid response. Our request retry code is exactly the same code we’ve used throughout this book. The Friends array is then pulled out of the responseJSON, and the new list is redrawn.
Now that we’ve seen the client code, let’s take a look at how the Web service itself looks. The first thing to do, as always, is to update our app.yaml file:
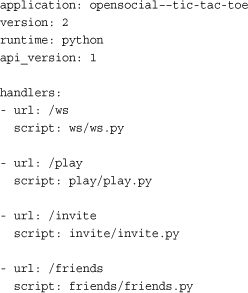
And now, our friends.py script. You’ll notice that it’s fairly similar to the Web services we defined in Chapter 8.
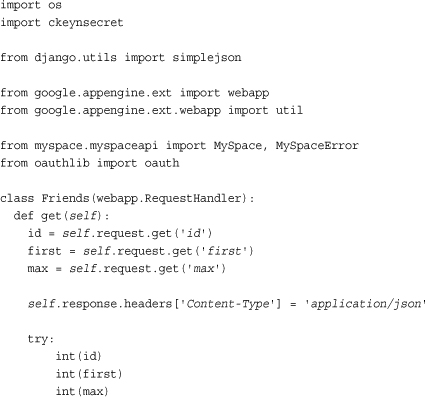
Let’s take a closer look at the GET handler. We first try to parse all of our parameters into integers to make sure they’re legitimate values. If they’re not, we return an error object that will be picked up by our JavaScript callback.
A MySpace object is then created and we attempt to fetch the friend list for the given user and paging values. If this request fails (usually a permission error; make sure the recipient has the app installed, for example), we again return an error object describing what happened.
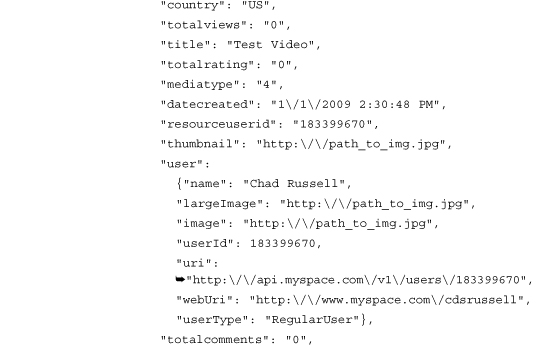
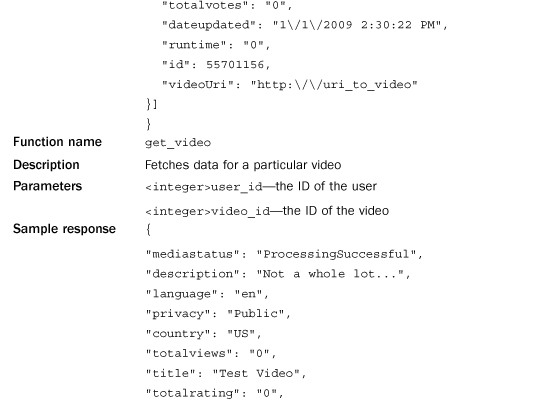
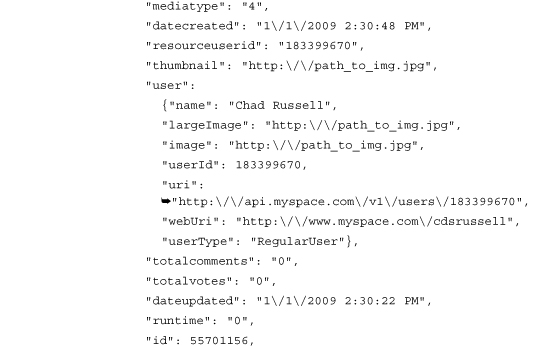
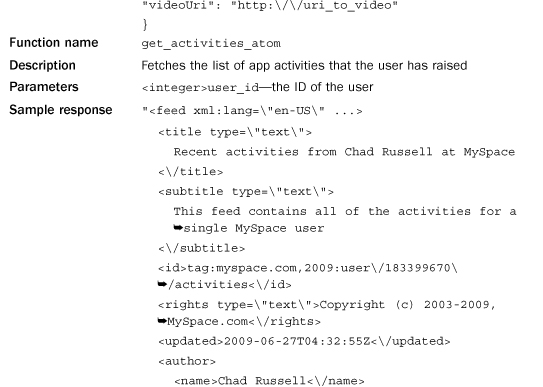
The Profile Endpoint
We’ve now mostly converted our Invite tab. The last piece of the puzzle is the ability to actually send messages to our users, which we’ll cover later in the chapter. First, we’d like to port the Play tab to an off-site app, as there’s not much fun in an app that just invites people to it. Adding a game would be a nice touch.
In the Tic-Tac-Toe app we pull down every Profile field (opensocial.Person.Field in OpenSocial speak) that MySpace supports. These fields are mapped loosely to the MySpace API using the detailtype parameter. There are three levels of detail: basic, full, and extended. Let’s take a look at exactly what that means in handy tabular format as shown in Table 9.2.
Table 9.2 Basic, Full, and Extended Profile Data
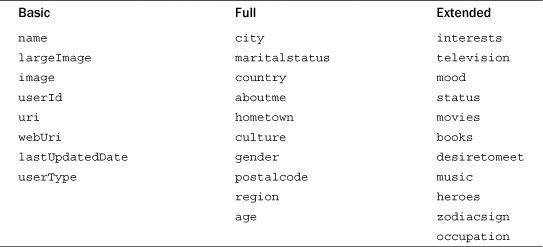
A full Profile also returns basic data, and an extended Profile returns full and basic data. So if you request extended, you should get back everything.
MySpace provides some good documentation on this functionality, which can be found at http://wiki.developer.myspace.com/index.php?title=GET_v1_users_userId_profile_basic_full_extended.
With this information in hand, we can go on to porting over our Play tab to an external iframe app. The Python script for the Play tab is almost identical to the script for our Invite tab, so we’ll skip listing all the code again. The only main difference is what data we request. We need the user’s extended Profile data instead of the friend list.
profile = ms.get_profile(id, 'extended')
This data is pushed down onto the page exactly as it was with our friend list from earlier.
On the client side we also do some now familiar things. The Profile data is saved into a JavaScript object:
var viewer = {{ viewer_obj }};
And the link back to the Invite page is created:

The big difference comes when we want to access the Profile data. In the Tic-Tac-Toe app, we have a printPerson function that takes all the details for the Viewer, builds some markup, and displays it onto the page. Let’s convert this function to use our extended Profile data that was fetched from the MySpace REST API.
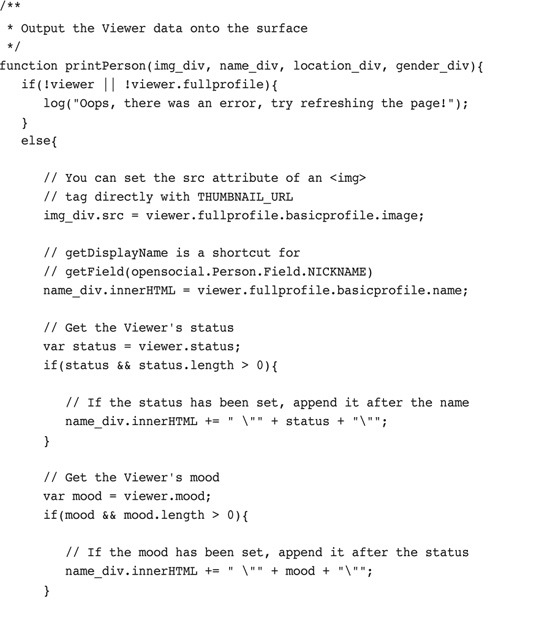
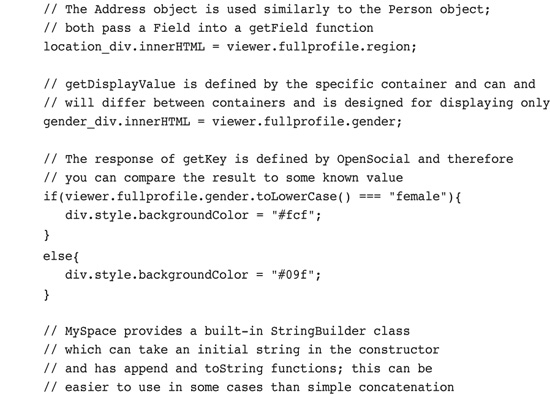
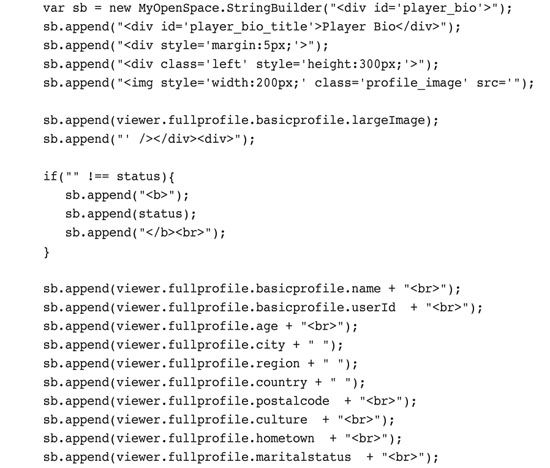
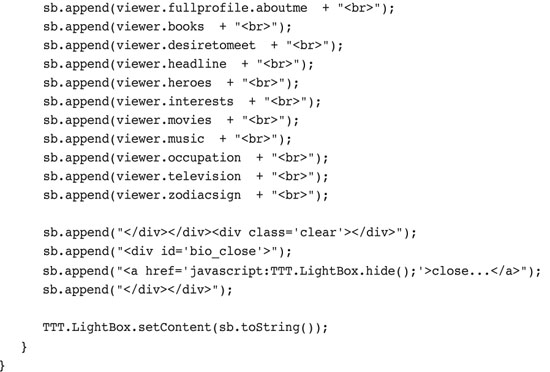
You’ll notice that the data is contained in the object in a strange manner. All of the extended fields (see Table 9.2 for which data is which) are accessed directly from the object, such as viewer.heroes. The viewer object also contains a fullprofile object, which in turn contains all of the full fields, such as viewer.fullprofile.age. The fullprofile object also contains a basicprofile object. This object contains all of the basic fields, such as viewer.fullprofile.basicprofile.image. Just to clarify a bit, let’s take a look at a sample JSON response:
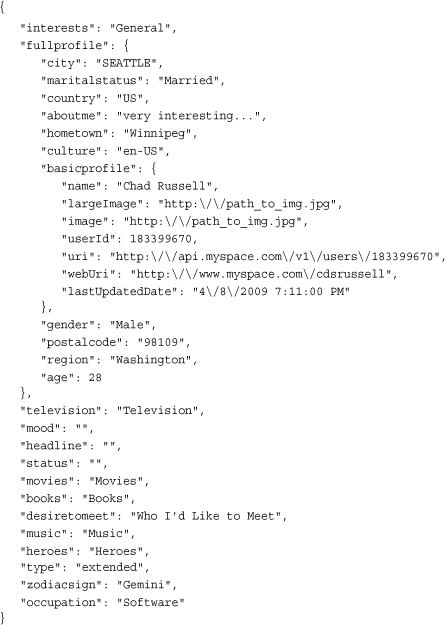
That should give you some idea of how the data is laid out. As you can see in the printPerson function, all of this data is accessed fairly simply from the viewer object.
That’s all there is to porting the Play tab over to an off-site app; the rest of the code can be used as is. However, as promised earlier, there is still one thing left to do for the Invite tab. Let’s take a look.
Sending Messages Using IFPC
IFPC, or inter-frame procedure call, was explained in Chapter 2, Getting Basic MySpace Data, but briefly. It’s a library that facilitates cross-domain JavaScript calls. Typically, you can’t access the DOM of a page that isn’t living on the same domain as the DOM on which you are currently living. This is a security feature of browsers, created to prevent various malicious attacks.
MySpace uses IFPC for a number of purposes, such as resizing the app, navigating between pages, and sending messages; see Chapter 2, Getting Basic MySpace Data, for a list of the features that are exposed. For on-site apps, this functionality works with little or no work on your part. MySpace has set up IFPC to work between the msappspace.com domain where on-site apps live and myspace.com. However, the same can’t be said about communication between myspace.com and whatever domain an off-site app happens to be running on.
So, in order to expose the IFPC functionality to off-site apps, we’ll have to set it up to work with a different domain. Luckily, MySpace provides some libraries to help us do this. Setting it up can be pretty simple, but it’s a very picky process. Keep in mind that this whole IFPC cross-domain thing is just a big hack; browsers were not meant to do this. But if we’re careful with our settings, it’s a snap.
The library MySpace provides does a couple of things for us. First, it pushes down all the necessary IFPC JavaScript code onto the page. This essentially gives us the container for use on our external domain. Second, if you provide the correct details, it sets up all the required IFPC parameters.
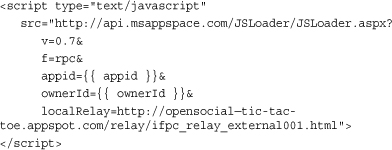
The most basic way to include the library is as follows:
![]()
The library is actually a dynamic ASP.NET page that spews out JavaScript in its response. The two required parameters are "v" for OpenSocial container version and "f" for feature. Here we’re asking for version 0.7 and the "rpc" feature; RPC is just another name for IFPC. So this allows us to make IFPC calls using the 0.7 container. Why the 0.7 container and not something a little newer, you may ask? We’ll get to that a little later, but there’s a good reason for it.
That should actually be all that’s required to make IFPC calls, as long as you don’t need a callback; the callback is always the tricky part. So at this point you should be able to call gadgets.window.adjustHeight() and it should actually resize your app. Magic!
So what about that callback? The other parameters that the JSLoader accepts are appid, ownerId, and localRelay. The first two are fairly self-explanatory, but the third not so much. IFPC works by using two relays, one on each domain. These relays are just simple HTML files that don’t do much, but they must live on the two domains between which you want to communicate. That means one has to live on myspace.com, which is taken care of by MySpace, and the other has to live on the external domain; in our case, it’s opensocial-tic-tac-toe.appspot.com.
We’ll need to do two things to get this working. First, download the relay HTML file from MySpace’s servers: http://x.myspacecdn.com/modules/applications/static/js/ifpc_relay_external001.html. Save that file and upload it to your server. In our case, we put it at http://opensocial-tic-tac-toe.appspot.com/relay/ifpc_relay_external001.html.
Note that there are no UI elements on these HTML pages, so don’t worry when you load them and it looks as if there’s nothing there.
Now add this entry to your app.yaml:
![]()
The next step is to tell the MySpace library where this relay file lives. That’s done by setting the localRelay parameter. So putting it all together, we get a script tag that pulls in all the JavaScript we’ll need and correctly sets up IFPC:
Warning
Make sure your relay file has the same domain as your app.
Just remember to keep it all on one line in your code; it’s broken up here for readability only. This final script tag should allow IFPC calls along with callbacks. The one “gotcha” to look out for is to make sure the relay file has the same domain as your app. It’s a common mistake to host the relay on something like http://static.example.com/ifpc_relay_external001.html but host the actual app somewhere like http://app.example.com/app.html. Because the subdomains are different, IFPC won’t be able to function.
If you can’t host all your files on the same subdomain, or prefer not to, there is one thing you can do. JavaScript allows you to modify the domain of the current page, but only if you make the domain more generic. That means you can remove the subdomain—to go from static.example.com to example.com, for example—but not the other way around. Once you set it to example.com, you can’t set it back to static.example.com. At the top of the relay file, and any other page in your app, you would have to generalize your domain, for example:
document.domain = "example.com"
Putting that at the top of each page should allow IFPC to function correctly.
Using the 0.7 Container for postTo
Now, why were we including the 0.7 container? An early quirk of the MySpace platform was to implement a function called postTo. This function behaved exactly like opensocial.requestSendMessage (see Chapter 5, Communication and Viral Features, for details), except it didn’t take IDs for the recipient parameter; it took opensocial.Person objects. The result of this was that the back-end infrastructure expected not only the recipient’s ID but also the recipient’s name and image. To work around this limitation, when you use opensocial.requestSendMessage and pass in an ID, MySpace sends a request to the API to retrieve the full opensocial.Person object for that user ID. The callback then initiates the postTo function. So requestSendMessage just wraps postTo.
The problem is that you can’t use the MySpace OpenSocial API from an external iframe; only IFPC calls are possible. So when you call requestSendMessage from an external iframe, it attempts to make a request to the API, which fails because it would be a cross-domain Ajax request. This is where the 0.7 container comes in handy, because it contains the postTo functionality.
Fortunately, the opensocial.requestShareApp function doesn’t have the same limitation as opensocial.requestSendMessage. Passing in just an ID doesn’t cause a request to the API, so it just works as normal.
Let’s take a look at how to modify our JavaScript to use the 0.7 postTo functionality:
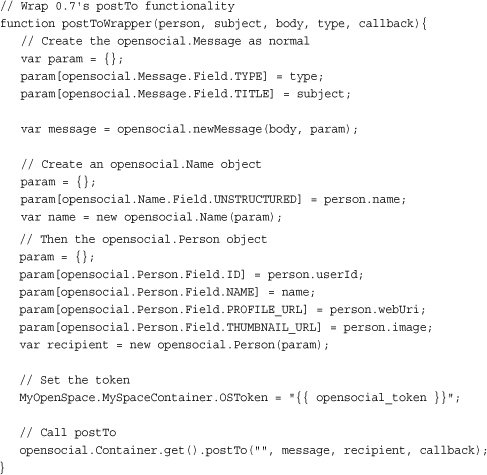
This function wraps the postTo functionality. The person parameter comes from data retrieved by the REST API, and we’ll take a look at how that’s created in a second. First, the opensocial.Message object is created. We then need to map the friend data from the REST API into opensocial.Person objects. From there, an opensocial.Name object is created, and then the opensocial.Person itself.
Once all of our little OpenSocial objects are created, the token needs to be set. The postTo function looks for the token at MyOpenSpace.MySpaceContainer.OSToken, so we set that to the token we’ve pushed down from our Python script.
The first parameter for postTo is no longer used, so just pass in an empty string. message is the opensocial.Message object we created, recipient is the opensocial.Person object we created, and callback is the function that will execute once postTo has completed.
The callback response is an integer, specifically 0 if the user canceled the pop-up dialog, 1 if the user sent the message, or −1 if an error occurred.
The Friends Response from the REST API
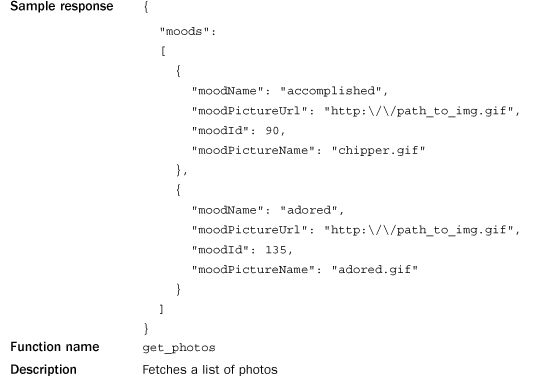
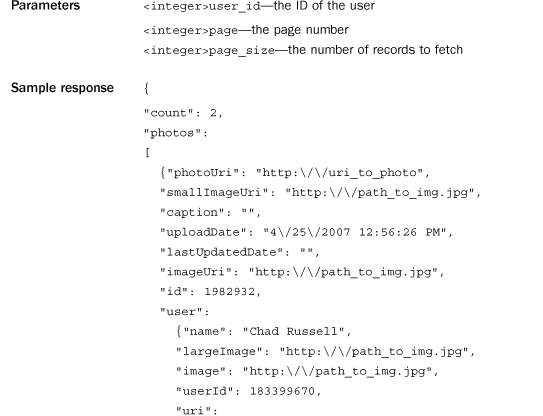
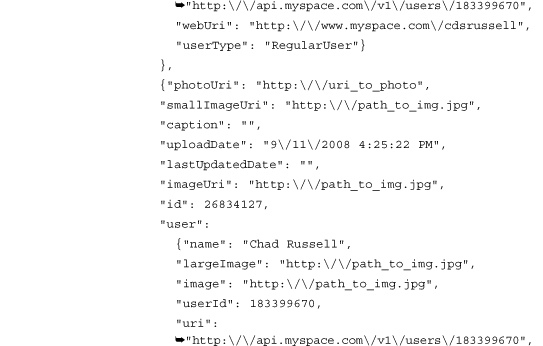
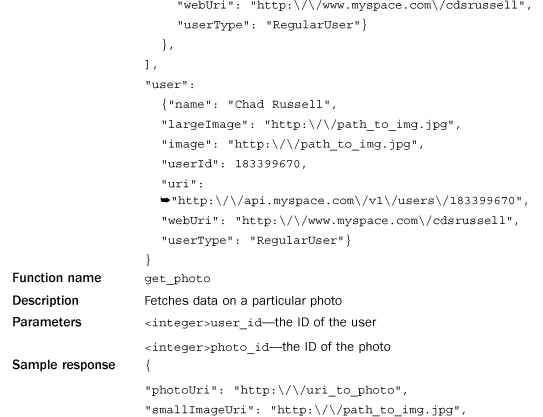
Let’s take a look at one last function. The friends object is the response from the REST API when we requested a friend list. The get_friends section of Table 9.1 has the details of exactly how this data object looks.
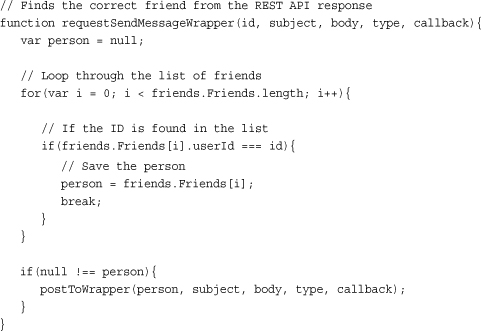
We loop through the list of friends looking for a particular ID. If the ID is found in the list, the person is saved and passed into the postToWrapper function described previously. That function then converts the data into an opensocial.Person object for use in postTo.
Summary
A lot of complexity is generated when using external iframe apps compared to on-site apps. Trying to figure out the vagaries of OAuth and IFPC is a daunting task and one we recommend only for the academic pursuit of knowledge. MySpace provides some fairly capable libraries that abstract a lot of the complexity away, and we highly recommend using them.
Off-site apps also greatly lower the bar for entry onto the MySpace platform. Many existing Web apps can be ported directly onto MySpace without much work at all, as long as they don’t require any social features. Adding those social features is then fairly simple, given the libraries described throughout this chapter. Before you know it, your simple Web app will become a fully integrated MySpace app, with an audience of tens of millions.
Note
Code listings and/or code examples for this chapter can be found on our Google Code page under http://opensocialtictactoe.googlecode.com.