8. Gestures and Touches
The touch represents the heart of iPhone interaction; it provides the most important way that users communicate their intent to an application. Touches are not limited to button presses and keyboard interaction. You can design and build applications that work directly with users’ taps and other gestures. This chapter introduces direct manipulation interfaces that go far beyond prebuilt controls. You see how to create views that users can drag around the screen. You also discover how to distinguish and interpret gestures and how to work with the iPhone’s built-in multitouch sensors. By the time you finish reading this chapter, you’ll have read about many different ways you can implement gesture control in your own applications.
Touches
Cocoa Touch implements direct manipulation in the simplest way possible. It sends touch events to the view you’re working with. As an iPhone developer, you tell the view how to respond to each touch.
Touches convey information: where the touch took place (both the current and previous location), what phase of the touch was used (essentially mouse down, mouse moved, mouse up in the desktop application world, corresponding to finger or touch down, moved, and up in the direct manipulation world), a tap count (for example, single-tap/double-tap), and when the touch took place (through a time stamp). Touches and their information are stored in UITouch objects. Each object represents a single touch event. Your applications receive these in the view class, which is where you need to process and respond to them.
This may seem counterintuitive. You probably expect to separate the way an interface looks (its view) from the way it responds to touches (its controller). In the iPhone world, direct touch interaction follows a fairly primitive design pattern, offering little or no Model-View-Controller design orthogonality. The rule for this is that you program in the UIView class and not in the UIViewController class. This is an important point. Trying to implement low-level gesture control in the wrong class has tripped up many new iPhone developers.
When working with low-level touch interaction, gesture interpretation and visual display become tightly intertwined. There are benefits to this organization. View controllers can own multiple views, all of which can use touches differently. If the view controller handled all touches directly, its response routines would have to choose between responses appropriate for each view. The code would quickly become complicated. Keeping that programming at the view level simplifies each implementation. As a second benefit, programming at the view level makes it possible for you to create custom user interface objects that are completely self-contained.
In the following sections and recipes, you discover how touches work, how you can incorporate them into your apps, and how you connect what a user sees with how that user interacts with the screen.
Phases
Touches have life cycles. Each touch can pass through any of five phases that represent the progress of the touch within an interface. These phases are as follows:
• UITouchPhaseBegan—Starts when users touch the screen.
• UITouchPhaseMoved—Means a touch has moved on the screen.
• UITouchPhaseStationary—Indicates that a touch remains on the screen surface but that there has not been any movement since the previous event.
• UITouchPhaseEnded—Gets triggered when the touch is pulled away from the screen.
• UITouchPhaseCancelled—Occurs when the iPhone OS system stops tracking a particular touch. This usually occurs due to a system interruption, such as when the application is no longer active or the view is removed from the window.
Taken as a whole, these five phases form the interaction language for a touch event. They describe all the possible ways that a touch can progress or fail to progress within an interface and provide the basis for control for that interface. It’s up to you as the developer to interpret those phases and provide reactions to them. You do that by implementing a series of view methods.
Touches and View Methods
All members and children of the UIResponder class, including UIView, respond to touches. Each class decides whether and how to respond. When choosing to do so, they implement customized behavior when a user touches one or more fingers down in a view or window.
Predefined callback methods handle the start, movement, and release of touches from the screen. Corresponding to the phases you’ve already seen, the methods involved are as follows. Notice that UITouchPhaseStationary does not generate a callback.
• touchesBegan:withEvent:—Gets called at the starting phase of the event, as the user starts touching the screen.
• touchesMoved:withEvent:—Handles the movement of the fingers over time.
• touchesEnded:withEvent:—Concludes the touch process, where the finger or fingers are released. It provides an opportune time to clean up any work that was handled during the movement sequence.
• touchesCancelled:WithEvent:—Called when Cocoa Touch must respond to a system interruption of the ongoing touch event.
Each of these is a UIResponder method, typically implemented in a UIView subclass. All views inherit basic nonfunctional versions of the methods. When you want to add touch behavior to your application, you override these methods and add a custom version that provides the responses your application needs.
The recipes in this chapter implement some but not all of these methods. For real-world deployment, you may want to add a touches cancelled event to handle the case of incoming phone calls, which cancels an ongoing touch sequence. Apple recommends overriding all four methods in UIView subclasses as a best practice.
Note
Views have a mode called exclusive touch that prevents touches from being delivered to other views. When enabled, this property blocks other views from receiving touch events. The primary view handles all touch events exclusively.
Touching Views
When dealing with many onscreen views, the iPhone automatically decides which view the user touched and passes any touch events to the proper view for you. This helps you write concrete direct manipulation interfaces where users touch, drag, and interact with onscreen objects.
Just because a touch is passed to a view doesn’t mean that a view has to respond. Each view can choose whether to handle a touch or to let that touch fall through to views beneath it. As you see in the recipes that follow, you can use clever response strategies to decide when your view should respond, particularly when you’re using irregular art with partial transparency.
Multitouch
The iPhone supports both single and multitouch interfaces. For single touch GUIs, you handle just one touch at any time. This relieves you of any responsibility of trying to determine which touch you were tracking. The one touch you receive is the only one you need to work with. You look at its data, respond to it, and wait for the next event.
When working with multitouch, that is, when you respond to multiple onscreen touches at once, you receive an entire set of touches. It is up to you to order and respond to that set. You can track each touch separately and see how it changes over time, providing a richer set of possible user interaction. Recipes for both single touch and multitouch interaction follow in this chapter.
Recipe: Adding a Simple Direct Manipulation Interface
The design focus moves from the UIViewController to the UIView when you work with direct manipulation. The view, or more precisely the UIResponder, forms the heart of direct manipulation development. Create touch-based interfaces by customizing methods that derive from the UIResponder class.
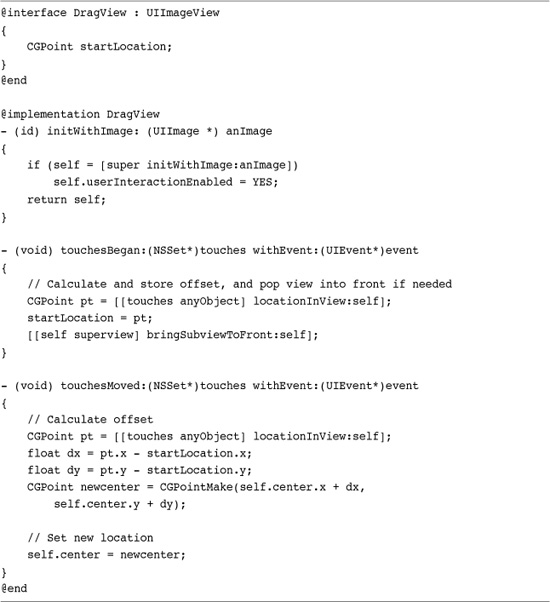
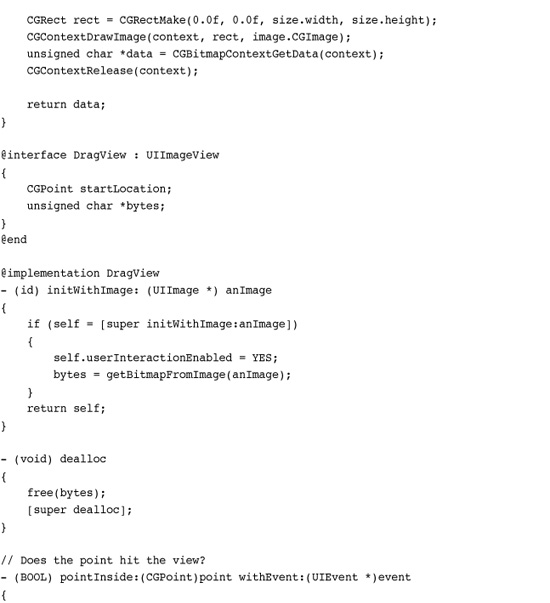
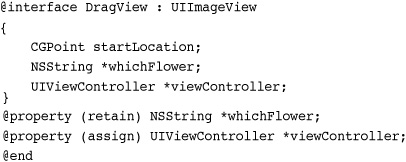
Recipe 8-1 centers on touches in action. This example creates a child of UIImageView called DragView and adds touch responsiveness to the class. Being an image view, it’s important to enable user interaction, that is, set setUserInteractionEnabled to YES. This property affects all the view’s children as well as the view itself.
Recipe 8-1 Creating a Draggable View
Get This Recipe’s Code
To get the code used for this recipe, go to http://github.com/erica/iphone-3.0-cookbook-, or if you’ve downloaded the disk image containing all of the sample code from the book, go to the folder for Chapter 8 and open the project for this recipe.
The recipe works by updating a view’s center to match the movement of an onscreen touch. When a user first touches any DragView, the object stores the start location as an offset from the view’s origin. As the user drags, the view moves along with the finger—always maintaining the same origin offset so that the movement feels natural. Movement occurs by updating the object’s center. Recipe 8-1 calculates x- and y-offsets and adjusts the view center by those offsets after each touch movement.
Upon being touched, the view pops to the front. That’s due to a call in the touchesMoved:withEvent: method. The code tells the superview that owns the DragView to bring that view to the front. This allows the active element to always appear foremost in the interface.
This recipe does not implement touches-ended or touches-cancelled methods. Its interests lie only in the movement of onscreen objects. When the user stops interacting with the screen, the class has no further work to do.
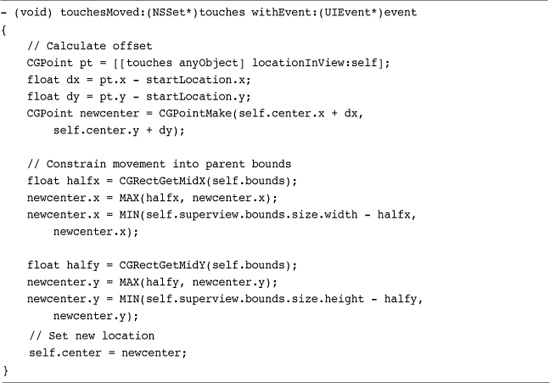
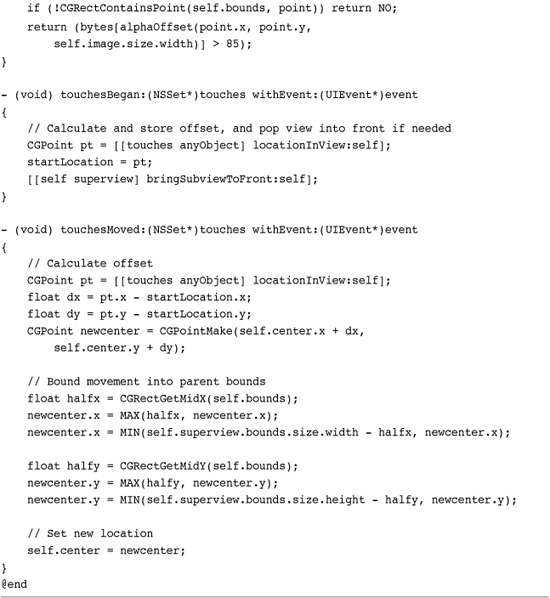
Recipe: Constraining Movement
The problem with the simple approach of Recipe 8-1 is that it’s entirely possible to drag a view offscreen to the point where the user cannot see or easily recover it. That recipe uses completely unconstrained movement. There is no check to test whether the object remains in view and is touchable. Recipe 8-2 fixes this problem by constraining a view’s movement to within its parent.
Get This Recipe’s Code
To get the code used for this recipe, go to http://github.com/erica/iphone-3.0-cookbook-, or if you’ve downloaded the disk image containing all of the sample code from the book, go to the folder for Chapter 8 and open the project for this recipe.
It achieves this by limiting movement in each direction, splitting its checks into separate x and y constraints. This two-check approach allows the view to continue to move even when one direction has passed its maximum. If the view has hit the rightmost edge of its parent, for example, it can still move up and down.
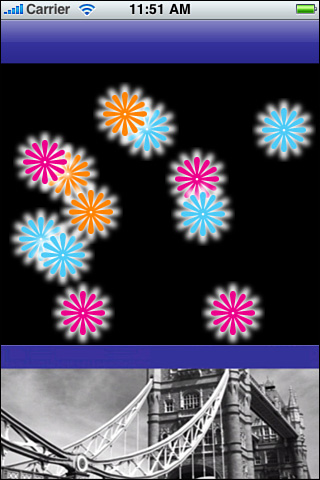
Figure 8-1 shows this interface. The flowers are constrained into the black rectangle in the center of the interface and cannot be dragged off-view. The code is general and can adapt to parent bounds and child views of any size.
Figure 8-1 The movement of these flowers is bounded into the black rectangle.
Recipe: Testing Touches
Most onscreen view elements for direct manipulation interfaces are not rectangular. This complicates touch detection because parts of the actual view rectangle may not correspond to actual touch points. Figure 8-2 shows the problem in action. The screenshot on the right shows the interface with its touch-based subviews. The shot on the left shows the actual view bounds for each subview. The light gray areas around each onscreen circle fall within the bounds, but touches to those areas should not “hit” the view in question.
Figure 8-2 The application should ignore touches to the gray areas that surround each circle (left). The actual interface (right) uses zero alpha values to hide the parts of the view that are not used.

The iPhone senses user taps throughout the entire view frame. This includes the undrawn area such as the corners of the frame outside the actual circles of Figure 8-2 just as much as the primary presentation. That means that unless you add some sort of hit test, users may attempt to tap through to a view that’s “obscured” by the clear portion of the UIView frame.
Visualize your actual view bounds by setting a view’s background color, for example:
dragger.backgroundColor = [UIColor lightGrayColor];
This adds the backsplashes shown in Figure 8-2 (left) without affecting the actual onscreen art. In this case, the art consists of a centered circle with a transparent background. Unless you add some sort of test, all taps to any portion of this frame are captured by the view in question. Enabling background colors offers a convenient debugging aid to visualize the true extent of each view; don’t forget to comment out the background color assignment in production code.
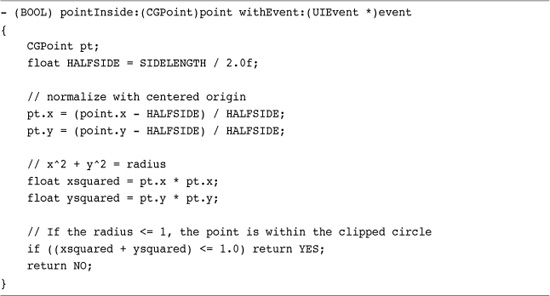
Recipe 8-3 adds a simple hit test to the views, determining whether touches fall within the circle. This test overrides the standard UIView pointInside:withEvent: method. This method returns either YES (the point falls inside the view) or NO (it does not). The test here uses basic geometry, checking whether the touch lies within the circle’s radius. You can provide any test that works with your onscreen views. As you see in Recipe 8-4, that test can be expanded for much finer control.
Recipe 8-3 Providing a Circular Hit Test
Get This Recipe’s Code
To get the code used for this recipe, go to http://github.com/erica/iphone-3.0-cookbook-, or if you’ve downloaded the disk image containing all of the sample code from the book, go to the folder for Chapter 8 and open the project for this recipe.
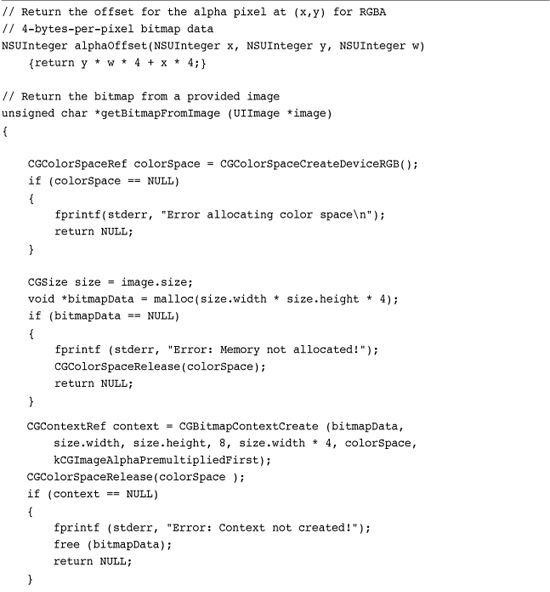
Recipe 8-4 Testing Touches Against Bitmap Alpha Levels
Get This Recipe’s Code
To get the code used for this recipe, go to http://github.com/erica/iphone-3.0-cookbook-, or if you’ve downloaded the disk image containing all of the sample code from the book, go to the folder for Chapter 8 and open the project for this recipe.
Recipe: Testing Against a Bitmap
Unfortunately, most views don’t fall into the simple geometries that make the hit test from Recipe 8-3 so straightforward. The flowers shown in Figure 8-1, for example, offer irregular boundaries and varied transparencies. For complicated art, it helps to test touches against a bitmap. Bitmaps provide byte-by-byte information about the contents of an image-based view, allowing you to test whether a touch hits a solid portion of the image or should pass through to any views below.
Recipe 8-4 extracts an image bitmap from a UIImageView. It assumes that the image used provides a pixel-by-pixel representation of the view in question. When you distort that view (normally by resizing a frame or applying a transform), update the math accordingly. Keeping the art at a 1:1 proportion to the actual view pixels simplifies lookup. You can recover the pixel in question, test its alpha level, and determine whether the touch has hit a solid portion of the view.
This example uses a cutoff of 85. That corresponds to a minimum alpha level of 33% (that is, 85 / 255). The pointInside: method considers any pixel with an alpha level below 33% to be transparent. This is arbitrary. Use any level (or other test for that matter) that works with the demands of your actual GUI.
Recipe: Adding Persistence to Direct Manipulation Interfaces
Persistence represents a key iPhone design touch point. After users leave a program, Apple strongly recommends that they return to a state that matches as closely to where they left off as possible. Adding persistence to a direct manipulation interface, in the simplest approach, involves storing a representation of the onscreen data when an application terminates and restoring that state on startup.
Storing State
Every view knows its position because you can query its frame or center. This enables you to easily recover and store positions for each onscreen flower. The flower type (green, pink, or blue) is another matter. For each view to report its current flower, the DragView class must store that value, too. Adding a string instance variable enables the view to return the image name used. Extending the DragView interface lets you do that.
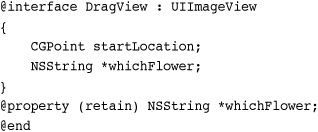
Adding this extra property lets the view controller that owns the flowers store both a list of colors and a list of locations to its defaults file. Here, a simple loop collects both values from each draggable view and then stores them.
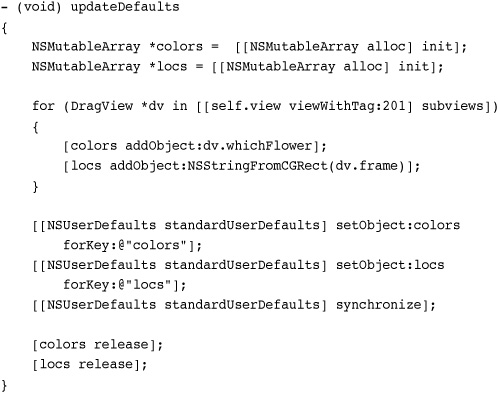
Defaults, as you can see, work like a dictionary. Just assign an object to a key and the iPhone updates the preferences file associated with your application ID. Defaults are stored in Library/Preferences inside your application’s sandbox. Calling the synchronize function updates those defaults immediately instead of waiting for the program to terminate.
The NSStringFromCGRect() function provides a tight way to store frame information as a string. To recover the rectangle, issue CGRectFromString(). Each call takes one argument: a CGRect in the first case, an NSString object in the second. The UIKit framework provides functions that translate points and sizes as well as rectangles to and from strings.
This updateDefaults method, which saves the current state to disk, should be called in the application delegate’s applicationWillTerminate: method, just before the program ends. The defaults are stored to reflect the final application state.

Recovering State
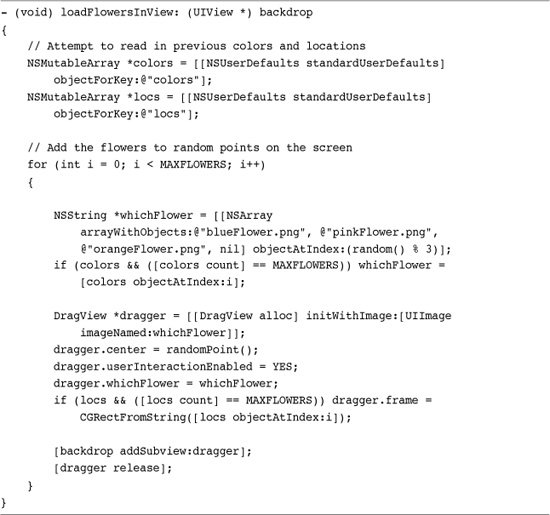
To bring views back to life, re-create them in either the loadView or viewDidLoad methods of your view controller. (Persistence awareness can also reside in the view controller’s init method if you’re not working with actual views.) Your methods should find any previous state information and update the interface to match that state.
When querying user defaults, Recipe 8-5 checks whether state data is unavailable (for example, the value returned is nil). When state data goes missing, the method creates random flowers at random points.
Recipe 8-5 Checking for Previous State
Get This Recipe’s Code
To get the code used for this recipe, go to http://github.com/erica/iphone-3.0-cookbook-, or if you’ve downloaded the disk image containing all of the sample code from the book, go to the folder for Chapter 8 and open the project for this recipe.
Note
When working with large data sources, you may want to initialize and populate your saved object array in the UIViewController’s init method, and then draw them in loadView or viewDidLoad. Where possible, use threading when working with many objects to avoid too much processing on the main thread. This can make the program laggy or unresponsive by blocking GUI updates.
Recipe: Persistence Through Archiving
Recipe 8-5 created persistence via the user defaults system. It stored descriptions of the onscreen views and built those views from the recovered description. Recipe 8-6 takes things to the next level. Instead of storing descriptions, it archives the objects themselves, or at least as much of the objects as is necessary to reconstruct them at launch time.
Recipe 8-6 Archiving Interfaces
Get This Recipe’s Code
To get the code used for this recipe, go to http://github.com/erica/iphone-3.0-cookbook-, or if you’ve downloaded the disk image containing all of the sample code from the book, go to the folder for Chapter 8 and open the project for this recipe.
Two classes—NSKeyedArchiver and NSKeyedUnarchiver—provide an elegant solution for archiving objects into a file for later retrieval. These archive classes provide an object persistence API that allows you to restore objects between successive application sessions. The example you’re about to see uses the simplest archiving approach. It stores a single root object, which in this case is an array of DragViews, that is, the flowers.
To create an archivable object class, you must define a pair of methods. The first, encodeWithCoder:, stores any information needed to rebuild the object. In this case, that is the view’s frame and its flower. Both are stored as NSString objects. The second method, initWithCoder:, recovers that information and initializes objects using saved information. Here are the two methods defined for the DragView class, allowing objects of this class to be encoded and retrieved from an archive.
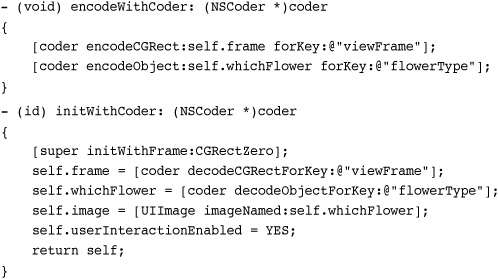
Each element is stored with a key name. Keys let you recover stored data in any order. Special UIKit extensions to the NSCoder class add storage methods for points, sizes, rectangles, affine transforms, and edge insets. This example takes advantage of the rectangle method for encoding and decoding the view frame.
Data is saved to an actual file. You supply an archive path to that file. This example stores its data in the Documents folder in the sandbox in a file called flowers.archive.
![]()
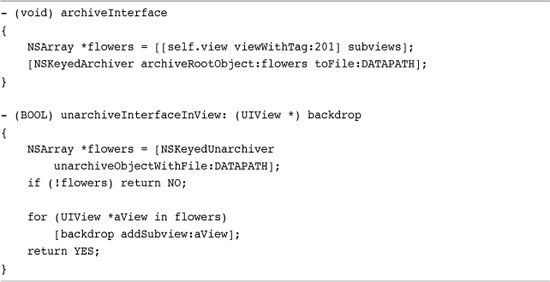
So for this direct manipulation interface, how do you actually perform the archiving and unarchiving? Recipe 8-6 shows the exact calls, which in this case are implemented in the view controller. Here are two custom methods that collect the DragViews and archive them to the file, and that retrieve the views from the file.
Notice that the latter method returns a Boolean value. This indicates whether the views could be read in correctly. On fail, a fallback method generates a new set of subviews. It’s assumed that either the data was corrupted or that this is the first time running the application. Either way, the application generates new data to populate the backdrop.
Recipe: Adding Undo Support
Undo support provides another important component of direct manipulation interfaces. For a simple GUI, this involves little more than returning each object to a previous onscreen position. Cocoa Touch offers the NSUndoManager class to provide a way to reverse user actions.
Creating an Undo Manager
Define your undo manager in the most central location possible. You want to use just one instance of this class for each primary view controller, sharing it with any child views in your interface. The viewDidLoad or loadView methods provide a good place to allocate a new undo manager.

The manager can store an arbitrary number of undo actions. You specify how deep that stack goes. Each action can be complex, involving groups of undo activities, or the action can be simple as in the example shown here. These undos do one thing: move a view to a previous location.
Child-View Undo Support
All children of the UIResponder class can find the nearest undo manager in the responder chain. This means that if you add DragView instances to a view whose view controller has an undo manager, each DragView automatically knows about that manager through its undoManager property. This is enormously convenient as you can add undo support in your main view controller, and all your child views basically pick up that support for free.
Working with Navigation Bars
When working with the navigation bar in any way, child views should store a pointer to their view controller. A pointer to their view controller lets the children coordinate with any navigation controller bar button items. You only want an Undo button to appear when items are available on the undo stack.
Upon adding an undo item to the manager, you may want to display an Undo button as this example does. The Undo button calls the manager’s undo method, which in turn uses the target, action, and object set stored at the top of the undo stack to perform the actual reversion. When the undo manager has no more undos to perform, the Undo button should hide.
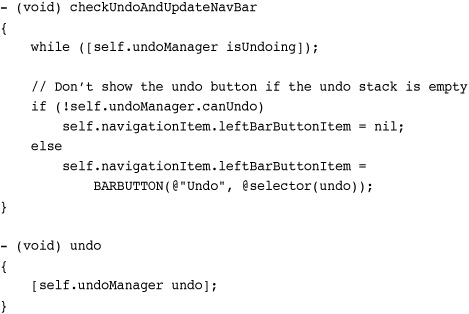
Notice that this method waits for the undo manager to finish any ongoing undo actions before proceeding to update the navigation bar.
Registering Undos
Here is the simplest call to register an undo. It stores the object location at the start of a touch sequence, specifying that upon undo, the object should reset its position to this start location. This call is made from the child view, and not from the view controller. This approach tells the undo manager how to reset an object to its previous attributes.

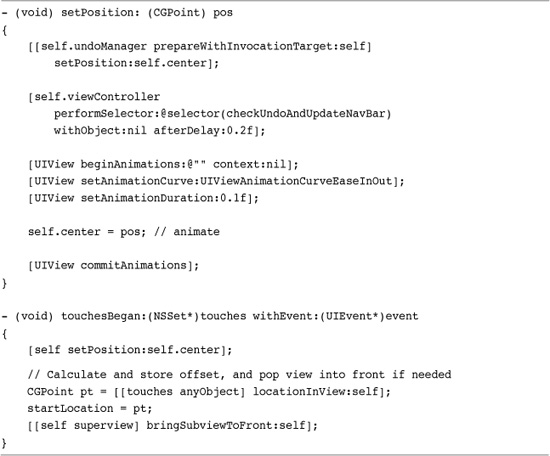
An alternative, preferred approach uses an invocation instead of a target and selector. The invocation records a message for reverting state, that is, it stores a way that it can jump back to the previous state. Perform this preparation before you change the object’s state.
[[self.undoManager prepareWithInvocationTarget:self] setPosition:self.center];
With invocations, you can use a method with any number of arguments and argument types. This invocation simplifies adding redo support, which is why it is preferred.
There are several ways to approach the undo registration process in a direct manipulation interface. Placing a call to a setter/unsetter method from the touchesBegan:withEvent: provides the easiest solution, as shown in Recipe 8-7.
Recipe 8-7 Creating a Custom Undo Routine
Get This Recipe’s Code
To get the code used for this recipe, go to http://github.com/erica/iphone-3.0-cookbook-, or if you’ve downloaded the disk image containing all of the sample code from the book, go to the folder for Chapter 8 and open the project for this recipe.
Be aware that if users touch an object and release without moving it, undo results may be imperceptible. You may want to add a check into the touches ended routine to make sure that an object was actually moved. If not, remove the last item from the undo stack by issuing undo.
Recipe 8-7 lists the actual undo code. The setPosition: method provides both a set and reset solution for the undo manager. Upon registration, it stores the position of a view into the undo stack. Upon undo, it animates the view back to that position, providing a visual connection between the new value and the old. Although redo support is not used in this recipe (see Recipe 8-8), the setPosition: method is redo compliant. When called by the undo manager, the repeat prepareWithInvocationTarget: call gets added to the redo stack.
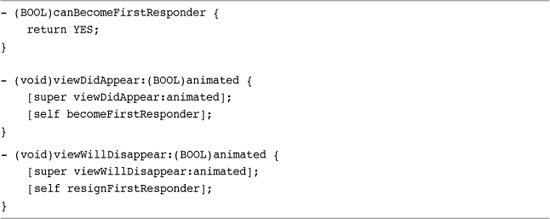
Recipe 8-8 Providing Shake-to-Edit Support by Becoming First Responder
Get This Recipe’s Code
To get the code used for this recipe, go to http://github.com/erica/iphone-3.0-cookbook-, or if you’ve downloaded the disk image containing all of the sample code from the book, go to the folder for Chapter 8 and open the project for this recipe.
The delayed selector in this method, checkUndoAndUpdateNavBar:, triggers after the animation has completed. This allows the setPosition: method to finish before any checks are made against the undo stack.
The stack will not decrease its count until after the registered method returns. If you call the method directly, the Undo button on the navigation controller will not dismiss even though there are no further undos to perform. The while loop that checks for isUndoing would never clear and setPosition: would never return.
Recipe: Adding Shake-Controlled Undo Support
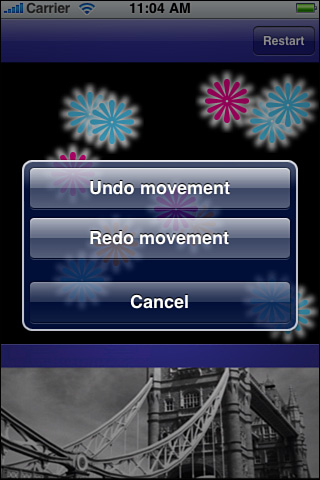
New to the 3.0 SDK, shake-to-undo support offers a whimsical feature that automatically produces an undo/redo menu. When users shake the phone, this menu appears, connected to the current undo manager. The menu allows users to undo the previous action or redo an action that has been undone. Figure 8-3 shows the shake-to-undo menu.
Figure 8-3 Shake-to-undo provides an undo/redo menu for users.
Shake-to-edit is a clever concept, but it’s not entirely practical in application. Training your users to shake the phone rather than press an Undo button presents a real-world hurdle. Even trained, it’s a pain to keep shaking the phone to process a series of undo events. If you plan to include this feature in your applications, consider using it to enhance and extend an existing undo setup rather than replace it.
Adding support for shake-to-edit takes just a few steps. Here is an item-by-item list of the changes you make to offer this feature in your application.
Add an Action Name for Undo and Redo
Action names provide the word or words that appear after “Undo” and “Redo,” as shown in Figure 8-3. Here, the action name is set to “movement.” The undo menu option is therefore Undo Movement. Extend the setPosition: method to provide this name by adding this line right after you prepare the invocation target.
![]()
Provide Shake-To-Edit Support
Locate the applicationDidFinishLaunching: method of your application delegate. In that method add this line. Setting the applicationSupportsShakeToEdit property explicitly adds shake-to-edit support to the application as a whole.
application.applicationSupportsShakeToEdit = YES;
Force First Responder
For a view controller to handle undo/redo, it must always be first responder. Since each application may be handling several undo manager clients, the application must match each undo manager to a particular view controller. Only the first responder receives undo/redo calls.
As the undo manager typically lives inside a UIViewController instance, make sure to add the routines from Recipe 8-8 to your view controller. These ensure that it becomes first responder whenever it appears onscreen and that its undo manager is used.
Recipe: Drawing Onscreen
As with gestures, the UIView hosts the realm of direct onscreen drawing. Its drawRect: method offers a low-level way to draw content directly, letting you create and display arbitrary elements using Quartz 2D calls. These two elements can join together to build concrete, manipulatable interfaces.
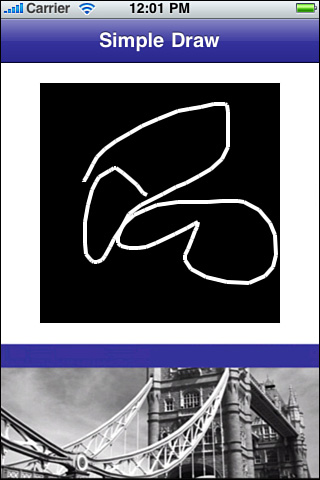
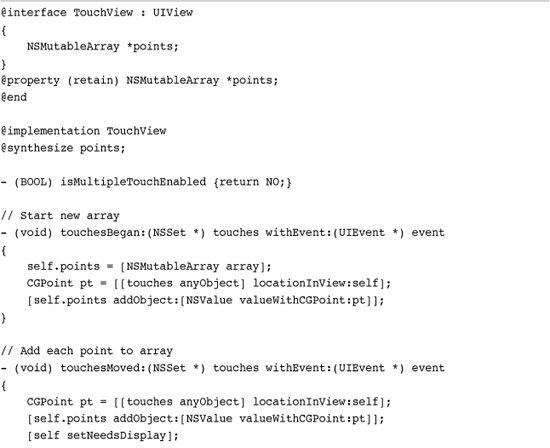
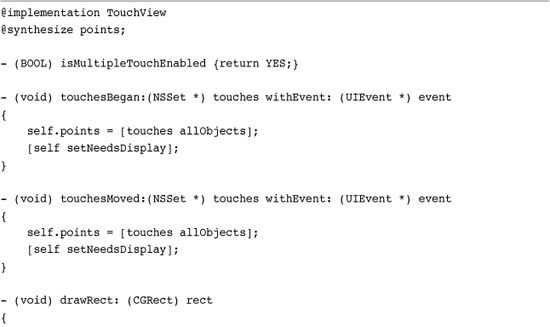
Recipe 8-9 combines gestures with drawRect to create touch-based painting. As a user touches the screen, the TouchView class collects a series of points. At each touch movement, the touchesMoved:withEvent: method calls setNeedsDisplay. This, in turn, triggers a call to drawRect:, where the view draws a series of line segments from those points to create a visual onscreen path. Figure 8-4 shows the interface with a user-created path.
Figure 8-4 A simple painting tool for the iPhone requires little more than collecting touches along a path and painting that path with Quartz 2D calls.
Recipe 8-9 Touch-Based Painting in a UIView

Get This Recipe’s Code
To get the code used for this recipe, go to http://github.com/erica/iphone-3.0-cookbook-, or if you’ve downloaded the disk image containing all of the sample code from the book, go to the folder for Chapter 8 and open the project for this recipe.
Recipe: Calculating Lines
When user input relies primarily on touches, applied geometry can help interpret those gestures. In this recipe and the next, computational solutions filter user input to create simpler data sets that are more application appropriate. Recipe 8-10 collects the same touch array that was shown in Recipe 8-9. When the gesture finishes, that is, at touch-up, this code analyzes that array and creates a minimized set of line segments to match the freeform points.
Recipe 8-10 Creating Line Segments from Freeform Gestures

Get This Recipe’s Code
To get the code used for this recipe, go to http://github.com/erica/iphone-3.0-cookbook-, or if you’ve downloaded the disk image containing all of the sample code from the book, go to the folder for Chapter 8 and open the project for this recipe.
A reduced point set accomplishes two things. First, it creates a straighter, better-looking presentation. The right image in Figure 8-5 is much cleaner than the one on the left. Second, it produces a set of points that are better matched to interpretation. The six-point line segments shown in Figure 8-5 on the right are far easier to analyze than the more than 50 points on the left.
Figure 8-5 Computational solutions can manage user input. Here, a line detection algorithm reduces the number of input points by converting user intent into a better geometric representation.
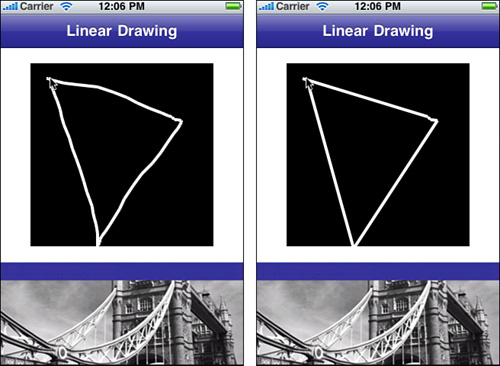
The extra line segments are due to a slight finger squiggle at the top-right of the triangle. Converting a freeform gesture into meaningful user intent can be a significantly hard problem. Although it’s obvious to a human that the user meant to draw a triangle, computational algorithms are never perfect. When you need to interpret gestures, a certain amount of hand waving accommodation is necessary.
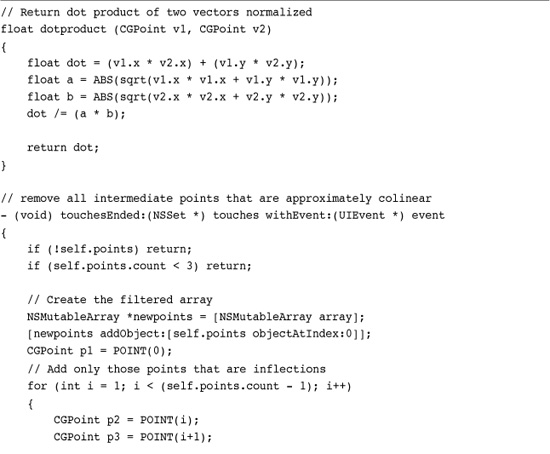
Recipe 8-10 works by analyzing sets of three points at a time. For each triplet, it centers the first and third points around the origin of the second. It then takes the dot product of the vectors to the first and third points. The dot product returns a value that is the cosine of the angle between the two vectors. If those points are collinear, that is, the angle between them is roughly 180 degrees (give or take), the algorithm discards the middle point.
The cosine of 180 degrees is -1. This code discards all points where the vector cosine falls below -0.75. Increasing the tolerance (by raising the cosine check, say to -0.6 or -0.5) produces flatter results but may also discard intentional direction changes from users. If your goal is to check for triangles, squares, and other simple polygons, the tolerance can be quite robust. To produce “prettier” line drawings, use a tighter tolerance to retain user-provided detail.
Recipe: Detecting Circles
In a direct manipulation interface like the iPhone, you’d imagine that most people could get by just pointing to items onscreen. And yet, circle detection remains one of the most requested gestures. Developers like having people circle items onscreen with their fingers. In the spirit of providing solutions that readers have requested, Recipe 8-11 offers a relatively simple circle detector, which is shown in Figure 8-6.
Get This Recipe’s Code
To get the code used for this recipe, go to http://github.com/erica/iphone-3.0-cookbook-, or if you’ve downloaded the disk image containing all of the sample code from the book, go to the folder for Chapter 8 and open the project for this recipe.
Figure 8-6 The dot and the outer ellipse show the key features of the detected circle.

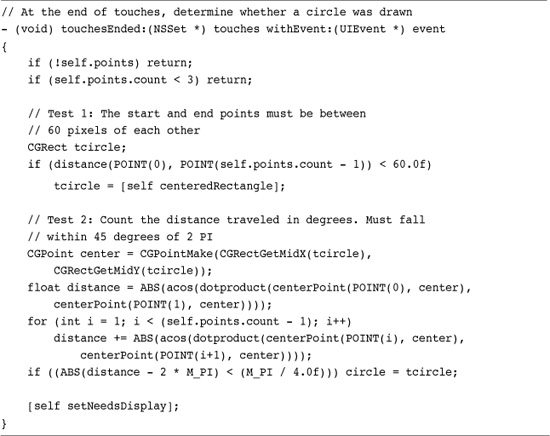
In this implementation, detection uses a two-step test. First, there’s a convergence test. The circle must start and end close enough together that the points are somehow related. A fair amount of leeway is needed because when you don’t provide direct visual feedback, users tend to undershoot or overshoot where they began. The pixel distance used here is a generous 60 pixels, approximately a third of the view size.
The second test looks at movement around a central point. It adds up the arcs traveled, which should equal 360 degrees in a perfect circle. This sample allows any movement that falls within 45 degrees of that number.
Upon passing the two tests, the algorithm produces a least bounding rectangle and centers that rectangle on the geometric mean of the points from the original gesture. This result is assigned to the circle instance variable. It’s not a perfect detection system (you can try to fool it when testing the sample code), but it’s robust enough to provide reasonably good circle checks for many iPhone applications.
Recipe: Detecting Multitouch
Enabling multitouch interaction in your UIViews lets the iPhone recover and respond to more than one finger touch at a time. Set the UIView property multipleTouchEnabled to YES or override isMultipleTouchEnabled for your view. When multitouch is enabled, each touch callback returns an entire set of touches. When that set’s count exceeds one, you know you’re dealing with multitouch.
In theory, the iPhone could support an arbitrary number of touches. On the iPhone, multitouch is limited to five finger touches at a time. Even five at a time goes beyond what most developers need. There aren’t many meaningful gestures you can make with five fingers at once. This particularly holds true when you grasp the iPhone with one hand and touch with the other.
Touches are not grouped. If, for example, you touch the screen with two fingers from each hand, there’s no way to determine which touches belong to which hand. The touch order is arbitrary. Although grouped touches retain the same finger order for the lifetime of a single touch event (down, move, up), the order may change the next time your user touches the screen. When you need to distinguish touches from each other, build a touch dictionary indexed by the touch objects.
Perhaps it’s a comfort to know that if you need to, the extra finger support has been built in. Unfortunately, when you are using three or more touches at a time, the screen has a pronounced tendency to lose track of one or more of those fingers. It’s hard to programmatically track smooth gestures when you go beyond two finger touches.
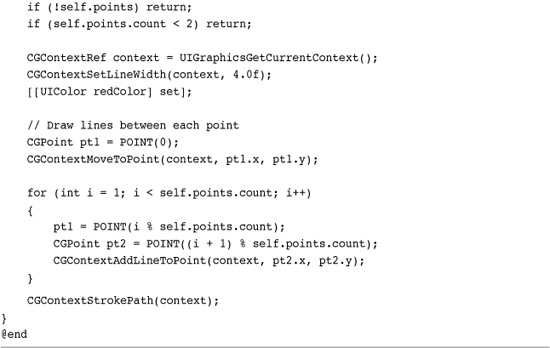
Recipe 8-12 adds multitouch to a UIView (via the isMultipleToucheEnabled method) and draws lines between each touch location onscreen. When you limit your input to two touches, it produces a reasonably steady response, maintaining a line between those two fingers. Add a third touch to the screen and the lines start to flicker. That’s because the iPhone does not steadily detect all the touches.
Recipe 8-12 Adding Basic Multitouch
Get This Recipe’s Code
To get the code used for this recipe, go to http://github.com/erica/iphone-3.0-cookbook-, or if you’ve downloaded the disk image containing all of the sample code from the book, go to the folder for Chapter 8 and open the project for this recipe.
Unfortunately, multitouch detection is not nearly as stable and dependable as single touch interaction. You see that in this recipe and see an even more pronounced example in Recipe 8-13. While multitouch is available and, admittedly, an exciting technology, its limits mean you should use it cautiously and with heavy testing before deployment to real-world applications.
Recipe 8-13 Interpreting Gestures
Get This Recipe’s Code
To get the code used for this recipe, go to http://github.com/erica/iphone-3.0-cookbook-, or if you’ve downloaded the disk image containing all of the sample code from the book, go to the folder for Chapter 8 and open the project for this recipe.
Note
Apple provides many Core Graphics/Quartz 2D resources on its developer Web site. Although many of these forums, mailing lists, and source code samples are not iPhone specific, they offer an invaluable resource for expanding your iPhone Core Graphics knowledge.
Recipe: Gesture Distinction
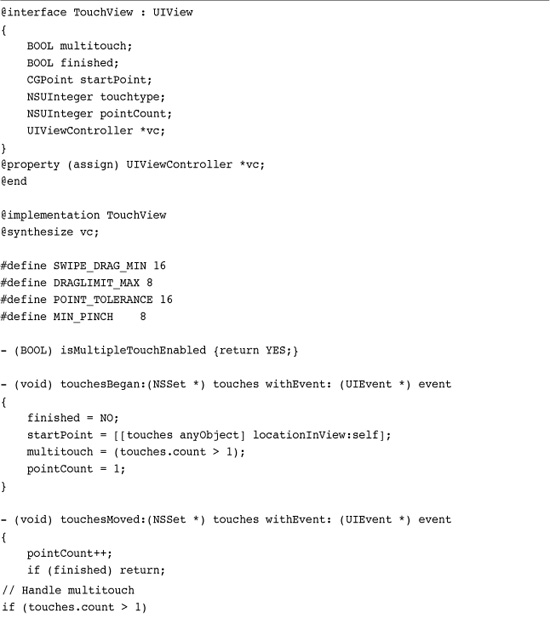
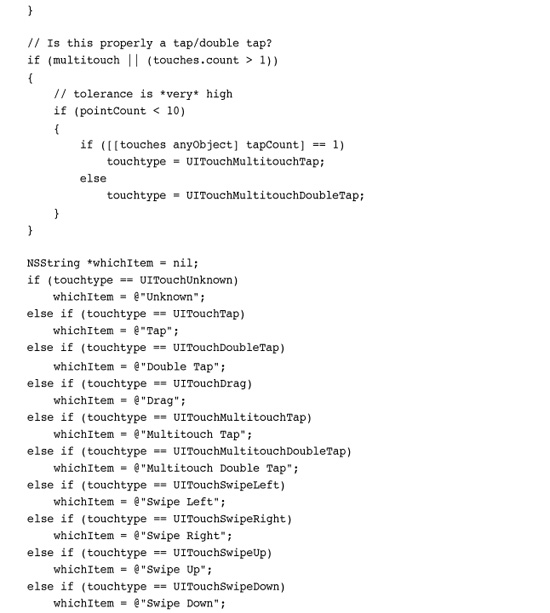
Standard Apple iPhone applications support a variety of gestures that have become a basic language for touch interaction. Users can tap, double-tap, swipe, and drag the screen, and Apple applications interpret those gestures accordingly. Unfortunately, Apple does not offer a public API that performs the heavy lifting. You need to interpret your own gestures. Recipe 8-13 offers a gesture detection system that waits for user input and then evaluates that input.
Distinguishing gestures is not trivial, particularly when you add multitouch into the equation. As Recipe 8-12 demonstrated, iPhone touch sensors are less reliable in multitouch mode. A two-touch drag, for example, might flip back and forth between detecting two fingers and one.
The solution in Recipe 8-13 for working with this inconsistency is twofold. First, the code tries to find the most immediate solution for matching input to a known gesture as quickly as possible. When matched, it sets a “finished” flag so the first gesture matched wins. Second, this code may invalidate a match should user input continue beyond a reasonable limit. For example, taps are short; a tap should not involve 20 or 30 UITouch instances. Here are the gestures that Recipe 8-13 handles, and how it interprets them:
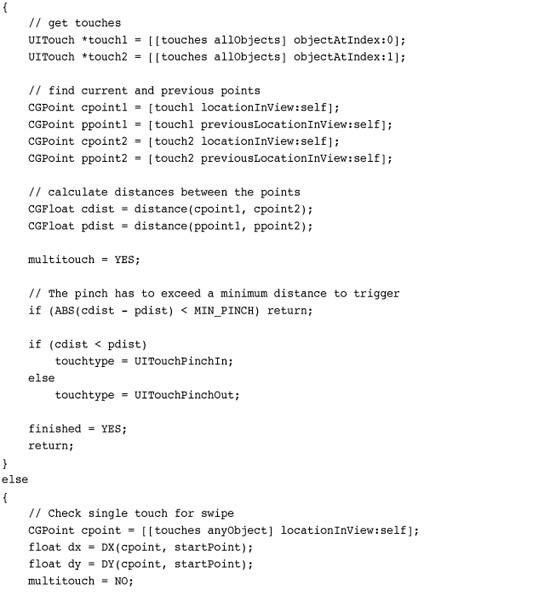
• Swipes—Swipes are short, single-touch gestures that move in a single cardinal direction: up, down, left, or right. They cannot move too far off course from that primary direction. The code here checks for touches that travel at least 16 pixels in X or Y, without straying more than 8 pixels in another direction.
• Pinches—To pinch or unpinch, a user must move two fingers together or apart in a single movement. That gesture must compress or expand by at least 8 pixels to register with this code.
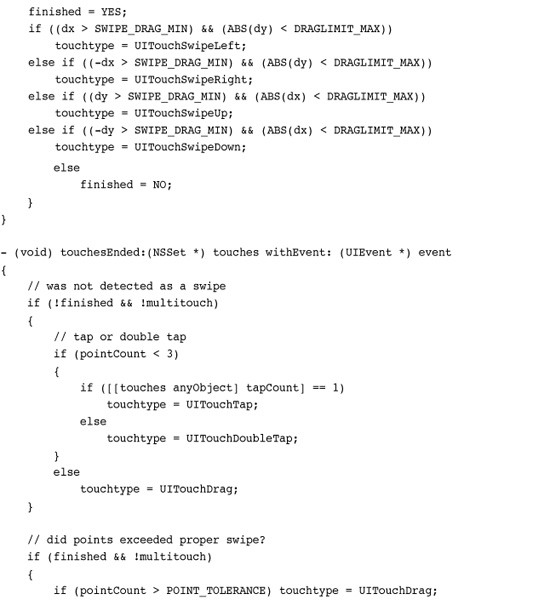
• Taps—Although a tap should ideally represent a single touch to the screen, extra callbacks may register. Recipe 8-13 uses a point limit of 3 for single-touch taps, and 10 for double-touch taps. And yes, that high tolerance is needed. Empirical testing set the levels used in this recipe. Users touched one or two fingers to the screen at once, and the code counted the UITouch instances produced.
• Double-taps—Each touch object provides a tap count, letting you check whether users tapped once or twice. However, a double-tap is not counted until a single-tap has already been processed. When looking to distinguish between single- and double-taps, be aware of this behavior.
• Drags—For the purpose of this example, a drag refers to any single-touch event that is not a tap, a double-tap, or a swipe.
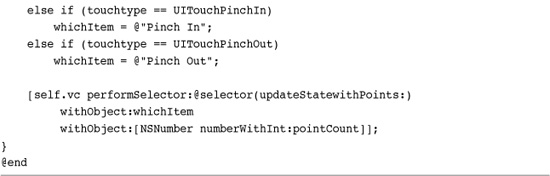
One More Thing: Interactive Resize and Rotation
As the recipes in this chapter have shown, if you’re willing to bring math to the table, the iPhone can respond in powerful ways. Listing 8-1 demonstrates that power by combining the DragView class shown throughout this chapter with Apple sample code. This code creates a touchable, interactive view that responds to single and double touches by translating, rotating, and zooming.
Listing 8-1 Resizing and Rotating Views
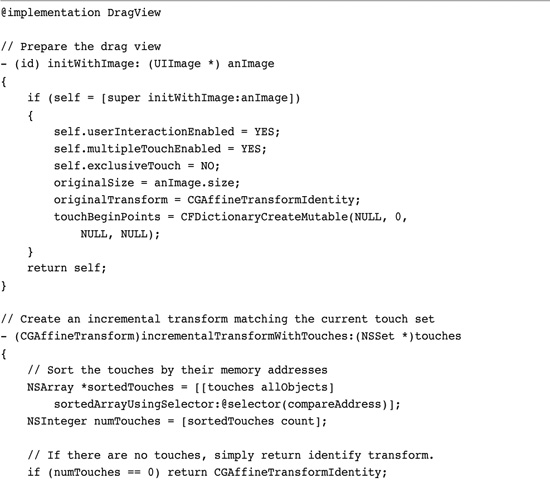

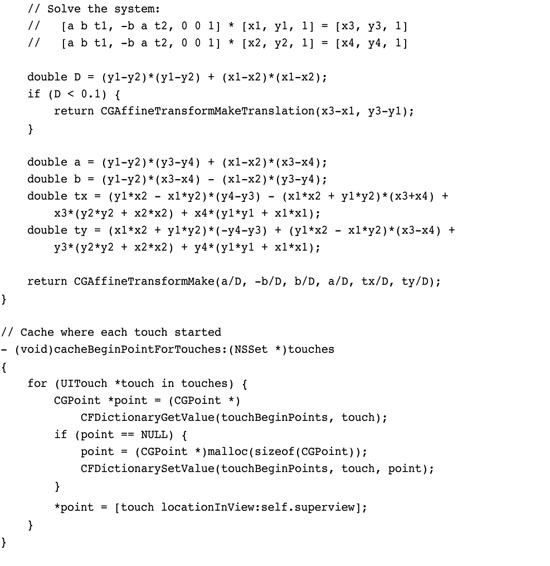
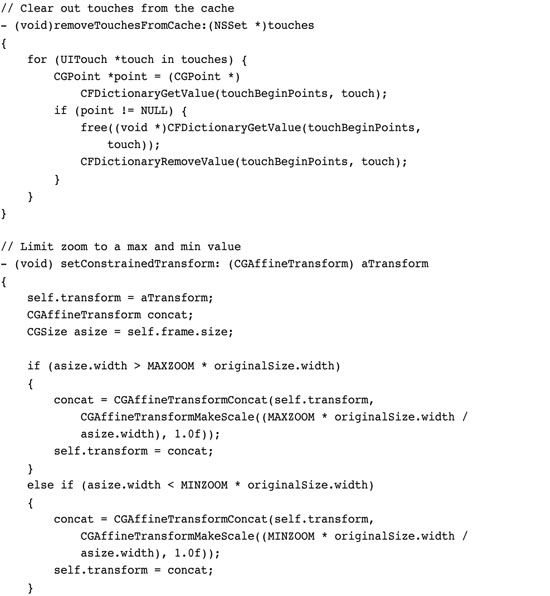
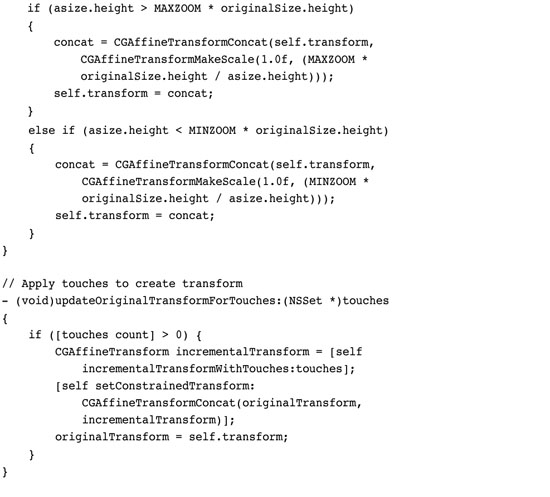
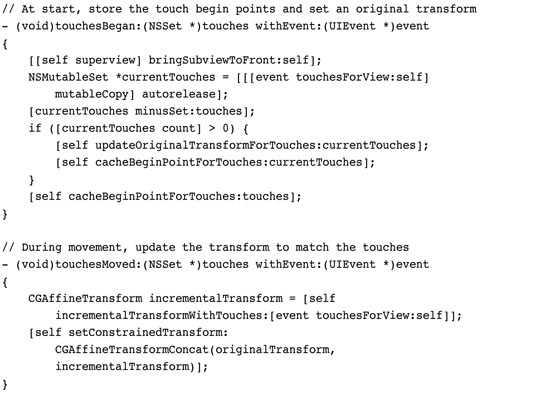
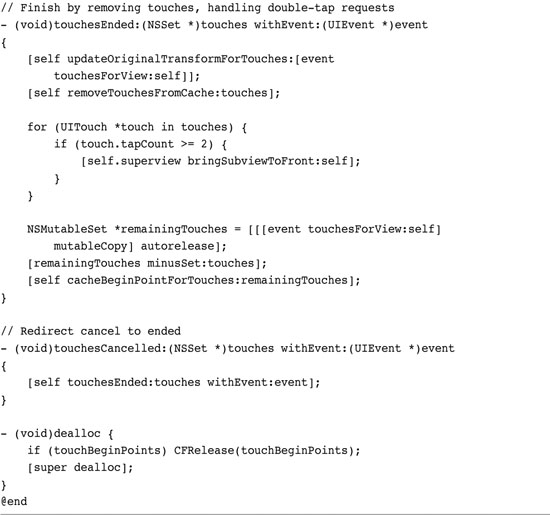
This implementation, whose features are due to Apple and whose mistakes are down solely to me, stores a set of points at the beginning of each touch. It then creates incremental affine transforms based on touch progress, comparing the touch locations to their starting positions and updating the view transform in real time.
It’s a complicated way to approach direct manipulation, but the results are outstanding. This class responds directly to user interaction to match the view to its touches.
Summary
UIViews provide the onscreen components your users see. Gestures give views the ability to interact with those users via the UITouch class. As this chapter has shown, even in their most basic form, touch-based interfaces offer easy-to-implement flexibility and power. You discovered how to move views around the screen and how to bound that movement. You read about testing touches to see whether views should or should not respond to them. Several recipes covered both persistence and undo support for direct manipulation interfaces. You saw how to “paint” on a view and how to process user touches to interpret and respond to gestures. Here’s a collection of thoughts about the recipes in this chapter that you might want to ponder before moving on:
• Be concrete. The iPhone has a perfectly good touch screen. Why not let your users drag items around the screen with their fingers? It adds to the reality and the platform’s interactive nature.
• Users typically have five fingers per hand. Don’t limit yourself to a one-finger interface when it makes sense to expand your interaction into multitouch territory.
• A solid grounding in Quartz graphics and Core Animation will be your friend. Using drawRect:, you can build any kind of custom UIView presentation you’d like, including text, Bézier curves, scribbles, and so forth.
• Explore! This chapter only touched lightly on the ways you can use direct manipulation in your applications. Use this material as a jumping-off point to explore the full vocabulary of the UITouch class.