
13. Networking
As an Internet-connected device, the iPhone is particularly well suited to retrieving remote data and subscribing to Web-based services. Apple has lavished the platform with a solid grounding in all kinds of network computing and its supporting technologies. The iPhone SDK handles sockets, password keychains, XML processing, and more. This chapter surveys common techniques for network computing, offering recipes that simplify day-to-day tasks. You read about checking the network status, monitoring that status for changes, and testing site reachability. You also learn how to download resources asynchronously and how to respond to authentication challenges. By the time you finish this chapter, you’ll have discovered how to build an FTP client, a custom iPhone-based Web browser, and more.
Recipe: Checking Your Network Status
Networked applications need a live connection to communicate with the Internet or other nearby devices. Applications should know whether that connection exists before reaching out to send or retrieve data. Checking the network status lets the application communicate with users and explain why certain functions might be disabled.
Apple has and will reject applications that do not check the network status before providing download options to the user. Apple reviewers are trained to check whether you properly notify the user, especially in the case of network errors. Always verify your network status and alert the user accordingly.
Apple also rejects applications based on “excessive data usage.” If you plan to stream large quantities of data in your application, such as voice or data, you’ll need to test for the current connection type. Provide lower quality data streams for users on a cell network connection and higher quality data for users with Wi-Fi connections. Apple has little tolerance for applications that place high demands on cell network data.
The iPhone can currently test for the following configuration states: some (i.e., any kind of) network connection available, Wi-Fi available, and cell service available. There are no APIs that allow the iPhone to test for Bluetooth connectivity at this time (although you can limit your application to run only on Bluetooth-enabled devices), nor can you check to see whether a user is roaming before offering data access.
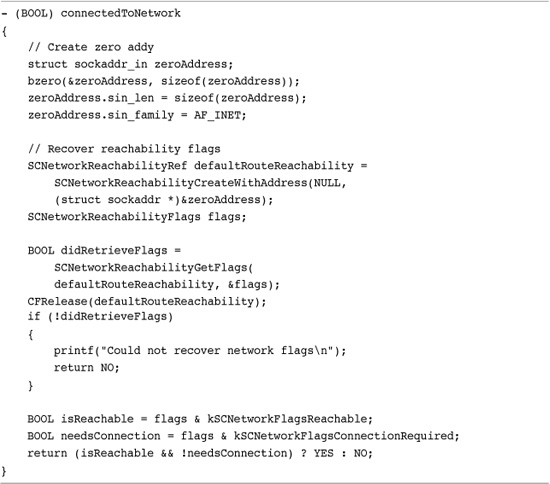
The System Configuration framework offers many networking aware functions. Among these, SCNetworkReachabilityCreateWithAddress checks whether an IP address is reachable. Recipe 13-1 shows a simple example of this test in action.
Recipe 13-1 Testing a Network Connection
Get This Recipe’s Code
To get the code used for this recipe, go to http://github.com/erica/iphone-3.0-cookbook-, or if you’ve downloaded the disk image containing all of the sample code from the book, go to the folder for Chapter 13 and open the project for this recipe.
It provides a basic detector that determines whether your device has outgoing connectivity, which it defines as having both access and a live connection. This method, based on Apple sample code, returns YES when the network is available and NO otherwise. The flags used here indicate both that the network is reachable (kSCNetworkFlagsReachable) and that no further connection is required (kSCNetworkFlagsConnectionRequired). Other flags you may use are as follows:
• kSCNetworkReachabilityFlagsIsWWAN—Tests whether your user is using the carrier’s network or local Wi-Fi. When available, the network can be reached via EDGE, GPRS, or another cell connection. That means you might want to use lightweight versions of your resources (for example, smaller versions of images) due to the connection’s constricted bandwidth.
• kSCNetworkReachabilityFlagsIsDirect—Tells you whether the network traffic goes through a gateway or arrives directly.
To confirm that connectivity code works, it is best evaluated on an iPhone. iPhones provide both cell and Wi-Fi support allowing you to confirm that the network remains reachable when using a WWAN connection. Test out this code by toggling Wi-Fi and airplane mode off and on in the iPhone’s Setting app. Be aware that there’s sometimes a slight delay when checking for network reachability, so design your applications accordingly. Let the user know what your code is up to during the check.
Recipe: Extending the UIDevice Class for Reachability
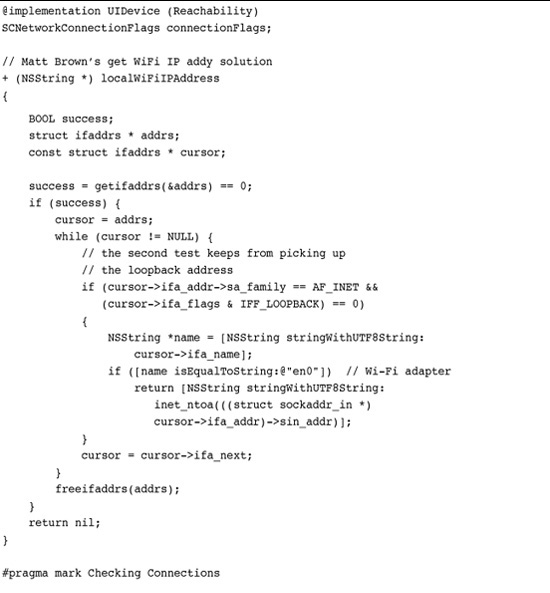
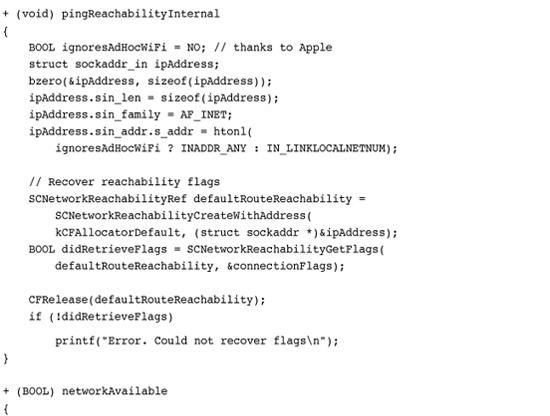
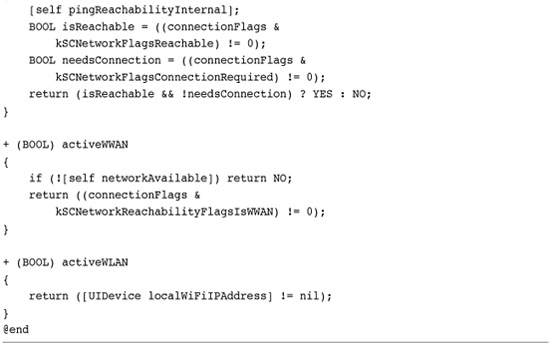
The UIDevice class provides information about the current device in use, such as its battery state, model, orientation, and so forth. Adding reachability seems like a natural extension for a class whose purpose is to report device state. Recipe 13-2 defines a UIDevice category called Reachability. It hides calls to the System Configuration framework and provides a simple way to check on the current network state. You can ask if the network is active, and whether it is using cell service or Wi-Fi.
Recipe 13-2 Extending UIDevice for Reachability
Get This Recipe’s Code
To get the code used for this recipe, go to http://github.com/erica/iphone-3.0-cookbook-, or if you’ve downloaded the disk image containing all of the sample code from the book, go to the folder for Chapter 13 and open the project for this recipe.
Most connectivity checking solutions assume that a connected device, whose connection is not provided by WWAN cell service, has Wi-Fi connectivity. This is an assumption that may not continue to hold true should Apple open up Bluetooth services to the SDK. Recipe 13-2 uses a direct Wi-Fi checking solution developed by Matt Brown, a software developer and a fan of the first edition of this book. It applies low-level (but SDK-friendly) calls to retrieve the local Wi-Fi IP address. If one is found, the class returns a positive result for Wi-Fi.
Note that this class uses a slightly different network check than Recipe 13-1, again one inspired by Apple sample code. Use the ignoresAdHocWiFi Boolean to limit network checks. When enabled, the recipe won’t return a success on detecting an ad hoc Wi-Fi connection.
Recipe: Scanning for Connectivity Changes
Connectivity state may change while an application is running. Checking once at application launch usually isn’t enough for an application that depends on data connections throughout its lifetime. You may want to alert the user that a network connection was lost—or could finally be established.
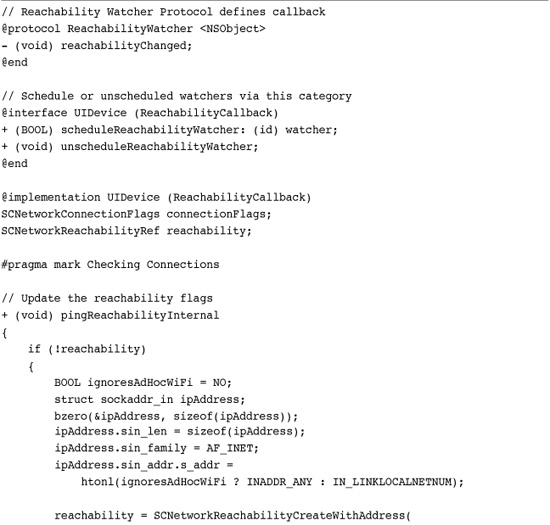
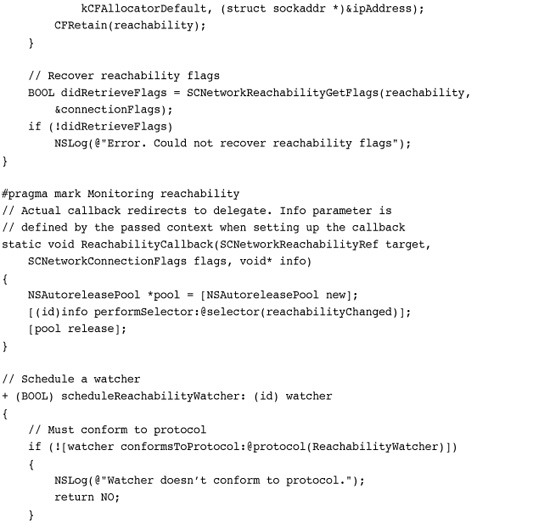
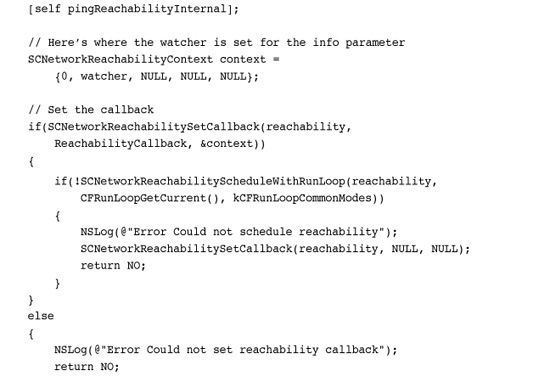
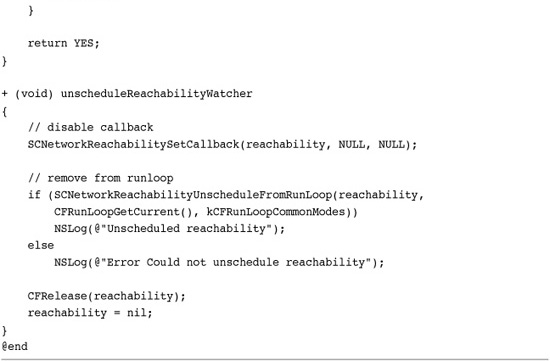
Recipe 13-3 addresses this challenge by using another UIDevice category to monitor reachability. It provides a pair of methods that allow you to schedule and unschedule reachability watchers, observers who must be notified when the connectivity state changes. It builds a callback that messages a watcher object when that state changes. The monitor is scheduled on the current run loop and runs asynchronously. Upon detecting a change, the callback function triggers.
Recipe 13-3 Monitoring Connectivity Changes
Get This Recipe’s Code
To get the code used for this recipe, go to http://github.com/erica/iphone-3.0-cookbook-, or if you’ve downloaded the disk image containing all of the sample code from the book, go to the folder for Chapter 13 and open the project for this recipe.
Recipe 13-3’s callback function redirects itself to a specific delegate method, reachabilityChanged, which must be implemented by an object that conforms to the ReachabilityWatcher protocol. That watcher object can then query UIDevice (via the Reachability category) for the current flags and network state.
The method that schedules the watcher assigns the delegate as its parameter.

Your application will generally receive one callback at a time for each kind of state change, that is, when the cellular data connection is established or released, or when Wi-Fi is established or lost. Your user’s connectivity settings (especially remembering and logging in to known Wi-Fi networks) will affect the kind and number of callbacks you may have to handle.
Be sure to inform your user when connectivity changes as well as update your interface to mirror the current state. You might want to disable buttons or menu items that depend on network access when that access disappears. Providing an alert of some kind lets the user know why the GUI has updated.
Recipe: Recovering IP and Host Information
In the day-to-day world of iPhone network programming, certain tasks come up over and over again, particularly those dealing with recovering the local iPhone IP address information and working with address structures. Recipe 13-4 provides a handful of utilities, several based on Apple sample code, that help you manage these tasks.
Recipe 13-4 IP and Host Utilities

Get This Recipe’s Code
To get the code used for this recipe, go to http://github.com/erica/iphone-3.0-cookbook-, or if you’ve downloaded the disk image containing all of the sample code from the book, go to the folder for Chapter 13 and open the project for this recipe.
As with Recipes 13-2 and 13-3, these methods are wrapped into the UIDevice class as a category extension. They are, again, all implemented as class methods as their utility is not tied to any particular object instance. The methods in this recipe are as follows.
• A pair of methods (stringFromAddress: and addressFromString:) helps you convert address structures to and from string representations. The BonjourHelper recipes in Chapter 12, “Making Connections with GameKit and Bonjour,” used these methods extensively. They integrate well with the NSNetService class, allowing you to convert sockaddr structures into NSString instances and back.
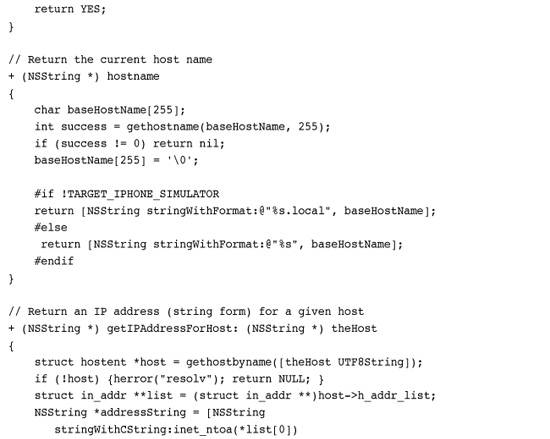
• The hostname method returns the host name for the current device. This method observes a small iPhone quirk. The simulator normally appends the .local domain to the current host name. The iPhone does not. This routine forces the host name into Mac-style compliance. Be aware that hostname, as well as some of the following methods, may fail on certain releases of the iPhone simulator, particularly in Snow Leopard (versus Leopard). It continues to work properly, at the time this book was written, on the iPhone device.
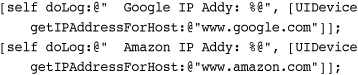
• Use getIPAddressForHost: to look up an address for a given host name. The sample code that accompanies this chapter uses this routine to retrieve IP addresses for www.google.com and www.amazon.com. These calls are blocking, and they take a certain amount of time to return (especially for nonexistent hosts). Use them judiciously, preferably on a secondary thread or via an NSOperationQueue.
• The localIPAddress method looks up the host’s address and returns it as a string. Like getIPAddressForHost:, this method uses gethostbyname() to convert a host name into an IP address.
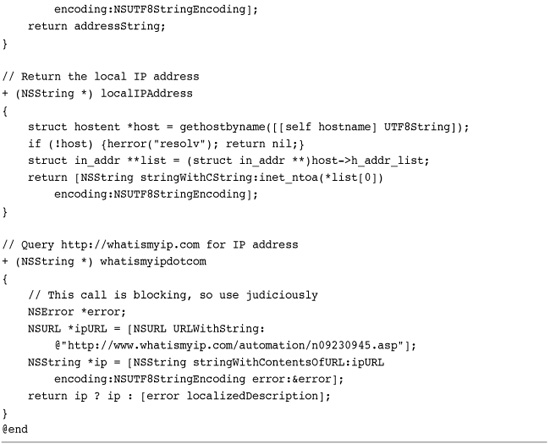
• A final method, whatismyipdotcom, helps move past a local LAN to determine a cable, DSL, or similar IP address. It sends out a call to the whatismyip.com Web site, which returns the connection IP address. This method is run synchronously, so it blocks. You should always make sure that you are connected to the network before attempting to call this method.
Recipe: Checking Site Availability
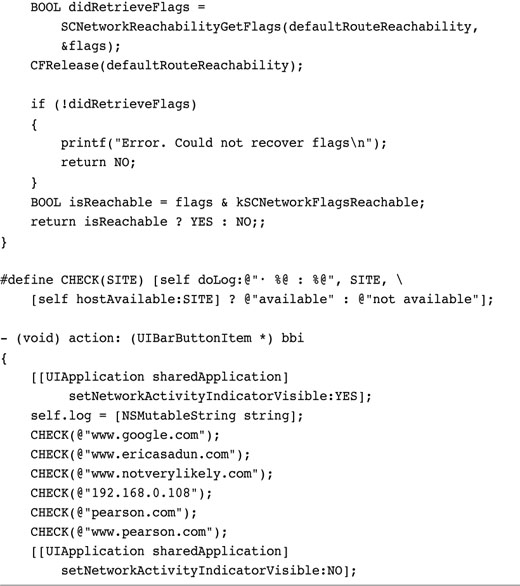
After recovering a site’s IP address, use the SCNetworkReachabilityCreateWithAddress() function to check its availability. Pass a sockaddr record populated with the site’s IP address, and then check for the kSCNetworkFlagsReachable flag when the function returns. Recipe 13-5 shows the site checking the hostAvailable: method. It returns YES or NO.
Recipe 13-5 Checking Site Reachability

Get This Recipe’s Code
To get the code used for this recipe, go to http://github.com/erica/iphone-3.0-cookbook-, or if you’ve downloaded the disk image containing all of the sample code from the book, go to the folder for Chapter 13 and open the project for this recipe.
This kind of check is synchronous and will block interaction until the method returns. Recipe 13-5 uses the UIApplication network activity indicator, but in real-world use, you may want to run these tests on a second thread and provide some kind of feedback during the wait. (Recipes shown later in this chapter use the NSOperation and NSOperationQueue objects to facilitate easy threading.) During testing, this recipe took approximately 30 seconds to run all six tests, including the “notverylikely.com” test, which was included to force a lookup failure.
Recipe: Synchronous Downloads
Synchronous downloads allow you to request data from the Internet, wait until that data is received, and then move on to the next step in your application. For example, Recipe 7-1 from Chapter 7, “Working with Images,” used synchronous downloads to initialize an image with the contents retrieved from a URL address. Here is the call that was used. Notice that this snippet is both synchronous and blocking. You will not return from this method until all the data is received.
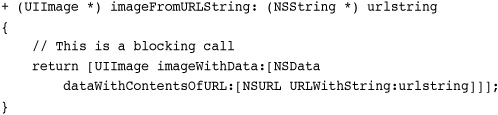
The NSURLConnection class provides a more general download approach than class-specific URL initialization. It provides both synchronous and asynchronous downloads, the latter provided by a series of delegate callbacks. Recipe 13-6 focuses on the simpler, synchronous approach. It begins by creating an NSMutableURLRequest with the URL of choice. That request is sent synchronously using the NSURLConnection class.

Recipe 13-6 Synchronous Downloads
Get This Recipe’s Code
To get the code used for this recipe, go to http://github.com/erica/iphone-3.0-cookbook-, or if you’ve downloaded the disk image containing all of the sample code from the book, go to the folder for Chapter 13 and open the project for this recipe.
This call blocks until the request fails (returning nil, and an error is produced) or the data finishes downloading.
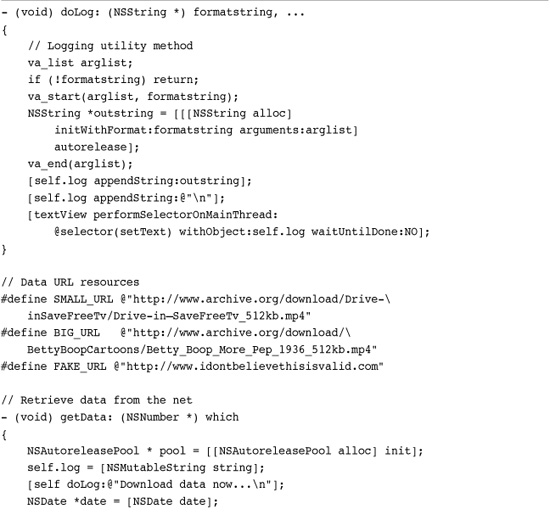
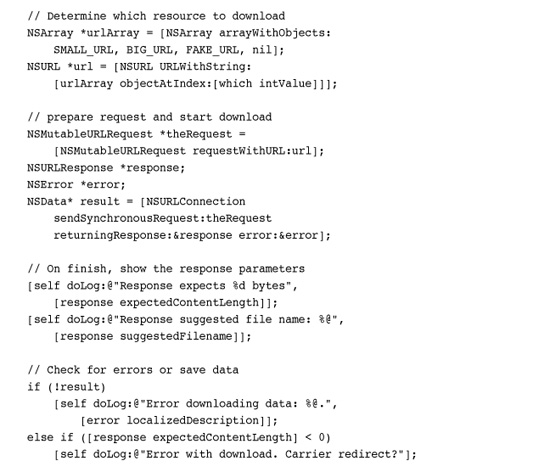
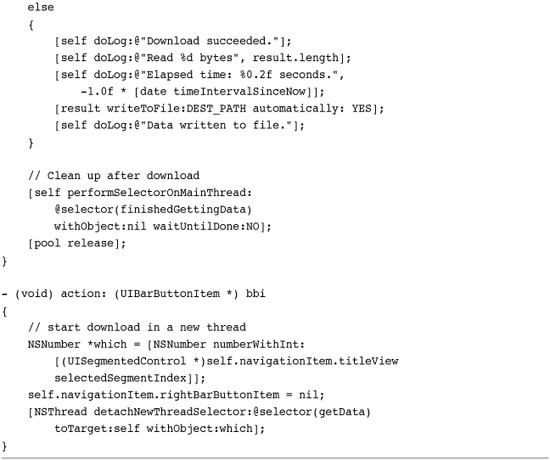
Recipe 13-6 performs the synchronous request in a second thread. To accommodate this, the doLog: method, which provides updates through the download process, has been modified for thread safety. Instead of updating the text view directly, the method performs the setText: selector on the main (GUI-safe) thread.
![]()
This example allows testing with three predefined URLs. There’s one that downloads a short (3MB) movie, another using a larger (23MB) movie, and a final fake URL to test errors. The movies are sourced from the Internet Archive (archive.org), which provides a wealth of public domain data.
Some Internet providers produce a valid Web page, even when given a completely bogus URL. The data returned in the response parameter helps you determine when this happens. This parameter points to an NSURLResponse object. It stores information about the data returned by the URL connection. These parameters include expected content length and a suggested filename. Should the expected content length be less than zero, that’s a good clue that the provider has returned data that does not match up to your expected request.
[self doLog:@"Response expects %d bytes",
[response expectedContentLength]];
As you can see in Recipe 13-6, trying to integrate large downloads into the main application GUI gets messy and slow, even with a secondary thread. Recipe 13-7 addresses both these issues by using a more streamlined special-purpose class to handle the download.

Get This Recipe’s Code
To get the code used for this recipe, go to http://github.com/erica/iphone-3.0-cookbook-, or if you’ve downloaded the disk image containing all of the sample code from the book, go to the folder for Chapter 13 and open the project for this recipe.
Recipe: Asynchronous Downloads
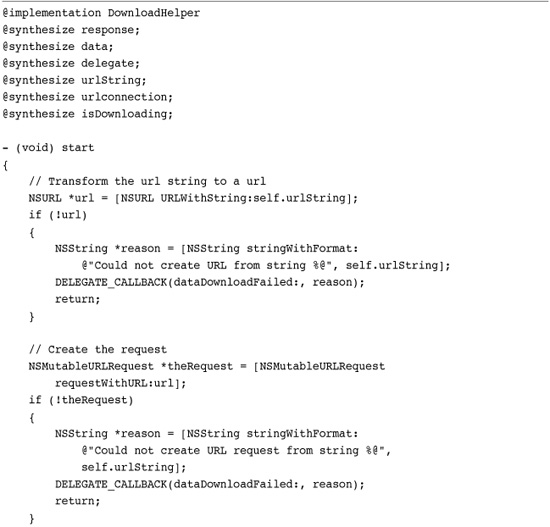
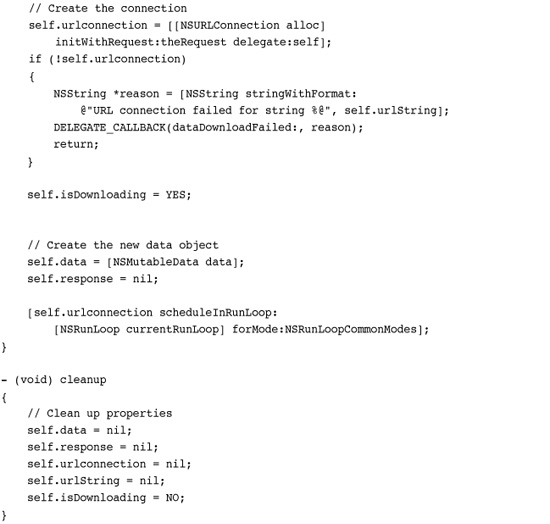
Asynchronous downloads allow your application to download data in the background. This keeps your code from blocking while waiting for a download to finish. For example, you might use asynchronous downloads with table views, presenting placeholder images while downloading thumbnails from a service like YouTube. Recipe 13-7 looks at an asynchronous way to use NSURLConnections. It builds a helper class called DownloadHelper that hides the details involved in downloading data. It works in the following fashion. Instead of sending a synchronous request, it initializes the connection and assigns a delegate.
NSURLConnection *theConnection = [[NSURLConnection alloc]
initWithRequest:theRequest delegate:sharedInstance];
When setting up a connection this way, the data starts to download asynchronously, but it does not yet allow the GUI to update without blocking. To accomplish that, you must schedule the connection on the current run loop. Make sure to unschedule the connection when the download finishes. A download may finish either by retrieving all the requested data or failing with an error.
[self.urlconnection scheduleInRunLoop:[NSRunLoop currentRunLoop]
forMode:NSRunLoopCommonModes];
Delegate methods help you track download life cycle. You receive updates when new data is available, when the data has finished downloading, or if the download fails. To support these callbacks, the DownloadHelper class defines several key properties:
• A URL string property points to the requested resource. It’s used to initialize the URL request that begins the download process (requestWithURL:).
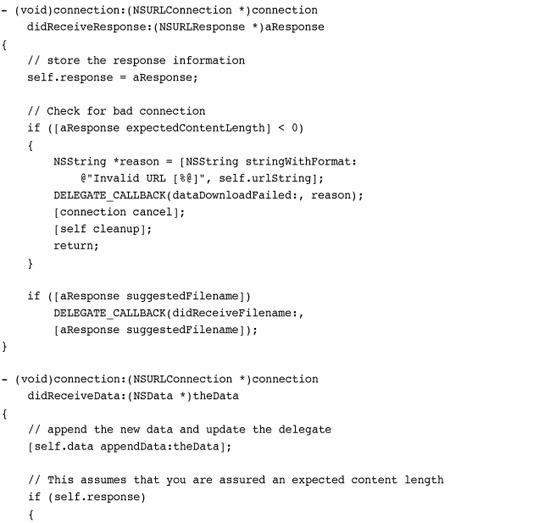
• The response property keeps track of the expected content length and the filename for the downloaded object. This response is returned in the connection:didReceiveResponse: delegate callback.
• A data property stores the data received during the download. It’s is an instance of the NSMutableData class. When new data arrives (connection:didReceiveData:), the helper appends it to the end of any existing data.
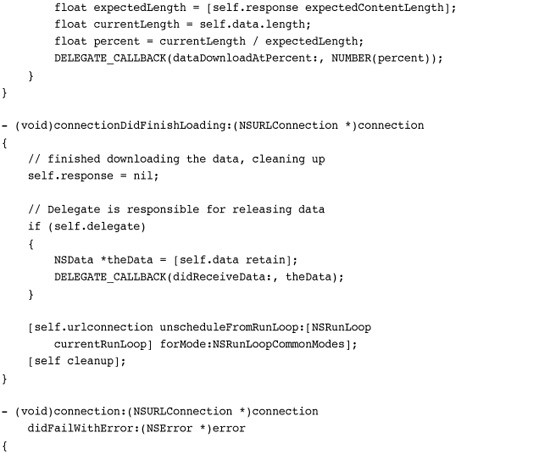
• A delegate property points to the client object. The delegate, which must implement the DownloadHelperDelegate protocol, is updated with optional callbacks as the download progresses. This external delegate is distinct from the internal delegate used with the NSURLConnection object. External callbacks occur when the download succeeds (connection:didFinishLoading:), fails (connection:didFailWithError:), when the filename becomes known (connection:didReceiveResponse:), and as each chunk of data arrives (connection:didReceiveData:). By passing a percentage with the optional dataDownloadAtPercent: callback, the data consumer can update a progress view to show the user how far a download has progressed.
• The urlconnection property stores the current NSURLConnection object. It is kept on hand to allow the DownloadHelper class’s cancel method to halt an ongoing download, that is, [sharedInstance.urlconnection cancel].
The client starts the download by assigning a DownloadHelper delegate (presumably itself) and requesting a download as follows. This helper class provides an extremely simple developer interface as shown here.
[DownloadHelper sharedInstance].delegate = self;
[DownloadHelper download:urlString];
Although all the DownloadHelper delegate methods are optional, at a minimum, the delegate should implement didReceiveData:, which is called with the fully downloaded data.
Note
Recipe 13-7 assumes that you are assured an expected content length from the data provider. When the server side returns a response using chunked data (i.e., Transfer-Encoding:chunked), the content length is not specified in the response. Recipe 13-7 does not work with chunked data as it tests for content length and fails if the expected length is unknown (i.e., NSURLResponseUnknownLength).
Recipe: Handling Authentication Challenges
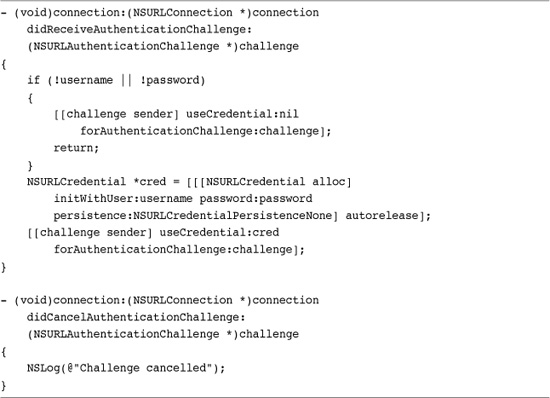
Some Web sites are protected with usernames and passwords. NSURLConnection lets you access these sites by responding to authentication challenges. Recipe 13-8 extends DownloadHelper for challenges. To comply, it creates a new NSURLCredential object and initializes it with a username and password. It passes this object to the challenge sender, who then decides whether to accept it.
Recipe 13-8 Authentication with NSURLCredential Instances
Get This Recipe’s Code
To get the code used for this recipe, go to http://github.com/erica/iphone-3.0-cookbook-, or if you’ve downloaded the disk image containing all of the sample code from the book, go to the folder for Chapter 13 and open the project for this recipe.
To test authentication, connect to http://ericasadun.com/Private, which was set up for use with this recipe. This test folder uses the username PrivateAccess and password tuR7!mZ#eh. Here are the calls needed to set up DownloadHelper to respond to an authentication challenge.

To test an unauthorized connection—that is, you will be refused—set the username and password to nil or to nonsense strings. When set to nil, the challenge will be sent a nil credential, producing an immediate failure. With nonsense strings, the challenge will fail after the sender rejects the credentials.
Recipe: Using the Keychain to Store Sensitive Data
The iPhone keychain lets you store user credentials securely. “Secure” password text fields that save their data to regular files are not particularly secure. Although the text is obscured onscreen, files, including preferences files, use clear text when written to disk. You can encrypt that data yourself, but then you subject your application to a variety of export issues. With the keychain, Apple provides a built-in highly secure password service that takes care of the work for you.
Keychain Wrapper
The keychain uses the Security framework. This framework is available exclusively for the device. You cannot program for or test the keychain on the simulator. When you add the framework to your project, you must deploy to the device.
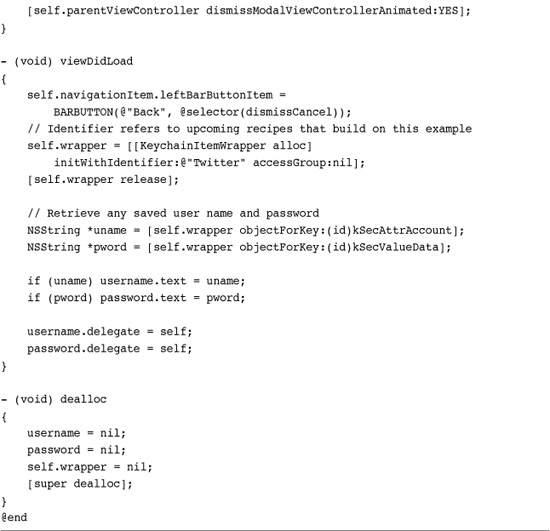
Programming the keychain is complex. Fortunately, Apple provides a simple KeychainItemWrapper class that handles most basic keychain work for you. To use the wrapper, you create an instance and initialize it with an identifier and access group. Create a unique identifier for each login pair you will use. This allows you to add credentials for each kind of account being used.
self.wrapper = [[KeychainItemWrapper alloc]
initWithIdentifier:@"Twitter" accessGroup:nil];
Unless you need to use your keychain across more than one application, set the access group to nil. (Recipe 13-12, which follows later in this chapter, demonstrates how to use cross-application keychains.)
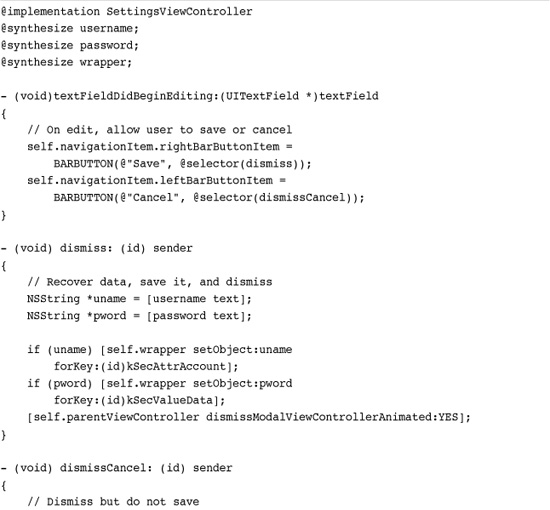
To write items into the keychain, use the predefined account and data keys to store the username and password as you would to update a dictionary. The wrapper automatically updates the keychain without any further work needed to confirm the storage.
[self.wrapper setObject:uname forKey:(id)kSecAttrAccount];
[self.wrapper setObject:pword forKey:(id)kSecValueData];
When you’re ready to retrieve the data, use objectForKey:.
uname = [self.wrapper objectForKey:(id)kSecAttrAccount];
pword = [self.wrapper objectForKey:(id)kSecValueData];
Recipe 13-9 introduces a modal SettingsViewController class that loads a username and password into its text fields when it is presented and saves any changes when it is dismissed. It takes advantage of the keychain wrapper to do this.
Recipe 13-9 Accessing the iPhone Keychain Via a Modal Settings View
Get This Recipe’s Code
To get the code used for this recipe, go to http://github.com/erica/iphone-3.0-cookbook-, or if you’ve downloaded the disk image containing all of the sample code from the book, go to the folder for Chapter 13 and open the project for this recipe.
Pay attention to the bar button approach used in this recipe. At first, the button shows “Back” until a text field is interacted with. Once a user starts editing, two new buttons appear: Save and Cancel. This context sensitivity presents more meaningful button choices than a simple Done button.
Keychain Persistence
Keychain data persists even after deinstalling your application. Apple’s developer relations writes, “Keychain items created by any application will be persistent across uninstalls because of the mere fact that the keychain store isn’t located inside of the application bundle and there is no facility by which the system can be notified of when something is uninstalled to then also uninstall all associated keychain items. It is also a policy issue between the trade-offs of losing sensitive passwords through malicious uninstalling and keeping sensitive passwords intact and potentially secured away for the user(s).”
This behavior allows you to use the keychain to maintain persistent iPhone information. You might keep track of user registration or limit demo mode usage. The persistence means that nothing short of a firmware reinstall (without a backup restore) will wipe the data.
Recipe: Uploading Via POST
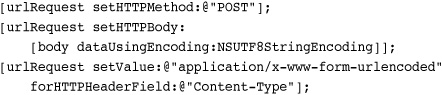
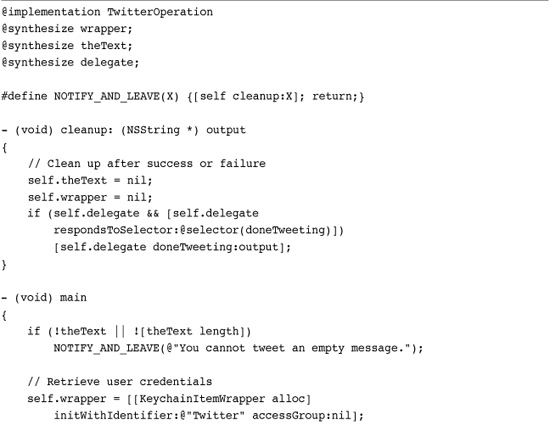
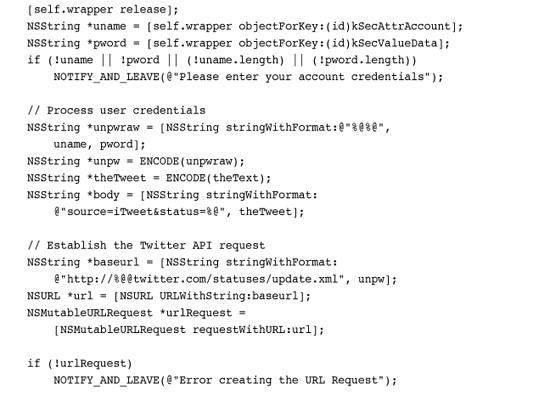
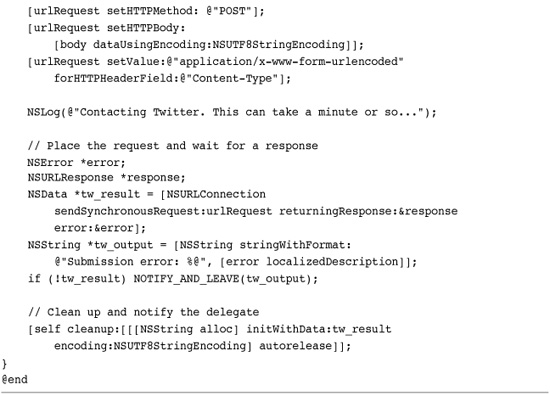
NSURLRequest instances are a lot more flexible than the recipes in this chapter so far have demonstrated. Recipe 13-10 builds a request that sends data to the Twitter social networking service. It does this by creating an HTTP-style POST request and populating it with a message.
Recipe 13-10 Tweeting Via POST
Get This Recipe’s Code
To get the code used for this recipe, go to http://github.com/erica/iphone-3.0-cookbook-, or if you’ve downloaded the disk image containing all of the sample code from the book, go to the folder for Chapter 13 and open the project for this recipe.
The URL request allows you to set header fields, a body, and more. It basically provides an Internet-savvy class that is well suited for communicating with online services.
For this example, the username and password are sent as part of the URL, that is,
http://username:[email protected]/statuses/update.xml
That is not normally the case for many services (as you see in Recipe 13-11). Because of this approach, Twitter provides a good example of the simplest kind of POST-based API.
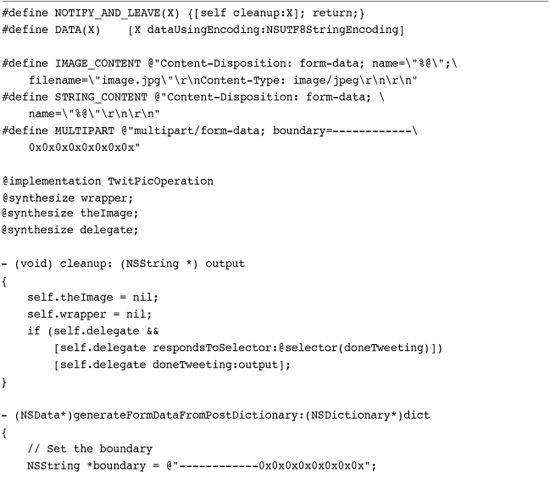
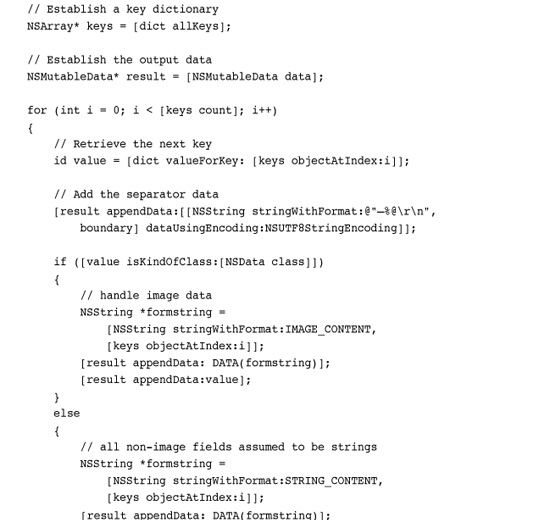
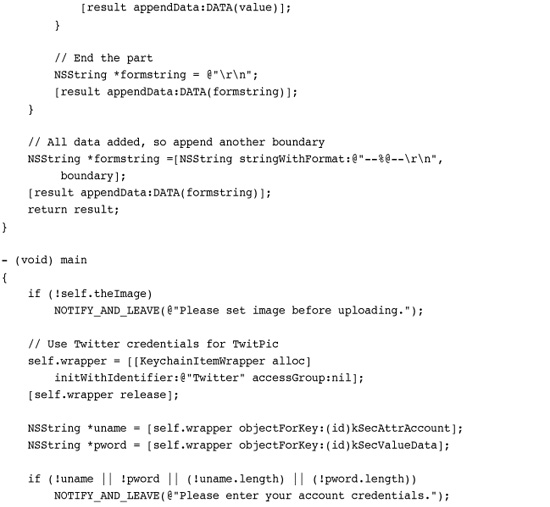
Recipe 13-11 Uploading Images to TwitPic
Get This Recipe’s Code
To get the code used for this recipe, go to http://github.com/erica/iphone-3.0-cookbook-, or if you’ve downloaded the disk image containing all of the sample code from the book, go to the folder for Chapter 13 and open the project for this recipe.
NSOperationQueue
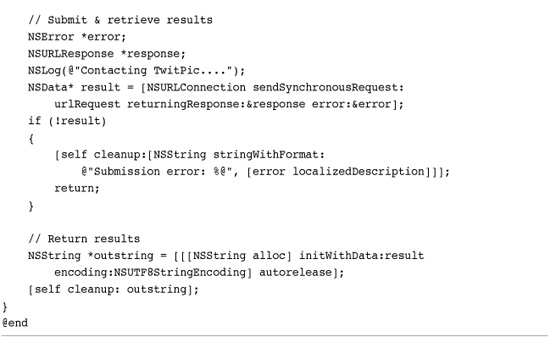
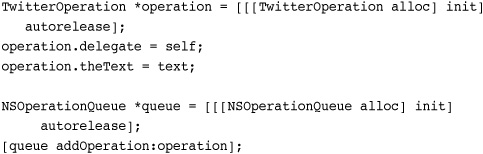
This example uses a synchronous request to perform the upload, which can take up to a minute or so to process. To avoid blocking GUI updates, the entire submission process is embedded into an NSOperation subclass, TwitterOperation. Operations encapsulate code and data for a single task, allowing you to run that task asynchronously.
Using NSOperation objects lets you submit them to an asynchronous NSOperationQueue. Operation queues manage the execution of individual operations. Each operation is prioritized and placed into the queue, where it is executed in priority order. By submitting an operation to a queue, you can introduce GUI elements (such as an activity indicator view or progress bar) whose presentation will not be blocked by the execution of the operation.
Since this operation runs asynchronously, the main view controller needs some way to know when the upload completes. During the upload, the GUI for this example is disabled and a UIActivityIndicatorView displayed. For this example, a delegate callback method (doneTweeting:) is sent from the operation. This callback lets the main GUI know when to restore itself to its normal interactive mode.
Whenever you subclass NSOperation, make sure to implement a main method. This method is called when the operation executes. When main returns, the operation finishes.
Recipe: Uploading Data
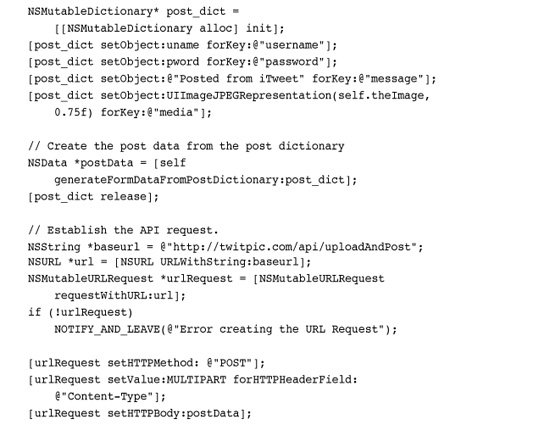
Recipe 13-10 used a simple URL encoded form to submit data. Recipe 13-11 moves that up a notch to create a full multipart form data submission. This recipe allows you to upload images to the TwitPic.com service using your user’s Twitter credentials. The TwitPic API is accessed at http://twitpic.com/api/uploadAndPost. It requires a username, password, and binary image data.
The challenge for Recipe 13-11 is to create a properly formatted body that can be used by the TwitPic service. It implements a method that generates form data from a dictionary of keys and values. For the purposes of this example, the objects in that dictionary are limited to strings and images. You can extend this approach for other data types by changing the content type string with different MIME types.
Recipe: Sharing Keychains Between Applications
Unfortunately, sharing keychains is not as simple as assigning a group name. There are several hurdles you need to pass through to work with a keychain that’s valid across applications. As you can see from Recipe 13-12, there’s not a lot to be done from the application end. Most of the work is done setting things up in Xcode. Here’s a step-by-step walkthrough of the process:
1. Locate your Application Identifier.
a. In Xcode, open the Organizer (select Window > Organizer) and click on IPHONE DEVELOPMENT > Provisioning Profiles. Select your standard wildcard development provision, or if you’re ready to distribute your application, your standard wildcard distribution provision. The application identifier (“App Identifier”) appears in the profile overview.
b. This identifier should be the same for both provisions, assuming you’ve followed the com.yourcompany.* naming convention. A ten-character prefix should appear right before your identifier. Copy the entire identifier. For me, that identifier is Y93A4XLA79.com.sadun.*.
2. Set your keychain access group.
In your application, update all your wrapper initializations to use the following access group. Substitute GenericKeychainSuite for the final asterisk in the identifier, but otherwise use the identifier you copied from the provision listing, that is, don’t use Y93A4XLA79. That identifier is assigned to com.sadun, not to your company.
The phrase GenericKeychainSuite is arbitrary. You can use another suite name if desired, but adapt the rest of these instructions accordingly if you do so.
3. Create a new entitlement.
In Xcode, choose File > New File > Code Signing > Entitlements and click Next. Name the new entitlement KeychainEntitlement.plist (again, this is an arbitrary name) and click Finish. Xcode adds the new file to your active project.
4. Edit the entitlement.
Delete the get-task-allow entry in your new property list. Then add a new item called keychain-access-groups. Use this phrase exactly. Set its type to Array. Add one item; the name is “Item 1” by default. Set the string value of this item to your access group name, for example, Y93A4XLA79.com.sadun.GenericKeychainSuite. Again, make sure you use your own company and your own provisioning identity. Save the file and close it.
5. Update the target.
a. In the Project window, select Groups & Files > Targets > YourApplicationName. Click the blue Info button at the top of the Project window. Open the Build tab.
b. When the Build Tab is displayed, scroll down to find the Code Signing > Code Signing Entitlements section. Double-click to open the entitlements editor. Type KeychainEntitlement.plist into the text field and click OK. This filename must match the actual property list you edited in the previous step.
c. Close the target window when you are done.
After following these steps, you will have updated your project to allow you to share the same keychain across multiple applications. To test, copy your project, change the application identifier in the Info.plist file, and run it on your iPhone. The new application should have equal access to the data. When deployed, users can update credentials for popular services in one of your applications, and they’ll be ready for use in all your apps.
Recipe 13-12 Wrapper Initialization for Keychain Sharing

Get This Recipe’s Code
To get the code used for this recipe, go to http://github.com/erica/iphone-3.0-cookbook-, or if you’ve downloaded the disk image containing all of the sample code from the book, go to the folder for Chapter 13 and open the project for this recipe.
Note
The same entitlement and access group can be used for multiple login items within the same or separate applications. Just use different identifiers for each login item.
Recipe: Converting XML into Trees
The NSXMLParser class provided in the iPhone SDK scans through XML, creating callbacks as new elements are processed and finished (i.e., using the typical logic of a SAX parser). The class is terrific for when you’re downloading simple data feeds and want to scrape just a bit or two of relevant information. It’s not so great when you’re doing production-type work that relies on error checking, status information, and back-and-forth handshaking.
Tree data structures offer a better way to represent XML data. They allow you to create search paths through the data, so you can find just the data you’re looking for. You can retrieve all “entries,” search for a success value, and so forth. Trees convert text-based XML back into a multidimensional structure.
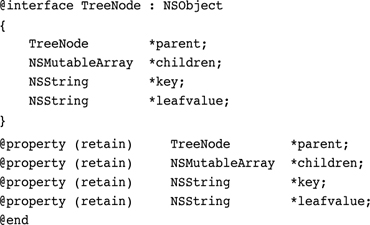
To bridge the gap between NSXMLParser and tree-based parse results, you can use an NSXMLParser-based helper class to return more standard tree-based data. This requires a simple tree node like the kind shown here. This node uses double linking to access its parent and its children allowing two-way traversal in a tree.
Building a Parse Tree
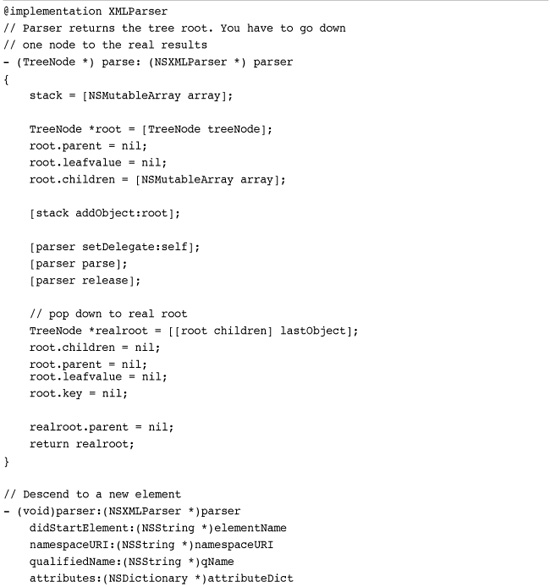
Recipe 13-13 introduces the XMLParser class. Its job is to build a parse tree as the NSXMLParser class works its way through XML source. The three standard NSXML routines (start element, finish element, and found characters) perform a recursive depth-first descent through the tree.
Recipe 13-13 The XMLParser Helper Class
Get This Recipe’s Code
To get the code used for this recipe, go to http://github.com/erica/iphone-3.0-cookbook-, or if you’ve downloaded the disk image containing all of the sample code from the book, go to the folder for Chapter 13 and open the project for this recipe.
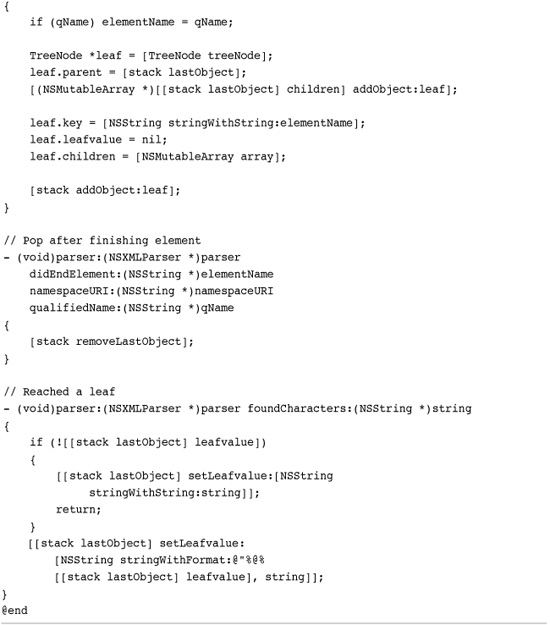
The class adds new nodes when reaching new elements (parser:didStartElement:qualifiedName:attributes:) and adds leaf values when encountering text (parser:foundCharacters:). Because XML allows siblings at the same tree depth, this code uses a stack to keep track of the current path to the tree root. Siblings always pop back to the same parent in parser:didEndElement:, so they are added at the proper level.
After finishing the XML scan, the parseXMLFile: method returns the root node.
Using the Tree Results
Listing 13-1 demonstrates an XML parse-tree consumer that works with the data returned from Recipe 13-13. This example presents a series of table view controllers that drill down from the root of the tree until the leaves. Whenever leaves are encountered, their values are displayed in an alert. Subtrees lead to additional view controller screens.
Listing 13-1 Browsing the Parse Tree
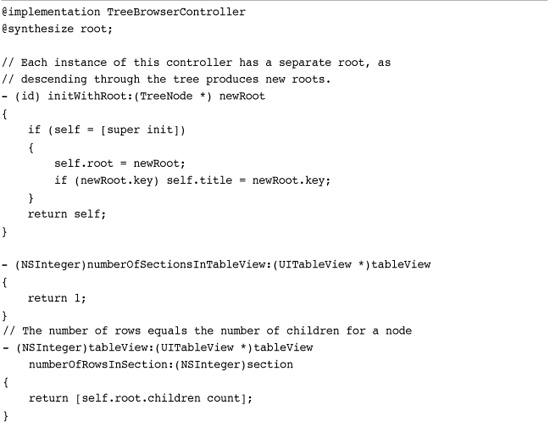
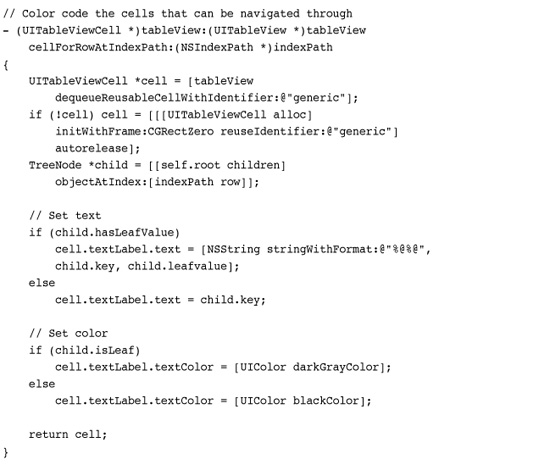

This example uses the TreeNode class trivially. The only items of interest are the leaf values and the child nodes. The class can do far more, including returning leaves and objects that match a given key. This functionality lets you retrieve information without knowing the exact path to a child node as long as you know what the node is called, such as “entry” or “published.” These two names are in fact used by Twitter’s API. The TreeNode search facility is demonstrated further in Recipe 16-3 in Chapter 16, “Push Notifications,” which uses this to retrieve individual tweets and the time they were published.
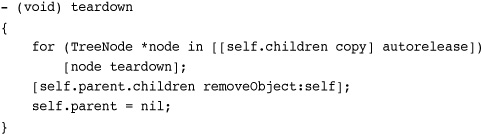
Tearing Down a Tree
The XML parser code used in this recipe builds a two-way linked object tree. Parents own their children, and children own their parents. To properly dispose of this memory when you are done using it, make sure you tear down the tree to remove these links so each node’s retain count can go down to zero.
The following TreeNode method should be issued to the root of the tree in use, just before you release the root. Do not tear down the tree until you’re ready for the entire structure to be deallocated.
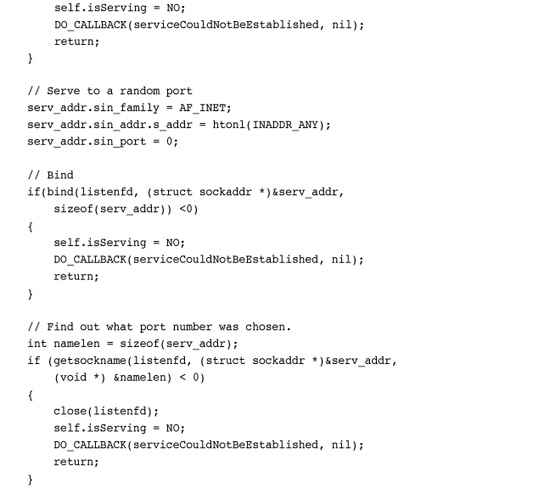
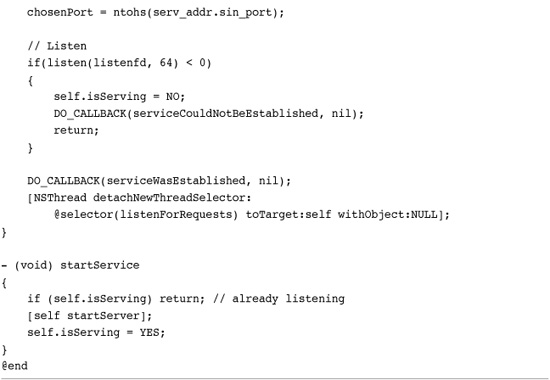
Recipe: Building a Simple Web-Based Server
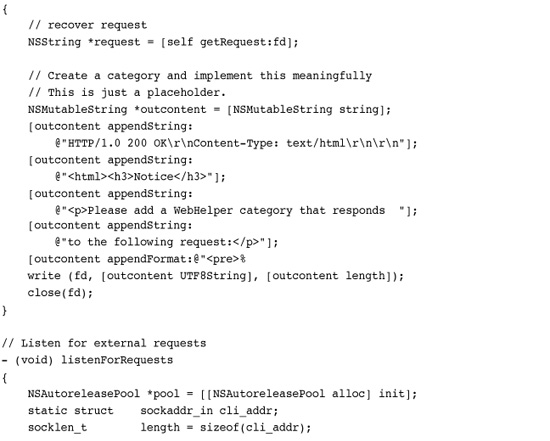
A Web server provides one of the cleanest ways to serve data off your phone to another computer. You don’t need special client software. Any browser can list and access Web-based files. Best of all, a Web server requires just a few key routines. You must establish the service, creating a loop that listens for a request (startServer), and then pass those requests onto a handler (handleWebRequest:) that responds with the requested data. Recipe 13-14 shows a WebHelper class that handles establishing and controlling a Web service.
Recipe 13-14 Serving iPhone Files Through a Web Service


Get This Recipe’s Code
To get the code used for this recipe, go to http://github.com/erica/iphone-3.0-cookbook-, or if you’ve downloaded the disk image containing all of the sample code from the book, go to the folder for Chapter 13 and open the project for this recipe.
The loop routine uses low-level socket programming to establish a listening port and catch client requests. When the client issues a GET command, the server intercepts that request and passes it to the Web request handler. The handler decomposes it, typically to find the name of the desired data file. The default version of the WebHelper class shown here assumes that you will add your own handler method via a category (rather than a subclass). This recipe produces a single, simple feedback page regardless of the GET request received. You might want to expand this class to provide file access or access to services from your application. An example file service category is included with this chapter’s sample code.
One More Thing: FTPHelper
The File Transfer Protocol is especially nice to use because it’s standard across so many platforms. Apple’s Core Foundation FTP sample code is easy to work with, if you’re willing to overlook a bit of inelegant coding. You can find the source at http://developer.apple.com/samplecode/CFFTPSample. There’s little you have to do to get the upload and download functionality working. Once you have a user’s name, password, and host information stored, FTP data transfer can be easily automated.
At the request of any number of readers, I have included an FTPHelper class with the sample code for this chapter. It is not an elegant solution by any stretch of the imagination, but it offers enough functionality to provide a jumping-off point for anyone who wants to use FTP access from an application. You probably shouldn’t deploy code based on this helper to App Store without a lot of testing and tweaking, but you can learn about how FTP access basically works.
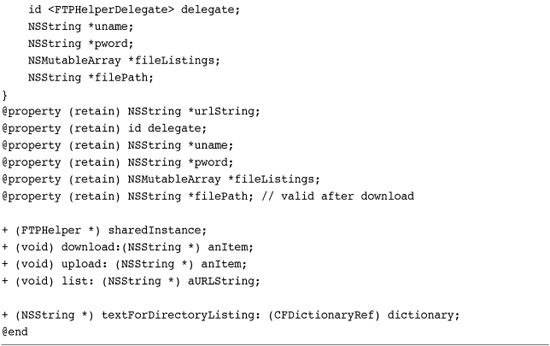
The FTPHelper class provides access to file upload, download, and directory lists. Here’s how you set up the delegate for all three operations.

Use simple string constants for the username and password. The base URL path does not point to a specific resource. Instead, you give it a general ftp address like @“ftp://MySystem.local”, @“ftp://somehost.com”, or even @“ftp://somehost.com/ftp/UploadArea”. Make sure you use the ftp:// prefix.
When uploading and downloading, specify the filename as a separate parameter. In the current implementation, all files move into and out from the main Documents folder in the sandbox.
Listing 13-2 shows the interface for the FTPHelper class and the protocol for its delegate. It provides its functionality via simple class methods.
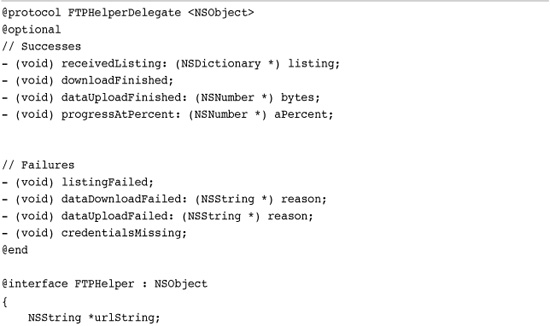
Summary
This chapter introduced a wide range network supporting technologies. You saw how to check for network connectivity, work with keychains for secure authentication challenges, upload and download data via NSURLConnection, via FTP, and more. Here are a few thoughts to take away with you before leaving this chapter:
• Most of Apple’s networking support is provided through very low-level C-based routines. If you can find a friendly Objective-C wrapper to simplify your programming work, consider using it. The only drawback occurs when you specifically need tight networking control at the most basic level of your application.
• There was not space in this chapter to discuss more detailed authentication schemes for data APIs. If you need access to OAuth, for example, search for existing Cocoa implementations. A number are available in open source repositories, and they are easily ported to Cocoa Touch. If you need to work with simpler data checksum, digest, and encoding routines, point your browser to http://www.cocoadev.com/index.pl?NSDataCategory. This extremely handy NSData category offers md5, sha1, and base32 solutions, among others.
• Many data services provide simple to use APIs such as Twitter and TwitPic. These APIs are often more limited than the fully authorized developer APIs, which typically require developer credentials and advanced authorization. At the same time, they often offer simple solutions to the tasks you actually need to perform, especially if you’re not writing a full client specific to a given service.
• Sharing keychains across applications is tied to the provision that signed them. You can share user login items between your own applications but not with other developers. Make sure you take care when creating and using keychain entitlement files to follow every step of the process. This avoids a lot of frustration when trying to produce a successful compilation.
• Even when Apple provides Objective-C wrappers, as they do with NSXMLParser, it’s not always the class you wanted or hoped for. Adapting classes is a big part of the iPhone programming experience. This chapter introduced many custom classes that simplify access to core Cocoa Touch objects.