16. Push Notifications
When developers need to communicate directly with users, push notifications provide the solution. They deliver messages directly to the iPhone screen via a special Apple service. Push notifications let the iPhone display an alert, play a custom sound, or update an application badge. In this way, off-phone services connect with an iPhone-based client, letting them know about new data or updates. Unlike most other iPhone development arenas, nearly all the push story takes place off the phone. Developers must create Web-based services to manage and deploy these updates. In this chapter, you learn how push notifications work and dive into the details needed to create your own push-based system.
Introducing Push Notifications
Push notifications, also called remote notifications, refer to a kind of message sent to iPhones by an outside service. These push-based services work with any kind of application that normally checks for information updates. For example, a service might poll for new direct messages on Twitter or respond to sensors for in-home security systems. When new information becomes available for a client, the service pushes that update through Apple’s remote notification system. The notification transmits directly to the phone, which has registered to receive those updates.
The key to push is that these messages originate from outside the device itself. They are part of a client-server paradigm that lets Web-based server components communicate with iPhone clients through an Apple-supplied service. With push, developers can send nearly instant updates to iPhones that don’t rely on users launching a particular application. Instead, processing occurs on the server side of things. When push messages arrive, the iPhone client can respond by displaying a badge, playing a sound, and/or showing an alert box.
According to Apple, battery life is the single biggest reason for endorsing push notification. When many applications run at once via background processes, these processes can put an undue burden on a device battery, shortening the amount of time available before a recharge is needed. With push, applications can learn about new updates even when they’re not running. This lets Apple enforce its strict one-third-party-application-at-a-time policy while at the same time allowing users to receive notifications that are tied to application state changes.
Moving application logic to a server also limits the client-side complexity. Offsite processing provides energy savings for iPhone-based applications. They can now rely on push rather than using the iPhone’s local CPU resources to monitor and react to important information changes.
Push’s reason for being is not only tied into local resources. It also offers a valuable solution for communicating with Web-based services that goes beyond poll-and-update applications. For example, push might allow you to hook into a recommendation service that produces restaurant suggestions even when an application isn’t running or to a calendar service that sends you reminder notices about an upcoming appointment. So don’t think about push solely as a battery saver. Also think about it as a conduit for Web services as well.
From social networking to monitoring RSS feeds, push lets iPhone users keep on top of asynchronous data feeds. It offers a powerful solution for connecting iPhone clients to Web-based systems of all kinds. With push, the services you write can connect to your installed iPhone base and communicate updates in a clean, functional manner.
How Push Works
Push notifications aren’t just a general way to talk directly to iPhones at will. They are tied to specific applications and require several security checks. A push server can only communicate with those iPhones that are running its application, that are online, and that have opted to receive remote messages. Users have the ultimate say in push updates. They can allow or disallow that kind of communication, and a well-written application lets users opt-in and opt-out of the service at will.
The chain of communication between server and client works like this. Push providers deliver message requests through a central Apple server and via that server to their iPhone clients. In normal use, the server triggers on some event (like new mail or an upcoming appointment) and generates notification data aimed at a specific iPhone device. It sends this message request to the Apple Push Notification Service (APNS). This notification uses JSON formatting and is limited to 256 bytes each, so the information that can be pushed through on that message is quite limited. This formatting and size ensures that APNS limits bandwidth to the tightest possible configuration.
APNS offers a centralized system that negotiates communication with iPhones in the real world. It passes the message through to the designated iPhone. A handler on the iPhone decides how to process the message. As Figure 16-1 shows, push providers talk to APNS, sending their message requests, and APNS talks to phones, relaying those messages to handlers on the unit.
Figure 16-1 Providers send messages through Apple’s centralized push notification service to communicate with an iPhone.
Multiple Provider Support
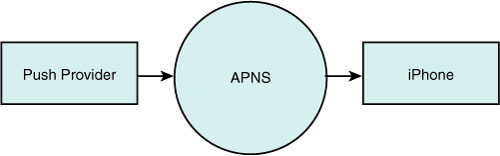
APNS was built to support multiple provider connections, allowing many services to communicate with it at once. It offers multiple gateways into the service so that each push service does not have to wait for availability before sending its message. Figure 16-2 illustrates the many-to-many relationship between providers and iPhones. APNS allows providers to connect at once through multiple gateways. Each provider can push messages to many different iPhones.
Figure 16-2 Apple’s Push Notification Service offers many gateways on its provider-facing side, allowing multiple providers to connect in parallel. Each push provider may connect to any number of iPhone devices.
Security
Security is a primary component of remote notifications. The push provider must sign up for a secure sockets layer certificate for each application it works with. Services cannot communicate with APNS unless they authenticate themselves with this certificate. They must also provide a unique key called a token that identifies both the phone to message and the application to notify.
After receiving an authenticated message and device token, APNS contacts the phone in question. Each iPhone or member of the iPhone family such as the iPod touch must be online in some way to receive a notification. They can be connected to a cellular data network or to a Wi-Fi hotspot. APNS establishes a connection with the device and relays the notification request. If the device is offline and the APNS server cannot make a connection, the notification is queued for later delivery.
Upon receiving the request, the iPhone performs a number of checks. Push requests are ignored when the user disables push updates for a given application; users can do so in the Settings application on their iPhone. When updates are allowed, and only then, the iPhone determines whether the client application is currently running. If so, it sends a message directly to the running application via the application delegate. If not, it performs some kind of alert, whether displaying text, playing a sound, or updating a badge.
When an alert displays, users typically have the option to close the alert or tap View. If they choose View, the iPhone launches the application in question and sends it the notification message that it would have received while running. If the user taps Close, the notification gets ignored and the application does not launch.
This pathway, from server to APNS to iPhone to application, forms the core flow of push notifications. Each stage moves the message along the way. Although the multiple steps may sound extensive, in real life the notification arrives almost instantaneously. Once you set up your certificates, identifiers, and connections, the actual delivery of information becomes trivial. Nearly all the work lies in first setting up that chain and then in producing the information you want to deliver.
Make sure you treat all application certificates and device tokens as sensitive information. When storing these items on your server, you must ensure that they are not generally accessible. Should this information hit the wild, it could be exploited by third parties. This would likely result in Apple revoking your SSL push certificate. This would disable all remote notifications for any apps you have sold and might force you to pull the application from the store.
Push Limitations
Push notifications are not reliable. In reality, they can be fairly flaky. Apple does not guarantee the delivery of each notification or the order in which notifications arrive. Never send vital information by push. Reserve this feature for helpful notifications that update the user, but that the user can miss without consequence.
Items in the push delivery queue may be displaced by new notifications. That means that notifications may have to compete and may get lost along the way. Although Apple’s feedback service reports failed deliveries (i.e., messages that cannot be properly sent through the push service, specifically to applications that have been removed from a device), you cannot retrieve information regarding bumped notifications. From the APN service point of view, a lost message was still successfully “delivered.”
Provisioning Push
To start push development, you must visit Apple’s iPhone Developer Program portal. This portal is located at http://developer.apple.com/iphone/manage/overview/index.action. Sign in with your iPhone developer credentials to gain access to the site. Here at the portal, you can work through the steps needed to create a new application identifier that can be associated with a push service.
There’s a fair amount of detail involved. Make sure you hit every point. The following sections walk you through the process. You see how to create a new identifier, generate a certificate, and request a special provisioning profile so you can build push-enabled applications. Without a push-enabled profile, your application will not be able to receive remote notifications.
Generate a New Application Identifier
At the developer portal, click on App IDs. You’ll find this option in the column on the left side of the Web page. This opens a page that allows you to create new application identifiers. Each push service is based on a single identifier, which you must create and then set to allow remote notification. You cannot use a wild-card identifier with push applications; every push-enabled app demands a unique identifier.
In the App IDs section, click Add ID; this button appears at the top-right of the Web page. Once clicked, the site opens a new Create App ID page. Enter a name that describes your new identifier, such as “My First Push Application” and a new bundle identifier.
These IDs typically use reverse domain patterns like com.domainname.appname, such as com.sadun.firstpushapp. The identifier must be unique and may not conflict with any other registered application identifier in Apple’s system. The bundle identifier for your application (set in the Info.plist file) needs to exactly match the last part of this string. If, for example, the ID in the portal is XYZZYPLUGH.com.sadun.pushapp, then the bundle identifier of your app should be com.sadun.pushapp.
Click Submit to add the new identifier. This adds the app ID irrevocably to Apple’s system, where it is now registered to you. You return to the App ID page with its list of identifiers and are now ready to establish that identifier as push compliant.
Note
Apple does not provide any way to remove an application identifier from the program portal once it has been created.
Generate Your SSL Certificate
On the App ID page, you can see which identifiers work with push and which do not. The Apple Push Notification column shows whether push has been enabled for each app ID. The three states for this column are
• Unavailable (gray) for IDs that are no longer available
• Available (yellow) for apps that can be used with push but that haven’t yet been set up to do so
• Enabled (green) for apps that are ready for push
You’ll find two dots next to each application identifier—one for Development and another for Production. These options are configured separately. Locate your new app ID, make sure the yellow Available for Development is shown, and click Configure. This option appears in the rightmost column. When clicked, the browser opens a new Configure App ID page that permits you to associate your identifier with the push notification service.
An Enable Push Notification Services check box appears about halfway down the page. Check this box to start the certificate creation process. Once checked, the two Configure buttons on the right side of the page become enabled. Click that button. A page of instructions loads, showing you how to proceed. It guides you through creating a secure certificate that will be used by your server to sign messages it sends to the APNS.
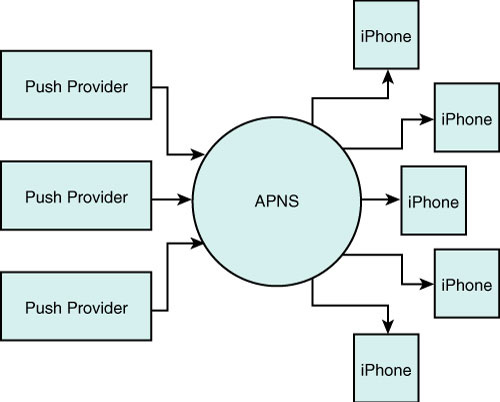
As instructed, launch the Keychain Access application. This application is located on your Macintosh in the /Applications/Utilities folder. Once launched, choose Keychain Access > Certificate Assistant > Request a Certificate From a Certificate Authority (see Figure 16-3). You need to perform this step again even if you’ve already created previous requests for your developer and distribution certificates. The new request adds information that uniquely identifies the SSL certificate.
Figure 16-3 Create a new certificate request even though you’ve probably already done so in the past for your developer and distribution certificates.
Once the Certificate Assistant opens, enter your e-mail address and add a recognizable common name such as First Push App. This common name is important. It will come in handy for the future, so choose one that is easy to identify and that describes your project accurately. The common name lets you distinguish otherwise similar looking keychain items from each other in the OS X Keychain Access utility.
After specifying a common name, choose Saved to Disk and click Continue. The Certificate Assistant prompts you to choose a location to save to (the Desktop is handy). Click Save, wait for the certificate to be generated, and then click Done. Return to your Web browser and click Continue. You are now ready to submit the certificate-signing request.
Click Choose File and navigate to the request you just generated. Select it and click Choose. Click Generate to build your new SSL push service certificate. This can take a minute or two, so be patient and do not close the Web page. Once the certificate has been generated, click Continue. Download the new certificate by clicking Download Now. Finally, click Done. You return to the App ID page where a new, green Enabled indicator should appear next to your app ID (see Figure 16-4). Apple also e-mails you a confirmation that your certificate request was approved.
Figure 16-4 The Enabled label appears next to application identifiers that have been approved for push notification. You must create separate SSL certificates for development and for production.
![]()
Note
Should you ever need to download your SSL certificate again, click Configure to return to the Configure App ID page. There, you can click Download to request another copy.
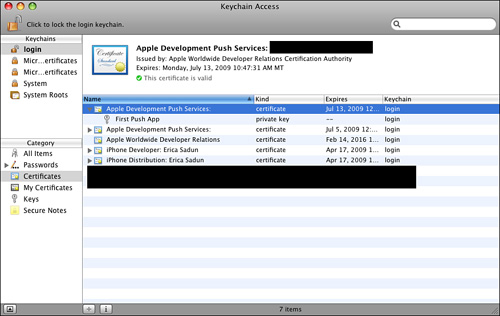
If you plan to run your Push Server from your Macintosh, add the new certificate to your keychain by double-clicking the downloaded .cer file. It will be added to your login keychain and appear in your Certificates. Figure 16-5 shows that you can identify the certificate by clicking the small triangle next to it to reveal the common name you used when creating the certificate request.
Figure 16-5 Identify which Push Service SSL certificate you are dealing with by clicking the down arrow. This reveals the common name used to generate the original certificate request.
Push-Specific Provisions
You cannot use wild-card provisions for push-enabled applications. Instead, you must create a single provision for just that application. This means that if you intend to create development, ad hoc, and distribution versions of your app, you must request three new mobile provision files in addition to whatever provisions you have already created for other work.
Go to the Provisioning section of the developer portal and choose whether to create a Development or Distribution profile by clicking the appropriate tab. Click Add Profile to begin creating your new provision. A Create iPhone Provisioning Profile page opens, whether for development or distribution.
• Development Provision—For development, enter a profile name such as “My First Push App Development.” Check the certificate you will be using and choose your application identifier from the pop-up list. Select the devices you will be using and click Submit.
• Distribution Provision—For distribution, select App Store or Ad Hoc. Enter a name for your new provision such as “My First Push App Distribution” or “My First Push App Ad Hoc.” Choose your application identifier from the pop-up list. For Ad Hoc distribution only, select the devices to include in your provision. Click Submit to finish.
It may take a minute or two for your profile to generate. Wait a short while and reload the page. The provision status should change from Pending to Active. Download your new provision and add it to Xcode by dragging it onto the Xcode application icon.
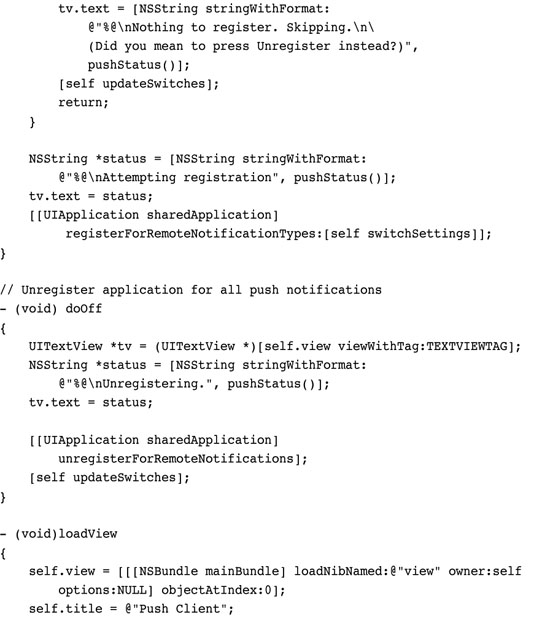
Registering Your Application
Signing an application with a push-compatible mobile provision is just the first step to working with push notifications. The application must request to register itself with the iPhone’s remote notification system. You do this with a single UIApplication call, as follows. The application did finish launching delegate method provides a particularly convenient place to call this.
[[UIApplication sharedApplication]
registerForRemoteNotificationTypes:types];
This call tells the iPhone OS that your application wants to accept push messages. The types you pass specify what kinds of alerts your application will receive. The iPhone offers three types of notifications:
• UIRemoteNotificationTypeBadge—This kind of notification adds a red badge to your application icon on SpringBoard.
• UIRemoteNotificationTypeSound—Sound notifications let you play sound files from your application bundle.
• UIRemoteNotificationTypeAlert—This style displays a text alert box in SpringBoard or any other application with a custom message using the alert notification.
Choose the types you want to use and or them together. They are bit flags, which combine to tell the notification registration process how you want to proceed. For example, the following flags allow alerts and badges but not sounds.
types = UIRemoteNotificationTypeBadge | UIRemoteNotificationTypeAlert;
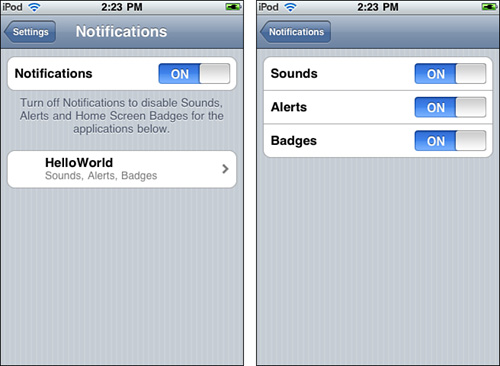
Performing the registration updates user settings. As Figure 16-6 shows, a Notifications pane gets added to Settings if one has not already been created by another program. Your application appears as a subpane, offering user control over notification types. Switches appear only for those notifications that you registered. If your application uses just two types, then two switches appear in that pane. Figure 16-6 shows an application that has registered for all three.
Figure 16-6 Remote notification controls appear for each application that has registered with the iPhone for push support. These controls are removed when applications unregister.
To remove your application from active participation in push notifications, send unregisterForRemoteNotifications. This unregisters your application for all notification types and does not take any arguments.
[[UIApplication sharedApplication] unregisterForRemoteNotifications];
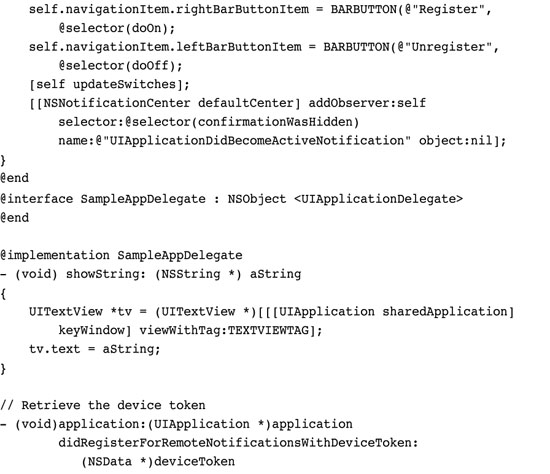
Retrieving the Device Token
Your application cannot receive push messages until it generates and delivers a device token to your server. It must send that device token to the offsite service that pushes the actual notifications. Recipe 16-1, which follows this section, does not implement server functionality. It provides only the client software.
Recipe 16-1 Push Client Skeleton
Get This Recipe’s Code
To get the code used for this recipe, go to http://github.com/erica/iphone-3.0-cookbook-, or if you’ve downloaded the disk image containing all of the sample code from the book, go to the folder for Chapter 16 and open the project for this recipe.
A token is tied to one device. In combination with the SSL certificate, it uniquely identifies the iPhone and can be used to send messages back to the phone in question. Be aware that device tokens can change after you restore iPhone firmware.
Device tokens are created as a byproduct of registration. Upon receiving a registration request, the iPhone OS contacts the Apple Push Notification Service. It uses a secure socket layer (SSL) request. Somewhat obviously, the unit must be connected to the Internet. If it is not, the request will fail. The iPhone forwards the request to APNS and waits for it to respond with a device token.
APNS builds the device token and returns it to the iPhone OS, which in turn passes it back to the application via an application delegate callback, namely
application:didRegisterForRemoteNotificationsWithDeviceToken:
Your application must retrieve this token and pass it to the provider component of your service, where it needs to be stored securely. Anyone who gains access to a device token and the application’s SSL certificate could spam messages to iPhones. You must treat this information as sensitive and protect it accordingly.
Note
At times, the token may take time to generate. Consider designing around possible delays into your application by registering at each application run. Until the token is created and uploaded to your site, you will not be able to provide remote notifications to your users.
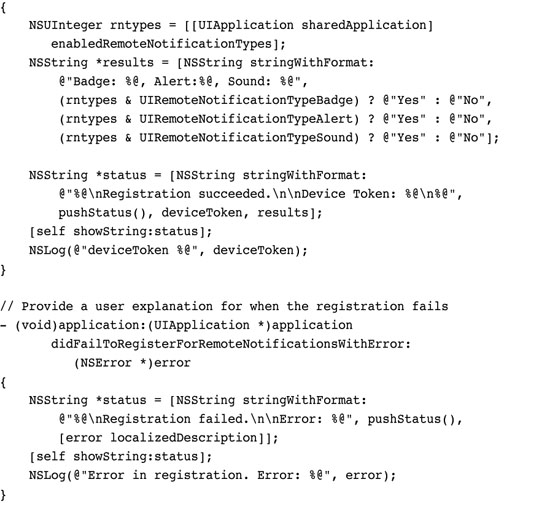
Handling Token Request Errors
At times, APNS is unable to create a token or your device may not be able to send a request. For example, you cannot generate tokens from the simulator. A UIApplicationDelegate method application: didFailToRegisterForRemoteNotificationsWithError: lets you handle these token request errors. For the most part, you’ll want to retrieve the error and display it to the user.

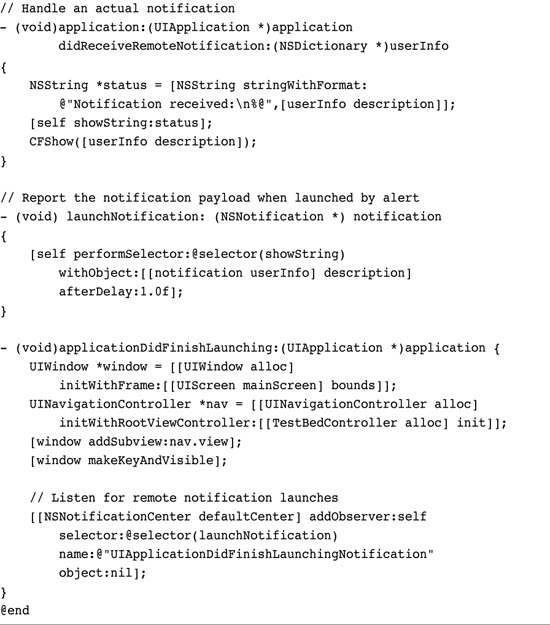
Responding to Notifications
The iPhone uses a set chain of operations (see Figure 16-7) in responding to push notifications. When an application is running, the notification is sent directly to a UIApplicationDelegate method, application: didReceiveRemoteNotification:. The payload, which is sent in JSON format, is converted automatically into an NSDictionary, and the application is free to use the information in that payload however it wants. As the application is already running, no further sounds, badges, or alerts are invoked.
Figure 16-7 Visible and audible notification are only presented when the application is not running. Should the user click on an alert’s action key (normally View), the application launches and the payload is sent as a notification to the UIApplicationDelegate.
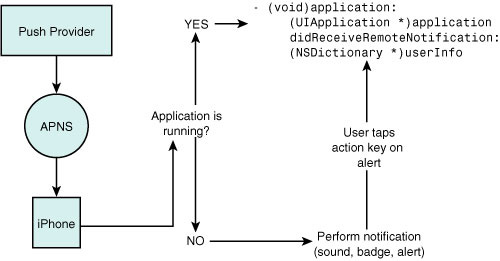
When an application is not running, the iPhone performs all requested notifications that are allowed by registration and by user settings. These notifications may include playing a sound, badging the application, and/or displaying an alert. Playing a sound can also trigger iPhone vibration when a notification is received.
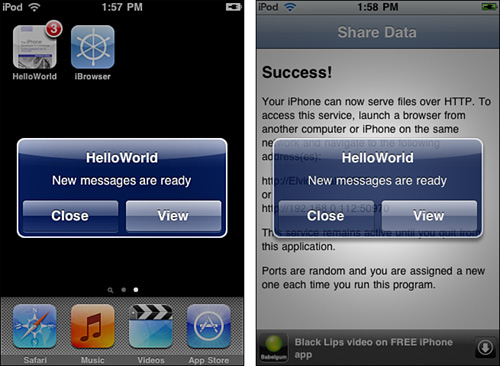
In the case of an alert, all two-buttoned alerts offer a pair of choices. The user can tap Close (the leftmost button) and close the alert or tap the alert’s action key (the rightmost button) and launch the app. Upon launching, the application delegate receives the same remote notification callback that an already-running application would have seen (see Figure 16-8). Alerts appear on the lock screen when the iPhone is locked.
Figure 16-8 Remote alerts can appear in SpringBoard (left) or in third-party applications (right). Users may Close the alert or, by pressing the action button on the right, switch to the notifying application. In this case, that application is HelloWorld, whose name is clearly seen on the alert. The action button text is customizable.
Recipe: Push Client Skeleton
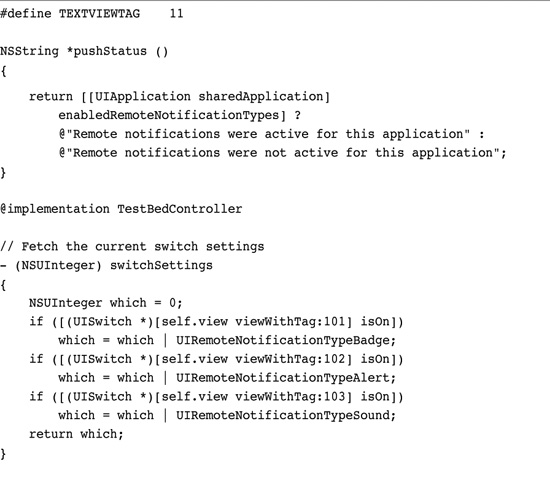
Recipe 16-1 introduces a basic client that allows users to register and unregister for push notifications. The interface (shown in Figure 16-9) uses three switches that control the services to be registered. When the application launches, it queries the app’s enabled remote notification types and updates the switches to match. Thereafter, the client keeps track of registrations and unregistrations, adjusting the switches to keep sync with the reality of the settings.
Figure 16-9 The Push Client skeleton introduced in Recipe 16-1 lets users specify which services they want to register.

Two buttons at the top left and right of the interface let users unregister and register their application. As mentioned earlier in this chapter, unregistering disables all services associated with the app. It provides a clean sweep. In contrast, registering apps requires flags to indicate which services are requested.
When requesting new services, the user is always prompted to approve. Figure 16-10 shows the dialog that appears. The user must confirm by explicitly granting the application permission. If the user does not, by tapping Don’t Allow, the flags remain at their previous settings.
Figure 16-10 Users must explicitly grant permission for an application to receive remote notifications.
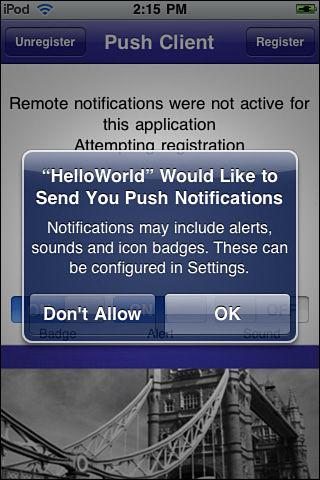
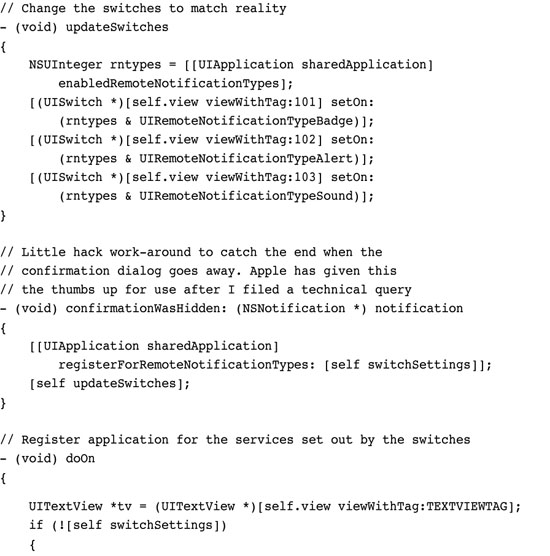
Unfortunately, the confirmation dialog does not generate a callback when it is dismissed, regardless of whether the user agreed or not. To catch this event, you can listen for a general notification (UIApplicationDidBecomeActiveNotification) that gets generated when the dialog returns control to the application. It’s a hack and is not guaranteed to work in the long term, but at the time of writing, Apple has not provided any other way to know when the user responded and how the user responded. In Recipe 16-1, the confirmationWasHidden: method catches this notification and updates the switches to match any new registration settings.
Being something of a skeletal system, this push client doesn’t actually respond to push notifications beyond showing the contents of the user info payload that gets delivered. Figure 16-9 illustrates the actual payload that was sent in Figure 16-10. This display is performed in the application: didReceiveRemoteNotification: method in the application delegate.
Note
The three sound files included in the online sample project (ping1.caf, ping2.caf, and ping3.caf) let you test sound notifications with real audio.
Building Notification Payloads
Delivering push notification through APNS requires three things: your SSL certificate, a device ID, and a custom payload with the notification you want to send. The payload uses JSON formatting. You’ve already read about generating the certificate and producing the device identifiers, which you need to pass up to your server. Building the JSON payloads basically involves transforming a small well-defined dictionary into JSON format.
JSON (JavaScript Object Notation) is a simple data interchange format based on key-value pairs. The JSON Web site (www.json.org) offers a full syntax breakdown of the format, which allows you to represent values that are strings, numbers, and arrays. The APNS payload consists of up to 256 bytes, which must contain your complete notification information.
Notification payloads must include an aps dictionary. This dictionary defines the properties that produce the sound, badge, and/or alert sent to the user. In addition, you may add custom dictionaries with any data you need to send to your application so long as you stay within the 256 byte limit. Figure 16-11 shows the hierarchy for basic (nonlocalized) alerts.
Figure 16-11 The aps dictionary may contain one or more notification types including a badge request, a sound file, and/or an alert.
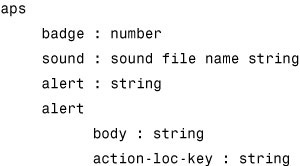
The aps dictionary contains one or more notification types. These include the standard types you’ve already read about: badges, sounds, and alerts. Badge and sound notifications each take one argument. The badge is set by a number, the sound by a string that refers to a file already inside the application bundle. If that file is not found (or the developer passes default as the argument), a default sound plays for any notification with a sound request. When a badge request is not included, the iPhone removes any existing badge from the application icon.
There are two ways to produce an alert. You can pass a string, which defines the message to show. This automatically produces a notification with two buttons under that message: Close and View. To customize buttons, pass a dictionary instead. Send the message text as the body and the string to use for the Action key (normally View) as action-loc-key. This replaces View with whatever text you specify.
To produce an alert with a single OK button, pass null as the argument to action-loc-key. This creates a special alert style with one button. Just as when a user taps Close, the OK style alert will not pass any data directly to your application. The app must poll for any updates when next opened by the user.
Localized Alerts
When working with localized applications, construct your aps > alert dictionary with two additional keys. Use loc-key to pass a key that is defined in your application’s Localizable.strings file. The iPhone looks up the key and replaces it with the string found for the current localization.
At times, localization strings use arguments like %@ and %n$@. Should that hold true for the localization you are using, you can pass those arguments as an array of strings via loc-args. As a rule, Apple recommends against using complicated localizations as they can consume a major portion of your 256-byte bandwidth.
Transforming from Dictionary to JSON
Once you’ve designed your dictionary, you must transform it to JSON. The JSON format is simple but precise. If you can, use an automated library to convert your dictionary to the JSON string. There are numerous solutions for this for any number of programming languages, including JavaScript, Perl, and so on. Here’s a quick rundown of JSON basics. Table 16-1 offers examples of these rules in action.
Table 16-1 JSON Payload Samples

• The entire payload is a dictionary. Dictionaries consist of key-value pairs stored between brackets, that is, {key:value, key:value, key:value, ...}.
• Key-value pairs are separated with commas.
• Strings use double quotes; numbers do not. Reserved words include true, false, and null. Reserved words are not quoted.
• Arrays consist of a list of items between square brackets, that is, [item, item, item,...].
• The following symbols must be escaped in strings by using a backslash literal indicator: ' " /.
• You may want to remove carriage returns (
) and new lines (
) from your payloads when sending messages.
• Spaces are optional. Save space by omitting them between items.
• The aps dictionary appears within the top-level folder, so the most basic payload looks something like {aps:{}}.
Custom Data
So long as your payload has room left, keeping in mind your tight byte budget, you can send additional information in the form of key-value pairs. As Table 16-1 showed, these custom items can include arrays and dictionaries as well as strings, numbers, and constants. You define how to use and interpret this additional information. The entire payload dictionary is sent to your application so whatever information you pass along will be available to the application: didReceiveRemoteNotification: method via the user dictionary.
A dictionary containing custom key-value pairs does not need to provide an alert, although doing so allows your user to choose to open your application if it isn’t running. If your application is already launched, the key-value pairs arrive as a part of the payload dictionary.
Receiving Data on Launch
When your client receives a notification, tapping the action key (by default, View) launches your application. Then after launching, the iPhone sends your application delegate an optional callback. The delegate recovers its notification dictionary by implementing a method named application:didFinishLaunchingWithOptions:. Unfortunately, this method might not work properly. So here are both the standard ways of retrieving notification information plus a work-around.
Normally, the iPhone passes the notification dictionary to the delegate method via the launch options parameter. For remote notifications, this is the official callback to retrieve data from an alert-box launch. The didReceiveRemoteNotification: method is not called when the iPhone receives a notification and the application is not running.
This “finished launching” method is actually designed to handle two completely different circumstances. First, it handles these notification alert launches, allowing you to recover the payload dictionary and use the data that was sent. Second, it works with application launches from openURL:. If your app has published a URL scheme, and that scheme is used by another application, the application delegate handles that launch with this method.
In either case, the method must return a Boolean value. As a rule, return YES if you were able to process the request or NO if you were not. This value is actually ignored in the case of remote notification launches, but you must still return a value.
At the time of writing, implementing this method does not work properly. The application will hang without displaying a GUI. Fortunately, there’s an easy work-around that does not rely on the callback method. You can, instead, listen for a launch notification and catch the userInfo dictionary that is sent with it. This solution has the advantage of being reliable and tested. Keep an eye on Apple’s developer forums (http://devforums.apple.com) to keep track of when this issue gets fixed.
Start by adding your application delegate as a listener via the default NSNotificationCenter in your normal applicationDidFinishLaunching method.

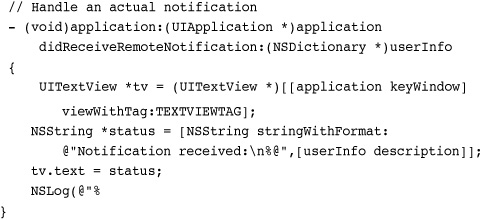
Then implement the method for the selector you provided. Here, the application waits for the GUI to finish loading and then displays the user info dictionary, where the remote notification data has been stored.

Between the notification listener and the method callback, you can reliably grab the user data from remote notifications. This work-around should remain viable regardless of when and how Apple addresses the didFinishLaunchingWithOptions method.
Note
When your user taps Close and later opens your application, the notification is not sent on launch. You must check in with your server manually to retrieve any new user information. Applications are not guaranteed to receive alerts. In addition to tapping Close, the alert may simply get lost. Always design your application so that it doesn’t rely solely on receiving push notifications to update itself and its data.
Recipe: Sending Notifications
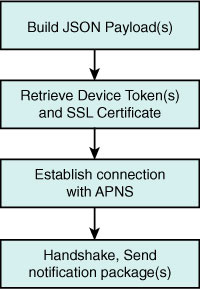
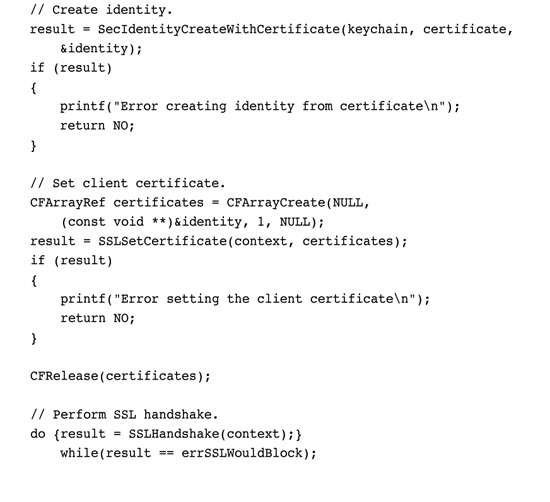
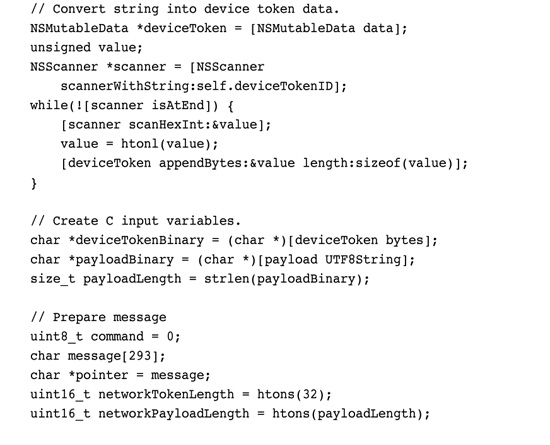
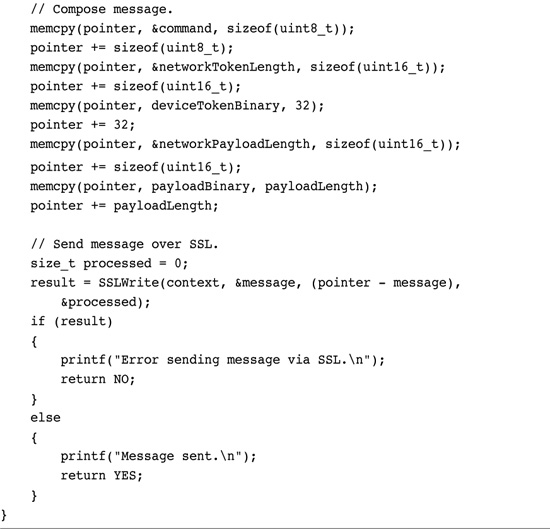
The notification process involves several steps (see Figure 16-12). First, you build your JSON payload, which you just read about in the previous section. Next, you retrieve the SSL certificate and the device token for the unit you want to send to. How you store these is left up to you, but you must remember that these are sensitive pieces of information. Open a secure connection to the APNS server. Finally, you handshake with the server, send the notification package, and close the connection.
Figure 16-12 The steps for sending remote notifications.
This is the most basic way of communicating and assumes you have just one payload to send. In fact, you can establish a session and send many packets at a time; however, that is left as an exercise for the reader as is creating services in languages other than Objective-C. The Apple Developer Forums (devforums.apple.com) host ongoing discussions about push providers and offer an excellent jumping off point for finding sample code for PHP, Perl, and other languages.
Be aware that APNS may react badly to a rapid series of connections that are repeatedly established and torn down. If you have multiple notifications to send at once, go ahead and send them during a single session. Otherwise, APNS might confuse your push deliveries with a denial of service attack.
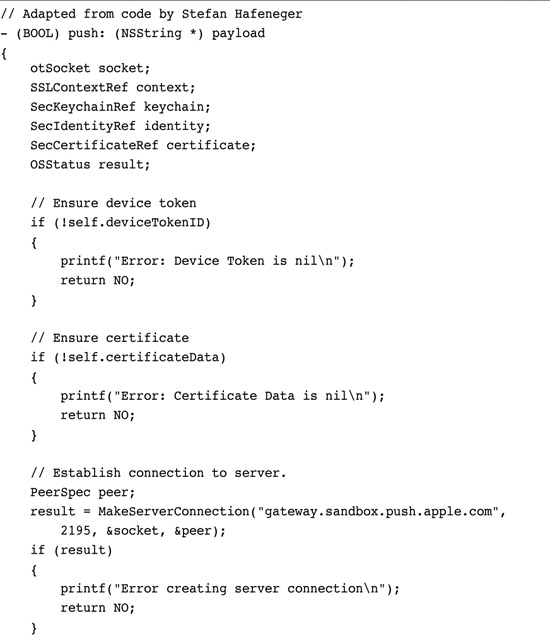
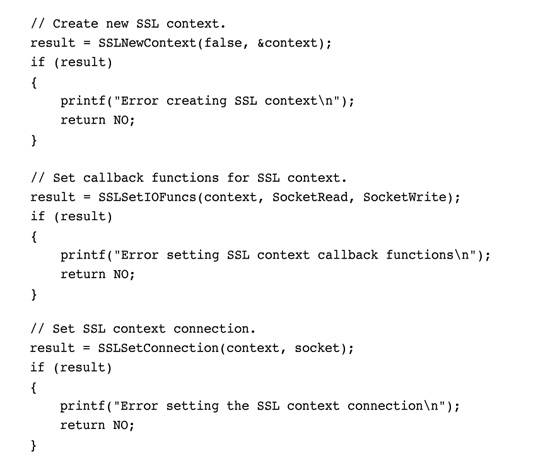
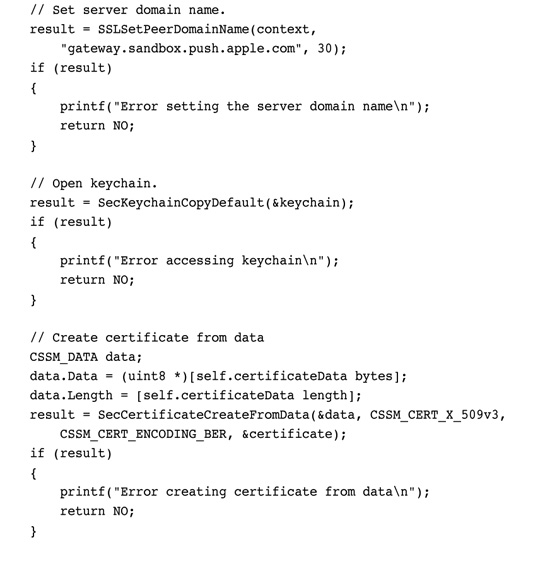
Recipe 16-2 demonstrates how to send a single payload to APNS, showing the steps needed to implement the fourth and final box in Figure 16-12. The recipe is built around code developed by Stefan Hafeneger and uses Apple’s ioSock sample source code.
Recipe 16-2 Pushing Payloads to the APNS Server
Get This Recipe’s Code
To get the code used for this recipe, go to http://github.com/erica/iphone-3.0-cookbook-, or if you’ve downloaded the disk image containing all of the sample code from the book, go to the folder for Chapter 16 and open the project for this recipe.
The individual server setups vary greatly depending on your security, databases, organization, and programming language. Recipe 16-2 demonstrates a minimum of what is required to implement this functionality and serves as a template for your own server implementation in whatever form this might take.
Sandbox and Production
Apple provides both sandbox (development) and production (distribution) environments for push notification. You must create separate SSL certificates for each. The sandbox helps you develop and test your application before submitting to App Store. It works with a smaller set of servers and is not meant for large-scale testing. The production system is reserved for deployed applications that have been accepted to App Store.
• The Sandbox servers are located at gateway.sandbox.push.apple.com, port 2195.
• The Production servers are located at gateway.push.apple.com, port 2195.
Recipe: Push in Action
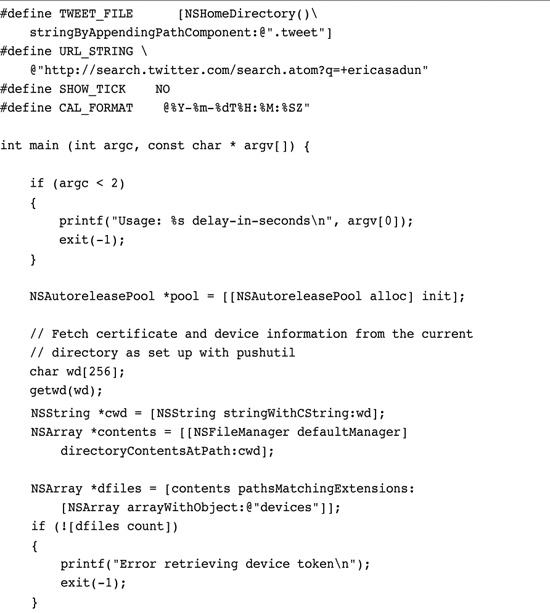
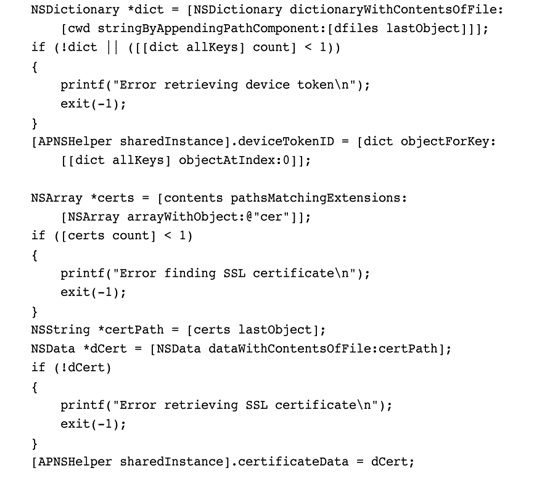
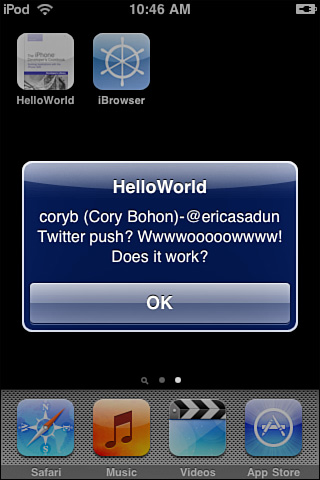
Once you set up a client such as the one discussed in Recipe 16-1 and routines like Recipe 16-2 that let you send notifications, it’s time to think about deploying an actual service. Recipe 16-3 introduces a Twitter client that repeatedly scans a search.twitter.com RSS feed and pushes notifications whenever a new tweet is found (see Figure 16-13).
Recipe 16-3 Wrapping Remote Notifications into a Simple Twitter Utility
Get This Recipe’s Code
To get the code used for this recipe, go to http://github.com/erica/iphone-3.0-cookbook-, or if you’ve downloaded the disk image containing all of the sample code from the book, go to the folder for Chapter 16 and open the project for this recipe.
Figure 16-13 Twitter provides an ideal way to test a polled RSS feed.
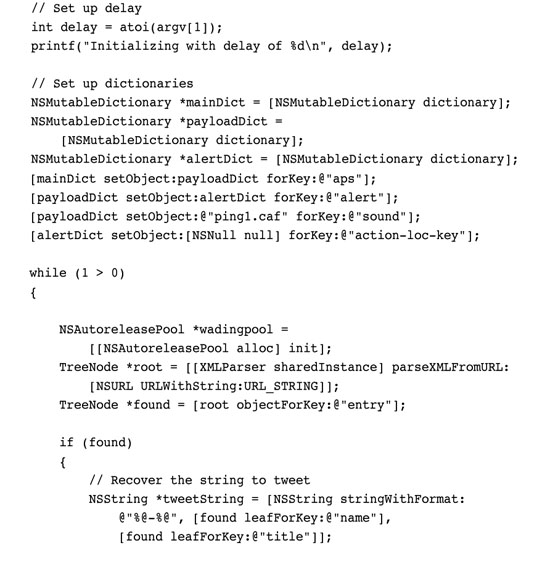
This code is built around the push routine from Recipe 16-2 and the XML parser from Recipe 13-13. This utility pulls down Twitter search data as an XML tree and finds the first tree node of the type “entry,” which is how Twitter stores each tweet.
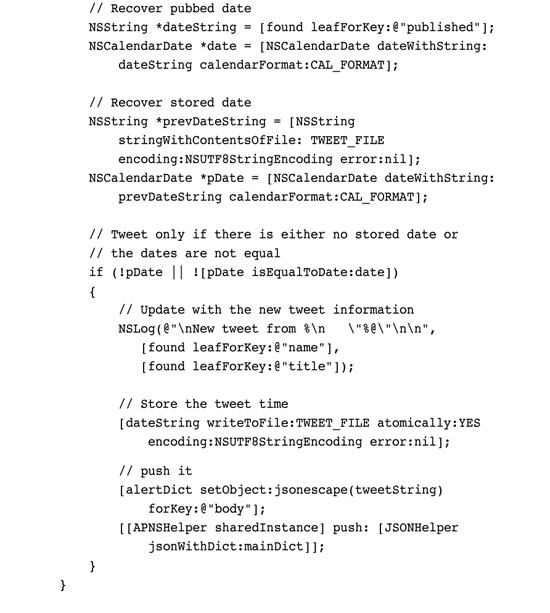
Next, it creates a string by combining the poster name (from the “name” leaf) and the post contents (from the “title” leaf). It then adds a JSON-escaped version of this string to the aps > alert dictionary as the message body. The alert sound and one-button style are fixed in the main aps payload dictionary.
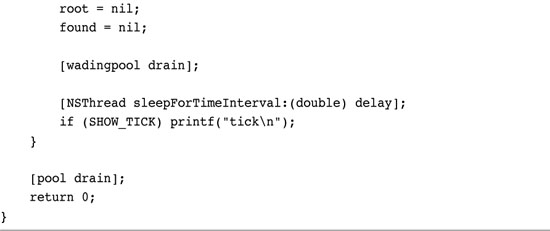
The application runs in a loop with a time delay set by a command-line argument. Every n seconds (determined by the second command-line argument), it polls, parses, and checks for a new tweet, and if it finds one, pushes it out through APNS. Figure 16-13 shows this utility in action, displaying a tweet alert on the client iPhone.
Feedback Service
Apps don’t live forever. Users add, remove, and replace applications on their iPhones all the time. From an APNS point of view, it’s pointless to deliver notifications to iPhones that no longer host your application. As a push provider, it’s your duty to remove inactive device tokens from your active support list. As Apple puts it, “APNS monitors providers for their diligence in checking the feedback service and refraining from sending push notifications to nonexistent applications on devices.” Big Brother is watching.
Apple provides a simple way to manage inactive device tokens. When users uninstall apps from a device, push notifications begin to fail. Apple tracks these failures and provides reports from its APNS feedback server. The APNS feedback service lists devices that failed to receive notifications. As a provider, you need to fetch this report on a periodic basis and weed through your device tokens.
The feedback server hosts sandbox and production addresses, just like the notification server. You find these at feedback.push.apple.com (port 2196) and feedback.sandbox.push.apple.com. You contact the server with a production SSL certificate and shake hands in the same way you do to send notifications. After the handshake, read your results. The server sends data immediately without any further explicit commands on your side.
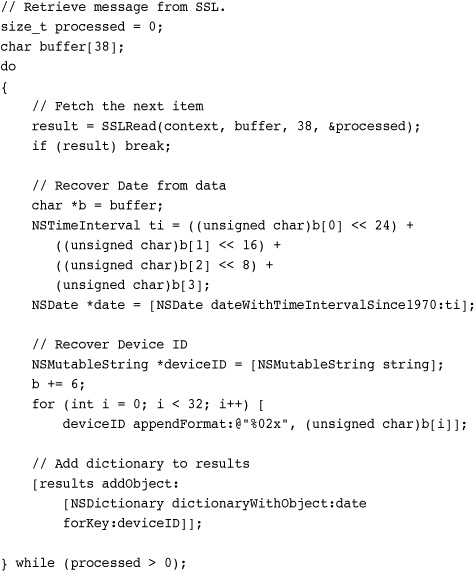
The feedback data consists of 38 bytes. This includes the time (4 bytes), the token length (2 bytes), and the token itself (32 bytes). The timestamp tells you when APNS first determined that the application no longer existed on the device. This uses a standard UNIX epoch, namely seconds since Midnight, January 1st, 1970. The device token is stored in binary format. You need to convert it to a hex representation to match it to your device tokens if you use strings to store token data. At the time of writing this book, you can ignore the length bytes. They are always 0 and 32, referring to the 32-byte length of the device token.
Note
Search your Xcode Organizer Console for “aps” to locate APNS error messages.
Designing for Push
When designing for push, keep scaling in mind. Normal computing doesn’t need to scale. When coding is done, an app runs on a device using the local CPU. Should a developer deploy an extra 10,000 copies, there’s no further investment involved other than increased technical support.
Push computing does scale. Whether you have 10,000 or 100,000 or 1,000,000 users matters. That’s because developers must provide the service layer that handles the operations for every unit sold. The more users supported, the greater the costs will be. Consider that these services need to be completely reliable and that consumers will not be tolerant of extended downtimes.
Consider an application with just 10,000 users. It might service a million uses per day, assuming update checks every 15 minutes. More time-critical uses might demand checks every few minutes or even several times a minute. As the computational burden builds, so do the hosting costs. While cloud computing provides an excellent match to these kinds of needs, that kind of solution comes with a real price in development, maintenance, and day-to-day operations.
On top of reliability, add in security concerns. Many polled services require secure credentials. Those credentials must be uploaded to the service for remote use rather than being stored solely on the device. Even if the service in question does not use that kind of authentication, the device token that allows your service to contact a specific phone is sensitive in itself. Should that identifier be stolen, it could let spammers send unsolicited alerts. Any developer who enters this arena must take these possible threats seriously and provide highly secure solutions for storing and protecting information.
These concerns, when taken together, point to the fact that push notifications are serious business. Some small development houses may completely opt out of being push providers for apps that depend on new information notifications. Between infrastructure and security concerns, the work it will take to properly offer this kind of service may price itself out of reach for those developers. Third party providers like Key Lime Tie (keylimetie.com) and Urban Airship (urbanairship.com) offer ready-to-use Push infrastracture with affordable pricing plans. They handle the remote notification deployment for you.
On the other hand, many developers may employ push for occasional opt-in notifications, such as alerting users that upgrades are now available in the App Store or to send tips about using the product. How tolerant iPhone users will be of this kind of use remains to be seen.
Summary
In this chapter, you saw push notifications both from a client-building point of view and as a provider. You learned about the kinds of notifications you can send and how to create the payload that moves those notifications to the device. You discovered registering and unregistering devices and how users can opt in and out from the service. You saw how to create a provider utility that pushes new Twitter items.
Much of the push story lies outside this chapter. It’s up to you to set up a server and deal with security, bandwidth, and scaling issues. The reality of deployment is that there are many platforms and languages that can be used that go beyond the Objective-C sample code shown here. Regardless, the concepts discussed and recipes shown in this chapter give you a good stepping off point. You know what the issues are and how things have to work. Now it’s up to you to put them to good use.
• The big wins of notifications are their instant updates and immediate presentation. Like SMS messages, they’re hard to overlook when they arrive on your iPhone. There’s nothing wrong in opting out of push if your application does not demand that kind of immediacy.
• Guard your SSL certificate and device tokens. Although it’s too early to say how Apple will respond to security breaches, experience suggests that it will be messy and unpleasant.
• Don’t leave users without service when you have promised to provide it to them. Build a timeline into your business plan that anticipates what it will take to keep delivering notifications over time and how you will fund this. Consumers will not be tolerant of extended downtimes; your service must be completely reliable.
• Build to scale. Although your application may not initially have tens of thousands of users, you must anticipate a successful app launch as well as a modest one. Create a system that can grow along with your user base.