You can use Word's basic formatting commands 'Bold, Italic, and Underline ' to quickly add formatting to your text. These three formatting styles are the most common ways to change the appearance of text in a document.
Add Basic Formatting
Note
See Chapter 4 to learn how toselect text.
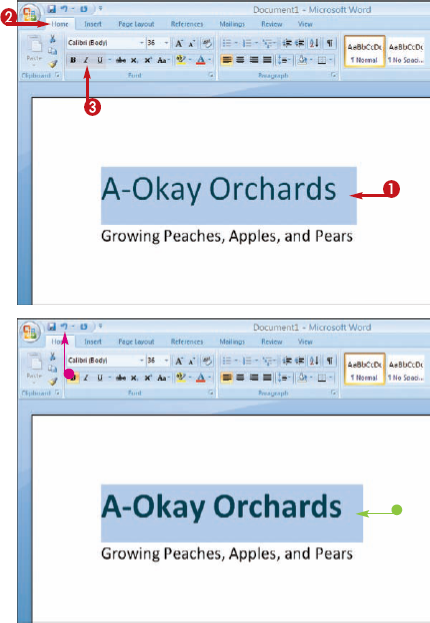
You can click Bold (
You can click Italic (
You can click Underline (
Word applies the formatting to the text.
You can use keyboard shortcuts to quickly apply formatting. Press
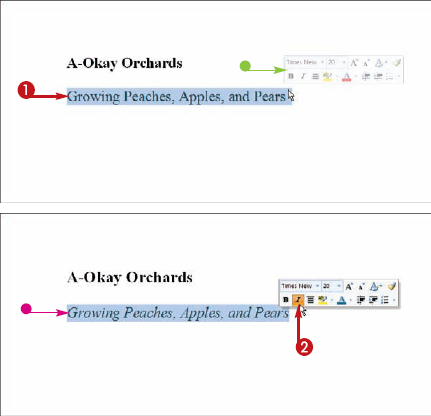
Word's new mini toolbar feature gives you quick access to common formatting commands. The mini toolbar appears faintly when you select text in a document. If you want to use the toolbar, you can activate its tools. If you prefer not to use the toolbar, you can continue working, and the toolbar disappears.
Note
See Chapter 4 to learn how to select text
You can also right-click over the selected text to display the toolbar.
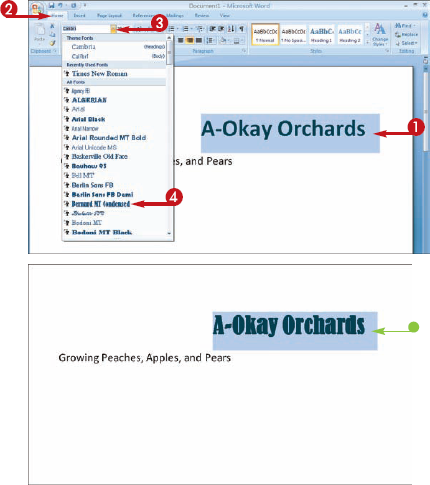
You can change the font to alter the appearance of text in a document. For example, you might change the font of the title of your document. By default, Word 2007 applies Calibri to every new document that you create. You can change the font by using the Font tool.
QUICKLY CHANGE THE FONT
Note
See Chapter 4 to learn how toselect text
Note
With Word's Live Preview feature on, you can immediately preview any fontin the list by moving
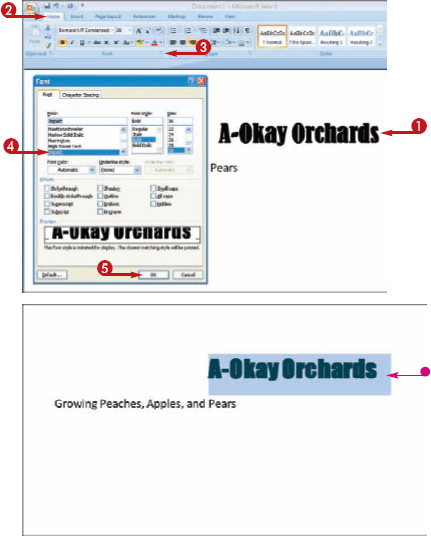
USE THE FONT DIALOG BOX
Note
See Chapter 4 to learn how to select text


The Font dialog box appears.

You can also use this dialog box to change the font style and size, and to apply other text effects.
Note
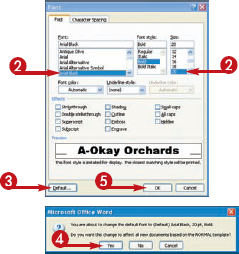
Can I change the default font and size that Word always applies to new documents?
Yes. To change the default font and size, follow these steps:
A confirmation prompt appears.
The next time that you create a new document, Word applies the default font and size that youspecified.
You can change the font size to alter the appearance of text in a document. For example, you can increase the title text to appear larger than the other text in your document. Font sizes are measured in points. By default, Word applies a 11-point font size to every new document that you create. You can change the font size to suit your document needs.
Change the Font Size
QUICKLY CHANGE THE FONT SIZE
Note
See Chapter 4 to learn how toselect text
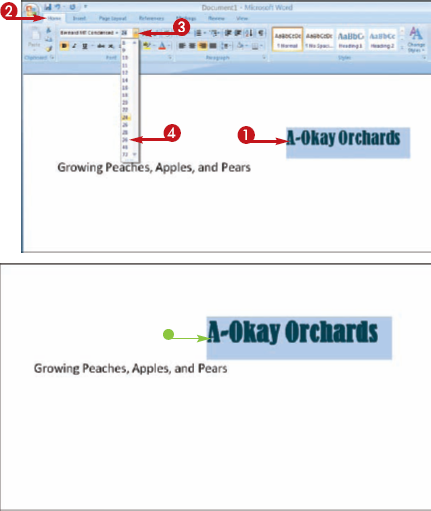
Word applies the font size to the text.
USE THE FONT DIALOG BOX
Note
See Chapter 4 to learn how toselect text
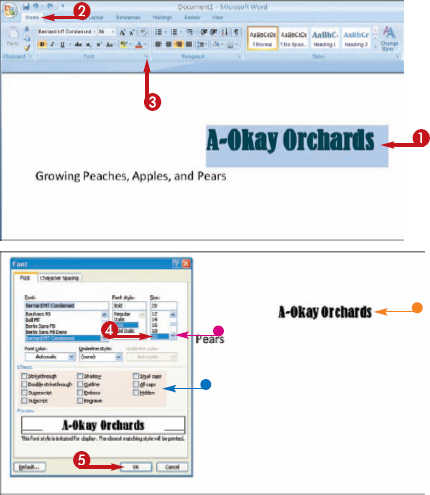
The Font dialog box appears.
You can also type a size directly into the Size text box.
Note
How do I apply superscript or subscript text
You can apply superscript and subscript text for reference numbers or scientific coding. Superscript text appears smaller and slightly above the baseline, while subscript text appears smaller and slightly below the baseline. To apply superscript or subscript text, simply click the Superscript or Subscript buttons (

Is there another way to change my font sizes?
Yes. You can click the Grow Font and Shrink Font buttons

You can add color to your Word text to enhance the appearance of a document or to add emphasis to your text. When selecting text colors, you should avoid choosing colors that make your text difficult to read.
Add Color to Text
Note
See Chapter 4 to learn how toselect text
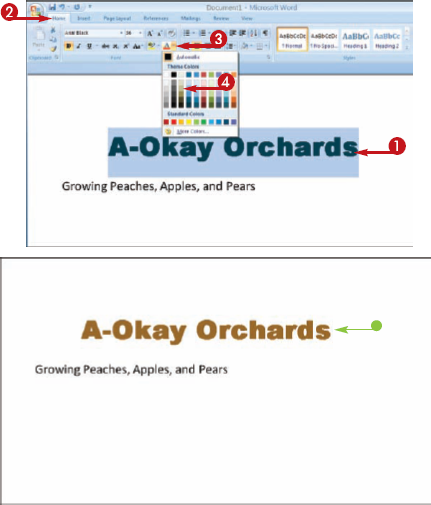
Word applies the color to the text.
You can use Word's alignment commands to change how text is positioned horizontally on a page. By default, Word assigns the Left Align command. You can also choose to center your text on a page, align it to the right side of the page, or justify it so that it lines up at both the left and right margins of the page.
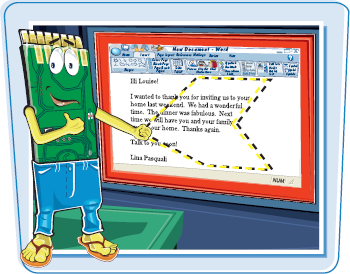
Align Text
Click the Align Left button (
Click the Center button (
Click the Align Right button (
Click the Justify button (
Word applies the alignment to the text.
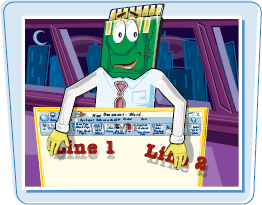
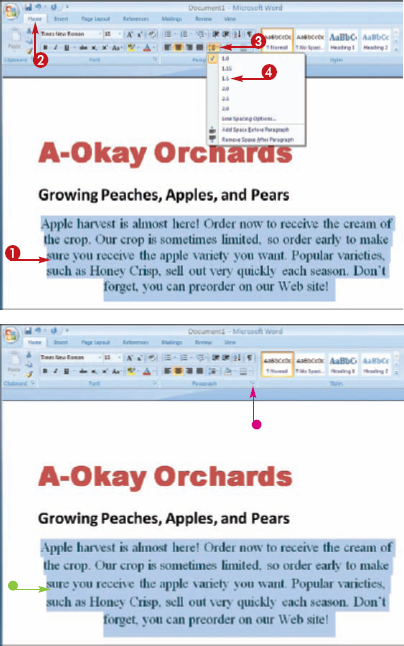
You can adjust the amount of spacing that appears between lines of text in your paragraphs. For example, you may need to set double-spacing to allow for handwritten edits in your printed document, or set 1.5 spacing to make the paragraphs easier to read. By default, Word assigns single spacing for all new documents that you create.
Set Line Spacing
Word immediately applies the new spacing.
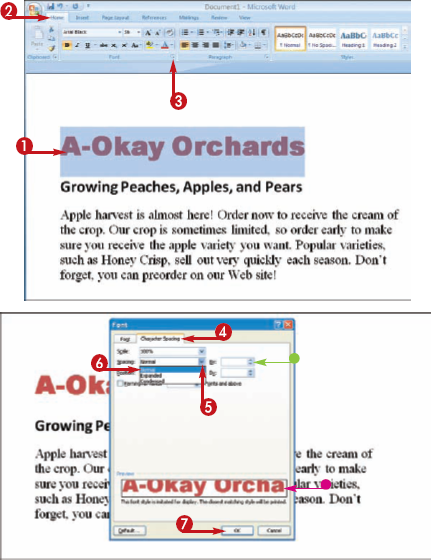
You can control the spacing that occurs between characters in your text. For example, you may want the title text of your document to appear stretched out across the top of the page, or you may need to condense the spacing to make the title text fit on one line.
Set Character Spacing
Note See Chapter 4 to learn how to select text.
The Font dialog box appears.
Word applies the formatting to your text.
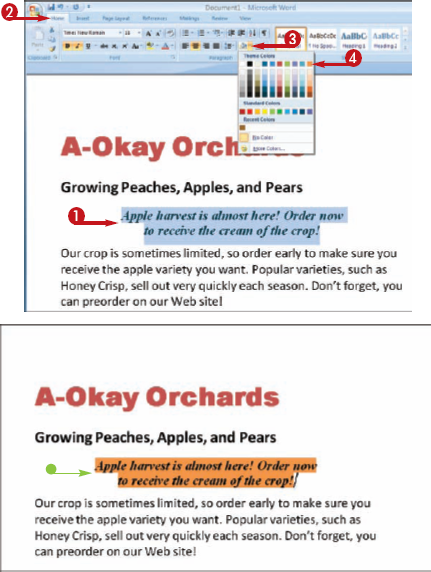
You can add color shading behind text to create emphasis or to set the text apart from the rest of the document. Word's Shading feature allows you to choose from a palette of complimentary theme colors for your document, or you can choose from standard colors.
Apply Color Shading
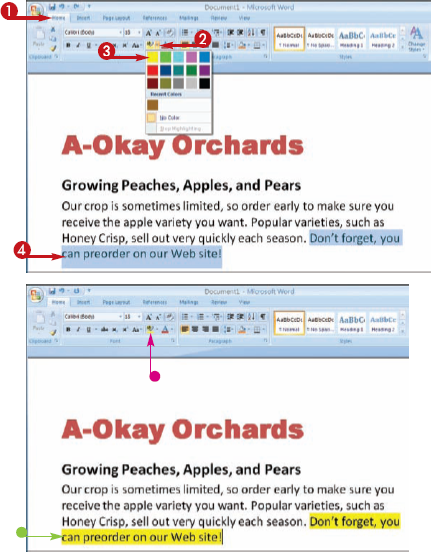
You can use Word's Highlight tool to add highlighting to text in a document. For example, if you share a document with others, you can highlight a sentence or paragraph that you add to the page to draw attention to the new addition. You might also highlight text that you want a colleague to check. When you apply highlighting, you can specify a highlight color.
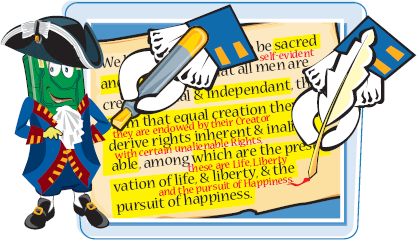
Highlight Text
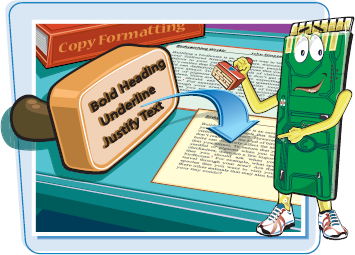
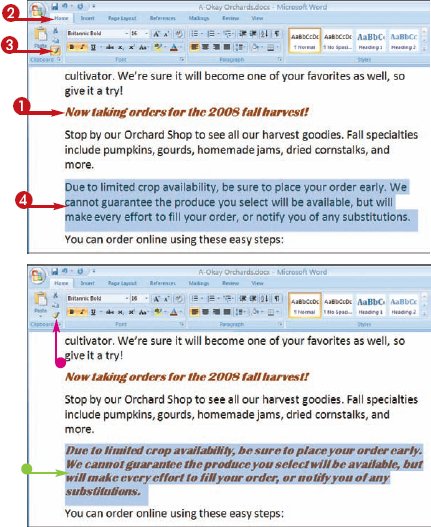
You can use the Format Painter feature to copy formatting to other text in your document. For example, you may have applied a variety of formatting to a paragraph to create a certain look. When you want to re-create the same look elsewhere in the document, you do not have to repeat the same steps that you applied to assign the original formatting. Instead, you can "paint" the formatting to the other text in one swift action.
Copy Formatting
Note
See Chapter 4 to learn how to select text
You can press
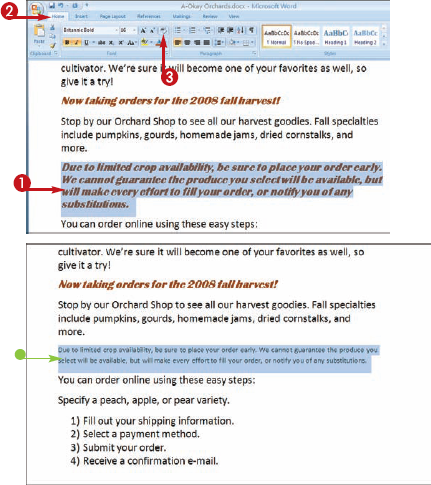
You can use Word's Clear Formatting command to remove any formatting that is applied to the document text. When you apply the Clear Formatting command, Word removes any formatting that is applied to the text, and restores the default settings.
Clear Formatting
Note
See Chapter 4 to learn how toselect text.
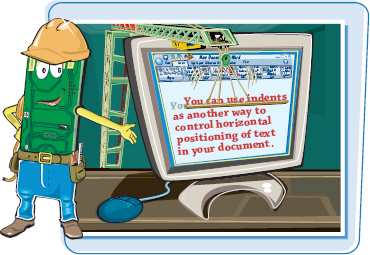
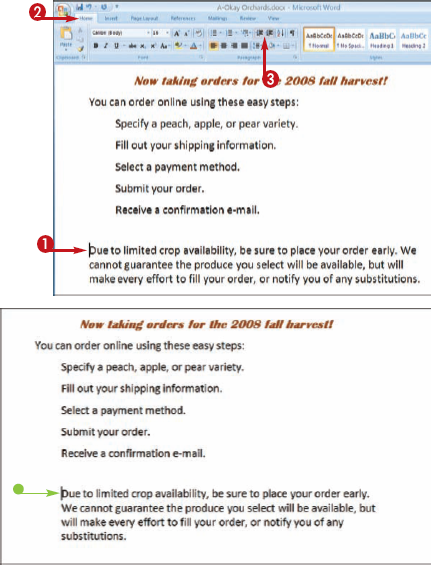
You can use indents as another way to control the horizontal positioning of text in a document. Indents are simply margins that affect individual lines of text or paragraphs. You can use indents to distinguish paragraphs on a page.
Indent Text
SET QUICK INDENTS
You can click the Decrease Indent button (
You can click the Increase Indent button (
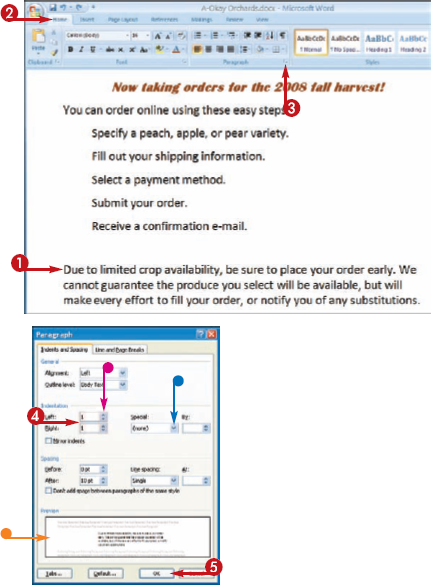
SET PRECISE INDENTS
The Paragraph dialog box appears.
Word applies the indent to the text.
Note
What is the difference between an indent and a tab?
You can use tabs to create columnar text across a page, while indents control where a paragraph or line of text starts in relation to the margins. However, you can press
Can I set indents using the Word ruler?
Yes. You can drag the indent marker (

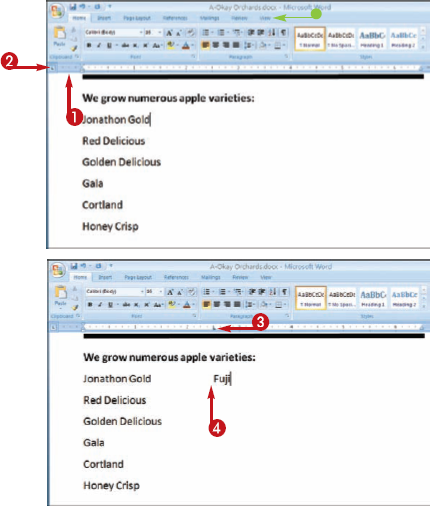
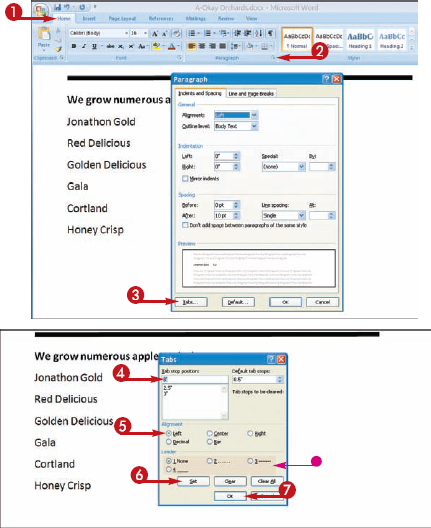
You can use tabs to create vertically aligned columns of text in your Word document. By default, Word creates tab stops every 0.5 inches across the page, and aligns the text to the left of each tab column. You can set your own tab stops using the ruler or the Tabs dialog box. You can also change the tab alignment and specify an exact measurement between tab stops.
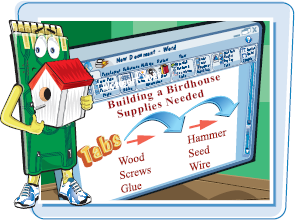
You can use tab stop alignments to control how text aligns. For example, you can align tab text to the right or center of the tab column, use a decimal tab to line up decimal points, or use a bar tab to set a vertical bar between columns.
Set Tabs
SET QUICK TABS
SET PRECISE TABS
The Paragraph dialog box appears.
The Tabs dialog box appears.
Word saves the new tab stop.
Word exits the dialog box, and you can use the new tab stops.
Note
How do I remove tab stops that I no longer need?
To remove a tab stop from the ruler, simply drag the tab stop off of the ruler. To remove a tab stop in the Tabs dialog box, you can select it, and then click Clear. To clear every tab stop that you saved in the Tabs dialog box, click Clear All.
What are leader tabs?
You can use leader tabs to separate tab columns with dots, dashes, or lines. Leader tabs can help readers follow the information across tab columns. You can set leader tabs using the Tabs dialog box, as shown in this task

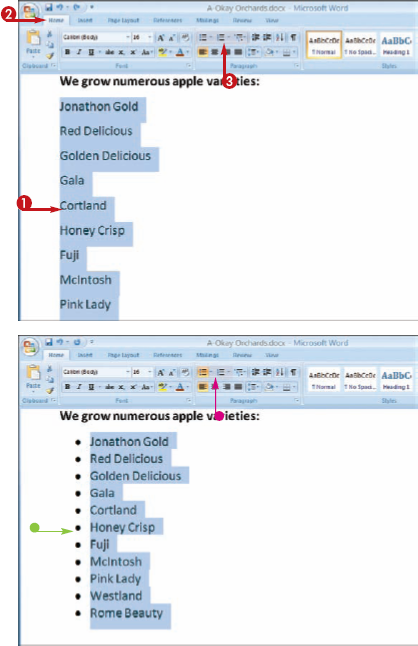
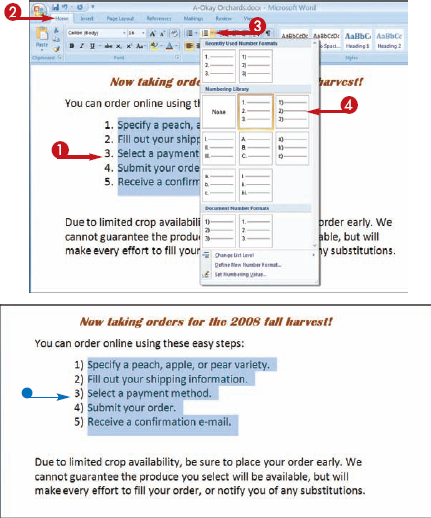
You can set off lists of information in your documents by using bullets or numbers. A bulleted list adds bullet dots in front of each list item, while a numbered list adds numbers in front of each list item. Bulleted and numbered lists can help you keep your information better organized.

Create Bulleted or Numbered Lists
SET QUICK LISTS
You can click the Bullets button (
You can click the Numbering button(
You can click the Multilevel button (
Word applies the formatting to the list.
To add more text to the list, you can click at the end of the line and press
CHANGE BULLET OR NUMBER STYLES
Note
Can I customize a style?
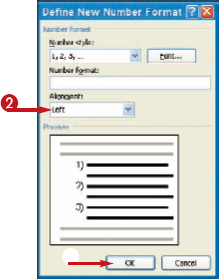
Yes. You can create a customized style or control the positioning of bullets and numbers. Follow these steps:
The Define New Bullet or Define New Number Format dialog box appears.
Word applies the customized style.
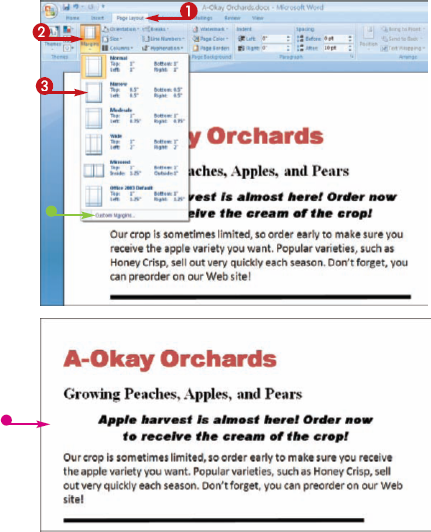
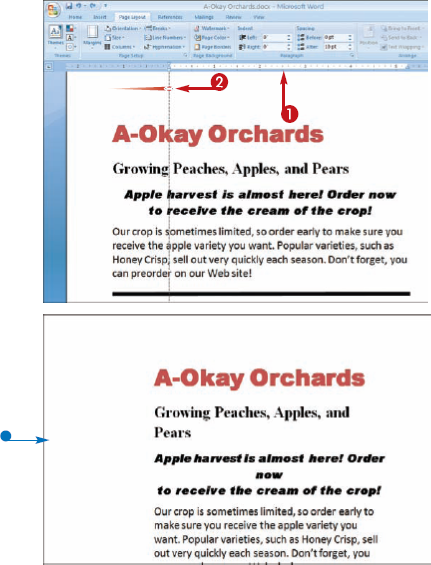
You can control the margins of your document pages. By default, Word assigns a 1-inch margin at the top and bottom of a page, and a 1.25-inch margin on the left and right sides of a page in every new document that you create. You can set wider margins to fit more text on a page, or set smaller margins to fit less text on a page.
Set Margins
SET MARGINS USING PAGE LAYOUT TOOLS
SET MARGINS USING THE RULER
The
Note
How do I set new default margins for all of my Word documents?
If your company or organization consistently uses the same margins, you can choose those settings as the default for every new document that you open in Word. Click the Margins button on the Page Layout tab and click the Custom Margins option. This opens the Page Setup dialog box. Set the new margins using the options in the Margins tab, and then click Default.
I set new margins, but my printer did not follow them. Why not?
Use caution when setting margins that are too wide. Some printers have a minimum margin in which nothing can be printed. For example, with many printers, anything less than 0.25 inches is outside the printable area. Be sure to test the margins, or check your printer documentation for more information.

Word comes with a collection of preset styles that you can use. You can also customize the styles, as well as create your own new styles.
You can use Word's styles to apply a collection of formatting specifications all at the same time. For example, if a corporate report requires specific formatting for every heading, you can assign the formatting to a style and apply it whenever you need it. This can save you time that you would otherwise spend assigning multiple formatting settings over and over again.
Format with Styles
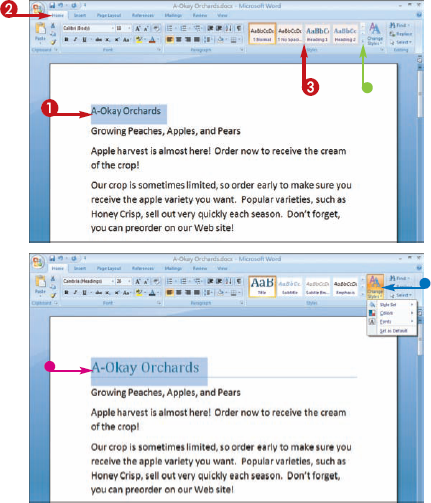
APPLY A QUICK STYLE
Word applies the style.
CREATE A NEW QUICK STYLE
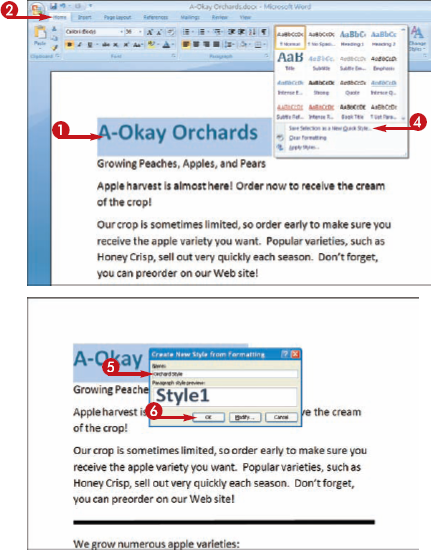
The Create New Style from Formatting dialog box appears.
Word adds the style to the list of Quick Styles.
Note
How do I remove a style that I no longer need?"
From the Home tab, display the full Quick Styles palette and right-click over the style that you want to remove. Click the Remove from Quick Style Gallery command. Word removes the style immediately from the Quick Styles list.

How do I customize an existing style?
Apply a style to your text and then leave the text selected. Click the Change Styles button on the Home tab, and then click the type of change that you want to make. For example, if you want to switch fonts, click the Fonts option and then select another font. If you want to change style colors, click the Colors option and then select another color set.

