
The latest release of the SharePoint platform, Microsoft Office SharePoint Server (MOSS) 2007, introduces new capabilities to the SharePoint platform: hosting content-centric Web sites on SharePoint and providing a robust publishing infrastructure. This publishing infrastructure enables site owners to delegate to certain individuals the creation and management of content on the site. Other users have rights to approve and publish content for readers to see. Interwoven in this process is a robust controlled publishing infrastructure founded on the Windows Workflow Foundation (WFF). Combined with significant performance enhancements and improvements to the underlying foundation of MOSS, Windows SharePoint Services (WSS) v3, SharePoint is now capable of hosting content-centric Internet sites! This component of MOSS 2007 is commonly referred to as Web Content Management (WCM), and sites utilizing the WCM features are called Publishing sites.
A major component to Publishing sites is the development story: the process behind constructing a content-centric site. Most development concepts surrounding Publishing sites are really SharePoint concepts, because a Publishing site is just another WSS site with some extra functionality. So, how are you supposed to develop a Publishing site? To date, only one approach has been the leader in the WCM community. This is the approach you will find in virtually all documentation, every whitepaper, every Webcast, every conference or trade show presentation, and every magazine article. However, this approach poses certain challenges in the real world when many organizations have a strict change control process.
An alternate development process is presented in this chapter. It addresses many of the pitfalls associated with the conventional approach. Though many of the concepts in this chapter are tailored to work specifically with Publishing sites, they will also work with little or no modifications in general WSS v3 sites. Before any concerns arise from the process outlined in this chapter, rest assured everything is 100 percent supported by Microsoft. In fact, this is the process Microsoft's out-of-the-box site templates (Collaboration Portal and Publishing Portal) utilize to create the site infrastructure and layout files to implement the default sites!
What guidance is provided when approaching a new Publishing site project? Most of the documentation comes from the MOSS 2007 Software Development Kit (SDK), from various Webcasts, blog posts, presentations, and so on. Collectively, the guidance from all of these sources is generally the same.
First, identify the different types of pages that will be used across a site. These types of pages help in identifying the different content types that must be defined. In the process of defining all the content types used in a Publishing site, common site columns are identified that can be shared across two or more content types (such as "First Name"). This process of identifying the content types and site columns for a Publishing site defines the schema of all pages in the site.
Once the schema of the pages in a Publishing site is defined, the site columns and content types must be created. MOSS provides three options to creating site columns and content types:
Via the SharePoint browser interface
Writing custom code to create site columns and content types using the SharePoint object model
Creating XML files containing
<Field>and<ContentType>nodes included in element manifest files within SharePoint Features
The first option is by far the most commonly used and documented approach to creating site columns and content types. Because of its widespread popularity, it is referred to as the conventional approach in this chapter.
The next step is to scope out the various rendering options for each of the content types, or page schemas. The deliverable of this exercise is a list of all the page layouts (also known as page templates) that will be created for each content type.
Next, the project designer(s) will create mock-ups of each page layout, giving the Publishing site a user interface. Once the mock-ups have been created and the site has a user interface, common elements are identified. These include elements such as the site logo, common branding (page headers and footers), global navigation, and search controls, to list the more common ones. These common elements are abstracted out of the page layouts into one or more ASP.NET 2.0 master pages to enforce consistency and ease the maintenance burden once the site is in production. Obviously, part of this process involves incorporating any necessary images, cascading style sheets (CSS), and script files that are needed to support the user interface into the Publishing site's appropriate lists (such as the styles, documents, and images libraries).
Just like site columns and content types, developers have a few options for creating page layouts and ASP.NET 2.0 master pages in a Publishing site:
Use Office SharePoint Designer 2007 (SPD 2007) to create the page layouts and master pages against a live Publishing site.
Create page layouts and master pages outside of the live Publishing site with SPD 2007, Visual Studio 2005, or another editor, and upload the files to the Master Page Gallery through the SharePoint browser interface.
Create page layouts and master pages using the same tools listed in the previous option, but add these files to the Master Page Gallery using XML files containing
<Module>nodes included in element manifest files within SharePoint Features.
As with site columns and content types, the first option listed (using SPD 2007) is the most documented and commonly used approach to creating page layouts and master pages. Because of its popularity, it, too, is referred to as the conventional approach in this chapter.
At this point, the infrastructure of the content pages has been defined, and the layout files have been created and added to the Publishing site. Typically, this is where the available documentation ends. Although this is enough information to get a site created, it stops well short of what is needed in the real world. Unfortunately, developers, designers, and project owners are left to figure out the best way to move all this work from the developer's workstations to a central development build server, and then progress through the typical development environment: from build to user acceptance testing to staging and, ultimately, to production.
The conventional approach, as the previous section outlined, leaves those with the responsibility of creating and managing Publishing sites to craft their own policies and procedures to move the infrastructure components (site columns and content types) and layout files (page layouts, master pages, images, CSS, script files, and so on) in a project between developers and environments. Unfortunately, the conventional approach has many challenges associated with it. This section examines the most significant challenges.
Content types are used in a MOSS Publishing site to define the schema (or the type of content that can be saved) on a specific page layout. Each content type contains site columns that define the individual kinds of content the content type supports. The site columns and content types make up the core Publishing site infrastructure.
As previously discussed, the conventional approach to creating and managing content types and site columns is by using the SharePoint browser interface. This is by far the easiest and quickest way to manage site columns and content types. This method is fine when developing a Publishing site in a development environment, but what happens when the content types and site columns must be moved into another environment (such as another project team member's development machine, or the central development machine)? What happens when the content types and site columns must be implemented in the test, staging, or production environment?
One option is to re-create the site's infrastructure components manually using the SharePoint browser-based interface. This is obviously not ideal, because it is tedious, error-prone, and not automated. Another option would be to use the content deployment capabilities in Publishing sites to move the infrastructure to another environment. This is not an ideal option either, because content deployment is not intended to move site columns and content types between environments; its primary purpose is to move content from staging environments to production environments.
Another option is to write custom code that uses the SharePoint object model to analyze one Publishing site's infrastructure, and dynamically either create or modify another Publishing site's infrastructure. Although this option offers the most granular control over implementing changes to different environments, it is also potentially the least desirable because each implementation creates more custom code that must be tested and maintained.
Clearly, though the conventional approach of creating a Publishing site's infrastructure is very easy using the provided SharePoint browser interface, it has its downsides.
With the site columns and content types created, the next step is to build the user interface part of a Publishing site. The user interface component of a Publishing site is implemented with page layouts, master pages, images, CSS, client-side script files, and other types of media files (Flash, Windows Media, and so on).
As previously discussed, the conventional approach to authoring page layouts and master pages (including the ancillary supporting media files) promotes the use of SPD. Using SPD, developers can author and preview master pages and page layouts in a rich designer, similar to the ASP.NET designer in Visual Studio 2005. Developers can easily create new master pages and page layouts, drag-and-drop field controls from associated content types from a tool window onto a page layout, create new Web Part zones and add default Web Parts to zones, and utilize rich navigation and preview functionality when editing CSS or inline styles.
Just like the site infrastructure issue, this method will work just fine in a development environment, but what happens when the layout files must be migrated to another environment? How are changes to the layout files migrated from development to testing, then to staging and, ultimately, into the production environment?
The conventional approach promotes the use of SPD to make the changes to each file manually, live in each environment. This is not ideal, because developers and designers will need to have contributor-level access in each of the environments, including production, to implement the changes. Such access is typically not permitted in most organizations because of the inherit risks and lack of a strict change control process.
Another challenge with the conventional approach is that making changes using SPD customizes pages. It is important to understand how SharePoint stores pages, and what the terms customized and uncustomized mean when referring to pages in SharePoint.
Customized pages can pose a challenge in a production environment for a large organization. For example, consider if an organization wants to implement a rebranding campaign. If pages have been customized, this means that each customized page on each and every site must be updated using SPD, or using the SharePoint Application Programming Interface (API) to update the page in each site's content database. A rebranding campaign would be much easier to implement if the files resided on the SharePoint WFE server's file system where it is easier to deploy multiple modified files to various locations at once, just like a typical ASP.NET application.
As in the site infrastructure discussion, moving layout files between environments can also be achieved using MOSS's content deployment capabilities. However, just as in the site infrastructure discussion, this is not ideal, because content deployment is not intended to move files between environments; content deployment is ideally used to move content (such as page instances and images) between environments.
Although the challenges outlined in this section may make it seem as if there are not any good options when it comes to developing a Publishing site the proper way, this is certainly not the case. In the remaining sections of this chapter, an alternate method is presented, as well as guidance on how to implement it in your Publishing site development environment. Though it may seem a bit tedious at first, consider the gains over the long-term life of your project, and the time and manageability savings will be evident.
So far, this chapter has covered the challenges associated with developing a Publishing site using the conventional approach, which involves using the SharePoint browser interface to create and manage the site infrastructure (site columns and content types), as well as using SPD to create and manage layout files (master pages, page layouts, images, CSS, and so on). Though the conventional approach is by far the most documented and advocated approach to developing a Publishing site, it is not the only option, nor is it the best option. Another (and arguably better) option is to leverage the Feature and solution framework, a new addition in WSS v3.
Before diving into the solution, it is important to have an understanding of the Feature and solution framework.
Before explaining what Features and solutions are, it helps to understand why they were introduced in WSS v3. When a site was created in WSS v2, it was not easy to add new functionality to the site at a later date without writing some custom code to implement the changes. In addition, when some sort of functionality was reused across multiple site definitions or site templates in WSS v2, the functionality was literally copied to each site definition or site template. This meant there was no such thing as code reuse in WSS v2 when it came to site definitions and site templates.
A classic example of this is a list definition. Many site templates used the Tasks list definition. However in WSS v2, to make this work, Microsoft had to copy the Tasks list definition into each site template configuration. In addition, if a site was already created, there was no easy way to add a new (or updated) list definition to previously provisioned (created) sites.
Another challenge in WSS v2 was the deployment of custom code and files. The deployment of Web Parts was handled by creating *.CAB files and adding them to each site using the SharePoint command-line administration utility STSADM.EXE. Web Part developers could also package custom Web Parts into a *.MSI using the WPPackager utility, but this utility had known issues and Microsoft pulled support for it even before WSS v3 was released. However, there was no method other than copy-and-paste to deploy new site definitions, site templates, or list templates, to name a few.
Microsoft introduced the concept of Features in WSS v3 to address a few issues in previous versions of SharePoint. Put quite simply, a Feature reduces the need for duplicating functionality or site customizations across multiple site definitions and templates. In addition, Features can be activated or deactivated on specific sites after they have been created, adding or removing functionality or customizations at any point in the site's lifetime. WSS v2 had no such included vehicle to add functionality to existing sites.
Features can be used to add various types of functionality to a site, as well as implement site customizations. Table 4-1 lists the various ways Features can be used in WSS v3.
Table 4.1. Feature Capabilities
Description | |
|---|---|
Content Type | Define a content type that can be applied to list definitions or existing lists. Features can also bind content types to existing list templates. |
Controls | Define and register user controls in an already defined delegate control on a Web page. Used to replace existing controls, such as the out-of-the-box search control with a custom user control. |
Custom Actions and Groups | Create (or hide) new menu items within one of many predefined menus: site actions, Content Type settings page, Site Settings page, Edit Control Block menu (ECB menu, the drop-down menu actions that appears on items in a list), toolbar buttons on New/Edit/Display toolbars, and so on. Also enables the creation of custom action groups. |
Event Receivers | Register an event receiver with a specific event on SharePoint lists and sites. |
Document Converter | Define an executable that takes a file from one list and creates a different file in another list. |
Feature Receivers | Define and register custom code to handle Feature events such as installed, activated, deactivating, and uninstalling. |
Field | Define a new field definition (also known as a site column) that can be used in new or existing lists and content types. |
List Templates and Instances | Register a new list template definition, or create an instance of a list based on an existing template definition. |
Module | Provision files into SharePoint lists, libraries, or other files that are simply added to a site. |
Site Definition or Template Association | Bind a Feature to a specific site definition or template (also known as stapling). Once a Feature is bound to a site definition or template, it is automatically activated when a site is created, based on the definition or template. |
Workflow | Register a custom workflow in the Workflow Gallery to be used in new or existing lists. |
As Table 4-1 outlines, SharePoint developers now have a very powerful tool to implement new functionality and site customizations not only to new sites, but also to existing sites that have already been provisioned using Features. This chapter does not go into granular detail on all the capabilities of Features. Rather, it focuses on a select few: content types, fields, and modules.
To address the issue with deploying custom code, files, and other components to SharePoint implementations, Microsoft added the solution framework to WSS v3. Using the solution framework, developers can deploy custom components such as Web Parts, Features, site definitions and templates, custom code access security (CAS) policies, and assemblies to a specific SharePoint site's BIN directory or to the global assembly cache (GAC).
A solution file, called a Windows SharePoint Package (WSP) file, is essentially a cabinet (*.CAB) file with a *.WSP extension. The solution framework is based on similar functionality that was included in WSS v2: *.STP files. As previously mentioned, WSPs also now serve the same purpose as Web Part Package (*.WPP) files as well in WSS v3.
Each solution file is composed of a single manifest file and one or more content files. The manifest file (manifest.xml located in the root of the *.WSP file) contains a list of everything included in the solution (such as Web Parts, resource files, Features, site definitions and templates, and assemblies). The solution framework uses this file to determine what to do with all the files included in the *.WSP file.
Once a solution is created, the SharePoint farm administrator adds it to the farm's solution store. This can only be done using the SharePoint command-line utility STSADM.EXE. If the solution package were named Sample.wsp, the command to add it to the SharePoint farm's solution store would be the following:
stsadm.exe -o addsolution -filename sample.wsp
With the solution package added to the SharePoint farm's solution store, it can now be deployed. Deployment can be triggered in one of two ways:
Central Administration — SharePoint administrators can deploy solutions from Central Administration. Open Central Administration, select the Operations tab, and under the Global Configuration section, select Solution Management to deploy, retract, and remove solutions.
Command line — Administrators can also deploy solutions using the
STSADM.EXEcommand-line utility with the following command (this command deploys a solution to all SharePoint sites in a farm):stsadm.exe -o deploysolution -name sample.wsp -allcontenturls
Finally, if a SharePoint farm has multiple load-balanced WFEs, the solution framework will deploy the solution package to each WFE that is hosting the SharePoint site the solution is deployed to. In addition, SharePoint solutions are easily retracted once a solution has been deployed.
Features and solutions each individually bring many benefits and improvements to the WSS v3 platform, but when used together, they provide an entirely new set of capabilities that can be used to solve common SharePoint development challenges.
Using Features and solutions, SharePoint developers can package multiple SharePoint components into a single portable file that can be easily shared with developers on the same team, as well as deploying the new application or functionality to a central build server, or user acceptance environment, or, ultimately, into production. These solutions can be as big or as small as desired, and not all solutions must be used in all environments on a project. Some solutions may be small enough to simply serve the purpose of sharing a few new files with the rest of a development team. In a way, the combination of the Feature and solution frameworks acts as SharePoint's own installer infrastructure.
Going back to the discussion on the conventional approach to creating the site infrastructure (site columns and content types) and layout files (master pages, page layouts, images, and so on), remember that most of the issues associated with the conventional approach are centered around many manual steps. If the combination of Features and solutions can be thought of as an installer infrastructure for SharePoint, could these same frameworks be used to eliminate many of those manual tasks in the conventional approach? They sure can!
Remember from the earlier discussion about the conventional approach that both site infrastructure and layout files can be implemented with XML files in Features. Among their various capabilities, Features can be used to create site columns (also known as fields), content types, and provision files. Using these capabilities, developers can create a Feature (or multiple Features) that create the site infrastructure (site columns and content types) and layout files (master pages, page layouts, and so on), package up the Feature(s) into a solution file, and share it with other development team members, or hand it off to environment administrators to implement the changes to the production systems.
The ideal way to implement a Publishing site's site columns, content types, and add files (also called file provisioning) is using a Feature(s) and deploying the Feature(s) with solutions. Quite simply, it offers developers the most granular control and the easiest way to implement the necessary elements in various environments.
All files used in the following demonstration are available for download from
www.wrox.com.
The first step in this alternate approach is to create a Feature. To create a Feature, create a new directory named AlternativeApproach in the following location:
C:Program FilesCommon FilesMicrosoft Sharedweb server
extensions12TEMPLATESFEATURES.
All Features must contain a Feature definition file, so create a new XML file in Visual Studio 2005 named feature.xml and save it in the AlternativeApproach directory.
With feature.xml open in Visual Studio 2005, add the following code to the file to create the Feature definition. (Table 4-2 contains a list of the most common attributes used in the <Feature> node.)
<?xml version="1.0" encoding="utf-8"?>
<Feature xmlns="http://schemas.microsoft.com/sharepoint/"
         Id="6B0480D2-009A-49c1-9DCB-EBF5F7358873"
         Title="Alternative Approach Feature"
         Description="Creates site columns, content types, a master page, and page
layouts for a Publishing site."
         Scope="Site"
         Hidden="FALSE">
</Feature>
Table 4.2. Feature Element's Attributes
Only one attribute needs to be highlighted here: Scope. When creating site columns and content types, Scope can be Site or Web. However, when provisioning files, it should be Site.
For more information on the
<Feature>node schema, refer to the following MSDN documentation:http://msdn2.microsoft.com/en-us/library/ms475601.aspx.
With the shell of a Feature created, the next step is to create an element manifest file that will create a site column. Create a new XML file in Visual Studio 2005 named SiteColumn.xml and save it in the AlternativeApproach directory.
Then, add the element manifest file to the Feature by adding the following code between the <Feature></Feature> tags in the feature.xml file:
<ElementManifests>
  <ElementManifest Location="SiteColumn.xml"/>
</ElementManifests>
Next, add the following code to SiteColumn.xml that will create the site column when the Feature is activated. (Table 4-3 contains a list of the most common attributes used in the <Field> node.)
<?xml version="1.0" encoding="utf-8"?>
<Elements xmlns="http://schemas.microsoft.com/sharepoint/">
<Field ID="{C3AA9C21-81F7-41d7-B5A5-CBEB40768C46}"
         Name="AlternateApproachColumn"
         DisplayName="Alternate Approach Column"
         Group="WROX"
         Type="Text" />
</Elements>
Table 4.3. Field Node's Attributes
Description | |
|---|---|
| Unique ID (a GUID with brackets) of the site column. This is required. |
| Unique name for the new site column. This is the internal name used by SharePoint to uniquely identify the column within a list. This value will never change. This is optional. If not specified, the |
| The user-friendly name of the column that appears in the SharePoint browser-based interface, such as the column name when a list is displayed in table format. This is optional. |
| Specifies the site column group that the site column will be added to. This is optional. |
| The data type of the field. |
For more information on the
<Field>node schema, refer to the following MSDN documentation:http://msdn2.microsoft.com/en-us/library/ms437580.aspx.
The next step is to add a content type to the Feature. Create a new XML file in Visual Studio 2005 named ContentType.xml and save it in the AlternativeApproach directory.
Then, add the element manifest file to the Feature by adding the following code between the <ElementManifests></ElementManifests> tags, just after the existing <ElementManifest> tag in the feature.xml file:
<ElementManifest Location="ContentType.xml"/>
Next, add the following code to ContentType.xml that will create the content type when the Feature is activated. (Table 4-4 contains a list of the most common attributes used in the <ContentType> node.)
<?xml version="1.0" encoding="utf-8"?>
<Elements xmlns="http://schemas.microsoft.com/sharepoint/">
  <ContentType
ID="0x010100C568DB52D9D0A14D9B2FDCC96666E9F2007948130EC3DB064584E219954237AF3900213
FEEC23C37400bBEC425C10E76F37F"
               Name="Alternate Approach Content Type"
               Group="WROX">
<FieldRefs>
<FieldRef ID="{C3AA9C21-81F7-41d7-B5A5-CBEB40768C46}"
Name="AlternateApproachColumn" />
</FieldRefs>
</ContentType>
</Elements>For more information on the
<ContentType>node schema, refer to the following MSDN documentation:http://msdn2.microsoft.com/en-us/library/aa544268.aspx.
Two things need some explanation in the preceding code snippet.
First, the content type ID is a unique ID that every content type requires. Every content type must inherit from another content type; no content type can exist without a parent. The first part of the content type ID (up to the third instance of 00) represents the ID of the content type's parent. In the preceding code snippet, this is the Page content type that is created by MOSS when provisioning a new Publishing site. The latter part of the content type ID (00213FEEC23C37400bBEC425C10E76F37F) is what makes this content type unique from other content types.
For more information on content type IDs (a complex subject), refer to the following MSDN documentation:
http://msdn2.microsoft.com/en-us/library/aa543822.aspx.
Second, note that the <FieldRef> node's ID and Name attributes are the same as the site column previously created. This is how a site column is added to a content type.
Now that the site infrastructure components have been created and added to the Feature, the next step is to create the element manifest file that will provision the master page and page layout, each using a specific preview image. Create a new XML file in Visual Studio 2005 named ProvisionFiles.xml and save it in the AlternativeApproach directory.
Then, add the element manifest file to the Feature by adding the following code between the <ElementManifests></ElementManifests> tags, just after the existing <ElementManifest> tag in the feature.xml file:
<ElementManifest Location="ProvisionFiles.xml"/>
Next, add the following code to ProvisionFiles.xml that will provision the files when the Feature is activated. (Table 4-5 contains a list of the most common attributes used in the <Module> node, and Table 4-6 contains a list of the most common attributes used in the <File> node.)
<?xml version="1.0" encoding="utf-8"?>
<Elements xmlns="http://schemas.microsoft.com/sharepoint/">
  <!-- provision master page -->
  <Module Name="WROXMasterPages"
          Url="_catalogs/masterpage"
          Path=""
          RootWebOnly="TRUE">
    <File Url="ACminimal.master"
          Type="GhostableInLibrary">
      <Property Name="ContentType"
                Value="$Resources:cmscore,contenttype_masterpage_name;" />
      <Property Name="PublishingPreviewImage"
                Value="~SiteCollection/_catalogs/masterpage/Preview
Images/wrox.jpg, ~SiteCollection/_catalogs/masterpagePreview Images/wrox.jpg" />
      <Property Name="Description"
                Value="Provisioned from the AlternativeApproach Feature. "/>
    </File>
  </Module>

  <!-- provision page layout  -->
  <Module Name="WROXPageLayouts"
          Url="_catalogs/masterpage"
          Path=""
          RootWebOnly="TRUE">
    <File Url="AltApproachPageLayout.aspx"
          Type="GhostableInLibrary">
      <Property Name="ContentType"
                Value="$Resources:cmscore,contenttype_pagelayout_name;"/>
      <Property Name="PublishingAssociatedContentType"

Value=";#$Resources:cmscore,contenttype_articlepage_name;;#0x010100C568DB52D9D0A14D
9B2FDCC96666E9F2007948130EC3DB064584E219954237AF3900242457EFB8B24247815D688C526CD44
D;#"/>
      <Property Name="PublishingPreviewImage"
                Value="~SiteCollection/_catalogs/masterpage/Preview
Images/wrox.jpg, ~SiteCollection/_catalogs/masterpagePreview Images/wrox.jpg" />
      <Property Name="Description"
                Value="Provisioned from the AlternativeApproach Feature"/>
    </File>
  </Module>
  <!-- provision preview image -->
  <Module Name="WROXPreviewImages"
          Url="_catalogs/masterpage"
          Path=""
          RootWebOnly="TRUE">
    <File Url="wrox.jpg"
          Name="Preview Images/wrox.jpg"
          Type="GhostableInLibrary"/>
  </Module>
</Elements>
Table 4.5. Module Node's Attributes
Description | |
|---|---|
| Name of the file set. This is required. |
| Address of the folder, relative to the top-level Web in the site collection, where the files in the set will be provisioned. This is optional. |
| Address of the folder, relative to the |
| When set to |
Table 4.6. File Node's Attributes
Attribute | Description |
|---|---|
| Path to the file. This is combined with the |
| When provisioning files, this should always be set to |
In the preceding code snippet, notice that the master page is provisioned, followed by the page layout, and finally the preview image used by both files is added to the site. Each <Module> node contains at least one <File> node, which contains optional <Property> nodes.
The <Module> node, signifying a file set, contains a few attributes that define the common aspects of the file set. The Url attribute specifies the target SharePoint library where the files in the set should be provisioned. Path is the local, Feature-relative path where the files are located. In the case of the Feature in the preceding code, because all files are in the root directory, no path is necessary. If the master page and page layout were in the LayoutFiles directory within the Feature, Path would be set to LayoutFiles. The last attribute, RootWebOnly, specifies that the files are provisioned only in the top-level Web of the site collection the Feature is activated in. In the case of Publishing sites, RootWebOnly should always be set to True.
For more information on the
<Module>node schema, refer to the following MSDN documentation:http://msdn2.microsoft.com/en-us/library/ms434127.aspx.
Modules are essentially file set groupings. Each <Module> node contains one or more <File> nodes. All files in a set will follow the directives set in the set they belong to, defined in the <Module> node. The Url attribute specifies the location of the file in the feature. This is combined with the Path attribute defined in the <Module> that contains the <File> node.
Although optional, the other attribute that should always be included in the <File> node is Type, which, when specified, dictates the file should be cached in memory on the SharePoint WFE server, regardless of the value. There are two possible values for Type: Ghostable and GhostableInLibrary. Ghostable is used when files are not stored in a library or gallery. In the case of a Publishing site, when provisioning files, this value should never be used because master pages, page layouts, images, CSS — they will all reside in a library in the top-level Web of the Publishing site collection. Therefore, always specify GhostableInLibrary here.
For more information on the
<Module>node schema, refer to the following MSDN documentation:http://msdn2.microsoft.com/en-us/library/ms459213.aspx.
<Property> nodes are contained within <File> nodes. These elements are used to specify the value of the fields within the SharePoint library the file is provisioned into. For example, for the master page and page layout files in the previous code snippet, three properties are specified:
ContentType— This value specifies the content type of the item. For master pages and page layouts, developers should use localized values. The master page localized value is$Resources:cmscore,contenttype_masterpage_name;and the page layout localized value is$Resources:cmscore,contenttype_pagelayout_name;.PublishingAssociatedContentType— This is the content type that is associated with the page layout. The associated content type is the content type that defines the schema of the page. The value contains a delimited string, which includes the name of the content type as well as the content type ID.PublishingPreviewImage— This is the value where the preview image can be found. The field type of thePublishingPreviewImagefield is of typeURL. This explains why the preview image value is specified as a comma-delimited string with two values. One value is used as the description for the URL, and the other is used for the target. In the previous code snippet, the same address was used for both values, so content owners and administrators can easily identify where the image is located.The address of the preview image is pointing to the image that is provisioned at the end of the code snippet.
Description— This field is used to enter a user-friendly description of the file.
Notice that no properties are specified for the preview image provisioning. None are required, and in this demonstration, none were specified to simply add variation to the code snippet.
At this point, the Feature is ready for deployment. The following test assumes a Publishing Portal site has been created with the URL of http://wrox.
First, the Feature must be installed. Open a command prompt and navigate to the following directory:
C:Program FilesCommon FilesMicrosoft Sharedweb server extensions12BIN
Now, install the Feature by entering the following in the command line:
STSADM.EXE -o installfeature -name AlternativeApproach
STSADM.EXE should have returned the message Operation completed successfully. The next step is to activate the Feature. This can be done in one of two ways.
First, the user can browse to the top-level Web in the site collection, browse to the Site Settings page, and select Site Collection Features from the Site Collection Administration group. From the Site Collection Features page, click the Activate button for the specific Feature.
The other way to deploy the Feature is with STSADM.EXE:
STSADM.EXE -o activatefeature -name AlternativeApproach -url http://wrox
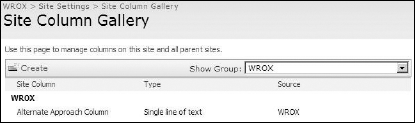
Again, STSADM.EXE should have returned the message Operation completed successfully. To verify everything worked correctly, navigate to the Site Settings page for the top-level Web in the site collection. First, verify the site column was created by selecting site columns from the Galleries group. Use the Show Group selector to filter on the group WROX. The single site column specified in the Feature should be listed, as shown in Figure 4-1.
Next, verify the content type was created by selecting "Site content types" from the Galleries group on the top-level Web in the site collection's Site Settings page. Use the Show Group selector to filter on the group WROX. The single content type specified in the Feature should be listed, as shown in Figure 4-2.
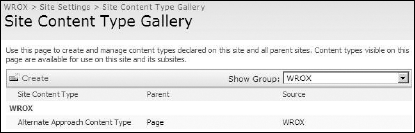
Select the content type by clicking its name. The list of columns should contain many columns coming from the source System Page. However, there should be one more column with no source listed: Alternate Approach Column Type — the one created in the Feature!
Finally, verify that the three files were successfully provisioned. Select Content And Structure under the Site Administration group on the top-level Web in the site collection's Site Settings page. Navigate to the Master Page Gallery. Most likely near the bottom of the list, the master page and page layout should be listed, as shown Figure 4-3.
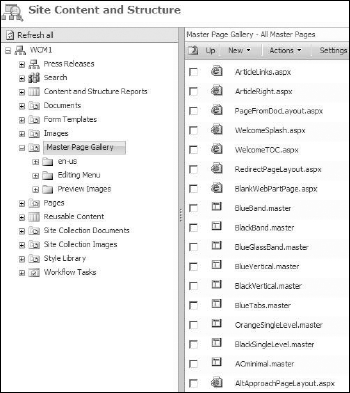
Notice there is a new subfolder in the Master Page Gallery: Preview Images highlighted in Figure 4-3. This did not exist prior to activating the Feature. Because the Feature specified the preview image should be placed the Preview Images directory within the Master Page Gallery, SharePoint automatically created the folder for you!
This concludes the demonstration that has shown how to use Features to create site columns, content types, and provision layout files into a Publishing site.
As with any process, there are advantages and disadvantages to using Features and solutions to implement a Publishing site's infrastructure and layout files. Regardless of the advantages and disadvantages of this approach, this is still the most preferred method in the development of a Publishing site. Before walking through a demonstration of this approach, let's cover the positives and negatives when following the guidance outlined in this chapter. The following two sections extrapolate the disadvantages and advantages to this approach.
Even though the approach of using Features and solutions for implementing a Publishing site's infrastructure and layout files is recommended, it does have a few drawbacks.
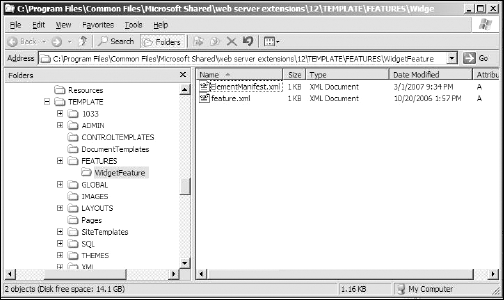
First and foremost, Features are tedious to build. At a minimum, all Features must live in a subdirectory within the directory where all SharePoint Features reside (C:Program FilesCommon FilesMicrosoft Sharedweb server extensions12TEMPLATESFEATURES) and contain a definition file (feature.xml) that specifies the ID, name, description, and scope of the Feature, as shown in Figure 4-4. Typically, the Feature definition file also contains references to element manifest files that define the actions to perform on the Feature. The element manifest file is where the site column, content type, and provisioning of files is defined.
Features are also nearly all XML, with exception of the resource files that are referenced by the Feature such as an assembly. Unfortunately, no Feature or solution designer is available, so all XML files must be created by hand. The same is true for the solution manifest.xml file required in all *.WSP files. This drawback is somewhat mitigated because Microsoft provides an XML schema file that adds IntelliSense when editing files in Visual Studio 2005. Enabling IntelliSense for SharePoint-based XML files in Visual Studio is covered in the section, "Tips, Tricks, and Traps," later in this chapter.
Once a Feature has been deployed to the SharePoint Features directory, the next step is to install and activate it. If there are any syntax errors in the XML files or other random problems, SharePoint will fail to install/activate the Feature and return an error message. Many times, this error message does not provide enough detail to effectively troubleshoot the problem. Unfortunately, no mechanism exists that allows you to perform rich debugging when installing or activating a Feature (such as applying breakpoints and watches that are familiar to .NET developers in Visual Studio). The same is true when adding solutions to the SharePoint farm's solution store.
When encountering troubling errors in solutions and Features, you should cut out pieces of XML, and then repeat the installation or activation of the Feature or solution. Eventually, the error will disappear, providing a hint to the problem area. Once the error has been resolved, add the cut-out sections of XML back to the files and repeat the installation/activation process. This process is also referred to as Pac-Man Debugging because sections of XML are removed until the error disappears, then they are added back one piece at a time.
Provisioning files into a Publishing site has its drawbacks as well. First, a developer must create a user interface for the site and pull everything together, adding images to master pages and page layouts, incorporating CSS, and writing any custom client-side script necessary to implement the user interface. Only after the site has been completed can the Feature(s) be created that will provision the files. This introduces a bottleneck into the process, because one step cannot be implemented until the previous step is complete.
In addition, this requires that files be created in one environment (SPD and a live Publishing site), then saved locally to the developer's workstation to create the file-provisioning Features. This results in a pseudo-double development because files are created in one environment, then duplicated in another environment.
When activating a Feature that provisions files, creates site columns, and creates content types, each of these different actions adds information to the specified Publishing site. Conventional wisdom would be that when these Features were deactivated, everything they added to the site would be removed. Unfortunately, conventional wisdom does not prevail in this case.
Generally speaking, SharePoint does not remove data that was added to a site via Feature activation when that Feature is deactivated. This means that simply deactivating a Feature does not remove all the master pages and page layouts that were added to the Master Page Gallery. The files are not locked where they were provisioned. Files can still be removed manually via the SharePoint browser interface, or by writing custom code that utilizes the SharePoint object model.
The same is true for site columns and content types under certain circumstances. For example, if a content type has not been added to any lists, it will be removed. However, if the content type has been added to a list, deactivating the Feature that created it will not remove it from the site because the content type is technically in use. Site columns work the same way. If they are used in a list or in a content type that has been added to a list, they will not be removed when the Feature that created them is deactivated. However, if the site column is not used anywhere on the site, it will be removed when the Feature is deactivated.
With the negatives out on the table, let's take a look at some of the advantages this approach carries with it. Arguably, the advantages outweigh the disadvantages when you consider the productivity gains and, more importantly, the maintenance of a Publishing site well beyond the "go-live" milestone.
When files are provisioned into a Publishing site using Features, they are added to the various lists and libraries as GhostableInLibrary (this is one option, defined in the element manifest file within the Feature). This creates an entry in the target list or library for the file, but it tells SharePoint that the contents of the file are actually on the file system, not in the database. Therefore, the file is added to the Publishing site as an uncustomized file.
What if someone wants to open the file in SPD and make changes to it? No problem, that is completely supported and possible. The only difference between editing files using SPD when the file has been provisioned with a Feature and when a file is originally created in SPD is that SharePoint will switch the provisioned file from uncustomized to be customized instead of the SPD-created file, which started out customized. To the developer, there is no difference.
Uncustomized files are preferred in most cases. Consider a single master page that is used by three different sites. If the master page were created using SPD, it will exist as three different instances within SharePoint (one copy in each Publishing site's content database). However, if the master page was provisioned to each site using a Feature, three records would exist (one in each Publishing site's content database), but all would be pointing to the same physical file in the Feature. In the future, if the organization needs to update the master page, in the first case, developers would need to update three different files using SPD. In the latter case, only one file would need to be updated in the feature.
A common misperception with uncustomized files is they are much faster than customized files because they live on the file system rather than in a SharePoint site's content database. Thus, the misperception continues that uncustomized files eliminate the need to hit the database. This is not true, because SharePoint must go to the database to determine if the file is customized (and lives in the database) or uncustomized (and lives on the file system) regardless.
An obvious benefit to packaging files, assemblies, and Features into solutions is that it is very easy to deploy these grouped files to multiple sites with a single operation. Once the solution has been added to the SharePoint solution store, farm administrators can deploy the solution to one or all SharePoint sites in the farm very easily via SharePoint's Central Administration site.
Another added benefit is that the solution deployment mechanism is smart enough to deploy the solution to all Web applications if a specific site collection has been extended to multiple zones using Alternate Access Mappings (AAMs).
Once a site collection is created, administrators can extend the existing Web application where the site collection resides with a new Web application. This new Web application is assigned a specific zone (such as Internet, Intranet, Extranet, or Custom). Each zone is then accessible using a different URL. The benefit to using multiple zones and AAMs is that each zone can leverage unique authentication providers. The Default zone can be configured to only permit authenticated users, authenticating against Active Directory, whereas the Internet zone would leverage Forms Based Authentication (FBA) and allow anonymous users. Both zones would point to the same site collection, meaning the site is now exposed to two types of users, as well as anonymous users!
When a solution is deployed to a Web application that leverages multiple zones via AAM, SharePoint will automatically deploy the solution to each Web application. Why is this important? Consider if the solution contained a Web Part with an assembly deployed to the site's BIN directory. If the Web application has been extended to more than one zone, the solution deployment mechanism will deploy the assembly to both Web applications' BIN directory, add the <SafeControl /> entry to both Web applications' web.config file, and add the Web Part's *.webpart file to the wpcatalog directory in both Web applications. If this were not the case, either manual steps would be necessary to avoid errors on one of the zones, or the solution would need to be deployed twice.
Files, assemblies, and Features packaged into solution files make it very easy to quickly distribute multiple changes to an environment. This approach is beneficial for moving custom solutions from a developer's workstation to a central, shared development environment, a user acceptance testing environment, a staging environment, or eventually into the production environment.
In addition, if the development team subscribes to the isolated development model (where each developer works against an individual copy of the environment) rather than a shared development environment, solutions make it much easier for one developer to share the latest updates with the rest of the development team. One developer can share a solution package with other developers on the team, and everyone can quickly incorporate the changes by either adding the solution to the solution store, or upgrading it if the solution is an update to a previously deployed version.
Using a solution to share project and code updates is much easier than sending multiple files in a ZIP, or as a loose collection with a long and detailed installation script.
The conventional approach to building a Publishing site does not yield itself to being incorporated into a source control management (SCM) solution such as Microsoft's Visual Source Safe (VSS), Microsoft Team Foundation Server (TFS), or the Open Source Subversion, to name a few of the more popular options. The tasks that are typically implemented using the SharePoint browser interface (such as creating site columns and content types) have no source or version control built in. There is no way to make batch changes to multiple content types at once, nor is there a facility to revert back to a previous version of the site column or content type.
Creating layout files using the conventional approach also does not allow for easy SCM integration. When a master page or page layout is modified in SPD, a new version is created. Though this does allow developers to view or revert to previous versions and track who made the changes, as well as when those changes were made, this is not true source control — it is simply version control. Version control does not offer things such as branching and labeling (also known as tagging in some SCM implementations), or atomic commits (committing multiple files as a single check-in, all adopting the same check-in comment) — things that are included as core functionality in SCM implementations.
The development approach outlined in this chapter is founded on using Features to do all the work of creating the site infrastructure and layout files. Because Features are just a collection of files and folders, they can be added to any source control solution and fully leverage atomic commits, branching, labeling/tagging, and all the other capabilities of today's robust SCM solutions. Putting the source for creating site columns, content types, and provisioning files in an SCM facilitates increased collaboration and control between development team members.
When creating site columns and content types using Features, developers have full control over the IDs and names of each component created. This is a huge advantage over creating these same components using the SharePoint browser-based interface.
For example, if a new site column called Street Address is created using the browser interface, the field is assigned an internal name of Street_x0020_Address. Any custom code that references this field must do so using this name, not Street Address. However, if the same site column were created using a Feature, the developer would have the option to specify the internal name of the site column as StreetAddress, a value much easier to remember and type.
After absorbing the development process outlined in this chapter, the advantages and disadvantages associated with it, and walking through a demonstration, it may look like a significant amount of additional work is required when compared to the conventional approach. Much of the additional work, and topics highlighted in the disadvantages section of the chapter, can be addressed with a few tips and tricks. However, this approach also introduces a few nuances that developers should be aware of.
This section introduces a few tips and tricks that developers can leverage to eliminate some of the additional work, as well as a few traps to watch out for.
One of the disadvantages previously covered is that the XML files that make up Features and solution package manifests are tedious to build. In addition, because of the lack of a designer and debugging support, typos can pose quite a problem.
Thankfully, Microsoft has shipped a fairly well flushed-out XML schema that, when added to XML files in Visual Studio 2005, adds IntelliSense to most SharePoint-related XML files. There are two ways to add IntelliSense to SharePoint-related XML files (such as the Feature definition file feature.xml or solution manifest file manifest.xml) in Visual Studio 2005:
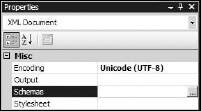
The first option is to add the SharePoint XML schema to an individual XML file. With an XML file open in the Visual Studio 2005 Code Editor, open the Properties tool window by selecting Properties Window from the View menu, or by pressing F4. Select the ellipsis for the Schemas field to open the XSD Schemas dialog, as shown in Figure 4-5.
In the XSD Schemas dialog, click Add... and browse to the SharePoint WSS.XSD file in the following location:
c:Program FilesCommon FilesMicrosoft Sharedweb server
extensions12TEMPLATEXMLwss.xsd
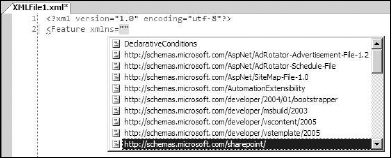
Click Open in the Open XSD Schema dialog, and then click OK in the XSD Schemas dialog. Now, the SharePoint XML schema has been added to the file. This is demonstrated by typing an opening XML bracket (<), which should trigger the IntelliSense to appear, as shown in Figure 4-6.

The downside to this approach is that it must be repeated for every single file.
The second option is to add the SharePoint XML schema to the Visual Studio 2005 XML Schema Cache. Every time Visual Studio 2005 loads, it loads the schemas defined in the XML Schema Cache automatically, eliminating the need to attach a schema for each and every file. To implement this preferred method, the SharePoint XML schema must be added to the Visual Studio 2005 Schema Cache.
Using Windows Explorer, navigate to the following directory that contains the Visual Studio 2005 XML Schema Cache:
C:Program FilesMicrosoft Visual Studio 8XmlSchemas
Create a new file named sharepointcatalog.xml and open it in a text editor (such as Visual Studio 2005). Add the following code to the file:
<SchemaCatalog xmlns="http://schemas.microsoft.com/xsd/catalog">
  <Schema href="file://%ProgramFiles%/Common Files/Microsoft Shared/web server
extensions/12/TEMPLATE/XML/wss.xsd"
          targetNamespace="http://schemas.microsoft.com/sharepoint/"/>
</SchemaCatalog>
This file tells Visual Studio 2005 where the XML schema file is, and the namespace that utilizes it. If Visual Studio 2005 is open, close and reopen it because it only loads the XML Schema Cache when it starts up. Create a new XML file in Visual Studio 2005. To use the schema, a root node must exist that contains the XML namespace specified in the file added to the XML Schema Cache. This requires the developer know the root node for the SharePoint XML file that the developer is working in, and represents the only loss in functionality this method provides when compared to adding the XML schema to each file individually.
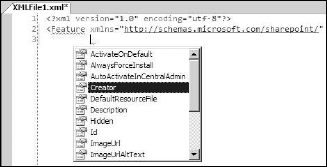
For example, if a Feature definition file were being created, enter the root node and specify the XML namespace, as shown in Figure 4-7.
Once the namespace is selected, the XML file will now have complete IntelliSense, as demonstrated in Figure 4-8.
WSP solutions are simply cabinet (*.CAB) files with a *.WSP extension. How do you build a cabinet file? Unfortunately, it is not as easy as it seems. Visual Studio 2005 includes a setup project template that you can use to include another project's output, but it has two limitations, one of which is very big:
The project will only generate
*.CABfiles. Even if the output has renamed the settings, it will always generate a*.CABfile.The project doesn't allow the creation of subdirectories in the
*.WSP, which localized deployments require.
Cabinet creation is not limited to the project template provided in Visual Studio 2005. Another option is to use MakeCab.EXE, included in the Microsoft Cabinet SDK, to generate WSP files (yes, the output filename can be specified using MakeCab.EXE).
The Microsoft Cabinet SDK is available for download at the following address:
http://support.microsoft.com/default.aspx/kb/310618.
MakeCab.EXE is a command-line utility that takes a few arguments. One argument is the name of a file containing the instructions for MakeCab.EXE (such as how to compress the files, subdirectories that should be created in the cabinet file, and the files that should be included in the cabinet, as well as which subfolders to add the files to). This file is a diamond directive file (*.DDF). Other arguments passed into MakeCab.EXE are parameters for things such as the name of the cabinet to create and where the file should be created.
Creating a cabinet file sounds tedious, and it is if you do it by hand. However, it can be automated by leveraging MSBuild, the workhorse behind the build process of Visual Studio 2005. Once a Visual Studio 2005 project is created, add a custom MSBuild targets file (which contains the instructions for MSBuild) to the project.
Entire books have been written about
MSBuild, and it warrants that, but details about it are beyond the focus of this chapter. For more information onMSBuild, refer to the documentation on MSDN (http://msdn2.microsoft.com/en-us/library/0k6kkbsd.aspx) or the officialMSBuildwiki onChannel9(http://channel9.msdn.com/wiki/default.aspx/MSBuild.HomePage).
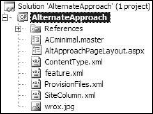
The first step is to create a new C# Empty Project in Visual Studio 2005. Next, add all files to be included in the Feature to the project (Figure 4-9). In this case, I'll use the Feature built previously in this chapter.
Every SharePoint solution file (*.WSP) must contain a manifest file, so add the manifest file to the project. This file includes all information about the solution, such as the location of the Feature definition file and all files required by the Feature. The next step is to create the diamond directive file (*.DDF) that contains the instructions for MakeCab.EXE to build the project and add it to the project. The following code snippet represents the contents of the *.DDF file for this project:
.OPTION Explicit
.Set DiskDirectoryTemplate=CDROM
.Set CompressionType=MSZIP
.Set UniqueFiles=Off
.Set Cabinet=On
;**************************************************
manifest.xml

.Set DestinationDir=AlternativeApproach
feature.xml
SiteColumn.xml
ContentType.xml
ProvisionFiles.xml
ACminimal.master
AltApproachPageLayout.master
WROX.jpg

;***End
Now, the custom MSBuild targets file must be added to the project. The following code snippet represents the contents of the *.targets file for this project:
<?xml version="1.0" encoding="utf-8" ?>
<Project DefaultTargets="BuildSharePointPackage"
xmlns="http://schemas.microsoft.com/developer/msbuild/2003.png">
  <PropertyGroup>
  <!-- assumes MSFT Cab SDK extracted to the following directory -->
    <MakeCabPath>"C:Program FilesMicrosoft Cabinet
SDKBINMAKECAB.EXE"</MakeCabPath>
  </PropertyGroup>

  <Target Name="BuildSharePointPackage">
  <!-- execute MakeCab from the command line, specifying necessary arguments -->
    <Exec Command="$(MakeCabPath) /F BuildSharePointPackage.ddf /D
CabinetNameTemplate=$(MSBuildProjectName).wsp /D DiskDirectory1=$(OutputPath)"/>
  </Target>
</Project>
The last step is to modify the project file to tell MSBuild to call the custom targets file. Right-click the project name in the Solution Explorer tool window in Visual Studio 2005 and select Unload Project. Now, right-click the project name in the Solution Explorer tool window and select Edit [project name].csproj. Make the following changes:
Change the
DefaultTargetsattribute in the opening node fromBuildtoSharePointFeaturePackage.On (or about) line 31, change the node's
Projectattribute toBuildSharePointPackage.Targets. This tellsMSBuildto use the targets file, not the C# targets file (usually used for compiling).
That's it! Save all changes, right-click the project in the Solution Explorer tool window, and select Reload Project. (If you are prompted with a security warning, select Load Project Normally and click OK.) Build the project (Shift+Ctrl+B). When the build is finished, in the project's BINDEBUG directory, there should be a file named [project name].wsp.
The development approach outlined in this chapter advocates using Features to create site infrastructure and layout files. This requires the creation of multiple XML files. Each XML file can grow to be quite large, increasing the probability of a typo or specifying an incorrect value. Compounding the problem is the fact that Feature installation and activation includes no debugging support, and this can turn into quite a daunting task. Another challenge is knowing which values to specify, and, as of this of writing, the SharePoint (both WSS v3 and MOSS 2007) SDK does not include granular detail on this (such as every attribute for the <Field> node when creating site columns or the <ContentType> node when creating content types).
Fortunately, SharePoint includes a very robust API that developers can use to obtain references to existing SharePoint objects as a point of reference. Developers can even create utilities that leverage the SharePoint API to make their lives easier, which provides a nice transition to the next trick!
The lack of a designer for the various XML files used in Features presents a challenge to creating element manifests that create site columns, content types, and the provisioning of files. XML files are not the only way to create site columns or content types, as covered in the overview of the conventional approach at the beginning of this chapter.
The SharePoint browser-based interface can be used to create site columns and content types. As the previous tip explained, SharePoint comes with a very robust API that enables developers to write custom code to obtain references to SharePoint objects — including site columns and content types! This means that developers are provided with a designer for creating the site infrastructure components right out of the box!
Now, all that is needed is a utility that can obtain a reference to a site column or content type, and create the XML element files used in Features to create the site infrastructure components. Instead of writing a new utility from scratch, why not leverage an existing one that every SharePoint installation already has out-of-the-box?
Microsoft extended the capabilities of the command-line utility STSADM.EXE to allow for custom commands in the WSS v3 release. Developers can now extend STSADM.EXE by adding custom commands to address specific administrative functions required by their organization.
Taking this approach, I've started a project called AC's WCM Custom Commands for STSADM.EXE. The goal of this project is to create a suite of commands targeted to SharePoint Publishing site developers that generates the XML element files used to create the site infrastructure. This allows developers to leverage the SharePoint browser interface to "design" the site infrastructure.
AC's WCM Custom Commands for STSADM.EXE is a free, Open Source project, available on my blog. The following URL contains links for downloading the latest release, as well as the source code and documentation for all the commands included in the project:
http://www.andrewconnell.com/blog/articles/MossStsadmWcmCommands.aspx.
Once site columns and content types are created using the browser, use the custom commands to generate the XML used in the element files within a Feature. The commands do not address every possible scenario; instead the approach of the project is to generate as much valid XML as possible. Developers would then use these files as starting points and edit them for their specific needs. Think of the project as following the 80-20 rule, where 80 percent of the work is automated, leaving only 20 percent for developer involvement.
Following this 80-20 rule, two of the custom commands in AC's WCM Custom Commands for STSADM.EXE generate the XML that can be used as a starting point for constructing a Feature that creates site columns (command: GenSiteColumnsXml) and content types (command: GenSiteContentTypesXml). Again, the XML generated by these commands is not intended to be dropped into a Feature right away. The contents of the XML must be inspected and tweaked to the desire of the developer. Not all code in the XML files is necessary, but it is certainly easier to cut code out than it is to write it; therefore, this is the approach I took with this project.
The project is by no means complete. It is in a constant state of revision and tweaking because I have many plans for future commands that will become part of the project.
When using the SharePoint API to analyze the properties of site columns, or using AC's WCM Custom Commands for STSADM.EXE, be aware that fields created using one of the Publishing field types do not expose their underlying type.
Site columns are represented as the object SPField in the SharePoint object model. The read-only property SPField.Type returns the underlying type of the field using the SPFieldType enumeration. The SPFieldType enumeration contains named constants for each of the out-of-the-box WSS v3 field types. Unfortunately, this list does not include the Publishing field types added when MOSS 2007 is installed.
When a site column is created using one of the Publishing field types, the SPField.Type property returns SPFieldType.Invalid because the actual field type is not an option in the enumeration. However, developers can obtain the actual field type. The public properties SPField.TypeAsString (the actual Publishing field type name) and SPField.TypeDisplayName (the display name of the Publishing field type) contain all the information needed to deduce the Publishing field type of the site column.
A list of all Publishing field types added to SharePoint when MOSS is installed can be found in the following file:
C:Program FilesCommon FilesMicrosoft Sharedweb server extensions12TEMPLATE
XMLfldtypes_publishing.xml
Each <FieldType> listed in the Publishing field types definition file contains the values contained in the SPField.TypeAsString and SPField.TypeDisplayName properties. The SPField.TypeDisplayName is actually obtained from a resource file installed when MOSS is installed. Table 4-7 displays the value in the SPField object, the value from the Publishing field types definition file, and the corresponding values for the Publishing HTML field type.
Table 4.7. SPField Object, Publishing Field Types, and Publishing HTML Field Values
SPField Property | SPField Property Value | Publishing Field Type Definition Node Name | Publishing Field Type Definition Value |
|---|---|---|---|
|
|
|
|
|
|
|
|
|
|
|
|
As is always the case in the process of developing an application, changes must be made to some of the objects created. To update a site column, the Feature should be deactivated, the element manifest is modified with the desired changes to the site column, and, finally, the Feature is reactivated.
However, at times, the changes to the site column are not reflected when the Feature is reactivated, even when using the optional -force switch to force all updates. It appears that, even though the Feature was deactivated and the site column was removed from the site, SharePoint has left an artifact or orphaned site column in the system, and future changes will not take effect, even though it does not appear anywhere on the site.
To get around this issue, add the attribute DisplaceOnUpgrade=TRUE to the <Field> node. This way, SharePoint will update the existing site column the next time it is activated.
Another method is to change the site column's ID, a GUID, when making other changes to the site column so that the next time the Feature is updated, SharePoint will see it as a brand new site column. Note that any content types referencing this site column must have their references updated as well. This is lesser preferred of the two options.
Once a Feature containing content types is activated, developers can update the Feature and reactivate it to make changes to the created content type. However, changes are not pushed down to other content types that inherit from the one being inherited, nor are the changes pushed onto lists where the content type has been added. The only content types updated are those that are not in use.
Unfortunately, this is a big hang-up for this approach. However, this limitation only exists when updating content types using Features. The SharePoint object model provides a method for updating content types, and forcing updates to cascade to other child content types and lists that contain the content types. Regardless, content type changes can still be implemented using the object model or via the SharePoint browser-based interface. This approach has an optional flag the individual can set if updating child content types and lists is desired.
After a comprehensive discussion on the conventional approach, the alternative development process, an examination of the advantages and disadvantages of this alternate process, as well as identifying some tips, tricks, and traps associated with it, you may be left wondering, "OK, so is this really a good idea?" I'm convinced this alternate development approach is how all Publishing sites should be created. Though there are some disadvantages to this approach as well as some pitfalls, the advantages mitigate virtually all of them.
How do I use this approach to developing a new Publishing site? Today, I use the SharePoint browser-based user interface to create all the site columns and content types necessary for a new site. Then, I leverage SPD to create all master pages and page layouts that will be used in the site. The most common question I hear when I describe this approach is, "Why do you use SPD for the creation of your master pages and page layouts?" Quite simply, it is much easier to drag-and-drop field controls, Web Part zones, and Web Parts onto page layouts, edit the CSS, and view the files in a live preview of the site using SPD. So, I'm effectively using the conventional approach for the first part of my development, and I stay in this phase for quite a while — until I feel my master pages and page layouts are essentially complete (minus a few tweaks here and there).
Next, I use my AC's WCM Custom Commands for STSADM.EXE utility to generate the site column and content type element manifest files for the site infrastructure components. I never use the full generated XML files. I edit them before adding them to a Feature for deployment. Then, I save all layout files, including master pages, page layouts, images, CSS, media files (movies or animations), and client-side script files, locally into a Feature that will provision all of them. Finally, I package both Features into a single SharePoint solution for deployment.
I recommend you use two different Features to create the site infrastructure and layout files. This way, you can be assured that the dependency that page layouts have on content types is addressed by first activating the Feature containing the site infrastructure, then activating the Feature containing layout files. This is the same approach Microsoft takes when creating a new Publishing site using the Publishing Portal site template. When the site is created, it activates a Feature (PublishingWeb) that does nothing but activate two other Features (PublishingSite and Publishing), both of which are hidden from the SharePoint browser interface. The PublishingSite Feature then activates four more Features, one of which contains the site infrastructure (PublishingResources) and another which creates the layout files (PublishingLayouts).
This chapter has presented an alternative approach to developing Microsoft Office SharePoint Server 2007 Publishing sites than that of the generally accepted conventional development approach. The conventional approach advocates using the SharePoint browser-based interface to create site infrastructure components (such as site columns and content types), and using Office SPD 2007 to create layout files (such as master pages and page layouts). Development teams usually run into challenges with this approach while implementing it in real-world projects when first attempting to replicate the site infrastructure and layout files from the development environment. After covering the challenges with the conventional approach to developing a Publishing site, a better approach is proposed.
The approach covered in this chapter advocates using Features to create site infrastructure components and layout files when developing Publishing sites. Arguably, there is more work associated with this approach, and much of it was outlined when the disadvantages were covered, specifically regarding double deployment and cleaning up artifacts left around after deactivating the Feature(s). However, the advantages covered provide enough proof that this process is worth the drawbacks. After a demonstration of the process, some tips, tricks, and traps associated with the proposed development approach were covered, arming developers with all the knowledge necessary to implement the process on their next Publishing site projects.
Finally, I offered some prescriptive guidance on how to best leverage this approach in your own development environment.