
The application menu, the Dock, the Help Viewer, and other features are all available to your Java application. If you want your application to look native, you can make it look and feel like any Cocoa or Carbon application.
You can do more than just make your Java application look and feel like Cocoa and Carbon applications. The com.apple.eawt package contains one class that allows you to embed native GUI widgets and interfaces directly into your JFrames and other Java Containers. This class is the CocoaComponent class.
The CocoaComponent integrates with native Objective-C GUI elements. The elements are Objective-C NSView objects. The native code you write instantiates an NSView and then passes the NSView reference back to the Java CocoaComponent. You place the CocoaComponent in the Java Container of your choice.
Using CocoaComponents requires knowledge of JNI, C, and Objective-C. Also, an understanding of the Cocoa framework is useful. I explain the JNI, C, and Objective-C code used in this and other chapters. I do not attempt to thoroughly teach C or Objective-C. Rather, I attempt to give you a basic understanding of C and Objective-C as it applies to implementing CocoaComponents.
I explain JNI on OS X more thoroughly in Chapter 9. Other chapters also use JNI as the basis of examples, such as screensaver integration and ncurses support. Apple suggests using JNI for Java interaction with native Apple technologies. Learning JNI opens many Apple technologies to your Java application development.
In this chapter, I explain basic JNI for the integration of CocoaComponents with Swing and AWT. I begin by explaining basic Java interaction with Objective-C objects by way of JNI. I explain the creation of C header files with javah.
Of course, some C and Objective-C are involved. When I use C and Objective-C, I explain the details of the code so Java developers can understand it. I give as many details as are relevant to this chapter.
After explaining the basics of JNI and Objective-C integration, I delve into a deeper explanation of CocoaComponent use of JNI. Events and data traveling to and from Java and Objective-C are rarely compatible. I explain passing events in both directions, while making their data compatible. I also explain how to avoid blocking and locking your applications while passing events around.
Objective-C and Java are worlds apart. Pointers, defines, and other C holdovers pervade Objective-C. Most Objective-C application developers still handle their own memory management without the benefits of automated garbage collection. Delving into Objective-C will remind you why you chose Java as your preferred language.
On the other hand, Objective-C is an advanced and powerful Object-Oriented language. Many of the design patterns applied to Objective-C application development feel familiar to Java developers. After learning Objective-C, Java developers often find themselves wishing Java had a few of Objective-C's features.
Objective-C is based on ANSI C. Objective-C is an Object-Oriented version of C. More than one developer has pointed to Objective-C and said Objective-C succeeded where C++ failed. If you know a smattering of C and understand Java, learning Objective-C is easy. Expect to be productive in Objective-C in a few hours.
Note
Much of your understanding of Object-Oriented Programming (OOP) from Java carries over to Objective-C. Often the Objective-C syntax is very different from Java, or concepts, such as interfaces, have more richness in Objective-C, but after the initial learning curve Objective-C is very friendly to Java programmers.
Because Objective-C is based on C, JNI is a natural fit for integration of Java and Objective-C. The preferred development framework supported by Apple is the Cocoa framework. The Cocoa framework is an Objective-C framework. Full integration of your Java application with most Cocoa libraries is only a few JNI calls and callbacks away.
Follow these steps to create a basic JNI bridge to native code:
Create the native code in C, Objective-C, or C++.
Create the Java class that will handle JNI communication.
Label methods that will call native C methods with the
nativekeyword.Create private methods that your native C functions will use for callbacks to Java.
Add a static block in the Java class to load your native library.
Compile your Java class that handles the JNI interaction.
Execute the
javahcommand on the command to create a C header file.Execute the
javapcommand to find the method signature of your private Java methods.These are the methods you use to accept messages from your native code.
Write a C interface hooking up your native C, C++, or Objective-C code to your Java class.
The C interface
#includes the header file created withjavahand implements the callback to Java.Compile your native source into a dynamic library for loading by your JVM.
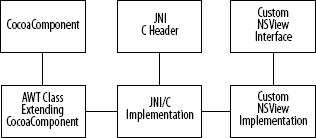
The second example later in this chapter implements these steps. These steps are a little overwhelming the first time, so the first example actually implements only a base subset of these steps. The overall layout of code when hooking Java to Objective-C follows the pattern of Java connected to C by way of JNI, and the C code communicating with Objective-C, as shown in Figure 8.1.
In this chapter, I present two examples. The first sample program, NativeLogExample, demonstrates the creation of a simple JNI application where Java communicates unidirectionally with an Objective-C object. I find it easiest to learn (or explain) new programming paradigms with simple examples, so this first JNI class is stripped of all extras.
The second example, later in this chapter, details full communication from Java to an NSView and from an NSView to a Java CocoaComponent. The second example is much more complex, so unless you are already familiar with JNI on OS X, don't skip the first example.
The first example follows a shorter list of steps than mentioned previously:
Create the native code in C and Objective-C.
Create the Java class that will handle JNI communication.
Label methods that will call native C methods with the
nativekeyword.Add a static block in the Java class to load your native library.
Compile your Java class that handles the JNI interaction.
Execute the
javahcommand on the command to create a C header file.Write a C interface hooking up your native C and Objective-C.
The C interface
#includes the header file created withjavah.Compile your native source into a dynamic library for loading by your JVM.
While the steps don't appear much smaller than the preceding list, this first example requires less complex code. Handling the callbacks is rather tricky. Callbacks require several JNI-specific references and attaching/detaching threads. The first example has no callbacks.
Note
I explain JNI is greater detail in Chapter 9.
Note
The full source for the NativeLogExample and the other example in this chapter are on this book's Web site.
JNI has a steep learning curve. Lots of technologies are involved. If you don't understand some basics of C, JNI is nearly impossible to learn. Familiarity with pointers is a must. Be sure to read the "Overview of C Pointers" sidebar for a brief review of C pointers.
Note
Both Ant-based example projects for this chapter are on the book's Web site. The first example project is named native_log_example. The second is named nsbutton_in_jframe. Because both are Ant-based projects, you can integrate into most popular IDEs. I explain Ant projects in detail in Chapter 4.
The following example is called native_log_example. The example project is found on the book's Web site. I provide an Ant build.xml file with the project to aid in building the project. Later in this chapter, I go over the build.xml file provided for this project.
The following source is the NativeLogExample class. As with other Java classes, you should put the NativeLogExample class in a file named after the class. In this case, you should name the file NativeLogExample.java. Alternatively, you can open the file from the book's Web site.
The nativeLogExample class contains static blocks and native methods. Unless you have written JNI applications in the past, you likely have never seen or heard of static blocks or native methods in Java programs. Most Java applications have little use for either. However, JNI uses both static blocks and native methods.
The NativeLogExample class demonstrates a static block of Java code and a method with the native label:
package com.genedavis;n
import java.io.File;
import java.io.IOException;
public class NativeLogExample {
   // executed during class load
   static
   {
      // Use System.load() to load directly from a non-system
      // path. Be sure to catch an IOException if used
      // File lib = new File("objc_bin/libNativeLogger.jnilib")
      // System.load( lib.getCanonicalPath() );

      //use System.loadLibrary() when loading from a system
      //library path
      System.loadLibrary("NativeLogger");
   }

   /**
    * It all begins here
    */
   public static void main(String[] args)
   {
         NativeLogExample nl = new NativeLogExample();
         nl.log("Hello world! (of course)");
   }

   // native method call
   private native void log(String message);
}
Static blocks are code blocks that execute when the ClassLoaders loads a class. To use a static block, place the following code outside of all methods, but inside the class definition:
static
{
   // Place initialization code here.
}
Place your code between the curly braces. By convention, position static blocks somewhere near the top of the class, so they are easily noticed. Static blocks execute before any other code, meaning that code in static blocks executes before the main() method is called.
Tip
To learn about static blocks, try writing some purely procedural programs in Java using a static block instead of a main() method. Static blocks do have limitations, and this is a good exercise to learn those limitations.
However, avoid static blocks when writing actual production-quality code.
Static blocks execute in the order that they load. This means that static blocks within a class execute in the order they appear. However, if you have static blocks in multiple classes, the order in which the classes load is undefined. Do not make static blocks in one class depend on static blocks in another class.
Static blocks are not very object oriented, so avoid them. However, occasionally you need to perform some class or object initialization before the main() method executes. JNI library loading and initialization of native libraries are two cases where use of static blocks is justified in Java.
The NativeLogExample class uses a static block to load the native library NativeLogger. (I explain creation of the NativeLogger library later in this chapter.) If you look around the example code for a class named exactly "NativeLogger," you will be disappointed.
JNI uses dynamic libraries. On OS X, the naming convention for dynamic libraries is as follows:
lib<library name>.jnilib
When loading a dynamic library for use in JNI, load the library by name and ignore the extras. In the case of a library named NativeLogger, the actual filename for the library is this:
libNativeLogger.jnilib
The call for loading the NativeLogger library is this:
System.loadLibrary("NativeLogger");Two common ways of loading dynamic libraries exist. If your library is in the system path or specified a known path to the JVM, System.loadLibrary() works fine. The JVM finds the library and loads it. However, if the program knows the location of the library and the library is not in the system path, use the System.load() method.
The System.load() method takes an absolute path as an argument. Do not worry about the absolute path if you only know the relative path. Create a File object from your relative path, and then call getCanonicalPath() on the new File object. This creates an absolute path from your relative path. The only catch (quite literally) is that the process needs to be enclosed in a try-catch to catch potential IOExceptions.
I place one native method in the NativeLogExample class. The method is as follows:
private native void log(String message);
Note that it is not implemented. Native methods are implemented in native C (or C or Objective-C) code. The naming conventions for the native implementation are nasty. You can create the methods signatures by hand, but I do not recommend it. Instead use javah.
Before writing the C implementations of your Java class's native methods, run javah. The javah tool is a command-line tool for creation of C header files from Java classes with native methods.
Note
In Chapter 4, I discuss many of the common Java command-line tools. Javah is among the tools I discuss.
These are the steps for running javah:
Open the Terminal.
Determine the directories containing your compiled Java classes.
Determine the directory in which to place your C header file(s).
Run
javah.The common options are
-classpathfor your Java classpath and-dfor the directory in which you create the new header(s).
For example, creating a C header for the implementation of the Java NativeLogExample class might look like the following:
javah -classpath java_bin -d objc_src com.genedavis.NativeLogExample
If you want all your JNI method declarations in the same header file, use the -o option instead of the -d option. The -o option specifies the path and name of a header file in which to place all C method signatures.
The JNI header file is generated automatically from the NativeLogExample using javah. I named the file I generated native_log_example_jni.h, and its source follows:
/* DO NOT EDIT THIS FILE - it is machine generated */
#include <jni.h>
/* Header for class com_genedavis_NativeLogExample */
#ifndef _Included_com_genedavis_NativeLogExample
#define _Included_com_genedavis_NativeLogExample
#ifdef __cplusplus
extern "C" {
#endif
/*
 * Class:     com_genedavis_NativeLogExample
 * Method:    log
 * Signature: (Ljava/lang/String;)V
 */
JNIEXPORT void JNICALL Java_com_genedavis_NativeLogExample_log (JNIEnv *, jobject, jstring); #ifdef __cplusplus } #endif #endif
This entire header defines only one native method, log(). The actual C method declaration is this:
JNIEXPORT void JNICALL Java_com_genedavis_NativeLogExample_log
  (JNIEnv *, jobject, jstring);
The method name log() in Java becomes this function in C: Java_com_genedavis_NativeLogExample_log()
At first glance, this new name seems overly complex, but the complexity prevents naming collisions. Also, because javah did all the work naming the function, it is not too painful. The name starts with "Java," followed by the package and class name where the native method is initially declared, and is finished off by the actual Java native method name.
Warning
The javah generated header file changes every time javah is run. Do not place any comments or code into header files generated by javah, or the comments/code will vanish with your next full build.
When writing JNI bridges to Objective-C, I prefer buffering the Objective-C classes from the JNI interface. I place the C implementations of the Java native methods in a separate C file. I find this buffer prevents purely procedural code from mixing with Object-Oriented code. Generally, you should avoid mixing the two types of programming in the same file. It makes the code more legible.
In the case of this project, I placed the JNI implementation code inside a *.m file. The .m extension indicates that Objective-C is found in the file. Objective-C extends ANSI C, so using Objective-C in a file that is mostly ANSI C is convenient. In this case, Objective-C is providing #import, instantiation of the Objective-C class NativeLogExample, and an object release pool. Usually, C uses #include. When headers are defined improperly, #include can actually include the same library in your compiled code multiple times. Luckily, Objective-C defines the #import that, like the Java import, prevents multiple includes of code without any additional work by you the programmer.
The following source is the implementation of the automatically generated JNI header file. Notice the import of the native_log_example_jni.h. The native_log_example_jni.h header is the header generated from the Java class containing the native log() method. The filename is nle.m. As I mentioned earlier, the lowercase m in the filename extension signifies an Objective-C file.
#import <jni.h>
#import <stdio.h>
#import <Cocoa/Cocoa.h>
#import "native_log_example_jni.h"
#import "NativeLogExample.h"

// This is the entry point from Java to the Objective-C code
JNIEXPORT void JNICALL Java_com_genedavis_NativeLogExample_log
   (JNIEnv * jenv, jobject job, jstring my_jstring)
{
   // Every thread must be wrapped in an NSAutoreleasePool
   // This prevents memory leaks
   NSAutoreleasePool    *pool = [[NSAutoreleasePool alloc] init];

   // converting the jstring to an NSString
   // 1. get a jchar array from the jstring
   // 2. get the length of the jstring
   // 3. instantiate the NSString
   // 4. free the jvm resources (no garbage collector here)
   const jchar *chars = (*jenv)->GetStringChars(jenv, my_jstring, NULL);
   NSUInteger str_len = (*jenv)->GetStringLength(jenv, my_jstring);
   NSString *message = [NSString
                          stringWithCharacters:(UniChar *)chars
                          length:str_len];
   (*jenv)->ReleaseStringChars(jenv, my_jstring, chars);

   // instantiating a NativeLogExample object
   NativeLogExample *nfe = [[NativeLogExample alloc] init];

   // calling the log() method on the NativeLogExample instance
   // passing an NSString to the method log()
   [nfe log: message];

   // destroy instances
   [message release];
   [nfe release];

   // destroying the NSAutoreleasePool
   [pool release];
}
I start the nle.m file by importing two standard headers. They are jni.h and stdio.h. These are both C headers, and as you have guessed, jni.h is required when implementing JNI native methods. Next, I import the Objective-C framework called Cocoa. Finally, I import the two project header files: native_log_example_jni.h and NativeLogExample.h. NativeLogExample.h defines the Objective-C class used in this example.
Note
Including the stdio.h header in C is similar to importing the java.io.* library in Java. Both contain code necessary for common I/O operations for their respective languages.
C, and to a lesser extent Objective-C, requires programmers to clean up after themselves in ways that Java programmers usually ignore. Most C and Objective-C programs do not use a garbage collector of any sort. Newer releases of Objective-C come with a garbage collector, but the garbage collection is not built with JNI in mind, so don't use it with JNI or you may see needed Objective-C variables garbage collected at unpleasant times.
Warning
Even in Java, garbage collection occasionally happens on classes being used with JNI. Watch out for class instances that the garbage collector doesn't realize are in use. When all Java references from Java to a Java object containing JNI callbacks disappear, the garbage collector may not notice that native code is still using the object instance. Place a reference to the Java object in a safe place, such as a static variable in an active class, to prevent it from being garbage collected.
When Objects are created and then never removed from memory, you get a memory leak. In trivial programs, memory leaks are not much of a problem. However, when dealing with a small memory leak replicated thousands or millions of times, the leak can kill your application.
Objective-C environments without garbage collection handle object removal through reference counting and auto release pools. The concept is straightforward. All Objective-C objects are stored as references, similar to Java. Count the existing references. If the number reaches 0, clean up the memory storing the object. Essentially, this is manual garbage collection.
Follow these steps to perform memory management of Objective-C objects:
Create a reference pool.
Normal GUI-based Objective-C applications have their own reference pool. JNI applications usually need their own reference pool created.
Add one to your reference count, when a new reference to your object is created.
Typically, this is automatic.
Subtract one from your reference count, when a reference to your object is released.
Your reference count is decremented by calling the
releasemethod.Clean the object out of memory when the reference count for the object reaches 0.
The reference pool and the object work together to make this happen behind the scenes. More advanced Objective-C programmers may choose to customize this process.
Remove the auto release pool from memory when it is going out of scope.
The first step of removing an auto release pool from memory is reducing all its object reference counts to 0, thereby repeating Step 4 with each object still in the pool.
Note
Apple maintains extensive documentation on Objective-C memory management issues. This is a good reference to read: http://developer.apple.com/mac/library/documentation/Cocoa/Conceptual/MemoryMgmt/MemoryMgmt.pdf
The call to the native implementation is a new thread as far as Objective-C is concerned. The first thing I do in nle.m in the Java_com_genedavis_NativeLogExample_log() function is create an instance of NSAutoreleasePool to handle reference counting. The last thing I do in the same method is release the NSAutoreleasePool.
I use release methods to remove objects. The release method call does not directly clean up Objective-C objects from memory. Instead, it reduces the reference count of the object by 1. If the reference count reaches 0, then the object knows to clean up after itself. After the reference count reaches 0 and the object cleans up any of its used resources, the object is removed from memory.
Objective-C methods look very different from their Java equivalents. Objective-C surrounds method calls with square brackets. Also, each parameter to an Objective-C method gets a description built right into the code. The extra description helps Objective-C self-document.
Using an example from the nle.m file, the following method call probably looks a little intimidating:
[NSString stringWithCharacters:
   ( UniChar * ) chars
   length: str_len ];
NSString is a class. stringWithCharacters is a method name. length is a continuation of the method name, describing the second argument to the method. Both chars and str_len are variables. ( UniChar * ) is simply a cast, as you expect to see in Java.
The Java equivalent of the above function call, might look like this:
String.stringWithCharactersLength ( (char[]) chars, str_len );
As it turns out, NSStrings (the Objective-C equivalent to String) are not too different from Java Strings. They share a common unicode base. That is UTF-16. The common base for NSStrings and Java Strings makes conversion relatively simple. Four statements handle the conversion in the native log() implementation.
const jchar *chars = (*jenv)->GetStringChars(
                                             jenv,
                                             my_jstring,
                                             NULL);
NSUInteger str_len = (*jenv)->GetStringLength(jenv, my_jstring);
NSString *message = [NSString
                          stringWithCharacters:(UniChar *)chars
                          length:str_len];
(*jenv)->ReleaseStringChars(jenv, my_jstring, chars);
Follow these steps:
Obtain the Java
Stringas ajchar*.Accomplish this with a call to the
GetStringChars()function contained in the JNI environment.Get the length of the string.
The length of the string is obtained with another call to the JNI environment. Strings are essentially character arrays in C. Because C does not track the length of arrays, strings in C contain a value of
0at the end of the string. (This is referred to as null terminating.) You must manually place this value of0when creating strings in C. That is why I need the string length.Create an
NSStringby providing a pointer to the raw unicode characters and the length of the final string.Free the JVM resources in the JNI environment.
Now that I have my string's value safely copied to a shiny new
NSString, it is time to release the JNI environment's string resources. Again, I call a function in theJNIEnv*variable, namedjenv, to release the resources.
Note
In Chapter 9, I explain more Java string conversions for OS X JNI programming.
Warning
Always remember to release the JNI environment resources when you are done with them. They are finite.
Objective-C is an OOP language. So of course, objects play a central role in the language. In this section, I discuss Objective-C classes and creation of instances.
On the Java side, CocoaComponent usage consists of a Java class extending CocoaComponent. On the Objective-C side, CocoaComponents consist of an Objective-C class implementing a protocol called AWTCocoaComponent. (Protocols are analogous to Java interfaces.) Because CocoaComponent requires Objective-C classes, I introduce a basic Objective-C class in this first example. I hold off implementing the AWTCocoaComponent protocol until the second JNI example.
Note
Objective-C contains protocols and interfaces. Java interfaces perform the same function as either Objective-C protocols or Objective-C interfaces in the Java language.
Objective-C classes are often placed in one file or split into two files, mostly depending on the style of the programmer and the complexity of the class. Objective-C classes consist of an interface that defines the methods and variables contained by the class and an implementation that implements the interface. When the class is split into two files, the interface is placed in a header file (*.h), along with any #defines and #imports the class needs. The implementation is placed in an Objective-C file (*.m), along with a #import statement importing the class interface. When the class is placed in only one file, the interface and implementation both go in a file with the .m extension.
The Objective-C class I use in the first JNI example exists in two files. The header is in the file NativeLogExample.h. The following is the source for the class interface:
#import <jni.h>
#import <Cocoa/Cocoa.h>
// defining the NativeLogExample class
@interface NativeLogExample : NSObject {
   // instance variable declarations go here
}
// one method named log takes an NSString object
-( void ) log: (NSString *) message ;
@end
The interface starts by importing the Cocoa.h header. JNI uses the jni.h header, but this class lets the nle.m code take care of all the messy JNI. So I do not import jni.h in this interface file. In the next example's class header, I do import jni.h because the Objective-C class interacts with JNI directly.
Tip
Both standard Java commenting styles are supported by Objective-C. The comment styles // and /* */ have the same use in Objective-C as in Java. Alas, Javadoc comments don't have special meaning in Objective-C.
Interfaces in Objective-C take the following form:
@interface ClassName : SomeSuperClass <ProtocolImplemented>
{
   variable declaration;
}
method declaration;
@end
Interfaces work differently in Objective-C than in Java. In Objective-C a declared interface is merely a declaration of one class. Although this use of interfaces exists in Java, it is not common. Objective-C uses what are called protocols, in addition to interfaces. Protocols more closely match the Java expectation and use of interfaces. Both Objective-C interfaces and Objective-C protocols together equate to Java interfaces.
Instead of surrounding interface declarations with curly braces as Java does, Objective-C surrounds interfaces with @interface and @end.
Interfaces defined with @interface do not extend other interfaces. (Remember, Objective-C @interfaces are class definitions.) Instead, @interfaces extend classes. In other words, Objective-C class extensions are handled by their class definitions—the interfaces. The colon (:) is used in place of the keyword extends that Java uses.
Class and object scoped methods and variables are defined in @interfaces. Objects and methods of class scope begin with a plus symbol (+). Objective-C's + is the equivalent of Java's static keyword. Methods and variables of object scope begin with a minus symbol (-). In the example code, the NativeLogExample contains one method named log of object scope.
The implementation of the NativeLogExample is in a file called NativeLogExample.m. The implementation for the Objective-C class NativeLogExample follows here:
#import "NativeLogExample.h"
// implementing the NativeLogExample class
@implementation NativeLogExample
// in Java this method signature would look like
// public void log (NSString message) { ... }
-( void ) log: (NSString *) message {

   // NSLog sends a log message to standard out
   // the message must be formatted. %@ is the
   // format specifier for objects. 'message' is
   // an object.
   NSLog( @"%@", message );

}
@end
The class implementation imports its own interface, and that is it. By convention, the file with the class implementation should import only one header: its interface. The interface takes care of all other imports.
Objective-C class implementations take the following form:
#import InterfaceDeclaration
@implementation ClassName
method implementations
@end
Notice that implementations start with the @implementation and end with the @end. Some programmers mix C-style functions into class implementations. I avoid this and instead place needed C-style functions into separate files that I then import into the class interface for use in the Objective-C class.
Tip
The commands @interface, @implementation, and @end are actually compiler directives, not keywords. The use of compiler directives is not surprising because Objective-C is built on top of ANSI C.
You can compile the C and Objective-C code using gcc directly if you like. The command for compiling the NativeLogExample and the nle.m file is something similar to the following:
gcc
         -bundle
         ./objc_src/nle.m
         ./objc_src/NativeLogExample.m
         -o ./objc_bin/libNativeLogger.jnilib
         -I/System/Library/Frameworks/JavaVM.framework/Headers
         -I ./objc_src/
         -framework JavaVM
         -framework Cocoa
The gcc command should be one line, not multiple lines. I formatted the gcc command for legibility.
The sample gcc command assumes that you have the headers and code in a subdirectory called objc_src. The command-line argument to create a dynamic library from the C and Objective-C is -bundle. Sometimes, I see -dynamic instead of -bundle; however, -dynamic can cause problems when loading multiple libraries for use with JNI. You are better off using -bundle to generate your dynamic library.
The argument -o specifies the name of the output file. The OS X convention for naming dynamic libraries in JNI is lib<name>.jnilib. The -I argument specifies directories of headers to search while building. The -framework argument specifies libraries used in the build. In this case, I use the JavaVM framework because the resulting library uses JNI. I also specify the Cocoa framework because I use an NSAutoreleasePool.
If you have followed the explanation of this first example up to this point, you have a fully workable Java-Objective-C application. It runs with the following command or one modified to match your classpath:
java -Djava.library.path=objc_bin -cp java_bin/ ¬
com.genedavis.NativeLogExample
The output is not too spectacular, but it is a good first step. Running your new JNI application results in output similar to the following:
2009-10-29 20:22:24.683 java[8280:d07] Hello world! (of course)
Setting up projects to handle javac, javah, and gcc is painful. If you want to move your project to a new IDE or share the project with a programmer using a different IDE, "painful" becomes horribly difficult. Set your build up with Ant or a similar build tool, and your project is more portable. Ant integrates with all Java IDEs. Best of all, Ant on OS X supports gcc through the exec tag, so even if your IDE does not officially support C or Objective-C, building the native code is no problem.
Note
In Chapter 4, I explain Ant build.xml files in detail.
Tip
Xcode fully supports Objective-C syntax coloring and hints, even if your favorite IDE does not. Many IDEs support external editors for project files. Configure Xcode as your editor for *.m and *.h files. Often setting Xcode to the default application in the Finder is enough. Sometimes your IDE needs an extra preference set in order for it to use Xcode as the editor for *.m and *.h files. For example, in Eclipse, set the File Associations preference for *.m files and *.h files to Xcode.
I set up an Ant build for this example in the project's build.xml file. The source for the Ant build.xml file follows:
<?xml version="1.0" encoding="UTF-8"?>
<project
      name="Native Log Example"
      default="run"
      basedir=".">
   <property name="java.source" value="java_src" />
   <property name="objective.c.source" value="objc_src" />
   <property name="java.bin" value="java_bin" />
   <property name="native.bin" value="objc_bin" />

   <target
      name="explain"
description="Explains the objective of the build">
<echo>Building the full Java and Native source.</echo>
</target>
<target
name="clean"
description="Removes previous build">
<echo>Cleaning Java and Native bin folders...</echo>
<delete dir="${java.bin}" />
<delete dir="${native.bin}" />
</target>
<target
name="java-build"
depends="clean"
description="Builds the Java source">
<echo>Building Java...</echo>
<mkdir dir="${java.bin}"/>
<javac srcdir="${java.source}" destdir="${java.bin}" />
</target>
<target
name="native-header-build"
description="Builds the native headers file">
<echo>Creating native header file...</echo>
<mkdir dir="${native.bin}"/>
<javah
outputfile="${objective.c.source}/native_log_example_jni.h"
classpath="${java.bin}">
<class name="com.genedavis.NativeLogExample" />
</javah>
</target>
<target
name="native-build"
description="Builds the native lib*.jnilib"><echo>Creating native lib*.jnilib</echo>
<exec executable="gcc">
<arg value="-bundle"/>
<arg value="./${objective.c.source}/nle.m"/>
<arg value="./${objective.c.source}/NativeLogExample.m"/>
<arg line="-o ./${native.bin}/libNativeLogger.jnilib"/>
<arg
value="-I/System/Library/Frameworks/JavaVM.framework/Headers"/>
<arg line="-framework JavaVM"/>
<arg line="-framework Cocoa"/>
</exec>
</target>
<target
name="build"
depends="explain, java-build, native-header-build, native-build"
description="builds full Java and Native byte code.">
<echo>Build complete</echo>
</target>
<target
name="run"
depends="build"
description="cleans, builds, and then runs app">
<!--
java
-Djava.library.path=objc_bin
-cp java_bin/
com.genedavis.NativeLogExample
-->
<java
classpath="${java.bin}/"
classname="com.genedavis.NativeLogExample"
fork="true">
<jvmarg value="-Djava.library.path=${native.bin}" />
</java>
</target>
</project>I discuss most of the Ant tasks used in this build.xml in Chapter 4. However, the javah and gcc integrations are new. The native-header-build target contains the task for javah execution. I chose the outputfile attribute instead of the destdir attribute. The outputfile attribute specifies a file in which to place all JNI headers. The destdir specifies a directory, and javah creates multiple header files in that directory. Typically, you use outputfile if you have few native methods to implement. Use destdir if your project has many native methods to implement.
Alternately, if you want better control over naming and destination directories for a project with many native methods, run the javah task several times to produce multiple header files with names and locations of your choice.
I run the gcc command inside of an exec task. Some commands run from inside exec need a full path specified. Because gcc is in the system path, simply executing gcc is enough. I pass the arguments to gcc in with the arg tag. Arguments that require two parameters use the line attribute. Arguments that require only one parameter use the value attribute.
When only building the application, use the command ant build from the Terminal. When building and running the application, use the command ant run from the Terminal. The result of executing ant run appears very similar to this output generated on my Mac:
Buildfile: build.xml
explain:
     [echo] Building the full Java and Native source.
clean:
     [echo] Cleaning Java and Native bin folders...
   [delete] Deleting directory /Users/tdavis/Desktop/ch08_code/
   native_log_example/java_bin
   [delete] Deleting directory /Users/tdavis/Desktop/ch08_code/
   native_log_example/objc_bin
java-build:
     [echo] Building Java...
    [mkdir] Created dir: /Users/tdavis/Desktop/ch08_code/native_
   log_example/java_bin
    [javac] Compiling 1 source file to /Users/tdavis/Desktop/
   ch08_code/native_log_example/java_bin
native-header-build:
     [echo] Creating native header file...
    [mkdir] Created dir: /Users/tdavis/Desktop/ch08_code/native_
   log_example/objc_bin
native-build:
     [echo] Creating native lib*.jnilib
build:
     [echo] Build complete
run:
     [java] 2009-10-26 20:42:48.029 java[3652:1303] Hello world!
   (of course)
BUILD SUCCESSFUL
Total time: 2 seconds
The line tagged run indicates the following output is the result of running the freshly built application. In this example, the output of run is:
[java] 2009-10-26 20:42:48.029 java[3652:1303] Hello world! (of course)
The only difference between this output and the output when running the java command yourself is that the output is prepended with [java]. The prefix [java] indicates that the line was generated from the java tool.
Now that you understand basic JNI integration, simple Objective-C programming, and setting up Ant builds for Java/Objective-C hybrid projects, you are ready to examine CocoaComponent use. When including CocoaCompoments in your project, expect to use at least one Java class with native declarations, at least one interface class in C, and one Objective-C class. Your applications likely need more native integration than one of each, but that is the minimum.
In the remainder of this chapter, I explain details of using the CocoaComponent. I provide an additional example as an illustration of my explanations. The example demonstrates embedding an NSButton in a JFrame. The source is available on the book's Web site. The name of the project is nsbutton_in_jframe.
Integration of CocoaComponent into a JNI application is a more complex than the example JNI project from earlier in this chapter. The main components in projects that use CocoaComponents are the following:
Java-based
CocoaComponentchildJNI-based header for Java-to-C communication definitions
C implementation
Objective-C
NSViewchild declarationObjective-C
NSViewchild implementation
The pieces fit together as shown in Figure 8.2.
The CocoaComponent example I provide consists of the most basic code possible while making the example useful for integration into your projects. The NSButton in this project is really just a placeholder. You can substitute any NSView-based object needed in your project. You can even substitute your own custom widgets, as long as they descend from NSView.
I provide these project files for the next example:
CustomNSButton.java
NSButtonExample.java
nbe.h
nbe.m
nsbutton_example_jni.h
NSButtonExample.h
NSButtonExample.m
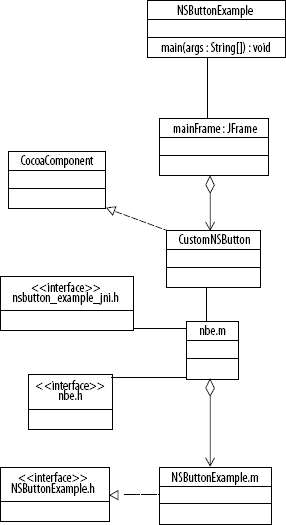
The source associations are shown in Figure 8.3. Essentially, Figure 8.2 and 8.3 are the same. Figure 8.3 shows an actual implementation, so it appears more complex than the more conceptual presentation of Figure 8.2.
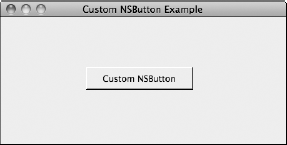
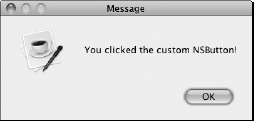
The example application creates and displays an NSButton in a JFrame, as shown in Figure 8.4. The title of the button is set with a call to CocoaComponent's sendMessage(). When the NSButton is clicked, a JOptionPane message dialog box pops up announcing the click, as shown in Figure 8.5. The application demonstrates placement of Cocoa Application Kit GUI elements in Java windows. The application also demonstrates events propagating from Java to Objective-C and events propagating from Objective-C to Java.
The CocoaComponent class belongs to the com.apple.eawt package. It is part of the Apple Java Extensions. The CocoaComponent is designed to wrap children of Objective-C's NSView class in such a way that they integrate with AWT. The CocoaComponent class is a child of java.awt.Canvas and behaves like any Canvas class.
To use CocoaComponent, extend it with your own class. Then add it to your own Java Container. In my example, I add it to a JFrame's content pane. Override the size methods to set the minimum, maximum, and preferred size of your CocoaComponent.
Sure, it sounds easy. After you look through the source of the example CocoaComponent child, I discuss the tricky bits.
The following is the source for the CocoaComponent child, CustomNSButton class:
package com.genedavis;
import java.awt.Dimension;
import javax.swing.JOptionPane;
import com.apple.eawt.CocoaComponent;
public class CustomNSButton extends CocoaComponent
{
   // executed during class load
   static
   {
      //used to load from a system library path
      System.loadLibrary("CustomNSButton");
      setupNativeCallbacks();
   }

   /**
    * Supersedes the createNSView() method.
    */
   public native long createNSViewLong();

   /**
    * Performing setup on the Native end.
    */
   public static native long setupNativeCallbacks();
   /**
    * This version of the createNSView() is
    * not used anymore, but you need to implement
    * it until it is removed from the API.
    */
   @Override
   public int createNSView() {
      return 0;
   }
   /**
    * Providing max size of NSButton.
    */
   @Override
   public Dimension getMaximumSize() {
      Dimension dim = new Dimension(150, 32);
return dim;
}
/**
* Providing minimum size of NSButton.
*/
@Override
public Dimension getMinimumSize() {
Dimension dim = new Dimension(150, 32);
return dim;
}
/**
* Providing preferred size of NSButton.
*/
@Override
public Dimension getPreferredSize() {
Dimension dim = new Dimension(150, 32);
return dim;
}
public void setCustomTitle(String title)
{
sendMessage(1, title);// 1 arbitrarily chosen
}
/**
* Called from C. Do not call locally!
*
* Find the signature of this method in the
* compiled class by calling:
*
* javap -private -s CustomNSButton
*
* from the command line.
*/
@SuppressWarnings("unused")
private void customButtonClicked()
{
// Remember that your system will lock up
// if you don't give back the native thread
// BEFORE trying to use Java AWT.
Thread t = new Thread(new Runnable() {
public void run()
{
JOptionPane.showMessageDialog(
null,
"You clicked the custom NSButton!");
}
});
t.start();
}
}Four tasks in Java integrate CustomNSButton with its native counterpart:
You can send messages to your CocoaComponent's NSView with the sendMessage() method. You don't need to override the sendMessage(); you simply call it. In the CustomNSButton class, I call the sendMessage() method from the setCustomTitle() method.
The sendMessage() method takes two parameters: int and Object. Neither parameter interacts with CocoaComponent or the underlying NSView. As the software architect or programmer, you choose the values of the parameters and their meanings, and then you write the native code to interpret the int and Object.
Normally when writing JNI, you declare native methods, and all your Java to native code communication happens with those calls. Then, after your JNI functions interpret your calls, you pass the data to your native objects. The CocoaComponent's sendMessage() method removes the JNI step from your AWT to NSView communication. As I detail later, calling sendMessage() on your CocoaComponent results in a method call directly into your NSView implementation. Both the int and Object are passed to the NSView for handling.
Use the int parameter in sendMessage() to pass a message id. The message id represents a native method to which you forward the message. My example uses only one message id. However, with multiple message ids, set up a switch statement in the native code, and pass each message off to an appropriate method for handling.
The Object parameter in sendMessage() is the data associated with the message id. Because you are passing a java.lang.Object, there is no limit to what Object you can send to the native code. Just keep in mind that you have to write native code to deal with extracting data from that Object, and then you have to interpret that data in a way that makes sense to your native code.
I recommend keeping the message Objects simple, if possible. For instance, in the sample code I pass a String. Java Strings are UTF-16 strings, just as NSStrings are. Passing Java Strings to Objective-C and interpreting those strings is simple. When you are pressed to meet a deadline, you will appreciate simple.
When Java methods are called from native code, those calls are called callbacks. At some point, you need asynchronous method calls when using JNI. For instance, if your native code performs a long calculation or does a network call to a busy server, you don't want to wait for the return.
Set up a Java callback.
Spawn a thread in your native environment.
Have that thread perform a call to Java when a return value is finally available.
In the case of CustomNSButton, I wrap an NSButton. When a user clicks the button, an event needs to propagate to the CustomNSButton class. The callback I use is the customButtonClicked() method.
Tip
Debugging JNI is painful. Do not make it harder by reusing callback methods. Keep them private and unused by the Java code. Call them only from native code.
JNI is not restrained by visibility. This means private methods are not hidden from native JNI callbacks. Take advantage of it. Hide your callbacks from your Java code.
The callback method in CustomNSButton is the customButtonClicked() method. It is private. I do not call the customButtonClicked() method from the Java code. I added the @SuppressWarnings("unused") annotation to prevent the compiler from complaining about an unused method. (The method is used by the native code via JNI.) Keeping the callback method private makes debugging callbacks simpler. You know the method is called only from the native code. If the method is called when it shouldn't be called, then you know to look in the native code for your problem.
As soon as the callback method, customButtonClicked(), is called, I pass the data to a new thread. I return the thread making the callback. Always return threads coming from callbacks immediately. Otherwise, you may lock up your application or impair performance of the native code.
The createNSViewLong() method in CocoaComponent replaces the older (and deprecated) createNSView() method. The purpose of the createNSViewLong() method is instantiating your native NSView. The return value is a pointer to the native NSView wrapped by your CocoaComponent. The super class, CocoaComponent, handles the connection to your native NSView using the returned pointer.
The best way to handle the createNSViewLong() method is to make it a native method. Let your native JNI code perform the instantiation of the NSView. After instantiating the NSView, get your NSView's pointer and return it to Java as a long.
Note
The createNSView() method returned an int. When Mac OS X ran off a 32-bit architecture, the preferred way to pass a pointer to Java from JNI was as an int. However, now OS X is a fully 64-bit OS. Pointers from JNI are passed to Java as long values. That is why a new createNSView() method exists.
Your Java program needs to initialize your native C and Objective-C code. There is nothing too magical about initializing the native code. From the Java side, include a static block in your Java class. In the static block, load your code from a dynamic library. After loading the native library, call an initialization method. The initialization method is a native method of your choosing.
The only other Java code needed to initialize native code when extending CustomNSButton is the native declaration of createNSViewLong(). The createNSViewLong() method is called by the CocoaComponent implementation. It obtains a pointer to the underlying Objective-C NSView.
Consider the native initialization that occurs in CustomNSButton:
static
{
   System.loadLibrary("CustomNSButton");
   setupNativeCallbacks();
}
public native long createNSViewLong();
public static native long setupNativeCallbacks();
The System.loadLibrary() method loads the dynamic library containing the project's native code. The setupNativeCallbacks() method is a call to a method I declared as native. In other words, setupNativeCallbacksc() is implemented in the CustomNSButton library. The method createNSViewLong() is declared as native with additional initialization of the native library happening after the CocoaComponent calls the method.
I return to a detailed discussion of initialization of the native library later in this chapter. I discuss initialization further when I discuss the JNI environment.
The CocoaComponents wrap NSViews for use in Java GUI applications. Wrapping NSView opens up most, if not all, predefined and custom Cocoa widgets for use in AWT and Swing. To share the significance of the Java CocoaComponent, I explain the Objective-C NSView.
The Objective-C NSView class shares a similar position in the Cocoa framework as the java.awt.Component class shares in the Java API. Essentially, all widgets, buttons, tools, and panels in the Application Kit framework descend from NSView. NSView children include NSButton, NSTabView, NSOpenGLView, and NSColorWell. The NSView contains the largest tree in Cocoa's Application Kit (with the exception of its parent, NSResponder).
NSView handles events and basic drawing in Cocoa applications. NSViews are placed in NSWindows in similar fashion as Components are placed in JFrames and Windows in Java.
Note
The Cocoa framework is an umbrella framework. An umbrella framework is a framework that does not contain any libraries, just other frameworks. The Cocoa framework contains the Application Kit framework. The NSView class is part of the Application Kit.
Note
The online reference for NSView is located here: http://developer.apple.com/mac/library/documentation/Cocoa/Reference/ApplicationKit/Classes/NSView_Class/Reference/NSView.html.
The online documentation for the Application Kit framework is located here: http://developer.apple.com/mac/library/documentation/Cocoa/Reference/ApplicationKit/ObjC_classic/Intro/IntroAppKit.html.
As I have stated, CocoaComponents are wrappers for native NSViews. Using CocoaComponents, you can embed NSViews in Swing and AWT just like other java.awt.Components. Follow these steps:
Set the layout manager for your container.
Construct your
CocoaComponent.Set the size for your
CocoaComponet.Add your
CocoaComponentto a container.
No worries. After your CocoaComponent is written, the process for adding the NSView to Swing or AWT has no unusual steps.
Tip
Common wisdom is that Swing and AWT don't mix. Reality is that they mix fine, if you are careful. The important rule is that you should never draw Swing components over AWT components that do not contain them.
The classic mistake is to place a Swing drop-down menu where it draws over an AWT Component not containing the drop-down menu. In this case, the AWT component always draws over top of the Swing component.
Note
If downloaded from the Web site, both projects in this chapter clean, build, and run with a single command, ant. Simply run the Terminal application found in the /Applications/Utilities/ directory. Change the directory to the project directory with the cd command. Finally, enter the ant command to build and run the project.
The following code creates a JFrame and embeds a CocoaComponent in the JFrame:
package com.genedavis;
import java.awt.Container;
import java.awt.event.ActionEvent;
import java.awt.event.ActionListener;
import java.awt.event.MouseAdapter;
import java.awt.event.MouseEvent;
import javax.swing.JButton;
import javax.swing.JFrame;
import javax.swing.JOptionPane;
public class NSButtonExample {
   public static void main(String[] args)
   {
      // true prevents deadlock, but may cause JNI calls
      // to return asynchronously instead of synchronously.
      System.setProperty(
            "com.apple.eawt.CocoaComponent.CompatibilityMode",
            "false");

      new NSButtonExample();
   }

   public NSButtonExample()
   {

      final JFrame mainFrame =
         new JFrame("Custom NSButton Example");
      Container pane = mainFrame.getContentPane();
      pane.setLayout( null );

      CustomNSButton button = new CustomNSButton();
      mainFrame.add( button );

      button.setSize( button.getPreferredSize() );
      button.setLocation(120,70);

      mainFrame.setSize(400, 200);
      mainFrame.setVisible(true);

      // cannot call until the button is visible
      // or a null pointer exception occurs.
      button.setCustomTitle("Custom NSButton");

   }
}
These steps allow you to use the custom CocoaComponent in this code example:
Create a
JFrame.Set the
JFrame's content pane layout manager.Instantiate the class that extends
CocoaComponent.Add the
CocoaComponentinstance to theJFrame's content pane.Set the size and location of the
CocoaComponent.
Warning
Remember that through inheritance, a class is an implementation of its parent. Therefore, I use the name CocoaComponent frequently when referring to children of CocoaComponent.
Warning
In the example, I set the NSButton label with a call to an Objective-C method using the CocoaComponent method, sendMessage(). To ensure that the NSView (in this case, NSButton) is constructed, do not sendMessages() until the containing window or frame is set to visible.
Execute the javah application against the compiled CustomNSButton class to generate your needed JNI header file. Using javah from inside an Ant project makes lots of sense, too. The Ant target for running javah in this project follows:
<target
   name="native-header-build"
   description="Builds the native headers file">

   <echo>Creating native header file...</echo>

   <mkdir dir="${native.bin}"/>
   <javah
        outputfile="${objective.c.source}/nsbutton_example_jni.h"
        classpath="${java.bin}">

      <class name="com.genedavis.CustomNSButton" />

   </javah>
</target>
Note
Remember that the ${some.variable.name} notation places a variable contained by ${} into the containing string.
The interesting part of the javah-generated header file, nsbutton_example_jni.h, follows:
/*
 * Class:     com_genedavis_CustomNSButton
 * Method:    createNSViewLong
 * Signature: ()J
 */
JNIEXPORT jlong JNICALL Java_com_genedavis_CustomNSButton_createNSViewLong
  (JNIEnv *, jobject);
/*
 * Class:     com_genedavis_CustomNSButton
 * Method:    setupNativeCallbacks
 * Signature: ()J
 */
JNIEXPORT jlong JNICALL Java_com_genedavis_CustomNSButton_
  setupNativeCallbacks
  (JNIEnv *, jclass);
Notice that the sendMessage() method from CocoaComponent is not represented. CocoaComponent handles connecting the sendMessage() method directly to the underlying NSView. This saves time for you as a programmer. Obviously, if you want more direct control, you can refuse to use the sendMessage() method and implement your own native methods for sending messages to the NSView.
The code for the C implementation of the generated header is much more complex than the earlier example's C implementation. It consists of a header file and an Objective-C file. The header, nbe.h, is simply this:
// function prototype(s) for callbacks to Java
// defining INCLUDED_NBE_H to prevent multiple inclusions
// of this code. Obviously, not a problem with the
// example, but still a good habit with C.
#ifndef INCLUDED_NBE_H
#define INCLUDED_NBE_H
void notifyJavaThatButtonWasClicked( void );
#endif
However, the Objective-C file, nbe.m, contains the source for the incoming messages, callbacks to Java, and code for obtaining a JavaVM, jobject, jmethod, and the JNIEnv references as needed. Here is the full source:
#import <jni.h>
#import <AWTCocoaComponent.h>
#import <stdio.h>
#import <Cocoa/Cocoa.h>
#import <nsbutton_example_jni.h>
#import <NSButtonExample.h>
#include "nbe.h"

// retaining references to jvm and methods
// never retain env references as they change
// NOTE: in C "static" means ...
// "global, but only visible in this file"
static JavaVM *jvm;
static jmethodID buttonClickMethod;
static jobject customNSButtonJavaObject;

// This function tells Java to provide the newest
// version of the JNI library. Otherwise, you do NOT
// have access to any features added after Java 1.1!!!
JNIEXPORT jint JNICALL JNI_OnLoad(JavaVM *vm, void *reserved)
{
   jvm = vm;
   return JNI_VERSION_1_6;
}
// Called from Java to set up the method ids;
// obtaining method callbacks is a potentially slow
// process, so getting them ahead of time is advised
JNIEXPORT jlong JNICALL
Java_com_genedavis_CustomNSButton_setupNativeCallbacks
(JNIEnv *env, jclass jclazz)
{
   buttonClickMethod =
      (*env)->GetMethodID(
                       env,
                       jclazz,
                       "customButtonClicked",
                       " ()V");
}


// Remember the createNSViewLong() method in the
// Java class, CustomNSButton? This is the native
// implementation of that method.
JNIEXPORT jlong JNICALL
Java_com_genedavis_CustomNSButton_createNSViewLong
(JNIEnv * env, jobject jobj)
{
   // storing the Java object that called this function.
   // NOTE: The object, not the class is stored
   // NOTE: clean up of a global ref usually entails
   // calling DeleteGlobalRef().
   customNSButtonJavaObject =
     (*env)->NewGlobalRef(env, jobj);
// Every thread must be wrapped in an NSAutoreleasePool
// This prevents memory leaks
NSAutoreleasePool *pool = [[NSAutoreleasePool alloc]
init];
NSButtonExample *customButton = nil;
// instantiating Objective-C NSButtonExample object
customButton = [[NSButtonExample alloc] init];
// add NSButtonExample customization code here
// no customization performed in this example
// destroying the NSAutoreleasePool
// time to clean up after myself
[pool release];
// return reference to native custom NSButton
return (long)(uintptr_t) customButton;
}
// notifies Java via the callback
void notifyJavaThatButtonWasClicked( void )
{
JNIEnv *env = NULL;
jint env_error = JNI_OK;
BOOL detach = NO;
// Use the JVM reference to get an up-to-date
// JNIEnv. JNIEnv variables need constant
// updates
env_error = (*jvm)->GetEnv(
jvm,
(void **)&env,
JNI_VERSION_1_6);
// Making sure that this is not part of a
// Java thread yet.
if ( env_error == JNI_EDETACHED)
{
// Attaching this thread to a JVM thread
env_error = (*jvm)->AttachCurrentThread(
jvm,
(void **)env,
NULL);
// assuming there was no error attaching the// current thread to the JVM, remember to detach
// the from the JVM when done calling the Java
// method.
if (env_error == JNI_OK)
{
detach = YES;
}
}
// This is the actual method call to the method
// reference "buttonClickMethod" on the object
// "customNSButtonJavaObject".
(*env)->CallVoidMethod(
env,
customNSButtonJavaObject,
buttonClickMethod);
// All done. Time to detach the thread.
if (detach)
{
(*jvm)->DetachCurrentThread( jvm );
}
}Caching the needed elements for handling callbacks from the native NSView, is a little tricky. This section explains avoiding common pitfalls of performs and scope when arranging callbacks; I cover JavaVM pointers, jobject pointers, jmethod points, and JNIEnv pointers.
JavaVM pointers represent an entire JVM. JavaVM pointers are most commonly used in creating JVMs from native code. In the case of using CocoaComponent, I don't create a JVM from native code. Instead, I grab a reference to the JVM for use in handling user-generated events that need callbacks to Java.
The best way to grab a pointer to the JVM in a native library is when the JVM loads the native library. When loading a JNI-based dynamic library, Java calls the JNI_OnLoad() function. The first argument to JNI_OnLoad() is a JavaVM pointer.
For quick reference, here again is the code for the JNI_OnLoad() function in nbe.m:
JNIEXPORT jint JNICALL JNI_OnLoad(JavaVM *vm, void *reserved)
{
   jvm = vm;
   return JNI_VERSION_1_6;
}
The JavaVM pointer is good for as long as the JavaVM exists. Unless you are creating and destroying JVMs from native code, JavaVM points won't go bad. So I grab the pointer during the onload call and keep it in a static variable for future use.
Note
In C, static means something different than in Java. If static is used when defining a variable outside a function in C, it restricts visibility of the variable to code in that physical file. When static is used while defining a variable inside a function, the variable's value is retained as a local variable between calls to the function.
Tip
When unloading a dynamic native library, Java calls the JNI_OnUnload() function. Place your cleanup code for the dynamic library in the JNI_OnUnload() function.
As you probably can guess, jobjects represent Java class instances. There are three types of jobject pointers: local, global, and weak global references. Local references go out of scope and clean up as soon as a native call returns to the JVM. Both types of global references remain valid after the native method call returns. Both types of global references are candidates for caching.
I choose to cache a global reference in the nbe.m example instead of a weak global reference. The difference between weak global and standard global jobject references is that weak global references allow for the underlying object to be garbage collected. I have no need for garbage collecting the referenced object. Normally, the choice between weak and standard jobject references comes down to whether the Java Object is consuming many resources.
I create the jobject reference in nbe.m, in this function:
Java_com_genedavis_CustomNSButton_createNSViewLong()
Here is the full source for the native createNSViewLong() function:
JNIEXPORT jlong JNICALL
Java_com_genedavis_CustomNSButton_createNSViewLong
(JNIEnv * env, jobject jobj)
{
   customNSButtonJavaObject =
     (*env)->NewGlobalRef(env, jobj);

   NSAutoreleasePool  *pool = [[NSAutoreleasePool alloc] init];

   NSButtonExample *customButton = nil;
   customButton = [[NSButtonExample alloc] init];

   [pool release];
return (long)(uintptr_t) customButton; }
The call to (*env)->NewGlobalRef(env, jobj) actually created the global jobject reference. I store the global reference in the static variable customNSButtonJavaObject.
Object references are stored in jobject pointers. So it is no surprise that method references are stored in jmethod pointers. References to methods stay good between native calls. Caching jmethod pointers is perfectly safe if the JVM itself won't go away.
Remember the static block in CustomNSButton. In the static block, I call setupNativeCallbacks(). In the native implementation of that method, I grab the jmethod reference. In fact, that is the only operation performed in the native implementation.
Here again is the source for quick reference:
JNIEXPORT jlong JNICALL
Java_com_genedavis_CustomNSButton_setupNativeCallbacks
(JNIEnv *env, jclass jclazz)
{
   buttonClickMethod =
      (*env)->GetMethodID(
                       env,
                       jclazz,
                       "customButtonClicked",
                       "()V");
}
The function call GetMethodID() retrieves the jmethod pointer, buttonClickMethod. The GetMethodID() function takes the JNIEnv pointer, a jclass pointer, the name of the method, and a signature for the method. The native method call provides both the JNIEnv pointer and the jclass pointer. Just use the variables passed in on the method call. The method name, in this case "customButtonClicked", is just the name of the Java method.
The method signature needs a little more discussion. Potential method overloading in Java creates the need for distinguishing methods with similar names but different signatures. The format for a method signature is as follows:
(<argument><argument><...>)<return>
Methods with no arguments contain an empty set of parentheses. Methods with no return value ends with a V. In the case of the method customButtonClicked(), the signature is "()V". Retrieve more complex method signatures with the javap tool.
The command for obtaining all the method signatures in CustomNSButton is this:
javap -s -private CustomNSButton
To run javap against your own class, just change the name of the class in the javap command to the name of your class. Run the javap tool against the compiled CustomNSButton class, and it returns the following results:
public class com.genedavis.CustomNSButton extends com.apple.eawt.
   CocoaComponent{
public com.genedavis.CustomNSButton();
  Signature: ()V
public native long createNSViewLong();
  Signature: ()J
public static native long setupNativeCallbacks();
  Signature: ()J
public int createNSView();
  Signature: ()I
public java.awt.Dimension getMaximumSize();
  Signature: ()Ljava/awt/Dimension;
public java.awt.Dimension getMinimumSize();
  Signature: ()Ljava/awt/Dimension;
public java.awt.Dimension getPreferredSize();
  Signature: ()Ljava/awt/Dimension;
public void setCustomTitle(java.lang.String);
  Signature: (Ljava/lang/String;)V
private void customButtonClicked();
  Signature: ()V
static {};
  Signature: ()V
}
Each method signature is clearly stated. Just copy the results to the GetMethodID when retrieving jmethod references.
Warning
Run the javap tool against compiled classes, not source files.
Tip
Obtaining jmethod and jfield (corresponding to Java attributes) pointers is relatively expensive. If you need repeated access to Java methods or fields, cache the pointers for performance improvements.
JNIEnv references provide the means for calling most of the methods you need when handling JNI native method implementations. You will get very accustomed to typing the following:
(*env)->SomeMethodNames();
The pointers I discussed so far are valid between native calls. JNIEnv is not valid across threads. Never cache JNIEnv pointers.
JNIEnv pointers are the first argument to all methods in JNI, so getting a new one that is valid on your current thread is usually not difficult when the thread is provided by the JVM. However, when you handle threads generated by user events on an NSView, you need to get your own JNIEnv pointer.
The notifyJavaThatButtonWasClicked( void ) function in nbe.m provides an example of obtaining a JNIEnv pointer from a JavaVM pointer. For convenience, the source for notifyJavaThatButtonWasClicked( void ) follows:
void notifyJavaThatButtonWasClicked( void )
{

   JNIEnv *env = NULL;
   jint env_error = JNI_OK;
   BOOL detach = NO;

   env_error = (*jvm)->GetEnv(
                              jvm,
                              (void **)&env,
                              JNI_VERSION_1_6);

   if ( env_error == JNI_EDETACHED)
   {
      // Attaching this thread to a JVM thread
      env_error = (*jvm)->AttachCurrentThread(
                                              jvm,
                                              (void **)env,
                                              NULL);

      if (env_error == JNI_OK)
      {
             detach = YES;
      }
   }

   (*env)->CallVoidMethod(
                          env,
                          customNSButtonJavaObject,
                          buttonClickMethod);
if (detach)
{
(*jvm)->DetachCurrentThread( jvm );
}
}Follow these steps to obtain a JNIEnv pointer:
Cache a
JavaVMpointer cached.Typically, caching a
JavaVMpointer when your dynamic library loads is easy. Cache theJavaVMpointer whenJNI_OnLoad()is called.Declare a
JNIEnvpointer.The declaration looks like this:
JNIEnv *env = NULL;
Retrieve the correct JNIEnv pointer from the JavaVM.
This is the call:
(*jvm)->GetEnv(
               jvm,
               (void **)&env,
               JNI_VERSION_1_6);
The function
GetEnv()takes aJavaVMpointer as the first argument. TheGetEnv()function takes a JNI version as the last parameter. TheJNIEnvpointer is filled with the proper value by theGetEnv()function in a similar manner because Java methods often set the value of Java objects passed into the methods as arguments.Attach the current thread to the JVM.
The
JNIEnvpointer does no good, if your current thread is not attached to the JVM. The error code returned byGetEnv()indicates the attached status of the current thread.Check the return value against
JNI_EDETACHED. If the current thread is not attached, call the following to attach the thread:(*jvm)->AttachCurrentThread( jvm, (void **)env, NULL);
Finally, all this work getting a valid JNIEnv allows you to perform a callback using the CallMethod(). The actual call in nbe.m follows:
(*env)->CallVoidMethod(
                          env,
                          customNSButtonJavaObject,
                          buttonClickMethod);
The word "void" in the CallVoidMethod() function indicates that the return value of the method you are calling is void. If there are arguments to the method, pass the appropriate JNI variables in to the function call as additional argument to the function call.
Tip
There are several version of the Call*Method() function. For a complete list of provided call method functions, see the jni.h file. A simple search by filename in the Finder provides the location of jni.h.
This section explains events in the context of CocoaComponent implementations. Most NSViews require user interaction and interaction from the Java code. Events are the last piece of the CocoaComponent puzzle that you need to understand.
The source for the Objective-C object, NSButtonExample, is found in the files NSButtonExample.h and NSButtonEample.m. As always, glancing at the Objective-C interface gives a quick overview of the Objective-C class. The following source is found in the NSButtonExample.h file on the Web site:
#import <jni.h>
#import <AWTCocoaComponent.h>
#import <Cocoa/Cocoa.h>
#include "nbe.h"

@interface NSButtonExample : NSButton <AWTCocoaComponent> {
}
-( id ) init;
- (void)mouseDown:(NSEvent *)theEvent;
-( void ) awtMessage: ( jint ) awtMessageID
message: ( jobject ) messageObject
env: ( JNIEnv * ) jni_env;
@endFrom this interface, you can see the NSButtonExample class extends NSButton. NSButton is an NSView. Not too surprisingly, NSButtons generate click events.
The NSButtonExample interface declares no variables.
The NSButtonExample declares the init: method, the mouseDown: method, and the awtMessage: method. The init: method is the class constructor. The mouseDown: method captures clicks on the NSButtonExample. The awtMessage: method receives method calls from the Java CocoaComponent's sendMessage() method.
The implementation source from NSButtonExample.m follows:
#import "NSButtonExample.h"
@implementation NSButtonExample
-( id ) init
{
   return [super init];
}
- (void)mouseDown:(NSEvent *)theEvent
{
   notifyJavaThatButtonWasClicked();
}
// receives sendMessage() calls
// from Java CocoaComponent
-( void ) awtMessage: ( jint ) awtMessageID
             message: ( jobject ) messageObject
                 env: ( JNIEnv * ) jni_env
{
   // Normally I would check the id to see which
   // message this was, but I only have one
   // implemented, so no need for a switch
   // statement this time.

   // converting the jstring to an NSString
   // 1. get a jchar array from the jstring
   // 2. get the length of the jstring
   // 3. instantiate the NSString
   // 4. free the jvm resources (no garbage collector here)
   const jchar *chars = (*jni_env)->GetStringChars(jni_env,
   messageObject, NULL);
   NSUInteger str_len = (*jni_env)->GetStringLength(jni_env,
   messageObject);
   NSString *message = [NSString
                        stringWithCharacters:(UniChar *)chars
                        length:str_len];
   (*jni_env)->ReleaseStringChars(jni_env, messageObject, chars);
   // setting the title of this button
   [self setTitle: message];
}
@end
When you implement an NSView, follow this pattern:
Implement an
init:method to handle configuration and initialization of theNSView.Implement user event handler(s).
Implement
awtMessage:to handlesendMessage()from the JavaCocoaComponent.
The NSButtonExample implementation handles mouse-down events by passing the event to the notifyJavaThatButtonWasClicked() function found in the nbe.m file. Once in the notifyJavaThatButtonWasClicked() function, retrieve a valid JNIEnv pointer, attach the current thread to the JVM, and issue a callback to the private customButtonClicked() method in the CustomNSButton class.
After I have the Application Kit's thread in Java, create a new Thread to handle the event, while returning the Application Kit's thread. Never allow an AWT thread to call an Application Kit's method in a way that may block the thread, and never allow an Application Kit's thread to call an AWT method in a way that may block the Application Kit's thread. The JOptionPane used in this example definitely blocks, so I call it on a separate thread.
Always play nice with threads that aren't yours. It sounds like some sort of rule of etiquette, but it actually prevents deadlocks and perceived performance issues.
The awtMessage: method in the NSButtonExample implementation handles incoming sendMessage() calls. (Note that the JNIEnv pointer is actually the last parameter, not the first as you might expect with JNI related functions.) The jint is the int representing the message id. The jobject represents the message data.
In the case of this example, the jobject is a Java String. These are conversion steps for the jobject to an NSString:
Obtain the Java
Stringas ajchar*.You accomplish this with a call to the
GetStringChars()function contained in the JNI environment.Get the length of the string.
The length of the string is obtained with another call to the JNI environment. Strings are essentially character arrays in C. Because C does not track the length of arrays, strings in C contain a value of
0at the end of the string. (This is referred to as null terminating.) You must manually place this value of0when creating strings in C. That is why I need the string length.Create an
NSStringby providing a pointer to the raw unicode characters and the length of the final string.Free the JVM resources in the JNI environment.
Now that I have my string's value safely copied to a shiny new
NSString, it is time to release the JNI environment's string resources. Again, I call a function in theJNIEnv*variable, namedjenv, to release the resources.
Other jobject types actually require more steps to translate, so for simple messages I stick with sending strings from Java to Objective-C.
This chapter is about using the CocoaComponent from the Apple Java Extensions' com.apple.eawt package. When delving into the complexities of using the CocoaComponent, understanding the basics of JNI is helpful. Even trivial implementations of the CocoaComponent require basic JNI skills.
Java classes that handle JNI, usually contain native Java methods and static code blocks. The command-line tool, javah, creates JNI header files for use with C. The javah tool does this by investigating a compiled class's methods and then creates the C headers based on those Java methods tagged with the native key word.
CocoaCompoments wrap Objective-C classes that extend NSView. Implement your CocoaComponent on the Java side by extending CocoaComponent and implementing the createNSViewLong() method as a native method. CocoaComponent is an AWT Canvas, so add it to any appropriate AWT or Swing hierarchy.
Communication between Objective-C NSView implementations and Java CocoaComponent requires the sendMessage() method and native callbacks to Java. Use the sendMessage() method to send messages to your native NSView implementation. Use callbacks to message Java from your NSView when users trigger events on the NSView.
When implementing NSView objects for use in the CocoaComponent, implement the AWTCocoaComponent protocol. The AWTCocoaComponent protocol provides the receiving method for messages sent from the CocoaComponent's sendMessage() method. The awtMessage: method provides your NSView implementation with a message id, a message object, and a copy of the current JNI environment.
As an Objective-C class, your NSView needs to define a class implementation and a class interface. A *.h file contains the interface. A *.m file contains the class implementation. Though discouraged, both Objective-C object interface and Objective-C object implementation may exist in a single file. If so, place them in an *.m file.