
Chapter 4
Searching, Browsing, and Sorting in iTunes
- Browsing your iTunes library
- Changing options for viewing your content
- Sorting content by view options
- Searching for content in the library
You rip a few CDs, buy some songs and movies from the iTunes Store, and you're hooked. You keep adding more and more content to your library and forget how to find items you added last month. It's time to discover how to organize your content and navigate your iTunes library.
The iTunes library can hold an unlimited number of files, depending on how much space you have on your hard drive. But even if you keep your iTunes library down to the size of what fits on your iPod or iPhone, you still have a formidable collection at your fingertips. If your content collection is getting large, organize it to make finding songs, audio books, podcasts, and videos easier. After all, finding U2's “I Still Haven't Found What I'm Looking For” is a challenge, even in a library that fits on an 8GB iPod nano.
This chapter shows you how to search, browse, and sort your iTunes library. You can find any content item in seconds. You can also change the viewing options to make your library's display more useful, such as displaying songs sorted by artist, album, genre, or other attributes, or sorting TV shows by season or episode.
Browsing by Artist, Album, and Cover
The iTunes window provides you with the List pane running down its right side and the Source pane on the left side The List pane offers a view of your library and content, depending on which sources of content you choose in the Source pane on the left side.
That's all well and good, but what if your content library has grown by leaps and bounds, making it hard to get an overview of all the content in the List pane? Try browsing. iTunes offers three View buttons in the upper-right corner for browsing your content in the List pane:
- List (the left button, or choose View
 As List) shows items in a list. To see all the music in your library in List view, select Music in the Source pane in the Library section. The List view shows the title of each song in the Name column, the artist or band name in the Artist column, and the title of the album in the Album column.
 In List view, choose ViewShow Column Browser to show the browser, which displays columns you can browse to easily find items. To make the browser disappear and see your content in a full list, choose ViewHide Column Browser. You can also display songs in a list with the album cover art by choosing ViewShow Artwork Column. (Turn this off by choosing ViewHide Artwork Column.)
 - Grid (the center button, or choose ViewAs Grid) shows thumbnail cover art images in a grid, as shown in Figure 4-1. Double-click a thumbnail to display a list of albums with an artwork column.
- Cover Flow (the right button, or choose ViewAs Cover Flow) shows the cover browser, also known as Cover Flow, as described in the next section.
Cover Flow lets you flip through your cover art to select music, movies, TV shows, podcasts, and audio books. Just drag the slider to scroll swiftly through your library or click to the right or left of the cover art in the foreground to move forward or backward, respectively. When you scroll or click through cover art, the content items in the List pane also change. Doubleclick the foreground cover art to start playing the first item — whether it's an album's first song, a movie, the first chapter of an audio book, or the first episode of a TV show.
To fill your library automatically with cover art, get yourself an iTunes Store account (if you don't already have one). Log in to your account; then choose Advanced![]() Get Album Artwork. iTunes grabs the cover art not only for content downloaded from the iTunes Store — including movies, TV shows, audio books, and podcasts — but also for CDs you ripped, provided that the albums are also available in the iTunes Store. Even if you downloaded or ripped only one song of an album, you get the album's cover art for that song.
Get Album Artwork. iTunes grabs the cover art not only for content downloaded from the iTunes Store — including movies, TV shows, audio books, and podcasts — but also for CDs you ripped, provided that the albums are also available in the iTunes Store. Even if you downloaded or ripped only one song of an album, you get the album's cover art for that song.
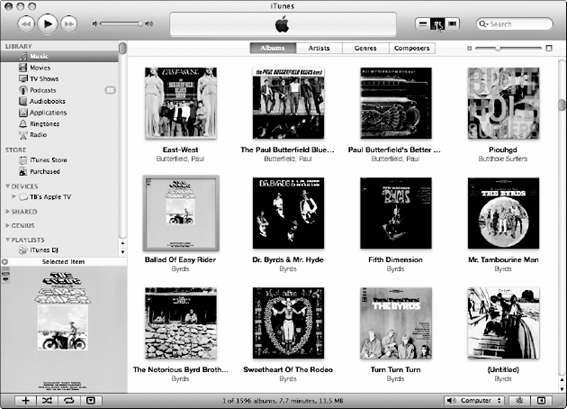
Figure 4-1: Browse music in the List pane as a grid of cover art.
Understanding the Content Indicators
When you make choices in iTunes, it displays an action indicator next to each content item in List view — song, movie, TV show episode, music video, audio book, radio station, or podcast episode — to show you what it's doing. Here's a list of the indicators and their meanings:
- Orange waveform: iTunes is importing the item.
- Green check mark: iTunes finished importing the item.
- Exclamation point: iTunes can't find the item.
- Broadcast icon: The item is on the Internet and plays as a stream.
- Black check mark: The item is marked for the next operation, such as importing from an audio CD or playing in sequence. Click to remove the check mark.
- Speaker: The item (song, movie, episode, or whatever) is playing.
- Chasing arrows: iTunes is copying the content item from another location or downloading it from the Internet.
Changing the List View Options
iTunes lets you customize the List view in the List pane for each type of content. For music, the list starts out with the Name, Artist, Album, Track, Time, Genre, My Rating, Play Count, and Last Played categories. You might have to drag the horizontal scroll bar along the bottom of the song list to see all these columns. You can display more, less, or different information in your song list.
Customize your List view in the following ways:
- Make a column wider or narrower. While you move your cursor over the divider between two columns, the cursor changes to a vertical bar with opposing arrows extending left and right; you can click and drag the divider to change the column's width.
- Change the order of columns. Click a column heading and drag the entire column to the left or right.
- Add or remove columns. You can add or remove any column except Name and the playlist order:
a. Select the type of content in the Source pane in the Library section (Music, Movies, TV Shows, Podcasts, Audiobooks, Radio, or Ringtones) and choose View
View Options.b. Select the columns that you want to appear in the list from the View Options dialog (as shown in Figure 4-2).
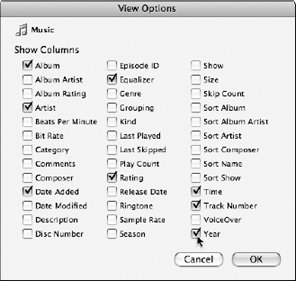
Figure 4-2: Change the viewing options for music in List view.
Enabling the Kind column in the View Options dialog can help you keep track of different kinds of files, such as songs encoded as AIFF, AAC, or MP3 or videos encoded in QuickTime or MPEG.
Sorting Content by the List View Options
With just a little know-how, you can use the List view options to sort the listing of content items. You can sort items not only by name or album but also by composer, the date the items were added to the library, or other information that you've added to an item.
At the very least, you can sort the content by the column headings you now use in the List view. You can also add other column headings to your List view (as I describe in the previous section) and sort with them.
For example, clicking the Time heading reorders the items by their duration in ascending order, from shortest to longest. If you click the Time heading again, the sort is in descending order, which is reversed, starting with the longest item. You can sort by any column heading, such as Artist, Album, Track, Date Added, and Ratings.
You can tell whether the sort is in ascending or descending order by the little arrow indicator in the heading. When the arrow points up, the sort is in ascending order; when pointing down, it's in descending order.
You can always sort a list using the old standby, alphabetical order. Click the Artist heading to sort the items in the list by artist name in alphabetical order (arrow pointing up). Click it again to sort the list in reverse alphabetical order (arrow pointing down).
iTunes also lets you sort the song list via the Album column. Each time you click Album, the heading cycles through each of the following options:
- Album, which sorts alphabetically by album title.
- Album by Artist, which groups albums by artist and then lists them alphabetically.
- Album by Year, which groups albums by artist and then lists them chronologically by year (set in the Song Information dialog).
Searching for Content
Because your iTunes library will most likely grow, you might find the usual browsing and scrolling methods that I describe earlier in this chapter too time-consuming. Let iTunes find your content for you!
 If you want to search the entire library with the browser open in List view, select All at the top of the Genre and Artist columns to browse the entire library before typing a term in the Search field. Or, if you prefer, choose View
![]() Hide Column Browser to show the List view without the browser.
Hide Column Browser to show the List view without the browser.
Locate the Search field — the oval field in the upper-right corner — and follow these steps:
- Click in the Search field and enter several characters of your search term.
Use these tips for successful searching:
- Specify your search with a specific title, artist, or album.
- Narrow your search by typing more characters. Using fewer characters results in a longer list of possible songs.
- Case doesn't matter, nor do whole words. The Search feature ignores case. For example, when I search for miles, iTunes finds a long list that includes “Eight Miles High,” “Forty Miles of Bad Road,” and “She Smiles like a River,” as well as everything by Miles Davis.
- Scroll through the search results and then click an item to select it.
To back out of a search so that the full list appears again, you can either click the circled X in the Search field (which appears after you start typing characters) or delete what you typed. You then see the entire list in the List pane, just like before you began your search. All the items are still there and remain there unless you explicitly remove them. Searching manipulates only your view of the items.
Finding the Content's Media File
Getting lost in a large library is easy. While you browse your library, you might want to return quickly to view the current item playing. While your file plays, choose View![]() Go to Current Song (or press
Go to Current Song (or press ![]() -L on a Mac or Ctrl-L in Windows as a shortcut). iTunes shows you the item that's playing.
-L on a Mac or Ctrl-L in Windows as a shortcut). iTunes shows you the item that's playing.
You can also show the location of the media file for any content item. This trick comes in handy when you want to open the media file's folder. On a Mac, choose File![]() Show in Finder (or press
Show in Finder (or press ![]() -R); in Windows, choose File
-R); in Windows, choose File![]() Show in Windows Explorer (or press Ctrl-R). iTunes gives control to the operating system (Mac or Windows), which displays the folder that contains the media file.
Show in Windows Explorer (or press Ctrl-R). iTunes gives control to the operating system (Mac or Windows), which displays the folder that contains the media file.