
Chapter 2
Setting Up iTunes and Your iPod
- Installing iTunes on a Windows PC and a Mac
- Examining what you can do with iTunes
- Visiting the iTunes Store
- Setting up a store account
This chapter explains how to set up your iPod with iTunes on a Mac or for Windows. iTunes includes the iPod software, which provides the intelligence inside the device. iTunes is no slouch in the intelligence department either, because it immediately recognizes the type of iPod you have and installs the correct software.
Installing iTunes
If you're a Mac user, you should already have iTunes installed because all Macs sold since 2003 (and many before that time) are preinstalled with iTunes and Mac OS X, and you also get iTunes if you install Mac OS X on an older machine. The most up-to-date version of iTunes as of this writing is version 9.
The version of iTunes that's provided with the Mac might be the newest version; then again, it might not be. Software updates occur very rapidly. If iTunes displays a dialog with the message that a new version of iTunes is available and asks whether you would like to download it now, click Yes to download the new version. Mac OS X not only downloads iTunes but also installs it automatically.
 You can set your Mac to automatically download the latest version of iTunes when it becomes available. Choose Preferences from the iTunes menu, click the General tab, and select the Check for Updates Automatically check box at the bottom of the General preferences to turn it on.
If your tastes run to Windows PCs, then you'll want to download the Windows version of iTunes from the Apple Web site (www.apple.com/itunes/download). Just select the appropriate version (Windows here) and then click the Free Download button, as shown in Figure 2-1. Follow the instructions to download the installer to your hard drive and then have the installer walk you through getting iTunes set up on your machine.
What You Can Do with iTunes
You can purchase songs or entire albums, audio books, TV shows, movies, and other videos from the iTunes Store and download them directly into your iTunes library, or you can copy these items from other sources (including audio CDs) into your iTunes library. You can also subscribe to podcasts that transfer audio or audio/video episodes, such as weekly broadcasts, automatically to your iTunes library from the Internet or through the iTunes Store. You can even use iTunes to listen to Web radio stations and add your favorite stations to your music library. After you store the content in your iTunes library, you can play it on your computer and transfer it to iPod, Apple TV, and iPhone models. You can also burn the audio content onto an audio CD or copy audio and video files onto other hard drives or DVD data discs as backups.
Transferring songs from a CD to your computer is called ripping a CD (to the chagrin of the music industry old-timers who think that users intend to rip off music without paying for it). Ripping an entire CD's worth of songs is quick and easy, and track information, such as artist name and title, arrives automatically over the Internet for most commercial CDs. (You can add the information yourself for rare CDs, custom-mix CDs, live CDs, and others that are unknown to the database.)

Figure 2-1: Download the newest version of iTunes from the Internet.
You can also add video files to your iTunes library in a couple of ways: by choosing content from the iTunes Store (such as TV shows, feature-length movies, music videos, and even free movie trailers) or by downloading standard video files in the MPEG-4 format from other sources on the Internet. You can also create your own videos with a digital camcorder (or cameras built into computers, such as the iSight camera included with MacBooks) and copy them to iTunes.
As if that weren't enough, iTunes gives you the power to organize content into playlists. (You can even set up dynamic, smart playlists that reflect your preferences and listening habits.) It even has a built-in equalizer with preset settings for all kinds of music and listening environments, with the added bonus of being able to customize and save your own personalized settings with each item of content.
The Mac and Windows versions of iTunes are virtually identical, with the exception that dialogs and icons look a bit different between the two operating systems. There are also a few other differences, mostly related to the different operating environments. The Windows version lets you import Windows Media (WMA) songs; the Mac version, like most Mac applications, can be controlled by AppleScript programs and Automator workflows. Nevertheless, as Apple continues to improve iTunes, the company releases upgrades to both versions at the same time, and the versions are free to download.
Opening the iTunes Window
You can run iTunes anytime (with or without an iPod) to build and manage your library. You don't have to actually connect your iPod until you're ready to transfer content to it.
When you launch iTunes, your library and other sources of content appear. Figure 2-2 shows the iTunes window on a PC running Windows showing the Column Browser to browse by artist, and the Artwork Column to show album covers.
The Mac and Windows versions of iTunes look nearly identical and offer the same functions and viewing options, including the cover browser (also known by its older name, Cover Flow). Figure 2-3 shows the iTunes window on the Mac with the cover browser open, displaying the cover art for albums.
iTunes offers a view of your library and other sources for content, as well as controls for organizing, importing, and playing content, as follows:
- Source pane: Displays the source of content, divided into sections called Library (your music, movies, TV shows, podcasts, audio books, applications, radio stations, and ringtones); Store (the iTunes Store and your Purchased list); Devices (such “TB's Apple TV” in Figure 2-3), Shared libraries, Genius mixes and Genius playlists as well as regular Playlists like the iTunes DJ and your own playlists).
- Cover browser: Also called Cover Flow, the cover browser lets you flip through your cover art to choose songs. You can use the slider (refer to Figure 2-3) to move swiftly through your library, or you can click to the right or left of the cover in the foreground to move forward or backward in your library.
- List pane: Depending on the source that's selected in the Source pane under Library, Store, Devices, Shared, Genius, or Playlists, the List pane (refer to Figure 2-2) displays the content from that source. For example, choosing an iPod in the Devices section displays the iPod content in the List pane, while choosing Music in the Library section displays the music in your iTunes library.
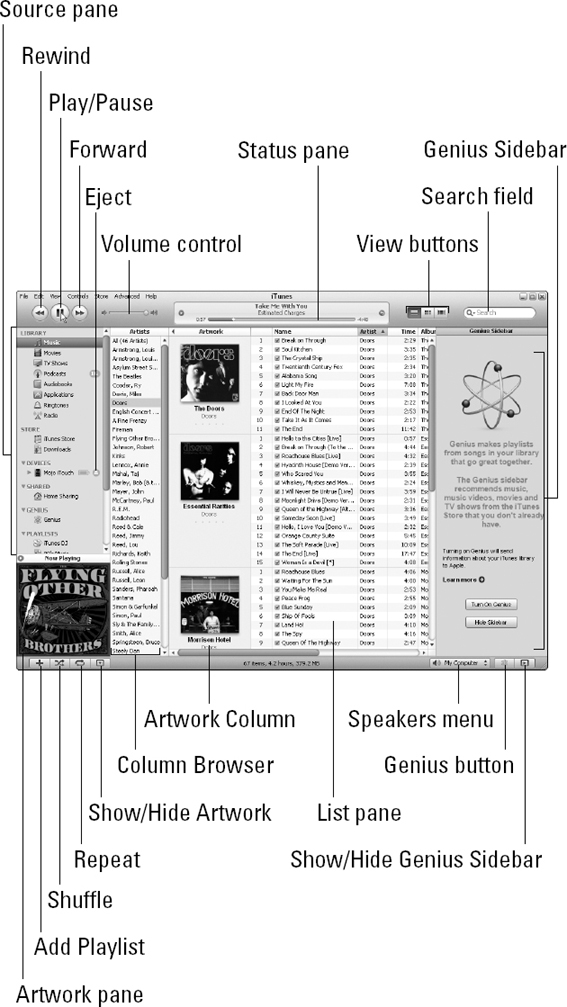
Figure 2-2: The iTunes window on a PC in Browse view.
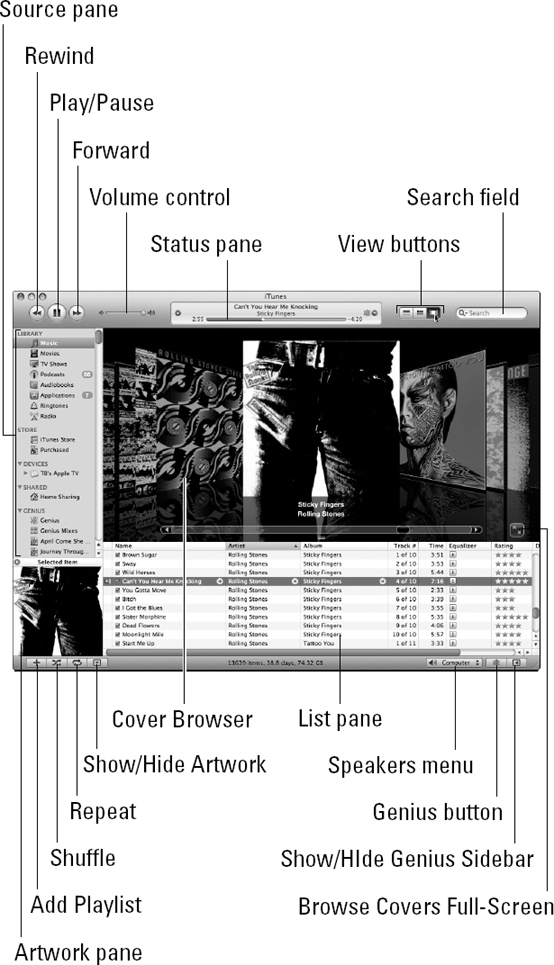
Figure 2-3: The iTunes window on a Mac with the cover browser open.
- Column Browser and Artwork Column: To see these views, click the leftmost View button for List view (refer to Figure 2-2) and then choose either View
 Show Column Browser or ViewShow Artwork Column. To hide the Artwork Column, click the tiny left arrow to the left of the Artwork Column heading or choose ViewHide Artwork Column; to hide the Column Browser, choose ViewHide Column Browser.
 - Genius Sidebar: The Genius Sidebar (refer to Figure 2-2) makes suggestions for what to get from the iTunes Store based on what you've selected. There's no obligation to buy anything, and you can open or close the Genius pane by clicking the boxed-arrow Show/Hide Genius pane button in the lower-right corner of the iTunes window.
- View buttons: The three buttons in the upper-right corner change your view of the List and Browse panes to show items in a list, show cover art thumbnail images in a grid, or show the cover browser.
- Start Genius button: The Start Genius button at the lower-right corner of the iTunes window — just to the left of the Show/Hide Genius Sidebar button — generates a playlist of songs from your library that go great with the song you selected. The Start Genius button appears only when selecting music or a playlist.
- Status pane: When a song, audio book, radio station, podcast, or video is playing, you see the artist name, piece title (if known), and the elapsed time displayed in this pane.
- Search field: Type in this field to search your library, peruse a playlist, or look in the iTunes Store.
- Player buttons — Forward/Next, Play/Pause, and Previous/Rewind: Use these buttons to control the playback of content in iTunes.
- Playlist buttons — Add, Shuffle, Repeat: Use these buttons to add playlists and shuffle or repeat playback of playlists.
- Volume control: You can change the volume level in iTunes by dragging the volume control slider in the upper-left section of the iTunes window to the right to increase the volume, or to the left to decrease it. The maximum volume of the iTunes volume slider is the maximum set for the computer's sound.
- Show/Hide Artwork: Display or hide artwork (either your own or artwork supplied with purchased songs and videos).
- Eject button: This button appears next to the name of an audio CD or iPod in the Source pane to eject the CD or iPod. Whereas a CD actually pops out of some computers, iPods are hard drives. So ejecting an iPod simply removes (unmounts) the drive from the system.
Visiting the iTunes Store
You can visit the iTunes Store by connecting to the Internet and using iTunes. You can also click an iTunes Store link on Apple's Web site, or a similar link on any other Web site that is an iTunes affiliate with songs for sale (such as www.rockument.com). The link automatically launches your installed copy of iTunes and opens the iTunes Store.
As of this writing, the iTunes Store offers millions of songs you can freely copy and play on other devices for 69 cents, 99 cents, or $1.29. Until recently, many of the songs were copy-protected — you could only play them on up to five different authorized computers and use them on iPods, iPhones, or Apple TVs. Now, all songs and albums are provided in the “iTunes Plus” format that offers higher sound quality without copy protection. You can play iTunes Plus songs on any player that supports the AAC format and on an unlimited number of computers, and you can burn an unlimited number of CDs with them.
You can also buy audio books and episodes and entire seasons of TV shows. First-run movies are also available for rent or purchase. iTunes also offers tons of free content in the form of podcasts, which are similar to syndicated radio and TV shows, but you can download them into iTunes and play them at your convenience on your computer and on your iPod.
 The iTunes Store is part of iTunes version 4 and newer, but you should be using version 9 as of this writing. If you're running an older version of iTunes, download the newest version, as described earlier in this chapter.
With the iTunes Store, you can preview any song for up to 30 seconds. Some movies offer one-minute previews and movie trailers you can view for free, and TV shows and audio books can offer previews up to 90 seconds.
If you have an account set up, you can buy and download content immediately, including movies for rent. I don't know of a faster way to purchase or rent content.
If you already have your iTunes program open, you have at least three choices when it comes to opening the iTunes Store:
- Click the iTunes Store option in the Source pane. The iTunes Store's home page opens, as shown in Figure 2-4.
- Click any link in the Genius Sidebar. The iTunes Store home page opens and automatically switches your Source pane selection to iTunes Store. The Genius Sidebar offers suggestions based on the music you select in your library; see Chapter 6 for details.
- Follow a content link in iTunes. Click the content link (the gray-circled arrow next to a song or video title, an artist name, or an album title) to go to an iTunes Store page related to the song or video, artist, or album. iTunes searches the iTunes Store based on the item you selected. If nothing closely related turns up, at least you end up in the iTunes Store, and you might even find music you like that you didn't know about.
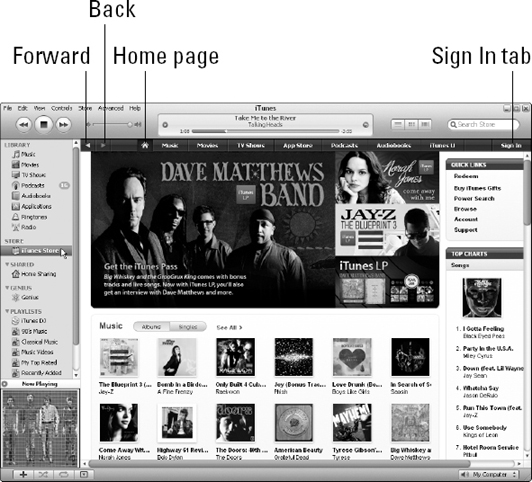
Figure 2-4: The iTunes Store home page.
The iTunes Store uses the iTunes List pane to display its wares. You can check out content to your heart's content, although you can't buy content, download free content, or rent movies unless you have an iTunes Store account set up.
The iTunes Store also provides tabs and buttons on a black bar above the List pane. The left and right triangle buttons work just like the Back and Forward buttons of a Web browser, moving back a page or forward a page, respectively. The button with the Home icon takes you to the iTunes Store home page. (Refer to Figure 2-4.)
Setting Up an Account
You need an account to purchase content or to rent movies. To create an iTunes Store account, follow these steps:
- In iTunes, click the iTunes Store option in the Store section of the Source pane, or click a music link or Genius Sidebar link.
The iTunes Store home page appears (refer to Figure 2-4), replacing the List and Browse panes.
- Click the Sign In tab in the upper-right area of the window to either create an account or sign in to an existing account.
When you're logged in to an iTunes account, the account name appears in place of the Sign In tab.
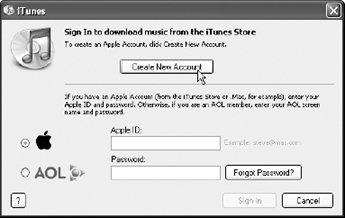
After you click the Sign In tab, iTunes displays the account sign-in dialog, as shown in Figure 2-5.
- Click the Create New Account button.
iTunes displays a new page, replacing the iTunes Store home page with the terms of use and an explanation of the steps for creating a new account.
- Click the Agree button to agree with the legal terms and then click Continue.
iTunes displays the personal account information page of the setup procedure.
- Fill in your personal account information.
You need to enter your e-mail address, password, test question and answer (in case you forget your password), birth date, and privacy options.
- Click the Continue button to go to the next page, and then enter your credit card information.
The entire procedure is secure, so you don't have to worry. The iTunes Store keeps your personal information (including your credit card information) on file, and you won't have to type it again.
- Click Continue to finish the procedure.
You can now use the iTunes Store to purchase and download content to play in iTunes and use on an iPod, iPhone, or Apple TV.