
Chapter 6
Organizing iTunes Content with Playlists
- Creating a playlist of songs and albums
- Creating and editing smart playlists
- Creating a Genius playlist
The ability to play any set of songs in a specific order is one of the joys of using iTunes and iPods. A playlist is a list of the items that you want, organized in the sequence that you want to play them. For example, you can make a playlist of love songs from different albums for a romantic mood, or surf songs for a trip to the beach.
You can also organize playlists for different operations, such as copying to your iPod, iPhone, or Apple TV or burning a CD. I create playlists that combine songs from different albums based on themes or similarities. For example, I have a jazz playlist for cruising around with my iPhone in the city at night, a classic rock playlist for jogging with my iPod shuffle in the morning and hanging out in coffee shops with my iPod nano, a playlist of short films mixed with TV shows for a long airplane ride with my iPod touch, and a playlist of rain songs to celebrate rainy days.
You can create as many playlists of songs, audio books, podcast episodes, and videos as you want, in any order that you like. The items and their files don't change, nor are they copied. iTunes simply creates a list of the item names with links to the actual items and their files.
You can even create a smart playlist, which automatically includes items in the playlist based on the criteria you set up and also removes items that don't match the criteria. The information included in iTunes is very useful for setting up the criteria. For example, you can define the criteria for a smart playlist to automatically include songs from a particular artist or songs that have the highest rating or fit within a particular musical genre.
Creating Playlists
Playlists are important for managing your content library. For example, you need to create a playlist in order to burn a CD, and you may want to synchronize your iPod or iPhone using playlists (as I describe in Chapter 7). They can also make it easier to find items you like without searching the entire library for them. You can create playlists of individual songs or entire albums. You can also include audio books, TV shows, videos, podcast episodes, and Web radio stations in playlists.
To create a playlist, follow these steps:
- Click the Add Playlist button (the + button in the lower-left corner of the iTunes window under the Source pane) or choose File
 New Playlist.
This step creates a new, untitled playlist in the Playlists section of the Source pane named, appropriately enough, untitled playlist, highlighted and ready to rename.
- Give the playlist a new descriptive name.
You can begin typing a new name and press Return (or just click somewhere else) to save the name. (If the playlist name wasn't highlighted first, click once to select it and then click the name again so that the text cursor appears; doing so highlights the playlist name, making it ready for you to type the new name.)
After you type the new name, iTunes automatically sorts it into alphabetical order in the Playlists section of the Source pane (underneath the preset smart playlists).
- Select a source, such as Music or Audiobooks, in the Library section of the Source pane and then drag items from the library to the playlist.
Drag one item at a time or drag a group of items, dropping them onto the playlist name in the Source pane. The initial order of items in the playlist is based on the order in which you drag them to the list.
- Select the playlist in the Playlists section of the Source pane to play it.
After selecting a playlist, the items in the playlist appear in the List pane. Select any item in the playlist to start playing from that item to the end of the playlist, and click the Play button.
To rearrange the list of items in the playlist, see the section “Rearranging and managing playlists,” later in this chapter.
To open a playlist in a new window, double-click the icon next to the playlist name in the Source pane. You can then browse your music library and drag items from your music library to the separate playlist window.
 To create a playlist quickly, select the group of items in the List pane that you want to make into a playlist. Choose File
![]() New Playlist from Selection, or drag the selection to an area between playlists in the Source pane. You can then type a name for the new playlist that appears.
New Playlist from Selection, or drag the selection to an area between playlists in the Source pane. You can then type a name for the new playlist that appears.
Making playlists of albums
Making a playlist of an album is simple. Select the Music option in the Library section of the Source pane, and select an album — either in Grid or Cover Flow view, or in List view using the Column Browser (choose View![]() Show Column Browser). Then drag the selected album to an area between playlists in the Playlists section of the Source pane. Or, select the album and then choose File
Show Column Browser). Then drag the selected album to an area between playlists in the Playlists section of the Source pane. Or, select the album and then choose File![]() New Playlist from Selection. iTunes automatically creates a new playlist named after the album.
New Playlist from Selection. iTunes automatically creates a new playlist named after the album.
You might want to play several albums back to back without having to select each album to play it. For example, you might want to use an iPod on that long drive from London to Liverpool to play The Beatles' albums in the order they were released (or perhaps in the reverse order, following The Beatles' career from London back to Liverpool). To create a playlist of entire albums in a particular order, drag each album to the same playlist in the order you want to play them. Each time you drag an album, iTunes automatically lists the songs in the proper track sequence for each album. The albums are listed in the playlist in the order that you dragged them.
Rearranging and managing playlists
To rearrange the items in a playlist, follow these steps:
- Select the playlist in the Playlists section of the Source pane.
After selecting a playlist, the items in the playlist appear in the List pane.
- Drag items in the List pane to rearrange the list.
- To move an item (such as a song) up the list and scroll at the same time, drag it over the up arrow in the first column.
- To move an item down the list and scroll, drag it to the bottom of the list.
- To move a group of items at once, press Shift and select a range of items (or press
 on a Mac or Ctrl in Windows while clicking to select specific songs) and then drag them into a new position.
Besides dragging items, you can also rearrange a playlist by sorting it: Just click one of the column headings, such as Name, Time, or Artist.
 You can drag items from one playlist to another. Only links are copied, not the actual files.
You can rename a playlist at any time by clicking its name twice and typing a new one. Also, in case you forget which items are in which playlists, you can see all the playlists that include a particular item. In List view, press Control on a Mac and click the item; in Windows, right-click the item and choose Show in Playlist from the contextual menu. The playlists that include the item are listed in the submenu.
Deleting items from a playlist
You can delete items from playlists while keeping the items in your library. When you delete an item from a playlist, the item is simply deleted from the list — not from the library. You can also delete entire playlists without harming the content in the library. Note: You'll need to switch to the Library section of the Source pane (Music, Movies, TV Shows, and so on) if you want to delete items permanently from your library.
To delete an item from a playlist, select the playlist in the Playlists section of the Source pane and then select the item. Press Delete/Backspace or choose Edit![]() Delete. In the warning dialog that appears, click the Remove button to remove the selected item from the list.
Delete. In the warning dialog that appears, click the Remove button to remove the selected item from the list.
The one way you can completely delete an item from your library from within a playlist is by selecting the item and pressing ![]() -Option-Delete (Mac) or Ctrl-Alt-Backspace (Windows).
-Option-Delete (Mac) or Ctrl-Alt-Backspace (Windows).
To delete a whole playlist, select the playlist in the Playlists section of the Source pane and then press Delete/Backspace or choose Edit![]() Delete.
Delete.
Using Smart Playlists
Under iTunes DJ (near the top of the Playlists section of the Source pane), you can find smart playlists, which are indicated by a gear-in-a-document icon. iTunes comes with a few sample smart playlists, such as My Top Rated and Recently Added, and you can create your own. Smart playlists add items to themselves based on prearranged criteria, or rules. For example, when you rate your content items, My Top Rated changes to reflect your new ratings. You don't have to set up anything because My Top Rated and Recently Added are already defined for you.
Of course, smart playlists are ignorant of your taste in music or video. You have to program them with rules by using the song information in iTunes (see Chapter 5 about adding or editing song information, including ratings). For example, you can create a smart playlist that uses the Year field to grab all the songs from 1966. This list, in no particular order, might include The Beatles (“Eleanor Rigby”), Frank Sinatra (“Strangers in the Night”), The Yardbirds (“Over Under Sideways Down”), and Ike and Tina Turner (“River Deep, Mountain High”) — a far-out playlist, no doubt, but not necessarily what you want. You can use other fields of information that you entered (such as ratings, artist name, or composer) to fine-tune your criteria. You can also use built-in functions, such as Play Count (the number of times the item was played) or Date Added (the date the item was added to the library).
Creating a smart playlist
To create a new smart playlist, choose File![]() New Smart Playlist. The Smart Playlist dialog appears (as shown in Figure 6-1), offering the following choices for setting criteria:
New Smart Playlist. The Smart Playlist dialog appears (as shown in Figure 6-1), offering the following choices for setting criteria:
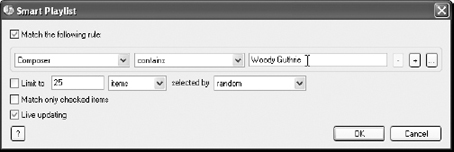
Figure 6-1: Set the first match rule for a smart playlist.
- Match the Following Rule: From the first pop-up menu (refer to Figure 6-1), you can choose any of the categories used for information, such as Artist, Composer, or Last Played. From the second pop-up menu, you can choose an operator, such as the greater-than or less-than operator. The selections that you make in these two pop-up menus combine to create a rule, such as Year is greater than 1966 or, as in Figure 6-1, Composer contains (the words) Woody Guthrie.
You can also add multiple conditions by clicking the + button (on the right) as shown in Figure 6-2. You then decide whether to match all or any of these conditions. The Match xx of the Following Rules option is enabled by default when you set one or more rules.
- Limit To: You can limit the smart playlist to a specific duration, measured by the number of songs (items), time, or size in megabytes or gigabytes, as shown in Figure 6-2. You can have items selected by various methods, such as random, most recently played, and so on.
- Match Only Checked Items: This option selects only those songs or other items in the library that have a check mark beside them, along with the rest of the criteria. Selecting and deselecting items is an easy way to fine-tune your selection for a smart playlist.
- Live Updating: This allows iTunes to continually update the playlist while you play items, add or remove items from the library, change their ratings, and so on.
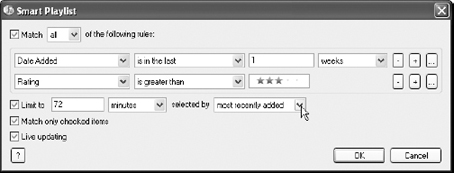
Figure 6-2: Use multiple conditions and a time limit for a smart playlist.
After setting up the rules, click the OK button. iTunes creates the playlist, noted by a gear-in-a-document icon and the name untitled playlist (or whatever phrase you used for the first condition, such as the album or artist name). You can click in the playlist field and then type a new name for it.
Editing a smart playlist
To edit a smart playlist, select it from the Playlists section of the Source pane and choose File![]() Edit Smart Playlist. Or, you can Control-click (Mac) or right-click (Windows) the playlist and then choose Edit Smart Playlist from the contextual menu. Either way, the Smart Playlist window appears with the criteria for the smart playlist.
Edit Smart Playlist. Or, you can Control-click (Mac) or right-click (Windows) the playlist and then choose Edit Smart Playlist from the contextual menu. Either way, the Smart Playlist window appears with the criteria for the smart playlist.
For example, to modify the smart playlist so that items with a higher rating are picked, simply add another star or two to the My Rating criteria.
You can also choose to limit the playlist to a certain number of items selected by various methods, such as random, most recently played, and so on.
Adding a Touch of Genius
If you select a song and click the Genius button, iTunes takes a look at your selection and creates a playlist of songs that go along with it. That's genius!
The Genius sidebar works with Apple's iTunes Store content to match your tastes to other iTunes users using a technique called collaborative filtering. The Genius feature analyzes the music in other people's iTunes libraries — people who also have the same song you selected (if they also turn on the Genius feature in iTunes). All this information is shared anonymously. The only music Genius knows, however, is the music available in the iTunes Store.
For the Genius feature to work, you need an iTunes Store account and you must turn on Genius to enable iTunes to scan your music library and catalog your iTunes collection. The scanning process may take a few minutes or (for very large collections) a few hours, but you can continue using iTunes while it scans your music.
To turn on Genius, click the Turn on Genius button in the Genius sidebar, enter your Apple ID and password for your iTunes Store account, and click the Continue button.
You can also turn on the Genius feature by choosing Store![]() Turn On Genius, and turn if off by choosing Store
Turn On Genius, and turn if off by choosing Store![]() Turn Off Genius. If you add new music, you can tell iTunes to immediately update the Genius feature with new information by choosing Store
Turn Off Genius. If you add new music, you can tell iTunes to immediately update the Genius feature with new information by choosing Store![]() Update Genius.
Update Genius.
Creating a Genius playlist
To create a Genius playlist, select a song in the List pane and click the Genius button (the button with the atom icon) at the lower-right corner of the iTunes window. iTunes displays the Genius playlist based on the selected song. You can limit the number of songs for the Genius playlist by clicking the Limit To pop-up menu in the top row of buttons on the right side of the List pane, as shown in Figure 6-3.
You can refresh the Genius playlist with a new batch of songs based on the selected song by clicking the Refresh button in the top row of buttons (refer to Figure 6-3). When you refresh a Genius playlist, you lose the previous version of that playlist.
To save a Genius playlist, click the Save Playlist button in the right corner of the top row of buttons. The playlist is saved with the Genius icon using the name of the selected song and listed in the Playlists section of the Source pane at the top, above smart playlists. You can revisit this Genius playlist and refresh it, or change its song limit. You can also rearrange the songs in the Genius playlist by dragging them. To sort the songs, click the column headers in the List pane — just like other playlists.
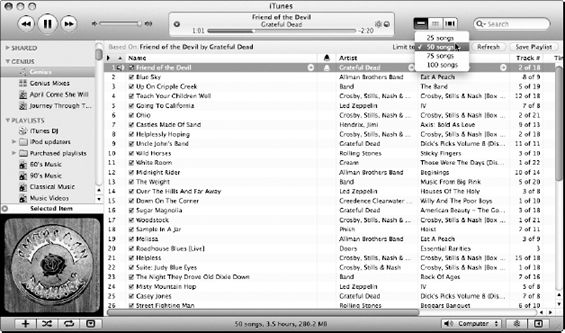
Figure 6-3: Limit the number of songs for the Genius playlist.
You can synchronize your saved Genius playlists with your iPod or iPhone (see Chapter 7 for details). Synchronized Genius playlists on the iPod or iPhone contain the same songs that appeared in the iTunes version of the playlist.
Playing Genius mixes
The Genius of iTunes is that it can take into consideration everything in your library and, comparing your library to other libraries, come up with an interesting mix of songs. To give you a taste of what's possible with the Genius feature, check out Genius Mixes: Select Genius Mixes in the Genius section of the Source pane (Genius must already be turned on as described earlier in this section).
iTunes compiles a set of Genius mixes based on your library, as shown in Figure 6-4. Each square represents a separate mix. As you hover over a square, a play button appears; click the play button to play the mix.
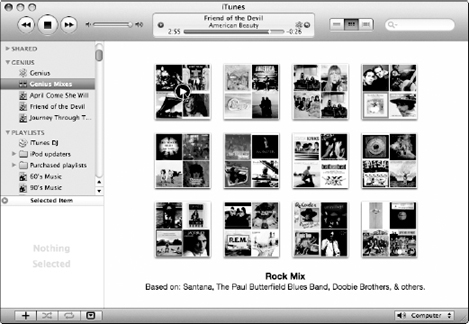
Figure 6-4: Generate Genius mixes from your entire library.
You may be surprised at how well the Genius feature serves up appropriate mixes. Apple has improved the Genius feature by collecting more data from millions of iTunes users. You are one, so you should be proud that you have contributed to Genius!