
Chapter 9
Your Pocket Picture Player
The world is awash in pictures, from photos and video clips to cartoon images, graphics, and famous paintings. If you like to carry pictures around with you, you're going to love the iPod as a player for viewing pictures. This chapter shows you how.
Syncing with Photo Albums and Folders
After importing photos from cameras into your computer, and importing image files from other sources, you can organize them into albums or collections. On a Mac, you can use iPhoto (version 4.0.3 or newer) or Aperture. On a Windows PC, you can use Adobe Photoshop Album (version 2.0 or newer) or Adobe Photoshop Elements (version 3.0 or newer).
You can then set up your iPod to sync with your entire photo library or with specific albums in your library so that any changes you make to the library or to those albums are copied to the iPod. In addition, any pictures you collect from e-mails on your iPod touch are synced back to the photo library on your computer.
If you don't have iPhoto or one of the Adobe products, you can store your pictures in their own folder on your hard drive (such as the Pictures folder in your home folder on a Mac or the My Pictures folder in your My Documents folder in Windows). You can then use iTunes to transfer pictures from this folder, treating the folder as a single photo album. If you have subfolders in this folder, iTunes copies the subfolder assignments as if they were album assignments.
 To find out more about organizing pictures into albums, visit the free tips section of my Web site (www.tonybove.com).
Transferring pictures to your iPod
To copy pictures from your computer to your iPod using iTunes, follow these steps:
- Connect your iPod to your computer and then select its name in the Devices section of the iTunes Source pane.
iTunes displays the Summary page (under the Summary tab of the synchronization pages) to the right of the Source pane.
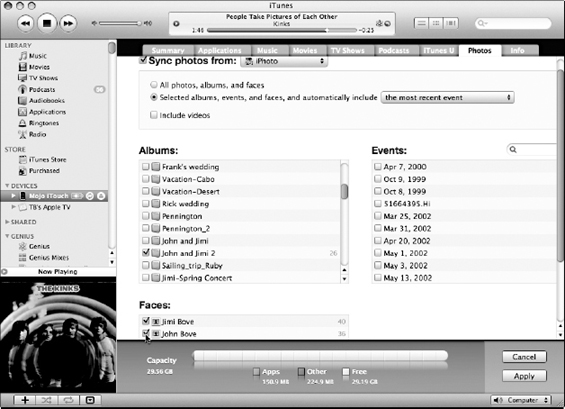
- Click the Photos tab.
The Photos sync options appear, as shown in Figure 9-1. (On a Mac, you'll see iPhoto selected to sync photos from.)
- Select the Sync Photos From check box and then pick the source of your pictures from the pop-up menu: a photo application, the Pictures (Mac) or My Pictures (PC) folder, or the Choose Folder option.
Pick your application (such as iPhoto on a Mac or Adobe Photoshop Album in Windows) from the pop-up menu to synchronize with its library. If you don't use these applications, pick the Pictures folder on a Mac or the My Pictures folder on a PC, or pick Choose Folder to browse your hard drive or other storage media and select the folder containing pictures.
- If you chose a photo application that organizes pictures by album, collection, events, or faces (such as iPhoto), or if you stored pictures in subfolders in your Pictures or My Pictures folder, select one of the following options below the Sync Photos From check box:
- All Photos, Albums, and Faces: Copies all pictures and albums (or collections) from the library or folder selected in Step 3.
- Selected Albums, Events, and Faces, and Automatically Include: Select this option to be more specific about which albums, events, and/or faces to sync, and to include recent events automatically — you can choose how many recent events (or events from the last month or several months) from the pop-up menu, or choose All Events or No Events. After selecting this option, you can then make selections in the Albums, Events, and Faces columns.
- Events column: If you chose a photo application that organizes pictures by events (such as iPhoto), you can select the check box next to each name (or date, if no name) of an event to synchronize.
- Albums column: Lets you choose which photo albums from the library (or subfolders from the folder) selected in Step 3 you want to copy. The idea here is to scroll the list box to see all the albums or collections in your library (or subfolders in your folder) and then select the check box next to each one you want to copy.
- Faces column: If you chose a photo application that organizes pictures by faces (such as iPhoto), you can select the check box next to each face's name.
- Click the Apply button to apply changes, and click the Sync button if synchronization hasn't already started automatically.
iTunes copies the photo library or albums you selected to your iPod (and deletes all other pictures from the iPod except those saved in Saved Images or in Camera Roll).
Syncing saved pictures with iTunes
Pictures that you receive via e-mail on your iPod touch are stored in a special photo album — Saved Images (for image captures and e-mailed pictures you save) or Camera Roll (for videos you shoot).
To synchronize these saved pictures back to your computer, connect your iPod to your computer as you normally would to sync it (as described in Step 1 of the previous section).
On a Mac, iPhoto pops up automatically — click the Import All button, or select the pictures you want and click the Import Selected button. After importing the pictures into the iPhoto library, iPhoto asks whether you want to delete the originals from the iPod. Click Delete Originals to delete the pictures from the iPod (they're safe in your photo library now) or click Keep Originals to save them — in case you want to e-mail them or upload them to social networks from your iPod touch.
On a Windows PC, iTunes can be set up to sync with Adobe Photoshop Album or Photoshop Elements (as I describe in the previous section) and will automatically transfer the pictures (including video clips). If you don't use those applications, follow the instructions that came with your photo application to import the pictures, or use the Microsoft Scanner and Camera Wizard to save the pictures to a folder of your choice.
Viewing Pictures and Slideshows
Slide shows are an especially entertaining way of showing pictures because you can include music as well as transitions between them. You can display your slide show on the iPod, or on a television, by connecting your iPod to the TV using the Universal Dock, Component AV Cable, or Composite AV Cable from Apple (available in the Apple Store).
To find out how to connect your iPod to televisions, stereos, video monitors, and video equipment, visit this book's companion Web site.
Viewing pictures on an iPod touch
To view pictures on your iPod touch, follow these steps:
- Tap Photos on the Home screen.
The Photo Albums screen appears, with a list of photo albums. The list includes Saved Photos if you've saved pictures from e-mail messages.
- Tap a photo album's name (or the arrow to the right of the name), or tap Photo Library to see all pictures.
The Photo Library choice displays thumbnails of all the pictures in your iPod touch (except the Saved Images albums). Selecting an album displays thumbnails of only the pictures assigned to that album.
- Flick your finger to scroll the thumbnails and tap a thumbnail to select a picture.
You might have several screens of thumbnails. Flick your finger to scroll the thumbnails and tap one to select it and view it.
To view a picture in landscape orientation, rotate the iPod touch sideways. The picture automatically changes to fit the new orientation and expands to fit the screen if the picture itself is in landscape orientation.
To zoom into the picture to see more detail, double-tap the area you want to zoom into. Double-tap again to zoom out. You can also zoom into an area by unpinching with two fingers, and zoom out by pinching. To pan around a picture, drag it with your finger.
To move to the next picture in the library, flick horizontally across the picture with your finger. You can flick across to go backward or forward through the album or the entire library.
Tap the full-screen picture to show or hide the navigation controls, as shown in Figure 9-2. You can see the next or previous pictures in the album or library by tapping the Previous or Next buttons that appear when you tap the picture.

Figure 9-2: Photo navigation controls.
To set up a slide show, follow these steps:
- Choose Settings
 Photos from the Home screen.
The Photos Slideshow settings screen appears.
- Tap the Play Each Slide For option to set the duration of each slide.
You can select ranges from 2 to 20 seconds.
- Tap the Transition option to pick a transition to use between photos in the slide show.
The Wipe Across transition is my favorite, but you can select Cube, Dissolve, Ripple, or Wipe Down. Tap the Photos button to return to the Photos Slideshow settings screen.
- Select the other options as appropriate for your slide show:
- Repeat: Repeats the slide show.
- Shuffle: Shuffles photos in the slide show in a random order.
- Tap the Settings button to return to the Settings screen or press the physical Home button to return to the Home screen.
To play a slide show, follow these steps:
- Tap Photos on the Home screen, and tap an album on the Photos screen or tap Photo Library.
- To start the show, tap the Play/Pause button at the bottom of the thumbnail images.
- Use the navigation buttons to move back and forth in your slide show.
Tap any picture to see the navigation controls (refer to Figure 9-2) to move to the next or previous picture.
- Press the physical Home button to stop the slide show.
The Home button returns you to the Home screen. You can also stop a slide show by tapping the picture.
Viewing pictures on an iPod nano or iPod classic
To view pictures on your iPod nano or iPod classic, follow these steps:
- Choose Photos from the main menu.
The Photos menu appears with All Photos and Settings choices at the top, followed by a list of photo albums and/or events in alphabetical order.
- Choose All Photos or an album or event name.
The All Photos choice displays thumbnail images of all the pictures in your iPod. Selecting an album or event displays thumbnail images of only the pictures assigned to that album or event.
- Scroll the click wheel to highlight the thumbnail you want and then press the Select button to select the picture.
You might have several screens of thumbnails. Scroll the click wheel to scroll through the thumbnails. When you select a thumbnail, your iPod displays the picture.
To view a picture in landscape orientation on an iPod nano, rotate the iPod nano sideways. The picture automatically changes to fit the new orientation and expands to fit the screen if the picture itself is in landscape orientation.
Press the Previous/Rewind button to see the previous picture in the album or library, or the Next/Fast Forward button to see the next picture. Press the Play/Pause button to start a slide show. Press Menu to return to the thumbnails, and press Menu again to return to the Photos menu.
To set up a slide show, follow these steps:
- Choose PhotosSettings from the main menu.
- Choose Times per Slide from the Settings menu to set the duration of each slide.
You can select ranges from 2 to 20 seconds. Or, you can select Manual to set the slide show to advance to the next slide when you click the Next/Fast Forward button.
- Pick your music by choosing Music from the Settings menu and then choose a playlist.
You can choose any playlist in your iPod for your slide show, including On-The-Go and Now Playing. iPhoto lets you assign an iTunes playlist to an iPhoto album, and that assignment is saved in your iPod. If you copy the playlist to your iPod, it's automatically assigned to the slide show.
- Select a transition to use between photos in the slide show by choosing Transitions from the Settings menu.
Wipe Across is my favorite, but you can select Cross Fade, Fade to Black, Zoom Out, or Wipe Center. Choose Random if you want to use a different (and random) transition for each photo change. Choose Off for no transition. After you choose a transition, the Settings menu appears again.
- Set the iPod to display the slide show by choosing TV Out from the Settings menu.
You have three choices for TV Out:
- On displays the slide show on a television. While the slide show plays on your TV, you can also see the slides as large thumbnails on your iPod, along with the photo number within the album or library, and the Next and Previous icons.
- Ask displays a screen requesting that you select TV Off or TV On; you make the choice each time you play a slide show.
- Off displays the slide show with full-size images on the iPod.
- (Optional) Select other preferences from the Settings menu:
- Repeat: Repeats the slide show.
- Shuffle Photos: Shuffles photos in the slide show in a random order.
- TV Signal: Changes your television signal to PAL for European and other countries that use PAL as their video standard. NTSC (also referred to humorously as “never the same color”) is the U.S. standard.
To play a slide show, follow these steps:
- Choose Photos from the main menu.
- Choose an album in the Photos menu, or All Photos.
- To start the show, press the Play/Pause button.
- If you previously set TV Out to Ask (as described in the previous section), choose TV On or TV Off for your slide show.
- Use the playback buttons to navigate your slide show.
If you set Time per Slide to Manual, press Next/Fast Forward to move to the next picture and press Previous/Rewind to return to the previous picture.
If you set Time per Slide to a specific duration, use Play/Pause to pause and play the slide show.
- Press the Menu button to stop the slide show.
Pressing the Menu button returns you to the Photos menu.