
Chapter 3
Getting Songs into Your iPod
- Browsing and previewing songs
- Buying and downloading songs
- Setting the importing preferences
- Ripping music from CDs
- Automatically syncing between iTunes and your iPod
With iTunes, you can put content on your iPod quickly and keep it synchronized every time you connect it. However, to put content on your iPod, you must first get it into your iTunes library.
Copyright law prohibits you from copying copyrighted content and selling it to someone else. With iTunes, however, you are allowed to make copies of music, movies, videos, audio books, and podcasts you own for your personal use, such as making backup copies on discs or hard drives, and using the content with as many iPods as you wish. However, you can't copy content from your iPod to your computer via iTunes. It's a one-way trip from iTunes to your iPod.
If you're like that guy in the movie Diner who couldn't stand to have his records misfiled, you'll love iTunes and its nice, neat file storage methods. For all content items, iTunes creates a folder named for the artist and then creates folders within the artist folder named for each album. These folders are stored in the iTunes Music folder unless you change your storage preferences. Content items purchased and downloaded from the iTunes Store are saved in this folder, as well as media files you drag to the iTunes window — which are copied into the iTunes Music folder without deleting the original files.
When you have the content in your iTunes library, it's a snap to automatically synchronize your iPod to your library, and away you go.
Browsing and Previewing Songs
The iTunes Store home page is loaded with specials and advertisements to peruse. To look at music in more depth, choose the Music tab in the black bar above the List pane. You can also pick a music genre by clicking the down-arrow button that appears next to the Music tab when you click it. iTunes displays more panels of advertisements and specials for music lovers, including iTunes LP albums that include liner notes, lyrics, videos, and other features.
What if you're looking for particular music in a particular genre? You can browse the iTunes Store by genre and artist name in a method similar to browsing your iTunes library.
To browse the iTunes Store, choose View![]() Show Column Browser, or click the Browse link in the Quick Links column on the right side of the iTunes Store home page. iTunes displays the store's offerings categorized by type of content (such as Music), and it displays music by genre and subgenre — and within each subgenre, by artist and album. Select a genre in the Genre column, then a subgenre in the Subgenre column, then an artist in the Artist column, and finally an album in the Album column, which takes you to the list of songs from that album that are available to preview or purchase, as shown in Figure 3-1.
Show Column Browser, or click the Browse link in the Quick Links column on the right side of the iTunes Store home page. iTunes displays the store's offerings categorized by type of content (such as Music), and it displays music by genre and subgenre — and within each subgenre, by artist and album. Select a genre in the Genre column, then a subgenre in the Subgenre column, then an artist in the Artist column, and finally an album in the Album column, which takes you to the list of songs from that album that are available to preview or purchase, as shown in Figure 3-1.

Figure 3-1: Browsing the iTunes Store for music by genre, artist, and album.
To see more information about a song or the album that it came from, click the content link (one of the gray-circled arrow buttons in the List pane):
- Clicking the arrow in the Artist column takes you to the artist's page of albums.
- Clicking the arrow in the Album column takes you to the album page.
- Clicking the arrow in the Name column takes you to the album page with the song highlighted.
 My only complaint about browsing by artist is that artists are listed alphabetically by first name. For example, you have to look up Bob Dylan under Bob, and not Dylan.
To preview a song, click the song title in the List pane and then click the Play button (or press the spacebar).
By default, the previews play on your computer off the Internet in a stream, so you might hear a few hiccups in the playback. Each preview lasts about 30 seconds. Just when you start really getting into the song, it ends. If the song is irresistible, though, you can buy it on the spot.
If you know specifically what you're looking for, you can search instead of browse. The Search field in the top-right corner of the iTunes window lets you search the iTunes Store for just about anything. Type part of a song title or artist name to quickly search the iTunes Store, or use the Power Search feature to narrow your search.
Buying and Downloading Content
As you select multimedia content, you can purchase the items and download them to your computer immediately. All you need to do is click the Buy button, whether the item is a song, an album, a TV show episode, or an audio book.
For example, if you select a song in the List pane, click the Buy Song button in the far-right column for the song. (You might have to scroll your iTunes Store window to see the far-right column.) When you select a TV show episode, click the Buy Episode button in the far-right column. You can also click the Buy Album button in an album advertisement.
The iTunes Store may prompt you to log in to your account after you click the Buy button (unless you just recently logged in). It then displays a warning dialog to make sure that you want to buy the item, and you can then complete your purchase by clicking the Buy button, or cancel. After clicking the Buy button, iTunes downloads the item and, after downloading, it appears in your iTunes library. You can continue buying items while downloading, and since you already logged in, the iTunes Store complies immediately without asking again for a password. The iTunes Store keeps track of your purchases over a 24-hour period and charges you for a total sum rather than for each single purchase.
You can see the list of all the items that you purchased by selecting the Purchased playlist under the iTunes Store option in the Source pane. The List pane changes to show the items you purchased.
Each time you buy content, you get an e-mail from the iTunes Store with the purchase information. It's nice to know right away what you bought.
Changing other iTunes Store preferences
You can change iTunes Store preference settings by choosing iTunes![]() Preferences on the Mac or by choosing Edit
Preferences on the Mac or by choosing Edit![]() Preferences in Windows. In the Preferences window, click the Store button. The Store Preferences pane appears, as shown in Figure 3-2. You can set the following features:
Preferences in Windows. In the Preferences window, click the Store button. The Store Preferences pane appears, as shown in Figure 3-2. You can set the following features:
- Automatically check for available downloads from the iTunes Store, such as downloads that were not completed and new episodes for a podcast subscription.
- Automatically download prepurchased content, such as an iTunes Pass for TV show episodes. As the episodes become available, iTunes automatically downloads them.
- Automatically download missing album artwork from the iTunes Store for albums and songs you've imported from other sources (such as audio CDs).
- Use the full iTunes window for the iTunes Store (rather than just the List pane) so that you can see more of the store choices.

Figure 3-2: Change preferences for the iTunes Store.
Adding Music from CDs
Bringing music tracks from a CD into iTunes is known as ripping a CD. I'm not sure why it's called that, but Apple certainly took the term to a new level with an ad campaign for Macs that featured the slogan Rip, Mix, Burn. Burning a mix CD was the hip thing to do a few years ago. With iTunes, you can still rip and mix, but if you have an iPod, you may no longer need to burn CDs to play your music wherever you go.
Ripping, in technical terms, is extracting the song's digital information from an audio CD. In common terms, ripping also includes compressing the song's digital information and encoding it in a particular sound file format. The ripping process is straightforward, but the import settings that you choose affect sound quality, hard drive (and iPod) space, and compatibility with other types of players and computers.
Setting the importing preferences
Although importing music from an audio CD takes a lot less time than playing the CD, it still takes time. To minimize that time, be sure your import settings are correct before starting. To do this, follow these steps:
- Choose iTunes
 PreferencesGeneral on a Mac or EditPreferencesGeneral in Windows.
The iTunes Preferences dialog opens, showing the General preferences, including the Import Settings button.
- Choose what action iTunes should take for the When You Insert a CD option in the General preferences.
Choose one of the following actions on the pop-up menu for when you insert an audio CD:
- Show CD: iTunes does nothing else. This setting is ideal if you regularly edit the song information first.
- Begin Playing: You've got music.
- Ask to Import CD: iTunes displays a dialog asking whether you want to import the CD.
- Import CD: iTunes uses the current import settings and automatically imports the CD. Don't use this setting unless you're sure that the import settings are already set to your liking.
- Import CD and Eject: iTunes automatically imports and then ejects the CD, making way for the next one. This option is useful for importing a batch of CDs. Don't use this setting unless you're sure that the import settings are already set to your liking.
- Select the Automatically Retrieve CD Track Names from Internet check box.
iTunes automatically grabs the song titles, artist names, album titles, and so forth directly from an Internet database of songs. I recommend that you select this check box (assuming that you're connected to the Internet, that is).
- Click the Import Settings button in the General preferences.
The Import Settings dialog appears, as shown in Figure 3-3.
- Make your changes, guided by my suggestions that follow, and then click the OK button.
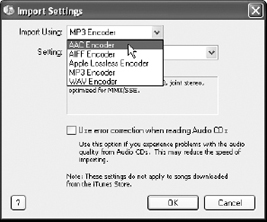
Figure 3-3: Change your importing settings for ripping CDs.
The Import Settings dialog offers the following choices:
- Import Using: Set this pop-up menu to choose the import encoder. This choice is perhaps the most important, and I describe it in more detail later in this section.
- Setting: This offers different settings depending on your choice of encoder. See below for more information about encoders and settings and how they affect quality and file size.
- Use Error Correction When Reading Audio CDs: Although you'll reduce importing speed, select this check box to use error correction if you have problems with audio quality or if the CD skips. (Not every skipping CD can be imported even with error correction, but it might help.)
For a quick and pain-free ripping session, select from among the following encoders in the Import Using pop-up menu based on how you plan to use your iTunes library:
- AAC Encoder: I recommend AAC for almost all music. (However, AIFF or WAV is better if you plan to burn another audio CD at the highest quality with the songs you ripped.) For music, choose the High Quality or iTunes Plus settings from the Setting pop-up menu.
 You can always convert a song that you've already ripped in AIFF, Apple Lossless, or WAV to AAC or MP3. However, ripping a CD with one encoder might be more convenient. After that, you can rip it again with a different encoder. For example, you might import Sgt. Pepper's Lonely Hearts Club Band with the AAC encoder for use in your Mac and iPod and then import it again with the AIFF encoder. You might call the album Sgt. Pepper-2, for example, in order to burn songs onto an audio CD. After burning the CD, you can delete Sgt. Pepper-2 to reclaim the hard drive space.
 - AIFF Encoder: Use AIFF if you plan to burn the song to an audio CD using a Mac (use WAV for Windows). AIFF offers the highest possible quality, but it takes up a lot of space (about 10MB per minute). Choose the Automatic option from the Setting pop-up menu for best results. Don't use AIFF format for songs that you intend to transfer to your iPod; convert them first to AAC or MP3.
- Apple Lossless Encoder: Use the Apple Lossless encoder for songs that you intend to burn onto audio CDs as well as for playing on iPods. The files are just small enough (about 60–70 percent of the size of the AIFF versions) that they don't hiccup on playback.
- MP3 Encoder: Use the MP3 format for songs that you intend to burn on MP3 CDs or that you intend to use with MP3 players or your iPod — it's universally supported. If you use MP3, I recommend choosing the Higher Quality option from the Setting pop-up menu.
- WAV Encoder: WAV is the high-quality sound format that's used on PCs (like AIFF), but it also takes up a lot of space (about 10MB per minute). Use WAV if you plan on burning the song to an audio CD or using WAV with PCs. Choose the Automatic option from the Setting pop-up menu for best results. Don't use WAV for songs that you intend to transfer to your iPod; use MP3 instead.
Ripping music from CDs
After changing your import settings and preferences, you're ready to rip. To rip a CD, follow these steps:
- Insert an audio CD into your computer.
The songs appear in the List pane as generic, unnamed tracks at first. If your computer is connected to the Internet, if you've turned on the option to automatically retrieve song information from the Internet, and if the CD is in the Gracenote database (most commercial CDs are), iTunes automatically retrieves the track information.
A dialog appears, asking whether you want to import the CD, with Yes and No buttons.
- Click Yes to import (and skip to Step 5) or No to set options first.
Click the No button to set preferences and import settings as described in the previous section, to set songs to be skipped, or if you see unnamed tracks rather than the proper track, artist, and album names in the List pane. If all you need to change are the import settings, click the Import Settings button in the lower-right corner of the List pane.
If the first attempt at retrieving song information doesn't work and you see unnamed tracks, check your connection to the Internet first. If everything is fine with your connection, stop the importing operation and then choose AdvancedGet CD Track Names to try again to get the track information. If you don't want to connect to the Internet or if your CD isn't recognized by the Gracenote database, you can type in the track information yourself. - (Optional) Deselect the check boxes next to any songs on the CD that you don't want to import.
iTunes imports only the songs that have a check mark next to them; when you remove the check mark, iTunes skips that song.
Be sure to set your importing preferences to your liking before actually ripping the CD. - Click the Import CD button.
The Import CD button appears next to the Import Settings button in the lower-right corner of the List pane after you insert a CD. The status display shows the progress of the operation. To cancel, click the small x next to the progress bar in the status display.
iTunes displays an orange, animated waveform icon next to the song that it's importing. When iTunes finishes importing each song, it replaces the waveform icon with a check mark, as shown in Figure 3-4. (On a color monitor, the check mark is green.) iTunes chimes when it finishes the import list.
- When all the songs are imported, eject the CD by clicking the Eject button next to the disc name in the Devices section of the Source pane.
You can also choose Controls
Eject Disc to eject the disc. Mac users can press the Eject button on the upper-right corner of the Mac keyboard.
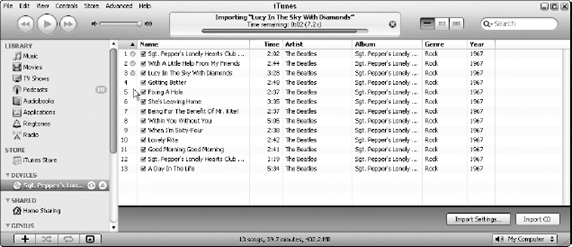
Figure 3-4: iTunes shows a check mark to indicate it's done ripping the song.
Synchronizing Your iPod Automatically
When you set up your iPod, you can choose the option to copy your entire iTunes library automatically, matching it exactly, item for item, playlist for playlist. From that point on, your iPod synchronizes with your entire library automatically, right after you connect it to your computer.
If you make changes in iTunes after synchronizing a device, those changes are automatically made in the device when you synchronize again. If you add or delete content in your iTunes library, that content is added or deleted in the iPod when you sync again.
If you store photos in an iPhoto library (on a Mac) or in a program (such as Adobe Photoshop Album in Windows), you can set up your iPod with the option to copy your entire photo library. Your iPod is then synchronized automatically so that any changes you make to the photo library are copied to the device. Content items stored remotely (such as songs shared from other iTunes libraries on a network) aren't synchronized because the files aren't physically on your computer.
To prevent an iPod from automatically synchronizing, press ![]() -Option (Mac) or Ctrl-Alt (Windows) while you connect the device, and then keep pressing until the iPod name appears in the iTunes Source pane.
-Option (Mac) or Ctrl-Alt (Windows) while you connect the device, and then keep pressing until the iPod name appears in the iTunes Source pane.
Follow these steps to start synchronizing your iPod with your iTunes library:
- Connect the iPod or iPhone and select its name when it appears in the Devices section of the Source pane.
iTunes displays the sync options to the right of the Source pane, with the Summary page (under the Summary tab) open. The Summary page shows how much space on the device is occupied by content and how much is still free. (See Figure 3-5.)
- If the iPod or iPhone isn't already synchronizing, click the Sync button in the lower-right corner to synchronize it.
The iTunes Status pane tells you that iTunes is syncing the device.
- Wait for the synchronization to finish and then click the Eject button next to the iPod or iPhone name in the Source pane.
You should always wait until the iTunes Status pane (at the top) displays that the synchronization is finished.
- Disconnect your iPod or iPhone from your computer.
That's it. Your iPod is now synchronized.
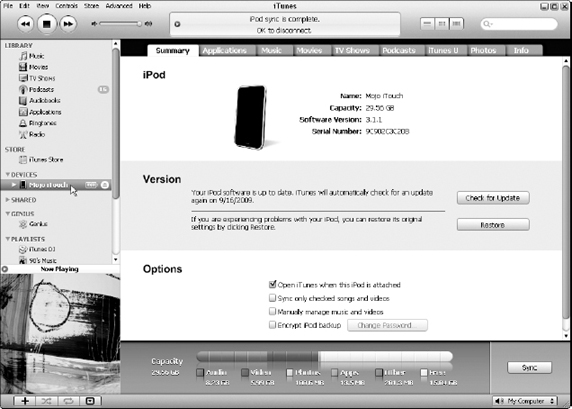
Figure 3-5: The iPod Summary tab.
If your iTunes library is too large to fit on your iPod, you can still keep your iPod automatically synchronized to a subset of your library. For example, you can update the iPod automatically but only with selected songs, movies, TV shows, videos, audio books, or podcast episodes. To use this method, you must first deselect the items in your iTunes library that you don't want to transfer, because all the items in your library are selected by default.
To deselect an item, click the check box next to the item in the List pane so that the check mark disappears. To select an item, click the check box so that the check mark appears.
Alternatively, you can change your iPod's Music settings to include just the items that are defined in playlists, including Genius playlists, and/or just specific artists. Syncing by playlists, artists, and genres is a great way of syncing vast amounts of music without syncing the entire library.
Here's how this works: After connecting your iPod or iPhone to your computer, select its name when it appears in the Devices section of the Source pane (refer to Figure 3-5). Then click the Music tab of the sync options to call up the Music sync options page.
To choose playlists, artists, and genres to sync with the iPod or iPhone, click the Selected Playlists, Artists, and Genres option at the top of the Music sync options page. You can then select each playlist from the Playlists list, each artist from the Artists list, and (if you scroll the Music sync options page) each genre from the Genres list. Finally, click the Apply button to apply changes, and click the Sync button if synchronization hasn't already started automatically.
iTunes copies only what you've selected in the Playlists, Artists, and Genres sections of the Music sync options page, separating the wheat from the chaff. Neat, huh?