In This Chapter
Mapping your route with Maps
Course-setting with Compass
Getting quotes with Stocks
Watching the weather with Weather
In this chapter, we look at four of the iPhone's Internet-enabled apps: Maps, Compass, Stocks, and Weather. We call them Internet-enabled because they display information collected over your Internet connection — whether Wi-Fi or wireless data network — in real time (or in the case of Stocks, near-real time).

In the first edition of this book, we said that the Maps feature was one of the sleeper hits of our iPhone experience and an app we both use more than we expected because it's so darn handy. Since then, Maps has become better and more capable. With Maps, you can quickly and easily discover exactly where you are, find nearby restaurants and businesses, get turn-by-turn driving, walking, and public transportation instructions from any address to any other address, and see real-time traffic information for many locations.
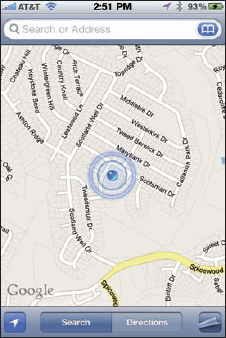
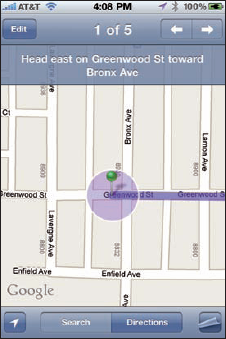
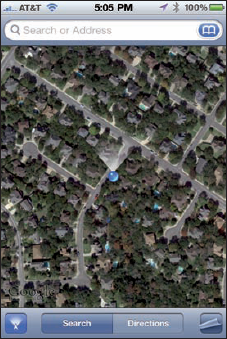
If you have an iPhone 3G, 3GS, or 4, a pulsating blue marker indicates your location on the map when the phone's GPS is used to find your location and a purple arrowhead appears to the right of the current time in the status bar (both are shown in Figure 12-1).
If GPS is not being used because you're out of the satellite's sight line or because you're using a first-generation iPhone (which had no GPS), a somewhat larger pale blue circle shows your approximate location. Either way, when you move around, the iPhone updates your location and adjusts the map so the location indicator stays in the middle of the screen.
Note
If you tap or drag the map, your iPhone continues to update your location; but it won't recenter the marker, which means that the location indicator can move off the screen.
To find a person, place, or thing with Maps, tap the search field at the top of the screen to make the keyboard appear. Now type what you're looking for. You can search for addresses, zip codes, intersections, towns, landmarks, and businesses by category and by name, or combinations, such as New York, NY 10022, pizza 60645, or Auditorium Shores Austin TX.
Tip
If the letters you type match names in your Contacts list, the matching contacts appear in a list below the search field. Tap a name to see a map of that contact's location. Maps is smart about it, too; it displays only the names of contacts that have a street address.
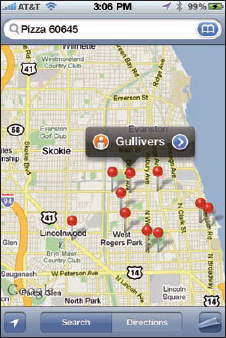
When you finish typing, tap Search. After a few seconds, a map appears. If you searched for a single location, it is marked with a single pushpin. If you searched for a category (pizza 60645, for example), you see multiple pushpins, one for each matching location, as shown in Figure 12-2.
In Map, Satellite, or Hybrid view, you can zoom to see either more or less of the map — or scroll (pan) to see what's above, below, or to the left or right of what's on the screen:
To zoom out: Pinch the map or double-tap using two fingers. To zoom out even more, pinch or double-tap using two fingers again.
Note
Double-tapping with two fingers may be a new concept to you: Merely tap twice in rapid succession with two fingers rather than the usual one finger. That's a total of four taps, input efficiently as two taps per finger.
To zoom in: Unpinch the map or double-tap (the usual way — with just one finger) the spot you want to zoom in on. Unpinch or double-tap with one finger again to zoom in even more.
An unpinch is the opposite of a pinch. Start with your thumb and a finger together and then flick them apart.
Tip
You can also unpinch with two fingers or two thumbs, one from each hand, but you'll probably find that a single-handed pinch and unpinch is handier.
To scroll: Flick or drag up, down, left, or right.
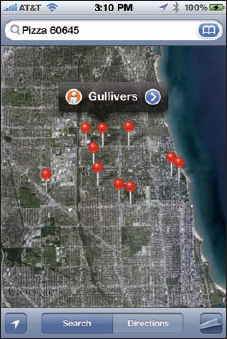
After you find a location by typing an address into Maps, you can add that location to one of your contacts. Or you can create a new contact with a location you've found. To do either, tap the location's pushpin on the map, and then tap the little > in a blue circle to the right of the location's name or description (shown for Gullivers in Figures 12-2 and 12-3) to display its Info screen (see Figure 12-5).
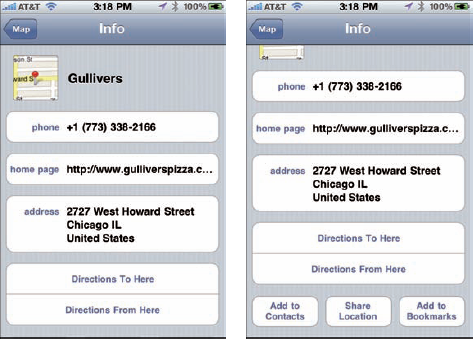
Figure 12.5. The unscrolled Info screen for Gullivers Pizzeria (left), and the same screen when you scroll to the bottom (right).
Now tap the Add to Contacts button on the Info screen. You'll probably have to scroll to the bottom of the Info screen (refer to Figure 12-5, right) to see this button.
Note
You work with your contacts in two ways. One way is to tap the Contacts icon, which is on the second page of icons on the Home screen (swipe from right to left on the Home screen to see this second page). Or two, tap the Phone icon on your Home screen, and then tap the Contacts icon in the Phone screen's dock.
You can also get driving directions from most locations, including a contact's address, to most other locations, including another contact's address. You see how to do that in the "Smart map tricks" section, later in the chapter.
Maps offers three tools that can save you from having to type the same locations over and over. All three are in the Bookmarks screen, which appears when you tap the little blue bookmarks icon on the right side of the search field (refer to Figure 12-4).
At the bottom of the Bookmarks screen, you find three buttons: Bookmarks, Recents, and Contacts. The following sections give you the lowdown on these buttons.
Bookmarks in the Maps app, like bookmarks in Safari, let you return to a location without typing a single character. Simply tap the little > in a blue circle to the right of the location's name or description to display the Info screen for that location. Tap the Add to Bookmarks button on the Info screen. (You may have to scroll down the Info screen to see the Add to Bookmarks button.)
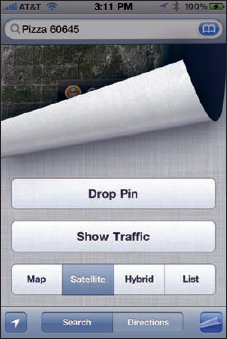
You can also drop a pin anywhere on the map by tapping the curling page button in the lower-right corner, and then tapping the Drop Pin button. After you've dropped a pin, you can press and drag it anywhere on the map. When the pin is where you want it, lift your finger to drop the pin and a banner with the location of the pin (if Maps can figure it out) and a little > in a blue circle appears. Tap the little > and the Info screen for the dropped pin appears. Now tap the Add to Bookmarks button on the Info screen.
Tip
The info screen for a dropped pin offers several buttons in addition to Add to Bookmarks, namely Directions to Here, Directions from Here, Add to Contacts, Share Location, and Remove Pin.
After you add a bookmark, you can recall it at any time. To do so, tap the bookmarks icon in the search field, tap the Bookmarks button at the bottom of the screen, and then tap the bookmark name to see it on a map.
Tip
The first things you should bookmark are your home and work addresses. These are things you use all the time with Maps, so you might as well bookmark them now to avoid typing them over and over. Also create zip code bookmarks for your home, work, and other locations you frequently visit. Then when you want to find businesses near any of those locations, you can choose the zip code bookmark and type what you're looking for, such as 78729 pizza, 60645 gas station, or 90201 Starbucks.
To manage your bookmarks, first tap the Edit button in the top-left corner of the Bookmarks screen. Then:
To move a bookmark up or down in the Bookmarks list: Drag the little icon with three gray bars that appears to the right of the bookmark upward to move the bookmark higher in the list or downward to move the bookmark lower in the list.
To delete a bookmark from the Bookmarks list: Tap the — button to the left of the bookmark's name.
When you're finished using bookmarks, tap the Done button in the top-right corner of the Bookmarks screen to return to the map.
Maps automatically remembers every location you've searched for in its Recents list (unless you've cleared it, as described next). To see this list, tap the bookmarks icon in the search field, and then tap the Recents button at the bottom of the screen. To see a map of a recent item, tap the item's name.
To clear the Recents list, tap the Clear button in the top-left corner of the screen, and then tap the Clear All Recents button.
When you're finished using the Recents list, tap the Done button in the top-right corner of the screen to return to the map.
To see a map of a contact's location, tap the bookmarks icon in the search field, and then tap the Contacts button at the bottom of the screen. To see a map of a contact's location, tap the contact's name in the list.
To limit the Contacts list to specific groups (assuming you have some groups in your Contacts list), tap the Groups button in the top-left corner of the screen and then tap the name of the group. Now only contacts in this group are displayed in the list.
When you're finished using the Contacts list, tap the Done button in the top-right corner of the screen to return to the map.
The Maps app has more tricks up its sleeve. This section lists a few nifty features you may find useful.
You can get route maps and driving directions to any location from any other location in a couple of ways:
If a pushpin is already on the screen: Tap the pushpin and then tap the little > in a blue circle to the right of the name or description. This action displays the item's Info screen. Now tap the Directions to Here or Directions from Here button to get directions to or from that location, respectively.
When you're looking at a map screen: Tap the Directions button at the bottom of the map screen. The Start and End fields appear at the top of the screen. Type the start and end points or select them from your bookmarks, recent maps, or contacts if you prefer. If you want to swap the starting and ending locations, tap the little swirly arrow button to the left of the Start and End fields.
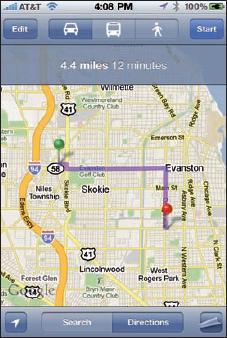
When the start and end locations are correct, tap the Route button in the bottom-right corner of the screen and the route map appears, as shown in Figure 12-6.
If you need to change the start or end location, tap the Edit button in the top-left corner and type a new start or end location.
Note
Weird but true: If you type the end location, you'll have to tap the Route button before you can perform the next step; but if you select the end location from your Bookmarks, Contacts, or Recents list, you won't see the Route button and thus won't have to tap it before you perform the next step.
The next step is to tap the Start button in the top-right corner to receive turn-by-turn driving directions, as shown in Figure 12-7. To see the next step in the directions, tap the right-facing arrow in the top-right corner; to see the preceding step, tap the left-facing arrow in the top-right corner.
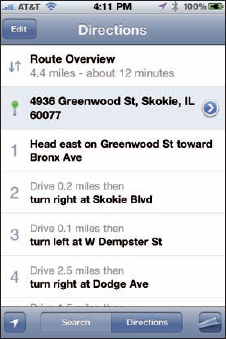
If you prefer your driving directions displayed as a list with all the steps, as shown in Figure 12-8, tap the curling page button in the lower-right corner and then tap the List button.
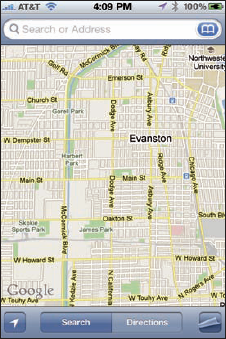
When you're finished with the step-by-step directions, tap the Search button at the bottom of the screen to return to the regular map screen and single search field, as shown in Figure 12-9.
As well as step-by-step directions work, we wish the iPhone offered the type of audible turn-by-turn directions feature found on some dedicated GPS devices. You know, where some friendly male or female voice states instructions (such as "turn right on Main Street").
Tip
We're in luck. The iPhone can speak directions if you use one of several GPS apps, such as TomTom U. S. A. ($49.99), Navigon MobileNavigator ($79.99), or MotionX GPS Drive ($2.99 plus $2.99 per month or $24.99 per year for Live Voice Guidance), which are all decent. We advise plugging the iPhone into a power outlet if at all possible while driving because such apps can quickly drain the battery.
After you've provided a starting and ending location and tapped the Route button, the next screen that appears has three icons near the top: a car, a bus, and a person walking. In the preceding example, we showed directions by car, which is the default.
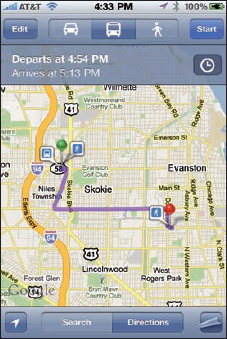
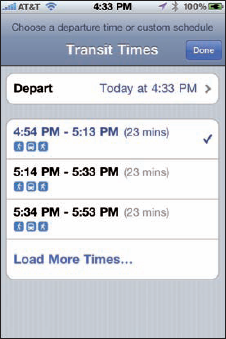
For public transportation information, tap the bus icon instead. When you do, the departure and arrival times for the next bus or train appear, as shown in Figure 12-10. Tap the little clock icon below the Start button (at the top of the screen) to see additional departure and arrival times, as shown in Figure 12-11.
The step-by-step directions for public transportation routes explain where you need to walk to catch the bus or train, where you need to get off that bus or train, and where you have to walk from there to reach your destination, as shown in Figure 12-12.
For step-by-step directions for walking, tap the person walking icon. Walking directions generally look a lot like driving directions except for your travel time. For example, driving time in Figure 12-6 is approximately 12 minutes with traffic; walking time (not shown) is estimated at 1 hour and 24 minutes.
You can find out the traffic conditions for whatever map you're viewing by tapping the curling page button in the lower-right corner and then tapping the Show Traffic button. When you do this, major roadways are color-coded to inform you of the current traffic speed, as shown in Figure 12-13. Here's the key:
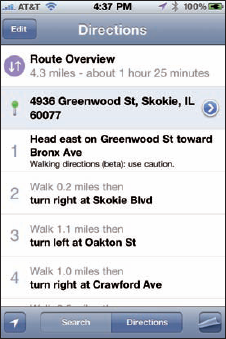
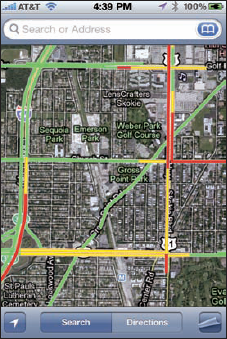
Figure 12.13. Traffic is moving really slowly (red), kind of slowly (yellow), and nice and fast (green).
Warning
Traffic info isn't available in every location, but the only way to find out is to give it a try. If no color codes appear, assume that traffic information doesn't work for that particular location.
If a location has a little > in a blue circle to the right of its name or description (refer to Figure 12-2), you can tap the > to see the location's Info screen.
As we explain earlier in this chapter, you can get directions to or from that location, add the location to your bookmarks or contacts, or create a new contact from it. But you can do three more things with a location from its Info screen:
Tap the phone number to call it.
Tap the e-mail address to launch the Mail app and send an e-mail to it.
Tap the URL to launch Safari and view its Web site.
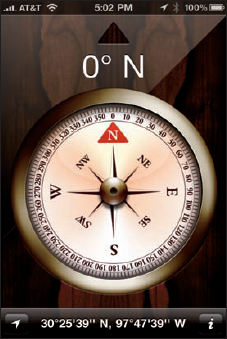
The Compass app, available only on the iPhone 3GS and iPhone 4, works like a magnetic needle compass. Launch the Compass app by tapping its icon in the Utilities folder on your Home screen, and it shows you the direction you're facing, as shown in Figure 12-14.
But wait — there's more. If you were to tap the little arrowhead icon in the lower-left corner of the Compass screen, the Maps app launches. Now for the cool part: Tap the little arrowhead icon in the lower-left corner of the Maps app two times and the blue marker grows a little white cone that indicates the direction you're facing, as shown in Figure 12-15.
Tip
If you rotate to face a different direction while Maps is in compass mode, the map rotates in real time. So the map always displays the direction you're currently facing, even if you've moved around a bit, which is pretty darn cool.
Stocks is another Internet-enabled app on your iPhone. It's kind of a one-trick pony, but if you need its trick — information about specific stocks — it's a winner.
Every time you open the Stocks app by tapping its icon on the Home screen, it displays the latest price for your stocks, with two provisos:
So tap that Stocks icon and take a peek. The first time you open Stocks, you see information for a group of default stocks, funds, and indexes. There are more of them than you can see on the screen at once, so flick upward to scroll down.
Because the chance of you owning that exact group of stocks, funds, and indexes displayed on the screen is slim, this section shows you how to add your own stocks, funds, or indexes and delete any or all default ones if you want.
Here's how to add a stock, a fund, or an index:
Tap the i button in the bottom-right corner of the initial Stocks screen.
The i is for info.
Tap the + button in the top-left corner of the Stocks screen.
Type the stock symbol or the name of the company, index, or fund.
Tap the Search button.
Stocks finds the company or companies that match your search request.
Tap the one you want to add.
Repeat Steps 4 and 5 until you're through adding stocks, funds, and indexes.
Tap the Done button in the top-right corner.
And here's how to delete a stock (the steps for deleting a fund or an index are the same):
To change the order of the list, tap the i button and then drag the three horizontal lines to the right of the stock, fund, or index up or down to its new place in the list.
To see the details for an item, tap its name to select it and the lower portion of the screen will offer additional information. Note the three small dots under the words Quotes delayed by 20 minutes. These dots tell you that there are three screens of information, all shown in Figure 12-16. To switch between these three screens, simply swipe to the left or the right on the lower part of the screen.
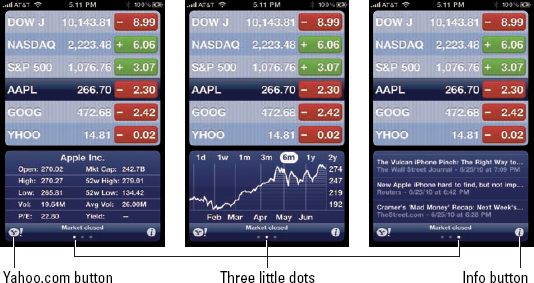
To look up additional information about a stock at Yahoo.com, first tap the stock's name to select it, and then tap the Y! button in the lower-left corner of the screen. Safari launches and displays the Yahoo.com finance page for that stock.
Referring to Figure 12-16, note the chart at the bottom of the middle image. At the top of the chart, you see a bunch of numbers and letters, namely 1d, 1w, 1m, 3m, 6m, 1y, and 2y. They stand for 1 day, 1 week, 1 month, 3 months, 6 months (selected in Figure 12-16), 1 year, and 2 years, respectively. Tap one of them and the chart updates to reflect that period of time.
That's sweet but here's an even sweeter feature: If you rotate your iPhone 90 degrees, the chart appears in full-screen, as shown in Figure 12-17. Here are three cool things you can do with full-screen charts:
Touch any point in time to see the value for that day.
Use two fingers to touch any two points in time to see the difference in values between those two days, as shown in Figure 12-17.
Swipe left or right to see the chart for another stock, fund, or index.
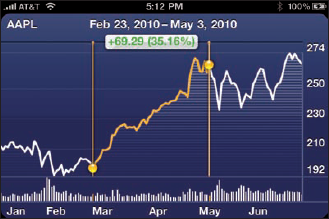
Figure 12.17. Use two fingers to see the difference in values ($69.29, or 35.16%) between two dates (Feb 23, 2010 and May 3, 2010).
By default, the Stocks app displays the change in a stock's price in dollars. You can instead see the change expressed as a percentage or as the stock's market capitalization. Simply tap the number next to any stock (green numbers are positive; red numbers are negative) to toggle the display for all stocks — dollar change, percent change, market cap. So if your stocks, funds, and indexes are currently displayed as dollars, tapping any one of them switches them all to percent — and tapping again switches them to market cap.
Another method requires more steps: Tap the i button in the bottom-right corner of the initial Stocks screen. Then tap the %, Price, or Mkt Cap button at the bottom of the screen. The values are then displayed in the manner you chose. Tap the Done button in the top-right corner when you're finished.
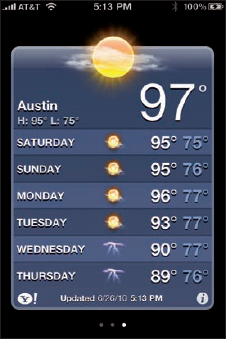
Weather is a simple app that provides you with the current weather forecast for the city or cities of your choice. By default, you see a six-day forecast for the chosen city. If the background for the forecast is blue, as it is in Figure 12-18, it's daytime (between 6:00 a.m. and 6:00 p.m.) in that city; if it's a deep purple, it's nighttime (between 6:00 p.m. and 6:00 a.m.).
To add a city, first tap the i button in the bottom-right corner. Next, tap the + button in the upper-left corner, type a city and state or zip code, and tap the Search button in the bottom-right corner of the screen. Finally, tap the name of the found city. Add as many cities as you want this way.
To delete a city, tap the i button in the bottom-right corner. Tap the red — button to the left of its name, and then tap the Delete button that appears to the right of its name.
You can also choose between Fahrenheit and Celsius by first tapping the i button in the bottom-right corner and then tapping either the °F or °C button near the bottom of the screen. When you're finished, tap the Done button in the top-right corner of the screen.
If you've added more than one city to Weather, you can switch between them by flicking your finger across the screen to the left or the right.
Tip
See the three little dots — two gray and one white — at the bottom of the screen in Figure 12-18? They denote the number of cities you have stored (which is three in this case).
Last, but not least, to see detailed weather information about a city at Yahoo.com, tap the Y! button in the lower-left corner of the screen. Safari launches and then displays the Yahoo.com weather page for the current city, as shown in Figure 12-19.