
Chapter 5. HTML Content
Adobe AIR allows a strong integration with HTML content and JavaScript. Thanks to the WebKit open source browser engine embedded in the Adobe runtime, AIR offers a complete and robust HTML renderer and JavaScript interpreter to re-create a browser-like experience. Through the WebKit framework (http://webkit.org/), developers can create an AIR application completely in HTML, JavaScript, DOM, and CSS. In AIR 1.5, the new SquirrelFish JavaScript interpreter from the WebKit project was added. This makes JavaScript code execution extremely fast within AIR.
The core of the HTML and JavaScript environment is represented by the
HTMLLoader class, which enables you to specify the HTML content to display in
an AIR application. HTMLLoader is part of
the flash.html package and is a subclass
of the Sprite class that does not
implement the UIComponent interface. If
you want to use the class in AIR applications created with Flex, you have to
extend the UIComponent interface and
include an HTMLLoader object.
The HTMLLoader object can also be accessed via JavaScript by using the htmlLoader property of the window object. In HTML windows, the HTMLLoader object contains all the HTML content
that is, in turn, contained in a NativeWindow object. Furthermore, the HTMLLoader object provides properties, methods,
and events to control how content is loaded and rendered within the AIR
application.
When you use HTML content in an application, you need to understand how to interact with the AIR environment by using JavaScript as well as ActionScript. In this chapter, you will learn how to access JavaScript from ActionScript, as well as how to access ActionScript from JavaScript in an HTML container.
Displaying HTML Content
Solution
Use the HTMLLoader class to
directly load HTML content via a URL or assign the content as an HTML
string. The HTML content will be rendered through the HTML WebKit
engine, embedded in AIR.
Discussion
The HTMLoader class enables you
to load and view HTML content from a desktop application in several
ways. Part of the flash.html package,
HTMLLoader is a Sprite subclass and inherits all the display
properties, methods, and events of a Sprite object: click, mouseMove, rotation, and so on. No matter which method
you choose for loading HTML content, you must make an HTMLLoader object visible onscreen by changing
its default height and width properties (0 × 0 pixels) to your preferred
size. Remember that the maximum width allowed is 2880 pixels. So if you
set the dimension to more than 2880 pixels, an ArgumentError exception will be thrown.
The first method is to load HTML content from a URL in an HTMLLoader class. To do so, create an instance
of the HTMLLoader class, set its
width and height, and then launch its load method. The load method accepts a URLRequest object as a parameter, which
specifies the URL to load. For example:
var html:HTMLLoader = new HTMLLoader();
html.width = 320;
html.height = 240;
var urlReq:URLRequest = new URLRequest("http://www.comtaste.com/en");
html.load(urlReq);
After the load method has been
launched, several are dispatched, as listed in Table 5-1.
HTMLLoader ClassThe second method of loading content is to assign an HTML string,
instead of a URL, to the HTMLLoader
class, as in loadString(htmlContent:String):void.
This method loads and renders the HTML string, which is passed as
a parameter to loadString:
var html:HTMLLoader = new HTMLLoader();
html.width = 320;
html.height = 240;
var htmlCode:String = "<html><body><h1>Hello World!</h1></b>.</body></html>";

html.loadString(htmlCode);
It is also possible to use the HTMLLoader class to load an HTML page instead
of an HTML string. In this scenario, the syntax doesn’t change and
entails the creation of a NativeWindowInit object, where the HTMLLoader object will be hosted.
ActionScript/Flash
To demonstrate how loading HTML could fit into a larger
application, the following ActionScript 3 class uses the SimpleButton and TextField classes to build an application’s
visual elements dynamically and then triggers the load method of the HTMLLoader upon the click event of the button. You can easily
implement this snippet in a SWF-based application for loading into
HTML content from a URL.
package com.oreilly.aircookbook.ch5
{
    import flash.display.NativeWindowInitOptions;
    import flash.display.SimpleButton;
    import flash.display.Sprite;
    import flash.display.StageAlign;
    import flash.display.StageScaleMode;
    import flash.events.MouseEvent;
    import flash.geom.Rectangle;

    import flash.html.HTMLLoader;

    import flash.net.URLRequest;
    import flash.text.TextField;
    import flash.text.TextFieldAutoSize;
    import flash.text.TextFieldType;
    import flash.text.TextFormat;
    import flash.text.TextFormatAlign;

    public class DisplayHTMLContent extends Sprite
    {
       private var _html:HTMLLoader;
       private var _field:TextField;
       private var _loadBtn:SimpleButton;

       public function DisplayHTMLContent()
       {
           this.stage.scaleMode = StageScaleMode.NO_SCALE;
           this.stage.align = StageAlign.TOP_LEFT;

           drawLayout();
       }

       private function drawLayout():void
       {
            // draw URL input bar
             _field = new TextField();
             _field.type = TextFieldType.INPUT;
             _field.multiline = false;
             _field.width = 300;
             _field.height = 50;
             _field.border = true;
             _field.borderColor = 0x999999;
             _field.x = 50;
             _field.y = 10;
             _field.textColor = 0x666666;
             _field.text = "http://www.comtaste.com/en";
             this.addChild(_field);

            createButton();
        }

      private function createButton():void
      {
           var upState:Sprite = new Sprite();
           upState.graphics.lineStyle( 1, 0x330000 );
           upState.graphics.beginFill( 0x999999 );
           upState.graphics.drawRect( 0,0,40,30 );
           upState.graphics.endFill();
           var upLabel:TextField = new TextField();
           upLabel.width = 50;
           upLabel.height = 30;
           upLabel.autoSize = TextFieldAutoSize.NONE;
           var upFo:TextFormat = new TextFormat();
           upFo.size = 12;
           upFo.color = 0x330000;
           upFo.align = TextFormatAlign.CENTER;
           upLabel.defaultTextFormat = upFo;
           upLabel.text = "LOAD";
           upState.addChild( upLabel );

           var downState:Sprite = new Sprite();
           downState.graphics.lineStyle( 1, 0x000033 );
           downState.graphics.beginFill( 0xcc0000 );
           downState.graphics.drawRect( 0,0,40,30 );
           downState.graphics.endFill();
           var downLabel:TextField = new TextField();
           downLabel.width = 50;
           downLabel.height = 30;
           downLabel.autoSize = TextFieldAutoSize.NONE;
           var downFo:TextFormat = new TextFormat();
           downFo.size = 12;
           downFo.color = 0x000000;
           downFo.align = TextFormatAlign.CENTER;
           downLabel.defaultTextFormat = downFo;
           downLabel.text = "LOAD";
           downState.addChild( downLabel );

           _loadBtn = new SimpleButton( upState, downState, downState, downState );
           _loadBtn.x = _field.x + _field.width + 10;
           _loadBtn.y = _field.y;

           _loadBtn.addEventListener(MouseEvent.CLICK, onClickLoad);

           addChild( _loadBtn );
     }

     private function onClickLoad( evt:MouseEvent ):void
     {
           if( _field.text == "" )
           trace ( "Button clicked but none URL to load has been specified !" );

           var initOptions:NativeWindowInitOptions = new NativeWindowInitOptions();
           var bounds:Rectangle = new Rectangle(50, 30, 500, 400);

           _html = HTMLLoader.createRootWindow(false, initOptions, true, bounds);
           _html.stage.nativeWindow.activate();

           var urlReq:URLRequest = new URLRequest( _field.text );
           _html.load( urlReq );

     }
   }
}
The core of the class is in the private onClickLoad method, which is an event
handler that is triggered by the click event dispatched from the SimpleButton instance. In this event
handler, the load method is
launched, and the text contained in the _field text field is assigned as a
URL.
ActionScript/Flex
In Flex, only classes that extend the UIComponent class can be added as children
of the Flex container. Because the HTMLLoader class is a Sprite subclass, you cannot add an HTMLLoader object as a child of a container.
If you try, you’ll get an error. You can avoid this minor
inconvenience in two ways. The first is to use the Flex component
<mx:HTML>, whereas the second
is to create an ActionScript class that extends the UIComponent
class and that contains an HTMLLoader class, making it
a child of this UIComponent
instance.
To use the <mx:HTML>
control in Flex, simply call it as you do with any other control on a
page:
<?xml version="1.0" encoding="utf-8"?>
<mx:WindowedApplication xmlns:mx="http://www.adobe.com/2006/mxml">

   <mx:HTML id="content" location="http://www.comtaste.com/en"/>

</mx:WindowedApplication>
Within the control tag definition, you assign the location property to specify the URL of an
HTML page whose content is displayed in the control, or you can set
the htmlText property to specify a
String containing HTML-formatted
text that is rendered in the control.
On the other hand, you can create an ActionScript 3 class that
extends the UIComponent class, and then
you can use the class within a Flex container. To do so, use code
similar to this:
package com.oreilly.aircookbook.ch5
{
    import mx.core.UIComponent;


    import flash.events.Event;
    import flash.html.HTMLLoader;
    import flash.net.URLRequest;

    [Event(name="complete")]
    public class DisplayHTMLContentFromFlex extends UIComponent
    {
        private var _html:HTMLLoader;

        public function DisplayHTMLContentFromFlex()
        {
          super();
        }


        override protected function createChildren():void
        {
            _html = new HTMLLoader();
            _html.width = 800;
            _html.height = 600;
            addChild(_html);

            _html.addEventListener( Event.COMPLETE, onComplete );
        }


        override protected function measure():void
        {
            measuredWidth = 800;
            measuredHeight= 600;
        }

        override protected function updateDisplayList(unscaledWidth:Number,
                                                      unscaledHeight:Number):void
        {
            super.updateDisplayList(unscaledWidth, unscaledHeight);

            _html.width = unscaledWidth;
            _html.height= unscaledHeight;
        }

        private function onComplete( event:Event ) : void
        {
            var newEvent:Event = new Event(Event.COMPLETE);
            dispatchEvent( newEvent );
        }

        public function load( url:String ) : void
        {
            var request:URLRequest = new URLRequest(url);
            _html.load(request);
        }
    }
}
Before the declaration of the class, the [Event] metadata has been used. The [Event] metadata tag defines events
dispatched by a component. In this way, the Flex compiler can
recognize them as MXML tag attributes in an MXML file.
Then an instance of the HTMLLoader class is created with the
createChildren method, which
creates child objects for the component. Next, the methods to assign a
default dimension of the UIComponent class are overridden, first
measure and then
updateDisplayList(unscaledWidth:Number,
        unscaledHeight:Number)
. Finally, the complete event of the HTMLLoader is registered with the addEventListener method. Within the onComplete
event handler, a new complete event
is dispatched because this event does not bubble:
private function onComplete(event:Event):void
{
    var newEvent:Event = new Event(Event.COMPLETE);
    dispatchEvent( newEvent );
}
To implement this class in an AIR application created with Flex Builder, import the class as a custom component by creating a custom namespace:
<?xml version="1.0" encoding="utf-8"?>
<mx:WindowedApplication xmlns:mx="http://www.adobe.com/2006/mxml"
layout="vertical"
xmlns:comp="com.oreilly.aircookbook.ch5.*">

    <mx:Script>
    <![CDATA[

        private function loadHTML():void
        {
            htmlComp.load("http://www.comtaste.com");
        }

    ]]>
    </mx:Script>


    <comp:DisplayHTMLContentFromFlex id="htmlComp" />

    <mx:Button click="loadHTML()" label="Load HTML page" >

    </mx:Button>

</mx:WindowedApplication>
JavaScript/HTML
The JavaScript environment of AIR is represented by the
HTMLLoader class. The environment
provides an HTML renderer, DOM, and JavaScript interpreter.
Figure 5-1 illustrates the relationship between the JavaScript environment and AIR in a bit more detail.
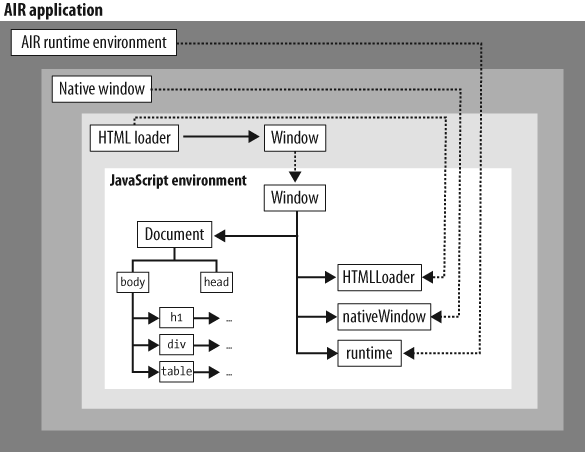
In Figure 5-1
notice that the JavaScript environment has its Document and Window objects. As you can see, the
JavaScript environment can communicate with AIR through the following
properties:
runtime(allows access to AIR API classes)nativeWindowhtmlLoader
The ActionScript code can access and communicate with the JavaScript environment through the following:
The
windowpropertyThe
HTMLLoaderobject (referenced to the JavaScriptWindowobject)
In JavaScript, you use the createRootWindow method, which returns an
HTMLLoader object and accepts the
following values as parameters:
visible:BooleanwindowInitOptions:NativeWindowInitOptionsscrollBarsVisible:Booleanbounds:Rectangle
Before invoking the createRootWindow method, you must create an
instance of the air.NativeWindowInitOptions class, as well
as a Rectangle object, which is an
area defined by its position, as indicated by its top-left corner
point (x, y) and by its
width and its height.
This example implements an HTMLLoader in JavaScript and uses the
activate method to bring the window
to the front and give it focus:
var _initOptions = new air.NativeWindowInitOptions();
var _bounds = new air.Rectangle(50, 50, 320, 240);

var html = air.HTMLLoader.createRootWindow(false, _initOptions, true, _bounds);

var urlReq = new air.URLRequest( 'http://www.comtaste.com/en' );
html.load( urlReq );

html.stage.nativeWindow.activate();
Accessing JavaScript from ActionScript in an HTML Container
Solution
Use the global window property
of the HTMLLoader class.
Discussion
AIR applications that use the HTMLLoader class to load and view HTML content
frequently must also contain a means of communication between the
JavaScript code and ActionScript properties, methods, or objects. For
example, you may need to pass ActionScript data to HTML
content or launch JavaScript functions from the application’s
ActionScript classes.
The HTML content loaded within an HTMLLoader object can easily access
ActionScript objects through JavaScript by using the window property of the HTMLLoader class in the ActionScript class.
The window property, typed as a
generic Object, represents the global
JavaScript object for the content loaded into the HTML control, and
therefore it lets you make ActionScript properties, methods, and objects
available to JavaScript. When you type something as a generic Object, you are implying that there is no type
checking on the properties you add on that object.
After creating the instance of the HTMLLoader object, you can make ActionScript
objects and functions available to JavaScript code by creating
references within the JavaScript execution context.
The following ActionScript class, saved as AccessJavaScript.as, creates an instance of
the HTMLLoader object and loads the
htmlcontent.html page as HTML
content. Then it adds the HTMLStringFromAS property and the linkedToAS function referencing ActionScript
objects to the window object of an
HTML page:
package com.oreilly.aircookbook.ch5
{

    import flash.display.Sprite;
    import flash.display.StageAlign;
    import flash.display.StageScaleMode;
    import flash.events.Event;
    import flash.html.HTMLLoader;
    import flash.net.URLRequest;

    public class AccessJavaScript extends Sprite
    {
        private var _html:HTMLLoader;

        public function AccessJavaScript ()
        {
            this.stage.scaleMode = StageScaleMode.NO_SCALE;
            this.stage.align = StageAlign.TOP_LEFT;

           var urlReq:URLRequest = new URLRequest( "htmlcontent.html" );
           _html.load( urlReq );

           initLayout();
        }

        protected function initLayout():void
        {
            _html = new HTMLLoader();
            _html.width = stage.stageWidth;
            _html.height = stage.stageHeight;
            _html.addEventListener(Event.COMPLETE, onComplete);
            this.addChild( _html );
        }


        private function onComplete(e:Event):void
        {
            _html.window.HTMLStringFromAS = "<div style= ' overflow:hidden;
                          height:20px' id= ' fromAS ' ><strong>This is an HTML
                          string generated by ActionScript</strong></div>"
            _html.window.linkedToJS = linkedToAS;
        }

        private function linkedToAS( messageFromJS:String ):void
        {
            trace( "From JavaScript: ", messageFromJS );
        }

    }
}
Take a closer look at what’s happening in the class. The HTMLLoader object, which has the name instance_html assigned, registers the onComplete event handler upon the COMPLETE event. In this event handler, the
HTMLStringFromAS property is assigned
a value, and the linkedToAS
ActionScript function is mapped to the linkedToJS JavaScript function.
Warning
If you use the COMPLETE
event, only scripts in the page that run after the page load event can
access the added objects.
An HTML string that includes a div tag is assigned as a value to the HTMLStringFromAS property,
which contains simple bold text:
<div style='overflow:hidden; height:20px' id='fromAS'>
<strong>This is an HTML string generated by ActionScript</strong></div>
The linkedToAS function is an
ActionScript function that accepts a simple String as a parameter. This function will be
invoked by the JavaScript code declared in the htmlcontent.html page and loaded in the
HTMLLoader class. This function
executes a simple trace
command:
private function linkedToAS( messageFromJS:String ):void
{
    trace( "From JavaScript: ", messageFromJS );
}
The htmlcontent.html page,
loaded in the HTMLLoader object, uses
the HTMLStringFromAS ActionScript
property and invokes the linkedToAS
ActionScript function:
<!DOCTYPE html PUBLIC "-//W3C//DTD XHTML 1.0
 Transitional//EN" "http://www.w3.org/TR/xhtml1/DTD/xhtml1-transitional.dtd">
<html xmlns="http://www.w3.org/1999/xhtml">
<head>

<meta http-equiv="Content-Type" content="text/html; charset=UTF-8">
<title>Solution 15.2: Accessing JavaScript from ActionScript in an HTML
Container</title>

<script type="text/javascript" src="frameworks/AIRAliases.js"></script>
<script type="text/javascript" src="frameworks/AIRIntrospector.js" ></script>

<script type="text/javascript">

    var messageFromAir = null;

    function showMessageFromAir()
    {
        document.getElementById("contentData").innerHTML = HTMLStringFromAS;
    }

</script>

</head>

<body>

    <h2>Display the HTMLStringFromAS ActionScript-generated strings</h2>
    <p>
        <button onclick="showMessageFromAir()">
             Access to ActionScript property from JavaScript
        </button>
    </p>

        <h2>Send a trace action into Adobe AIR output console from JavaScript</h2>
    <p>

        <button onclick="linkedToAS('This is a JavaScript generated string.')">
            Access to ActionScript function from JavaScript
        </button>
    </p>

    <div id="contentData" style="overflow:auto; width:100%; height:100%"></div>

</body>

</html>
The HTML page defines the showMessageFromAir JavaScript function, which
has the task of adding the HTMLStringFromAS HTML string, declared in the
ActionScript class, in the contentData
div.
The ActionScript property from the innerHTML is consumed in the body of the HTML page, and the ActionScript
function is invoked and is passed on a String directly from JavaScript.
The first button launches the showMessageFromAir JavaScript function upon
the click event, which loads the
content of the ActionScript property HTMLStringFromAS within the contentData div tag. The second button invokes
the ActionScript function linkedToAS, to which it
assigns a String as a
parameter.
AIR also lets you make an ActionScript class definition available
to JavaScript. With this possibility, you can create an instance of an
ActionScript object by inheriting all its properties directly from
JavaScript. To make an ActionScript class available, you need to set the
runtimeApplicationDomain property of
the HTMLLoader class to ApplicationDomain.currentDomain
or to the application domain containing the class definitions. runtimeApplicationDomain is a property of the
HTMLLoader class that specifies the
application domain to use for the window.runtime object in JavaScript in the
HTML page:
html.runtimeApplicationDomain = ApplicationDomain.currentDomain;
Once you specify the runtimeApplicationDomain, you can create an
instance of a class in JavaScript by referring to the window.runtime property:
var customClassObject = new window.runtime.CustomClass();
But be careful of the security domain of the HTML content. If you
are actually loading a remote HTML content from the Internet, you cannot
set the runtimeApplicationDomain
property to the ApplicationDomain.currentDomain
value.
Accessing ActionScript from JavaScript in an HTML Container
Problem
You need to access ActionScript functions, properties, and methods from JavaScript in an HTML container.
Solution
The window property of the
HTMLLoader class is typed as Object to represent the global JavaScript
object for the content loaded into the HTML control. By mapping the
elements you want to refer to from ActionScript to JavaScript, you can
then call the objects themselves with the JavaScript code specified in
the HTML content.
Discussion
When you load HTML content by using the HTMLLoader class, that content is able to
communicate with and access its parent. This means an AIR application
can call ActionScript
functions or use properties declared in an ActionScript class through
JavaScript code contained in a loaded HTML page.
The window property of the
HTMLLoader class allows AIR
developers to map any ActionScript object so as to make it available to
the HTML content. For example:
        private var ASProperty:String = new String("Hello JavaScript !");

        private var _html:HTMLLoader = new HTMLLoader();
        private var _urlReq:URLRequest = new URLRequest("myPage.html");

        private function init():void
        {
           _html.load(_urlReq);
           _html.addEventListener(Event.COMPLETE, onComplete);
        }

        private function onComplete (e:Event):void
        {
           _html.window.JSfunction = ASfunction;
           _html.window.JSproperty = ASProperty;
        }

        private function ASfunction ( evt:MouseEvent ):void
        {
           trace( "JavaScript calls !" );
        }
The complete event of the
HTMLLoader class corresponds to the
load event of the body of the HTML page. The previous example
creates a listener for this COMPLETE
event to execute the mapping of the ActionScript objects. The onComplete event handler is executed only
after the whole page is loaded.
Inside the onComplete event
handler, you need to link JSFunction,
which was declared in the HTML page, to Asfunction, which is defined in the
ActionScript code. Next, you map the JSproperty property, which was created in the
JavaScript code of the HTML page, to ASProperty, which is declared via
ActionScript.
The following example creates an ActionScript class that extends
the Sprite class and that exposes a
method and a property to JavaScript:
package com.oreilly.aircookbook.ch5
{

    import flash.display.Sprite;
    import flash.display.StageAlign;
    import flash.display.StageScaleMode;
    import flash.events.Event;
    import flash.events.MouseEvent;
    import flash.html.HTMLLoader;
    import flash.net.URLRequest;


        public class AccessingActionScript extends Sprite
        {

            private var _html:HTMLLoader;
            private var ASProperty:String = new String("Hello JavaScript !");

            public function AccessingActionScript()
            {
                this.stage.scaleMode = StageScaleMode.NO_SCALE;
                this.stage.align = StageAlign.TOP_LEFT;

                _html = new HTMLLoader();

                var urlReq:URLRequest = new URLRequest( "myHTMLContent.html" );
                _html.load( urlReq );

                _html.width = stage.stageWidth;
                _html.height = stage.stageHeight;
                _html.addEventListener(Event.COMPLETE, onComplete);

                this.addChild( _html );

            }

            private function onComplete (e:Event):void
            {
                _html.window.JSfunction = ASfunction;
                _html.window.JSproperty = ASProperty;
            }

            // Pass the trace string to the Adobe AIR output console
            private function ASfunction( evt:MouseEvent=null ):void
            {
                trace( "JavaScript calls !" );
            }
    }
}
The previous example maps the ActionScript method and property to
the JavaScript property and method on the event handler registered for
the COMPLETE event, which is
dispatched by HTMLLoader when the
content of the page has been loaded.
In the myHTMLContent.html
page, which is loaded in the HTMLLoader class instance, you can access the
ASfunction ActionScript function and
the ASProperty property through
JavaScript.
This is the code of the myHTMLContent.html page, loaded by the
HTMLLoader class:
<!DOCTYPE html PUBLIC "-//W3C//DTD XHTML 1.0 Transitional//EN"
"http://www.w3.org/TR/xhtml1/DTD/xhtml1-transitional.dtd">
<html xmlns="http://www.w3.org/1999/xhtml">
<head>

<meta http-equiv="Content-Type" content="text/html; charset=UTF-8">
<title>Solution 15.3: Accessing ActionScript  from JavaScript  in an HTML
Container</title>

<script type="text/javascript" src="frameworks/AIRAliases.js"></script>
<script type="text/javascript" src="frameworks/AIRIntrospector.js"></script>

<script type="text/javascript">

    function accessingASProperty()
    {
        document.getElementById("contentData").innerText = JSproperty;
    }

</script>

</head>

<body>

<p>
    <button onClick="accessingASProperty()">
        Access to ActionScript property from JavaScript
    </button>
</p>

<h2>Send a trace action into Adobe AIR output console from JavaScript</h2>
<p>

    <button onClick="JSfunction()">
        Access to ActionScript function from JavaScript
    </button>

</p>

<div id="contentData" style="overflow:auto; width:100%; height:100%"></div>

</body>

</html>
The JavaScript code accesses the ActionScript function when the
user clicks the button. It is precisely on the onclick event that Jsfunction, a function that is mapped in the
ActionScript code to ASfunction, is
called.
The HTML page, on the other hand, accesses the ASProperty ActionScript property, when the
JavaScript accessingASProperty event
handler is invoked.
The accessingASProperty
JavaScript function accesses the contentData
div element and sets the innerText property to the value assigned to
the ASProperty ActionScript property.
With this same approach, you can access practically any element of
the HTML page loaded in the HTMLLoader and interact with the HTML DOM. In
the next recipe, you will access the HTML DOM of the HTML page that is
loaded in an instance of the HTMLLoader class through
ActionScript.
Scripting the DOM from ActionScript
Problem
You need to access and manipulate the elements in the HTML
DOM for the page loaded within the HTMLLoader class.
Solution
Use the getElementById and
getElementsByTagName methods, as well
as innerText and innerHTML, to access DOM elements in
AIR.
Discussion
The term DOM refers to an object model to represent XML and related formats. By using the DOM, you can dynamically edit any element in an HTML page through ActionScript, as well as create new pages programmatically. To do so, you use some methods and properties of the DOM. The DOM methods and properties you need to use are as follows:
getElementsByTagName(inDOMString tagname)This method enables you to access a DOM element of the document by referring to the name of the tag. This method is very useful when you want to number and access all the elements of the same kind. The following code iterates the entire document of the HTML document node tree and returns the nodes that have been passed onto the function in an
Array:function listElements(whichTag, whichAttr, whichValue) { var startElement; var listElement_arr= new Array(); if (whichTag) { startElement = document.getElementsByTagName(whichTag); } else { startElement = (document.all) ? document.all : document.getElementsByTagName("*"); } if (whichAttr) { for (var i = 0; i < startElement.length; i++) { if (startElement[i].getAttribute(whichAttr)) { if (whichValue) { if (startElement[i].getAttribute(whichAttr) == whichValue) { listElement_arr[listElement_arr.length] = startElement[i]; } } else { listElement_arr[listElement_arr.length] = startElement[i]; } } } } else { listElement_arr= startElement; } return listElement_arr; }This function can be invoked by ActionScript by using the name of the instance of the
HTMLLoaderobject and itswindowproperty:var myElementArray:Array = _html.window.listElements("a","class", "trainingLink");By launching the JavaScript function with these parameters, an
Arraywill be returned with all theatype nodes that will have theattributeclass set to the valuetrainingLink.getElementById(inDOMString elementId)This method enables you to access an element by referring to its ID attribute, specified in the tag node. You have already seen an example that uses this method in Accessing ActionScript from JavaScript in an HTML Container:
function accessingASProperty() { document.getElementById("contentData").innerText = "Hello World" ; }innerTextThis DOM property sets or retrieves the text between the start and end tags of the object.
innerHTMLThis DOM property returns or sets all the content of the specified element in the
htmltag of the page. This property also enables you to set the content for one or more of the DOM’s elements.
Note
To see which DOM classes are contained in the WebKit engine, visit http://developer.apple.com/documentation/AppleApplications/Reference/WebKitDOMRef/index.html.
After you create an HTMLLoader
object, you can navigate the DOM tree of the elements contained in the
HTML contents. The following example of ActionScript code creates an
HTMLLoader object that loads the page
http://www.comtaste.com/en/training.htm:
var initOptions:NativeWindowInitOptions = new NativeWindowInitOptions();
var bounds:Rectangle = new Rectangle(50, 30, 800, 600);
var _html = HTMLLoader.createRootWindow(false, initOptions, true, bounds);
_html.stage.nativeWindow.activate();
var _urlReq:URLRequest = new URLRequest( "http://www.comtaste.com/en/training.htm" );
_html.load( _urlReq );
_html.addEventListener( Event.COMPLETE, onComplete );
Warning
Be aware that before the COMPLETE event is dispatched, the DOM
elements may not have been parsed or created. As best practice, wait
for this event before accessing any HTML DOM elements.
Upon the COMPLETE event, the
onComplete event handler is invoked.
Within the event handler, you’ll write the code to access the HTML DOM.
The following example accesses the DOM element with the same ID of the container and returns the HTML
content of that node.
The hmtlCode variable contains
the following HTML content:
<ul class="primary-links">
<li><a href="company.htm">COMPANY</a></li>
  <li><a href="solutions.htm">SOLUTIONS</a></li>
  <li><a href="consulting.htm">CONSULTING</a></li>
  <li><a href="training.htm" class="active">TRAINING</a></li>
  <li><a href="clients.htm">CLIENTS</a></li>
  <li><a href="casestudieslist.htm">CASE STUDIES</a></li>
</ul>
This content corresponds precisely with the HTML code contained in
the div with ID="menu" of the http://www.comtaste.com/en/training.htm page.
In addition to accessing the DOM elements, you can change their
properties. For example, you could change the src attributes of the img tag, add the alt attribute to all the a links, or even dynamically add elements to
the page with ActionScript. The following example adds a portion of HTML
code that creates a div element with
a text value to the onComplete event
handler:
private function onComplete( event:Event ) : void
{
    var htmlCode:String = _html.window.document.getElementById("menu").innerHTML;
    _html.window.document.getElementById("menu").innerHTML =
                            "<div style="overflow:hidden; height:20px"
                            id="fromAS"><strong>This is an HTML string
                            generated by ActionScript</strong></div>"
}
In the previous example, you programmatically changed the elements of an HTML page accessing the DOM directly. Accessing HTML DOM directly from ActionScript offers many possibilities for creating highly interactive AIR applications. For example, you could create applications that exploit HTML and JavaScript by programming directly from ActionScript and by leveraging the more advanced functions of the programming language of Flash and Flex.
ActionScript/Flex
The following ActionScript class accesses and
manipulates the HTML DOM to dynamically change the elements of the
HTML content that is loaded in an HTMLLoader object.
The class is a subclass of the Flex Framework’s UIComponent class and can, therefore, also
be used in this environment:
package com.oreilly.aircookbook.ch5
{
     import flash.events.Event;
     import flash.html.HTMLLoader;
     import flash.net.URLRequest;

     import mx.core.UIComponent;


     [Event(name="complete")]
     public class AccessDOMElements extends UIComponent
     {

        private var _html:HTMLLoader;


        public function AccessDOMElements()
        {
            super();
        }

        override protected function createChildren():void
        {
            _html = new HTMLLoader();
            _html.width = 800;
            _html.height = 600;
            addChild(_html);

            _html.addEventListener( Event.COMPLETE, onComplete );
        }


        override protected function measure():void
        {
            measuredWidth = 800;
            measuredHeight= 600;
        }


        override protected function updateDisplayList(unscaledWidth:Number,
                                                      unscaledHeight:Number):void
        {
            super.updateDisplayList(unscaledWidth, unscaledHeight);

            _html.width = unscaledWidth;
            _html.height= unscaledHeight;
        }


        private function onComplete( event:Event ) : void
        {
            var newEvent:Event = new Event(Event.COMPLETE);
            dispatchEvent( newEvent );

        }


        public function load( url:String ) : void
        {
            var request:URLRequest = new URLRequest(url);
            _html.load(request);

        }


        public function htmlCodebyID():String
        {

            var htmlCode:String = _html.window.document.getElementById("container").innerHTML;

            return htmlCode;
        }

        public function htmlCodebyTag():String
        {

            var htmlCode:Object = _html.window.document.getElementsByTagName("img");
            var htmlStr:String;

            if (htmlCode != null)

            for (var i:Number = 0; i < htmlCode.length; i++)
            {
                if (htmlCode[i].getAttribute("class") == "logo")
                {
                    htmlCode[i].src =
"http://livedocs.adobe.com/air/1/devappsflash/images/adobe.png";
                    htmlStr += htmlCode[i].src +"
";
                    htmlStr += htmlCode[i].width +"
";
                    htmlStr += htmlCode[i].height +"
";
                }
        }

        return htmlStr;
        }

        private  function listElements(whichTag:String,
                                       whichAttr:String="",
                                       whichValue:String=""):Object
        {

            var startElement:Object = new Object();
            var listElement_arr:Object= new Object();

            if (whichTag) {
                startElement =
_html.window.document.getElementsByTagName(whichTag);
            } else {
                startElement = (_html.window.document.all) ?
_html.window.document.all :
                    _html.window.document.getElementsByTagName("*");
            }
            if (whichAttr) {
                for (var i:Number = 0; i < startElement.length; i++) {
                    if (startElement[i].getAttribute(whichAttr)) {
                        if (whichValue) {
                            if (startElement[i].getAttribute(whichAttr) ==
whichValue) {
                                listElement_arr[listElement_arr.length] =
startElement[i];
                            }
                        } else {
                            listElement_arr[listElement_arr.length] =
startElement[i];
                        }
                    }
                }
            } else {

                listElement_arr= startElement;
            }

            return listElement_arr;
        }

        public function walkingTree(tagName:String):String
        {
            var DOMList:Object = listElements(tagName);
            var walkingTreeList:String;

            if (DOMList != null)

            for (var i:Number = 0; i < DOMList.length; i++)
            {
             walkingTreeList += DOMList[i].innerHTML +"
";
            }

        return walkingTreeList;

        }

    }
}
The AccessDOMElements class
navigates through the DOM elements of the HTML page loaded into the
HTMLLoader instance looking for an
explicit image within the HTML code. Upon finding the image, the code
switches to the new one.
The AccessDOMElements class
has three public methods. The first, htmlCodebyID, is a public method and returns
a String that contains HTML code in
the tag that is specified by using the getElementById method.
The second public method, htmlCodebyTag, returns the HTML code
contained in a certain HTML tag that is specified with the getElementsByTagName method. Furthermore,
this method uses the DOM getAttribute method, which allows access to
certain attributes of the selected node. That way, you are able to act
on the single HTML element and change any of its values. With a loop,
this function looks in all the img
tags of the content, and when it verifies a condition on the attribute
class of that tag, it changes its src attribute, loading a new image from a
new pathway:
public function htmlCodebyTag():String
{

    var htmlCode:Object = _html.window.document.getElementsByTagName("img");
    var htmlStr:String;

    if (htmlCode != null)

    for (var i:Number = 0; i < htmlCode.length; i++)
    {
        if (htmlCode[i].getAttribute("class") == "logo")
        {
        htmlCode[i].src =
"http://livedocs.adobe.com/air/1/devappsflash/images/adobe.png";
        htmlStr += htmlCode[i].src +"
";
        htmlStr += htmlCode[i].width +"
";
        htmlStr += htmlCode[i].height +"
";
        }
    }

    return htmlStr;
}
The third public function, walkingTree, returns the content of the HTML
DOM elements that correspond to the search criteria; it returns the
content with the innerHTML
property. This criteria is specified in another method that is
launched by the walkingTree: the
private listElements method. The
listElements method accepts three
parameters: whichTag (the name of
the tag to point to), whichAttr
(the attribute of the specified tag to use), and whichValue (the value of the attribute to
compare). This method returns a collection of elements that verify the
conditions of the parameters sent to it.
The property that is returned by the method is called listElement_arr. Even if in theory this
property contains an array of elements and if you assign them as data
type Array, the application will
raise a Type coercion error:
Error #1034: Type Coercion failed: cannot convert __HTMLScriptObject@fb55b1 in
Array.
Instead, you must type the properties as Object classes that return the elements by
using the getElementsByTagName
method.
You can use the AccessDOMElements class in a simple MXML
application that will then be packaged in AIR. You can use Flex
Builder 3 as an environment to write the following code, or you can
write it with any text editor and then compile it with the AIR
adl command-line compiler (which
you can find in the AIR SDK):
<?xml version="1.0" encoding="utf-8"?>
<mx:WindowedApplication xmlns:mx="http://www.adobe.com/2006/mxml"
layout="vertical">

    <mx:Script>
    <![CDATA[

        private var list_arr:Array;

        private function loadHTML():void
        {
            htmlComp.load("http://www.comtaste.com/en/training.htm");

        }

    ]]>
    </mx:Script>

    <mx:TextArea width="800" height="300" id="myTA" />
    <mx:HBox>

        <mx:Button label="Show HTML Code"  click="myTA.text =
        htmlComp.htmlCodebyID()" />

        <mx:Button label="Change Image"  click="myTA.text =
        htmlComp.htmlCodebyTag()" />

        <mx:Label text="Insert the name of the Tag: " />
        <mx:TextInput id="tagName" text="*" />
        <mx:Button label="Navigate The DOM Tree by Tag"
        click="myTA.text = htmlComp.walkingTree(tagName.text)" />

    </mx:HBox>

    <comp:AccessDOMElements xmlns:comp="com.oreilly.aircookbook.ch5.*"
    id="htmlComp"
     initialize="loadHTML()" />

</mx:WindowedApplication>
It is the AccessDOMElements
component that creates the instance of the AccessDOMElements
ActionScript class, created in the com.oreilly.aircookbook.ch5 package and
associated to the namespace comp.
Once the AIR application has been compiled, it will load the
content of the page http://www.comtaste.com/en/training.htm in the HTMLLoader object and will expose three
buttons (Figure 5-2),
which will launch the previously mentioned three public methods of the
ActionScript class.
When the user inserts the name of an HTML tag in the TexInput, the walkingTree method will be called by
clicking the Navigate button, and all the elements on the page that
have been declared with that tag will be returned.
By clicking the Change Image button, the image of the Comtaste logo will be replaced with an image loaded from a remote source at the following URL: http://livedocs.adobe.com/air/1/devappsflash/images/adobe.png.
This exchange of images is made possible thanks to the htmlCodebyID method that accesses the DOM
element with the img tag and
verifies the following condition with the DOM getAttribute:
htmlCode[i].getAttribute("class") == "logo"
Accessing and Editing an HTML Style Sheet from ActionScript
Solution
Edit the CSS styles using the cssRules property, which contains an array of
the window.document.styleSheets
elements.
Discussion
To access the attributes that regulate the CSS styles of an
element in an HTML page, you can use the getElementById and getElementsByTagName methods to access the
HTML element and then edit its style
property:
_html.window.document.getElementById("contentID").style.color = "#FF6600";
_html.window.document.getElementById("contentID").style.size = 2;
For accessing and editing HTML style sheets, however, you can use
the cssRules property of the window.document object that contains an array
of the styles declared on the page. This is a better approach.
Consider this example of HTML, which specifies a style sheet with two CSS classes:
<html>
<style>
    .button1{
    background-color: #ffff00;
    font-size: 12px;
    }
    .button2{
    color: #ff0000;
    }
</style>
To access and edit these style sheets, use the following ActionScript code:
var myStyle:Object = _html.window.document.styleSheets[0];

myStyle.cssRules[0].style.backgroundColor = "#00ff00";
myStyle.cssRules[0].style.fontSize = "20px";
The myStyle object provides
access to the HTML code’s CSS style declaration. You edit its existing
settings through the backgroundColor
and fontSize properties.
If you like, you can even add new properties that weren’t previously specified in the element’s style sheet:
myStyle.cssRules[1].style.textDecoration = "underline";
Accessing the HTML Container History List
Problem
You want to access the HTML history list and move forward or backward throughout the HTML pages loaded within the HTML container.
Solution
Use the historyLength, historyPosition, historyAt, historyBack, historyForward, and historyGo methods of the HTMLLoader class to interact with the HTML
history.
Discussion
When you navigate and load new pages in the HTMLLoader object, you will need to access a
list that contains the pages loaded so far. AIR automatically maintains
a history list for the pages.
AIR provides plenty of flexibility for working with the HTML history list, as you can see in Table 5-2.
The items maintained by the runtime are typed as HistoryListItem objects. The HistoryListItem contains the
properties shown in Table 5-3.
Items in the history list are stored as objects of type HistoryListItem. To be able to access the
properties that contain the URL and the title of the HTML pages loaded
in the HTML container, for example, you have to first create a variable,
typed as HistoryListItem, and from
this instance access the url property
and title:
var tempHistoryItem:HTMLHistoryItem = _html.getHistoryAt(index);
myDataProvider.addItem({label:tempHistoryItem.title,data:tempHistoryItem.url});
In this recipe, you will work with some of the methods of the HTML history list.
ActionScript/Flex
To access the history list from your Flex project, you
need to create a custom ActionScript call that uses the HTMLLoader class and extends the UIComponent class. The code for this class,
named HandleHistory, is shown later
in this section.
As you examine it, focus your attention on the onComplete event handler of the COMPLETE
event; here you need to register a listener for the LOCATION_CHANGE event:
_html.addEventListener(Event.LOCATION_CHANGE, showHistoryHTMLContent);
This event defines the value of the type property of a locationChange event object and is triggered
every time the HTML content changes within the HTMLLoader object. This event is therefore
used to monitor all navigation of a user in an HTML page. In the
showHistoryHTMLContent event
handler, an instance of the HTMLHistoryItem is created, from which the
URL properties and titles of the HTML content are taken. This
information is added to an ArrayCollection, which will contain the
navigation history.
Note
If you want to use the UIComponent class in a Flash project, all
you have to do is change the parent class from UIComponent to Sprite and replace the ArrayCollection class with the DataProvider class. (For more information,
see the Flash documentation at http://livedocs.adobe.com/flash/9.0/main/wwhelp/wwhimpl/common/html/wwhelp.htm?context=LiveDocs_Parts&file=00000410.html.)
package com.oreilly.aircookbook.ch5
{
    import flash.events.Event;
    import flash.html.HTMLHistoryItem;
    import flash.html.HTMLLoader;
    import flash.net.URLRequest;

    import mx.collections.ArrayCollection;
    import mx.core.UIComponent;

    public class HandleHistory extends UIComponent
    {

        private var _html:HTMLLoader;
        private var _historyDP:ArrayCollection = new ArrayCollection();

        public function get html():HTMLLoader
        {
        return _html;
        }

        public function get historyDP():ArrayCollection
        {
        return _historyDP;
        }


        public function HandleHistory()
        {
        super();
        }

        override protected function createChildren():void
        {
            _html = new HTMLLoader();
            _html.width = 800;
            _html.height = 600;
            addChild(_html);

            _html.addEventListener( Event.COMPLETE, onComplete );
        }

        override protected function measure():void
        {
            measuredWidth = 800;
            measuredHeight= 600;
        }

        override protected function updateDisplayList(unscaledWidth:Number,
                                                      unscaledHeight:Number):void
        {
            super.updateDisplayList(unscaledWidth, unscaledHeight);

            _html.width = unscaledWidth;
            _html.height= unscaledHeight;
        }

        private function onComplete( event:Event ) : void
        {
           _html.addEventListener(Event.LOCATION_CHANGE, showHistoryHTMLContent);
        }

        public function loadURL( url:String ) : void
        {
            var request:URLRequest = new URLRequest(url);
            _html.load(request);
        }

        public function showHistoryHTMLContent(evt:Event):void
        {
            _historyDP.removeAll();


            for (var i:int = 0; i< _html.historyLength ; i++)
            {
                var tempHistoryItem:HTMLHistoryItem = _html.getHistoryAt(i);

                _historyDP.addItem({label:tempHistoryItem.title,data:tempHistoryItem.url});
            }
        }

        public function gotToURL(selIndex:int):void
        {
            loadURL(historyDP.getItemAt(selIndex).data as String);
        }
    }
}
You now have access to the history list. To move backward and
forward in the list, you’ll add the code for management of the Back
and Forward buttons to your class. To do so, simply use the HTMLLoader class’s historyBack, historyForward, and historyGo methods as event handlers for the
click event of the button
instances. The historyBack and
historyForward methods navigate
back and forward through the history list, respectively. The historyGo method navigates forward and
backward by passing a positive or negative number as a parameter (a
positive number will make the historyGo method navigate forward).
You can use the HandleHistory
class you created in a Flex project by creating an MXML file with
three buttons to manage the historyGo, historyForward, and historyBack functions, as well as a list
that contains the history list of the HTMLLoader object. To create the list,
simply load the ArrayCollection
instance of the HandleHistory class
with a binding.
Here is the complete MXML file:
<?xml version="1.0" encoding="utf-8"?>
<mx:WindowedApplication
xmlns:mx="http://www.adobe.com/2006/mxml" layout="vertical"
xmlns:comp="com.oreilly.aircookbook.ch5.*">

    <mx:Script>
    <![CDATA[
        import mx.events.ListEvent;
        import mx.collections.ArrayCollection;
        import mx.events.CollectionEvent;

        private var list_arr:Array;
        [Bindable]
        private var myAC:ArrayCollection;

        private function loadHTML():void
        {
            htmlComp.loadURL("http://www.comtaste.com/");


            htmlComp.historyDP.addEventListener(CollectionEvent.COLLECTION_CHANGE,
                                                onACChange);
            gotorul.addEventListener(MouseEvent.CLICK, onGotourl);

            myAC = htmlComp.historyDP;
        }

        private function onShowHistoryClick(evt:MouseEvent):void
        {
            hisList.dataProvider =  htmlComp.historyDP;
        }

        private function onGotourl(evt:MouseEvent):void
        {
            htmlComp.gotToURL(hisList.selectedIndex);
        }

        private function onACChange(evt:CollectionEvent):void
        {
            hisList.selectedIndex = htmlComp.html.historyPosition;
        }

    ]]>
    </mx:Script>
    <mx:HBox>
        <mx:Button label="Back" id="backBtn" click="htmlComp.html.historyGo(-1)" />
        <mx:Button label="Next" id="ffBtn" click="htmlComp.html.historyGo(1)" />
        <mx:Button label="Go to URL" id="gotorul" />
    </mx:HBox>

    <mx:List id="hisList" dataProvider="{myAC}" />

    <comp:HandleHistory id="htmlComp" initialize="loadHTML()" />

</mx:WindowedApplication>
In JavaScript, the implementation of the history list is
identical to the one used in ActionScript. The methods shown by the
HTMLLoader class are the same, and
the history list corresponds to the window.history object in the HTML
page.
Bridging Content from Different Security Sandboxes
Contributed by MarinTodorov (http://www.underplot.com) with an introduction by Marco Casario
Problem
You may want to run content, exchange data, and use functionality from the application sandbox and a nonapplication sandbox at the same time. You may even want to do all this between different nonapplication sandboxes.
Solution
Use the provided bridging interface to expose variables or methods between the sandboxes. For communication between nonapplication sandboxes, use the application sandbox as a proxy between them.
Discussion
The security of a desktop application is fundamentally important. AIR applications run directly on the desktop, and the security model for HTML content running in AIR is more stringent than the security model of a typical web browser.
AIR follows a series of rules to guarantee the security of the applications and the users.
When the application has to do with HTML content, it exposes itself to a series of potential attacks that are launched following malicious code execution. One of these techniques is known as cross-site scripting.
A malicious developer could, for example, use the eval method of JavaScript, the JavaScript
pattern in the a tag, or the DOM
properties innerHTML and innerText to execute malicious code. The
following is a classic example of malicious code that can create serious
security problems:
<a href="#" onclick="var myFile=new air.File('c:\windowsmyFile.dll'),
myFile.deleteFile();">Click here to read the file. </a>
When users are unaware of the code behind the link, they will click the text, thinking they are reading something, and instead they will be able to delete a system file.
To avoid this and many other problems linked to security, Adobe AIR allows you to define the permits for each file (internally as well as externally) in an application. Using sandboxes, AIR establishes access protocols to data and operations by using two concepts of sandboxes: an application sandbox and a nonapplication sandbox. According to the sandbox that is specified, different rules apply.
Code in an application sandbox context has access to AIR APIs, has
a limited ability to generate code dynamically after a page loads, and
cannot load content via a script tag.
In this sandbox, the possibility of executing JavaScript code is
disabled after a page has been loaded. This stops malicious code from
being created, for example, on the eval method or by interacting with DOM
properties. The developers specify the trusted directories to work on by
using the app:/ schema. All files and
data are installed and copied in app:/, and the ones that are outside this
folder are treated as if they were in the web browser.
Code in nonapplication sandboxes essentially imitates typical browser restrictions and behaviors for local trusted HTML. This is the sandbox that is automatically assigned to all content that is loaded from an Internet location (or from a network). The content specified in this sandbox can access the JavaScript code and interact with DOM.
The AIR sandbox bridge model enables broader functionality and less risk than is associated with typical browser-based applications.
Application Sandbox from Nonapplication Content
The application sandbox can set up a bridge interface inside the
nonapplication box called parentSandboxBridge that can be accessed by
the nonapplication sandbox code. Consider the following
example:
var parentBridge = {
    sayHello = function (msg) {
        alert("Hello from the application sandbox! "+msg);
};

function setupBridge(){
    document.getElementById("sandbox").contentWindow.parentSandbox
Bridge = parentBridge;
}
This example creates the bridge between the different sandboxes. Specifically, the following code includes the nonapplication sandbox content in the application:
<iframe id="sandbox" src="http://www.site_abc.com/sandbox.html"
     documentRoot="app:/"
     sandboxRoot="http://www.site_abc.com/"
     ondominitialize="setupBridge ()">
</iframe>
In this way, the nonapplication sandbox code (in sandbox.html) can invoke the method
sayHello from the application
sandbox:
window.parentSandboxBridge.sayHello("and from non-app sandbox");Communicate Between Different Nonapplication Sandboxes
The nonapplication code can access the parent via the parentSandboxBridge and can expose data and
methods via the childSandboxBridge.
You might immediately suppose that in this case it is possible to
expose directly the childSandboxBridge of nonapplication sandbox
1 to nonapplication sandbox 2 (using the application sandbox’s
parentSandboxBridge), but
this setup does not work (for security reasons). The access to the
bridges is very restricted. From outside the sandbox, the bridges are
defined and are read-only. In addition, if you try to read an exposed
method’s body in order to peek at the nonexposed objects, you will
find out alert(childSandboxBridge.exposedMethod) will
give you an empty function.
To exchange data between nonapplication sandboxes, you should set up a bridge proxy in the application sandbox code. The following example is an application that loads two different websites: one that has a database with clients and another where the user wants to copy some of those clients (of course, the two sites must implement the appropriate code, as described in a moment, for this setup to work).
The parent code (running on AIR) is as follows:
<html>
<head>
<script type="text/javascript">

    var bridgeProxy = {
        broadcast: function (method, args, sandbox) {
            document.getElementById(sandbox).contentWindow.childSandboxBridge.
callMethod(method, args)
            }
    }

    function setupBridge(sandbox){
        sandbox.contentWindow.parentSandboxBridge = bridgeProxy;
    }

</script>
</head>
<body>

<!-- that's the first non-app sandbox www.abc.com -->
<iframe id="site_abc" src="http://www.abc.com/site_abc.html" documentRoot="app:/"
sandboxRoot="http://www.abc.com/" ondominitialize="setupBridge(this)"></iframe>

<!-- that's the second non-app sandbox www.xyz.com -->
<iframe id="site_xyz" src="http://www.xyz.com/site_xyz.html" documentRoot="app:/"
sandboxRoot="http://www.xyz.com/" ondominitialize="setupBridge(this)"></iframe>

</body>
</html>
Note that each iframe calls
the setupBridge function to create
the parentSandboxBridge in its
window object. This is the code of
the view customer page on the website ABC (your first nonapplication
sandbox):
<html>
<head>
<script type="text/javascript">

    function copyInfo() {
       // call the parent bridge with arguments : method name, data, iframe id
       window.parentSandboxBridge.broadcast('copyInfo1',
       {
           firstName: document.getElementById('firstName').value,
           lastName : document.getElementById('lastName').value,
           street : document.getElementById('street').value,
           city : document.getElementById('city').value
       },
      'site_xyz'),
    }

</script>
</head>
<body>

<b>Web site ABC</b><br />
View Client information:<br /><br />

First name: <input type="text" id="firstName" value="Ford" /> <br />
Last name: <input type="text" id="lastName" value="Prefect" /> <br />
Street: <input type="text" id="street" value="42, East side drive" /> <br />
City: <input type="text" id="city" value="Manchester" /> <br />

<input type="button" value="Copy information" onClick="copyInfo()" />

</body>
</html>
When the user clicks the Copy Information button, the form
information is gathered and sent to the parent bridge proxy, and the
data is addressed to the sandbox with the ID site_xyz. Here is the code in the other
website, which has to receive the customer information:
<html>
<head>

<script type="text/javascript">
    function copyInfo (args)
    {
        document.getElementById('name').value = args.firstName +" "+ args.lastName;
        document.getElementById('address').value = args.street +", "+ args.city;
    }

   var childBridge = {

        callMethod : function(name, args) {
            if (window[name]) window[name](args);
            else alert("No "+name+" defined!");
        }
   }

   window.childSandboxBridge = childBridge;

</script>
</head>
<body>
<b>Web site XYZ</b><br />
Create new customer:<br /><br />

Name: <input type="text" id="name" value="" /> <br />
Address: <input type="text" id="address" value="" /> <br />

<input type="button" value="Create customer" onClick="alert('New
 customer created!')" />

</body>
</html>
The bridge interface of site_xyz just calls the required method and
passes the data—in this case, the method copyInfo, which reformats the customer data
and fills in the form. The user now has to just click Create Customer,
and you’re done.
This example shows how far you can go by exposing the window’s methods via the bridge. In most cases, it would have been better to encapsulate the exposed methods in the bridge object.
Note
For more details on AIR security, see the “Adobe AIR Security” white paper at http://www.adobe.com/go/learn_air_security_wp_en.
Creating JavaScript Functions from ActionScript
Solution
Use the loadString method of
the HTMLLoader class to load HTML
code passed in as a simple string. Create a complex HTML code snippet
that also includes JavaScript using only the ActionScript
language.
Discussion
By passing an HTML string to the loadString method, you can load HTML content.
The syntax of the method is as follows:
public function loadString(htmlContent:String):void
where the htmlContent parameter
is the HTML string that will be loaded in the HTMLLoader class.
Using this technique, you can assign a whole HTML page with
JavaScript code to the loadString
method.
Warning
When you call the loadString
method, any pending load operation initiated with this method
or with the load method is
canceled. This means that the complete event for the previous load
operation will never be delivered.
ActionScript/Flex
The following example creates HTML content directly in
an ActionScript class. The htmlToLoad property, typed as XML, is set
with HTML content, which loads a text message into a div:
package com.oreilly.aircookbook.ch5
{

    import flash.display.Sprite;
    import flash.display.StageAlign;
    import flash.display.StageScaleMode;
    import flash.events.Event;
    import flash.html.HTMLLoader;
    import flash.net.URLRequest;


    public class CreateJSfromAS extends Sprite
    {

        private var _html:HTMLLoader;
        private var htmlToLoad:XML = new XML();


        public function CreateJSfromAS()
        {
            this.stage.scaleMode = StageScaleMode.NO_SCALE;
            this.stage.align = StageAlign.TOP_LEFT;

            _html = new HTMLLoader();

            _html.width = stage.stageWidth;
            _html.height = stage.stageHeight;

            loadHTMLcontent();

            _html.addEventListener(Event.COMPLETE, onComplete);

            this.addChild( _html );

        }


        private function onComplete (e:Event):void
        {
            // The window.document object includes the contentData element
            // that we access using the getElementById method.
            // It returns the text into the contentData div

            trace(html.window.document.getElementById("contentData").innerText);

        }


        private function loadHTMLcontent( ):void
        {

            // Define the HTML string to pass to the
            // loadString() method of the _html istance

            _htmlToLoad = <![CDATA[
            <html xmlns="http://www.w3.org/1999/xhtml">
            <head>

            <title>Solution 15.X: Creating a JavaScript function from
                ActionScript</title>

            <script type="text/javascript">

            function showMessage(message)
            {
            document.getElementById("contentData").innerHTML = message;
            }

            </script>

            <body onload=" showMessage ('This is a JavaScript function created
                within an ActionScript class')">

            <p>

            <div id="contentData" style="overflow:auto; width:100%; height:100%">
            </div>

            </p>

            <p>


            </p>

            </body>
            </html> ]]>;

            // Loads the htmlToLoad string within the
            // HTMLLoader class

            _html.loadString(htmlToLoad.toString());


        }
    }
}
The long HTML string contained in the htmlToLoad property is assigned to the
loadString method. The onComplete event handler provides access to
the resultDiv element through
ActionScript, specifically with the getElementById method specified in the HTML
string:
private function onComplete (e:Event):void
{
    // The window.document object includes the contentData element
    // that we access using the getElementById method.
    // It returns the text into the contentData div

    trace(html.window.document.getElementById("contentData").innerText);

}
Only after the page has been completely loaded, when the
HTMLLoader object dispatches the
complete event, can you access the
HTML DOM through the ActionScript code.
Scrolling HTML Content in ActionScript
Problem
You need to create a window with scrolling HTML content or simply want to scroll HTML content.
Solution
Scroll HTML content by setting the scrollBarsVisible parameter of the HTMLLoader createRootWindow method to true.
Discussion
By default, the HTMLLoader
class does not provide scroll bars for the HTML content it displays. By
specifying a parameter in the createRootWindow method, however, you can
force the HTMLLoader window to use
the horizontal and vertical scroll bars.
The static createRootWindow
method of the HTMLLoader class has
the following syntax:
createRootWindow(visible:Boolean = true, windowInitOptions:NativeWindowInitOptions
= null, scrollBarsVisible:Boolean = true, bounds:Rectangle = null):HTMLLoader
This method lets you create a new NativeWindow object that contains an HTMLLoader object for which a URL can be
specified to be loaded. The third parameter of this method, scrollBarsVisible, enables you to specify
whether the window with HTML content uses scroll bars. To turn on scroll
bars, set scrollBarsVisible to
true, as shown here:
var _initOptions = new air.NativeWindowInitOptions();
var _bounds = new air.Rectangle(50, 50, 320, 240);

var html = air.HTMLLoader.createRootWindow(false, _initOptions, true, _bounds);

var urlReq = new air.URLRequest( "http://www.comtaste.com/en " );
html.load( urlReq );

html.stage.nativeWindow.activate();
The HTMLLoader class has the
following properties to control the scrolling of the HTML
content:
contentHeight: Specifies the height of the HTML contentcontentWidth: Specifies the width of the HTML contentscrollH: Represents the horizontal scroll position of the HTML contentscrollV: Represents the vertical scroll position of the HTML content
To check the scrolling of the HTML content, you use the properties
contentHeight, contentWidth, scrollH, and scrollV.
The following example creates an event handler on the htmlBoundsChange event, which is triggered
every time the contentHeight or
contentWidth property changes. This
event handler always places the vertical scroll of the HTML content in
the top position:
var html:HTMLLoader = new HTMLLoader();
html.width = 640;
html.height = 480;
var urlReq:URLRequest = new URLRequest("http://www.comtaste.com/en");
html.load(urlReq);

html.addEventListener(Event.HTML_BOUNDS_CHANGE, onContentChange);

this.addChild(html);

private function onContentChange(event:Event):void
{
    // Scroll to the top
    html.scrollV = 1;
}
Using ActionScript Libraries Within an HTML Page
Solution
Use the HTML script tag to
import and use ActionScript classes within an HTML page. To ensure the
ActionScript class is imported properly, specify the script tag’s type attribute as type="application/x-shockwave-flash".
Discussion
AIR can import ActionScript classes in a compiled SWF file within an HTML page.
To import an ActionScript library in an HTML page, you must first
compile the library as a SWF file with the acompc compiler.
The acompc tool is a command-line compiler included in the AIR SDK
(http://www.adobe.com/products/air/tools/sdk/). It
is launched by a terminal window and requires the classes to be
specified within the code base to include the library or component and,
if necessary, a configuration file.
In this example, you will be working with a simple ActionScript class that has one public property. You will learn how to access that public property from within JavaScript. Here is the class you will be working with:
package com.oreilly.aircookbook.ch5 {

    public class CreateJSfromAS
    {

        public var resultValue:String = "A Variable from ActionScript";

        public function CreateJSfromAS(){
        }

    }
}
The configuration file is a simple XML-based file that contains the information regarding the classes to include in the compiled file and their packages.
The following code is an example of a configuration:
<air-config>
    <compiler>
        <source-path>
            <path-element>source</path-element>
        </source-path>
    </compiler>
    <include-classes>
        <class>com.oreilly.aircookbook.ch5.CreateJSfromAS</class>
    </include-classes>
</air-config>
It is even possible to specify more than one ActionScript class in
the include-classes node by declaring
more than one class node:
<include-classes>
    <class>com.oreilly.aircookbook.ch5.CreateJSfromAS</class>
    <class>com.oreilly.aircookbook.ch5.myClass2</class>
    <class>com.oreilly.aircookbook.ch5.myClass3</class>
</include-classes>
This file is assigned to the command-line compiler by using the
load-config attribute and by
specifying the name and the folder in which the compiled file will be
placed. For example, in the following command line, the compiler loads
the configuration file air-config.xml and creates the asLib.swf file in the lib folder:
acompc -load-config air-config.xml -output lib/asLib.swf
After you create the ActionScript library, you can import it into
the HTML page and therefore use it in your JavaScript code. The example
of HTML page that follows imports the class with the script tag and creates an instance upon the
onload event. In addition, it takes
the value of the resultValue public variable from the
ActionScript class and populates the innerHTML
property of the result div:
<!DOCTYPE html PUBLIC "-//W3C//DTD XHTML 1.0 Transitional//EN"
"http://www.w3.org/TR/xhtml1/DTD/xhtml1-transitional.dtd">
<html xmlns="http://www.w3.org/1999/xhtml">
<head>

<meta http-equiv="Content-Type" content="text/html; charset=UTF-8">
<title>5.9 Using ActionScript libraries within an HTML page</title>

<script type="text/javascript" src="frameworks/AIRAliases.js"></script>
<script type="text/javascript" src="frameworks/AIRIntrospector.js"</script>

<script src="lib/asLib.swc" type="application/x-shockwave-flash"></script>

<script type="text/javascript">

    var libIstance = null;


    function loadASClass()
    {
        var libIstance = new
window.runtime.com.oreilly.aircookbook.ch5.CreateJSfromAS;
        var result = document.getElementById('result'),
        result.innerHTML = libInstance.resultValue;
    }

</script>

</head>

<body onload="loadASClass()">

    <div id="result"> </div>

</body>
</html>
To import the library properly, be sure to set the type attribute of the script tag to application/x-shockwave-flash:
<script src="lib/asLib.swc" type="application/x-shockwave-flash"></script>
To access the imported library (asLib.swc), you have to create a reference
through the runtime property of the
JavaScript window object (including
the package name for which the classes are organized), as shown below.
Since you have created the reference to the ActionScript class, you can
then access its public methods and properties:
function loadASClass()
{
    var libIstance = new window.runtime.com.oreilly.aircookbook.ch5.CreateJSfromAS;
    var result = document.getElementById('result'),
    result.innerHTML = libInstance.resultValue;
}