


Veeam FSI-CIFS
This chapter describes steps and preferred practices for configuring and setting up Veeam Backup & Replication for backup and restore. The chapter also provides parameters and settings for best performance with ProtecTIER File System Interface-Common Internet File System (FSI-CIFS).
Before continuing, be sure that your ProtecTIER System for FSI-CIFS is configured and that you completed the following tasks:
•A file system is created.
•CIFS authentication is configured.
•CIFS Share is created.
For general information about how to configure the ProtecTIER System for FSI, review Chapter 5, “ProtecTIER File System Interface: General introduction” on page 65.
Information about Veeam Backup & Replication is at the following web page:
|
Note: ProtecTIER GA Version 3.4 was released with only the Virtual Tape Library (VTL) interface support. File System Interface (FSI) support was added to ProtecTIER PGA 3.4 Version. For details, see the announcement letter:
|
This chapter describes the following topics:
19.1 Setting up backup infrastructure
Before creating backup and restore jobs, you must plan and set up a backup infrastructure. A typical Veeam backup infrastructure includes the following components:
•Backup repository
•Backup proxy
•Virtual servers (ESX(i))
This section provides steps to set up these components for the Veeam backup infrastructure.
19.1.1 Creating backup repository
A backup repository is a location for storing backup data on the target side. This section describes how to configure a Windows-based backup repository that is built on a ProtecTIER FSI-CIFS share.
To create the backup repository, complete the following steps:
1. Start the Veeam Backup & Replication console.
2. In the left pane, open the Backup Infrastructure view.
3. Right-click the Backup Repositories node and select Add Backup Repository.
4. In the wizard, specify a name for the repository and a description for future reference. Click Next.
5. Choose Shared folder as the type of backup repository you want to create. Click Next.
6. In the Shared folder field (Figure 19-1), specify the Universal Naming Convention (UNC) path to the share folder and select the This share requires access credentials check box. Enter an account with administrative privileges on the share. Click Next.

Figure 19-1 Creating a backup repository
7. For the Repository location (Figure 19-2), click Populate to calculate the capacity and free space on the selected share folder.
|
Note: A suggestion is to set the Limit maximum concurrent jobs count parameter to 16.
|

Figure 19-2 Setting maximum concurrent jobs count
8. Click Advanced to select the following two parameters:
– Align backup file data blocks.
– Decompress backup data blocks before storing.
|
Note: Review Table 19-1 on page 291 for suggested settings of these parameters.
|
9. Click Finish.
19.1.2 Adding VMware backup proxy
To add a VMware backup proxy, complete the following steps:
1. Start the Veeam Backup & Replication console.
2. In the left pane, open the Backup Infrastructure view.
3. Right-click the Backup Proxies node and select Add VMware backup proxy.
4. From the Choose server list, select any other server as a new backup proxy.
To select another server as a backup proxy, you can click Add new to open the New Windows Server wizard to add a new server.
5. Click Finish.
|
Tip: For best performance, a suggestion is for the server that is installed with Veeam proxy to have a direct storage area network (SAN) connection to the virtual machine disk.
|
19.1.3 Adding a VMware Server
To add a VMware Server, complete the following steps:
1. Start the Veeam Backup & Replication console.
2. In the left pane, open the backup Infrastructure view.
3. Right-click the Managed servers node and select Add server.
4. In the Add server window, select VMware vSphere.
5. Enter the DNS name or IP address of the VMware vCenter server in the DNS name or IP address field and provide a description. For example: 10.0.0.1. Click Next.
6. Enter a user account with local administrator privileges on the server you are adding, as shown in Figure 19-3.

Figure 19-3 Adding VMware server
7. Click Finish.
19.2 Setting up backup and restore
This section provides steps for configuring Veeam Backup & Replication V6.5 to perform backup and restore in a ProtecTIER FSI-CIFS environment.
19.2.1 Creating a new backup job for backup
To create a new backup job, complete the following steps:
1. Start the Veeam Backup & Replication console.
2. In the left pane, open the Backup & Replication view.
3. Right-click the Job node and select Backup to start a new backup job wizard.
4. Enter a name of new backup job in the Name field and provide a description. Click Next.
5. Click Add to select VMs that should be backed up and click add. Use the Recalculate button to refresh the total size value after you add new VMs to the job (note that it is suggested to have one job per VM). Click Next.
6. From the Backup repository list, select a repository that you previously created to store the created backup files (Figure 19-4).

Figure 19-4 Creating backup job
7. Click Finish
19.2.2 Performing backup
To perform a backup, complete the following steps:
1. Start the Veeam Backup & Replication console.
2. In the left pane, open the Backup & Replication view.
3. Select the node Jobs → Backup, right-click a backup job in the list, and select Start to manually run the backup.
|
Note: The first time that you run the backup in this way, it is a full backup; after that, it will be an incremental backup. If you want to run a full backup again, right-click a backup job and select Active Full.
|
19.2.3 Performing restore
To perform a restore, complete the following steps:
1. Start the Veeam Backup & Replication console.
2. On the Home tab, click Restore and select VMware.
3. In the Restore from backup section, choose Entire VM. Click Next.
4. Click Add VM → from backup to select the wanted VM in the list of available backup jobs.
5. Click Point to select the wanted restore point for the VM. Click Next.
6. Select Restore to a new location, or with different settings. Click Next.
7. In the Host field, specify a host on which the VM should run.
8. In the Resource pool list, select a resource pool to which the VM should be recovered.
9. In the Datastore field, select which disk and disk type should be used to restore the VM.
10. In the Folder field, change a new name under which the VM should be restored and registered. Click Next.
11. Select the Power on VM after restoring check box to start the VM immediately after recovery.
12. Click Finish to start restore.
19.3 Parameters for best performance with ProtecTIER-CIFS
For best performance with ProtecTIER-CIFS, use the suggested parameters that are described in this section.
19.3.1 Disabling data de-duplication and compression
By default, the Enable inline data deduplication check box is selected and Compression is optimal. These settings have a negative effect on the ProtecTIER deduplication factoring ratio. Therefore, disable both Enable inline data deduplication and Compression.
To disable those settings, complete the following steps:
1. Start the Veeam Backup & Replication console.
1. In the left pane, open Backup & Replication view and select Backup node.
2. Right-click a backup job and select Edit.
3. In the Storage field, click Advanced.
a. Clear the Enable inline data deduplication check box to disable data deduplication.
b. Select None for the compression Level to disable data compression.
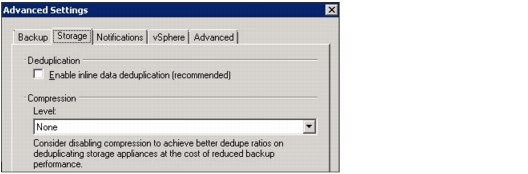
Figure 19-5 Disabling data deduplication and compression
19.3.2 Setting data block size for backup to SAN or local storage
To set the data block size for backup to SAN or local storage, complete the following steps:
1. Start the Veeam Backup & Replication console.
2. In the left pane, open Backup & Replication view and select Backup node.
3. Right-click a backup job and select Edit to start the Edit Backup Job wizard.
4. In the Storage field, click Advanced.
5. Under Storage optimizations (Optimize for), select Local target (Figure 19-6) for backup to SAN, direct-attached storage (DAS), or local storage. Click OK.
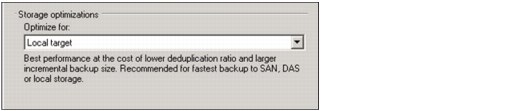
Figure 19-6 Setting data block size
19.3.3 Setting Incremental backup mode
Veeam Backup & Replication provides two methods for storing backup files:
•Reversed incremental backup
•Forward incremental backup
Reversed incremental backup
Reversed incremental backup will rebuild a full backup file for each incremental backup. During incremental backup, Veeam Backup & Replication copies only the data blocks that have changed since the last job, and then “injects” these changes into the previous full backup file (.vbk) to rebuild it to the most recent state of a VM. Meanwhile, it creates a reversed incremental file (.vrb) that contains the block data replaced when rebuilding the full backup file.
Forward incremental backup
Forward incremental backup as a normal incremental backup contains only changed block data since the last job (whether full or incremental) and creates backup files (.vib) until the next full backup.
Generally, the reversed incremental method is more convenient for restore. However, the forward incremental method will have better performance results than the reversed incremental method for backups. Therefore a suggestion is to use the forward incremental method with ProtecTIER.
To use the forward incremental method complete the following steps:
1. Start the Veeam Backup & Replication console.
2. In the left pane, open the Backup & Replication view and select Backup node.
3. In the backup list, right-click a backup job and select Edit.
4. Select the Storage tab and click Advanced.
5. Select the Incremental and Perform active full backups periodically check boxes, as shown in Figure 19-7.

Figure 19-7 Setting incremental backup mode
|
Tip: For best performance, disable synthetic backup, which performs incremental backups after the first full backup, and instead perform active full backup weekly because completing a synthetic backup takes more time.
|
19.4 Advanced backup repository settings
This section describes how to set up data blocks alignment and decompression methods.
19.4.1 Setting data blocks alignment
For storage systems using fixed block size, select the Align backup file data blocks check box. Veeam Backup & Replication will align VM data saved to a backup file to a 4 kilobits (Kb) block boundary, providing better deduplication across backup files.
19.4.2 Setting data blocks decompression
If backup data is compressed at the source side before writing to the target, select the Decompression backup data blocks before storing check box. Veeam Backup & Replication will compress VM data, transmit it over the local area network (LAN), decompress data on the target side, and write raw VM data to the storage device to achieve a higher deduplication ratio.
For more information about setting these parameters, see 19.1.1, “Creating backup repository” on page 284.
Figure 19-8 shows how to configure the advanced backup repository settings.

Figure 19-8 Setting advanced backup repository
19.5 Summary of parameters for best performance
Table 19-1 summarizes the required and suggested settings for ProtecTIER preferred practices with Veeam Backup & Replication.
Table 19-1 Summary of parameters for best performance
|
Component
|
Parameter
|
Value
|
|
Backup job:
Storage definition |
Deduplication
|
Disabled (Not selected)
|
|
Compression level
|
None
|
|
|
Storage optimizations
|
Local target
|
|
|
Backup job:
Backup definition |
Backup Mode
|
Forward Incremental
|
|
Active Full backup
|
Enable (Selected)
|
|
|
Backup Repository
|
Limit Maximum concurrent job count
|
16
|
|
Align backup file data blocks
|
Enable (Selected)
|
|
|
Decompress backup data blocks
|
Enable (Selected)
|
..................Content has been hidden....................
You can't read the all page of ebook, please click here login for view all page.