

182 Landscapes and townscapes | SUBJECTS
1
Tonal study
A pencil study helps organize the relationships between
the buildings and the water. Note the shadows beneath the
bridge and the darker tones along the canal edges, which
can be referred to when painting.
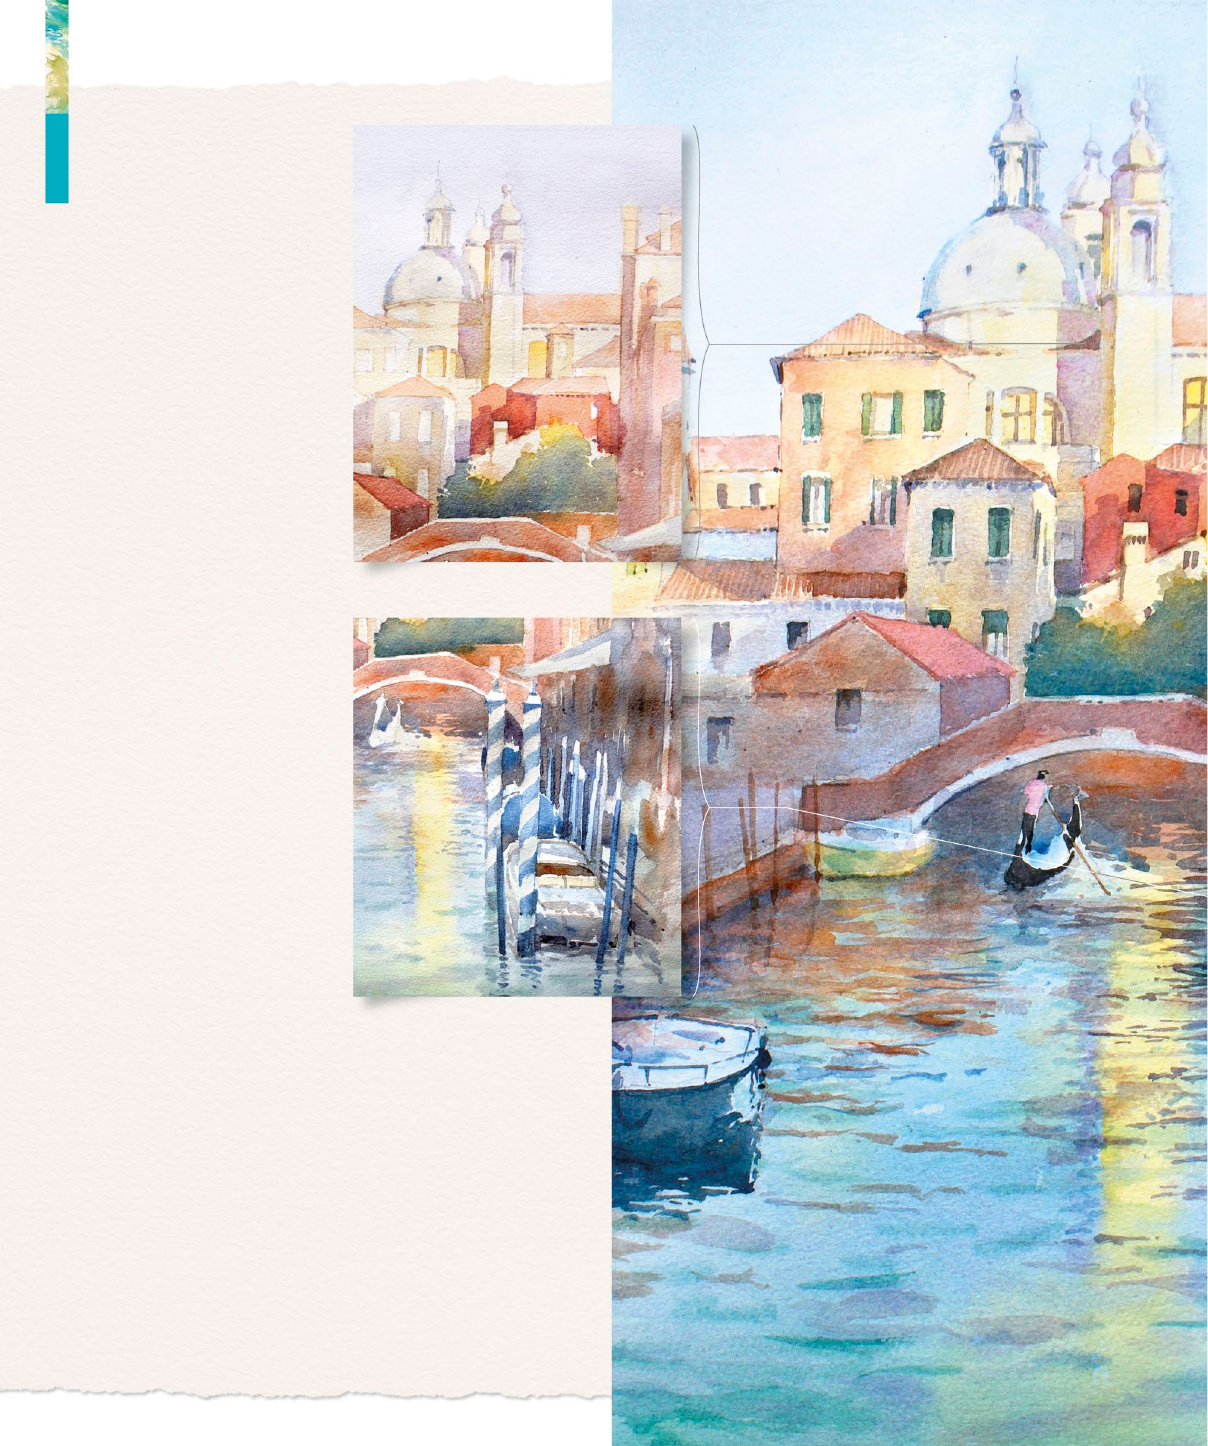
PUTTING IT INTO PRACTICE
The glittering reections in a gently rippling canal
are captured here using soft glazes and wet-in-wet
blends that create atmospheric effects to envelop
the scene with subtle cool and warm coloring.
No. 12, no. 8, and
no. 2 soft-hair
round brushes
20 x 14 in (51 x 35 cm)
cold press 140 lb
(300 gsm) watercolor
paper
You will need
Indian yellow
Light red
Burnt sienna
Phthalo blue
(green shade)
Cadmium red
Neutral tint
Raw sienna
French
ultramarine
Alizarin
crimson
Cobalt violet
Opera rose
Ultramarine
violet
Venetian
canal
Wet-in-wet reections
Where reected colors merge
and shift, apply pigments
quickly and allow them to blend
on the paper. Paint colors either
side by side or into each other
while they remain wet.
Glazing
Use thin, transparent glazes
(see pp.124–125) for shifting
colors and tonality or changing
the temperature from warm to
cool. Avoid opaque colors as
they can obscure the layers.
Wet-on-dry shapes
Work wet-on-dry, manipulating
the brush to make marks and
dashes for ripples and gentle
waves. Build dark washes over
a at layer, with a mix of tones
to add a sense of movement.
Still water
REFLECTIONS, RIPPLES, AND SHADOWS
It is important to consider how water
moves and the way reections appear when
tackling still water in a landscape. Exploit
the natural transparency of watercolor
paint to capture the delicate sense of light
on water, where colorful reections, ripples
of light, and shifting shadows are integral
to the composition.
Capturing subtle movement
Use a mixture of techniques to convey the sense that
water is gently animated: combine larger at washes,
wet-in-wet modulations of color, and dry brush for
texture to provide variety and interest. Use with
care so as not to overpower the whole composition.
Add darker tones beside the reection
to enhance the effect of light
US_182-185_Water_landscape.indd 182 02/04/2020 3:35pm

183 Still water
2
Establish light
Add a rst wash
to establish the
general light in the
view. The violet-blue
color of the sky is
complemented by
the light yellow
wash falling over
the buildings. At
this stage, leave
the area for the
water unpainted.
3
First wet-in-
wet layer
Quickly add the rst
base layer of water
wet-in-wet within the
shape of the canal
and around the boats
and gondola. Leave
clean paper where
the sunlit tower is
reected. Add bright
yellow into this space
and let it spread.
4
Add ripples
Use the tip of a
no. 2 brush to add a
layer of ripples under
the bridge, painting
small points and lines
of the darker ripples.
Apply ripples in the
foreground, then
dampen the paper
with clean water
and leave so that the
ripples soften out.
“Use soft, wet-in-wet edges to convey the
shifting colors of reections in water.”
Apply warm washes to the buildings
and their roofs, with bright mixtures
where the light hits
US_182-185_Water_landscape.indd 183 02/04/2020 3:35pm
184 Landscapes and townscapes | SUBJECTS
“The golden hour
in Venice is the
ideal moment to
paint reections
on rippling water.”
5
Strengthen shadows
The strong lighting in the
scene casts dramatic shadows
on the buildings. Use a variety
of colors in the basic shadow
mixture to keep the painting
interesting. Add a second,
slightly darker sky layer
to allow the light effects
to shine out.
6
Foreground detail
Add the dramatic darks of
the boats and striped mooring
posts. Here, the cool, neutral
coloring is a good foil to the
rich variety of color in the
background. Keep the boats,
pole, and reections as simple
as possible, working wet-on-
dry for the dark tones of the
reected solid shapes.
US_182-185_Water_landscape.indd 184 02/04/2020 3:35pm

185 Still water
7
Transparent glazes
Apply thin, transparent
glazes over the dry layers
to shift the tonality and
coloring in the painting,
using warm glazes to
connect the reections
to the buildings. Add
successive glazes to give
depth. Apply a gentle glaze
of viridian to the lower
section of the water, adding
more ripples while the
glaze is still wet.
8
Fine details and
nal glazes
Use different colors for
the windows, carefully
observing shapes to bring
character and scale to the
buildings, adding the ner
edges to the roof cornices
and tiles. Balance the
composition with a few
additional glazes on the
buildings to create a richer
sense of space, and nally
paint the gondolier to give
a sense of movement.
Adjust thin glazes to
modulate and unite the
composition throughout
the painting process
Viridian glaze brightens
the foreground
US_182-185_Water_landscape.indd 185 02/04/2020 3:35pm
..................Content has been hidden....................
You can't read the all page of ebook, please click here login for view all page.